The Perfect Butter Beans Stew | Made by Meaghan Moineau

The Perfect Butter Beans Stew | Made by Meaghan Moineau

Title: A Hearty Hug in a Bowl: The Perfect Butter Beans Stew
Description: Dive into a comforting dish that’s as nourishing as it is delicious. Our Perfect Butter Beans Stew is not only a celebration of simple, wholesome ingredients but also a gateway to cherished family memories. With a difficulty rating of 4 out of 10, this easy-to-master main dish is sure to become a favorite at your dinner table.

---


There’s something undeniably nostalgic about the aroma of a simmering stew, wafting through the kitchen and filling the home with warmth. For me, the Perfect Butter Beans Stew is more than just a meal; it’s a cherished family tradition that brings back fond memories of cozy, laughter-filled gatherings around the dinner table.


Whenever I prepare this dish, I’m reminded of Sundays spent at my grandmother’s house, where the scent of sautéed onions and garlic would greet us at the door. My grandmother was a culinary magician, turning simple ingredients into extraordinary dishes. Her secret? A generous sprinkle of love and a dash of patience.


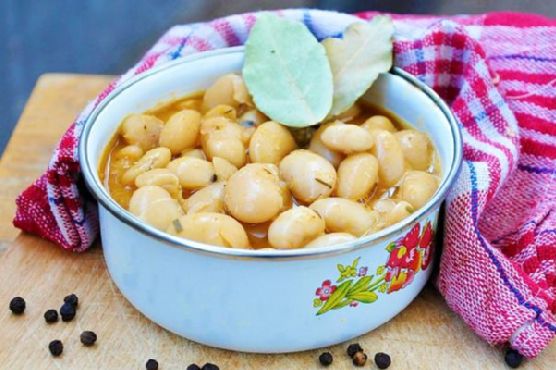
The star of this recipe is the humble butter bean, also known as the dry lima bean, which has been soaked overnight. This process not only softens the beans but also allows them to absorb flavors more deeply. Paired with the earthy notes of dry tarragon and the subtle heat of sweet paprika, each spoonful of this stew is like a warm hug.


The preparation begins with a drizzle of unrefined sunflower oil in a large pot, where diced onions and minced garlic cloves are gently sautéed until golden. The addition of canned and dry fresh tarragon, combined with bay leaves, infuses the stew with an irresistible aroma. A sprinkle of ground pepper and a pinch of sea salt enhance the flavors, while the sweet paprika adds a vibrant color and a hint of spice.


This dish, rated 4 out of 10 in difficulty, is a testament to the beauty of simplicity. It’s a main dish that celebrates the essence of home-cooked comfort, perfect for those seeking a hearty, nourishing meal without the fuss.


I remember vividly the clatter of bowls and the gentle hum of conversation as we gathered to enjoy this stew. Each serving was a testament to my grandmother’s culinary prowess, her ability to transform humble ingredients into something truly special. It’s a legacy I cherish and one I’m thrilled to share with you.


For the full step-by-step instructions on how to create this delightful dish, visit my blog at [Gourmandelle](http://gourmandelle.com/the-perfect-butter-beans-stew/). Embrace the nostalgia and warmth of the Perfect Butter Beans Stew, and bring a piece of my family’s tradition to your table.


---


Keywords: Butter Beans Stew, Family Recipe, Comfort Food, Main Dish, Simple Ingredients, Nostalgic Cooking, Easy Stew Recipe, Home-Cooked Meal, Wholesome Ingredients, Traditional Stew.

Read more about Appetizers

Read more about Main Dishes

Read more about Desserts

Meat rolls with prosciutto and sage | Made by Meaghan Moineau

Meat rolls with prosciutto and sage | Made by Meaghan Moineau

Title: Savory Elegance: Meat Rolls with Prosciutto and Sage
Description: Discover the delightful fusion of flavors in this classic Italian-inspired dish: Meat Rolls with Prosciutto and Sage. This recipe combines the savory goodness of beef flank steaks with the delicate taste of prosciutto and sage, creating a culinary experience that is sure to impress. Follow along for a step-by-step guide, with a heartwarming family story to bring an extra touch of nostalgia to your kitchen.

---


There’s something inherently comforting about gathering around the dining table with family, sharing stories, and indulging in a meal that’s been passed down through generations. One of my fondest memories is watching my grandmother prepare her famous Meat Rolls with Prosciutto and Sage for our Sunday dinners. The kitchen would fill with the enticing aroma of sizzling beef and fresh sage, a scent that still transports me back to those cherished moments.


Ingredients:

- Beef flank steaks


- Vegeta Natur or similar seasoning


- Prosciutto slices


- Fresh sage leaves


- Corn starch


- White wine


- Olive oil


- Butter


- Black bell pepper


Instructions:

1. Begin by washing and drying the beef flank steaks. Using a meat mallet, gently flatten the steaks to an even thickness.


2. Rub one side of each steak with Vegeta Natur or your preferred seasoning blend. This step infuses the meat with a savory base that enhances the overall flavor profile.


3. On the opposite side of each steak, place a slice of prosciutto and a fresh sage leaf. The prosciutto adds a hint of saltiness, while the sage contributes an earthy aroma.


4. Carefully roll the steaks, ensuring the prosciutto and sage remain inside. Secure each roll with wooden or metal toothpicks to prevent unrolling during cooking.


5. In a small bowl, whisk corn starch into the white wine until smooth. This mixture will form the base of a delicious, silky sauce.


6. Heat a mixture of olive oil and butter in a pan over medium heat. Once hot, sauté the rolls on all sides until they achieve a golden brown crust.


7. Gently pour in the wine mixture, allowing the sauce to thicken and coat the rolls. Season with freshly ground black bell pepper for an added kick.


8. Lower the heat, cover the pan, and let the rolls simmer for about 20 minutes, or until they are tender and flavorful.


9. Before serving, remember to remove the toothpicks. Arrange the rolls on a platter and drizzle with any remaining sauce from the pan.


A Nostalgic Family Story:

This dish was a staple at our family gatherings, often taking center stage during special occasions. I remember my grandmother preparing these rolls with meticulous care, her hands skillfully rolling and securing each piece. She would hum quietly as she cooked, a melody that seemed to weave through the air and into the fabric of our family traditions.


As kids, my siblings and I would eagerly await the moment the rolls would be unveiled at the table, their rich aroma acting as a siren call. The first bite was always magical—an explosion of flavors that made every Sunday feel like a holiday.


Difficulty: 6/10
Classification: Main Dish

This recipe, while requiring some attention to detail, is a rewarding main dish that promises to bring elegance and nostalgia to your dining experience. Whether you're cooking for family or entertaining guests, these Meat Rolls with Prosciutto and Sage are sure to leave a lasting impression. Enjoy this culinary journey, and perhaps create new memories of your own.

Read more about Appetizers

Read more about Main Dishes

Read more about Desserts

Crumbled Feta Couscous Salad | Made by Meaghan Moineau

Crumbled Feta Couscous Salad | Made by Meaghan Moineau

**Title: A Taste of Nostalgia: Crumbled Feta Couscous Salad**


**Description: Discover the comforting flavors and heartwarming memories wrapped up in our Crumbled Feta Couscous Salad. This easy-to-make dish, packed with fresh ingredients and cherished family stories, will become a staple in your culinary repertoire.**


---


### A Taste of Nostalgia: Crumbled Feta Couscous Salad


In the bustling heart of Mediterranean cuisine lies a dish that marries simplicity with flavor—our beloved Crumbled Feta Couscous Salad. This delightful recipe, rated a 3 out of 10 on the difficulty scale, effortlessly serves as an elegant appetizer or a light main dish. With every bite, you'll be transported back to cherished family gatherings, where food and laughter were the bonds that held us together.


#### Ingredients:


- 1 cup couscous


- 1 ½ cups vegetable stock or water


- 2 tablespoons quality olive oil


- A pinch of salt


- 1 diced Roma tomato


- ½ red onion, finely chopped


- ¼ cup fresh mint, chopped


- ¼ cup fresh parsley, chopped


- 2 tablespoons white balsamic vinegar


- ½ cup crumbled feta cheese


#### Instructions:


1. In a medium saucepan, bring the vegetable stock or water to a boil. Add the couscous, stirring quickly to ensure even cooking.


2. Remove the saucepan from the heat and cover it with a lid. Allow the couscous to stand for 4-5 minutes, absorbing all the flavors of the stock.


3. Remove the lid and stir in the olive oil, adding a subtle richness to the dish.


4. Pour the cooked couscous into a large bowl and let it chill, stirring occasionally to cool evenly.


5. Once cooled, stir in the diced Roma tomato, red onion, mint, parsley, and white balsamic vinegar.


6. Finally, fold in the crumbled feta cheese, ensuring each bite is filled with creamy goodness.


7. Chill the salad completely before serving to allow the flavors to meld beautifully.


#### A Family Memory


As a child, I remember summers spent in my grandmother's kitchen, a place where time seemed to slow down, and every moment was filled with warmth and love. The Crumbled Feta Couscous Salad was a staple at our family gatherings, a dish that brought everyone to the table with its vibrant colors and fresh aroma.


I recall one particular summer afternoon when Grandma decided to teach me how to make this salad. She showed me how to properly chop the herbs, her fingers deftly moving with years of practice. "The secret," she whispered, "is in the freshness of the ingredients. The mint and parsley should always be from the garden, and the olive oil must be the finest you can find."


As we stirred the couscous together, she shared stories of her childhood, of how this recipe had been passed down through generations, each one adding a little something of their own. That day, I learned not only how to prepare a dish but how food could carry the essence of family history, connecting us to those who came before.


Even today, when I make this Crumbled Feta Couscous Salad, I am reminded of those sunny afternoons with Grandma, the laughter echoing through the house, and the sense of belonging that only comes from being with loved ones.


#### Conclusion


The Crumbled Feta Couscous Salad is more than just a dish; it's a bridge to the past, a reminder of the joy that comes from sharing meals with family. Easy to prepare and bursting with flavor, it's perfect for any occasion. So gather your ingredients, invite your family, and create memories that will last a lifetime.

Read more about Appetizers

Read more about Main Dishes

Read more about Desserts

Authentic Jamaican Curry Chicken | Made by Meaghan Moineau

Authentic Jamaican Curry Chicken | Made by Meaghan Moineau

**Title: Savoring Tradition: Crafting Authentic Jamaican Curry Chicken**


**Description:** Dive into the vibrant world of Jamaican cuisine with our Authentic Jamaican Curry Chicken recipe. Infused with rich spices and a touch of nostalgia, this dish captures the essence of Caribbean flavors. Perfect for a cozy family dinner, this main dish will transport your taste buds to the sun-drenched shores of Jamaica.


---


**A Taste of Home: Authentic Jamaican Curry Chicken**


In the heart of every Jamaican kitchen lies a pot of bubbling curry, a symphony of spices and aromas that tell tales of heritage and warmth. Among these beloved dishes is the legendary Jamaican Curry Chicken, a staple that not only tantalizes the senses but also carries cherished memories of family gatherings and laughter-filled evenings.


**Ingredients:**


- 2 lbs skinless chicken thighs


- 2 tablespoons allspice


- 3 tablespoons coconut oil


- 4 tablespoons curry powder


- 4 cloves garlic, minced


- 1 green bell pepper, chopped


- 1 onion, chopped


- Salt and black pepper to taste


- 3 scallions, chopped


- 1 scotch bonnet pepper, whole


- 2 large sweet potatoes, peeled and cubed


- 2 teaspoons fresh thyme


- 3 cups water


**Instructions:**


1. **Marinate:** Begin by seasoning the chicken with allspice, curry powder, garlic, green bell pepper, onion, salt, black pepper, and scallions. Let the flavors meld together by marinating the chicken for at least 2 hours, or for a more intense flavor, leave it overnight in the refrigerator.


2. **Sear the Chicken:** Heat coconut oil in a Dutch oven over high heat. Carefully add the marinated chicken pieces and fry until each side is golden brown and seared, approximately 10 minutes.


3. **Simmer:** Once the chicken is browned, add the remaining marinade, scotch bonnet pepper, and water to the pot. Cover and bring to a boil.


4. **Thicken the Stew:** Add the sweet potatoes to the pot, reduce the heat to a simmer, and let the stew cook for about an hour, or until it reaches a thick, hearty consistency.


**Difficulty:** 6/10


**Classification:** Main Dish


**A Nostalgic Note:**


Growing up, Sunday dinners were a sacred tradition in our household. The aroma of spices would waft through the air as my grandmother prepared her famous curry chicken, a recipe passed down from her own mother. Our small kitchen became a haven, filled with stories and laughter. My siblings and I would gather around the table, eagerly waiting for our plates to be filled with the vibrant curry. Each bite was a celebration of our heritage, a connection to our roots, and a reminder of the love that binds our family together.


To this day, whenever I prepare this dish, I am transported back to those cherished moments, the warmth of my grandmother’s smile, and the comforting embrace of my family. It is more than just a meal; it is a legacy of love and togetherness.


---


Embrace the rich flavors and history of Jamaican cuisine with this classic curry chicken recipe. Whether you're sharing it with family or savoring a quiet meal alone, it promises to bring a taste of the Caribbean to your table.

Read more about Appetizers

Read more about Main Dishes

Read more about Desserts

Spinach Salad with Strawberry Vinaigrette | Made by Meaghan Moineau

Spinach Salad with Strawberry Vinaigrette | Made by Meaghan Moineau

**Title: A Taste of Spring: Spinach Salad with Strawberry Vinaigrette**


**Description: Discover a refreshing and vibrant salad that's as easy to make as it is delicious. Our Spinach Salad with Strawberry Vinaigrette is a delightful blend of fresh ingredients that promises to bring a burst of flavor to your table. Dive into a nostalgic story that makes this dish a cherished family favorite.**


---


**A Taste of Spring: Spinach Salad with Strawberry Vinaigrette**


When the first warm breeze of spring swept through our small town, it was always a signal for my family to gather in my grandmother's garden. Her backyard was a sanctuary of bursting colors, with rows of strawberries glistening like jewels under the sun and spinach leaves swaying gently in the breeze. Among the many dishes that graced our family table, none heralded the arrival of spring quite like our Spinach Salad with Strawberry Vinaigrette.


**Ingredients:**


- Fresh spinach leaves


- Strawberries, sliced


- Almonds, toasted


- Feta cheese, crumbled


- Cooked chicken, sliced


- Shallot, finely chopped


- Fresh thyme, finely chopped


- Ground pepper, to taste


**For the Strawberry Vinaigrette:**


- Strawberries, puréed


- Balsamic vinegar


- Dijon mustard


- Water


**Instructions:**


1. **Prepare the Vinaigrette:** In a small bowl, mix the puréed strawberries with balsamic vinegar, dijon mustard, and a splash of water. Whisk until smooth and set aside.


2. **Assemble the Salad:** On a large plate, layer the fresh spinach leaves. Top with sliced strawberries, toasted almonds, crumbled feta cheese, and cooked chicken.


3. **Add Flavor:** Sprinkle finely chopped shallot and fresh thyme over the salad. Season with ground pepper to taste.


4. **Drizzle and Serve:** Generously drizzle the strawberry vinaigrette over the salad. Serve immediately and enjoy a taste of spring.


**A Nostalgic Family Memory**


As children, my siblings and I would race barefoot through the garden, eager to pick the ripest strawberries. My grandmother would laugh at our stained fingers and delighted giggles as we tried to sneak a few berries into our mouths. Once the basket was full, she'd lead us to the kitchen, where we'd help her prepare this simple yet extraordinary salad.


Around the dinner table, stories of past springs would unfold, each tale more vibrant with the flavors of our meal. The combination of sweet strawberries, tangy vinaigrette, and savory chicken created a symphony on our plates, one that still resonates with me today.


**Difficulty: 2/10**


This recipe is delightfully easy, perfect for beginner cooks or anyone looking for a quick, nutritious meal.


**Classification: Main Dish**


Whether served as a light lunch or a refreshing dinner, this Spinach Salad with Strawberry Vinaigrette is a versatile main dish that embodies the essence of spring. Enjoy this dish with loved ones, and perhaps, create your own cherished memories around the table.

Read more about Appetizers

Read more about Main Dishes

Read more about Desserts

Mutton Rendang | Made by Meaghan Moineau

Mutton Rendang | Made by Meaghan Moineau

## The Art of Mutton Rendang: A Culinary Journey into Tradition


### Description:


Indulge in the rich flavors and aromatic spices of Mutton Rendang, a classic dish that transcends time and brings families together. Unravel the secrets of this beloved recipe, infused with cherished memories and traditional techniques. Perfect for a cozy family dinner or a festive celebration, Mutton Rendang is sure to captivate your taste buds and warm your heart.


---


### A Culinary Nostalgia: The Heartwarming Tale of Mutton Rendang


Cooking has always been more than just preparing food; it’s a journey into the heart of family traditions and shared memories. For me, Mutton Rendang is not just a dish; it’s a delicious reminder of my childhood, spent in my grandmother's warm kitchen. The air filled with the comforting aroma of spices sizzling in hot oil—a scent that, to this day, transports me back to those joyful days.


Every festive season, my family would gather at my grandmother's house. The centerpiece of our celebration was always her legendary Mutton Rendang. I remember watching her skillfully mix mutton pieces with turmeric powder and salt, a ritual that marked the beginning of a culinary masterpiece. She would then carefully cover the saucepan and place it on the stove, letting it boil until the meat was tender and flavorful.


As the meat simmered, my grandmother would blend a fragrant paste of dried chillis, shallots, onion, garlic, ginger, lemongrass, galangal, and fresh turmeric. The kitchen would come alive with the vibrant colors and tantalizing scents of these essential ingredients. The sound of cumin and fennel seeds crackling in hot oil signified the start of a magical transformation.


My grandmother always emphasized the importance of patience. "The longer you sauté the paste, the better the flavor," she would say with a twinkle in her eye. Her dedication to perfection was evident in every stir of the wok, every addition of thin coconut milk, dried tamarind, and turmeric leaf, and in the careful balance of salt. The final touch was the thick coconut milk, which enveloped the mutton in a creamy embrace, and the toasted coconut, adding a delightful texture and nutty aroma.


The result was a symphony of flavors—rich, spicy, and deeply satisfying. As we gathered around the dining table, each bite of Mutton Rendang was a taste of tradition, a spoonful of love passed down through generations. It was more than a meal; it was a celebration of family, heritage, and the art of cooking.


### Recipe Difficulty: 8/10


### Classification: Main Dish


Mutton Rendang is a dish that requires time, patience, and a love for authentic flavors. While the process may seem intricate, the reward is a delectable masterpiece that brings joy and togetherness to any meal. Whether you're a seasoned cook or a culinary enthusiast, this recipe invites you to experience the magic of traditional cooking and create lasting memories with your loved ones.

Read more about Appetizers

Read more about Main Dishes

Read more about Desserts

Roasted Brussels Sprouts With Red Onions and Pancetta | Made by Meaghan Moineau

Roasted Brussels Sprouts With Red Onions and Pancetta | Made by Meaghan Moineau

**Title: "A Taste of Home: Roasted Brussels Sprouts with Red Onions and Pancetta"**


**Description: Discover the heartwarming flavors of Roasted Brussels Sprouts with Red Onions and Pancetta, a recipe that combines savory pancetta, aromatic garlic, and crispy bread crumbs for a delightful dish. Perfect as an appetizer or a comforting main dish, this recipe will transport you to cherished family gatherings with every bite.**


---


There's something undeniably comforting about the aroma of roasted Brussels sprouts wafting through the kitchen. It’s a scent that transports me back to cozy family gatherings during the chilly months, where we would gather around the dining table, eager to dig into a meal that always felt like a warm embrace. One dish that stood out amidst the spread was my grandmother's Roasted Brussels Sprouts with Red Onions and Pancetta. It wasn’t just a dish; it was a staple that held a special place in our hearts and on our plates.


**Ingredients:**


- Brussels sprouts


- Pancetta


- Garlic


- Olive oil


- Bread


**Instructions:**


1. Preheat your oven to 350 degrees Fahrenheit. In a large plastic zippered bag, toss the Brussels sprouts with 3 pressed garlic cloves and 2 tablespoons of olive oil. Shake well to ensure even coating.


2. Empty the contents into an ovenproof dish and roast for 40 minutes. The Brussels sprouts should be tender with a slight char that enhances their natural sweetness.


3. While the Brussels sprouts are roasting, heat 1/4 cup of olive oil in a pan. Once heated, sauté a slice of bread until browned on both sides. Set aside to cool and become crisp.


4. When the Brussels sprouts are done, return to the pan used for the bread. Add the red onions and sauté for about 3 minutes. Be cautious not to let them become fully tender; they should retain a subtle crunch.


5. Introduce the pancetta to the pan, allowing it to heat through for an additional minute. The pancetta should be aromatic and slightly crispy.


6. Add the roasted Brussels sprouts to the pan and heat through for another 3 minutes. This will allow the flavors to meld beautifully.


7. Remove from heat. In a food processor, blend the sautéed bread with 1-2 cloves of garlic. This will create a fragrant, crunchy topping.


8. Sprinkle the garlic bread crumbs over the Brussels sprouts mixture and finish with a final drizzle of olive oil for added richness.


What I love about this dish is its simplicity and the way it brings people together. My grandmother used to say that the secret ingredient was love, and I wholeheartedly believe her. The combination of the savory pancetta with the slight bitterness of the Brussels sprouts, balanced by the sweetness of the onions and the crunch of the garlic-infused bread crumbs, creates a symphony of flavors that is both nostalgic and comforting.


This recipe, with its robust flavors and comforting taste, is rated a 4 out of 10 in difficulty—making it accessible to both novice and experienced cooks. It can be served as a delightful appetizer to whet the appetite, or as a main dish that stands proudly at the center of any meal.


So, if you are looking to recreate a dish that is as rich in flavor as it is in family history, give this Roasted Brussels Sprouts with Red Onions and Pancetta a try. It’s not just about cooking; it’s about creating memories that will be cherished for generations to come.

Read more about Appetizers

Read more about Main Dishes

Read more about Desserts

Chicken-Tortilla Chip Soup | Made by Meaghan Moineau

Chicken-Tortilla Chip Soup | Made by Meaghan Moineau

**Title: Cozy Bowls of Comfort: The Heartwarming Tale of Chicken-Tortilla Chip Soup**


**Description:** Dive into the comforting embrace of Chicken-Tortilla Chip Soup, a soul-warming recipe that combines tender chicken, vibrant veggies, and crunchy corn chips. Perfect as a main dish, this flavorful soup is steeped in family memories and is easy to prepare, with a difficulty rating of just 3 out of 10.


---


As the crisp autumn air weaves through the golden leaves, there's nothing quite like curling up with a bowl of homemade Chicken-Tortilla Chip Soup. This delightful dish, with its aromatic blend of seasoned chicken, fresh cilantro, and crunchy tortilla chips, is more than just a meal—it’s a cherished family tradition.


**The Recipe: Chicken-Tortilla Chip Soup**


**Ingredients:**


- 8 cups water


- 2 chicken breasts, boneless and skinless


- 2 bouillon cubes


- 1 cup diced carrots


- 1/2 cup diced cilantro


- 1 tablespoon Lawry's seasoned salt


**For Serving:**


- Corn chips


- Monterey Jack cheese, shredded


- Avocado, sliced


**Instructions:**


1. In a large pot, bring the water to a boil. Add the chicken breasts, bouillon cubes, diced carrots, cilantro, and Lawry's seasoned salt.


2. Reduce the heat to a simmer and cook for 30-40 minutes, or until the chicken is fully cooked and tender.


3. Remove the chicken breasts, shred them with two forks, and return them to the pot.


4. To serve, ladle the soup into bowls. Top with a handful of corn chips, a generous sprinkle of Monterey Jack cheese, and a few slices of avocado.


**A Nostalgic Family Memory**


Every time I cook this soup, I’m transported back to my grandmother’s cozy kitchen. It was a small space, always bustling with family chatter and the irresistible aroma of her simmering soup. As a child, I remember sitting at the wooden kitchen table, my feet dangling from the chair, eagerly watching my grandmother as she skillfully prepared this comforting meal.


The highlight of the evening was when she’d let me sprinkle the corn chips and cheese onto the soup, a task I took very seriously. The rich flavors, combined with the satisfying crunch of the chips, made every spoonful a delightful experience. It was during those cherished dinners that I learned the true meaning of comfort food—not just in taste, but in the warmth of family and shared moments.


**Difficulty Rating and Classification**


This Chicken-Tortilla Chip Soup is a breeze to prepare, making it a perfect recipe for cooks of all skill levels with a difficulty rating of just 3 out of 10. As a hearty and fulfilling main dish, it’s ideal for those cozy family dinners or a solo evening of self-care.


In the hustle and bustle of modern life, taking time to prepare and enjoy a simple, nourishing meal can be a powerful act of love—for yourself and those around you. So, gather your ingredients, embrace the nostalgia, and savor the heartwarming comfort of Chicken-Tortilla Chip Soup.

Read more about Appetizers

Read more about Main Dishes

Read more about Desserts

Moroccan Lemon Shish Kebabs | Made by Meaghan Moineau

Moroccan Lemon Shish Kebabs | Made by Meaghan Moineau

**Title: Savoring Tradition: Moroccan Lemon Shish Kebabs**


**Description:** Dive into the world of Moroccan cuisine with our delightful Moroccan Lemon Shish Kebabs. Discover the vibrant flavors of lemon, herbs, and spices wrapped around juicy chicken skewers. Experience the joy of creating a dish that's not just a meal, but a cherished family tradition.


---


**A Taste of Morocco: Moroccan Lemon Shish Kebabs Recipe**


When it comes to culinary experiences that transport you to another world, Moroccan cuisine never disappoints. Bursting with vibrant flavors and aromatic spices, one dish that stands out is the delectable Moroccan Lemon Shish Kebabs. These tantalizing skewers are not just a feast for the senses but also a cherished family tradition that brings nostalgic memories to life.


**Ingredients:**


- Lean chicken breast fillets, trimmed of fat and cut into 1" cubes


- Moroccan lemon marinade


- Fresh parsley


- Fresh rosemary leaves


- Fresh thyme leaves


- Garlic


- Black peppercorns


- Lemon juice


- Olive oil


**Instructions:**


1. **Prepare the Marinade:** In a large bowl, combine fresh parsley, rosemary leaves, thyme leaves, garlic, black peppercorns, lemon juice, and olive oil. Mix well to create the aromatic Moroccan lemon marinade.


2. **Marinate the Chicken:** Add the cubed chicken breast fillets to the marinade, ensuring each piece is well-coated. Cover the bowl with plastic wrap and let it marinate for at least half an hour. For deeper flavor, consider leaving it in the fridge for a few hours.


3. **Prepare the Skewers:** If using bamboo skewers, soak them in a tray of water to prevent burning during grilling.


4. **Thread the Chicken:** Thread about four pieces of marinated chicken onto each skewer.


5. **Cook the Kebabs:** Grill the shish kebabs over charcoal or on a skillet until the chicken is thoroughly cooked and slightly charred, releasing the irresistible aroma of lemon and herbs.


6. **Serve with a Side:** Once cooked, serve immediately on a bed of rice, Mediterranean couscous, or with warm pita bread.


**Difficulty:** 4/10


**Classification:** Main Dish


**A Nostalgic Family Memory:**


As a child, the aroma of Moroccan Lemon Shish Kebabs sizzling on the grill was a surefire sign that summer had arrived. My family would gather in the backyard, the air filled with laughter and stories shared across generations. My grandfather, a master of the grill, would always recount tales of his own childhood in Morocco, where these kebabs were a staple at family gatherings.


The preparation was a family affair. My mother would meticulously trim the chicken, while my father mixed the marinade, his hands a blur as he combined the fresh herbs and spices. I would watch in awe, occasionally sneaking a taste of the tangy marinade, my fingers sticky with lemon juice and olive oil.


As the sun began to set, the kebabs would be placed on the grill. The smoke rising from the coals seemed to carry with it the essence of Morocco. The first bite was always magical – the tender chicken bursting with flavors that danced on the tongue.


Even now, making these Moroccan Lemon Shish Kebabs feels like stepping back in time, each skewer a bridge to those cherished family moments. It's more than just a recipe; it's a reminder of the joy and love that food can bring to our lives.


Incorporating this dish into your recipe repertoire not only promises a delightful culinary experience but also invites the warmth and nostalgia of family traditions into your home. So, fire up the grill, gather your loved ones, and let the magic of Moroccan Lemon Shish Kebabs create new memories for generations to come.

Read more about Appetizers

Read more about Main Dishes

Read more about Desserts

Best Potato Cheese Soup in a bread bowl | Made by Meaghan Moineau

Best Potato Cheese Soup in a bread bowl | Made by Meaghan Moineau

**Title: "Cozy Comfort: Indulge in the Best Potato Cheese Soup in a Bread Bowl"**


**Description:**


Dive into a bowl of warmth and nostalgia with our Best Potato Cheese Soup in a Bread Bowl. This creamy, cheesy delight promises to be the star of your dinner table, offering a perfect blend of flavors that feels like a warm hug on a chilly day. With easy-to-follow instructions and a touch of family history, this recipe is a heartfelt journey into the world of comfort food.


---


**The Best Potato Cheese Soup in a Bread Bowl: A Family Tradition**


When the leaves begin to change and the autumn air turns crisp, there's one dish that instantly transports me back to my grandmother’s cozy kitchen—the creamy, savory delight of Potato Cheese Soup. Nestled in a warm bread bowl, this soup was more than just a meal; it was a family tradition, a cherished memory, and a symbol of togetherness.


**Ingredients:**


- 2 tablespoons olive oil


- 1 sweet onion, diced


- 2 cloves garlic, minced


- 4 cups chicken stock


- 2 cups water


- 1 teaspoon salt


- 4 red potatoes, diced


- 2 carrots, diced


- 1 cup whole milk


- 1 cup heavy cream


- 2 tablespoons butter


- 1 block Velveeta cheese, cubed


- 1 cup shredded sharp cheddar cheese


- Salt and pepper to taste


- Garnishes: bacon crumbles, chives, sour cream, additional shredded cheese


**Instructions:**


1. **Prep and Sauté:**


In a large heavy stock pot, heat 2 tablespoons of olive oil over medium heat. Add diced onions and cook until translucent, about 2-3 minutes. Stir in minced garlic and cook for another minute, letting the flavors meld.


2. **Build the Base:**


Pour in the chicken stock, water, and 1 teaspoon of salt. Add diced red potatoes and carrots, bringing the mixture to a boil. Cook until the potatoes are fork-tender.


3. **Blend for Creaminess:**


Turn off the burner and let the soup cool slightly. Remove about half of the potatoes with a slotted spoon and blend them in a food processor until smooth. Return the potato paste to the pot.


4. **Add Creaminess and Cheesy Goodness:**


Place the stock pot back on medium heat. Stir in whole milk, heavy cream, butter, and Velveeta cheese. Heat gently until the butter and Velveeta are melted; be careful not to let it boil. Stir frequently with a wooden spoon, scraping the bottom to prevent sticking.


5. **Cheesy Finish:**


Gradually add the shredded sharp cheddar, one handful at a time, stirring until melted. Sprinkle in some Parmesan cheese for extra depth. Season with additional salt and pepper to taste.


6. **Serve and Savor:**


Ladle the soup into a bread bowl or your favorite mug. Top with bacon crumbles, chives, a dollop of sour cream, and extra shredded cheese for the ultimate comfort experience.


**A Nostalgic Note:**


I remember sitting at my grandmother's kitchen table, the warm aroma of simmering soup filling the air. She would often tell us stories of her childhood, her voice a gentle melody against the backdrop of bubbling pots. Each spoonful of soup was like a page from her storybook, rich with history and love. Now, every time I make this soup, those cherished memories come alive, and I feel her warmth surrounding me.


**Rate Difficulty:** 5/10


**Classification:** Main Dish


Whether it's a family gathering or a quiet evening at home, this Potato Cheese Soup in a Bread Bowl is more than just a meal—it's a memory in the making. So, gather your loved ones, share stories, and enjoy the comforting embrace of a dish that's been passed down through generations.

Read more about Appetizers

Read more about Main Dishes

Read more about Desserts

Herb and Cheddar Cordon Bleu | Made by Meaghan Moineau

Herb and Cheddar Cordon Bleu | Made by Meaghan Moineau

### Title: Savoring Memories: Herb and Cheddar Cordon Bleu


**Description:** Dive into a flavorful family favorite with our Herb and Cheddar Cordon Bleu recipe. This delightful dish combines the richness of cheddar cheese with savory herbs and tender chicken, wrapped in a nostalgic story that will warm your heart as much as your palate. Perfect for a cozy meal, this main dish is sure to impress both in taste and presentation.


---


When the aroma of baking chicken mingles with the fragrant notes of rosemary, marjoram, and parsley, it never fails to transport me back to countless Sunday dinners at my grandmother's home. Our Herb and Cheddar Cordon Bleu was more than just a meal; it was a family tradition that brought us together, filling our hearts with warmth and our bellies with satisfaction.


**Ingredients:**


- 4 chicken breasts


- 4 slices of deli ham


- 4 slices of cheddar cheese


- 1 cup breadcrumbs


- 1 tablespoon dried marjoram


- 1 tablespoon dried parsley


- 1 tablespoon dried rosemary


- 1 egg


- 1/2 cup flour


- Salt and pepper to taste


**Instructions:**


1. **Preheat the Oven:** Start by preheating your oven to 350 degrees F (about 176 degrees C). This ensures an even cooking temperature for the perfect bake.


2. **Prepare the Chicken:** Place each chicken breast between two slices of wax paper. Using a rolling pin or meat mallet, gently pound until they are about a quarter of an inch thick.


3. **Assemble the Rolls:** On each flattened chicken breast, place a slice of ham and a slice of cheddar cheese. Roll the chicken as tightly as you can, securing with toothpicks or small skewers if necessary.


4. **Set Up Your Stations:** Beat an egg in a shallow baking dish. Prepare two more stations: one with flour and another with a mix of breadcrumbs, dried marjoram, parsley, and rosemary.


5. **Coat the Chicken:** First, coat the chicken rolls in flour, then dip them into the egg mixture. Finally, press them into the breadcrumb and herb mixture until thoroughly covered.


6. **Bake to Perfection:** Place the rolls in an oiled or buttered baking dish. Bake for about 30 minutes until golden brown and cooked through.


---


**A Walk Down Memory Lane:**


Every bite of this Herb and Cheddar Cordon Bleu is a nostalgic journey to those Sunday afternoons at Grandma's. I remember sitting at the kitchen table, watching her deft hands roll the chicken with precision, her stories flowing as freely as her laughter. It was in these moments that I learned cooking was more than just following a recipe; it was about creating an experience, a legacy of love passed down through generations.


**Difficulty Rating: 6/10**


This dish requires a bit of finesse with the rolling and coating, but is otherwise straightforward and ideal for anyone looking to hone their culinary skills.


**Classification:** Main Dish


---


Incorporate Herb and Cheddar Cordon Bleu into your meal rotation for a dish that encapsulates both flavor and familial love. Whether you're creating new memories or indulging in old ones, this recipe promises to be a cherished addition to your dining experience.

Read more about Appetizers

Read more about Main Dishes

Read more about Desserts

Chicken and Roasted Broccoli Salad With Goat Cheese | Made by Meaghan Moineau

Chicken and Roasted Broccoli Salad With Goat Cheese | Made by Meaghan Moineau

# Nostalgic Flavors: Chicken and Roasted Broccoli Salad with Goat Cheese


## A Taste of Home: Family Gatherings and Culinary Memories


Growing up, my family had a tradition of gathering every Sunday for a hearty meal. The kitchen would be filled with laughter, the clatter of pots and pans, and the mouthwatering aroma of delicious dishes. One of the standout recipes that often graced our table was the Chicken and Roasted Broccoli Salad with Goat Cheese. This dish, with its perfect blend of savory chicken, tangy goat cheese, and roasted broccoli, is not just a meal—it's a cherished memory.


### Ingredients:


- 1 head of broccoli, chopped into florets


- 2 garlic cloves, minced


- 4 oz goat cheese, crumbled


- Juice from 1 lemon


- 3 tbsp olive oil


- 1 tsp dried oregano


- 1/2 tsp freshly ground pepper


- 1 red bell pepper, sliced


- A pinch of red pepper flakes


- Salt, to taste


- 2 cups cooked shredded chicken


- 1 tsp sugar


### Instructions:


1. **Preheat the Oven:** Begin by heating your oven to a scorching 500 degrees Fahrenheit. Place a sturdy baking sheet on the lowest rack. This high heat is essential for achieving perfectly roasted broccoli.


2. **Prepare the Broccoli:** In a large bowl, toss the broccoli florets with minced garlic, olive oil, salt, pepper, and a dash of red pepper flakes. For an added touch of sweetness, sprinkle in the sugar.


3. **Roast the Broccoli:** Spread the broccoli mixture evenly on the preheated baking sheet. Roast in the oven for about 15-20 minutes, or until the broccoli is tender and has a slight char.


4. **Assemble the Salad:** In a large serving bowl, combine the roasted broccoli, shredded chicken, and red bell pepper slices. Drizzle with lemon juice and sprinkle with dried oregano.


5. **Add the Goat Cheese:** Finish the salad by crumbling goat cheese over the top. Its creamy texture and tangy flavor will elevate the dish.


6. **Serve:** Toss everything gently to combine, ensuring an even distribution of ingredients. Serve warm or at room temperature.


### A Family Memory:


I vividly remember one particular Sunday when my grandmother decided to add her unique twist to this classic dish. With her usual flair, she infused the salad with extra lemon juice and a touch of oregano, creating a symphony of flavors that lingered on our taste buds. That afternoon, we gathered around the table, reminiscing about old times and sharing stories that spanned generations. The Chicken and Roasted Broccoli Salad with Goat Cheese became more than just a meal—it was a symbol of love, tradition, and the bonds that tie us together.


### Difficulty Rating: 4/10


This dish is straightforward and perfect for cooks of all levels. The simple steps and readily available ingredients make it an ideal choice for a relaxing Sunday dinner.


### Classification: Main Dish


With its hearty combination of protein, vegetables, and cheese, this salad serves as a satisfying main dish. It’s perfect for a family meal or a casual dinner with friends.


---


Whether you're recreating family memories or crafting new ones, the Chicken and Roasted Broccoli Salad with Goat Cheese is a delightful dish that will warm your heart and satisfy your palate. Enjoy the nostalgia and flavors that come with each bite!

Read more about Appetizers

Read more about Main Dishes

Read more about Desserts

Rotisserie Chicken and Bean Tostadas | Made by Meaghan Moineau

Rotisserie Chicken and Bean Tostadas | Made by Meaghan Moineau

**Title: Savoring Nostalgia: Rotisserie Chicken and Bean Tostadas for a Heartwarming Family Feast**


**Description: Discover the delightful fusion of flavors in our Rotisserie Chicken and Bean Tostadas recipe. This easy-to-follow dish, rated a 3 out of 10 in difficulty, is perfect as a savory main dish. Uncover a cherished family tale that adds a sprinkle of nostalgia to each bite, and gather your loved ones around for a feast brimming with warmth and joy.**


---


As the oven preheats to a cozy 350 degrees, my kitchen fills with the comforting aroma of anticipation. Today, we're diving into a dish that has become synonymous with family gatherings and heartfelt laughter—Rotisserie Chicken and Bean Tostadas. This recipe, a delightful blend of simplicity and flavor, is not just about creating a meal but reliving cherished memories with every bite.


**A Taste of Tradition**


Growing up, Saturday afternoons were reserved for a ritual my family held dear. My abuela would gather us around her kitchen table, a place where stories were shared and bonds were strengthened. Among her repertoire of culinary creations, her rotisserie chicken and bean tostadas were legendary. The process was simple, yet it carried a weight of tradition that made each gathering special.


**The Recipe**


To recreate this nostalgic dish, start by placing corn tortillas on a cookie sheet, sliding them into the oven for 16-17 minutes until their edges brown and curl. The smell of warming tortillas always transports me back to those afternoons, the kitchen filled with laughter and stories.


Once the tortillas have cooled at room temperature, the assembly of the tostadas begins. Spread 1-2 tablespoons of canned refried beans on each tortilla, a creamy foundation that anchors the flavors. Top it with a generous handful of shredded rotisserie chicken, its savory aroma mingling with the memories of my abuela's kitchen.


A vibrant sprinkle of shredded iceberg lettuce and diced tomato adds a fresh crunch, reminiscent of the garden my grandfather tended with care. A dollop of guacamole, creamy and rich, is followed by a drizzle of lime juice, its citrusy tang brightening the dish.


The final touches are a sprinkle of cotija cheese, its salty crumble echoing the laughter shared over meals, and a drizzle of salsa. Garnish with jalapeños for a hint of heat, a nod to the spice that my family has always loved.


**A Meal to Share**


These tostadas, served open-faced on a platter, tell a story of family and tradition. They remind me of the joy of gathering around the table, sharing not just food but a piece of our heritage. As a main dish, this recipe is a testament to the power of food to connect us, to bring us closer to those we love.


**A Nostalgic Culinary Adventure**


As you savor these Rotisserie Chicken and Bean Tostadas, may your kitchen be filled with the same warmth and joy that mine was on those cherished Saturdays. This dish, a humble 3 out of 10 in difficulty, holds within it the power to create new memories while honoring the old. Gather your loved ones, share stories, and let the flavors of this dish carry you on a nostalgic culinary adventure.


**Keywords:** Rotisserie Chicken Tostadas, Easy Tostada Recipe, Family Meal, Nostalgic Dish, Mexican Cuisine, Main Dish, Simple Tostadas, Authentic Flavor, Family Tradition, Comfort Food.


---


Whether you're recreating family memories or crafting new ones, these Rotisserie Chicken and Bean Tostadas are sure to become a beloved staple in your home. Enjoy the flavors, cherish the moments, and let the tradition continue.

Read more about Appetizers

Read more about Main Dishes

Read more about Desserts

Turkey-Spinach Burgers With Sweet Soy-Ginger Sauce | Made by Meaghan Moineau

Turkey-Spinach Burgers With Sweet Soy-Ginger Sauce | Made by Meaghan Moineau

# Turkey-Spinach Burgers With Sweet Soy-Ginger Sauce: A Fusion of Flavors and Family Memories


## Description


Discover the culinary magic of Turkey-Spinach Burgers with Sweet Soy-Ginger Sauce. This delightful fusion dish combines the wholesome goodness of ground turkey and fresh spinach with a tantalizing Asian-inspired sauce. Perfect as a main dish, these burgers are not just a treat for the taste buds but also a stroll down memory lane, wrapped in a nostalgic family story.


## A Taste of Nostalgia


Cooking has always been a family affair in my household. Every Sunday, my mom and I would gather in the kitchen, aprons tied and ready for adventure. One particular Sunday, we stumbled upon a recipe that would become a staple in our family: Turkey-Spinach Burgers with Sweet Soy-Ginger Sauce.


The aroma of soy sauce and fresh ginger simmering on the stove would fill the kitchen, mingling with the laughter and stories we shared. My mom would recount tales of her childhood, and in those moments, I felt connected to generations past. The sizzling sound of turkey patties on the skillet was the soundtrack to our conversations, and the vibrant green of the spinach reminded us of the garden my grandmother used to tend with love and care.


Every bite of those burgers was a bite of history, flavored with love and memories. It's a recipe that transcends taste; it’s a testament to family bonds and culinary heritage.


## Recipe: Turkey-Spinach Burgers With Sweet Soy-Ginger Sauce


### Ingredients


- Fresh baby spinach


- Black pepper


- Canola oil


- Dark brown sugar


- Fresh ginger


- Ground turkey


- Mirin


- Salt


- Scallions


- Sesame oil


- Soy sauce


### Instructions


1. **Prepare the Sauce**: In a small saucepan, combine soy sauce, mirin, dark brown sugar, and fresh ginger. Bring to a boil over medium-high heat, whisking to dissolve the sugar. Reduce until slightly syrupy, about 3 minutes. Adjust the heat if necessary to prevent boil-over. Remove from heat and allow to cool completely. (Sauce may be prepared up to 2 days in advance and refrigerated in a covered container.)


2. **Prepare the Spinach**: Bring a large pot of water to a boil. Cook the spinach for 1 minute. Drain and transfer to a cold water bath to stop the cooking process. Drain again and dry thoroughly between layers of paper towels. (Spinach may be prepared up to 2 days in advance and refrigerated in a covered container.)


3. **Make the Patties**: In a large bowl, combine ground turkey, scallions, sesame oil, reserved spinach, and 1 tablespoon of the reserved sauce. Season with salt and black pepper and blend well without overworking the mixture. Form the turkey-spinach mixture into 4 patties, about 3 inches across and 1 inch thick.


4. **Cook the Burgers**: Heat canola oil in a large nonstick skillet over medium-high heat. When hot, add the patties and cook for about 5 minutes per side, until nicely browned and cooked through. Lower heat if necessary to prevent burning.


5. **Serve**: Serve the burgers with some of the sauce spooned over. Garnish with sliced scallions if desired.


### Difficulty Rating


Rated 5 out of 10 for difficulty, this dish is approachable for home cooks and offers a rewarding culinary experience.


### Classification


Main Dish


## Conclusion


These Turkey-Spinach Burgers with Sweet Soy-Ginger Sauce are more than just a meal; they are a bridge between past and present, a recipe that brings families together. Whether you're a seasoned chef or a kitchen novice, this dish invites you to create your own memories, one delicious bite at a time. Enjoy the fusion of flavors and the warmth of family tradition in every burger.

Read more about Appetizers

Read more about Main Dishes

Read more about Desserts

Avocado-Mango Salad With Grilled Shrimp | Made by Meaghan Moineau

Avocado-Mango Salad With Grilled Shrimp | Made by Meaghan Moineau

**Title: A Taste of Summer: Avocado-Mango Salad with Grilled Shrimp**


**Description: Dive into the flavors of summer with our Avocado-Mango Salad with Grilled Shrimp. This dish, a symphony of fresh ingredients and vibrant tastes, is perfect for family gatherings or a simple weeknight dinner. Rated a 6/10 in difficulty, this main dish is sure to impress without overwhelming your culinary skills.**


---


**A Taste of Summer: Avocado-Mango Salad with Grilled Shrimp**


There’s something inherently nostalgic about summer meals. The smell of a grill heating up, the sound of laughter and chatter in the background, and the vibrant flavors of fresh produce all remind me of family gatherings at my grandmother's house. Today, I want to share a recipe that encapsulates those cherished memories: Avocado-Mango Salad with Grilled Shrimp. This dish not only brings a burst of flavor but also transports me back to those carefree days of summer.


**Ingredients:**


- 1 lb shrimp, peeled and deveined


- 2 ripe Hass avocados, diced


- 1 cup diced mango


- Lime wedges for garnish


- 2 tbsp red wine vinegar


- 2 tbsp fresh lime juice


- 1 tsp fresh ginger, grated


- 1 tsp sugar


- 1 tbsp Dijon mustard


- 1/4 cup canola oil


- 1/4 cup cilantro, chopped


- 1 tsp lime zest


- 1 diced habanero chile (optional for heat)


- 1/2 cup red onion, thinly sliced


- Salt and black pepper to taste


**Instructions:**


1. **Preheat the Grill:** Start by preheating your gas grill to high heat. This ensures that the shrimp will cook quickly and evenly, achieving that perfect charred flavor.


2. **Prepare the Dressing:** In a small bowl, combine the red wine vinegar, fresh lime juice, grated ginger, sugar, Dijon mustard, and canola oil. Whisk until the ingredients are well blended. Season with salt and black pepper to taste. Set aside.


3. **Grill the Shrimp:** Season the shrimp with a pinch of salt and black pepper. Place them on the grill and cook for about 2-3 minutes on each side, until they turn pink and opaque. Remove from the grill and set aside.


4. **Assemble the Salad:** In a large bowl, combine the diced avocados, mango, red onion, lime zest, and cilantro. If you're feeling adventurous and enjoy a bit of heat, add the diced habanero chile. Drizzle the prepared dressing over the salad and toss gently to coat.


5. **Serve:** Arrange the grilled shrimp atop the salad, and garnish with lime wedges. This dish can be served warm or at room temperature, making it a versatile option for any occasion.


**A Family Memory:**


This dish always takes me back to the annual summer barbecues at my grandmother's house. I remember the excitement of helping her in the kitchen, carefully dicing the avocados and mangos while listening to her stories of summers past. The aroma of grilled shrimp would waft through the air as family members gathered around the picnic table, sharing laughter and love. It was during one of these gatherings that I first tasted the combination of creamy avocado with sweet mango and succulent shrimp—a flavor match made in heaven that has since become a family favorite.


**Final Thoughts:**


Our Avocado-Mango Salad with Grilled Shrimp is more than just a meal; it's an experience. It's a reminder of the joy that comes from sharing delicious food with loved ones. Whether you're creating new memories or reminiscing about old ones, this dish is sure to bring sunshine to your table.


**Difficulty Rating: 6/10**


**Classification: Main Dish**


So fire up the grill and gather your loved ones. It's time to create some delicious memories!

Read more about Appetizers

Read more about Main Dishes

Read more about Desserts

Brown Rice Mushroom Pilaf | Made by Meaghan Moineau

Brown Rice Mushroom Pilaf | Made by Meaghan Moineau

**Title: A Hearty Bowl of Comfort: Brown Rice Mushroom Pilaf**


**Description:** Discover the heartwarming delight of Brown Rice Mushroom Pilaf, a dish that brings back cherished family memories. Perfect as a main dish, this simple yet flavorful recipe is a wholesome addition to your menu. Join me as I share a nostalgic journey and a recipe that scores a 4 out of 10 on the difficulty scale, yet offers a 10 in satisfaction.


---


When the cool winds of autumn arrive, they carry with them a cascade of memories from a time when family gatherings were frequent and hearty meals filled the air with irresistible aromas. One such dish that has been a staple in my family for generations is the Brown Rice Mushroom Pilaf. With its earthy flavors and comforting warmth, it never fails to evoke a sense of home.


**The Nostalgic Story:**


I remember the first time I helped my grandmother make this pilaf. It was a chilly Saturday afternoon, and we were preparing for a large family dinner. The aroma of onions sizzling in sunflower oil filled the kitchen, mingling with the earthy scent of mushrooms. My grandmother, with her kind eyes and gentle hands, guided me through the process, teaching me how to patiently sauté the onions and mushrooms until they reached that perfect golden hue.


As the brown rice was added to the pan, she imparted her wisdom, "The secret, my dear, is to let each grain soak up the flavors. It’s like life; we must take in all the goodness around us." With her guidance, I learned the art of stirring the rice just enough to coat it in the oil without overdoing it, allowing each grain to absorb the rich flavors of the dish.


Once the water was added, we waited, sharing stories and laughter, letting the pilaf simmer, filling the air with its inviting aroma. The lid was placed on the saucepan, and we let it rest, just like she taught me, ensuring every drop of liquid was absorbed, leaving the rice tender and flavorful.


This dish, simple in its ingredients yet profound in its ability to bring people together, became a symbol of our family’s love and togetherness. To this day, whenever I prepare Brown Rice Mushroom Pilaf, it’s as if my grandmother is right there with me, smiling and reminding me of the importance of savoring life’s simple pleasures.


**Recipe for Brown Rice Mushroom Pilaf:**


**Ingredients:**


- 1 onion, chopped


- 1 cup brown rice


- 1 can (or equal amount) fresh mushrooms, sliced


- 2 tablespoons unrefined sunflower oil


- 2 cups water


- Sea salt, to taste


- Ground pepper, to taste


**Instructions:**


1. Heat the sunflower oil in a large saucepan over medium heat.


2. Add the chopped onion and sliced mushrooms, sautéing them for about 5 minutes until the onion becomes translucent and the mushrooms soften.


3. Stir in the brown rice, ensuring each grain is well-coated with the oil and flavors from the onion and mushrooms.


4. Pour in the water and bring the mixture to a boil.


5. Reduce the heat to a simmer, covering the saucepan. Let it cook for approximately 30 minutes.


6. Remove from heat, keeping the lid on, and let the pilaf rest until all the liquid is absorbed into the rice.


7. Season with sea salt and ground pepper to taste, then fluff with a fork before serving.


**Difficulty Rating:** 4/10


**Classification:** Main Dish


This Brown Rice Mushroom Pilaf is more than just a meal; it’s a journey into the past, a reminder of the warmth and love of family traditions. It’s perfect for a cozy dinner, offering a delightful blend of flavors that speak to the heart and soul. Whether you’re recreating cherished memories or making new ones, this dish is sure to become a beloved favorite in your home.

Read more about Appetizers

Read more about Main Dishes

Read more about Desserts

Masala-Tofu Burger | Made by Meaghan Moineau

Masala-Tofu Burger | Made by Meaghan Moineau

# Masala-Tofu Burger: A Flavorful Fusion Delight


## A Wholesome and Spicy Vegan Alternative


If you're looking to spice up your burger game with a healthy, vegan twist, the Masala-Tofu Burger is your answer. This vibrant dish combines the hearty goodness of tofu with the rich, aromatic spices of an Indian kitchen. Perfect for a weekend treat or a summer cookout, this burger is sure to impress family and friends alike. Let's dive into this culinary adventure that beautifully marries flavors and cultures.


### Ingredients You'll Need


- **White Onion:** Shopping list


- **Diced Red/Orange/Green Bell Pepper:** Shopping list


- **Frozen Peas-Carrots Mix:** Shopping list


- **Green Chilies:** Shopping list


- **Tofu:** Shopping list


- **Diced Potato:** Boiled


- **Garlic:** Shopping list


- **Black Mustard Seeds:** Shopping list


- **Curry Leaves:** Shopping list


- **Hing (Asafoetida):** Shopping list


- **Cumin Powder:** Shopping list


- **Turmeric:** Shopping list


- **Lemon:** Shopping list


- **Salt:** Shopping list


- **Cilantro:** Washed and finely chopped, shopping list


- **Indian Breadcrumbs:** Shopping list


- **Vegetable Oil:** Shopping list


- **PAM Original Flavor Spray:** Shopping list


- **Red/White Onion:** For garnish


- **Beefsteak Tomatoes:** Sliced for garnish


- **Mint-Cilantro Chutney Spread:** Shopping list


- **Portuguese Rolls:** Shopping list


### Cooking Instructions


1. **Prepare the Skillet:**


- In a large skillet over medium-high heat, spray a generous amount of PAM and add vegetable oil.


- Add black mustard seeds and sauté for 30 seconds until you hear popping noises.


- Carefully add curry leaves, as they will splatter in the hot oil.


2. **Cook the Vegetables:**


- Add diced onions and bell peppers; sweat them for about 30 seconds.


- Add chopped garlic, green chilies, and turmeric. Sauté for 5-7 minutes until onions and peppers are soft.


- Add the peas-carrots mix, cumin powder, and salt. Cook for another 7-10 minutes until all veggies are soft.


3. **Marinate the Tofu:**


- In a small bowl, combine cubed tofu with a pinch of turmeric, cumin powder, coarse black pepper, and cayenne pepper (optional). Set aside to marinate.


4. **Combine and Cook:**


- Add marinated tofu to the skillet and cook until slightly browned and crumbly.


- Squeeze juice from half a lemon and add half of the chopped cilantro. Mix well.


- Add diced boiled potatoes and toss until everything is coated. Taste for salt and spices.


- Mash the mixture until mushy and veggies are small. Set aside to cool.


5. **Form the Patties:**


- Once cooled, add breadcrumbs and mix with your hands.


- Form into four thick patties. If needed, add more breadcrumbs for consistency.


- Place patties on a plate and wrap with plastic wrap until ready to use.


6. **Cook the Patties:**


- In a small skillet sprayed with PAM over medium-high heat, cook each patty for about 2 minutes on each side until browned and crispy.


- Simultaneously, sauté thick slices of onion until charred and slightly soft.


7. **Assemble the Burger:**


- Spread a generous amount of mint-cilantro chutney on each side of the Portuguese rolls.


- Place the tofu patty, charred onions, tomato slices, and fresh cilantro leaves between the buns.


- Serve with a slice of lemon and reduced-fat chips on the side.


### A Nostalgic Family Memory


Growing up, Sundays were special in our family. My grandmother would gather us around her cozy kitchen, the air filled with a medley of spices and laughter. She had a knack for transforming simple ingredients into magical dishes, and her Masala-Tofu Burger was a family favorite. We would eagerly form an assembly line, each adding our own touch to the burgers. The final product was always met with cheers and anticipation, as we savored the deliciously spiced patty nestled between soft, fresh rolls. Even today, as I recreate this dish in my own kitchen, I am transported back to those cherished moments of family and flavor.


### Difficulty Level


- **Difficulty:** 6/10


- **Classification:** Main Dish


This Masala-Tofu Burger is a delightful blend of spices and textures, perfect for those looking to explore new culinary territories. Whether you're a seasoned cook or a beginner, this recipe offers a rewarding experience with every bite. Enjoy the memories and flavors that come with this unique twist on a classic favorite!

Read more about Appetizers

Read more about Main Dishes

Read more about Desserts

Jambalaya Stew | Made by Meaghan Moineau

Jambalaya Stew | Made by Meaghan Moineau

# A Hearty Bowl of Jambalaya Stew: A Taste of Tradition


**Description:** Dive into the rich flavors of New Orleans with our Jambalaya Stew, a delightful blend of savory chicken sausage, succulent shrimp, and vibrant vegetables. This hearty dish is perfect for family gatherings and a breeze to make. Join us as we explore the comforting nostalgia of this family favorite, with a sprinkle of history and a dash of spice.


---


## A Culinary Journey: Rediscovering Jambalaya Stew


There's something magical about a pot of Jambalaya simmering on the stove, the aroma of spices filling the kitchen, and the promise of a comforting meal waiting to be shared. This Jambalaya Stew is not just a recipe; it's a journey back to cherished family memories, a dish that brings loved ones together around the table.


### Ingredients You'll Need


- **4 cooked Italian sweet chicken sausage links**


- **1 can of diced tomatoes**


- **1 onion, chopped**


- **1 yellow and 1 green bell pepper, diced**


- **2 stalks of celery, chopped**


- **4 cups of low sodium chicken broth**


- **1 cup of brown rice**


- **3 cloves of garlic, minced**


- **2 tablespoons of Cajun seasoning**


- **A dash of hot sauce (or to taste)**


- **1 teaspoon of dried oregano**


- **1 teaspoon of dried thyme**


- **1 pound of raw shrimp, peeled and deveined**


### Cooking Instructions


1. **Combine Ingredients:** In a large pot, add all ingredients except the shrimp. Stir them together until well mixed.


2. **Bring to a Boil:** Heat the pot on the stove until it reaches a boil.


3. **Simmer:** Reduce the heat to medium-low. Cover the pot and let it simmer for about 35 minutes, or until the vegetables are tender and the rice is fluffy.


4. **Add Shrimp:** Stir in the shrimp, then re-cover the pot. Cook for an additional 6 minutes, or until the shrimp are tender and cooked through.


5. **Season to Taste:** If desired, add salt, black pepper, or more hot sauce to suit your taste.


6. **Serve and Enjoy:** Ladle the stew into bowls, serve hot, and enjoy the flavors of this traditional dish.


### A Nostalgic Family Tale


Growing up, Sundays were always a special day in our household. It was a time to slow down, gather the family, and enjoy a hearty meal together. My grandmother's Jambalaya Stew was the star of these Sunday gatherings. The kitchen would be a flurry of activity, with family members chopping vegetables, stirring pots, and sharing stories.


One particular Sunday stands out in my memory. It was a chilly afternoon, and as the stew simmered away on the stove, the warmth from the kitchen crept into every corner of the house. I remember my grandmother, her apron dusted with flour, telling tales of her own childhood in New Orleans, where Jambalaya was a staple at every family feast. Each spoonful of the stew was like a warm hug, a reminder of the love and care that went into every meal.


Even today, every time I make this Jambalaya Stew, I'm transported back to those cherished Sundays. It's more than just a dish—it's a celebration of family, tradition, and the simple joy of sharing a meal with those you love.


### Difficulty Rating and Classification


- **Difficulty:** 4/10 - This recipe is straightforward, making it perfect for both novice cooks and seasoned chefs.


- **Classification:** Main Dish - With its hearty ingredients and robust flavors, this Jambalaya Stew is sure to be the centerpiece of any meal.


Embrace the flavors of the South and create your own family memories with this Jambalaya Stew. Whether it's a casual weeknight dinner or a special family gathering, this dish is sure to warm hearts and fill bellies. Enjoy!

Read more about Appetizers

Read more about Main Dishes

Read more about Desserts

Peaches And Cream Oatmeal | Made by Meaghan Moineau

Peaches And Cream Oatmeal | Made by Meaghan Moineau

**Title: A Warm Hug in a Bowl: Nostalgic Peaches and Cream Oatmeal**


**Description: Discover the comforting embrace of our Peaches and Cream Oatmeal, a delightful breakfast treat that brings the warmth of home to your table. With simple ingredients and easy preparation, this dish captures the essence of family memories and cozy mornings.**


---


There's something profoundly comforting about a bowl of warm oatmeal, and when it comes with the sweet embrace of peaches and cream, it becomes much more than just a meal—it becomes a memory. Our Peaches and Cream Oatmeal is not only a delightful start to your day but also a nostalgic journey back to family breakfasts and cozy kitchen moments.


**Ingredients:**


- 1 cup frozen peaches


- 1/2 cup cooking oats


- 1 cup non-fat milk


- 2 tablespoons low-fat cream cheese


- 1 tablespoon agave syrup


- 1/2 teaspoon cinnamon


**Instructions:**


1. Begin by microwaving the frozen peaches for 30 seconds to thaw them just enough to release their sweet aroma.


2. In a microwave-safe bowl, add the oats, non-fat milk, and softened peaches.


3. Top it off with dollops of low-fat cream cheese, a drizzle of agave syrup, and a sprinkle of cinnamon.


4. Microwave the mixture for 1 minute until everything is warm and melded together.


5. Give it a good stir to combine all the flavors, and enjoy the creamy, peachy goodness!


**Nostalgic Family Memory:**


Every time I prepare this Peaches and Cream Oatmeal, I'm transported back to my grandmother's kitchen. It was a small, sunlit room that smelled perpetually of fresh fruit and baked goods. As a child, I spent countless mornings perched on a stool, watching her work her magic with simple ingredients. My favorite was always her peach oatmeal, which she lovingly prepared with fresh peaches plucked from the old tree in her backyard.


I remember the ritual vividly: she would slice the peaches with careful precision, their sweet scent filling the air. She'd tell stories of her own childhood, of how her mother had taught her to cook during long summer days. As I helped stir the oatmeal, she'd remind me that the secret ingredient was always a pinch of cinnamon and a lot of love.


Even now, as I recreate this dish with frozen peaches and modern conveniences like microwaves, I can feel her presence in the warmth of the bowl. It's a testament to how food can connect us across time, linking generations through shared flavors and cherished traditions.


**Difficulty Rating: 3/10**


**Classification: Main Dish**


Whether you're enjoying this dish on a lazy weekend morning or as a quick weekday breakfast, Peaches and Cream Oatmeal is a heartwarming experience. It's a simple recipe that brings a touch of nostalgia to your day, making it more than just a meal—it's a cherished memory in every spoonful.

Read more about Appetizers

Read more about Main Dishes

Read more about Desserts

Not Momofuku Ginger Scallion Noodles | Made by Meaghan Moineau

Not Momofuku Ginger Scallion Noodles | Made by Meaghan Moineau

**Title: A Taste of Nostalgia: Not Momofuku Ginger Scallion Noodles**


**Description:** Dive into the comforting embrace of Not Momofuku Ginger Scallion Noodles, a delightful dish packed with vibrant flavors and warm memories. This recipe is your gateway to a symphony of taste and nostalgia, blending simple ingredients into a soul-soothing experience. Perfect for a cozy dinner, this dish will transport you back to cherished family gatherings, making it a must-try for any home cook.


---


**Blog Post:**


There's something magical about a recipe that evokes cherished memories with every bite. For me, Not Momofuku Ginger Scallion Noodles is more than just a dish; it's a bridge to my past, a flavorful reminder of family gatherings filled with laughter, love, and of course, delightful aromas wafting from the kitchen.


**Ingredients:**


- Soba noodles


- 1/4 cup grapeseed oil


- 2 cups green onions, finely chopped


- 2 tablespoons ginger, minced


- 4 cloves garlic, minced


- 2 shallots, thinly sliced


- 2 tablespoons fish sauce


- 1 tablespoon sesame seed oil


- 1 tablespoon rice wine vinegar


- 2 tablespoons wheat-free tamari sauce


- 1 tablespoon honey


- 1 red chile pepper, crushed


- Himalayan salt, to taste


**Instructions:**


1. Heat the grapeseed oil in a saucepan over high heat until shimmering and hot, but not smoking. This is where the magic begins.


2. Carefully add the green onions, ginger, garlic, and shallots to the pan. Watch as the ingredients sizzle and the aroma fills your kitchen, instantly transforming the space into a fragrant haven. The onions will wilt and turn a vibrant green almost immediately.


3. Remove the pan from the heat and stir the mixture with a wooden spoon. Feel the warmth of the moment as you add the fish sauce, sesame seed oil, rice wine vinegar, tamari sauce, honey, crushed red chile pepper, and Himalayan salt. Allow the sauce to sit for 15 minutes, letting the flavors meld together.


4. Toss with your favorite noodles. While I used fresh Chinese egg noodles for a traditional touch, soba noodles offer a splendid alternative, absorbing the sauce beautifully.


**A Nostalgic Connection:**


This dish always takes me back to my grandmother's kitchen. As a child, I spent countless weekends there, perched on a stool, watching her deftly chop green onions and ginger while regaling me with stories of her own childhood. She had a way of making the simplest ingredients sing, turning every meal into an event. The aroma of sizzling onions and ginger would fill the house, drawing everyone to the kitchen like moths to a flame. Every bite of her noodles was a testament to her love; a warm, comforting embrace on a plate.


**Difficulty Rating: 3/10**


Classified as a **Main Dish**, Not Momofuku Ginger Scallion Noodles is surprisingly straightforward to prepare, making it an ideal choice for both novice cooks and seasoned chefs alike. Its simplicity is its strength, allowing each ingredient to shine while wrapping you in a blanket of nostalgia and flavor.


---


There's an undeniable comfort in recreating a recipe that has stood the test of time in your family. Not Momofuku Ginger Scallion Noodles is more than just a meal; it's a journey back to those precious moments spent with loved ones. Whether you're cooking for a crowd or just for yourself, this dish is sure to bring a smile to your face and warmth to your heart. So, gather your ingredients, ignite your stove, and let the magic of nostalgia fill your kitchen once more.

Read more about Appetizers

Read more about Main Dishes

Read more about Desserts