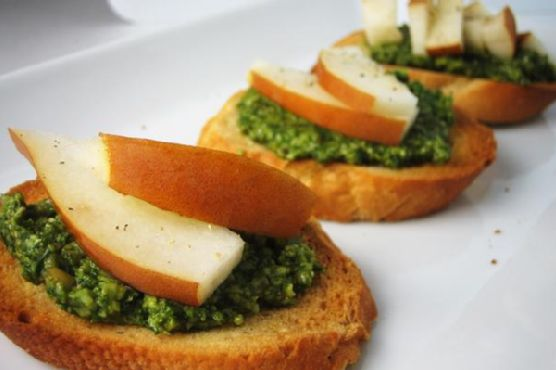
Pear and Pesto Crostini
Intro
There’s something magical about the combination of pear and pesto that instantly transports me back to my grandmother’s kitchen. I remember sitting at her rustic wooden table, eagerly watching as she prepared a variety of appetizers for our family gatherings. The distinct aroma of fresh basil and the nutty scent of roasted pine nuts would fill the air, creating an inviting atmosphere that welcomed everyone. Among all her creations, the Pear and Pesto Crostini stood out, a perfect blend of savory and sweet, crispy and creamy. Today, I’m excited to share this cherished family recipe with you.
Why You’ll Love It
This Pear and Pesto Crostini is not just a delightful appetizer; it’s a conversation starter. The crispiness of the French bread, the fragrant and nutty pesto, paired with the tender sweetness of the bosc pear, make for a symphony of flavors and textures in every bite. It’s elegant enough for a holiday party, yet simple enough to whip up for a casual weekend snack. Plus, it’s a great way to impress your guests with minimal effort!
Ingredients
- French bread
- Fresh basil leaves
- 1 garlic clove
- Pine nuts
- Pecorino Romano cheese
- Your best olive oil
- Salt and pepper to taste
- 1 Bosc pear
Instructions
- Preheat your oven to 400 degrees Fahrenheit.
- Slice the French loaf into 1/2-inch-thick slices.
- Brush or spray the slices with olive oil and place them on a baking sheet.
- Toast the bread in the oven for 10-15 minutes, or until the edges are a deep golden brown. Remove from the oven and set aside.
- While the bread is toasting, make your pesto. In a food processor, combine basil leaves, garlic clove, pine nuts, and Pecorino Romano cheese. Pulse until the mixture is coarse in texture, resembling coarse sand.
- Add in the olive oil and process until fully incorporated. Taste and adjust with salt and pepper if needed.
- Scrape the pesto into a serving bowl or dish and set aside. You should have about 3/4 cup of pesto.
- Slice the Bosc pear thinly, and when ready to serve, top each toasted bread slice with a generous spread of pesto and a slice of pear.
Tips
- For the best results, use high-quality olive oil, as it significantly enhances the flavor of the pesto.
- To prevent your pears from browning, you can toss them with a little lemon juice before placing them on the crostini.
- If you’re making these for a party, you can prepare the components ahead of time and assemble just before serving.
Variations & Substitutions
If you’re in the mood for a twist, consider swapping the Pecorino Romano for Parmesan cheese, which offers a slightly milder taste. You can also experiment with different nuts — walnuts or almonds can be a delightful substitute for pine nuts. For a touch of sweetness, drizzle a bit of honey over the top right before serving. Lastly, if pears are out of season, feel free to use apples or figs as an alternative fruit topping.
Storage
If you have leftovers (though they tend to disappear quickly!), store the components separately. Keep the toasted bread in an airtight container at room temperature for up to two days. The pesto can be stored in the refrigerator for up to a week. Just give it a stir before using it again. Unfortunately, sliced pears do not store well, so it’s best to slice them fresh as needed.
FAQ
Can I make the pesto in advance?
Yes, absolutely! The pesto can be made up to a week in advance and stored in an airtight container in the refrigerator. Just give it a good stir before using it, as the oil may separate over time.
What type of bread works best for crostini?
French bread is a classic choice due to its crusty exterior and soft interior, which toasts up perfectly. However, a baguette or ciabatta can also be used if you prefer a slightly different texture.
Is there a nut-free version of this recipe?
Definitely! You can omit the pine nuts entirely from the pesto, or substitute them with sunflower seeds for a nut-free version. The pesto will still be deliciously flavorful!
Nutrition
While I don’t have the exact nutritional breakdown, this appetizer is fairly light, especially if you’re mindful of the amount of olive oil used. The pears add a natural sweetness and a dose of fiber, while the pesto offers healthy fats from the olive oil and pine nuts. It’s a wonderful choice for those looking to indulge without guilt.
Conclusion
Whether you’re hosting a dinner party or looking for a delicious way to enjoy a quiet evening at home, this Pear and Pesto Crostini will not disappoint. It’s a testament to the power of simple, high-quality ingredients coming together to create something truly special. I hope this recipe brings as much joy to your table as it has to mine over the years. Enjoy every bite!
Related update: Pear and Pesto Crostini
Related update: Rustic Brie Toasts with Wild Mushroom, Cranberry and Shallot