Dutch Baby | Made by Meaghan Moineau

Dutch Baby | Made by Meaghan Moineau

Title: The Magic of Dutch Baby: A Delightful Morning Ritual
Description: Discover the enchanting world of the Dutch Baby—a heavenly, puffed pancake that transforms breakfast into a cherished family tradition. Unveil the simplicity of its creation and indulge in a nostalgic journey that celebrates togetherness. Perfect for beginners, this dish is a delightful dessert that brings warmth to the table.

---


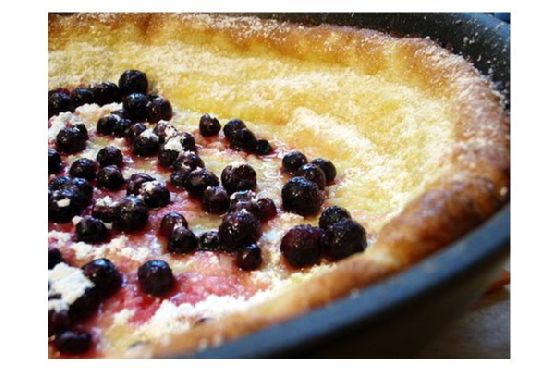
There's something magical about a Dutch Baby. Not only does it puff up like a glorious, golden crown, but it also carries with it a sense of nostalgia that warms the heart. For our family, the Dutch Baby is more than just a dish; it's a morning ritual that whispers of comfort and connection.


Ingredients:

- 3 large eggs


- ½ cup flour


- ½ cup milk


- 2 tablespoons unsalted butter


- 1-2 lemons


- Confectioner's sugar for dusting


Instructions:

1. Preheat your oven to a toasty 475 degrees F. This high heat is crucial for achieving that signature puff.


2. Cut the lemons in half crosswise—these will be your final flourish.


3. Place the unsalted butter in a heavy 10" oven-proof skillet and let it melt in the oven. The aroma of melting butter is just the beginning of this delightful journey.


4. While the butter melts, whisk together the eggs, flour, and milk in a bowl. Mix just until combined; overmixing isn't necessary.


5. Carefully remove the skillet from the oven once the butter has melted. Swirl the butter around to coat the sides of the skillet.


6. Pour the batter into the hot skillet and quickly return it to the oven.


7. Bake for 12 minutes or until your Dutch Baby has puffed up like a dream.


8. Once puffed and golden, remove it from the oven and transfer to a platter.


9. Squeeze the lemon halves over the Dutch Baby, letting the juice soak in. Dust generously with confectioner's sugar for that perfect finish.


10. Cut into serving-sized pieces and serve immediately.


Difficulty Rating: 3/10
Classification: Dessert

---


Growing up, Sundays were synonymous with family and food. My grandmother, with her apron tied loosely around her waist, would gather us in the kitchen to help with our favorite breakfast treat—the Dutch Baby. The anticipation was half the fun; we’d watch through the oven window as the batter rose, transforming into a golden, airy masterpiece.


As she pulled it from the oven, she’d tell us stories of her own childhood, of Sundays spent in her mother’s kitchen. The Dutch Baby was her mother's favorite too, and it became a thread that tied generations together. As the lemon juice mingled with the confectioner's sugar, we’d gather around the table, sharing stories, laughter, and the simple joy of being together.


The beauty of the Dutch Baby lies in its simplicity. It's a dish that invites you to slow down and savor the moment, to appreciate the warmth of family and the joy of shared meals. Whether you're a seasoned cook or a kitchen novice, this delightful dessert is an invitation to create your own family memories—one delicious puff at a time.

Read more about Appetizers

Read more about Main Dishes

Read more about Desserts

Gluten Free Profiteroles | Made by Meaghan Moineau

Gluten Free Profiteroles | Made by Meaghan Moineau

Title: Delightful Gluten-Free Profiteroles: A Taste of Nostalgia and Elegance
Description: Explore the world of gluten-free baking with our exquisite Gluten-Free Profiteroles recipe. Perfect for any occasion, these light and airy delights promise both flavor and nostalgia. Join us as we share a cherished family memory, step-by-step instructions, and tips for perfecting this elegant dessert.

---


When it comes to desserts, few things are as elegant and indulgent as profiteroles. These dainty puffs, filled with cream or custard and drizzled with chocolate or caramel, are a showstopper at any gathering. But for those with gluten sensitivities, enjoying this classic treat has often required compromise—until now. Our Gluten-Free Profiteroles are not only delicious but also evoke a sense of nostalgia and family warmth.


A Sweet Memory:

Growing up, my grandmother would make profiteroles every holiday season. Her kitchen would transform into a wonderland of sweet aromas and bustling activity. I remember standing on tiptoes to watch her skillfully work the dough, a process that seemed nothing short of magical. The anticipation was palpable as we waited for those golden puffs to emerge from the oven, perfectly crisp and hollow, ready to be filled with her signature vanilla custard.


One year, after discovering my gluten sensitivity, I thought those days of indulging in profiteroles were behind me. But my grandmother, ever the culinary wizard, adapted the recipe to be gluten-free. The result was just as delicious as the original, if not more so, because it was a testament to her love and creativity. Every bite was a reminder of those cherished holiday moments, a connection to family and tradition.


Recipe: Gluten-Free Profiteroles
Ingredients:

- 1/2 cup butter


- 1 cup water


- 1/2 cup milk


- 1 cup gluten-free flour


- 1/4 teaspoon xantham gum


- 1/2 teaspoon salt


- 1 tablespoon sugar


- 4 large eggs


Instructions:
1. Preheat the Oven: Set your oven to 375°F (190°C) and prepare your baking sheets by running them under cold water, shaking off excess water but leaving them slightly damp.
2. Prepare Dry Ingredients: Sift together the gluten-free flour, xanthan gum, salt, and sugar 3-4 times. Place the mixture in a convenient spot near the stove.
3. Mix Wet Ingredients: In a deep, heavy-bottomed pan, combine the water and milk. Cut the butter into small chunks and add to the pan. Heat gently until the butter is fully melted.
4. Bring to Boil: Increase the heat until the mixture reaches a rolling boil. Remove from heat immediately and pour the dry mixture into the pan all at once. Stir vigorously with a wooden spoon.
5. Form the Paste: Return the pan to low heat, continuing to stir until the mixture forms a smooth, shiny paste and pulls away from the sides of the pan.
6. Incorporate Eggs: Remove from heat. Gradually add the beaten eggs, using a hand mixer to blend thoroughly. The paste should be shiny, stiff, and able to hold its shape.
7. Prepare for Baking: Drop tablespoons of the dough onto the baking sheet, spaced about 10 cm apart. The puffs will expand significantly as they bake.
8. Bake: Place in the oven and bake for 20-25 minutes until the profiteroles are golden brown on all sides. Resist the urge to open the oven during the first 15 minutes to prevent collapse.
9. Cool and Serve: Transfer to a baking rack, piercing each puff with a toothpick to allow steam to escape. Once cooled, fill with your choice of cream or custard and enjoy!
Difficulty Rating: 6/10
Dish Classification: Dessert
Conclusion:

Creating gluten-free profiteroles might seem daunting, but the reward is well worth the effort. These airy puffs are a delightful dessert that brings elegance to any table while carrying the warmth of family memories. Whether you're serving them at a festive gathering or enjoying a quiet moment with a cup of tea, these profiteroles are a testament to the power of adaptability and love in the kitchen.

Read more about Appetizers

Read more about Main Dishes

Read more about Desserts

Gluten-Free Tres Leches Cake | Made by Meaghan Moineau

Gluten-Free Tres Leches Cake | Made by Meaghan Moineau

A Slice of Sweet Nostalgia: Gluten-Free Tres Leches Cake Recipe


Description: Dive into the rich, velvety world of our Gluten-Free Tres Leches Cake. This classic Latin American dessert, infused with a modern twist of gluten-free ingredients, promises to tantalize your taste buds with its creamy texture and fragrant flavors. Perfect for any occasion, this cake is as much a feast for the senses as it is a trip down memory lane.

---


Introduction: A Culinary Journey Back in Time


As the golden rays of the afternoon sun filtered through the lace curtains of my grandmother’s kitchen, the air was filled with the irresistible aroma of baking. It was a special day — Tres Leches Cake day. This cake is more than just a treat; it's a cherished family tradition, a recipe passed down through generations, each bite imbued with stories and laughter from the past. Today, I share with you a gluten-free version of this beloved dessert, ensuring that everyone can partake in this sweet piece of nostalgia.


Ingredients


- 1 cup sugar, divided


- 5 large eggs, separated


- 1/2 cup unsalted butter, softened


- 1 teaspoon vanilla extract


- Zest of one orange


- 1 teaspoon ground cinnamon


- 1 cup sorghum flour


- 1/2 cup masa harina


- 2 teaspoons baking powder


- 1/2 teaspoon xanthan gum


- 1/2 cup milk


- 1/4 teaspoon cream of tartar


- 1 can (12 ounces) evaporated milk


- 1 cup half-and-half


- 1 can (14 ounces) sweetened condensed milk


- 1 cup heavy whipping cream


- 2 tablespoons sugar


- 1 teaspoon vanilla extract


- Strawberries and mint leaves, for garnish


Instructions


1. Preparation:

Preheat your oven to 350 degrees Fahrenheit. Generously butter a 13x9-inch baking dish.


2. Make the Cake Batter:

In a large bowl, beat 1/2 cup of sugar, egg yolks, and butter until light and fluffy, about 5 minutes. Fold in the vanilla extract, orange zest, cinnamon, sorghum flour, masa harina, baking powder, xanthan gum, and milk.


3. Whip the Egg Whites:

In another large bowl, beat the egg whites to soft peaks, adding the cream of tartar after about 20 seconds. Gradually add the remaining 1/2 cup of sugar and continue beating until the egg whites are glossy and firm, but not dry.


4. Combine the Mixtures:

Gently fold the egg whites into the cake mixture. Pour this batter into the prepared baking dish, spreading it out evenly.


5. Bake:

Bake until the cake is golden and a toothpick inserted in the center comes out clean, about 25 minutes.


6. Add the Tres Leches:

Pierce the cake all over with a toothpick. Whisk together the evaporated milk, half-and-half, and sweetened condensed milk, then pour evenly over the cake. Allow it to cool slightly, then cover and refrigerate for at least 4 hours, preferably overnight.


7. Make the Topping:

Before serving, place the whipping cream, 2 tablespoons of sugar, and 1 teaspoon of vanilla in a mixer bowl. Whisk to stiff peaks until nice and thick. Spread over the cake.


8. Garnish and Serve:

Top with fresh strawberries and mint leaves. Allow the cake to chill in the refrigerator until ready to serve.


A Family Memory


Every Sunday, after a hearty family lunch, my grandmother would unveil her Tres Leches Cake. We, the grandchildren, would gather around the table, eyes wide with anticipation. The cake was always topped with fresh strawberries from her garden and sprigs of mint, their vibrant colors a prelude to the burst of flavors that awaited. These afternoons were filled with stories of her childhood, each tale as sweet as the dessert itself. This gluten-free rendition not only honors her legacy but also ensures that the tradition continues, inclusive and cherished by all.


Difficulty: 5/10


Classification: Dessert


---


Whether you're revisiting fond memories or creating new ones, this Gluten-Free Tres Leches Cake is a delightful, inclusive treat that everyone can enjoy. With its delicate balance of flavors and textures, each slice is a testament to the timelessness of family traditions. Happy baking!

Read more about Appetizers

Read more about Main Dishes

Read more about Desserts

Classic French Onion Soup | Made by Meaghan Moineau

Classic French Onion Soup | Made by Meaghan Moineau

Title: "Savoring Tradition: Crafting the Perfect Classic French Onion Soup"
Description: Dive into the warmth and nostalgia of a timeless Classic French Onion Soup. This comforting dish, with its rich flavors and aromatic herbs, is not only a culinary masterpiece but also a vessel of cherished family memories. Join us as we explore the heartwarming story behind this delectable soup and provide a detailed, step-by-step guide to crafting it in your own kitchen.

---


The Enchantment of Classic French Onion Soup: A Family Tradition

There's something profoundly magical about the aroma of onions caramelizing slowly, mingling with the robust scent of simmering beef broth, and the unmistakable fragrance of fresh herbs. Each spoonful of Classic French Onion Soup is a journey back to simpler times when the warmth of the kitchen brought families together.


As I prepare this cherished dish today, I am reminded of the countless Sunday afternoons spent in my grandmother's cozy kitchen. The heart of her home was always filled with the comforting melody of simmering pots and the gentle hum of family chatter. French Onion Soup was her specialty, a recipe passed down through generations, each one adding their unique touch yet preserving its classic essence.


Creating Your Own Bowl of Nostalgia
Ingredients:

- 3 tablespoons salted butter


- 6 large yellow onions, thinly sliced


- 2 tablespoons flour


- 1/2 cup sherry or dry white wine


- 8 cups beef broth


- 1 teaspoon fresh thyme


- 1 tablespoon fresh parsley, chopped


- 1 bay leaf


- Salt and pepper to taste


- 1 French crusty baguette, sliced


- 1 1/2 cups shredded Gruyere cheese


Instructions:
1. Preparation: Preheat your oven to 400°F (200°C).
2. Caramelizing the Onions: In a large Dutch oven, melt the butter over medium heat. Add the sliced onions to the pot, sprinkling them with flour. Reduce the heat to medium-low and let them cook for about 45 minutes, stirring occasionally. If the onions begin to cook too quickly, reduce the heat further. Let them reach a tender, golden hue.
3. De-glazing the Pot: Once the onions are perfectly caramelized, de-glaze the pan with sherry, scraping up any delicious brown bits from the bottom.
4. Simmering the Soup: Pour in the beef broth and bring the mixture to a gentle boil over medium heat. Add the thyme, parsley, bay leaf, and season with salt and pepper to taste. Reduce the heat and let it simmer for 15 minutes.
5. Preparing the Bread: Lightly spray a cookie sheet with cooking spray. Butter the slices of the French baguette and bake them in the oven for 5-10 minutes until they're dry and crusty. Set them aside.
6. Final Touches: Remove the herb stalks and bay leaf from the soup. Ladle portions of the soup into four oven-safe ramekins. Top each with a slice of the crusty French baguette and a generous sprinkle of shredded Gruyere cheese.
7. Melting the Cheese: Place the ramekins on a cookie sheet and bake, uncovered, at 400°F (200°C) for 5-10 minutes, or until the cheese is bubbling. For an extra golden top, broil for one more minute.
8. Serve Warm: Carefully remove the ramekins from the oven and serve immediately.
A Culinary Journey
Classifying this dish as a Main Dish, its rich flavors and hearty ingredients make it a perfect standalone meal. With a difficulty rating of 6 out of 10, this recipe is ideal for those intermediate cooks looking to expand their culinary repertoire and impress guests with a touch of French elegance.

As you savor each spoonful, may you feel the warmth of family and tradition, much like I did in my grandmother's kitchen. This Classic French Onion Soup is more than a dish; it's a beautiful reminder of the power of food to connect us with loved ones and cherished memories. Enjoy the journey of making it just as much as the delightful taste that awaits.

Read more about Appetizers

Read more about Main Dishes

Read more about Desserts

Nutella Stuffed French Toast | Made by Meaghan Moineau

Nutella Stuffed French Toast | Made by Meaghan Moineau

Title: Rediscovering Breakfast Bliss: Nutella Stuffed French Toast
Description: Dive into the comforting embrace of Nutella Stuffed French Toast, a decadent breakfast treat that marries nostalgia with indulgence. Perfect for leisurely weekend mornings, this dish will transport you back to simpler times with every bite.

---


Rediscovering Breakfast Bliss: Nutella Stuffed French Toast


There's something magical about the way certain dishes can transport us back in time. For me, Nutella Stuffed French Toast does just that. It’s a delicious journey to a sunlit kitchen, where the aroma of cinnamon and melted Nutella filled the air, and laughter echoed off the walls. This dish, with its gooey, chocolate-hazelnut center and flaky, golden-brown crust, is more than just food—it's a heartfelt memory served on a plate.


Ingredients:

- 2 eggs

- 1 cup of milk


- 2 tablespoons of sugar


- 1 teaspoon of cinnamon powder


- 4 slices of bread


- 1/2 cup of Nutella


- 2 tablespoons of butter


- Powdered sugar, for garnish


Instructions:


1. Prepare the Egg Mixture: In a deep, large bowl, whisk together the eggs, milk, sugar, and cinnamon powder. Stir it well using a fork until all ingredients are combined, then set aside.
2. Assemble the Sandwiches: Take two slices of bread and generously coat one side of each with Nutella. Press the Nutella-coated sides together to form a sandwich.
3. Soak the Sandwich: Immerse the Nutella-stuffed sandwich in the egg mixture. Use a knife to gently press down, ensuring the bread absorbs the mixture thoroughly. Let it sit for 3-5 minutes before flipping to coat the opposite side. Don’t forget to soak the edges!
4. Cook to Perfection: Preheat a pan over medium heat and melt the butter. Once sizzling, add the soaked sandwich and cook for about 5 minutes on each side. You're aiming for a golden-brown exterior—crispy yet not burnt.
5. Serve and Enjoy: Sprinkle a dusting of powdered sugar over the top and serve immediately. This rich, indulgent breakfast pairs perfectly with a strong cup of black coffee.
6. Repeat: Follow the same steps for the second sandwich to share the love (or indulge even more if you're feeling extra hungry).

A Nostalgic Bite


Every bite of Nutella Stuffed French Toast brings back memories of lazy Sunday mornings at my grandmother's house. I remember watching her expertly whisk the egg mixture, her hands moving with a practiced ease that only years of love-filled cooking could achieve. The kitchen was always warm and inviting, filled with the sweet, comforting aroma of cinnamon and sugar. As kids, my siblings and I would eagerly wait at the table, our excitement barely contained as we watched her flip the toast, each slice puffing up just right.


These mornings taught me that food is more than sustenance; it's a vessel for love and memories. Sharing this dish with my family now, I hope to pass on that same sense of comfort and joy.


Difficulty Rating: 4/10


While this recipe is relatively simple, the key is patience and attention to detail—perfect for a leisurely weekend breakfast. It’s classified as a Main Dish, ideal for a brunch centerpiece or a decadent breakfast treat.

---


Nutella Stuffed French Toast isn't just a meal—it's a delightful experience, rich with the flavors of nostalgia and warmth. As you savor each bite, consider the memories you're creating, and who knows? Perhaps one day, your own family will look back on these mornings with fondness, just as I do.

Read more about Appetizers

Read more about Main Dishes

Read more about Desserts

Spinach & Toasted Pumpkin Seed Pesto Pasta | Made by Meaghan Moineau

Spinach & Toasted Pumpkin Seed Pesto Pasta | Made by Meaghan Moineau

Spinach & Toasted Pumpkin Seed Pesto Pasta: A Taste of Home in Every Bite


Description: Discover the delightful harmony of flavors in our Spinach & Toasted Pumpkin Seed Pesto Pasta. This main dish is an exquisite combination of tender chicken, vibrant spinach, and nutty pumpkin seeds, all enveloped in a creamy pesto sauce. Perfect for a family gathering or a cozy weekday dinner, this recipe is sure to transport you back to cherished family meals filled with laughter and love.

---


A Family Tradition on a Plate


There's something magical about a dish that can evoke memories of family gatherings and joyful times spent around the dinner table. For me, Spinach & Toasted Pumpkin Seed Pesto Pasta isn't just a recipe; it's a nostalgic journey back to my grandmother's warm kitchen, where the scent of lemon and garlic danced in the air, and the sounds of clinking cutlery and laughter filled the room.


Growing up, family dinners were a cherished tradition. My grandmother had an incredible knack for turning simple ingredients into something extraordinary, and this pasta dish was one of her specialties. I remember watching her skillfully toast pumpkin seeds until they were golden and fragrant, a ritual that always fascinated me. The kitchen would come alive with the vibrant green of baby spinach and parsley, while the zest of fresh lemon added a burst of sunshine to her pesto.


Each time I prepare this dish, I'm reminded of those special evenings spent with family. The recipe has become a staple in our household, a comforting reminder of where we've come from and the shared moments that bind us together.


Ingredients


- 2 chicken breast halves


- Juice of 1 lemon


- Cooking fat (such as olive oil or butter)


- Dry salt


- 4 cups baby spinach


- Zest of 1 lemon


- 1/2 cup olive oil


- 3 green scallions, chopped


- 3 cloves garlic


- 1/2 cup pumpkin seeds


- 1/4 cup fresh parsley


- Salt to taste


- 12 oz colorful pasta


- 1/2 tbsp coarse salt


- Shavings of parmesan for serving


Instructions


1. Cook the Pasta:

- Begin by boiling water in a large pot. Add a pinch of salt and a drizzle of olive oil to prevent the pasta from sticking. Once the water is boiling, add the pasta, stir, and reduce the heat to medium. Cook according to package instructions, usually 9-12 minutes. Drain and set aside.


2. Prepare the Chicken:

- While the pasta is cooking, heat cooking fat in a skillet over medium heat. Season the chicken breast halves with salt, pepper, and dry oregano. Place the chicken in the heated skillet and cook for 1 minute on each side.


- Add the juice of 1 lemon to the skillet, reduce the heat to medium/low, and continue cooking, turning occasionally, until fully cooked (about 10-12 minutes). Set aside.


3. Toast the Pumpkin Seeds:

- If toasting pumpkin seeds, sprinkle 1/2 tbsp of coarse salt in a small skillet over medium heat. Add the pumpkin seeds and toast for a few minutes, stirring frequently, until they crack and turn golden. Turn off the heat and let them cool in the skillet. Remove seeds from the salt before using.


4. Make the Pesto:

- Reserve 1-2 tbsp of pumpkin seeds for garnish. Combine the remaining pumpkin seeds, baby spinach, lemon zest, olive oil, scallions, garlic, parsley, and a pinch of salt in a food processor. Pulse a few times, then blend until the pesto reaches a pancake batter-like consistency. Add more olive oil or lemon juice if needed.


5. Assemble the Dish:

- Slice or dice the cooked chicken breasts. In serving bowls, layer the pasta, chicken, pesto, a sprinkle of pumpkin seeds, and shaved parmesan.


A Dish to Savor


This Spinach & Toasted Pumpkin Seed Pesto Pasta is more than just a meal; it's a tribute to the family traditions that bring us together. As you take your first bite, savor the blend of flavors and the memories they inspire. And for a fun challenge, try saying "Spinach & Pumpkin Seed Pesto Chicken Pasta Bowl" three times fast—it's as delightful as the dish itself!


Difficulty: 6/10
Category: Main Dish

Enjoy this culinary journey, and may it fill your home with the warmth and love of family traditions, just as it has mine.

Read more about Appetizers

Read more about Main Dishes

Read more about Desserts

Flank Steak with Herbed Salsa | Made by Meaghan Moineau

Flank Steak with Herbed Salsa | Made by Meaghan Moineau

Title: Flavors of Nostalgia: Flank Steak with Herbed Salsa
Description: Dive into the vibrant flavors of our Flank Steak with Herbed Salsa recipe—a simple yet flavorful main dish that will transport you back to cherished family gatherings. With a difficulty rating of 5 out of 10, this dish combines succulent steak with a zesty, herbed salsa, offering a perfect blend of spices and memories.

---


A Taste of Tradition: Flank Steak with Herbed Salsa


In the heart of many families, certain dishes become synonymous with special occasions, weaving themselves into the fabric of shared experiences and stories. For me, Flank Steak with Herbed Salsa is more than just a meal; it's a tapestry of summer barbecues, laughter-filled evenings, and the unmistakable aroma of grilled perfection that lingers in the air.


Ingredients:


- 1 bunch of cilantro, finely chopped


- 3 tablespoons extra virgin olive oil


- 1 1/2 pounds flank steak


- 1 garlic clove, minced


- 1 whole jalapeno, finely chopped


- Juice of 1 lemon


- Juice of 1 lime


- Salt and freshly ground pepper, to taste


- 3 white scallions, thinly sliced


- 2 large tomatoes, diced


Instructions:


1. Prepare the Grill: Preheat a grill pan or light a grill to get it nice and hot.
2. Make the Herbed Salsa: In a medium bowl, combine the tomatoes, scallions, cilantro, jalapeno, garlic, lemon juice, and lime juice. Season the salsa with salt and freshly ground pepper to taste. Let it sit, allowing the flavors to meld together beautifully.
3. Season the Steak: Generously season the flank steak on both sides with salt and pepper.
4. Grill the Steak: Brush a light coat of extra virgin olive oil on the grill pan. Place the pan over high heat. Once hot, add the flank steak. Cook until it’s beautifully charred on the outside and medium-rare on the inside, approximately 3 minutes per side.
5. Rest and Serve: Transfer the steak to a carving board and let it rest for 5 minutes. This rest period is crucial as it helps the juices redistribute, making each bite tender and juicy. Thinly slice the steak across the grain and serve with a generous helping of herbed salsa.

A Nostalgic Family Memory:


Growing up, weekends were a time for family gatherings. My parents would host impromptu barbecues, inviting neighbors and friends to join in the festivities. The star of these gatherings was always my dad's Flank Steak with Herbed Salsa. As the grill sizzled, I would watch him expertly flip the steak, while the air filled with the mingling scents of garlic, citrus, and charred meat.


One evening stands out vividly in my memory. It was the Fourth of July, and our backyard was aglow with fairy lights and the crackling of fireworks in the distance. As we all gathered around the table, my dad served the flank steak, its juices glistening under the patio lights. With each bite, the flavors danced on our tongues, a perfect symphony of spice and zest. It was a meal that brought us all together, a reminder of the simple joys of good food and great company.


Difficulty Rating: 5/10


This dish is classified as a Main Dish—perfect for those looking to impress with minimal effort. The recipe’s moderate difficulty ensures that even novice cooks can achieve a restaurant-quality meal right at home.

---


Embrace the nostalgia and let this Flank Steak with Herbed Salsa become a staple in your own family’s culinary traditions. Whether it’s a special occasion or a casual weeknight dinner, this dish promises to bring warmth and flavor to your table.

Read more about Appetizers

Read more about Main Dishes

Read more about Desserts

Chilled Swiss Oatmeal | Made by Meaghan Moineau

Chilled Swiss Oatmeal | Made by Meaghan Moineau

Title: A Nostalgic Dive into Chilled Swiss Oatmeal: A Perfect Start to Your Day
Description: Discover the delightful simplicity of Chilled Swiss Oatmeal, a nutritious breakfast option that's rich in flavor and memories. This easy-to-make dish combines the wholesome goodness of oatmeal with the refreshing taste of fresh fruits and the crunch of walnuts. Perfect for busy mornings or leisurely brunches, it's a dish that will have you reminiscing about cherished family moments with every bite.

---


A Wholesome Morning with Chilled Swiss Oatmeal

There's something truly special about waking up to the comforting taste of Chilled Swiss Oatmeal. This delightful breakfast dish, rich in flavors and textures, has been a beloved staple in my family for generations. Easy to prepare and perfect for those who adore a nutritious start to their day, it's a recipe that brings both health and happiness to the table.


The Ingredients of Joy

To create this masterpiece, you'll need old-fashioned oatmeal, low-fat plain vanilla yogurt, and milk. These form the creamy base of our dish. Fresh slices of apple and banana, along with dried cranberries, infuse the oatmeal with a burst of natural sweetness and tang. Finally, a generous sprinkle of walnuts adds the perfect finishing touch, providing a satisfying crunch and a dose of heart-healthy fats.


Instructions for a Perfect Swiss Oatmeal

1. In a small bowl, combine the oatmeal, yogurt, and milk. Stir until well mixed. For best results, let this mixture sit for a few minutes or, ideally, several hours in the refrigerator.


2. Once chilled, add the freshly chopped apple and banana to the mix, along with the dried cranberries. Stir until all ingredients are well combined.


3. Just before serving, top with a handful of walnuts for added crunch and flavor.


*Note:* For the ultimate taste experience, allow the oatmeal to sit overnight. Add the fresh fruits right before serving to ensure they remain crisp and vibrant.


A Sprinkle of Nostalgia

This dish always takes me back to cozy Sunday mornings at my grandmother's house. I remember waking up to the aroma of freshly brewed coffee and the sight of my grandmother bustling around the kitchen, preparing breakfast for the family. Her Chilled Swiss Oatmeal was the highlight of those mornings, served with love and a side of warm smiles.


The anticipation of digging into a bowl of this chilled delight was almost as enjoyable as the taste itself. As children, my siblings and I would gather around the table, eagerly awaiting our turn to add our favorite toppings. For me, it was always a little extra walnut crunch. These breakfasts were more than just meals; they were family bonding sessions filled with laughter, stories, and the occasional playful banter.


Difficulty Rating and Classification
Difficulty: 3/10
Classification: Appetizer

Chilled Swiss Oatmeal is not just a dish; it's a journey back to simpler times, a reminder of the love and warmth shared around the breakfast table. Whether you're making it for yourself or sharing it with loved ones, this recipe is sure to become a cherished part of your morning routine. So, go ahead and indulge in the nostalgic flavors of Chilled Swiss Oatmeal, and create new memories with every delicious spoonful.

Read more about Appetizers

Read more about Main Dishes

Read more about Desserts

Farfalle with Shrimps, Tomatoes Basil Sauce | Made by Meaghan Moineau

Farfalle with Shrimps, Tomatoes Basil Sauce | Made by Meaghan Moineau

Title: Farfalle with Shrimps and Tomato Basil Sauce: A Taste of Summer Evenings
Description: Dive into the vibrant flavors of a quintessential Italian dish, Farfalle with Shrimps and Tomato Basil Sauce. This delightful recipe combines the tenderness of fresh shrimps with the aromatic charm of basil and tomatoes, creating a symphony of flavors that whisk you away to warm, sunlit family gatherings. Simple yet sophisticated, this main dish is a culinary ode to cherished memories and is perfect for bringing a touch of nostalgia to your dinner table.

---


Farfalle with Shrimps and Tomato Basil Sauce: A Culinary Journey Back in Time

There’s something truly magical about a dish that can transport you back to a cherished moment in time. For me, Farfalle with Shrimps and Tomato Basil Sauce is not just a meal—it’s a portal to warm summer evenings spent in my grandmother’s cozy kitchen, where the aroma of fresh basil and sizzling butter filled the air.


Ingredients:

- 2 tablespoons of butter


- 400g Farfalle pasta by Barilla


- A handful of fresh basil leaves, roughly torn


- Freshly ground black pepper and salt to taste


- 500g fresh shrimps, cleaned and deveined


- 4 ripe tomatoes, diced


Instructions:

1. Bring a large pot of salted water to a boil and cook the Farfalle pasta according to the package instructions, ensuring it is al dente.


2. While the pasta is cooking, melt the butter in a large frying pan over medium-high heat. Add the diced tomatoes and sauté for about 1 minute, allowing them to release their juices and meld with the butter.


3. Add the cleaned shrimps to the pan and cook until they turn a light pink, which should take about 3-4 minutes. Sprinkle with freshly ground black pepper and salt to taste.


4. Gently stir in the fresh basil leaves, allowing their fragrant oils to infuse the sauce.


5. Once the pasta is ready, drain it and add it directly to the skillet with the shrimps and tomato mixture. Add an extra pat of butter for richness and toss everything together until well combined.


6. Serve immediately while hot, and enjoy a dish that is as comforting as it is delicious.


A Nostalgic Tale:

Growing up, every Sunday was a celebration of family, food, and laughter. My grandmother, a woman whose heart was as vast as her culinary skills, had a way of turning simple ingredients into masterpieces. Her Farfalle with Shrimps and Tomato Basil Sauce was a staple at our gatherings, a dish that brought everyone to the table with eager anticipation.


I remember sitting by the kitchen counter, watching her nimble fingers deftly chop tomatoes and basil picked fresh from her garden. The air would be filled with stories of her own childhood, tales that danced through the kitchen as we waited for the water to boil and the butter to melt.


Each bite of this dish was like a hug from her—a reminder of the love and care she poured into everything she did. Even now, as I recreate this recipe in my own kitchen, I can almost hear her laughter and feel the warmth of those summer evenings. It’s a dish that not only satisfies the palate but also nourishes the soul, reminding me that food is one of the greatest ties that bind us to our past.


Difficulty: 4/10
Classification: Main Dish

Whether you're an experienced chef or a novice in the kitchen, this Farfalle with Shrimps and Tomato Basil Sauce is a delightful journey into the heart of Italian cuisine, rich with flavor and steeped in tradition. It's a meal that invites you to create your own memories, to share stories, and to savor the simple joys of life. Enjoy!

Read more about Appetizers

Read more about Main Dishes

Read more about Desserts

Chicken-Tortilla Chip Soup | Made by Meaghan Moineau

Chicken-Tortilla Chip Soup | Made by Meaghan Moineau

Title: Warm Your Soul with Chicken-Tortilla Chip Soup - A Bowl of Comfort and Memories
Description: Dive into the heartwarming world of Chicken-Tortilla Chip Soup, a delightful concoction that not only satisfies your taste buds but also stirs up cherished family memories. With a simple preparation process and rich flavors, this dish is perfect for both beginner and seasoned cooks alike. Discover the secret to this comforting main dish and the nostalgia it brings to the table.

---


As the leaves begin to change color and a crisp breeze fills the air, there's nothing quite like a warm bowl of soup to bring comfort to your soul. Our Chicken-Tortilla Chip Soup is more than just a meal; it's a heartfelt connection to cherished family moments, steeped in tradition and love.


Ingredients:

- Water


- Chicken breasts


- Bouillon cubes


- Diced carrots


- Diced cilantro


- Lawry's seasoned salt


Instructions:

1. In a large pot, combine the water, chicken breasts, bouillon cubes, diced carrots, diced cilantro, and Lawry's seasoned salt.


2. Bring the mixture to a boil, then reduce the heat to a simmer.


3. Allow the soup to cook for 30-40 minutes, letting the flavors meld together beautifully.


4. When ready to serve, garnish each bowl with crunchy corn chips, a generous sprinkle of Monterey Jack cheese, and slices of creamy avocado.


A Nostalgic Journey:

Every time I prepare this Chicken-Tortilla Chip Soup, I am transported back to my grandmother's cozy kitchen. She had a special way of turning simple ingredients into a meal that felt like a warm embrace. The aroma of simmering chicken and spices would fill the house, drawing everyone to the table with eager anticipation.


I remember one chilly autumn evening, the family gathered around the table, sharing laughter and stories, as the soup pot bubbled gently on the stove. My grandmother, with her infectious smile, would remind us that the secret ingredient to any great dish was a pinch of love. As we savored each spoonful of the hearty soup, topped with crunchy corn chips and gooey cheese, it was clear that her secret ingredient worked its magic.


These memories of togetherness and joy have become an integral part of my own kitchen. Now, I make this soup for my family, hoping to create the same kind of cherished moments that I was fortunate enough to experience.


Difficulty: 3/10

This recipe is straightforward and perfect for those just starting out in the kitchen or seasoned cooks looking for a quick, delicious meal.


Classification: Main Dish

Whether it’s a busy weeknight or a leisurely weekend meal, Chicken-Tortilla Chip Soup is a versatile main dish that never fails to delight. Gather your loved ones and create new memories with this comforting bowl of goodness. Enjoy!

Read more about Appetizers

Read more about Main Dishes

Read more about Desserts

I Like My Peas with Pancetta | Made by Meaghan Moineau

I Like My Peas with Pancetta | Made by Meaghan Moineau

I Like My Peas with Pancetta: A Delightful Dance of Flavors and Memories


Description

Discover a timeless family classic with "I Like My Peas with Pancetta," where tender peas meet savory pancetta in a symphony of flavors. This dish, enriched with the freshness of cherry tomatoes and the aromatic embrace of garlic and onion, is not just a meal — it's a memory on a plate. Perfect for those nostalgic moments when food brings the family together, this appetizer is both simple and delightful, with a difficulty rating of 4 out of 10. Join us on a journey of taste and tradition, and learn how to create a dish that has been a staple in our family gatherings.

Ingredients

- 1 cup sweet fresh green peas

- 4 oz guanciale or pancetta, diced


- 1 medium onion, finely chopped


- 2 cloves garlic, minced


- 1 cup cherry tomatoes, halved


- 1 tablespoon red wine vinegar


- Fresh parsley, chopped


- Salt & pepper to taste


- Extra virgin olive oil


Instructions

1. Prepare the Peas: Bring a medium pot of water to a boil. Once boiling, add the peas and blanch for 2-3 minutes until they are half-cooked. Strain and reserve a spoonful of the pea-water.
2. Sauté the Pancetta: In a medium skillet over medium-low heat, slowly render down the diced pancetta for 4-5 minutes, ensuring it does not become crispy. If it begins to brown, remove the pan from the heat or lower the flame.
3. Aromatic Base: Add the minced garlic and chopped onion to the skillet. Sauté for 5-6 minutes until the onion is soft and translucent. For a vegetarian twist, simply omit the pancetta and sauté the onions and garlic in olive oil.
4. Enhance with Tomatoes: When the onions and garlic are nearly ready, add the cherry tomatoes to the skillet. Allow the flavors to meld together.
5. Combine and Cook: Toss the blanched peas into the skillet with the pancetta mixture. Add a spoonful of the reserved pea-water. Cook until the peas are tender yet still slightly firm to the bite. Adjust the seasoning with salt and pepper to your taste.
6. Finishing Touches: Just before serving, toss in the fresh parsley and drizzle with a generous amount of high-quality extra virgin olive oil.

A Family Memory

Growing up, "I Like My Peas with Pancetta" was more than just a dish; it was a cherished family tradition. Every summer, as the days grew longer and the sun kissed the earth with warmth, my grandmother and I would gather in her sunlit kitchen. She would hand me a basket of freshly picked peas from her garden, their sweetness a testament to her green thumb.

As we shelled peas together, she would recount stories of her childhood in the Italian countryside, where this humble dish was a staple at family gatherings. The aroma of pancetta sizzling on the stove and the vibrant colors of the fresh ingredients created a symphony that filled the kitchen with love and laughter.


Preparing this dish now transports me back to those carefree days, reminding me of the timeless bond between family and food. It's a reminder that, sometimes, the simplest ingredients create the most enduring memories.


Conclusion

"I Like My Peas with Pancetta" is an appetizer that brings together the richness of tradition and the simplicity of fresh ingredients. With its easy preparation and delightful flavors, it holds a special place at any family table. Whether you're enjoying it with loved ones or savoring it alone, this dish is a celebration of culinary heritage, perfect for any occasion.

Read more about Appetizers

Read more about Main Dishes

Read more about Desserts

Mardi Gras Shrimp Étouffée | Made by Meaghan Moineau

Mardi Gras Shrimp Étouffée | Made by Meaghan Moineau

Title: Celebrate Mardi Gras with a Classic Shrimp Étouffée Recipe
Description: Dive into the vibrant flavors of New Orleans with our Mardi Gras Shrimp Étouffée recipe. This classic dish combines perfectly seasoned shrimp with a rich, savory sauce, served over fluffy rice. Whether you're celebrating Mardi Gras or simply craving some Southern comfort, this dish is sure to delight. Plus, discover a heartwarming family memory that makes this dish even more special.

---


Mardi Gras Shrimp Étouffée: A Flavorful Journey to New Orleans


Mardi Gras is a time of celebration, vibrant colors, and tantalizing flavors. It's that time of year when the streets of New Orleans come alive with parades, music, and culinary delights that captivate the senses. One dish that stands out among the festive foods is the classic Shrimp Étouffée. With its rich blend of spices and succulent shrimp, this dish is the perfect way to bring a taste of Mardi Gras into your home.


Ingredients:


- 4 tablespoons butter


- 4 tablespoons flour


- 2 green bell peppers, diced


- 3 celery stalks, diced


- 1 large yellow onion, diced


- 3 garlic cloves, minced


- 1 teaspoon dried thyme


- 2 tablespoons tomato paste


- 1 tablespoon Worcestershire sauce


- 2 tablespoons Creole seasoning


- 2 cups chicken broth


- 1 pound shrimp, peeled and deveined


- 1 tablespoon butter


- 3 scallions, sliced


- 1 diced fresh tomato


- Cooked rice for serving


Instructions:


1. Prepare the Roux: Heat a heavy pot over low heat. Add the butter and cook for about 10-12 minutes until it turns a light golden brown, stirring occasionally to prevent burning. Whisk in the flour until smooth, continuing to cook for about 8 minutes on low. The mixture should resemble slightly loose peanut butter.
2. Cook the Vegetables: Add in the diced bell peppers, celery, and onion. Stir to coat the veggies with the roux. Cook for another 10-15 minutes until softened.
3. Enhance the Flavor: Stir in the minced garlic and dried thyme, cooking for about a minute until fragrant. Add the tomato paste, Worcestershire sauce, Creole seasoning, and chicken broth. Simmer on low for 30-40 minutes, stirring occasionally, until the sauce is slightly thickened.
4. Add the Shrimp: Stir in the shrimp, turn off the heat, and cover with a lid. Allow the shrimp to cook for 5-8 minutes until they're just cooked through. Finish with an additional tablespoon of butter for added richness.
5. Serve and Garnish: Serve the Shrimp Étouffée over a bed of cooked rice. Garnish with sliced scallions and fresh diced tomato.

A Nostalgic Family Memory:


Growing up, Mardi Gras was more than just a festival; it was a cherished family tradition. Every year, my grandmother would gather the family in her cozy kitchen to prepare her famous Shrimp Étouffée. The air would be filled with laughter, stories, and the aroma of simmering spices. As a child, I remember being entrusted with the "important" job of stirring the roux, feeling a sense of pride as I watched the mixture transform.


Grandma would recount tales of her own childhood in New Orleans, weaving stories of parades and jazz into the fabric of our meal. To this day, whenever I make Shrimp Étouffée, I am transported back to those joyful gatherings, and I feel a connection to the generations before me who celebrated with this same beloved dish.


Difficulty Rating: 6/10


Classification: Main Dish


Bring the spirit of Mardi Gras into your home with this Shrimp Étouffée recipe. It's a dish that not only delights the taste buds but also warms the heart with its rich history and family ties. Enjoy and laissez les bons temps rouler! (Let the good times roll!)

Read more about Appetizers

Read more about Main Dishes

Read more about Desserts

Beef Cottage Pie | Made by Meaghan Moineau

Beef Cottage Pie | Made by Meaghan Moineau

Title: "Hearty Beef Cottage Pie: A Savory Comfort to Warm Your Soul"
Description: Discover the rich, savory flavors of Beef Cottage Pie, a dish that combines hearty ingredients and nostalgic memories to deliver comforting warmth with every bite. Perfect for family gatherings or a cozy night in, this main dish is as delightful to make as it is to eat.

---


Introduction

There's something truly special about a dish that brings back cherished memories while filling your home with an inviting aroma. Beef Cottage Pie is one of those dishes for me—a hearty meal that not only satisfies your taste buds but also warms your heart. Today, I’m excited to share this beloved recipe that has been a staple in my family for generations.


Ingredients:

- 1 pound of lean ground beef


- 1 cup of yellow diced onions


- 1 cup of diced celery


- 2 cloves of garlic, minced


- 1 teaspoon of fresh thyme


- 2 tablespoons of Worcestershire sauce


- 1 tablespoon of vegetable oil


- 1 cup of frozen vegetables (like peas, carrots, and corn)


- 1 cup of beef gravy


- 4 cups of mashed potatoes


- 1/4 cup of parmesan cheese


- Salt and pepper to taste


Instructions:
1. Preheat your oven to 375 degrees Fahrenheit.
2. Prepare the Vegetables: In a large skillet, heat the vegetable oil over medium heat. Add the diced onions, celery, and minced garlic. Cook until the vegetables are translucent but not browned, about 5-6 minutes. Remove to a clean dish.
3. Brown the Beef: In the same skillet, add the ground beef and cook until browned. Use a large spoon to discard any excess fat or grease.
4. Combine Ingredients: Return the onion, celery, and garlic mixture to the skillet with the beef. Stir well. Add the Worcestershire sauce and fresh thyme, cooking for an additional minute. Stir in the frozen vegetables and beef gravy, cooking for another 2-3 minutes. Season with salt and pepper to taste.
5. Assemble the Pie: Spray a large casserole dish with cooking spray. Pour the beef and vegetable mixture into the dish, spreading it evenly. Spoon the mashed potatoes over the top, carefully spreading to create an even layer. Sprinkle the parmesan cheese all over.
6. Bake: Place the dish in the preheated oven and bake for 25-30 minutes. Turn the oven broiler on and brown the top of the Cottage Pie until it turns an even golden brown color.
7. Serve: Remove from the oven and allow to set for 5-10 minutes before serving. Enjoy!
A Nostalgic Family Memory:

Growing up, Sunday dinners were a sacred time in my family. After church, my grandmother would welcome us into her warm, aromatic kitchen with a smile that rivaled the sun. Her Beef Cottage Pie was always the centerpiece of our gatherings. I remember sitting at the kitchen table, eagerly watching as she carefully spread the mashed potatoes over the beef mixture, her hands moving with grace and familiarity. Each bite of her Cottage Pie was a taste of home—rich with savory beef, creamy potatoes, and a sprinkle of love that only a grandmother could provide. Those Sundays, filled with laughter and stories, are a treasured part of my childhood, and this recipe is my way of keeping her spirit alive.


Difficulty Level: 4/10
Classification: Main Dish

---


Whether you're looking to create new memories or rekindle old ones, this Beef Cottage Pie is a timeless dish that promises comfort and satisfaction. Enjoy the process, savor the flavors, and most importantly, share it with those you love.

Read more about Appetizers

Read more about Main Dishes

Read more about Desserts

Coffee sold by major budget retailer recalled in 48 states for potential glass fragments – Syracuse.com | Analysis by Brian Moineau

Coffee sold by major budget retailer recalled in 48 states for potential glass fragments – Syracuse.com | Analysis by Brian Moineau

Coffee and Crunch: When Your Morning Brew Comes with Unexpected Surprises

Picture this: it’s a brisk autumn morning, and you’re reaching for your favorite morning brew to kickstart your day. As you pour that much-needed cup of joe, you can’t help but anticipate the rich aroma and comforting warmth that will soon envelop you. But wait—what’s that crunch? Suddenly, your coffee experience includes an uninvited guest: the dreaded glass fragment. Welcome to the latest installment of “When Good Mornings Go Bad,” brought to you by a beloved budget retailer.

Yes, you read that right. Coffee sold by a major budget retailer has been recalled in 48 states due to the potential presence of glass fragments, as reported by Syracuse.com. Customers who purchased the affected coffee are advised to contact the retailer via phone or email for a full refund. It’s like a plot twist in a suspense novel, except it’s happening right in your kitchen.

Before you panic and toss your entire coffee stash, it’s worth noting that recalls are not uncommon in the food and beverage industry. In fact, they serve as a vital safety net, ensuring that any potential hazards are swiftly addressed. Just last year, a popular brand of frozen berries was recalled due to possible Hepatitis A contamination. And who can forget the infamous romaine lettuce recall of 2018? These incidents, while alarming, highlight the importance of vigilance and prompt action in maintaining consumer safety.

In a world where unexpected surprises are the norm, the glass-in-coffee saga joins a growing list of recent recalls. The fast-food giant Taco Bell recently made headlines for recalling over 2.3 million pounds of seasoned beef over concerns it contained metal shavings. These incidents remind us that even the most established brands can face hiccups in quality control.

But let’s pivot back to our morning cup of coffee. The allure of a budget-friendly brew is undeniable, especially when inflation seems to be the buzzword of the year. With prices soaring from the grocery store aisles to the gas pumps, finding a good deal on your daily caffeine fix can feel like winning the lottery. Yet, as this recall reminds us, sometimes you get what you pay for—and occasionally, a little extra.

As consumers, it’s essential to stay informed and proactive. Checking recall notices, understanding return policies, and keeping an eye on product updates can help prevent any unwanted breakfast surprises. Plus, it’s always a good idea to have a backup plan for your caffeine needs. Perhaps it’s time to finally try that trendy matcha latte or explore the world of herbal teas.

In the grand scheme of things, a coffee recall might seem like a small blip on the radar. But it’s a timely reminder of the importance of quality and safety in the products we consume daily. So, next time you brew your morning coffee, take a moment to appreciate the journey it took to reach your mug—glass-free, of course.

Final Thought:
In a world filled with unpredictability, sometimes even the most mundane routines can surprise us. While a recall might temporarily disrupt your morning ritual, it’s also an opportunity to explore new flavors, support local coffee shops, or even experiment with brewing techniques at home. And remember, in the words of the great Johann Sebastian Bach: “Without my morning coffee, I’m just like a dried-up piece of roast goat.” Here’s to hoping your next cup of coffee is as smooth as your morning playlist. Cheers!

Read more about AI in Business

Read more about Latest Sports Trends

Read more about Technology Innovations


Related update: We recently published an article that expands on this topic: read the latest post.

One Bowl Jalapeno Cheddar Cornbread | Made by Meaghan Moineau

One Bowl Jalapeno Cheddar Cornbread | Made by Meaghan Moineau

Title: Spicing Up Tradition: One Bowl Jalapeno Cheddar Cornbread
Description: Discover the heartwarming blend of flavors in our One Bowl Jalapeno Cheddar Cornbread. This easy-to-make recipe is a delightful twist on a classic, blending spicy jalapenos with creamy cheddar and the comforting texture of cornbread. Perfect as an appetizer or side dish, this cornbread has a special place in our family gatherings.

---


Recipe: One Bowl Jalapeno Cheddar Cornbread
Difficulty: 3/10
Category: Appetizer / Side Dish

---


A Nostalgic Bite of Family Tradition


Every family has that one dish that feels like home—a recipe that transports you back to warm kitchens and laughter-filled dining rooms. For our family, that dish has always been Jalapeno Cheddar Cornbread. I remember my grandmother, her apron dusted with flour, humming to herself as she prepared this dish in her cozy kitchen. The air was always filled with the rich aroma of melting butter and the sharpness of cheddar cheese.


As a child, I would watch her, fascinated by the way she effortlessly mixed the ingredients in a single bowl. Her secret, she’d say with a wink, was the love she poured into every stir. As the bread baked, we’d all gather around the table, eagerly waiting for that first warm bite. The spicy kick of jalapenos combined with the creamy cheddar and sweet cornmeal was a taste that defined our family gatherings.


Ingredients


- 1 stick unsalted butter, melted


- 1 cup white sugar


- 2 large eggs


- 1 cup buttermilk


- 1 teaspoon baking soda


- 1 cup cornmeal


- 1 cup all-purpose flour


- 1/2 teaspoon salt


- 1 cup shredded cheddar cheese


- 1/2 cup canned diced jalapenos


- 1 fresh jalapeno, thinly sliced (for topping)


Instructions


1. Melt the Butter: Start by melting a stick of unsalted butter in a microwave-safe bowl. Microwave in 30-second intervals until fully melted.
2. Mix the Wet Ingredients: Whisk in the white sugar until well combined, followed by the eggs, ensuring the mixture is smooth.
3. Combine Buttermilk and Baking Soda: In a separate bowl, mix the buttermilk with baking soda, then pour this into the butter mixture. Stir until everything is well incorporated.
4. Incorporate the Dry Ingredients: Add cornmeal, flour, and salt to the mixture. Stir in the shredded cheddar cheese and canned diced jalapenos until just combined—be careful not to overmix.
5. Prepare the Oven and Pan: Preheat your oven to 375 degrees F. Prepare a mini loaf pan or an 8x8 pan with cooking spray.
6. Bake: Spoon the batter into the prepared pan. Top the batter with thinly sliced fresh jalapenos for an extra kick. Bake for about 25 to 35 minutes, depending on your pan size. Keep an eye on the cornbread as it bakes, and remove once a toothpick inserted comes out clean.
7. Cool and Serve: Let the loaves cool in the pan for a few minutes before transferring them to a cooling rack. Serve warm and enjoy the nostalgic blend of flavors that will surely become a staple in your family traditions.

Conclusion


This One Bowl Jalapeno Cheddar Cornbread isn't just a recipe; it's a piece of our family's story—a story of love, warmth, and shared meals. Whether you're making it for a holiday gathering or a simple weeknight dinner, this cornbread promises to bring a smile to your face and warmth to your heart. Serve it as an appetizer or side dish, and watch it become a beloved part of your own family's memories.

Read more about Appetizers

Read more about Main Dishes

Read more about Desserts

Quick N’ Easy Basil Pesto | Made by Meaghan Moineau

Quick N' Easy Basil Pesto | Made by Meaghan Moineau

Title: "Embrace the Flavors of Tradition: Quick N' Easy Basil Pesto Recipe"
Description: Dive into the rich, aromatic world of basil pesto with our Quick N' Easy recipe that promises to transport you back to cherished family gatherings. Whether you're a culinary novice or a seasoned home chef, this flavorful dish is sure to add a touch of nostalgia to your kitchen.

---


Quick N' Easy Basil Pesto: A Taste of Family Tradition

There's something undeniably comforting about the aroma of fresh basil mingling with the earthy tones of pine nuts and the pungent allure of garlic. For me, basil pesto isn't just a versatile condiment—it's a portal to sun-drenched summer afternoons spent in my grandmother's kitchen. It’s about the stories shared over the rhythmic hum of the food processor and the vibrant green concoction that would eventually grace our family table.


Ingredients:

- 2 cups fresh basil leaves


- 1/2 cup olive oil


- 1/3 cup pine nuts


- 2 cloves garlic


- 1/2 cup grated parmesan cheese


Instructions:

1. In a food processor, begin by adding a handful of fresh basil leaves, a drizzle of olive oil, a sprinkle of pine nuts, and a couple of garlic cloves.


2. Blend until the mixture starts to combine, then add the parmesan cheese.


3. Continue alternating the addition of ingredients, ensuring a smooth blend. If the pesto isn’t reaching the desired consistency, add more olive oil incrementally.


4. Use the pesto within 24 hours for optimal freshness, or freeze in plastic wrap-lined muffin cups for later use.


Difficulty Rating: 3/10
Classification: Appetizer
A Whiff of Nostalgia:

The first time I helped make basil pesto, I was perched on a stool, barely tall enough to see over the counter. My grandmother, with her gentle hands and warm smile, guided me through the process. She taught me the importance of patience and balance, of knowing just when to add more olive oil or sprinkle in a bit more cheese.


We would sit together, savoring the vibrant green pesto smeared over crusty bread, and she would tell me stories of her own childhood in the Italian countryside. Those afternoons were filled with laughter and learning, and while the pesto was delicious, it was the connection and love that made it truly special.


Today, whenever I make basil pesto, I’m reminded of those cherished moments. It’s amazing how a simple blend of ingredients can become a vessel for memories, transporting you to a different time and place.


Conclusion:

This Quick N' Easy Basil Pesto is more than just a recipe; it's an invitation to create your own memories. Perfect as an appetizer or to enhance your favorite dishes, it's a testament to the power of food in bringing people together. So, gather your loved ones, share stories, and enjoy the timeless flavors of basil pesto. Your taste buds—and your heart—will thank you.

Read more about Appetizers

Read more about Main Dishes

Read more about Desserts

Avocado Chocolate Bits Frozen Yogurt | Made by Meaghan Moineau

Avocado Chocolate Bits Frozen Yogurt | Made by Meaghan Moineau

Title: "Chilled Bliss: Avocado Chocolate Bits Frozen Yogurt"
Description: Discover the delightful fusion of creamy avocados and rich chocolate in a refreshing frozen yogurt treat. Perfect for warm days or as a nostalgic indulgence, this dessert is a unique twist on classic flavors that promises to captivate both avocado enthusiasts and chocolate lovers alike.

---


A Cool Treat with a Heartwarming Tale


When summer rolled around each year, the kitchen in my grandmother’s house became a sanctuary of cool, creamy delights. Amid the laughter of cousins and the clinking sounds of kitchen tools, one treat was always a centerpiece during our family gatherings: Avocado Chocolate Bits Frozen Yogurt. This isn’t just any dessert; it's a culinary embrace of memories, flavors, and generations.


A Nostalgic Family Story

I remember the first time my grandmother introduced this unique dessert. The air was filled with the scent of blooming flowers and distant laughter, as the sun set gently behind the old oak trees. We sat on the porch, ice cream bowls in hand, as my grandmother shared stories of her childhood in Baja California. She spoke of sunny afternoons spent in her mother's kitchen, where avocados were abundant and chocolate was a treasured luxury. Inspired by her own childhood memories, she created this frozen yogurt recipe, merging the creamy texture of avocados with the bittersweet allure of chocolate.


As we savored each spoonful, the flavors seemed to weave us into the tapestry of her past, connecting us to family roots that spanned continents and generations. The smoothness of the avocado paired with the slight crunch of chocolate bits created a symphony of tastes that was both exotic and comforting. Each bite was more than just a treat; it was a passage through time, a shared experience binding us together.


Ingredients:

- 2 cups whole milk


- 3/4 cup sugar


- 1 tsp vanilla extract


- 4 large egg yolks


- 2 cups plain whole-milk yogurt


- 2 firm-ripe avocados, peeled and pitted


- 1 tbsp fresh lemon juice


- 4 oz 70% bittersweet chocolate, chopped


- 1/2 cup sweetened condensed milk


Instructions:

1. In a medium saucepan, heat the whole milk and sugar over medium heat until it just comes to a boil, stirring occasionally. Stir in the vanilla extract.


2. Prepare an ice bath by filling a large bowl with ice. Set a small metal bowl over the ice with a strainer on top.


3. In a separate medium bowl, lightly beat the egg yolks. Slowly ladle some of the hot milk into the egg yolks, whisking to prevent curdling. Pour this egg mixture back into the saucepan with the remaining milk.


4. Cook over low-medium heat, stirring constantly, until the mixture thickens and can coat the back of a wooden spoon, approximately 4 to 8 minutes.


5. Pour the custard through the strainer into the small bowl over the ice bath. Stir in the yogurt and whisk until the mixture cools completely.


6. In a blender or food processor, puree the avocado meat with the lemon juice and some of the cooled custard. Combine this mixture with the remaining custard, blending until thick and creamy.


7. Freeze the custard in an ice cream maker according to the manufacturer's instructions. Halfway through the freezing process, fold in the chopped bittersweet chocolate.


8. Transfer the frozen yogurt into a freezer-safe container and freeze until solid, at least 4 hours.


Difficulty Rating: 7/10
Classification: Dessert

This Avocado Chocolate Bits Frozen Yogurt is a testament to the power of culinary creativity and the bonds of family. Its unique flavor combination is perfect for those who appreciate a twist on the traditional, offering a refreshing escape from the ordinary. As you prepare this recipe, I hope it brings you as much joy and connection as it has brought to my family over the years. Enjoy this delightful dessert and create your own cherished memories.

Read more about Appetizers

Read more about Main Dishes

Read more about Desserts

Cornish Game Hen with Whisky and Cream Pan Sauce | Made by Meaghan Moineau

Cornish Game Hen with Whisky and Cream Pan Sauce | Made by Meaghan Moineau

Title: "A Taste of Tradition: Cornish Game Hen with Whisky and Cream Pan Sauce"
Description: Discover the delightful blend of flavors in this Cornish Game Hen with Whisky and Cream Pan Sauce. This main dish is a journey through time, evoking cherished family memories with every bite. With its rich, savory sauce and tender, juicy meat, this recipe is perfect for special occasions or a nostalgic Sunday dinner. Rated a 6 out of 10 for difficulty, it's an achievable culinary adventure for home chefs looking to impress.

---


A Taste of Tradition: Cornish Game Hen with Whisky and Cream Pan Sauce

When I think of comfort food, my mind often drifts back to Sunday dinners at my grandmother's house. The warm, inviting aroma of roasting game hens would greet us at the door, mingling with the laughter and chatter of family gathered around the table. Those afternoons were filled with stories from the past, shared over a meal that was as much about connection as it was about flavor.


One of my all-time favorites from those gatherings was the Cornish Game Hen with Whisky and Cream Pan Sauce. This dish encapsulates a blend of rustic charm and refined taste, making it a standout at any family feast. The tender, succulent meat combined with the rich, creamy sauce creates a harmony of flavors that transports me back to those cherished family moments.


Ingredients:

- 2 Cornish game hens


- 2 tablespoons butter, divided


- Olive oil


- Salt and pepper, to taste


- 1 tablespoon Herbs de Provence


- 1 tablespoon unsalted butter


- 2 shallots, finely chopped


- 2 tablespoons Worcestershire sauce


- 2 teaspoons Dijon mustard


- 1 cup heavy cream


- 1 tablespoon fresh lemon juice


- 2 tablespoons whisky


Instructions:
1. Preheat and Prepare: Preheat your oven to 450°F (232°C) and position the rack in the middle. Begin by placing a hen, breast side down, on a cutting board. Using kitchen shears or a sharp knife, remove the backbone by cutting along both sides. Flip the hen and flatten it by pressing down on the breastbone with your palm. Split the hen into two along the breastbone. Repeat with the remaining hen.
2. Season and Roast: Arrange the hen halves on a heavy baking dish. On each half, spread 1/2 teaspoon of butter, a sprinkle of Herbs de Provence, salt, and pepper, and a drop of olive oil. Place the hens in the preheated oven and roast for 30 to 45 minutes. During cooking, occasionally poke the hens to release any juices. Once done, remove from the oven, place the hens in a dish, cover with aluminum foil, and let them rest.
3. Prepare the Pan Sauce: In a saucepan over medium heat, melt 1 tablespoon of unsalted butter. Add the chopped shallots and sauté until translucent. Stir in the Worcestershire sauce and Dijon mustard. Pour in the heavy cream and whisky, stirring to combine. Allow the sauce to simmer and thicken slightly before adding fresh lemon juice for a touch of brightness.
4. Serve: Once the hens have rested, serve them with a generous drizzle of the whisky and cream pan sauce. Pair with your favorite sides for a complete meal.
Nostalgia in Every Bite:

This dish isn't just about the flavors; it's a time capsule of family gatherings, bringing back memories of love, laughter, and shared stories. It's a reminder of how food can connect generations, preserving traditions and creating new ones.


Whether you're cooking for a special occasion or simply want to bring a touch of nostalgia to your dinner table, this Cornish Game Hen with Whisky and Cream Pan Sauce is a delightful choice. Rated a 6 out of 10 for difficulty, it's an accessible recipe that promises to impress both family and friends. Enjoy the taste of tradition and create memories with every bite.

Read more about Appetizers

Read more about Main Dishes

Read more about Desserts

Moon Pies | Made by Meaghan Moineau

Moon Pies | Made by Meaghan Moineau

Title: "Sweet Memories Under the Starry Sky: Crafting Perfect Moon Pies"
Description: Dive into the delightful world of homemade Moon Pies with this nostalgic recipe that promises sweet memories and irresistible flavors. Perfect for dessert lovers, this guide will walk you through each step to create these iconic treats, just like grandma used to make.

---


The Art of Crafting Moon Pies: A Nostalgic Journey

There’s a certain magic that fills the kitchen when Moon Pies are in the making. The smell of cocoa and vanilla intertwining, the gentle hum of the oven, and the anticipation of a sweet treat are enough to transport anyone back to simpler times. For me, these delectable treats are not just a dessert; they are a cherished family tradition that brings back memories of starry summer nights and laughter-filled gatherings.


Ingredients You’ll Need:

- 1/2 cup butter or margarine


- 1 cup white sugar


- 1 egg


- 1/2 cup evaporated milk


- 1 teaspoon vanilla extract


- 1 3/4 cups all-purpose flour


- 1/2 teaspoon salt


- 1/2 cup unsweetened cocoa powder


- 1/2 teaspoon baking soda


- 1/4 teaspoon baking powder


- 1/2 cup butter or margarine (for filling)


- 2 cups confectioners' sugar


- 1 teaspoon flavored extract


- 1 cup marshmallow creme


Instructions:
1. Preheat and Prepare: Begin by preheating your oven to 400 degrees F (200 degrees C). Lightly grease a cookie sheet to ensure your Moon Pies have the perfect base.
2. Create the Cookie Crusts: In a large mixing bowl, cream together 1/2 cup butter or margarine and white sugar until smooth. Add the egg, evaporated milk, and vanilla extract, mixing well to combine.
3. Mix the Dry Ingredients: In a separate bowl, whisk together the flour, salt, cocoa powder, baking soda, and baking powder. Gradually add the flour mixture to the sugar mixture, stirring just until all ingredients are combined.
4. Shape and Bake: Drop the dough onto the prepared cookie sheet by rounded tablespoonfuls, leaving at least 3 inches between each scoop. The dough will spread as it bakes. Bake in the preheated oven for 6 to 8 minutes, until the cookies are firm to the touch. Allow them to cool for at least an hour before proceeding.
5. Whip Up the Marshmallow Filling: In a medium mixing bowl, blend together 1/2 cup butter or margarine, confectioners' sugar, flavored extract, and marshmallow creme until smooth and creamy.
6. Assemble the Moon Pies: To assemble, spread 1 to 2 tablespoonfuls of the marshmallow filling on the flat side of a cooled cookie crust. Top with the flat side of another cookie crust, pressing gently to adhere.
A Nostalgic Tale:

Every summer, my family would gather at my grandparents' countryside home. The highlight of those visits was the night we spent outside, lying on blankets under the expansive sky, indulging in homemade Moon Pies. My grandmother would carefully craft these treats, her hands working the dough with practiced ease, while sharing stories of her childhood.


I remember the warmth of those evenings, the taste of the rich chocolate cookies paired perfectly with the sweet marshmallow filling, and the sound of crickets chirping in the background. As we bit into the Moon Pies, the gooey filling would sometimes ooze out, causing a chorus of laughter and sticky fingers. Those memories are wrapped delicately around each bite of these Moon Pies, reminding me of family, love, and the simple joys of life.


Difficulty Rating: 5/10
Classification: Dessert

Whether you're recreating a family tradition or starting a new one, these Moon Pies are sure to bring a touch of nostalgia and a lot of joy to your table. Enjoy making them, sharing them, and most importantly, savoring them under the glow of a moonlit sky.

Read more about Appetizers

Read more about Main Dishes

Read more about Desserts

Roast Chicken with Apples and Rosemary | Made by Meaghan Moineau

Roast Chicken with Apples and Rosemary | Made by Meaghan Moineau

Title: Aromatic Roast Chicken with Apples and Rosemary: A Taste of Family Tradition
Description: Discover the heartwarming flavors of Roast Chicken with Apples and Rosemary, a dish that brings a touch of tradition and a burst of freshness to your table. This recipe features juicy chicken infused with the aromatic blend of apples, rosemary, and lemon, perfect for a comforting family meal.

---


There’s something about the aroma of roast chicken wafting through the house that instantly transports me back to Sunday dinners at my grandmother’s home. The kitchen was always abuzz with activity, filled with laughter and the rich, inviting scents of family recipes passed down through generations. One dish that particularly stands out is our Roast Chicken with Apples and Rosemary—a recipe that not only warms the stomach but the heart.


This recipe is more than just a meal; it's a family tradition that has graced our table for as long as I can remember. My grandmother always insisted on using the freshest ingredients, and her kitchen was often stocked with the bounty from her own garden. The combination of apples and rosemary was her signature twist, adding a fragrant, slightly sweet, and earthy note to the classic roast chicken.


Ingredients:

- Fresh apples


- Onions


- Garlic


- Fresh rosemary


- Lemons


- Raimondo Sicilian Lemon Balsamic Vinegar


- Seasoning (for rub)


- Roasting chickens


- Canned stock


Instructions:

1. Preheat your oven to 400 degrees Fahrenheit and position a rack in the lower third of the oven.


2. Rinse the chicken thoroughly, then dry it well with paper towels, both inside and out.


3. In a shallow roasting pan, arrange apples, rosemary, lemons, onions, and garlic in a single layer. Season with salt and pepper, toss well, and pour in the balsamic vinegar.


4. Season the chicken generously with the prepared rub. Place it breast-side-up on top of the fruits and vegetables. Stuff the cavity of the chicken with the remaining fruits and veggies.


5. Roast the chicken for 30 minutes until the breast is firm and just beginning to brown. Using tongs, turn the chicken breast-down and continue roasting for another 20 minutes until the skin is lightly browned and an instant-read thermometer registers 175-180°F.


6. Tilt the chicken to drain cavity juices into the pan. Remove the chicken and set it aside on a cutting board.


7. Remove the rack from the pan and spoon off any excess fat. Set the pan over high heat, add the stock, and cook while scraping up any browned bits.


8. Squeeze the last lemon over the sauce to release its juices. Carve the chicken and serve with the chunky jus.


Nostalgic Family Memory:

I remember the first time I was allowed to help with this dish. I was about ten, and my grandmother guided me through each step with patience. We plucked fresh rosemary from her garden, its heady aroma filling the air as we gathered the sprigs. My favorite part was always arranging the apples and onions in the pan—their sweetness mingling with the sharpness of garlic and the zest of lemon. As we worked, she shared stories of her own childhood, of family gatherings filled with love and laughter, of recipes carried over from the old country. Those afternoons spent cooking with her taught me more than just how to prepare a meal; they taught me the importance of family traditions and the joy of sharing them.


Difficulty: 6/10
Classification: Main Dish

This Roast Chicken with Apples and Rosemary is not just a main dish; it’s a culinary journey that celebrates family, tradition, and the simple joys of home-cooked meals. Whether you’re creating new memories or reminiscing about the past, this dish is sure to become a beloved staple in your family’s recipe collection.

Read more about Appetizers

Read more about Main Dishes

Read more about Desserts