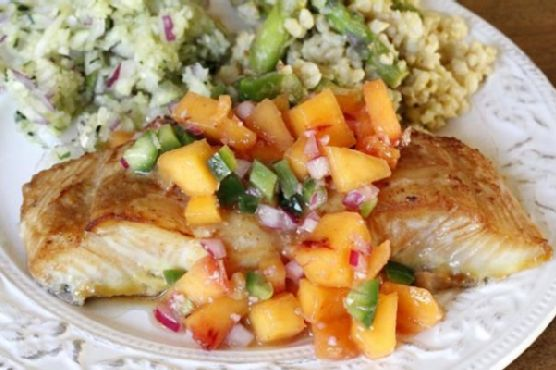
Picture this: it’s a Wednesday evening, my fridge looks like a ghost town except for a couple of halibut fillets staring back at me, and I’m craving something a bit more exciting than the usual mid-week fare. I’m also avoiding another last-minute dash to the store because, you know, life. So, I decided to bring some brightness and zing to the table with a Soy Ginger Glazed Halibut, topped with a Ginger Peach Relish that’s basically summer in a spoon. This recipe is the answer to impressing your taste buds without needing a culinary degree—or a packed pantry. Easy yet striking, this dish is the perfect combo of sweet, spicy, and savory. Trust me, you’ll want to keep this one in your recipe stash.
Jump to Recipe
What You’ll Need
Chances are, you already have most of what you need for this dish in your kitchen, especially if you’re a fan of Asian-inspired flavors. Here’s what to gather:
- Halibut fillets – the star of the show, make sure they’re nice and fresh
- Fresh ginger – adds that spicy zing we all love
- Soy sauce – for that umami depth
- White wine – adds a touch of elegance and acidity
- Olive oil – a smooth base for our marinade
- Peach – sweet and juicy, perfect for the relish
- Red onion – brings in a sharp, savory note
- Jalapeno – for a kick of heat
- Apple cider vinegar – a tangy counterbalance
- Lime – freshens everything up
How to Make Soy Ginger Glazed Halibut with Ginger Peach Relish
- Peel and roughly chop a piece of fresh ginger. You’re looking for that sharp, spicy aroma to fill your kitchen. Place all marinade ingredients—soy sauce, white wine, olive oil, and 1 tablespoon of chopped ginger—in a blender and blend until smooth. This ensures the ginger infuses its flavor beautifully.
- In a zip-lock bag or bowl with a secure cover, add the halibut fillets and pour in the marinade. Massage the bag gently to ensure the fillets are fully coated. Let them soak up all that goodness for at least 20 minutes, though a few hours would make them sing.
- Preheat your oven to broil. Once heated, place the fish in a casserole dish along with all the marinade. Set the dish on one of the top racks and bake for about 10-12 minutes. You’re aiming for a nice brown glaze on top and perfectly cooked-through fish.
- For the relish, chop up the peach, red onion, and jalapeno. Combine them in a bowl with apple cider vinegar, the juice of half a lime, and 1 tablespoon of ginger. Stir and refrigerate. The longer it sits, the more the flavors meld into a vibrant accompaniment.
Cook’s Notes
Let’s get practical for a second. First off, if you forget to marinate the fish ahead of time, don’t panic—it’ll still be delicious after just 20 minutes. However, if you can plan ahead, the flavors really deepen with a longer soak. When broiling, keep an eye on the fish to avoid burning, especially if your oven runs hot. As for the relish, it’s a make-ahead’s best friend. If you want, prepare it in the morning or even the night before. The flavors only get better with time, and it keeps beautifully in the fridge for a couple of days.
Make It Your Own
Feeling adventurous? Here are a few swaps that keep the spirit of the dish alive but shake things up a bit:
- Swap the halibut for salmon if you’re feeling more like a buttery fish vibe.
- If peaches are out of season, try using mango for the relish—a tropical twist that pairs beautifully with the heat of the jalapeno.
- Not a fan of heat? Leave out the jalapeno or swap it for a milder pepper like a poblano.
- For a gluten-free version, use tamari in place of soy sauce.
If you try this, I’d love to hear how it turns out—drop a comment or tag me! Seeing your creations is the best part of sharing these recipes. Bon appétit!
Related update: Soy Ginger Glazed Halibut with Ginger Peach Relish
Related update: Stir Fried Quinoa, Brown Rice and Chicken Breast

Last Tuesday, I found myself staring at an array of mismatched jars and half-opened cans in my pantry, curiously wondering, “What can I whip up for dinner that’s both comforting and easy?” The answer came in the form of this delightful Curry-Braised Chicken. It’s one of those glorious dishes where the simplicity of ingredients belies its depth of flavor. I’m all about recipes that make you look like a kitchen wizard without breaking a sweat, and this one’s a total weeknight win. The chicken turns out tender and juicy, and the creamy coconut curry sauce is pure magic over a bed of fluffy basmati rice. It’s the kind of dinner that makes you want to sit down, take a deep breath, and savor every bite. Plus, your home will smell incredible.
Jump to Recipe
What You’ll Need
This recipe is a pleasant surprise because chances are you already have most of these ingredients chilling in your kitchen.
- Skinless boneless chicken breasts – these soak up the curry flavors like a dream.
- Vegetable oil – just enough to get the party started in your Dutch oven.
- Salt – essential for seasoning the chicken.
- Yellow, red, or green curry paste – your choice here will define the dish’s character.
- Canned unsweetened coconut milk – the creamy backbone of our sauce.
- Fish sauce – brings a subtle umami depth.
- Brown sugar – a pinch of sweetness to balance the spice.
- Fresh lime juice – adds freshness and zing at the end.
- Basmati rice – perfect to soak up all that curry goodness.
- Bell pepper – optional, but adds a pop of color and texture.
How to Make Curry-Braised Chicken
- Preheat your oven to 325 degrees Fahrenheit. This ensures the magic happens slowly, making everything tender.
- Cut your chicken breasts in half. Season them with salt and a dash of pepper, massaging it in like you’re giving the chicken a spa day.
- Heat some vegetable oil over medium-high heat in a trusty Dutch oven. You want it hot enough that the chicken sizzles on contact.
- Brown the chicken on both sides for 1-2 minutes per side. You’re not cooking it through here; just giving it a lovely golden crust. Work in batches if needed.
- Remove the chicken and add your chosen curry paste to the same pot. Use a wooden spoon to break it up, getting the paste to meld beautifully with the leftover oil.
- Once the curry paste is fragrant and slightly darker, pour in the coconut milk. Stir with your spoon to scrape up any golden bits stuck to the bottom of the pot.
- Add the fish sauce and brown sugar, stirring until everything’s a harmonious blend.
- Return the chicken to the pot, snuggling it into the sauce. Cover with a lid and place the Dutch oven in the preheated oven.
- Bake for 45-55 minutes or until the chicken is cooked through and no longer pink. The sauce should be bubbling enticingly around the edges.
- Right before serving, stir in the fresh lime juice. Trust me, this is the zingy magic touch.
- Serve the curry-braised chicken over steaming basmati rice and, if using, sprinkle with sliced bell peppers for a crisp contrast.
Cook’s Notes
A few things I’ve learned along the way: don’t rush the browning step. That lovely golden crust adds layers of flavor. If you plan on making this ahead, you can pop it into the fridge after step 8 and finish baking when you’re ready to eat. Leftovers taste even better the next day, as the flavors have more time to mingle. Reheat gently on the stove, and add a splash of water if the sauce has thickened too much.
Make It Your Own
Looking to switch things up? Here are a few ideas:
- Swap the chicken for crispy tofu for a vegetarian version. Just brown the tofu pieces before adding them to the curry.
- Use shrimp instead of chicken. Adjust the cooking time – shrimp cooks much faster!
- Throw in some diced sweet potatoes along with the chicken. They’ll soak up the curry flavor wonderfully.
- Add a handful of spinach or kale at the end for a dose of greens.
If you try this, I’d love to hear how it turns out — drop a comment or tag me! Cooking is all about sharing, so let’s swap stories and tips. Happy cooking, friends!
Related update: Curry-Braised Chicken
Related update: Soy Ginger Glazed Halibut with Ginger Peach Relish
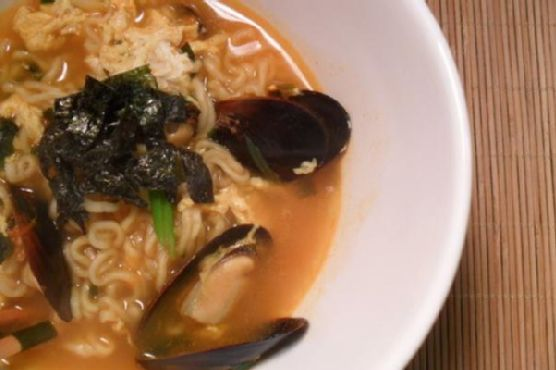
It was a chilly Tuesday, and I found myself rummaging through my pantry, yearning for something warm and satisfying. As I sifted through the usual suspects, my eyes caught a glimpse of a pack of Neoguri ramen — my secret weapon for those mid-week cravings. The spicy seafood aroma from this dish has always been my go-to comfort, especially when I’m in the mood for something quick yet soul-satisfying. The best part? It’s like taking a mini-trip to a seaside ramen bar without leaving my kitchen. Trust me, you don’t need much time or experience to whip this up, but the flavor will have you thinking you’re some kind of ramen master.
Jump to Recipe
What You’ll Need
You know what’s great about this recipe? You probably have most of these ingredients lounging in your pantry or fridge. No wild goose chase required!
- 1 pack of Neoguri ramen (spicy seafood flavor)
- Mussels (fresh or pre-cooked, your choice)
- 1 egg
- 1 green scallion
- 1 sheet of gim (seaweed)
How to Make Neoguri (Spicy Seafood Ramen)
- First, get a pot of water boiling. Toss in the mussels and the sauce packets from the Neoguri ramen. Let it roll on medium heat for about 5 minutes. The broth should smell like spicy seafood heaven.
- If you’re using fresh mussels, keep an eye on them. Once they open, they’re ready. Any stubborn closed ones? Toss them out — they’re not invited to this party.
- Now, add the ramen noodles. Let them mingle with the broth for 2 to 3 minutes. You’ll know it’s time when they’re perfectly tender.
- Time for the egg! Beat it lightly and pour it in while stirring the noodles in a circular motion. This creates that lovely, flaky egg drop texture. If you’re more of a poached egg fan, gently slip the egg off to the side of the pot instead.
- While the pot is doing its thing, slice your scallion into thin pieces and tear up the gim (seaweed). Prep done!
- Scoop everything into a serving bowl. Sprinkle with the scallions and gim, and get ready to dive in.
Cook’s Notes
Let me share a few nuggets of wisdom to make your ramen experience even better. If you’re prepping this ahead, keep the broth and noodles separate until you’re ready to eat — nobody likes mushy noodles. For leftovers (if there are any), store the broth and noodles individually. They’ll keep in the fridge for a day or two. Reheat gently on the stove for best results. Watch your mussels — overcooked ones turn rubbery, which is less than ideal.
Make It Your Own
Want to put a personal spin on this ramen? Here are some ideas:
- Swap the mussels for crispy tofu for a vegetarian twist. Just pan-fry the tofu until golden and add it when your noodles are done.
- Spice it up a notch by adding a spoonful of your favorite chili paste or sriracha to the broth.
- For a heartier meal, toss in some cooked shrimp or sliced fish cake along with the mussels.
- Throw in a handful of baby spinach or bok choy for a dose of greens. They’ll wilt beautifully in the hot broth.
If you try this, I’d love to hear how it turns out — drop a comment or tag me! Once your friends get a taste, they’ll be begging you for the recipe, and you can be all smug and mysterious about your ramen secrets.
Related update: Neoguri (Spicy Seafood Ramen)
Related update: Broccoli Rabe and Breaded Veal Scallopini
Related update: Roasted Garlic & Butternut Parmesan Soup
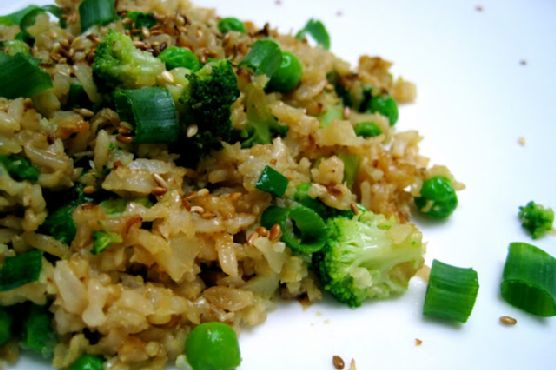
So there I was, standing in the kitchen on a Tuesday night, staring at my pantry like it was a black hole of culinary despair. You know those nights when you crave something satisfying but don’t want to spend an eternity making it? Enter this Cauliflower, Brown Rice, and Vegetable Fried Rice. It’s my go-to when I’m in the mood for something cozy yet packed with veggies. I promise, even if you’re a notorious takeout lover, you’ll want to make this at home. It’s got that perfect balance of taste and texture, and let’s be real, sneaking cauliflower into anything is a win in my book. Plus, it’s a great way to use up leftover rice and that stubborn head of cauliflower that’s been giving you the side-eye from the fridge. Jump to Recipe
What You’ll Need
This ingredient list is your best friend on a busy night. Chances are you already have most of this hanging out in your kitchen.
- 1 tablespoon grapeseed oil
- 1 tablespoon coconut oil
- 4 green dark scallions, sliced (white and green parts separated)
- 3 cloves garlic, minced
- 1 medium head of raw cauliflower, cut into florets
- 2 cups cooked brown rice
- 1 cup cooked broccoli
- 1 cup frozen peas
- 2 tablespoons low sodium soy sauce
- 1 teaspoon sesame oil
- 1 tablespoon sesame seeds
- Additional scallion tops for garnish
- Salt, to taste
How to Make Cauliflower, Brown Rice, and Vegetable Fried Rice
- Start by removing the cauliflower’s tough stem and save it for another day (hello, veggie broth!). Pulse the florets in a food processor until they look like rice or couscous. You’ll end up with about four cups of this magic “cauliflower rice.”
- Heat 1 tablespoon of butter and 1 tablespoon of grapeseed oil in a large skillet over medium heat. Add the garlic and the white and light green parts of the scallions. Sauté until they start smelling amazing, about a minute.
- Toss the cauliflower rice into the pan. Stir it to coat with oil, then spread it out in the pan. Let it sit so it can caramelize a bit—this is where the sweetness comes out. After a couple of minutes, give it a stir and spread it out again.
- Add the cold brown rice to the skillet along with the remaining grapeseed and coconut oil. Crank up the heat to medium-high. Mix everything together and spread it out over the whole pan, pressing it down slightly. This helps it toast up and get a little crispy, which is what we’re going for.
- Next, add the peas and broccoli. Mix them in with the rice. Drizzle the soy sauce and sesame oil on top and give it all a good stir. Cook for another minute or so, then turn off the heat.
- Top everything with the chopped scallion tops. Toast some sesame seeds in a dry pan until they’re golden, then sprinkle them along with some raw, chopped scallion over the rice. Give it a taste and season with salt if needed. If you’re pairing this with something salty, like teriyaki chicken, keep the salt in check.
Cook’s Notes
For the best results, use day-old rice. Freshly cooked rice tends to be too moist and can turn your dish into a mushy mess. If you make rice specifically for this, spread it out on a baking sheet and pop it in the fridge for an hour to dry it out a bit. You can store leftovers in an airtight container in the fridge for up to 3 days. Just reheat in a pan over medium heat — adding a splash of water helps bring it back to life.
If you’re a meal prepper (is that even a word?), this dish is your friend. The cauliflower ‘rice’ can be made ahead and stored in the fridge for a couple of days. Just keep it in an airtight container, and you’re good to go.
Make It Your Own
- Swap the broccoli for any other veggie you love — bell peppers and snap peas are excellent choices.
- If you’re in the mood for protein, add some crispy tofu or a scrambled egg for extra goodies.
- For a spicy kick, throw in a pinch of red pepper flakes or a drizzle of sriracha.
- Make it nutty by tossing in a handful of cashews or almonds before serving.
If you try this, I’d love to hear how it turns out — drop a comment or tag me! I’m always here for your kitchen adventures. Happy cooking!
Related update: Cauliflower, Brown Rice, and Vegetable Fried Rice