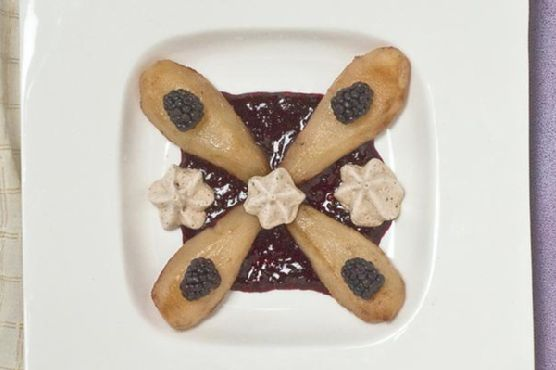
The Perfect Butter Beans Stew | Made by Meaghan Moineau

The Perfect Butter Beans Stew | Made by Meaghan Moineau

Title: A Hearty Hug in a Bowl: The Perfect Butter Beans Stew
Description: Dive into a comforting dish that’s as nourishing as it is delicious. Our Perfect Butter Beans Stew is not only a celebration of simple, wholesome ingredients but also a gateway to cherished family memories. With a difficulty rating of 4 out of 10, this easy-to-master main dish is sure to become a favorite at your dinner table.

---


There’s something undeniably nostalgic about the aroma of a simmering stew, wafting through the kitchen and filling the home with warmth. For me, the Perfect Butter Beans Stew is more than just a meal; it’s a cherished family tradition that brings back fond memories of cozy, laughter-filled gatherings around the dinner table.


Whenever I prepare this dish, I’m reminded of Sundays spent at my grandmother’s house, where the scent of sautéed onions and garlic would greet us at the door. My grandmother was a culinary magician, turning simple ingredients into extraordinary dishes. Her secret? A generous sprinkle of love and a dash of patience.


The star of this recipe is the humble butter bean, also known as the dry lima bean, which has been soaked overnight. This process not only softens the beans but also allows them to absorb flavors more deeply. Paired with the earthy notes of dry tarragon and the subtle heat of sweet paprika, each spoonful of this stew is like a warm hug.


The preparation begins with a drizzle of unrefined sunflower oil in a large pot, where diced onions and minced garlic cloves are gently sautéed until golden. The addition of canned and dry fresh tarragon, combined with bay leaves, infuses the stew with an irresistible aroma. A sprinkle of ground pepper and a pinch of sea salt enhance the flavors, while the sweet paprika adds a vibrant color and a hint of spice.


This dish, rated 4 out of 10 in difficulty, is a testament to the beauty of simplicity. It’s a main dish that celebrates the essence of home-cooked comfort, perfect for those seeking a hearty, nourishing meal without the fuss.


I remember vividly the clatter of bowls and the gentle hum of conversation as we gathered to enjoy this stew. Each serving was a testament to my grandmother’s culinary prowess, her ability to transform humble ingredients into something truly special. It’s a legacy I cherish and one I’m thrilled to share with you.


For the full step-by-step instructions on how to create this delightful dish, visit my blog at [Gourmandelle](http://gourmandelle.com/the-perfect-butter-beans-stew/). Embrace the nostalgia and warmth of the Perfect Butter Beans Stew, and bring a piece of my family’s tradition to your table.


---


Keywords: Butter Beans Stew, Family Recipe, Comfort Food, Main Dish, Simple Ingredients, Nostalgic Cooking, Easy Stew Recipe, Home-Cooked Meal, Wholesome Ingredients, Traditional Stew.

Read more about Appetizers

Read more about Main Dishes

Read more about Desserts

Crumbled Feta Couscous Salad | Made by Meaghan Moineau

Crumbled Feta Couscous Salad | Made by Meaghan Moineau

**Title: A Taste of Nostalgia: Crumbled Feta Couscous Salad**


**Description: Discover the comforting flavors and heartwarming memories wrapped up in our Crumbled Feta Couscous Salad. This easy-to-make dish, packed with fresh ingredients and cherished family stories, will become a staple in your culinary repertoire.**


---


### A Taste of Nostalgia: Crumbled Feta Couscous Salad


In the bustling heart of Mediterranean cuisine lies a dish that marries simplicity with flavor—our beloved Crumbled Feta Couscous Salad. This delightful recipe, rated a 3 out of 10 on the difficulty scale, effortlessly serves as an elegant appetizer or a light main dish. With every bite, you'll be transported back to cherished family gatherings, where food and laughter were the bonds that held us together.


#### Ingredients:


- 1 cup couscous


- 1 ½ cups vegetable stock or water


- 2 tablespoons quality olive oil


- A pinch of salt


- 1 diced Roma tomato


- ½ red onion, finely chopped


- ¼ cup fresh mint, chopped


- ¼ cup fresh parsley, chopped


- 2 tablespoons white balsamic vinegar


- ½ cup crumbled feta cheese


#### Instructions:


1. In a medium saucepan, bring the vegetable stock or water to a boil. Add the couscous, stirring quickly to ensure even cooking.


2. Remove the saucepan from the heat and cover it with a lid. Allow the couscous to stand for 4-5 minutes, absorbing all the flavors of the stock.


3. Remove the lid and stir in the olive oil, adding a subtle richness to the dish.


4. Pour the cooked couscous into a large bowl and let it chill, stirring occasionally to cool evenly.


5. Once cooled, stir in the diced Roma tomato, red onion, mint, parsley, and white balsamic vinegar.


6. Finally, fold in the crumbled feta cheese, ensuring each bite is filled with creamy goodness.


7. Chill the salad completely before serving to allow the flavors to meld beautifully.


#### A Family Memory


As a child, I remember summers spent in my grandmother's kitchen, a place where time seemed to slow down, and every moment was filled with warmth and love. The Crumbled Feta Couscous Salad was a staple at our family gatherings, a dish that brought everyone to the table with its vibrant colors and fresh aroma.


I recall one particular summer afternoon when Grandma decided to teach me how to make this salad. She showed me how to properly chop the herbs, her fingers deftly moving with years of practice. "The secret," she whispered, "is in the freshness of the ingredients. The mint and parsley should always be from the garden, and the olive oil must be the finest you can find."


As we stirred the couscous together, she shared stories of her childhood, of how this recipe had been passed down through generations, each one adding a little something of their own. That day, I learned not only how to prepare a dish but how food could carry the essence of family history, connecting us to those who came before.


Even today, when I make this Crumbled Feta Couscous Salad, I am reminded of those sunny afternoons with Grandma, the laughter echoing through the house, and the sense of belonging that only comes from being with loved ones.


#### Conclusion


The Crumbled Feta Couscous Salad is more than just a dish; it's a bridge to the past, a reminder of the joy that comes from sharing meals with family. Easy to prepare and bursting with flavor, it's perfect for any occasion. So gather your ingredients, invite your family, and create memories that will last a lifetime.

Read more about Appetizers

Read more about Main Dishes

Read more about Desserts

{No Bake} Cinnamon Butterscotch Energy Bites | Made by Meaghan Moineau

{No Bake} Cinnamon Butterscotch Energy Bites | Made by Meaghan Moineau

# Sweet Simplicity: {No Bake} Cinnamon Butterscotch Energy Bites


**Description:** Dive into the symphony of flavors with our {No Bake} Cinnamon Butterscotch Energy Bites. A perfect blend of nostalgia and nutrition, these bites are a breeze to whip up and are sure to become a family favorite. Whether you're looking for a quick snack or a delightful treat, these energy bites promise to fuel your day with a touch of sweetness and a lot of love.


## Introduction


There’s something incredibly comforting about the aroma of cinnamon and butterscotch wafting through the kitchen. It instantly transports me back to those cozy afternoons at my grandmother’s house, where the kitchen was a sanctuary of warmth and love. I remember sitting on the counter, watching her mix ingredients with a practiced hand, always sneaking in a taste when she wasn’t looking. The memory of her laughter and the delightful treats she created still linger with me today.


One of my favorite recipes, inspired by those cherished moments, is the {No Bake} Cinnamon Butterscotch Energy Bites. Quick to prepare and packed with flavor, these bites are a tribute to those sweet, nostalgic days.


## The Ingredients


To recreate this heartwarming delicacy, you will need:


- 1 cup oats (ground into a fine powder)


- 1 cup rice cereal


- 1/2 cup whole oats


- 1/4 cup ground flax seed


- 1/4 cup protein powder


- 1/4 cup brown sugar


- 1/2 cup peanut butter


- 1/4 cup honey


- 1/2 cup butterscotch chips


## Instructions


1. **Prepare the Oats:** Begin by grinding 1 cup of oats in a blender until they reach a fine, flour-like consistency.


2. **Mix the Dry Ingredients:** In a large bowl, combine the rice cereal, whole oats, ground oats, protein powder, and ground flax seed. This dry mixture is the foundation of your energy bites.


3. **Melt the Sweetness:** In a microwave-safe bowl, mix together the brown sugar, peanut butter, and honey. Heat in the microwave in 15-second intervals, stirring between each interval until the mixture is completely melted and smooth.


4. **Combine and Chill:** Pour the melted mixture over the dry ingredients and stir until everything is evenly combined. Place the bowl in the refrigerator for about 30 minutes to let the mixture firm up.


5. **Shape Your Bites:** Once the mixture has chilled, remove it from the fridge and roll into small balls. Press a few butterscotch chips into each ball for that extra burst of sweetness.


6. **Enjoy!** These energy bites are ready to serve as soon as you finish rolling and pressing the butterscotch chips.


## A Bite of Nostalgia


Creating these energy bites always brings me back to those treasured afternoons with my grandmother. Her kitchen was a place where stories were shared, laughter was abundant, and love was evident in every bite. While my version of the cinnamon butterscotch treat might be a tad different, the essence remains the same – a simple, sweet reminder of home.


## Difficulty Rating


I would rate this recipe a 3 out of 10 in terms of difficulty. It’s straightforward and requires no baking, making it a perfect project for kids or for anyone looking to indulge in a quick, satisfying treat.


## Classification


These {No Bake} Cinnamon Butterscotch Energy Bites can be classified as a **Dessert**. However, they also make for a delightful snack that can be enjoyed any time of the day.


Whether you're reminiscing about your own family traditions or creating new ones, this recipe is sure to add a touch of sweetness to your day. Enjoy the simplicity and the deliciousness of these energy bites, and let them bring a little bit of joy into your home.

Read more about Appetizers

Read more about Main Dishes

Read more about Desserts

Luscious Lemon Bars | Made by Meaghan Moineau

Luscious Lemon Bars | Made by Meaghan Moineau

# Zesty Bliss: Mastering the Art of Luscious Lemon Bars


**Description:** Dive into the tangy world of Luscious Lemon Bars—a delightful dessert that captures the essence of sunny afternoons and cherished family traditions. With a perfect balance of tart lemon and sweet sugar, this recipe is a must-try for anyone looking to add a zesty twist to their dessert repertoire. Follow our step-by-step guide and discover the nostalgic tale behind this refreshing treat.


---


### Introduction


There’s something undeniably charming about a dessert that can transport you back in time. For me, Luscious Lemon Bars do just that. Every bite is reminiscent of warm summer days spent in my grandmother’s kitchen, where the sweet aroma of lemon would fill the air. These bars, with their vibrant citrus flavor, have become a family staple, cherished across generations. Today, I’m thrilled to share not only the recipe but also a slice of my family’s history with you.


### Ingredients


- **Crust:**


- 1 cup butter, softened


- 2 cups all-purpose flour


- 1/2 cup powdered sugar


- **Filling:**


- 4 large eggs


- 1 1/2 cups white sugar


- 1/4 cup all-purpose flour


- 1/2 teaspoon baking powder


- 1/2 cup fresh lemon juice (approximately 2-3 lemons)


- 1 tablespoon lemon zest


- **Topping:**


- Powdered sugar for dusting


### Instructions


1. **Preheat and Prepare:**


- Preheat your oven to 350°F (175°C).


- Grease a 9x13 inch rectangular cake pan to prevent sticking.


2. **Create the Crust:**


- In a mixing bowl, combine the butter, 2 cups of flour, and 1/2 cup of powdered sugar.


- Mix until crumbly, then press the mixture evenly into the bottom of the prepared pan using your fingertips.


- Bake in the preheated oven for 20 minutes or until the edges are lightly golden.


3. **Prepare the Filling:**


- While the crust is baking, whisk together the eggs, white sugar, 1/4 cup flour, and baking powder in a medium bowl.


- Add the lemon juice and zest, whisking until well combined.


4. **Combine and Bake:**


- Once the crust is done, remove it from the oven and pour the lemon filling over the hot crust.


- Return the pan to the oven and bake for an additional 23-25 minutes. Keep an eye on the top to prevent overbrowning.


5. **Cool and Serve:**


- Remove from the oven and place the pan on a wire rack, allowing it to cool for about 30 minutes.


- To remove from the pan, cut the bars in half and use a large flexible spatula to lift each half out. Then, cut into squares.


- Dust the bars with sifted icing sugar before serving.


### A Slice of Nostalgia


Growing up, my grandmother’s kitchen was the heart of our family gatherings. Every Sunday, after a hearty meal, she would unveil her famous Luscious Lemon Bars. I vividly remember the joy of helping her zest lemons, the anticipation building as the bars baked, and the satisfaction of that first tangy bite. These bars were more than just a dessert; they were a symbol of love and togetherness, connecting us through shared moments and cherished memories.


### Conclusion


Luscious Lemon Bars are more than a sweet treat—they’re a journey back to simpler times, filled with love and laughter. With a difficulty rating of 4/10, this dessert is accessible for bakers of all skill levels, making it a delightful addition to any gathering. Whether you’re enjoying them with a cup of tea or sharing them with loved ones, these lemon bars are sure to bring a smile to your face.


For more recipes and photos, visit my blog at [Lemon Drops Foodie](http://lemondropsfoodie.blogspot.com/2011/02/luscious-lemon-bars.html).


---


Rediscover the joy of baking and the power of family traditions with this refreshing and timeless dessert. Happy baking!

Read more about Appetizers

Read more about Main Dishes

Read more about Desserts

Deviled Eggs With Crab | Made by Meaghan Moineau

Deviled Eggs With Crab | Made by Meaghan Moineau

# A Taste of Nostalgia: Deviled Eggs With Crab


## Description:


Indulge in a classic appetizer with a twist that’s sure to impress at any gathering. Our Deviled Eggs With Crab blend the creamy, savory textures of traditional deviled eggs with the luxurious taste of fresh lump crabmeat. Perfect for summer picnics, holiday parties, or a cozy family dinner, this dish is both simple to prepare and delightfully elegant.


### Keyword Highlights:


Deviled Eggs With Crab, appetizer, lump crabmeat, easy recipe, savory snack


---


### Ingredients:


- 12 hardboiled eggs, halved


- 1 cup lump crabmeat


- 1/4 cup celery, finely chopped


- 2 tablespoons sour cream


- 2 tablespoons mayonnaise


- 1 tablespoon Dijon mustard


- 1 tablespoon fresh lemon juice


- 2 tablespoons fresh chives, chopped


- Black salt and pepper, to taste


### Instructions:


1. **Prepare the Filling:** In a medium-sized mixing bowl, combine the crabmeat, celery, sour cream, mayonnaise, Dijon mustard, lemon juice, and chives. Stir until well combined.


2. **Season:** Add black salt and pepper to taste.


3. **Assemble the Eggs:** Carefully spoon the crab mixture into the halved egg whites.


4. **Serve:** Enjoy immediately, or chill until ready to serve.


### A Nostalgic Family Memory:


Growing up, deviled eggs were a staple at every family gathering, from Easter brunches to summer barbecues. However, it wasn’t until a particularly memorable Thanksgiving at my grandmother’s house that I first encountered the luxurious version featuring crabmeat. I vividly remember the excited chatter in the kitchen as my grandmother, with her ever-present apron, enlisted my help to meticulously fill each egg half with the creamy crab mixture. The air was filled with the aroma of freshly squeezed lemon and the subtle, briny scent of crab.


As we carried the platter to the dining table, I felt a surge of pride watching each family member reach eagerly for an egg. My grandfather, always one for theatrics, dramatically declared it the best appetizer of the year, much to the delight of my grandmother. It was in those moments, surrounded by love and laughter, that I learned food is not just about sustenance but about creating memories that linger long after the plates have been cleared.


### Difficulty Rating: 4/10


### Classification: Appetizer


Incorporating the rich flavors of the sea with a classic favorite, these Deviled Eggs With Crab are both an homage to cherished traditions and a nod to gourmet flair. Whether you're recreating a family memory or crafting new ones, this dish is sure to leave a lasting impression.

Read more about Appetizers

Read more about Main Dishes

Read more about Desserts

Spinach Salad with Strawberry Vinaigrette | Made by Meaghan Moineau

Spinach Salad with Strawberry Vinaigrette | Made by Meaghan Moineau

**Title: A Taste of Spring: Spinach Salad with Strawberry Vinaigrette**


**Description: Discover a refreshing and vibrant salad that's as easy to make as it is delicious. Our Spinach Salad with Strawberry Vinaigrette is a delightful blend of fresh ingredients that promises to bring a burst of flavor to your table. Dive into a nostalgic story that makes this dish a cherished family favorite.**


---


**A Taste of Spring: Spinach Salad with Strawberry Vinaigrette**


When the first warm breeze of spring swept through our small town, it was always a signal for my family to gather in my grandmother's garden. Her backyard was a sanctuary of bursting colors, with rows of strawberries glistening like jewels under the sun and spinach leaves swaying gently in the breeze. Among the many dishes that graced our family table, none heralded the arrival of spring quite like our Spinach Salad with Strawberry Vinaigrette.


**Ingredients:**


- Fresh spinach leaves


- Strawberries, sliced


- Almonds, toasted


- Feta cheese, crumbled


- Cooked chicken, sliced


- Shallot, finely chopped


- Fresh thyme, finely chopped


- Ground pepper, to taste


**For the Strawberry Vinaigrette:**


- Strawberries, puréed


- Balsamic vinegar


- Dijon mustard


- Water


**Instructions:**


1. **Prepare the Vinaigrette:** In a small bowl, mix the puréed strawberries with balsamic vinegar, dijon mustard, and a splash of water. Whisk until smooth and set aside.


2. **Assemble the Salad:** On a large plate, layer the fresh spinach leaves. Top with sliced strawberries, toasted almonds, crumbled feta cheese, and cooked chicken.


3. **Add Flavor:** Sprinkle finely chopped shallot and fresh thyme over the salad. Season with ground pepper to taste.


4. **Drizzle and Serve:** Generously drizzle the strawberry vinaigrette over the salad. Serve immediately and enjoy a taste of spring.


**A Nostalgic Family Memory**


As children, my siblings and I would race barefoot through the garden, eager to pick the ripest strawberries. My grandmother would laugh at our stained fingers and delighted giggles as we tried to sneak a few berries into our mouths. Once the basket was full, she'd lead us to the kitchen, where we'd help her prepare this simple yet extraordinary salad.


Around the dinner table, stories of past springs would unfold, each tale more vibrant with the flavors of our meal. The combination of sweet strawberries, tangy vinaigrette, and savory chicken created a symphony on our plates, one that still resonates with me today.


**Difficulty: 2/10**


This recipe is delightfully easy, perfect for beginner cooks or anyone looking for a quick, nutritious meal.


**Classification: Main Dish**


Whether served as a light lunch or a refreshing dinner, this Spinach Salad with Strawberry Vinaigrette is a versatile main dish that embodies the essence of spring. Enjoy this dish with loved ones, and perhaps, create your own cherished memories around the table.

Read more about Appetizers

Read more about Main Dishes

Read more about Desserts

Cherry Lime Mojito | Made by Meaghan Moineau

Cherry Lime Mojito | Made by Meaghan Moineau

# A Taste of Summer: The Cherry Lime Mojito that Brings Back Family Memories


## Description


Dive into the refreshing world of summer with our delightful Cherry Lime Mojito. This sparkling cocktail combines the sweetness of cherries with the tangy zest of lime and the coolness of mint, all perfectly balanced with a splash of white rum and bubbly carbonated water. This drink is not just a feast for your taste buds but also a journey down memory lane, evoking the warmth and joy of family gatherings. Whether you're hosting a summer soirée or simply relaxing on your porch, this mojito is the perfect companion. With a difficulty rating of 3 out of 10, this drink is a breeze to make and the ideal appetizer to kick off your evening.


---


### Ingredients:


- Fresh cherries


- Handful of mint leaves


- 1 fresh lime


- 2 teaspoons demerara sugar


- 2 ounces white rum


- Carbonated water


### Instructions:


1. **Prepare the Base**: In a tall glass, place a handful of fresh cherries, a few mint leaves, 2 teaspoons of demerara sugar, and juice from one lime.


2. **Muddle the Mixture**: Gently muddle these ingredients together at the bottom of the glass until the cherries are slightly crushed and the sugar begins to dissolve.


3. **Add the Spirit**: Drop in a few ice cubes and pour 2 ounces of white rum over the mixture.


4. **Finish with Fizz**: Fill the glass the rest of the way with carbonated water, giving it a gentle stir.


5. **Serve & Enjoy**: Garnish with a lime wedge or a sprig of mint and serve chilled.


---


### A Nostalgic Sip: Family Memories in a Glass


The Cherry Lime Mojito isn’t just a cocktail; for me, it’s a bottle of summer memories, shaken and stirred with love. Every time I take a sip, I'm transported back to those golden July afternoons in my grandmother’s backyard. The air was always filled with the scent of fresh mint and the laughter of family members gathered around the picnic table.


I remember my grandmother, her hands gentle and nimble, plucking cherries from the tree that stood as the backyard's centerpiece. She had a way of turning simple ingredients into something magical. As a child, I would watch her with awe, learning the art of muddling from the best. She’d always tell us stories—tales of her own youth, flavored with adventure and a hint of mischief—while she expertly crafted what she called her "signature summer potion."


Those afternoons taught me the true essence of family. It wasn’t about the grandeur of the gathering but the small, meaningful moments shared over a refreshing drink. Today, when I make this mojito, I feel her spirit guiding my hands, infusing each glass with love and nostalgia.


So, as you enjoy your Cherry Lime Mojito, take a moment to savor not just the flavors but the memories it might inspire. Here’s to family, to love, and to the timeless tradition of coming together over a perfect summer drink.


---


With its ease of preparation and the joy it brings, this Cherry Lime Mojito is more than just an appetizer. It's a celebration of flavors and family ties, making every sip a cherished memory.

Read more about Appetizers

Read more about Main Dishes

Read more about Desserts

Mashed Sweet Potatoes | Made by Meaghan Moineau

Mashed Sweet Potatoes | Made by Meaghan Moineau

**Title: Comfort in a Bowl: Nostalgic Mashed Sweet Potatoes**


**Description:** Dive into the heartwarming world of Mashed Sweet Potatoes, a dish that marries the comforting flavors of cinnamon and cardamom with the sweet allure of maple syrup and brown sugar. This recipe is not just a side dish; it's a journey through cherished family memories and the warmth of home cooking. Join me as I share the joy of creating and savoring this delectable, easy-to-make dish that scores a low 3/10 on the difficulty scale, perfect as a delightful side for any meal.


---


**The Sweet Essence of Family: A Mashed Sweet Potatoes Journey**


There's something magical about the kitchen during the holidays. The hum of conversation, the clinking of dishes, and the mouthwatering aroma of sweet and spicy flavors dancing through the air create an atmosphere of warmth and togetherness. For me, one dish that encapsulates this feeling is Mashed Sweet Potatoes—a dish as comforting as a grandmother's hug.


**A Nostalgic Tale:**


Growing up, the holiday season was a bustling affair at my grandmother's house. The kitchen was always filled with the sights and sounds of family members working side by side, each contributing to the festive feast. Among the many dishes, my grandmother's Mashed Sweet Potatoes held a special place on the table and in our hearts.


I vividly remember the first time she let me help prepare them. I was barely tall enough to see over the countertop, but she handed me a wooden spoon and guided my tiny hands as we mashed the sweet potatoes together. "Now, add a bit of this," she'd say, passing me a pinch of cinnamon or a spoonful of maple syrup, her eyes twinkling with the wisdom of years spent perfecting this recipe.


The secret, she confided, was in the balance of flavors—the warm spice of cardamom, the unexpected heat of cayenne pepper, and the bright zest of an orange, all melded together by the luxurious smoothness of cream and butter. Each bite was a revelation, a perfect harmony of sweet and savory that left you longing for more.


**The Recipe: Mashed Sweet Potatoes**


**Ingredients:**


- 4 large sweet potatoes, peeled and cut into chunks


- 1/4 cup brown sugar


- 1/4 cup butter


- 1/2 teaspoon ground cardamom


- 1/8 teaspoon cayenne pepper


- 1 teaspoon ground cinnamon


- 1/4 cup cream


- Kosher salt, to taste


- 1/4 cup maple syrup


- 1 tablespoon orange zest


- 1 teaspoon vanilla extract


**Instructions:**


1. Begin by boiling the sweet potatoes until tender. Drain and return them to the pot.


2. Mash the peeled potatoes until well broken up. For a smoother texture, feel free to use an electric mixer.


3. In a separate bowl, mix together the cinnamon, cayenne, cardamom, orange zest, and brown sugar. Set this aromatic mixture aside.


4. Add the butter, cream, vanilla extract, and maple syrup to the mashed sweet potatoes. Stir thoroughly until the mixture is well combined and creamy.


5. Incorporate the cinnamon sugar mixture, blending until smooth.


6. Salt to taste, adjusting the seasoning until the flavors sing.


**A Dish for Every Occasion:**


Rated at a 3/10 on the difficulty scale, this dish is not only simple to make but also versatile enough to accompany a variety of meals. Whether served as a comforting side to a holiday roast or as a hearty addition to a weeknight dinner, these Mashed Sweet Potatoes bring a touch of nostalgia and warmth to any table.


As you savor this dish, remember that it's more than just a recipe; it's a celebration of family, tradition, and the simple joys of cooking together. So, gather your loved ones, share the story, and enjoy the sweet embrace of a dish that feels like home.

Read more about Appetizers

Read more about Main Dishes

Read more about Desserts

Roasted Brussels Sprouts With Red Onions and Pancetta | Made by Meaghan Moineau

Roasted Brussels Sprouts With Red Onions and Pancetta | Made by Meaghan Moineau

**Title: "A Taste of Home: Roasted Brussels Sprouts with Red Onions and Pancetta"**


**Description: Discover the heartwarming flavors of Roasted Brussels Sprouts with Red Onions and Pancetta, a recipe that combines savory pancetta, aromatic garlic, and crispy bread crumbs for a delightful dish. Perfect as an appetizer or a comforting main dish, this recipe will transport you to cherished family gatherings with every bite.**


---


There's something undeniably comforting about the aroma of roasted Brussels sprouts wafting through the kitchen. It’s a scent that transports me back to cozy family gatherings during the chilly months, where we would gather around the dining table, eager to dig into a meal that always felt like a warm embrace. One dish that stood out amidst the spread was my grandmother's Roasted Brussels Sprouts with Red Onions and Pancetta. It wasn’t just a dish; it was a staple that held a special place in our hearts and on our plates.


**Ingredients:**


- Brussels sprouts


- Pancetta


- Garlic


- Olive oil


- Bread


**Instructions:**


1. Preheat your oven to 350 degrees Fahrenheit. In a large plastic zippered bag, toss the Brussels sprouts with 3 pressed garlic cloves and 2 tablespoons of olive oil. Shake well to ensure even coating.


2. Empty the contents into an ovenproof dish and roast for 40 minutes. The Brussels sprouts should be tender with a slight char that enhances their natural sweetness.


3. While the Brussels sprouts are roasting, heat 1/4 cup of olive oil in a pan. Once heated, sauté a slice of bread until browned on both sides. Set aside to cool and become crisp.


4. When the Brussels sprouts are done, return to the pan used for the bread. Add the red onions and sauté for about 3 minutes. Be cautious not to let them become fully tender; they should retain a subtle crunch.


5. Introduce the pancetta to the pan, allowing it to heat through for an additional minute. The pancetta should be aromatic and slightly crispy.


6. Add the roasted Brussels sprouts to the pan and heat through for another 3 minutes. This will allow the flavors to meld beautifully.


7. Remove from heat. In a food processor, blend the sautéed bread with 1-2 cloves of garlic. This will create a fragrant, crunchy topping.


8. Sprinkle the garlic bread crumbs over the Brussels sprouts mixture and finish with a final drizzle of olive oil for added richness.


What I love about this dish is its simplicity and the way it brings people together. My grandmother used to say that the secret ingredient was love, and I wholeheartedly believe her. The combination of the savory pancetta with the slight bitterness of the Brussels sprouts, balanced by the sweetness of the onions and the crunch of the garlic-infused bread crumbs, creates a symphony of flavors that is both nostalgic and comforting.


This recipe, with its robust flavors and comforting taste, is rated a 4 out of 10 in difficulty—making it accessible to both novice and experienced cooks. It can be served as a delightful appetizer to whet the appetite, or as a main dish that stands proudly at the center of any meal.


So, if you are looking to recreate a dish that is as rich in flavor as it is in family history, give this Roasted Brussels Sprouts with Red Onions and Pancetta a try. It’s not just about cooking; it’s about creating memories that will be cherished for generations to come.

Read more about Appetizers

Read more about Main Dishes

Read more about Desserts

Detox Orange Carrot Juice | Made by Meaghan Moineau

Detox Orange Carrot Juice | Made by Meaghan Moineau

**Title: Sip into Wellness: Detox Orange Carrot Juice Recipe**


**Description:**


Embark on a journey of rejuvenation with our Detox Orange Carrot Juice. This vibrant blend not only boasts an array of health benefits but also invites a wave of nostalgia, reminiscent of cherished family moments. Easy to prepare, this juice is your gateway to feeling lighter and refreshed.


---


In the whirlwind of modern life, finding a moment of peace often feels like a treasure hunt. But what if serenity was just a sip away? Enter our Detox Orange Carrot Juice, a vibrant concoction that harmonizes taste and wellness. With its radiant hue and refreshing flavor, this juice is not just a drink, but an experience—a journey back to simpler times.


**Ingredients:**


- Fresh carrots


- Juicy oranges


- Fresh ginger


- Fresh ground turmeric (or ground turmeric)


- Honey


**Instructions:**


1. Begin by juicing the carrots, oranges, and ginger in your juicer. If available, juice fresh turmeric as well.


2. Stir in ground turmeric and honey until well combined.


3. Pour the juice into two medium glasses or one large glass.


4. Enjoy immediately, feeling lighter and refreshed.


**Difficulty: 3/10**


**Classification: Appetizer**


---


**A Nostalgic Sip: A Family Memory**


I vividly recall summer mornings at my grandmother's cottage, where the sun filtered through the kitchen window, casting golden patterns on the wooden floor. My grandmother, a firm believer in the healing powers of nature, had a ritual: preparing a fresh juice blend to kickstart the day. Her favorite? A simple yet invigorating orange carrot juice, infused with the warmth of ginger and the earthiness of turmeric.


I would watch in awe as she expertly peeled and sliced the ingredients, her hands moving with practiced grace. The juicer hummed softly, filling the air with a melody of citrus and spice. Those mornings were a symphony of laughter, stories, and the gentle clinking of glasses as we toasted to health and happiness.


It was in those moments that I learned the true essence of nourishment—not just for the body, but for the soul. Each sip was a reminder of the love and care that went into creating something wholesome, a tradition I cherish and pass down to my own family today.


As you sip this Detox Orange Carrot Juice, may it transport you to your own treasured memories, inviting you to pause, reflect, and rejuvenate. Whether enjoyed as a refreshing appetizer or a mid-day pick-me-up, let each glass be a step towards a healthier, more mindful you.


---


In a world that never stops, take a moment to savor the simplicity of this delightful juice. Reconnect with nature, with family, and most importantly, with yourself. Cheers to your health!

Read more about Appetizers

Read more about Main Dishes

Read more about Desserts

Chicken-Tortilla Chip Soup | Made by Meaghan Moineau

Chicken-Tortilla Chip Soup | Made by Meaghan Moineau

**Title: Cozy Bowls of Comfort: The Heartwarming Tale of Chicken-Tortilla Chip Soup**


**Description:** Dive into the comforting embrace of Chicken-Tortilla Chip Soup, a soul-warming recipe that combines tender chicken, vibrant veggies, and crunchy corn chips. Perfect as a main dish, this flavorful soup is steeped in family memories and is easy to prepare, with a difficulty rating of just 3 out of 10.


---


As the crisp autumn air weaves through the golden leaves, there's nothing quite like curling up with a bowl of homemade Chicken-Tortilla Chip Soup. This delightful dish, with its aromatic blend of seasoned chicken, fresh cilantro, and crunchy tortilla chips, is more than just a meal—it’s a cherished family tradition.


**The Recipe: Chicken-Tortilla Chip Soup**


**Ingredients:**


- 8 cups water


- 2 chicken breasts, boneless and skinless


- 2 bouillon cubes


- 1 cup diced carrots


- 1/2 cup diced cilantro


- 1 tablespoon Lawry's seasoned salt


**For Serving:**


- Corn chips


- Monterey Jack cheese, shredded


- Avocado, sliced


**Instructions:**


1. In a large pot, bring the water to a boil. Add the chicken breasts, bouillon cubes, diced carrots, cilantro, and Lawry's seasoned salt.


2. Reduce the heat to a simmer and cook for 30-40 minutes, or until the chicken is fully cooked and tender.


3. Remove the chicken breasts, shred them with two forks, and return them to the pot.


4. To serve, ladle the soup into bowls. Top with a handful of corn chips, a generous sprinkle of Monterey Jack cheese, and a few slices of avocado.


**A Nostalgic Family Memory**


Every time I cook this soup, I’m transported back to my grandmother’s cozy kitchen. It was a small space, always bustling with family chatter and the irresistible aroma of her simmering soup. As a child, I remember sitting at the wooden kitchen table, my feet dangling from the chair, eagerly watching my grandmother as she skillfully prepared this comforting meal.


The highlight of the evening was when she’d let me sprinkle the corn chips and cheese onto the soup, a task I took very seriously. The rich flavors, combined with the satisfying crunch of the chips, made every spoonful a delightful experience. It was during those cherished dinners that I learned the true meaning of comfort food—not just in taste, but in the warmth of family and shared moments.


**Difficulty Rating and Classification**


This Chicken-Tortilla Chip Soup is a breeze to prepare, making it a perfect recipe for cooks of all skill levels with a difficulty rating of just 3 out of 10. As a hearty and fulfilling main dish, it’s ideal for those cozy family dinners or a solo evening of self-care.


In the hustle and bustle of modern life, taking time to prepare and enjoy a simple, nourishing meal can be a powerful act of love—for yourself and those around you. So, gather your ingredients, embrace the nostalgia, and savor the heartwarming comfort of Chicken-Tortilla Chip Soup.

Read more about Appetizers

Read more about Main Dishes

Read more about Desserts

Classic Pumpkin Pie | Made by Meaghan Moineau

Classic Pumpkin Pie | Made by Meaghan Moineau

Title: "A Slice of Nostalgia: The Timeless Allure of Classic Pumpkin Pie"


Description: Dive into the comforting embrace of fall with a Classic Pumpkin Pie recipe that not only tantalizes your taste buds but also warms your heart with a sprinkle of nostalgia.


---


As the crisp autumn air begins to weave its way through the trees, painting the landscape with hues of amber and gold, there's one classic dessert that captures the essence of the season like no other: Classic Pumpkin Pie. This timeless recipe combines the rich flavors of canned pumpkin, the warm spices of cinnamon, ginger, and nutmeg, and the creamy sweetness of condensed milk, all nestled within a tender, flaky pie crust. It's more than just a dessert; it's a culinary tradition that brings family and friends together around the table, year after year.


### Ingredients:


- 1 can of pumpkin


- 2 large eggs


- 1 teaspoon ground cinnamon


- 1/2 teaspoon ground ginger


- 1/4 teaspoon ground nutmeg


- 1/2 teaspoon salt


- 1 can sweetened condensed milk


- 1 unbaked pie crust


- Whipped cream for garnish


### Instructions:


1. **Preheat the Oven**: Begin by preheating your oven to 425 degrees F. This initial high temperature helps set the crust, ensuring it remains crisp and flaky.


2. **Mix the Filling**: In a medium bowl, whisk together the canned pumpkin, sweetened condensed milk, eggs, ground cinnamon, ginger, nutmeg, and salt. Stir until the mixture is smooth and well combined.


3. **Assemble the Pie**: Pour the pumpkin mixture into the unbaked pie crust, spreading it evenly with a spatula.


4. **Bake**: Place the pie in the oven and bake for 15 minutes. Then, reduce the oven temperature to 350 degrees F and continue baking for an additional 35 to 40 minutes. The pie is done when a knife inserted 1 inch from the crust comes out clean.


5. **Cool and Serve**: Allow the pie to cool completely before serving. Garnish with a generous dollop of whipped cream for the perfect finishing touch.


### Difficulty Rating: 4/10


### Classification: Dessert


**A Nostalgic Family Memory:**


Every Thanksgiving, as the fragrant aroma of pumpkin pie wafted through the house, it signaled the beginning of the holiday season for our family. I vividly remember my grandmother standing in her cozy kitchen, wearing her favorite apron, which was always dusted with a faint layer of flour. She would hum softly to herself as she whisked the pumpkin filling, a melody that echoed the warmth and love she poured into every dish she made.


Gathered around the dining table, with the pie taking center stage, we would share stories of the past and dreams for the future, laughter punctuating our conversations. As dessert was served, my grandmother would always insist on adding an extra swirl of whipped cream to each slice, a gesture that made every piece feel special.


This Classic Pumpkin Pie recipe is not just a dessert; it's a cherished tradition, a slice of nostalgia that connects us to our roots and reminds us of the simple joys of life. Whether you're a seasoned baker or a novice in the kitchen, this recipe offers a delightful journey back to those heartwarming moments that define the spirit of family gatherings.


As you take your first bite, may it transport you to a place of warmth, love, and cherished memories. Happy baking!

Read more about Appetizers

Read more about Main Dishes

Read more about Desserts

Moroccan Lemon Shish Kebabs | Made by Meaghan Moineau

Moroccan Lemon Shish Kebabs | Made by Meaghan Moineau

**Title: Savoring Tradition: Moroccan Lemon Shish Kebabs**


**Description:** Dive into the world of Moroccan cuisine with our delightful Moroccan Lemon Shish Kebabs. Discover the vibrant flavors of lemon, herbs, and spices wrapped around juicy chicken skewers. Experience the joy of creating a dish that's not just a meal, but a cherished family tradition.


---


**A Taste of Morocco: Moroccan Lemon Shish Kebabs Recipe**


When it comes to culinary experiences that transport you to another world, Moroccan cuisine never disappoints. Bursting with vibrant flavors and aromatic spices, one dish that stands out is the delectable Moroccan Lemon Shish Kebabs. These tantalizing skewers are not just a feast for the senses but also a cherished family tradition that brings nostalgic memories to life.


**Ingredients:**


- Lean chicken breast fillets, trimmed of fat and cut into 1" cubes


- Moroccan lemon marinade


- Fresh parsley


- Fresh rosemary leaves


- Fresh thyme leaves


- Garlic


- Black peppercorns


- Lemon juice


- Olive oil


**Instructions:**


1. **Prepare the Marinade:** In a large bowl, combine fresh parsley, rosemary leaves, thyme leaves, garlic, black peppercorns, lemon juice, and olive oil. Mix well to create the aromatic Moroccan lemon marinade.


2. **Marinate the Chicken:** Add the cubed chicken breast fillets to the marinade, ensuring each piece is well-coated. Cover the bowl with plastic wrap and let it marinate for at least half an hour. For deeper flavor, consider leaving it in the fridge for a few hours.


3. **Prepare the Skewers:** If using bamboo skewers, soak them in a tray of water to prevent burning during grilling.


4. **Thread the Chicken:** Thread about four pieces of marinated chicken onto each skewer.


5. **Cook the Kebabs:** Grill the shish kebabs over charcoal or on a skillet until the chicken is thoroughly cooked and slightly charred, releasing the irresistible aroma of lemon and herbs.


6. **Serve with a Side:** Once cooked, serve immediately on a bed of rice, Mediterranean couscous, or with warm pita bread.


**Difficulty:** 4/10


**Classification:** Main Dish


**A Nostalgic Family Memory:**


As a child, the aroma of Moroccan Lemon Shish Kebabs sizzling on the grill was a surefire sign that summer had arrived. My family would gather in the backyard, the air filled with laughter and stories shared across generations. My grandfather, a master of the grill, would always recount tales of his own childhood in Morocco, where these kebabs were a staple at family gatherings.


The preparation was a family affair. My mother would meticulously trim the chicken, while my father mixed the marinade, his hands a blur as he combined the fresh herbs and spices. I would watch in awe, occasionally sneaking a taste of the tangy marinade, my fingers sticky with lemon juice and olive oil.


As the sun began to set, the kebabs would be placed on the grill. The smoke rising from the coals seemed to carry with it the essence of Morocco. The first bite was always magical – the tender chicken bursting with flavors that danced on the tongue.


Even now, making these Moroccan Lemon Shish Kebabs feels like stepping back in time, each skewer a bridge to those cherished family moments. It's more than just a recipe; it's a reminder of the joy and love that food can bring to our lives.


Incorporating this dish into your recipe repertoire not only promises a delightful culinary experience but also invites the warmth and nostalgia of family traditions into your home. So, fire up the grill, gather your loved ones, and let the magic of Moroccan Lemon Shish Kebabs create new memories for generations to come.

Read more about Appetizers

Read more about Main Dishes

Read more about Desserts

Best Potato Cheese Soup in a bread bowl | Made by Meaghan Moineau

Best Potato Cheese Soup in a bread bowl | Made by Meaghan Moineau

**Title: "Cozy Comfort: Indulge in the Best Potato Cheese Soup in a Bread Bowl"**


**Description:**


Dive into a bowl of warmth and nostalgia with our Best Potato Cheese Soup in a Bread Bowl. This creamy, cheesy delight promises to be the star of your dinner table, offering a perfect blend of flavors that feels like a warm hug on a chilly day. With easy-to-follow instructions and a touch of family history, this recipe is a heartfelt journey into the world of comfort food.


---


**The Best Potato Cheese Soup in a Bread Bowl: A Family Tradition**


When the leaves begin to change and the autumn air turns crisp, there's one dish that instantly transports me back to my grandmother’s cozy kitchen—the creamy, savory delight of Potato Cheese Soup. Nestled in a warm bread bowl, this soup was more than just a meal; it was a family tradition, a cherished memory, and a symbol of togetherness.


**Ingredients:**


- 2 tablespoons olive oil


- 1 sweet onion, diced


- 2 cloves garlic, minced


- 4 cups chicken stock


- 2 cups water


- 1 teaspoon salt


- 4 red potatoes, diced


- 2 carrots, diced


- 1 cup whole milk


- 1 cup heavy cream


- 2 tablespoons butter


- 1 block Velveeta cheese, cubed


- 1 cup shredded sharp cheddar cheese


- Salt and pepper to taste


- Garnishes: bacon crumbles, chives, sour cream, additional shredded cheese


**Instructions:**


1. **Prep and Sauté:**


In a large heavy stock pot, heat 2 tablespoons of olive oil over medium heat. Add diced onions and cook until translucent, about 2-3 minutes. Stir in minced garlic and cook for another minute, letting the flavors meld.


2. **Build the Base:**


Pour in the chicken stock, water, and 1 teaspoon of salt. Add diced red potatoes and carrots, bringing the mixture to a boil. Cook until the potatoes are fork-tender.


3. **Blend for Creaminess:**


Turn off the burner and let the soup cool slightly. Remove about half of the potatoes with a slotted spoon and blend them in a food processor until smooth. Return the potato paste to the pot.


4. **Add Creaminess and Cheesy Goodness:**


Place the stock pot back on medium heat. Stir in whole milk, heavy cream, butter, and Velveeta cheese. Heat gently until the butter and Velveeta are melted; be careful not to let it boil. Stir frequently with a wooden spoon, scraping the bottom to prevent sticking.


5. **Cheesy Finish:**


Gradually add the shredded sharp cheddar, one handful at a time, stirring until melted. Sprinkle in some Parmesan cheese for extra depth. Season with additional salt and pepper to taste.


6. **Serve and Savor:**


Ladle the soup into a bread bowl or your favorite mug. Top with bacon crumbles, chives, a dollop of sour cream, and extra shredded cheese for the ultimate comfort experience.


**A Nostalgic Note:**


I remember sitting at my grandmother's kitchen table, the warm aroma of simmering soup filling the air. She would often tell us stories of her childhood, her voice a gentle melody against the backdrop of bubbling pots. Each spoonful of soup was like a page from her storybook, rich with history and love. Now, every time I make this soup, those cherished memories come alive, and I feel her warmth surrounding me.


**Rate Difficulty:** 5/10


**Classification:** Main Dish


Whether it's a family gathering or a quiet evening at home, this Potato Cheese Soup in a Bread Bowl is more than just a meal—it's a memory in the making. So, gather your loved ones, share stories, and enjoy the comforting embrace of a dish that's been passed down through generations.

Read more about Appetizers

Read more about Main Dishes

Read more about Desserts

Baked Cinnamon Apple Wedges | Made by Meaghan Moineau

Baked Cinnamon Apple Wedges | Made by Meaghan Moineau

**Title: A Warm Hug in Every Bite: Baked Cinnamon Apple Wedges**


**Description:** Dive into the nostalgic flavors of fall with our Baked Cinnamon Apple Wedges. This simple yet flavorful dessert is perfect for cozy gatherings or a comforting treat at home. With just four ingredients, this easy-to-make dish brings back cherished family memories while delighting your taste buds.


---


As autumn leaves begin to fall and a crisp breeze fills the air, my thoughts often drift back to cozy family gatherings. One of my fondest memories is of my grandmother bustling around her warm kitchen, the welcoming scent of cinnamon and nutmeg weaving through the house like a comforting embrace. She had a knack for turning the simplest ingredients into something magical, and her Baked Cinnamon Apple Wedges were no exception.


Every autumn, she would gather the freshest apples from the local orchard, their skins glistening in shades of red and green. I remember sitting at the kitchen table, my feet barely touching the floor, as she meticulously cut each apple into perfect wedges. She would then drizzle them with rich maple syrup, sprinkle them with aromatic cinnamon and nutmeg, and slide them into the oven. The anticipation was almost too much to bear, as the sweet and spicy aroma filled the room, wrapping us in its warmth.


Just ten minutes later, the apples emerged from the oven, golden brown and tender, ready to be savored. Each bite was like a warm hug, the flavors perfectly balanced and reminiscent of everything wonderful about the season. We would gather around the table, sharing stories and laughter, the simple act of enjoying these baked apple wedges creating memories that would last a lifetime.


Now, as I prepare this dish for my own family, I am reminded not only of my grandmother's love but also of the joy found in sharing these timeless recipes. The Baked Cinnamon Apple Wedges are more than just a dessert; they are a connection to the past, a celebration of the present, and a tradition I hope to pass on.


**Recipe: Baked Cinnamon Apple Wedges**


**Ingredients:**


- 1 apple


- 1 tablespoon maple syrup


- 1 teaspoon ground cinnamon


- 1/4 teaspoon ground nutmeg


**Instructions:**


1. Preheat your oven to 180 degrees Celsius (356 degrees Fahrenheit).


2. Cut the apple into approximately 10-12 wedges.


3. In a bowl, mix the apple wedges with maple syrup, cinnamon, and nutmeg until evenly coated.


4. Arrange the apple wedges in a single layer in a small baking dish or on a baking tray.


5. Bake in the preheated oven for 10 minutes, or until the apples are golden brown and cooked through.


6. Serve warm and enjoy the comforting flavors.


**Difficulty Rating:** 2/10


**Classification:** Dessert


Whether you're looking to recreate cherished family memories or simply indulge in a deliciously easy dessert, these Baked Cinnamon Apple Wedges are sure to delight. With their enticing aroma and comforting taste, they capture the essence of fall in every bite. So gather your loved ones, share a story or two, and enjoy this warm hug from the oven.

Read more about Appetizers

Read more about Main Dishes

Read more about Desserts

Easy Shrimp Scampi | Made by Meaghan Moineau

Easy Shrimp Scampi | Made by Meaghan Moineau

**Title: A Taste of Home: Easy Shrimp Scampi for the Soul**


**Description:** Dive into the heartwarming flavors of Easy Shrimp Scampi, a quick and delightful main dish that combines the rich taste of garlic, butter, and white wine with succulent shrimp. Perfect for a family dinner or a solo indulgence, this recipe is a nostalgic journey back to cherished family gatherings. Discover the simplicity and joy of cooking this classic dish, rated just 3 out of 10 in difficulty—ideal for both seasoned cooks and beginners alike.


---


There's something magical about the aroma of garlic sizzling in butter and olive oil, a fragrance that transports me back to my grandmother's cozy kitchen. Every Sunday, our family would gather around her wooden dining table, eagerly awaiting the feast she had prepared. Among her culinary masterpieces, her Shrimp Scampi was a standout—simple yet bursting with flavor.


**Ingredients:**


- 2 tablespoons butter


- 2 tablespoons olive oil


- 4 cloves garlic, minced


- 1/2 cup white wine


- 2 tablespoons lemon juice


- 1 pound shrimp, peeled and deveined


- 1/4 cup fresh parsley, chopped


- Salt and pepper to taste


**Instructions:**


1. In a large skillet, melt the butter and olive oil over medium heat. The kitchen fills with the comforting scent, reminiscent of those cherished Sunday gatherings.


2. Add the minced garlic and sauté for about 30 seconds, just until it begins to release its aromatic goodness.


3. Stir in the white wine and lemon juice, letting it simmer for a minute. This step always reminded me of my grandmother's gentle touch as she cooked, her love infusing every dish.


4. Add the shrimp, fresh parsley, salt, and pepper. Cooking over high heat, stir constantly for 2-3 minutes until the shrimp turn pink and are cooked through.


5. Serve immediately over a bed of pasta or rice, just like we did back then, when every bite was accompanied by laughter and stories from our week.


As I recreate this dish today, I remember a particular Sunday during a chilly autumn. The leaves were turning, painting the landscape in shades of gold and crimson. We were all gathered in my grandmother's warm kitchen, the windows fogged up from the heat of the stove. I watched as she moved gracefully, her hands a blur of practiced motions, creating magic with simple ingredients. Her Shrimp Scampi was always the highlight, a dish that brought us together and made us feel at home.


**Difficulty:** 3/10


**Classification:** Main Dish


With every bite of this Easy Shrimp Scampi, I'm reminded of those beautiful moments—an ode to simpler times, where food and family were the heart of our home. May this recipe bring a touch of that warmth and nostalgia to your table, too. Enjoy!

Read more about Appetizers

Read more about Main Dishes

Read more about Desserts

Chicken and Roasted Broccoli Salad With Goat Cheese | Made by Meaghan Moineau

Chicken and Roasted Broccoli Salad With Goat Cheese | Made by Meaghan Moineau

# Nostalgic Flavors: Chicken and Roasted Broccoli Salad with Goat Cheese


## A Taste of Home: Family Gatherings and Culinary Memories


Growing up, my family had a tradition of gathering every Sunday for a hearty meal. The kitchen would be filled with laughter, the clatter of pots and pans, and the mouthwatering aroma of delicious dishes. One of the standout recipes that often graced our table was the Chicken and Roasted Broccoli Salad with Goat Cheese. This dish, with its perfect blend of savory chicken, tangy goat cheese, and roasted broccoli, is not just a meal—it's a cherished memory.


### Ingredients:


- 1 head of broccoli, chopped into florets


- 2 garlic cloves, minced


- 4 oz goat cheese, crumbled


- Juice from 1 lemon


- 3 tbsp olive oil


- 1 tsp dried oregano


- 1/2 tsp freshly ground pepper


- 1 red bell pepper, sliced


- A pinch of red pepper flakes


- Salt, to taste


- 2 cups cooked shredded chicken


- 1 tsp sugar


### Instructions:


1. **Preheat the Oven:** Begin by heating your oven to a scorching 500 degrees Fahrenheit. Place a sturdy baking sheet on the lowest rack. This high heat is essential for achieving perfectly roasted broccoli.


2. **Prepare the Broccoli:** In a large bowl, toss the broccoli florets with minced garlic, olive oil, salt, pepper, and a dash of red pepper flakes. For an added touch of sweetness, sprinkle in the sugar.


3. **Roast the Broccoli:** Spread the broccoli mixture evenly on the preheated baking sheet. Roast in the oven for about 15-20 minutes, or until the broccoli is tender and has a slight char.


4. **Assemble the Salad:** In a large serving bowl, combine the roasted broccoli, shredded chicken, and red bell pepper slices. Drizzle with lemon juice and sprinkle with dried oregano.


5. **Add the Goat Cheese:** Finish the salad by crumbling goat cheese over the top. Its creamy texture and tangy flavor will elevate the dish.


6. **Serve:** Toss everything gently to combine, ensuring an even distribution of ingredients. Serve warm or at room temperature.


### A Family Memory:


I vividly remember one particular Sunday when my grandmother decided to add her unique twist to this classic dish. With her usual flair, she infused the salad with extra lemon juice and a touch of oregano, creating a symphony of flavors that lingered on our taste buds. That afternoon, we gathered around the table, reminiscing about old times and sharing stories that spanned generations. The Chicken and Roasted Broccoli Salad with Goat Cheese became more than just a meal—it was a symbol of love, tradition, and the bonds that tie us together.


### Difficulty Rating: 4/10


This dish is straightforward and perfect for cooks of all levels. The simple steps and readily available ingredients make it an ideal choice for a relaxing Sunday dinner.


### Classification: Main Dish


With its hearty combination of protein, vegetables, and cheese, this salad serves as a satisfying main dish. It’s perfect for a family meal or a casual dinner with friends.


---


Whether you're recreating family memories or crafting new ones, the Chicken and Roasted Broccoli Salad with Goat Cheese is a delightful dish that will warm your heart and satisfy your palate. Enjoy the nostalgia and flavors that come with each bite!

Read more about Appetizers

Read more about Main Dishes

Read more about Desserts

Creamy Lime Pie Square Bites | Made by Meaghan Moineau

Creamy Lime Pie Square Bites | Made by Meaghan Moineau

**Title: A Zesty Twist on Tradition: Creamy Lime Pie Square Bites**


**Description:** Dive into a world of tangy sweetness with our Creamy Lime Pie Square Bites. Perfect for dessert lovers, these luscious bites are a modern twist on a family classic. Discover the perfect blend of graham cracker crust and creamy lime filling, and indulge in a nostalgic journey that will tantalize your taste buds and warm your heart.


---


### A Nostalgic Bite of Lime Heaven


Growing up, my family had a tradition of gathering every Sunday afternoon at my grandmother's house for a potluck feast. Each member would bring their signature dish, but the highlight was always my grandmother's famous key lime pie. The tartness of the lime combined with the sweetness of the creamy filling was a taste that lingered in our memories long after the last bite was savored.


Fast forward to today, and I've taken her beloved recipe and transformed it into Creamy Lime Pie Square Bites—a delightful, bite-sized version that pays homage to those cherished family gatherings. These squares are perfect for sharing, just like the memories of those sunny Sundays in Grandma's kitchen.


### Ingredients:


- All-purpose flour


- Graham cracker crumbs


- Lime zest


- Sugar


- Unsalted butter


### Instructions:


1. **Preheat and Prepare:** Begin by preheating your oven to 350°F (175°C). Cover an 8x8 glass square dish with foil, ensuring the foil extends beyond the edges for easy removal later.


2. **Crust Creation:** In a medium bowl, whisk together all-purpose flour, graham cracker crumbs, lime zest, and sugar until they reach a grainy consistency. Melt unsalted butter and incorporate it into the mixture.


3. **Press and Bake:** Using a spoon or your fingers, press the graham crust mixture firmly into the prepared dish, making sure all edges and the bottom are well covered. Place in the oven and bake for 10-15 minutes until the crust is golden brown. Set aside to cool for about an hour.


4. **Filling the Flavor:** For the filling, combine all your ingredients in a medium bowl. Mix well for about 30 minutes, ensuring a smooth, creamy texture, then continue mixing on low speed for an additional 3 minutes.


5. **Assemble and Bake Again:** Pour the filling into the graham cracker crust, smoothing out the top and ensuring the edges are filled. Bake in the oven for another 5-10 minutes before removing the dish to a cooling rack for 15 minutes.


6. **Chill and Serve:** Finally, transfer the dish to the refrigerator for about 45 minutes to set. Once chilled, carefully lift the foil to remove the dessert from the dish. Slice into bite-sized squares and serve.


### A Tangy Twist on Tradition


These Creamy Lime Pie Square Bites are more than just a dessert. They're a testament to the power of family traditions and the joy of sharing a lovingly prepared meal. Whether you're a seasoned baker or a novice in the kitchen, these squares are a breeze to make and sure to impress.


**Difficulty:** 4/10


**Category:** Dessert


### Explore More Lime-Infused Delights


If you're as captivated by lime's zesty charm as we are, explore these delightful recipes:


- Coconut Lime Spritzer


- Blackberry Lime Margaritas


- Strawberry Limeade


- Cherry Lime Chia Energy Bars


- Strawberry Margarita Cheesecake


### A Note on Essential Oils


While adding a drop of high-quality lime essential oil can enhance the flavor, it's crucial to ensure the oil is edible. Look for therapeutic-grade oils with a Supplement Facts box. Always prioritize purity and safety in your culinary adventures.


Join our community of over 500,000 subscribers at Pink When and get exclusive recipes and tips delivered straight to your inbox. Sign up now and receive our FREE Simple Fit Dinners Ebook. Don’t miss out on the culinary fun!

Read more about Appetizers

Read more about Main Dishes

Read more about Desserts

Rotisserie Chicken and Bean Tostadas | Made by Meaghan Moineau

Rotisserie Chicken and Bean Tostadas | Made by Meaghan Moineau

**Title: Savoring Nostalgia: Rotisserie Chicken and Bean Tostadas for a Heartwarming Family Feast**


**Description: Discover the delightful fusion of flavors in our Rotisserie Chicken and Bean Tostadas recipe. This easy-to-follow dish, rated a 3 out of 10 in difficulty, is perfect as a savory main dish. Uncover a cherished family tale that adds a sprinkle of nostalgia to each bite, and gather your loved ones around for a feast brimming with warmth and joy.**


---


As the oven preheats to a cozy 350 degrees, my kitchen fills with the comforting aroma of anticipation. Today, we're diving into a dish that has become synonymous with family gatherings and heartfelt laughter—Rotisserie Chicken and Bean Tostadas. This recipe, a delightful blend of simplicity and flavor, is not just about creating a meal but reliving cherished memories with every bite.


**A Taste of Tradition**


Growing up, Saturday afternoons were reserved for a ritual my family held dear. My abuela would gather us around her kitchen table, a place where stories were shared and bonds were strengthened. Among her repertoire of culinary creations, her rotisserie chicken and bean tostadas were legendary. The process was simple, yet it carried a weight of tradition that made each gathering special.


**The Recipe**


To recreate this nostalgic dish, start by placing corn tortillas on a cookie sheet, sliding them into the oven for 16-17 minutes until their edges brown and curl. The smell of warming tortillas always transports me back to those afternoons, the kitchen filled with laughter and stories.


Once the tortillas have cooled at room temperature, the assembly of the tostadas begins. Spread 1-2 tablespoons of canned refried beans on each tortilla, a creamy foundation that anchors the flavors. Top it with a generous handful of shredded rotisserie chicken, its savory aroma mingling with the memories of my abuela's kitchen.


A vibrant sprinkle of shredded iceberg lettuce and diced tomato adds a fresh crunch, reminiscent of the garden my grandfather tended with care. A dollop of guacamole, creamy and rich, is followed by a drizzle of lime juice, its citrusy tang brightening the dish.


The final touches are a sprinkle of cotija cheese, its salty crumble echoing the laughter shared over meals, and a drizzle of salsa. Garnish with jalapeños for a hint of heat, a nod to the spice that my family has always loved.


**A Meal to Share**


These tostadas, served open-faced on a platter, tell a story of family and tradition. They remind me of the joy of gathering around the table, sharing not just food but a piece of our heritage. As a main dish, this recipe is a testament to the power of food to connect us, to bring us closer to those we love.


**A Nostalgic Culinary Adventure**


As you savor these Rotisserie Chicken and Bean Tostadas, may your kitchen be filled with the same warmth and joy that mine was on those cherished Saturdays. This dish, a humble 3 out of 10 in difficulty, holds within it the power to create new memories while honoring the old. Gather your loved ones, share stories, and let the flavors of this dish carry you on a nostalgic culinary adventure.


**Keywords:** Rotisserie Chicken Tostadas, Easy Tostada Recipe, Family Meal, Nostalgic Dish, Mexican Cuisine, Main Dish, Simple Tostadas, Authentic Flavor, Family Tradition, Comfort Food.


---


Whether you're recreating family memories or crafting new ones, these Rotisserie Chicken and Bean Tostadas are sure to become a beloved staple in your home. Enjoy the flavors, cherish the moments, and let the tradition continue.

Read more about Appetizers

Read more about Main Dishes

Read more about Desserts

Chewy Gingersnaps | Made by Meaghan Moineau

Chewy Gingersnaps | Made by Meaghan Moineau

**Title: "Chewy Gingersnaps: A Heartwarming Holiday Tradition"**


**Description:** Dive into the cozy nostalgia of the holiday season with these irresistibly chewy gingersnaps. Infused with the warm spices of ginger and cinnamon, this classic dessert offers a delightful balance of sweet and spicy flavors. Ideal for family gatherings or a quiet night by the fire, these cookies are sure to become a cherished part of your seasonal traditions. With a difficulty rating of 4 out of 10, they're accessible for bakers of all skill levels.


---


As the crisp air of fall deepens into the chill of winter, my kitchen becomes a haven of warmth and spice. The scent of gingersnaps baking in the oven is more than just a delightful aroma; it’s a passport to cherished family memories. These chewy gingersnaps, with their perfect blend of ginger, cinnamon, and molasses, have been a staple at our holiday gatherings for as long as I can remember.


Growing up, the holidays meant a bustling kitchen, filled with the laughter of family and the clatter of pots and pans. My grandmother would always take the lead, orchestrating the preparation of a feast while simultaneously baking batch after batch of her famous gingersnaps. These cookies were more than just a treat; they were a tradition, a symbol of the season, and a testament to the love that bound our family together.


The process of making gingersnaps was a family affair. My siblings and I would gather around the kitchen counter, eager to help in any way we could. Our roles were simple yet crucial: stirring the flour, baking soda, salt, and spices in one bowl while watching my grandmother cream the butter, oil, and sugars in another. The anticipation built as she beat in the eggs, one at a time, followed by the rich, dark molasses that gave the cookies their distinctive flavor.


Once the dough was mixed, it was time for our favorite part: shaping the dough into small balls and rolling them in a generous coating of sugar. As we placed them onto parchment-lined baking trays, my grandmother would remind us that the secret to their perfect chewiness was to bake them for precisely eight minutes. They would still seem a bit underdone when first taken out, but that was exactly how they were supposed to be.


The first bite of a freshly baked gingersnap was always magical. The outside was crisp with a sugar coating, while the inside was soft, chewy, and bursting with flavor. These cookies were often enjoyed with a cup of hot cocoa or mulled cider, completing the cozy holiday experience.


Today, I carry on the tradition with my own family, baking these chewy gingersnaps each year as the holidays approach. Each batch is a tribute to my grandmother and the loving memories she created. I hope that as you try this recipe, it brings warmth, joy, and a touch of nostalgia to your home as well.


**Difficulty: 4/10**


**Classification: Dessert**


**Ingredients:**


- 2 teaspoons baking soda


- 1 cup brown sugar


- 1 cup (2 sticks) butter, softened


- 2 teaspoons ground cinnamon


- 2 large eggs


- 2 cups all-purpose flour


- 2 teaspoons ground ginger


- 1/2 teaspoon kosher salt


- 1/4 cup molasses


- 1/4 cup vegetable oil


- 1/4 teaspoon ground white pepper


- 1/2 cup white sugar (plus extra for rolling)


**Instructions:**


1. Preheat oven to 325°F (160°C).


2. In a large bowl, stir together the flour, baking soda, salt, ginger, cinnamon, and white pepper.


3. In another bowl, cream the butter, oil, brown sugar, and white sugar together until light and fluffy.


4. Beat in the eggs, one at a time, until fully incorporated.


5. Stir in the molasses.


6. Gradually add the dry ingredients to the wet ingredients, stirring until well combined.


7. Shape the dough into small balls and roll them in additional white sugar.


8. Place the dough balls on a baking tray lined with parchment paper.


9. Bake for 8 minutes. The cookies will appear slightly underdone when removed from the oven.


10. Allow to cool on the baking tray for a few minutes before transferring to a wire rack to cool completely.


Enjoy these delightful chewy gingersnaps, and may they fill your home with warmth and joy this holiday season!

Read more about Appetizers

Read more about Main Dishes

Read more about Desserts