
Picture this: It’s a chilly fall evening, and my kitchen still smells like the remnants of the apple pie I baked last weekend. I’m standing in front of the pantry, craving something that’s both cozy and a little unexpected. Ever had those moments where you stare at the ingredients you have and think, “This could either be a disaster or magic”? That was me a few weeks ago, reaching for an acorn squash, some curry powder, and a bottle of maple syrup that I had been saving for pancake Sundays. What came out of that experimental whirlwind was a dish that’s not only delicious but also has become my go-to when I need to impress with minimal effort. It’s sweet, spicy, and roasted to perfection—ideal for spicing up a weeknight or wowing guests without breaking a sweat.
Jump to Recipe
What You’ll Need
This recipe is delightfully simple, and chances are you already have most of these on hand. Here’s what you’ll need:
- Acorn squash – pick one that’s firm and heavy for its size.
- Curry powder – this is where the magic happens, so use your favorite blend.
- Maple syrup – pure, not the pancake kind, for that rich, caramelized finish.
- Olive oil – for that perfect roast.
- Salt – to taste and to enhance all those flavors.
How to Make Maple & Curry Acorn Squash
- Preheat your oven to 400°F (200°C) and line a baking sheet with parchment paper or a silicone mat. This makes cleanup a breeze and prevents any sticky situations.
- Give the acorn squash a good rinse, especially if you plan to eat the skin (which, trust me, you’ll want to after it’s all roasted and crispy).
- Carefully, chop the squash in half and scoop out the seeds. You can use a spoon or an ice cream scoop for this—whichever feels less like wrestling and more like a gentle sweep.
- Slice the squash into one-inch wedges, using the natural grooves as your guide. Not only does this make the pieces look pretty, but it also ensures even cooking.
- In a medium bowl, toss the squash wedges with curry powder, maple syrup, olive oil, and salt. Stir until each piece is glistening with the mixture, and you’re tempted to lick your fingers.
- Arrange the wedges on the prepared baking sheet, cut side down. This helps them get that beautiful golden-brown finish on the edges.
- Bake for 15 minutes, then flip them over with a spatula so both sides get equal love and attention. Bake for another 10 to 15 minutes until they’re tender and can be easily pierced with a fork.
Cook’s Notes
When it comes to choosing the right acorn squash, look for one that feels heavy for its size and has a deep green skin. A few orange patches are okay and can even be a sign of ripeness. If you’re prepping ahead, you can slice the squash a day in advance and keep it in the fridge. Once roasted, these wedges keep well covered in the fridge for up to three days. Just pop them in the oven to reheat and crisp them back up. Be cautious not to over-bake; the squash should be tender but not mushy, and the edges should be caramelized but not burnt.
Make It Your Own
- Switch up the squash: Don’t have acorn squash? Butternut or delicata squash work beautifully too.
- Spice it up: Add a pinch of cayenne pepper to the mix for a spicy kick.
- Play with herbs: Sprinkle some fresh rosemary or thyme over the top before baking for an aromatic twist.
- Sweeten the deal: Drizzle a bit more maple syrup on top right before serving for an extra glossy finish.
If you try this, I’d love to hear how it turns out — drop a comment or tag me! Seriously, nothing makes my day more than seeing someone else enjoy something I whipped up in my kitchen. Happy cooking, and remember, kitchen experiments are just recipes in disguise!
Related update: Maple & Curry Acorn Squash
Related update: Pizza bites with pumpkin

Picture this: It’s a hectic Wednesday evening, and you’ve just walked through the door, shoes off, contemplating what to make for dinner. The fridge hums with half-empty bottles of condiments, and there’s a lone pack of pork chops staring back at you. This is the moment you realize the magic of Bruschetta Style Pork & Pasta. It’s the perfect blend of comforting pasta and savory pork, all wrapped in the tangy-sweet goodness of bruschetta flavors. It’s one of those dishes that feels fancy enough to impress but is wonderfully simple to throw together, ideal for those mid-week dinners when time is not on your side.
Jump to Recipe
What You’ll Need
This recipe is a lifesaver because chances are you already have most of the ingredients hanging around your kitchen. Here’s what you’ll need to whip up this delight:
- One package of bow tie pasta
- Freshly grated parmigiano reggiano
- A jar of Recipe Makers Chicken Bruschetta Pasta sauce
- 4-6 pork chops
How to Make What to make for dinner tonight?? Bruschetta Style Pork & Pasta
- First, give those pork chops a good wash and rinse. Pat them dry, then plop them into your skillet. You’ll want to cut them into bite-sized pieces so they cook quickly and soak up all those delicious flavors.
- Add half of the Basil Garlic simmer sauce from your Bruschetta Pasta kit into the skillet with the pork. You’ll know it’s working its magic when the kitchen starts to fill with a seriously drool-worthy aroma.
- Meanwhile, bring a pot of water to a boil and get your bow tie pasta cooking. Aim for al dente—that perfect balance of tender but still with a bit of bite.
- Once your pasta is done, drained, and ready, toss it into the skillet with the pork. Pour in the rest of the Basil Garlic Simmering Sauce, giving everything a nice mix so the pasta is well-coated.
- Now for the pièce de résistance: top the whole thing with the Chunky Bruschetta Finishing Sauce. Sprinkle generously with Parmesan, then cover the skillet. Let it all cook on low heat for 2 to 3 minutes, just until everything’s heated through and the cheese melts into gooey perfection.
Cook’s Notes
Here’s the deal: when cutting your pork, keep the pieces uniform in size to ensure even cooking. You want them golden but not overcooked. If you’re making this ahead, stop just before adding the Parmesan and Finishing Sauce. Store it in the fridge, and when you’re ready to eat, layer on the sauce and cheese, then heat through. Leftovers? They’re a dream. Just store them in an airtight container, and they’ll be good for up to three days. Reheat gently on the stove or in the microwave with a splash of water to keep everything from drying out.
Make It Your Own
Here are some ways you can switch things up:
- Swap the pork for crispy tofu for a vegetarian twist. Just pan-fry the tofu until golden before adding the sauces.
- Use zoodles or spaghetti squash instead of bow tie pasta for a low-carb version.
- Add a handful of fresh spinach to the skillet before serving for a pop of color and extra nutrients.
- For a spicy kick, toss in some red pepper flakes along with the Parmesan.
If you try this, I’d love to hear how it turns out—drop a comment or tag me! Cooking should be fun, stress-free, and delicious, so let’s make that happen. Happy cooking, friends!
Related update: What to make for dinner tonight?? Bruschetta Style Pork & Pasta

There was this one Thursday evening when I felt the chill in the air turning my fingers just a bit numb, and I craved something that felt like a warm hug. I was rifling through my pantry, hoping to discover a forgotten treasure, when I stumbled upon a jar of sauerkraut and a pack of knockwurst sitting in the fridge. Suddenly, inspiration struck. This dish is the epitome of comfort food — cozy, hearty, and surprisingly easy to throw together with a few pantry staples. The combination of savory knockwurst and tangy sauerkraut, all tied together with a hint of sweetness from molasses and the earthy warmth of spices, truly hits the spot on those brisk evenings when you just need a little extra comfort.
Jump to Recipe
What You’ll Need
This recipe is all about layering flavors with a minimal ingredient list — you’ll likely find many of these in your pantry already!
- 1 tablespoon butter
- 1 medium onion, chopped
- 1 cup beer
- 1 cup water
- 1 tablespoon cornstarch
- 2 tablespoons brown mustard
- 1 tablespoon molasses
- 1 teaspoon caraway seed
- 1/4 teaspoon ground allspice
- 1/4 teaspoon ground black pepper
- 1 medium rutabaga, peeled and chopped
- 1 pound cooked knockwurst
- 2 cooking apples, peeled, cored, and cut into wedges
- 1 can (about 14 ounces) sauerkraut
How to Make Knockwurst with Sauerkraut
- In a medium frying pan, melt the butter over medium heat. Add the knockwurst and cook, turning occasionally, until they’re browned and the edges are just starting to crisp — about 10-12 minutes.
- Meanwhile, drain the sauerkraut in a colander, rinse it under cold water, and let it drain again thoroughly. This step is crucial to avoid an overly sour dish.
- In a large pot, sauté the chopped onion over medium heat until the pieces are tender and translucent, but not browned. You’ll know it’s ready when the kitchen fills with that sweet, savory onion aroma.
- Pour in the beer and let it come to a gentle simmer. Meanwhile, in a separate bowl or measuring cup, mix together the water, cornstarch, brown mustard, molasses, caraway seed, ground allspice, and black pepper until smooth.
- Stir this mixture into the onion and beer in the pot. Cook and stir consistently until the sauce thickens and becomes bubbly. You’ll see it start to coat the back of a spoon — that’s when you know it’s ready for the next step.
- Add the chopped rutabaga to the pot, cover with a lid, and let it simmer for 15 minutes, allowing the rutabaga to become just tender.
- Finally, stir in the browned knockwurst, apple wedges, and sauerkraut. Cover the pot again and let everything simmer together for another 15 to 20 minutes, until the apples have softened and the flavors have melded beautifully.
Cook’s Notes
- When browning the knockwurst, be patient and let them get a nice brown crust. It adds a lovely depth of flavor that you don’t want to miss.
- The molasses adds a touch of sweetness but doesn’t overpower. If you prefer slightly less sweetness, you can reduce the amount to 1 teaspoon.
- This dish can be made ahead and actually tastes better the next day as the flavors have more time to develop. Simply store it in an airtight container in the fridge for up to 3 days. Reheat on the stove over low heat until warmed through.
Make It Your Own
- For a vegetarian twist, swap the knockwurst with crispy tofu cubes. You’ll get that savory satisfaction without the meat.
- Use sweet potatoes in place of rutabaga for a sweeter, more colorful dish.
- Add a handful of chopped kale or spinach at the end for a burst of color and nutrients.
- If you’re a spice lover, a pinch of red pepper flakes will add a nice kick.
If you try this recipe, I’d love to hear how it turns out for you! Drop a comment below or tag me in your culinary adventures. Enjoy every bite of this cozy, delicious meal!
Related update: Knockwurst with sauerkraut
Related update: What to make for dinner tonight?? Bruschetta Style Pork & Pasta

So, there I was last Tuesday, staring into the fridge, wondering what to make for dinner that wouldn’t take an eternity. You know those days when all you want is something delicious but quick enough that you won’t be stuck in the kitchen all night? Enter: Eggplant pizzette. It’s that magical intersection of pizza cravings and veggie goodness. Plus, it’s one of those recipes that looks fancy enough to impress but is secretly super simple to throw together. Trust me, once you smell that cheese bubbling away, you’re going to thank yourself for making these little guys.
Jump to Recipe
What You’ll Need
Let’s talk about the ingredient list — it’s mercifully short and sweet. Chances are, you already have most of this at home, especially if you’re a basil hoarder like me.
- Round eggplant – the base for our pizzette
- Tomatoes – fresh or canned, your choice!
- Swiss cheese – for that perfect melty goodness
- Fresh basil leaves
- Oregano leaves
- Olive oil
How to Make Eggplant pizzette
- Preheat your oven to 230°C. Trust me, getting this right from the start saves you from impatiently watching the oven later.
- Grab your round eggplant and slice it into rounds, about half an inch thick. You want them thin enough to cook quickly but thick enough to hold all that topping.
- Place the eggplant rounds on a non-stick pan greased with olive oil. A light coating will do; no one wants oily pizzette.
- Bake the eggplant in the oven for about 10 minutes. You’ll know it’s ready for the next step when the edges start looking golden and slightly crispy.
- Carefully remove the pan from the oven — the eggplant stays, so it keeps warm and toasty.
- Spoon a generous amount of chopped tomatoes onto each eggplant round. If you’re using canned, make sure they’re well-drained to avoid sogginess.
- Sprinkle fresh basil and oregano leaves over the tomatoes. The aroma will start to hit you about now, and it’s divine.
- Top everything with grated Swiss cheese. Go ahead and be generous here; a good layer ensures that melty, bubbly finish.
- Pop the pan back in the oven for another 5 minutes. Keep an eye out — you want that cheese to turn a lovely golden brown.
- Remove from the oven and let them cool for a minute or two. These are fab served warm or even cooled down a bit as a snack.
Cook’s Notes
Alright, a few things to keep in mind. First, if you slice the eggplant too thin, it might turn into a mushy mess, so aim for that half-inch thickness. If you’re worried about bitterness, sprinkle a bit of salt on the eggplant slices and let them sit for 10 minutes before rinsing and patting dry. Also, feel free to adjust the herbs based on what you have—dried oregano works if fresh isn’t available. These pizzette can be stored in the fridge for up to two days, though they’re best enjoyed fresh.
Make It Your Own
Want to switch things up? Here are some ideas:
- Swap the Swiss cheese for mozzarella for a more classic pizza flavor.
- Add a layer of pesto under the tomatoes for an herbaceous kick.
- Use zucchini slices instead of eggplant if you prefer a different base.
- Try adding thin slices of pepperoni or mushrooms for extra toppings.
If you try this, I’d love to hear how it turns out — drop a comment or tag me! Happy cooking, and may your kitchen adventures be as tasty as they are fun!
Related update: Eggplant pizzette
Related update: Maple & Curry Acorn Squash

It was one of those chaotic Tuesday afternoons when everything seemed to be happening all at once. My inbox was overflowing, the laundry was threatening to become a second couch, and the dog was doing her best to convince me that she hadn’t been fed in weeks with those soulful eyes. As I rummaged through my pantry, I stumbled upon a forgotten stash of chocolate chips and suddenly, the only logical thing to do was to bake. Enter: Neiman Marcus Oatmeal Chocolate Chip Cookies. This recipe is that perfect balance between a comforting classic and a little twist that makes it feel special. It’s the kind of cookie that makes a regular Tuesday feel like a mini celebration. And the best part? These cookies are incredibly easy to whip up, even when life feels a bit like a juggling act.
Jump to Recipe
What You’ll Need
Trust me, chances are you already have most of these hanging out in your kitchen, just waiting to become something amazing.
- 1 cup unsalted butter, softened
- 1 cup granulated sugar
- 1 cup brown sugar, packed
- 2 large eggs
- 1 teaspoon vanilla extract
- 2 cups all-purpose flour
- 2 ½ cups blended oatmeal (measure before blending)
- ½ teaspoon salt
- 1 teaspoon baking powder
- 1 teaspoon baking soda
- 12 ounces chocolate chips
- 1 4-ounce chocolate bar, grated
- 1 ½ cups chopped walnuts
How to Make Neiman Marcus Oatmeal Chocolate Chip Cookies
- Preheat your oven to 375 degrees F. The anticipation of warmth is part of the magic.
- In a large bowl, cream together the butter, granulated sugar, and brown sugar until the mixture is light and fluffy. You’re aiming for a dreamy, creamy consistency here.
- Add in the eggs, one at a time, and beat until just incorporated. Don’t forget the vanilla — it’s the unsung hero that ties everything together.
- Gradually mix in the flour, blended oatmeal, salt, baking powder, and baking soda. The dough will start to smell like a promise of good things to come.
- Fold in the chocolate chips, grated chocolate bar, and walnuts. You’ll want to use a spatula to make sure everything is evenly distributed and each scoop is a treasure trove of goodies.
- Roll the dough into balls and place them about two inches apart on a cookie sheet. This gives them room to spread and become their best cookie selves.
- Bake for about 10 minutes. Keep an eye out for those edges to turn golden and the aroma to fill your kitchen. That’s when you know they’re ready.
Cook’s Notes
Let’s be real — these cookies are hard to mess up. But here are a few thoughts to keep in mind. If your butter isn’t soft enough, you can microwave it for a few seconds, but watch closely — nobody wants half-melted butter. When blending your oatmeal, aim for a texture that’s slightly coarser than flour; it adds a delightful chewiness to the cookies. These cookies are at their most divine fresh out of the oven, but they’ll keep well in an airtight container for up to a week, if they last that long. You can even freeze the dough balls to bake later. Just add a couple of minutes to the bake time.
Make It Your Own
- Swap the walnuts for pecans or almonds if that’s your jam. Each nut brings its own character to the party.
- If you’re not a fan of oats, try substituting with crushed cornflakes for a different kind of crunchy texture.
- Go wild and use white chocolate chips instead of the regular ones if you’re feeling fancy.
- Add a teaspoon of cinnamon or espresso powder for a little extra depth in flavor. It’s like giving your cookies a secret superpower.
If you try this, I’d love to hear how it turns out — drop a comment or tag me! Happy baking, and may your Tuesday be as sweet as these cookies.
Related update: Neiman Marcus Oatmeal Chocolate Chip Cookies
Related update: Fall Fruit Compote
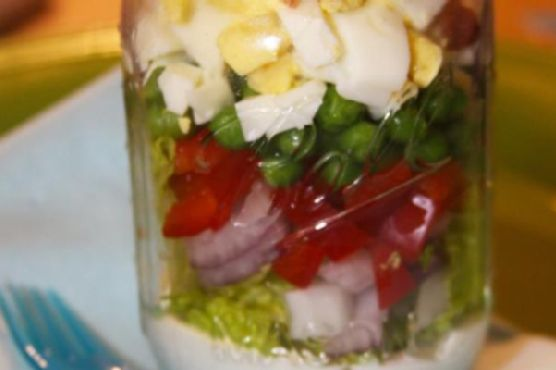
One chilly Tuesday evening last fall, I found myself digging through the fridge, craving something crisp and refreshing amidst all the usual comfort foods. The dilemma? It was one of those weeks where time seemed to vanish, and I needed something quick yet satisfying. That’s when it dawned on me: my favorite Southern 7 Layer Salad — but with a twist! Instead of the classic trifle dish, I opted for a mason jar presentation. Not only does it make for an easy, transportable lunch, but there’s something so charming about seeing those vibrant layers through glass. Plus, let’s be real, salads in mason jars just make you feel like you’ve got your life together. Ready to dive in?
Jump to Recipe
What You’ll Need
Here’s the beauty of this recipe: most of these ingredients are pantry regulars. If you don’t have them all, don’t worry — substitutions are a breeze!
- Bacon – because everything’s better with bacon, right?
- Black pepper
- Eggs – hard-boiled and chopped
- Lettuce – crisp and refreshing
- Mayo
- Frozen peas – they make the salad pop!
- Red diced bell pepper
- Sour cream
- Sugar
- Yellow or red diced onion
How to Make Southern 7 Layer Salad in a Mason Jar
- Prepare the dressing by mixing the mayo, sour cream, sugar, and a dash of black pepper in a small bowl. Give it a good whisk until smooth. Pop it in the fridge to chill while you prep everything else.
- Cook the bacon in a skillet over medium heat until it’s wonderfully crisp and the kitchen smells like breakfast heaven. Let it cool on a paper towel-lined plate, then chop it into bite-sized pieces.
- Hard-boil your eggs if you haven’t already, then dice them into little chunks. I love using an egg slicer for this — it’s oddly satisfying.
- Grab your large mason jars (21oz works beautifully). Start with a couple of spoonfuls of the chilled dressing at the bottom of each jar. This way, when you tip it out to eat, everything ends up nicely coated.
- Layer in this order: chopped lettuce, a sprinkle of diced onions, a cheerful scatter of red bell peppers, those poppy little peas, the diced eggs, and finally, the crispy bacon.
- Screw the lid on tightly, give it a little shake if you’re feeling adventurous, and either dig in straight from the jar or pour it into a bowl. Enjoy the crunchy, creamy goodness!
Cook’s Notes
Let’s talk practicalities:
– This salad is a fantastic prep-ahead option. You can make all the components the night before. Just wait to add the dressing until you’re ready to dig in to avoid anything getting soggy.
– Storing the salad in the fridge will keep it fresh for up to two days, but honestly, it’s so tasty it’ll probably disappear way before then.
– One potential trip-up: overcooking the bacon or eggs. Keep a close eye on both to ensure they’re just right.
Make It Your Own
Want to mix things up? Here are a few ideas:
- Swap the bacon for crispy tofu for a vegetarian twist.
- Use Greek yogurt instead of sour cream for a tangier, lighter dressing.
- Add shredded cheddar cheese for an extra savory kick.
- Include sliced avocado for a creamy texture and added health benefits.
So there you have it — my trusty Southern 7 Layer Salad in a Mason Jar! If you try this, I’d love to hear how it turns out. Drop a comment below or tag me on social media with your layered creations. Happy crunching!
Related update: Southern 7 Layer Salad in a Mason Jar
Related update: Avocado and Orange Salad With Orange-Ginger Dressing

Okay, picture this: It’s a lazy Sunday morning, and the sun is peeking through the kitchen window, but you’re still in your pajamas and not quite ready to embrace the day. You crave something sweet but are not in the mood for a mess of bowls and measuring cups. Enter Blueberry Almond Crescent Rolls, the savior for those who want to feel fancy without the fuss. These little guys are like a bakery treat you can whip up faster than you can say “brunch,” and I promise, they’ll make your kitchen smell like a dream. Plus, they’re guaranteed to impress anyone lounging around in their PJs with you! 🍇🥐
Jump to Recipe
What You’ll Need
This is one of those recipes where you might peek into your pantry and realize you’ve got most of it already. Here’s the lineup:
- 1 can of regular crescent rolls
- 1/4 cup blueberry jam
- 4 ounces cream cheese, softened
- 1/2 cup confectioner’s sugar, divided
- 1/4 teaspoon almond extract, divided
- 1 tablespoon flour
- Pinch of sea salt
- 1 egg
- 1 tablespoon water
- 1 tablespoon milk
- 2 tablespoons turbinado sugar
How to Make Blueberry Almond Crescent Rolls
- Preheat your oven to 375 degrees F. Line a large baking sheet with parchment paper or a silicone baking mat. Trust me, it’s worth it for easy cleanup!
- In the bowl of your stand mixer with the paddle attachment—or just a handheld mixer if you’re like me and can’t be bothered—mix together the cream cheese, blueberry jam, 2 tablespoons of confectioner’s sugar, flour, sea salt, and 1/4 teaspoon of almond extract. Blend until smooth, which should take about 30 seconds.
- Spread your crescent roll wedges out on a clean work surface. You know the drill: take a generous tablespoon of that heavenly cream cheese mixture and plop it on the wide end of each wedge.
- Roll ’em up! Start from the wide end and roll until the narrow end is snug underneath. Nestle them onto your prepared baking sheet.
- Whisk the egg and water together to create an egg wash, then brush it over your crescent rolls. Don’t skip this step—it gives them that gorgeous golden glow.
- Sprinkle with turbinado sugar. This stuff is like edible glitter, trust me.
- Bake for 13-15 minutes, or until they’re puffed and golden. The anticipation will build as your kitchen fills with the scent of warm blueberries and almond.
- While they cool slightly on a wire rack, prepare the glaze. In a medium bowl, combine the remaining 1/2 cup of confectioner’s sugar, remaining 1/4 teaspoon of almond extract, and milk. Whisk until smooth. Taste and add a pinch of sea salt if it’s too sweet for your liking.
- Drizzle that silky glaze over your crescent rolls and serve immediately. Enjoy the blissful combo of flaky, sweet, and creamy!
Cook’s Notes
- Don’t overfill the crescent rolls. It may be tempting, but too much filling can cause a messy overflow.
- If you don’t have turbinado sugar, regular sugar works in a pinch, though it won’t have the same crunch.
- The rolls are best enjoyed fresh but can be stored in an airtight container at room temperature for up to two days.
- For make-ahead magic, prepare the cream cheese filling a day in advance and store it covered in the fridge. Let it come to room temp before using.
Make It Your Own
- Swap the blueberry jam for raspberry or strawberry if that’s more your jam (pun intended!).
- Add a dash of cinnamon to the cream cheese mixture for an extra layer of flavor.
- Use orange marmalade and replace the almond extract with vanilla for a citrusy twist.
- Feeling nutty? Add a sprinkle of chopped almonds inside or on top for added crunch.
If you try this, I’d love to hear how it turns out—drop a comment or tag me! Let’s make every breakfast feel like a special occasion, one crescent roll at a time. 🌟
Related update: Blueberry Almond Crescent Rolls
Related update: Neiman Marcus Oatmeal Chocolate Chip Cookies
Related update: Soft Croatian corn bread – proja
Related update: Avocado Nests

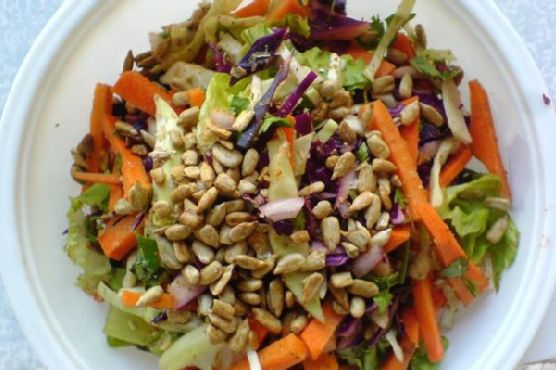
Last Tuesday was one of those days. You know the kind—when work drags, the laundry pile is a mountain, and the fridge looks like a post-apocalyptic wasteland. I needed something quick, fresh, and healthy, but my brain was too fried to concoct anything elaborate. As I rummaged through the crisper drawer, I found some vibrant swiss chard and an orange cauliflower that had somehow survived the week. With a handful of other ingredients, I whipped up some Swiss Chard Wraps. They were the perfect antidote to a hectic day: simple, fresh, and surprisingly satisfying. Plus, they look as good as they taste, which is always a bonus when you’re trying to convince your family (or yourself) to eat more greens.
Jump to Recipe
What You’ll Need
Chances are you already have most of this, but there are a few stars that make all the difference.
- Dried swiss chard leaves
- Orange cauliflower (it’s just a bit sweeter and cuter)
- Olive oil
- Garlic
- Salt
- Fresh basil
- Zucchini
- Red bell pepper
- Avocado
- Trader Joe’s spicy peanut vinaigrette
How to Make Swiss Chard Wraps
- Begin by chopping off the stems of the swiss chard right where they meet the leaf. I like to leave a bit of stem for extra crunch and structure, but feel free to stem them entirely if that’s your jam.
- Chop the cauliflower into small bits and toss them into a food processor. Give it a few pulses until it resembles rice. Yes, even the stalks!
- Heat up some olive oil in a sauté pan over medium-high heat. Once it’s shimmering, add the garlic and let it sizzle for a minute or two, until you can smell its toasty aroma.
- Add the cauliflower rice to the pan. Cook it for about 2-3 minutes until it turns a bright, cheerful orange. Stir in a pinch of salt and some chopped basil, letting the flavors mingle.
- Spiralize the zucchini using Blade B to make noodles. No spiralizer? No problem—use a vegetable peeler to create ribbons.
- To assemble, lay a swiss chard leaf flat. Pile on a bit of the sautéd cauliflower, zucchini noodles, slices of red bell pepper, and creamy avocado along the stalk.
- Drizzle some spicy peanut vinaigrette over everything (don’t be shy!) and wrap it all up snugly.
Cook’s Notes
Here’s the thing with these wraps: they really shine fresh. The swiss chard will wilt if you let it sit too long, so try to make just what you’ll eat in one go. However, if you find yourself with leftovers, pop them in an airtight container and store them in the fridge. They’ll last a day or two, but the flavors will meld and mellow a bit.
- Make the cauliflower rice a day ahead if you’re in a time crunch!
- If you’re not into raw red bell peppers, give them a quick sauté with the cauliflower rice to soften them up.
- Be generous with the vinaigrette; it’s the secret sauce that ties everything together.
Make It Your Own
- Swap the avocado: If you’re not an avocado fan, try hummus or a dollop of Greek yogurt for creaminess.
- Spice it up: Add some sliced jalapeños or a sprinkle of chili flakes to give your wraps a kick.
- Change up the greens: If you can’t find swiss chard, collard greens or large kale leaves work as excellent substitutes.
- Protein punch: Add grilled chicken, tofu, or shrimp for a more filling meal.
If you try this, I’d love to hear how it turns out—drop a comment or tag me on social media! Your kitchen adventures always brighten my day, and who knows? You might inspire the next variation. Enjoy your leafy, crunchy bites of happiness!
Related update: Southern 7 Layer Salad in a Mason Jar

It was one of those sticky summer afternoons when the air conditioner just couldn’t keep up, and I found myself craving something cool and refreshing. I’d been eyeing the basil plants on my kitchen windowsill, their leaves lush and inviting, and it hit me — basil coconut ice cream. It’s a little unusual, sure, but that’s part of its charm. This recipe is perfect when you’re in the mood for something a bit different yet incredibly easy to whip up. If you’re ready for a creamy, herby delight that tastes like a tropical breeze, you’re in the right place.
Jump to Recipe
What You’ll Need
The best part? You probably already have most of these ingredients in your kitchen. Just a few stars of the show to gather up, and you’re all set for a culinary adventure.
- Fresh basil leaves
- Canned full-fat coconut milk
- Honey
- Half & half
- Salt
How to Make Basil Coconut Ice Cream
- Start by heating the coconut milk and half & half in a saucepan over medium-high heat until it’s hot and just beginning to bubble gently. You’ll want to catch it right before a full boil.
- Add in the honey and a pinch of salt, stirring until they dissolve completely, giving the mixture a lovely sweet-salty balance.
- Drop in the fresh basil leaves and stir them through until they wilt down, infusing the liquid with their aromatic goodness. Remove the saucepan from heat.
- Pour the mixture into a blender, and blend until it’s silky smooth and no chunks of basil remain. If your blender leaves bits, strain the mixture through a fine sieve.
- Let the basil-infused cream cool for about 20 minutes, allowing the flavors to deepen.
- Transfer the mixture to a large container, cover, and chill it in the fridge for a few hours until completely cool.
- If you have an ice cream maker, follow your machine’s instructions to churn the mixture. If not, pour it into a freezer-safe container, and stir it every hour for about 8-10 hours to achieve the best texture possible.
Cook’s Notes
Making ice cream at home is as much about patience as it is about flavor. If you can, use fresh basil for the most vibrant taste. You can make the base a day ahead and chill it overnight, which can deepen the flavors even more. When it comes to leftovers, freeze them in a tightly sealed container. Just remember, the ice cream will harden significantly, so let it sit out for 10 minutes before scooping.
- If you don’t have an ice cream maker, don’t fret! While the texture won’t be as smooth, frequent stirring during the freezing phase will help prevent too many ice crystals from forming.
Make It Your Own
- Swap out the basil for mint leaves if you’re craving a more classic flavor combo.
- For a richer taste, replace half of the half & half with heavy cream.
- Substitute honey with maple syrup for a deeper, earthier sweetness.
- If you’re feeling adventurous, toss in a handful of dark chocolate chips during the churning process for a hint of bitterness against the sweetness.
If you try this, I’d love to hear how it turns out — drop a comment or tag me! Whether you’re enjoying it in the heat of summer or dreaming of warmer days, this basil coconut ice cream is sure to be a hit. Enjoy every refreshing scoop!
Related update: Basil Coconut Ice Cream

I was knee-deep in a midwinter slump, the kind where you just crave a burst of sunshine, when I stumbled upon this idea: Braid sweet citrus-flavored licorice. It’s a bit of a departure from your typical licorice, and honestly, it’s more of a pastry with a playful twist. Picture this: a light, flaky puff pastry with a zesty citrus glaze that dances on your taste buds. Perfect for those days when you need a little joy but aren’t in the mood for anything too fussy or time-consuming.
One of the best things about this recipe is its versatility. It’s a delightful treat that can play the part of a breakfast snack, a tea-time companion, or the unexpected star of a dessert platter. The secret weapon here is the citrus glaze, which brings this pastry to life with a sweet-tart zing. If you’ve got some puff pastry lingering in the freezer and a stash of citrus in the fruit bowl, you’re basically halfway there.
Jump to Recipe
What You’ll Need
Chances are you already have most of this sitting in your kitchen. Let’s keep it simple, shall we?
- Puff pastry Buitoni – the flaky base of our braids
- Fresh cream – to add richness to the glaze
- Grand cru muscovado sugar – for that deep, molasses-like sweetness
- Lemon – zest and juice will do wonders here
- Lime – for that extra citrus punch
- Orange – more zest, more flavor
How to Make Braid Sweet Citrus Flavored Licorice
- Roll out the puff pastry and use a sharp knife to etch designs of strips about 10 cm high and 1 cm wide. Precision isn’t key here, just have fun with it.
- Gently twist each strip on itself. It doesn’t have to be perfect; the twists will bake into beautiful, rustic braids.
- Place the twisted strips spaced apart on a sheet of parchment paper. This prevents them from sticking together as they bake.
- Bake in a preheated oven at 200°C for about 12 minutes, or until they’re golden brown and your kitchen smells like heaven.
- While the braids cool on a wire rack, zest your citrus fruits, and set the zest aside.
- Juice the lime, half of the orange, and half of the lemon. Boil the juices until you reduce it down to about two tablespoons of liquid.
- Remove from heat and stir in the cream and brown sugar until it’s well mixed and dreamy.
- Let the glaze cool until it thickens, then brush it generously over the cooled braids.
- Sprinkle the reserved citrus zest over the glazed braids while they’re still a bit wet to ensure it sticks well.
- Allow the glaze to dry on the wire rack until it hardens slightly. Then, go ahead and devour them!
Cook’s Notes
Don’t stress if your twists aren’t perfect—imperfections add character! Make sure to space them well on the parchment paper to allow for expansion. If your glaze seems too runny, let it cool a bit more; it thickens as it cools. Want to save time? You can make the glaze ahead of time and refrigerate it for up to two days. Just warm it slightly before using. Leftovers can be stored in an airtight container for a couple of days, but honestly, they probably won’t last that long.
Make It Your Own
- Try using blood orange instead of the regular orange for a more intense flavor and color.
- Add a splash of vanilla extract to the glaze for a warm, comforting undertone.
- For a spiced twist, sprinkle a little ground cardamom in with your citrus zest.
- If you’re feeling adventurous, drizzle a bit of melted white chocolate over the top once the glaze has set.
If you try this, I’d love to hear how it turns out—drop a comment or tag me! Enjoy the bright and citrusy vibes these braids bring, no matter what the weather outside is doing. Happy baking!
Related update: Braid sweet citrus flavored licorice
Related update: Basil Coconut Ice Cream
So there I was, standing in the kitchen, mid-week with a craving for something fresh yet satisfying. I’d just finished a long day of work, and the idea of a heavy meal felt like too much. My fridge had the usual suspects: a couple of carrots and half a cabbage from my last attempt at being super healthy. That’s when I remembered this Carrot and Cabbage Salad With Coriander+cumin Dry Rub. It’s one of those recipes that’s surprisingly easy and hits that magical spot between simplicity and flavor explosion. The combination of earthy spices and crunchy vegetables makes it refreshing and comforting at the same time. And the best part? It’s perfect for when you need to throw something together quickly but still feel like a kitchen wizard.
Jump to Recipe
What You’ll Need
You’re in luck because this ingredient list is all about basics that pack a punch. Chances are you already have most of this hanging out in your pantry and fridge.
- Carrots
- Green cabbage
- Red cabbage
- Cumin seed powder
- Ground coriander
- Fresh coriander
- Lime juice
- Olive oil
- Sunflower seeds
How to Make Carrot and Cabbage Salad With Coriander+cumin Dry Rub
- Start by chopping up the carrots and both the green and red cabbage into thin slivers. Aim for uniformity here so every bite is a perfect mix.
- In a large bowl, add the chopped veggies, then sprinkle in the ground coriander and cumin seed powder.
- Pour in the lime juice and olive oil. Now, roll up your sleeves and massage the spices into the veggies. You’ll know you’re done when everything’s lightly coated and you can smell the spices waking up.
- Finish by tossing in the fresh coriander and sunflower seeds. Give it a final stir to distribute these goodies evenly.
- Let the salad sit for a couple of hours. This waiting game is crucial for the spices to seep into the veggies, enriching the flavors.
Cook’s Notes
Don’t skip the resting period. This gives the spices a chance to penetrate the veggies, making them more flavorful. If you’re planning ahead, you can even prepare this salad the day before and let it sit in the fridge overnight. Just give it a quick toss before serving. Leftovers hold up surprisingly well too, so pack some for lunch the next day!
- Be sure to chop the vegetables evenly to ensure each bite is well-balanced.
- Feel free to adjust the lime juice to taste. More lime will give it a zestier kick!
Make It Your Own
- Switch out the sunflower seeds for pumpkin seeds for a different crunch.
- Add thinly sliced red onion or scallions for an extra layer of flavor.
- Replace the olive oil with avocado oil for a different, slightly nuttier taste.
- If you prefer a bit of heat, toss in some thinly sliced chili or a pinch of chili flakes.
If you try this, I’d love to hear how it turns out — drop a comment or tag me! Your variations and tweaks are always inspiring, and who knows, you might come up with the next favorite twist on this dish! 🌿🥕
Related update: Carrot and Cabbage Salad With Coriander+cumin Dry Rub

Picture this: it’s a Tuesday evening, and the week is already feeling like one long, chaotic whirlwind. I’m staring at the contents of my pantry, trying desperately to remember that elusive thing called “meal planning.” But instead of a dinner brainstorm, my mind wanders to something sweet and zesty—something that feels like sunshine on a plate. That’s when I remember the Lemonade Bundt Cake, a marvel of citrusy goodness and simplicity. This cake is like a mood booster in dessert form—tangy, moist, and delightfully easy to whip up with a handful of pantry staples. Whether you need a midweek pick-me-up or a show-stealing dessert for your next get-together, this cake is your answer.
Jump to Recipe
What You’ll Need
This recipe is delightfully straightforward, and chances are you already have most of these ingredients in your kitchen. Here’s what you’ll need:
- Lemon cake mix
- Lemon pudding mix
- 3 eggs
- Sour cream
- Vegetable oil
- Water
- Frozen lemonade concentrate
- Powdered sugar
How to Make Lemonade Bundt Cake
- First up, preheat your oven to 350 degrees. Take a moment to prepare your 10-inch bundt pan by greasing and flouring it. Trust me, this little step saves the cake from dreaded sticking disasters later on.
- Next, grab a large mixing bowl and combine the lemon cake mix, lemon pudding mix, eggs, sour cream, vegetable oil, and water. Mix everything together until you have a smooth, luscious batter that smells like pure lemony magic.
- Pour this gorgeous batter into your prepared bundt pan, smoothing the top with a spatula. Pop it into the oven and let it bake for 50-60 minutes. You’ll know it’s done when a toothpick inserted in the center comes out clean and the cake is a lovely golden hue.
- Once baked, let the cake cool in the pan for about 10-15 minutes. During this time, your kitchen will fill with a tantalizing lemony aroma that’s hard to resist.
- While the cake cools, make the glaze by combining the frozen lemonade concentrate with 1 cup of powdered sugar. Stir in more powdered sugar until the glaze reaches your desired consistency—thick enough to coat but still drizzle-friendly.
- Carefully turn your cake out onto a wire rack. Spoon the glaze generously over the top, allowing it to drip down the sides like a candied waterfall. For an added touch, dust the cake with more powdered sugar if you’re feeling fancy.
Cook’s Notes
This cake is as forgiving as it is delicious. You can make it a day ahead, and it will still taste fresh and fabulous. Just cover it tightly and store it at room temperature. If you’re in a rush, speed up the cooling process by placing the cake in the fridge for a few minutes before glazing. One common mistake is overmixing the batter, which can make the cake dense. Mix just until everything is combined, and you’ll be golden. Leftovers (if there are any!) can be kept in an airtight container for up to three days.
Make It Your Own
Here are a few fun ways to switch things up with this recipe:
- Replace the lemon cake mix with a white or vanilla cake mix for a subtler lemon flavor.
- Swap the lemon pudding mix for vanilla pudding mix if you prefer a less tangy cake.
- Add a handful of poppy seeds to the batter for a delightful crunch and a hint of nuttiness.
- For a berry twist, fold in fresh raspberries or blueberries before pouring the batter into the pan.
If you try this, I’d love to hear how it turns out — drop a comment or tag me! This Lemonade Bundt Cake is a little slice of sunshine, and I hope it brightens your day as much as it does mine. Enjoy every zesty bite!
Related update: Lemonade Bundt Cake
Related update: Braid sweet citrus flavored licorice
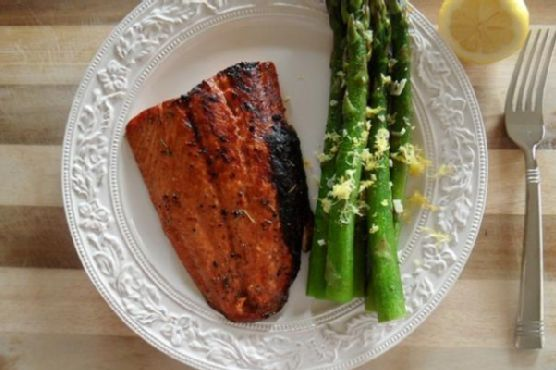
Picture this: It’s Tuesday evening, and you just got home from a day that felt longer than it had any right to be. You’re staring into the fridge, willing it to offer up some inspiration. Then, like a beacon of hope, you spot a lonely salmon fillet tucked behind last night’s leftovers. A lightbulb moment strikes: Balsamic & Honey Glazed Salmon with Lemony Asparagus. Deliciously sweet and tangy salmon, paired with asparagus that’s just the right amount of zesty. It’s the perfect blend of “fancy enough for company” and “easy enough for a weeknight.” This dish is a favorite because it’s quick yet feels special, and it hits all the right notes from tangy to savory. Trust me, your taste buds will thank you.
Jump to Recipe
What You’ll Need
You probably have most of these at home already, with maybe just a quick spice cabinet dive for a few aromatics. Here’s the lineup for this easy-peasy dinner:
- Salmon fillet
- Balsamic vinegar
- Apple cider vinegar
- Honey
- Dried dill
- Herbs de Provence
- Salt and pepper
- Grapeseed oil
- Lemon (juice and zest)
- Asparagus
- Garlic
- Vegetable stock
How to Make Balsamic & Honey Glazed Salmon with Lemony Asparagus
- In a small mixing bowl or blender, throw together all the balsamic marinade ingredients except the lemon juice: balsamic vinegar, apple cider vinegar, 1 tablespoon grapeseed oil, honey, dried dill, herbs de Provence, salt, and pepper. Whisk or blend until the mixture loses its vinegar-and-oil identity crisis.
- Lay the salmon fillet in a cozy little baking dish — I usually opt for a small casserole dish. Pour your freshly mingled marinade over the salmon, letting it settle in for at least 15 minutes. If patience is your virtue, up to 24 hours in the fridge is even better.
- Crank your oven to high broil. Just before the salmon gets its turn in the oven spotlight, drizzle the lemon juice over the top for that extra zing.
- Slide the salmon onto the top rack and broil for 10 to 12 minutes. You’re looking for glazed, browned, and a sizzle that says, “Dinner is almost ready!”
- While the salmon works its magic, prep your asparagus. Wash and trim off the tough ends — about an inch and a half will do. Lay them in a large skillet, as if sunbathing.
- Drizzle grapeseed oil over the asparagus, and use your hands to ensure every stalk gets some love. Sprinkle with salt and pepper, then sauté over medium heat for about 5 minutes.
- Add 2 tablespoons of vegetable stock, cover, and let them steam for 4 minutes. Lift the lid, introduce the minced garlic, and cover again. Let cook for another 3 to 5 minutes, just until tender but with a little bite.
- Finish with a flourish of freshly grated lemon zest over the asparagus, adding a citrusy brightness that ties the whole dish together.
Cook’s Notes
Let’s talk salmon: It should flake easily with a fork when it’s done. If you’re new to broiling, remember that it’s super quick and can go from perfect to overdone in a flash. As for leftovers (if there are any!), this dish reheats beautifully. Store the salmon and asparagus separately in airtight containers for up to two days. Reheat gently, so you don’t dry out that beautiful fish. If you’re meal prepping, the marinade is a fantastic make-ahead step. Whip it up and keep it in the fridge for when inspiration (or hunger) strikes.
Make It Your Own
Here are a few ways to switch things up:
- Swap salmon for crispy tofu if you’re going plant-based. Marinate and bake it the same way for a protein-packed treat.
- Try maple syrup instead of honey for a deeper, earthier sweetness.
- Substitute broccoli for asparagus if that’s more your jam — just adjust the cooking time to keep it crisp-tender.
- Add a sprinkle of red pepper flakes to the marinade for a little heat if you like things spicy.
Hey, if you try this, I’d love to hear how it turns out for you! Drop a comment below or tag me in your delicious photos. Happy cooking!
Related update: Balsamic & Honey Glazed Salmon with Lemony Asparagus
Related update: Yogurt Marinated Lamb Skewers

Have you ever had one of those days when the weather just flips from sunny and warm to cold and dreary, like the sky can’t make up its mind? That’s exactly what happened last Tuesday. I was planning on grilling dinner, but as the clouds rolled in, I found myself craving something warm and comforting instead. Enter my trusty Homemade Broccoli Cheddar Soup. It’s one of those recipes that feels like a big, cozy sweater for your insides. Plus, it’s surprisingly easy to whip up, which makes it perfect for those spontaneous soup days. With just a handful of ingredients, most of which are probably lurking in your pantry right now, you’ll have a bowl of creamy, cheesy goodness that hits all the right notes.
Jump to Recipe
What You’ll Need
This soup keeps things simple, but there are a few standout ingredients that make it special and oh-so-delicious. Don’t worry if your pantry is looking a little bare; chances are you already have most of this stuff on hand.
- Olive oil
- 1 shallot, chopped
- 1 red onion, chopped
- 1 jalapeno, optional for heat
- Lemon juice
- 4 cups vegetable broth
- Salt and pepper to taste
- 2 large Yukon Gold potatoes, peeled and diced
- 2 heads of raw broccoli, chopped (save a few florets for garnish!)
- Plain yogurt (like Chobani)
- Plain almond milk
- Fresh parsley, chopped
- Shredded cheddar cheese
- 1 bay leaf
How to Make Homemade Broccoli Cheddar Soup
- In your soup pot, heat 2 tablespoons of olive oil over medium-high heat. Add the shallot, red onion, and jalapeno. Sauté until the onions are translucent and everything smells heavenly.
- Add a splash of lemon juice, all the vegetable broth, the remaining olive oil, salt, and pepper. Give it a good stir, then reduce the heat to medium.
- Toss in the diced potatoes and bring the broth to a boil. Cook until you can easily pierce the potatoes with a fork.
- Stir in the chopped broccoli, but remember to reserve a few florets for later. Cover the pot and let the broccoli get nice and tender.
- Once the broccoli is cooked, turn off the heat. Carefully transfer the contents of the pot to a large mixing bowl and let it cool slightly.
- Add the parsley, yogurt, and almond milk to the bowl. Gently fold these into the soup mixture, letting the heat from the soup meld everything together.
- In batches, puree the mixture in a blender until it’s as smooth as you like it. I’m still dreaming of that Vitamix, but any blender will do!
- In the now-empty soup pot, sauté the reserved broccoli florets with a dash of veggie broth until they’re just tender.
- Return the pureed soup to the pot, add the bay leaf, and a few pinches of chopped basil if you’re feeling fancy. Simmer uncovered for at least 20 minutes, stirring frequently to banish those pesky air bubbles. Remember to fish out the bay leaf before serving!
Cook’s Notes
Let’s chat about some things that might come in handy as you make this soup. First off, if you’re not into spicy, feel free to skip the jalapeno; it’s totally optional. If you’re planning to make this soup ahead of time, it stores beautifully in the fridge for up to 3 days. Just reheat it slowly on the stove, and you’ll be good to go. As for freezing, I wouldn’t recommend it — the texture can get a little funky once thawed. Always remember to remove that bay leaf before serving; no one wants a surprise in their spoon!
Make It Your Own
This is where the fun begins! Here are a few ideas to tweak this soup to your liking:
- Swap the cheddar for Gruyere cheese if you’re feeling fancy; it adds a nutty depth to the soup.
- Want a heartier meal? Stir in some cooked quinoa or white beans for added protein.
- For a vegan twist, use nutritional yeast instead of cheddar cheese. It adds a cheesy flavor without the dairy.
- Love greens? Toss in a few handfuls of spinach or kale before blending for an extra boost of nutrients.
If you try this, I’d love to hear how it turns out — drop a comment or tag me! Whether you’re combating a surprise rainy day or just craving something warm and comforting, I hope this soup brings a bit of joy to your kitchen. Happy cooking!
Related update: Homemade Broccoli Cheddar Soup
Related update: Moroccan Carrot Soup

Last Tuesday night, I found myself elbow-deep in a fridge raid, eyeing a pack of chicken drumsticks that had been giving me the side-eye all week. It was one of those evenings where time was not on my side. I needed something quick, but I also craved something that felt a little special. That zingy, sweet, and sticky combination of balsamic vinegar and honey popped into my mind like a lightbulb moment, and let me tell you, it did not disappoint. These Balsamic-Honey Chicken Drumsticks are not only ridiculously easy to throw together but they make your kitchen smell like you’ve been cooking for hours. You know that feeling when a dish makes you look like a kitchen wizard with minimal effort? Yeah, this is one of those recipes. Bonus: The leftovers are a gift that keeps on giving.
Jump to Recipe
What You’ll Need
Let’s be real, the magic here lies in a few pantry staples that you probably already have lurking in your cupboards. Here’s your shopping list:
- Chicken drumsticks
- Balsamic vinegar
- Honey
- Brown sugar
- Soy sauce
- Rosemary sprigs
- Garlic cloves
- Sesame seeds
- Fresh flat-leaf parsley
How to Make Balsamic-Honey Chicken Drumsticks
- Grab a large, resealable plastic bag and toss in the balsamic vinegar, honey, brown sugar, soy sauce, rosemary, and garlic cloves. Now, shake it like a Polaroid picture until the honey and sugar dissolve. You’ll know it’s ready when it’s all shiny and smooth.
- Add the chicken drumsticks to the bag. Try to squeeze out as much air as you can before sealing it up. Give the drumsticks a little massage to make sure they’re all cozy in the marinade. Let them chill in the fridge for about two hours. Trust me, the wait is worth it.
- Preheat your oven to a toasty 450°F. Line a baking sheet with foil — it makes clean-up a breeze later. Lay out the marinated drumsticks, making sure they have some space to breathe.
- Bake the drumsticks for 30 to 35 minutes. You’re looking for that gorgeous caramelized skin, dark in spots, with the smell wafting through your home.
- While the drumsticks are in the oven, pour the leftover marinade into a small saucepan. Bring it to a bubbly boil, then simmer on low until it thickens up, about 15 minutes. This is your golden glaze.
- Once the drumsticks are out of the oven, brush them with the boiled marinade. It’s like giving them a glossy topcoat. Arrange them on a serving platter and sprinkle with sesame seeds and parsley. Voilà!
Cook’s Notes
A few words of wisdom from my kitchen to yours: If you accidentally leave the drumsticks to marinate a bit longer than two hours, it’s no biggie. It’s all about that flavor infusion. Just don’t go beyond 24 hours. This dish is perfect for making ahead; just stop before baking and keep the marinated chicken in the fridge until you’re ready to cook. Leftovers can be stored in an airtight container in the fridge for up to three days. Reheat them in the oven to keep that skin crispy.
Make It Your Own
- Swap the drumsticks for chicken thighs or wings — adjust cooking time accordingly.
- If you’re avoiding soy, coconut aminos make a great substitute.
- Not a fan of rosemary? Try thyme or oregano for a different aromatic twist.
- For a vegetarian option, replace the chicken with crispy tofu squares.
If you try this, I’d love to hear how it turns out — drop a comment or tag me! Whether it’s a weeknight dinner or an impromptu gathering, I promise these drumsticks will steal the show. Happy cooking!
Related update: Balsamic-Honey Chicken Drumsticks
Related update: Balsamic & Honey Glazed Salmon with Lemony Asparagus

Picture this: It’s a balmy summer evening, and I’m rummaging through my kitchen, desperate for something sweet. There, on the counter, sits a perfectly ripe mango, glistening like it’s daring me to turn it into something spectacular. That’s when it hits me—Mangoes with Rum and Ice Cream. It’s the kind of dessert that feels both indulgent and delightfully easy. The rum-soaked mangoes are a tropical escape with every bite, and the ice cream? Pure creamy bliss. It’s the dessert that says, “I see your heatwave and I raise you a cooling, boozy treat.” Plus, it’s a breeze to whip up, so you can spend less time in the kitchen and more time savoring summer’s finest.
Jump to Recipe
What You’ll Need
If your pantry is anything like mine, you might already have most of what you need. The key is in a few star ingredients that really bring the magic.
- Mangoes – ripe and juicy
- Sugar
- Dark Rum
- Fresh lime juice
- Lime rind
- Vanilla Ice Cream
How to Make Mangoes with Rum and Ice Cream
- Start by peeling your mangoes. Make sure to remove all traces of green-colored flesh; you want the mangoes to be perfectly ripe and sweet.
- Next, slice the mango flesh away from the pit and cut it into pieces about a half-inch thick. Discard the pit and any fibrous bits that might cling to it.
- In a bowl, combine the sugar, dark rum, freshly grated lime rind, and lime juice. Give it a good mix until the sugar starts to dissolve.
- Add the mango slices to the rum mixture. Gently stir so each piece is bathed in that luscious liquid. The aroma will start to swirl around you, making your kitchen smell like a tropical paradise.
- Cover the bowl and let it chill in the fridge for a couple of hours. This wait is key as it allows the flavors to meld beautifully.
- When you’re ready to serve, scoop some vanilla ice cream into chilled glasses. Spoon the rum-soaked mangoes on top, making sure each serving gets a generous amount of the fragrant syrup.
Cook’s Notes
Here’s the thing about this recipe: it’s pretty forgiving. Just make sure your mangoes are ripe; underripe ones can be a bit tart and don’t soak up the rum as well. If you’re in a pinch and can’t find fresh lime, a good quality bottled lime juice will do, but fresh really gives it that zing. For storing leftovers, keep the mango mixture in an airtight container in the fridge, but I doubt there will be any left! The flavors deepen over a day or two, so if you make it ahead, it only gets better. Just store the ice cream separately.
Make It Your Own
- Swap the Rum: If dark rum isn’t your thing, try using coconut rum for a creamy twist.
- Add Some Heat: A pinch of chili flakes can add a surprising kick to the sweet and boozy mixture.
- Try a Sorbet: Replace the vanilla ice cream with a mango or coconut sorbet for a lighter version.
- Go Nutty: Sprinkle some toasted coconut flakes or chopped macadamia nuts over the top for added texture.
If you try this, I’d love to hear how it turns out—drop a comment or tag me! Your feedback and variations are always a treat to read. Enjoy every sweet, boozy bite! 🍨🥭
Related update: Mangoes with Rum and Ice Cream
Related update: Lemonade Bundt Cake
Related update: Eggplant pizzette

One chilly Sunday morning, I found myself staring at a nearly empty pantry, craving something cozy and sweet without stepping out into the biting cold. That was the day my homemade organic maple granola was born, and let me tell you, it was like a warm hug in a bowl. There’s just something magical about the way the house smells when this granola is baking—sweet, nutty, and comforting. The best part? It’s ridiculously easy to make. You’ll end up with hearty, golden clusters that are perfect to pair with fresh, juicy fruit. Now, this recipe is a staple in my home, perfect for those days when you want something wholesome and satisfying, without a lot of fuss.
Jump to Recipe
What You’ll Need
The beauty of this granola lies in its simplicity and versatility. You might already have most of these ingredients lurking in your kitchen!
- Rolled oats
- Dark brown sugar
- Maple syrup
- Vegetable oil; peanut oil is preferred
- Salt
- Cashew pieces
- Slivered almonds
- Dried cranberries
- Dried raisins
- Fresh fruit (to serve)
How to Make Home made organic maple granola with fresh fruit
- Preheat your oven to 250°F. This low temperature ensures the granola dries out rather than burns, for that perfect crunch.
- In a large bowl, combine the rolled oats, cashew pieces, slivered almonds, salt, and dark brown sugar. Give it a good stir to distribute the sugar evenly.
- Pour in the maple syrup and vegetable oil. Mix everything until the oats and nuts are well coated. You should be able to smell the sweetness already!
- Spread the mixture thinly and evenly onto two baking sheets with sides about an inch high. Trust me, the thin layer is key for even baking.
- Bake for 45 to 60 minutes, stirring carefully every 15 minutes. Don’t forget to swap the positions of the trays each time you stir them. This little dance ensures even browning.
- You’ll know it’s done when the granola looks tan—not dark—and feels slightly crisp to the touch. It will harden more as it cools.
- Remove the trays from the oven and let the granola cool completely. Once cooled, mix in the dried cranberries and raisins.
- Store your granola in sealed plastic bags or containers. It’ll stay fresh for up to two weeks, unrefrigerated.
- Serve your granola with a handful of fresh fruit. Enjoy every crunchy, sweet bite!
Cook’s Notes
This granola is super forgiving, but here are a few tips to keep it foolproof. Remember to stir it gently to keep those lovely clusters intact. If you don’t have peanut oil, any neutral oil like canola will work in a pinch, but peanut oil does add a subtle, nutty flavor that’s just divine. Make sure to let it cool completely before storing, as any trapped heat can make it soggy. If you somehow don’t finish this in two weeks (but let’s be real, you will), just pop it in an airtight container in the freezer for longer storage.
Make It Your Own
Here are some fun tweaks to make this granola truly yours:
- Swap the cashews and almonds for your favorite nuts like walnuts or pecans for a different flavor profile.
- Add a teaspoon of cinnamon or a pinch of nutmeg to the oat mixture for a warm spice kick.
- Try using honey instead of maple syrup for a different kind of sweetness.
- Sprinkle some coconut flakes into the mix before baking for a tropical twist.
If you try this, I’d love to hear how it turns out — drop a comment or tag me! Happy granola-making, friends!
Related update: Home made organic maple granola with fresh fruit

Picture this: It’s a chilly Tuesday evening, and I’ve just walked in from a day that felt three years long. My stomach is grumbling louder than my thoughts, and the last thing I want is a kitchen marathon. That’s when my trusty Crock-Pot and this Asian-Style Country Ribs with Black Bean Garlic Sauce recipe save the day. It’s one of those magical dishes that feels like a warm hug—comforting and flavorful yet deceptively simple. I swear, the first time I made it, I was convinced it was a culinary miracle. Not only does it take just 10 minutes to prep, but the result is rich and complex, like you’ve been slaving away for hours. Seriously, if you can operate a can opener, you can make this. Jump to Recipe
What You’ll Need
You’ll love how this recipe leans on pantry staples, with just a couple of special ingredients that pack a punch. Chances are you already have most of this. Here’s what you’ll need:
- Boneless pork ribs
- Cooked black bean garlic sauce from a jar
- Low sodium soy sauce
- Chicken stock
- Dark sesame oil
- Fresh garlic
- Ginger root
- Honey
- Black coarsely cracked pepper
- Cornstarch
- Green scallions
How to Make Crock-Pot: Asian-Style Country Ribs with Black Bean Garlic Sauce
- Begin by mincing your fresh garlic and ginger root. Trust me, the aroma is going to be your first reward.
- In a small bowl, mix together the black bean garlic sauce, low sodium soy sauce, chicken stock, dark sesame oil, honey, and the minced garlic and ginger. This is your magic potion.
- Place your boneless pork ribs into the Crock-Pot. Pour the sauce mixture over them, ensuring each rib is drenched in deliciousness.
- Add cracked black pepper over the top. It will give a subtle heat that ties everything together.
- Set your Crock-Pot on low and let it work its magic for 5 to 6 hours. You’ll know it’s ready when the meat is tender and falling apart.
- In the last 15 minutes of cooking, whisk together cornstarch with a bit of cold water. Stir it into the sauce in the Crock-Pot to thicken it slightly.
- Just before serving, sprinkle sliced green scallions over the top. They’ll add a fresh crunch and a pop of color.
Cook’s Notes
Okay, a couple of things to keep in mind: Don’t let the ribs go past the 6-hour mark, or you’ll end up with mushy meat instead of that perfect fall-apart texture. If you’re juggling tasks, you can prep everything the night before, store it in the fridge, and just dump it all into the Crock-Pot in the morning.
Leftovers are gold! Store them in an airtight container, and they’ll keep in the fridge for up to three days. Just reheat slowly on the stovetop or microwave. If the sauce thickens too much, a splash of chicken stock will do the trick.
Make It Your Own
- Swap the pork for chicken thighs: They cook beautifully in the sauce and stay juicy.
- Add a kick with Sriracha: Mix a tablespoon into the sauce for some heat.
- Go vegetarian with tofu: Use firm tofu, cut into large cubes, and reduce cooking time to 3 hours.
- Try a citrus twist: Add a tablespoon of orange zest to the sauce for a fresh, zesty note.
If you try this, I’d love to hear how it turns out—drop a comment or tag me! Your kitchen deserves this kind of effortless magic, and so do you.
Related update: Crock-Pot: Asian-Style Country Ribs with Black Bean Garlic Sauce
Related update: Balsamic-Honey Chicken Drumsticks

Picture this: It’s a Wednesday night, and I have exactly 45 minutes to whip up something that feels a little fancy but won’t leave me with a mountain of dishes. That’s when I remember my trusty cream cheese stuffed chicken breasts. It’s the kind of meal that sounds like it took hours, but really, it’s a bit of kitchen magic that you can pull together with everyday ingredients. And let’s be honest, who doesn’t love a good creamy-cheesy-bacon combo? The first time I made it, I almost skipped the tarragon — but trust me, it’s the game-changer that makes this dish sing.
Jump to Recipe
What You’ll Need
This list is pretty much pantry-basics-plus-bacon. You might even have everything you need already, minus a quick trip to the fridge:
- Skinless boneless chicken breasts
- Cream cheese
- Bacon
- Olive oil or unsalted butter
- Diced onion
- Garlic
- Salt
- Black pepper
- Fresh tarragon
How to Make Cream Cheese Stuffed Chicken Breasts
- Preheat your oven to 350°F. This is your moment to take a deep breath and envision the golden deliciousness to come.
- In a small skillet, warm the butter or olive oil over medium-low heat. Add the diced onions and let them sweat it out until they’re soft and translucent, about 5 minutes. Toss in the garlic and stir for another minute until it’s fragrant enough to make you weak in the knees.
- While that cools, grab another skillet and give the bacon a gentle sauté over low heat. You want it soft and a little bit rendered, not crispy. Paper towel it up and let it chill.
- Place the chicken breasts between two sheets of waxed paper, and give them a good, even pounding to about 1/4-inch thickness. Channel your inner zen and season them with salt and pepper.
- Combine the cooled onion-garlic mix with the cream cheese. Spread a generous dollop of this goodness in the center of each chicken breast.
- Roll or fold the chicken around the cream cheese mixture. Tuck the ends under and secure these delightful little packages with toothpicks. Don’t worry if they look a bit rustic, that’s part of the charm.
- Sprinkle fresh tarragon over the rolled chicken. Wrap each piece with bacon, giving them a cozy little blanket.
- Place your chicken rolls in an 8×11 baking dish and drizzle with melted butter. Pop them in the oven for 25 to 30 minutes. They’re done when the chicken is cooked through, the bacon is browned, and the cream cheese is irresistibly melty.
- Serve immediately and watch them disappear. Seriously, they’re magic.
Cook’s Notes
A few things to keep in mind while you’re chef-ing it up:
– Make sure the onions and garlic are cool before mixing them with the cream cheese. Otherwise, things might get a bit too melty too soon.
– If you’re making this ahead, you can assemble the chicken rolls and keep them in the fridge for a few hours. Just bake them right before you’re ready to eat.
– Leftovers? Store them in an airtight container in the fridge for up to two days. Reheat gently in the oven to keep that bacon crisp.
Make It Your Own
Here’s where you can get a little playful:
- Swap the chicken for crispy tofu for a vegetarian twist that still brings all the creamy-bacon vibes (yep, vegetarian bacon exists!).
- Add some chopped spinach to the cream cheese mixture for a pop of color and a little extra nutrition.
- Try prosciutto instead of bacon for a slightly saltier, more gourmet flavor.
- Experiment with herbs — basil or rosemary could take this dish in a deliciously different direction.
If you try this, I’d love to hear how it turns out — drop a comment or tag me! Your kitchen adventures are what make this all so fun. Happy cooking!
Related update: Cream Cheese Stuffed Chicken Breasts
Related update: Crock-Pot: Asian-Style Country Ribs with Black Bean Garlic Sauce

It was a typical Wednesday evening, and I found myself rummaging through the pantry, desperately seeking something to satisfy my sweet tooth. The weather outside was chilly, the kind of evening that begged for something cozy and chocolatey. In the midst of my search, I stumbled upon a forgotten container of dark cocoa powder wedged between bags of flour and sugar. It was then that the idea struck me — Chocolate Crinkle Cookies. These cookies are like a warm hug: comforting, slightly crunchy on the outside, chewy on the inside, and oh-so-chocolaty. Perfect for a spontaneous midweek baking session, especially when they’re this easy to make. Within an hour, my kitchen was filled with the scent of rich cocoa, and I knew I’d found my new favorite go-to treat for those cold, restless evenings.
Jump to Recipe
What You’ll Need
Imagine the delight of realizing that you already have most of these ingredients lounging in your pantry. Here’s what you need to create these delightful cookies:
- Vegetable oil – keeps the cookies moist
- Sugar – for sweetness and texture
- Vanilla extract – adds a lovely aroma
- Eggs – the glue that binds
- Dark cocoa powder – the heart of the chocolatey goodness
- Flour – the base of any good cookie
- Baking powder – gives those crinkles their puff
- Confectioners’ sugar – for that signature snowy look
How to Make Chocolate Crinkle Cookies
Ready to dive into the wonderful world of crinkly cookies? Here’s the step-by-step:
- Start by mixing the vegetable oil, sugar, and vanilla extract in a mixing bowl. You’ll know it’s right when the mixture looks like wet sand glistening in the sun.
- Add the eggs one at a time, mixing well after each addition until the batter is silky and smooth.
- Incorporate the dark cocoa powder into the mixture, slowly stirring until it turns into a rich, dark chocolate color.
- Combine the flour and baking powder with the wet ingredients. Continue mixing until you have a smooth dough that’s slightly thicker than cake batter.
- Chill the dough in the refrigerator for at least 4 hours. This step isn’t just a suggestion — it’s crucial for achieving perfect crinkles.
- When you’re ready, preheat your oven to 350°F. Line a cookie sheet with greaseproof paper or a nonstick silicone mat.
- Using an ice cream scooper, scoop out the dough and roll each ball generously in confectioners’ sugar. Make sure they’re well-coated for that iconic crinkle effect.
- Place the dough balls on the cookie sheet, leaving about 2 inches of space between each to allow for spreading.
- Bake for 12 minutes. You’ll know they’re done when the edges are firm and the tops have a cracked, powdered sugar crust.
- Let the cookies cool on the sheet initially, then transfer them to a wire rack to finish cooling completely. This helps them firm up nicely.
Cook’s Notes
Let’s chat kitchen wisdom for a second. The dough is sticky, and that’s normal — resist the urge to add more flour! Chilling the dough helps it firm up enough to handle, so don’t skip that step. If you’re in a pinch, you can speed-chill in the freezer for about 30 minutes. These cookies are best enjoyed fresh, but they’ll keep in an airtight container for about a week. To revive day-old cookies, zap them in the microwave for a few seconds — they’ll taste freshly baked!
Make It Your Own
Feeling adventurous? Here are a few ways to tweak these cookies to suit your mood:
- Swap out the dark cocoa powder for regular cocoa powder if you prefer a milder chocolate flavor.
- Add a teaspoon of espresso powder to the dough for a subtle coffee kick that pairs beautifully with the cocoa.
- Fold in some chocolate chips or chunks just before chilling for an extra burst of chocolate in every bite.
- For a festive twist, mix in a teaspoon of peppermint extract or a handful of crushed candy canes.
If you try this, I’d love to hear how it turns out — drop a comment or tag me! Whether you’re indulging alone or sharing with loved ones, these Chocolate Crinkle Cookies are sure to bring a smile. Happy baking!
Related update: Chocolate Crinkle Cookies
Related update: Mangoes with Rum and Ice Cream