Warm Goat Cheese Salad | Made by Meaghan Moineau

Warm Goat Cheese Salad

Intro

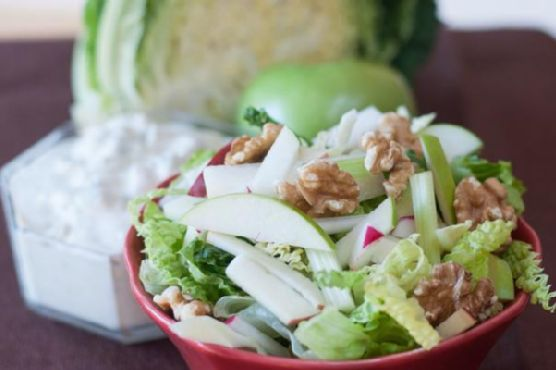
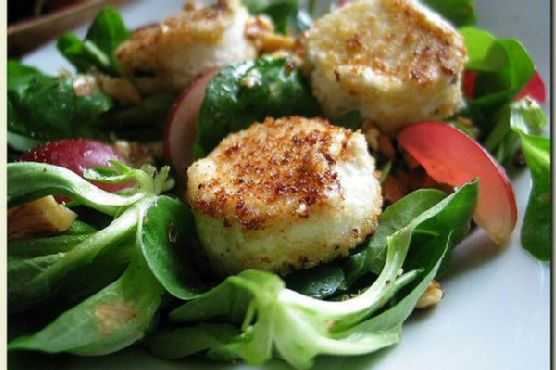
There’s something inherently comforting about a warm goat cheese salad. The combination of creamy cheese, crunchy walnuts, and fresh greens creates a delightful medley of textures and flavors. This recipe, which I first encountered during a summer trip to the French countryside, brings back fond memories of leisurely lunches in sunlit gardens. One particular afternoon, after a long bike ride through picturesque villages, we stumbled upon a charming little bistro. There, I savored my first taste of a warm goat cheese salad, and it was love at first bite. Now, I’m thrilled to share this cherished recipe with you, so you can create your own unforgettable culinary moments.

Why You’ll Love It

This warm goat cheese salad is a perfect blend of flavors and textures, making it a standout dish for any occasion. Here’s why you’ll adore it:

  • Quick and Easy: Ready in just 20 minutes, it’s perfect for a speedy lunch or an elegant starter.
  • Healthy and Nutritious: Packed with wholesome ingredients like fresh greens, walnuts, and goat cheese, it’s a nutritious choice.
  • Versatile: Ideal for a light lunch, dinner starter, or even a sophisticated side dish.
  • Impressive Presentation: With its vibrant colors and artful arrangement, this salad is as beautiful as it is delicious.

Ingredients

  • Some bread crumbs
  • Fresh rounds of goat cheese
  • Grapes
  • Lemon juice
  • Olive oil
  • Pepper
  • Salad greens
  • Salt and pepper
  • Shallot
  • Walnut oil
  • Walnuts

Instructions

  1. Whisk together 3 tablespoons of walnut oil with lemon juice, minced shallot, salt, and pepper to make a vinaigrette.
  2. Coat each goat cheese round with walnut oil and then the bread crumbs, patting the crumbs to adhere.
  3. Combine the greens and the walnuts in a large bowl. Add in enough of the vinaigrette and toss well. Adjust the seasoning and divide among two serving plates.
  4. Heat a nonstick skillet over medium heat. Add in olive oil. When the oil is hot, add the goat cheese rounds.
  5. Cook until nicely browned, about 30 seconds. Turn and cook the other side. Do not allow it to burn or melt.
  6. Transfer the goat cheese to the plates, placing 2 or 3 atop each salad.
  7. Sprinkle the cheese with freshly ground pepper and garnish with grape wedges.

Tips

To ensure your salad turns out perfectly every time, consider these helpful tips:

  • Chill the Cheese: Keep the goat cheese rounds in the fridge until just before coating and cooking to help them hold their shape.
  • Use Fresh Ingredients: Fresh salad greens and grapes will enhance the taste and texture of the salad.
  • Adjust the Vinaigrette: Taste the vinaigrette and adjust the seasoning to suit your preference.

Variations & Substitutions

Feel free to customize the salad to your liking with these variations and substitutions:

  • Nuts: Swap walnuts for pecans or almonds for a different nutty flavor.
  • Cheese: Substitute the goat cheese with feta or blue cheese for a different taste profile.
  • Fruits: Add sliced apples or pears for additional sweetness and crunch.
  • Greens: Use arugula or spinach in place of mixed salad greens for a peppery or earthy flavor.

Storage

This salad is best enjoyed fresh, but if you have leftovers, store the components separately in airtight containers:

  • Greens and Walnuts: Store in the refrigerator for up to 2 days.
  • Goat Cheese: Can be stored in an airtight container in the fridge for up to 5 days.
  • Vinaigrette: Keep refrigerated and use within a week.

FAQ

Can I make this salad vegan?

Absolutely! You can replace the goat cheese with a vegan cheese alternative and use a vegan-friendly bread crumb option.

How can I make the salad more filling?

Consider adding grilled chicken or chickpeas to increase the protein content and make it more satiating.

Nutrition

This warm goat cheese salad is not only delicious but also nutritious, offering a good balance of healthy fats, protein, and vitamins. While exact nutritional values can vary, a typical serving provides:

  • Calories: Approximately 400 per serving
  • Protein: 12g
  • Fat: 30g (with healthy fats from olive and walnut oil)
  • Carbohydrates: 20g

Conclusion

Whether you’re seeking a quick lunch option or an elegant starter for a dinner party, this warm goat cheese salad is sure to impress. Its delightful combination of flavors and textures will surely become a favorite in your recipe repertoire. So, gather your ingredients and enjoy the comforting taste of a warm goat cheese salad, perhaps while dreaming of sunny afternoons in the French countryside.

Related update: Warm Goat Cheese Salad

Related update: Simple Squash Salad

Related update: Crab Cake Stuffed Shrimp

Crispy Pineapple Fritters | Made by Meaghan Moineau

Crispy Pineapple Fritters: A Delightful Treat for Any Occasion

Intro

There’s something magical about the smell of freshly fried fritters wafting through the kitchen, bringing back memories of sunlit afternoons at my grandmother’s house. She would whip up a batch of her famous pineapple fritters, and we’d gather around the kitchen table, eagerly awaiting the first bite. The crispy exterior, the sweet and juicy pineapple inside, and a dusting of powdered sugar on top made for an unforgettable treat. Today, I’m thrilled to share this beloved recipe with you, updated for a new generation while preserving that nostalgic charm.

Why You’ll Love It

These Crispy Pineapple Fritters are a perfect blend of sweet and savory, with a satisfying crunch that makes them irresistibly good. Whether you’re serving them as a snack, dessert, or even a breakfast treat, these fritters are sure to delight everyone at the table. They’re easy to make, require simple ingredients, and are wonderfully versatile, allowing you to add your favorite toppings or enjoy them just as they are.

Ingredients

  • Canned pineapple rings
  • Flour
  • Cornstarch
  • Egg
  • Baking powder
  • Salt
  • Milk
  • Panko breadcrumbs
  • Canola oil

Instructions

  1. Prepare the batter by combining the flour, cornstarch, baking powder, salt, egg, and milk in a shallow dish. Whisk with a fork to create a smooth, pancake-like batter.
  2. In another shallow dish, place the panko breadcrumbs.
  3. Pour about an inch of canola oil into a large skillet and preheat the oil over medium-high heat.
  4. Pat the pineapple rings as dry as possible between sheets of paper towels to ensure they fry up crispy.
  5. Dip each pineapple ring into the batter, tapping off any excess, then coat well in the panko crumbs.
  6. Immediately fry the coated rings in the hot oil until they’re golden brown on both sides, about 2-3 minutes per side.
  7. Remove the fritters from the oil and drain them on paper towels.
  8. Serve the fritters hot, warm, or at room temperature. Optional garnishes include powdered sugar, cinnamon sugar, ice cream, or whipped cream.

Tips

For the best results, ensure your oil is at the right temperature. You can test this by dropping a small piece of batter into the oil; if it sizzles and browns quickly, you’re ready to fry. Also, be sure not to overcrowd the skillet, as this can lower the oil temperature and result in soggy fritters.

Variations & Substitutions

If you’re looking to switch things up, try using fresh pineapple instead of canned for a slightly tangier flavor. You can also experiment with different coatings, such as crushed cereal or coconut flakes, for added texture. For a dairy-free version, substitute the milk with almond or coconut milk, and for a gluten-free option, use gluten-free flour and breadcrumbs.

Storage

To store any leftover fritters, let them cool completely, then place them in an airtight container. They can be kept in the refrigerator for up to three days. To reheat, simply pop them in the oven at 350°F (175°C) for about 10 minutes or until heated through. Avoid microwaving, as it can make them soggy.

FAQ

Can I make these fritters ahead of time?

Yes, you can prepare the batter and coat the pineapple rings in advance. Store them in the refrigerator until you’re ready to fry. However, for the crispiest texture, it’s best to fry them just before serving.

What can I serve with pineapple fritters?

Pineapple fritters pair wonderfully with a scoop of vanilla ice cream or a dollop of whipped cream. For a more decadent treat, try drizzling them with caramel or chocolate sauce.

Nutrition

While the exact nutritional content will depend on the specific ingredients and portion sizes used, a typical serving of crispy pineapple fritters provides a delightful combination of carbohydrates, a moderate amount of fat from the frying process, and the natural sugars found in pineapple. Enjoy them as an occasional treat as part of a balanced diet.

Conclusion

Crispy Pineapple Fritters are a delightful way to bring a touch of tropical sweetness to any occasion. With their crunchy coating and juicy center, they’re sure to become a favorite in your household as they have in mine. I hope this recipe brings you as much joy and as many cherished memories as it has brought to my family. Happy cooking!

Related update: Crispy Pineapple Fritters

Related update: Fluffy frittata with spinach

Smoked Salmon and Mascarpone Calzone | Made by Meaghan Moineau

Smoked Salmon and Mascarpone Calzone

Intro

There’s something truly magical about the aroma of freshly baked calzones wafting through the kitchen. It instantly transports me back to my childhood, where Sunday afternoons were reserved for family cooking sessions. My grandmother, with her deft hands and infectious laughter, would guide us through the art of making the perfect calzone, each one stuffed with her secret ingredient—love. Today, I’m sharing a modern twist on this nostalgic favorite: the Smoked Salmon and Mascarpone Calzone. It’s a delightful fusion of creamy mascarpone, savory smoked salmon, and the delicate flavor of fresh chives and leeks, all encased in a perfectly golden crust.

Why You’ll Love It

This Smoked Salmon and Mascarpone Calzone is not just a dish; it’s an experience. Whether you’re a fan of traditional Italian cuisine or looking to try something new, this recipe offers a unique blend of flavors and textures that will captivate your taste buds. The richness of the mascarpone complements the smokiness of the salmon perfectly, while the leeks add a subtle sweetness that ties everything together. Plus, making calzones is a fun activity for the whole family, reminiscent of those cherished childhood memories.

Ingredients

  • Black pepper
  • Egg white
  • Extra virgin olive oil
  • Fresh chives
  • Kosher salt
  • Leek
  • Mascarpone
  • Pizza dough
  • Smoked salmon

Instructions

  1. Preheat your oven to 450°F and place the top rack in the lower third of your oven. Line a baking sheet with parchment paper for easier cleanup.
  2. Wash and pat dry the leek. Slice the leek lengthwise, then cut each half into long, very thin strips. Cut the strips into short pieces, about 2 inches long. Set aside.
  3. Divide the dough into two equal parts, and roll out each into a 10-inch circle. Gently spread a thin layer of mascarpone on the surface of the dough, leaving at least a 1-inch crust.
  4. In a small bowl, break up the smoked salmon using your fingers until it is fluffy. You want the filling of the calzone to be pretty even, or it will fall apart as you eat it.
  5. Divide the salmon between the two crusts, arranging it only on one side of the crust (in a half-moon shape), again leaving at least a 1-inch crust. Sprinkle the chives and leeks over the salmon, then lightly salt and pepper. Finally, drizzle with about 1 tsp of olive oil.
  6. Fold each calzone in half, making sure that the crusts line up. Using the tines of a fork, gently press down the edge all the way around the rounded side of the calzone to seal it. Make sure you get a tight seal; this will help the calzone puff up during baking.
  7. Brush the tops of each calzone with egg white. Bake at 450°F for about 15 minutes, or until golden brown and delicious.

Tips

Here are a few tips to ensure your calzones turn out perfectly:

  • Make sure your oven is fully preheated before baking to achieve the best crust.
  • If you’re short on time, store-bought pizza dough works just as well as homemade.
  • Ensure the seal is tight to prevent any filling from leaking out during baking.

Variations & Substitutions

This recipe is wonderfully versatile. Here are some variations and substitutions you can try:

  • Swap the smoked salmon for smoked trout or cooked shrimp for a different seafood twist.
  • Replace mascarpone with cream cheese for a tangier flavor.
  • Add capers or dill for an extra burst of flavor.

Storage

To store your calzones, allow them to cool completely, then wrap them tightly in foil or place them in an airtight container. They can be refrigerated for up to 3 days. To reheat, simply place them in an oven preheated to 350°F for 10-12 minutes or until warmed through.

FAQ

Can I make the calzone dough ahead of time?

Yes, you can make the dough ahead of time. Simply prepare the dough according to your recipe, then wrap it tightly in plastic wrap and store it in the refrigerator for up to 24 hours. Allow it to come to room temperature before rolling it out.

What can I serve with these calzones?

These calzones pair beautifully with a fresh green salad or a side of roasted vegetables. You can also serve them with a simple tomato sauce or a lemon-dill sauce for dipping.

Nutrition

While the exact nutritional content may vary depending on the specific brands and quantities used, each calzone is a good source of protein and healthy fats, thanks to the smoked salmon and mascarpone. For those watching their sodium intake, you may wish to use less kosher salt.

Conclusion

The Smoked Salmon and Mascarpone Calzone is more than just a meal; it’s a touchstone to cherished memories and a versatile recipe that can be adapted to suit any palate. Whether you’re making it for a special occasion or a casual family dinner, this calzone promises to deliver warmth, comfort, and plenty of flavor. Gather your loved ones, roll up your sleeves, and enjoy the delightful experience of making and sharing this delicious dish.

Related update: Smoked Salmon and Mascarpone Calzone

Gluten And Dairy Free Peanut Butter Cups | Made by Meaghan Moineau

Gluten And Dairy Free Peanut Butter Cups

Intro

There’s something utterly comforting about the combination of chocolate and peanut butter, a pairing as timeless as a warm embrace on a chilly day. Growing up, I fondly remember my grandmother’s kitchen, a treasure trove of sweet aromas and delightful treats. She always had a stash of peanut butter cups tucked away in a tin, ready to be brought out during family gatherings. Over the years, I’ve embraced a gluten and dairy-free lifestyle, but my love for this classic treat remains unchanged. This recipe is my homage to those cherished moments with a modern twist, ensuring that everyone, regardless of dietary restrictions, can indulge in this nostalgic delight.

Why You’ll Love It

If you’re a fan of creamy, nutty flavors encased in rich, velvety chocolate, these gluten and dairy-free peanut butter cups will quickly become a staple in your dessert repertoire. They are simple to make, require minimal ingredients, and are free from gluten and dairy, making them accessible for those with dietary restrictions. More than just a treat, they are a delightful reminder that sometimes, the simplest things in life bring the most joy.

Ingredients

  • 1 cup Enjoy Life semi-sweet chocolate chips
  • 2 tablespoons non-hydrogenated shortening
  • 1/2 cup creamy peanut butter
  • 2 tablespoons agave nectar
  • 1/4 teaspoon salt

Instructions

  1. Line a mini muffin tin with paper liners or spray with cooking oil.
  2. In a small bowl, mix together the creamy peanut butter, agave nectar, and salt. Set aside.
  3. In a heatproof bowl, combine the chocolate chips and shortening. Set the bowl over a pot of simmering water, ensuring that the water does not touch the bottom of the bowl.
  4. Stir the chocolate and shortening gently until fully melted and smooth.
  5. Spoon 1 teaspoon of the melted chocolate into each of the prepared mini muffin cups.
  6. Top the chocolate with a scant teaspoon of the peanut butter mixture.
  7. Finish by topping each cup with another teaspoon of the melted chocolate.
  8. Refrigerate the peanut butter cups until they are set, about 1-2 hours.
  9. Store the set peanut butter cups in an airtight container in the refrigerator.

Tips

For the best results, ensure that the chocolate and shortening are melted gently. Avoid overheating, as this can cause the chocolate to seize. If you don’t have a double boiler, a heatproof bowl over a pot of simmering water works perfectly. Patience is a virtue when it comes to setting these cups, so resist the urge to peek too soon!

Variations & Substitutions

This recipe is wonderfully flexible. If you prefer a different nut butter, almond or cashew butter can be substituted for peanut butter. For a touch of texture, consider mixing in a handful of chopped nuts or seeds into the peanut butter filling. If agave nectar isn’t available, maple syrup or honey (if not strictly vegan) can be used as an alternative sweetener.

Storage

These peanut butter cups are best stored in an airtight container in the refrigerator. They’ll keep well for up to two weeks, making them a perfect make-ahead treat. For longer storage, you can freeze them and enjoy a quick indulgence straight from the freezer.

FAQ

Can I use a different type of chocolate?

Absolutely! While semi-sweet chocolate provides a balanced sweetness, you can opt for dark chocolate if you prefer a richer, more intense flavor. Just ensure it is dairy-free to keep the recipe compliant with dietary needs.

Is there a substitute for shortening?

If you don’t have non-hydrogenated shortening on hand, coconut oil can be a good alternative. It will help the chocolate set with a smooth texture, though it may impart a slight coconut flavor.

Nutrition

These peanut butter cups are rich in flavor and moderately indulgent, making them a treat best enjoyed in moderation. The use of natural ingredients like agave nectar and creamy peanut butter offers a slightly healthier twist on traditional versions, with healthy fats and a touch of protein. As always, it’s important to consider portion sizes to maintain a balanced diet.

Conclusion

Creating these gluten and dairy-free peanut butter cups is more than just a culinary exercise—it’s a way to rekindle the warmth of cherished memories while crafting new ones. Whether you’re preparing them for a family gathering or simply to satisfy a personal craving, their simplicity and rich flavor will undoubtedly make them a favorite. I hope this recipe brings as much joy to your kitchen as it has to mine, and that each bite transports you to your own happy memories of yesteryears.

Related update: Gluten And Dairy Free Peanut Butter Cups

Related update: Crispy Pineapple Fritters

Parmesan Mashed Potatoes | Made by Meaghan Moineau

Parmesan Mashed Potatoes

Intro

There’s nothing quite like the comforting embrace of a bowl of mashed potatoes. Growing up, my grandmother’s kitchen was always filled with the intoxicating aroma of buttery potatoes during the holiday season. She had a special way of incorporating Parmesan that made her mashed potatoes the highlight of every meal. I’ve tried to capture that beloved family tradition in this recipe. Whether you’re gathered around the table with family or enjoying a cozy dinner for two, these Parmesan Mashed Potatoes are sure to bring warmth and joy to your meal.

Why You’ll Love It

This recipe takes a classic comfort food and elevates it with the rich, savory flavor of Parmesan cheese. The creaminess of the potatoes is perfectly complemented by the nutty and salty notes of the cheese, making it a dish that’s both simple and sophisticated. It’s easy to prepare, yet impressive enough to serve at a dinner party. Plus, it’s versatile enough to accompany a variety of main courses, from roasted chicken to grilled steak. You’ll love how these mashed potatoes turn any meal into a special occasion.

Ingredients

  • 4 pounds russet potatoes, peeled and cubed
  • 1 cup heavy cream
  • 1/2 cup unsalted butter
  • 1 cup grated Parmesan cheese
  • Salt and freshly ground black pepper, to taste

Instructions

  1. Place potatoes in a medium pot and cover with cold water.
  2. Bring to a boil, then reduce the heat to a simmer.
  3. Add a generous pinch of salt and continue to simmer until the potatoes are fork-tender, about 20 minutes.
  4. Meanwhile, heat the cream, butter, salt, and pepper in a medium saucepan over medium heat until steaming hot, about 6 minutes.
  5. When the potatoes are done, drain them and return them to the pot to dry slightly.
  6. Optional: Run potatoes through a food mill or potato ricer back into the pot for extra smoothness.
  7. Add the potatoes to the cream and butter mixture.
  8. Stir in the Parmesan cheese and taste for seasoning.

Tips

For the best texture, use russet potatoes as they are high in starch and yield a fluffier mash. Make sure to heat the cream and butter before adding them to the potatoes; this helps the potatoes absorb the liquid better, resulting in a creamier texture. If you prefer, you can leave the skins on for a more rustic feel, but be sure to scrub them well.

Variations & Substitutions

If you’re looking to change things up, consider adding roasted garlic for a deeper flavor. You can also substitute the Parmesan with Pecorino Romano for a slightly sharper taste. For a lighter version, you can use half-and-half in place of heavy cream. If you prefer a vegan option, use plant-based butter and cream, and nutritional yeast instead of Parmesan.

Storage

Store any leftover mashed potatoes in an airtight container in the refrigerator for up to 3 days. To reheat, place them in a saucepan over low heat, adding a splash of cream or milk to restore their creamy consistency. Stir frequently to prevent sticking.

FAQ

Can I make these mashed potatoes ahead of time?

Yes, you can prepare the mashed potatoes up to 2 days in advance. Store them in the refrigerator and reheat gently on the stovetop or in the oven before serving. Add a bit more cream or butter if needed to restore their creamy texture.

Can I freeze Parmesan Mashed Potatoes?

While it is possible to freeze mashed potatoes, the texture can change upon thawing. If you choose to freeze them, place them in a freezer-safe container for up to 1 month. Thaw in the refrigerator and reheat slowly, adding additional cream or butter as necessary.

Nutrition

Each serving of Parmesan Mashed Potatoes is approximately 250 calories. It contains about 15 grams of fat, 20 grams of carbohydrates, and 6 grams of protein. This dish is a source of calcium and vitamin C, thanks to the potatoes and Parmesan cheese.

Conclusion

These Parmesan Mashed Potatoes are a delightful twist on a classic dish that’s sure to be a hit with family and friends. Whether you’re making them for a special holiday meal or a cozy weeknight dinner, they bring a touch of elegance and warmth to the table. So, gather your loved ones, serve a generous helping, and enjoy the smiles that follow!

Related update: Parmesan Mashed Potatoes

Pork with Blueberry Sauce | Made by Meaghan Moineau

Pork with Blueberry Sauce

Intro

There’s something uniquely satisfying about combining savory flavors with a touch of sweetness. It reminds me of summer evenings spent at my grandmother’s house, where she would always surprise us with her inventive dishes. One of my fondest memories is of her tangy pork chops served with a delightful fruit sauce that seemed to encapsulate the essence of the season. Inspired by those cherished moments, I’ve crafted this recipe for Pork with Blueberry Sauce. It’s a dish that promises to bring a burst of flavor to your dinner table, and I’m excited to share it with you.

Why You’ll Love It

This Pork with Blueberry Sauce is a symphony of flavors. The juicy pork chops are perfectly seasoned and seared to golden perfection, while the blueberry sauce provides a sweet and tangy counterpoint. The balsamic vinegar adds depth, and the lime zest gives it a zesty punch. Whether you’re hosting a dinner party or enjoying a quiet meal at home, this dish is sure to impress. Plus, it’s easy to make and requires just a few simple ingredients!

Ingredients

  • Pork chops
  • Salt and pepper
  • Canola oil
  • Fresh pint blueberries
  • Brown sugar
  • Balsamic vinegar
  • Red diced onion
  • Lime zest
  • Parsley, for garnish

Instructions

  1. Preheat the oven to 400 degrees Fahrenheit.
  2. In a nonreactive bowl, mash the blueberries with the brown sugar to your desired consistency and set aside.
  3. Heat a sauté pan over medium heat. Season the pork chops with salt and pepper on both sides.
  4. Add canola oil to the sauté pan. Brown the pork chops on both sides until golden and crispy, about 2-3 minutes on each side. Remove from the pan and place on a baking dish to finish cooking in the oven, if necessary. If the pork is thin, keep it warm aside until the sauce is ready.
  5. In the same pan, add the chopped red onion and sauté until translucent.
  6. Add the mashed blueberry-sugar mixture and balsamic vinegar. Cook until the sauce thickens, about 2-3 minutes.
  7. Add the lime zest and juice to the sauce, seasoning with salt and pepper to taste.
  8. If you placed the pork in the oven, remove it and place on serving plates. Serve the sauce on top and garnish with parsley or cilantro. Enjoy!

Tips

To get the perfect sear on your pork chops, make sure your pan is hot before adding the meat. This will help achieve a crispy exterior while keeping the inside juicy. Additionally, letting the pork rest after cooking allows the juices to redistribute, resulting in tender and flavorful meat.

Variations & Substitutions

If you’re looking to switch things up, you can substitute pork chops with chicken breasts or turkey cutlets. For a vegetarian version, consider using seared tofu or tempeh. You can also experiment with different fruits like raspberries or blackberries for the sauce, adjusting the sugar to taste.

Storage

Leftover pork with blueberry sauce can be stored in an airtight container in the refrigerator for up to 3 days. To reheat, gently warm it in a pan over medium-low heat, adding a splash of water if the sauce has thickened too much during storage.

FAQ

Can I use frozen blueberries for this recipe?

Yes, you can use frozen blueberries if fresh ones are not available. Just make sure to thaw them and drain any excess liquid before mashing them with the sugar.

What can I serve with Pork with Blueberry Sauce?

This dish pairs beautifully with a variety of sides. Consider serving it with creamy mashed potatoes, roasted vegetables, or a simple green salad to complement the flavors.

Nutrition

While the exact nutritional content can vary based on the specific ingredients and portion sizes used, this dish is a good source of protein from the pork and antioxidants from the blueberries. It’s a balanced meal that offers both nutrients and flavor.

Conclusion

This Pork with Blueberry Sauce is more than just a meal; it’s an experience that brings together the best of sweet and savory. Whether you’re cooking for your family or hosting guests, this dish is sure to delight everyone at the table. I hope it becomes a favorite in your home, just as it has in mine. Enjoy the journey of flavors and happy cooking!

Related update: Pork with Blueberry Sauce

Related update: Smoked Salmon and Mascarpone Calzone

Chicken Stew For The Soul | Made by Meaghan Moineau

Chicken Stew For The Soul

Intro

There’s something magical about a simmering pot of chicken stew, its enticing aroma wafting through the kitchen, enveloping you in warmth and comfort. This Chicken Stew For The Soul is a recipe that has been passed down through generations in my family. I remember spending weekends at my grandmother’s house, eagerly helping her gather ingredients from her lush garden. The anticipation of tasting the rich, flavorful stew made the wait worthwhile. This recipe is not just a dish; it’s a culinary hug, a reminder of love and family gatherings.

Why You’ll Love It

This Chicken Stew for the Soul is everything you want in a comforting meal. It’s aromatic, thanks to a blend of spices like cardamoms and cinnamon, and creamy with the addition of coconut milk. The stew is perfect for gatherings, offering a hearty meal that warms both the heart and the stomach. It’s easy to make, yet feels like a special treat every time. Whether you’re cooking for yourself or for loved ones, this stew is sure to bring smiles all around.

Ingredients

  • Cardamoms
  • Chicken
  • Cinnamon stick, broken
  • Coconut milk
  • Curry leaves
  • Fresh coriander
  • Garam masala
  • Ginger garlic paste
  • Green chillies
  • Red ground chilli
  • Ground coriander
  • Ground turmeric
  • Lemon (juice)
  • Onion
  • Potatoes
  • Salt

Instructions

  1. Slice the onions, slit the chillies, cube the potatoes, and keep aside.
  2. Heat oil in a heavy-bottomed pan or pressure cooker, splutter mustard seeds.
  3. Add the whole spices and stir till you begin to get the aroma of the spices.
  4. Add sliced onions, curry leaves, and green chillies and sauté.
  5. Stir in the ground coriander and add the marinated chicken. Stir so that the chicken is covered well in the sautéed mixture.
  6. Cover and let it cook. When it is half done, add the cubed potatoes.
  7. When the chicken is almost done, add the garam masala, salt, and coconut milk and stir.
  8. When done, turn off the heat and garnish with chopped fresh coriander.
  9. Remember, the most important ingredient is love. Stir it with lots of love for the family and friends who will partake of the meal.
  10. Serve hot chicken stew with freshly made appams.

Tips

– For the best flavors, marinate the chicken with ginger-garlic paste, salt, and a squeeze of lemon juice for at least 30 minutes before cooking.
– If using a pressure cooker, be cautious with the cooking time to avoid overcooking the chicken and potatoes.
– Adjust the spice level according to your taste by varying the amount of green chillies and red ground chilli.

Variations & Substitutions

You can swap chicken with lamb for a richer taste, though it will require a longer cooking time. For a vegetarian version, use a mix of hearty vegetables like carrots and beans, or add chickpeas for protein. If coconut milk is unavailable, you can substitute it with heavy cream, though it will alter the flavor slightly.

Storage

Leftover chicken stew can be stored in an airtight container in the refrigerator for up to 3 days. To reheat, gently simmer the stew on the stove to ensure even heating without drying out the chicken.

FAQ

Can I freeze chicken stew?

Yes, you can freeze chicken stew for up to 3 months. Allow it to cool completely before transferring to a freezer-safe container. Thaw overnight in the refrigerator before reheating.

What can I serve with chicken stew?

Chicken stew pairs beautifully with freshly made appams, rice, or even a warm crusty bread to soak up the savory sauce.

Nutrition

While the exact nutritional content can vary, this chicken stew is a well-balanced meal offering protein from the chicken, healthy fats from coconut milk, and a range of vitamins and minerals from the spices and vegetables. It’s hearty yet healthy, making it a perfect choice for a nourishing family meal.

Conclusion

Chicken Stew For The Soul is more than just a recipe; it’s a heartfelt tradition that brings warmth and joy to any table. Whether shared with family on a cozy evening or enjoyed solo as a comforting indulgence, this stew is a testament to the power of good food to nurture the soul. I hope you enjoy making and savoring this dish as much as we do in our family. Bon appétit!

Related update: Chicken Stew For The Soul

Related update: Pork with Blueberry Sauce

Related update: Moosewood Lentil Soup

Huli-Huli Chicken | Made by Meaghan Moineau

Huli-Huli Chicken Recipe: A Taste of Aloha

Intro

There’s something magical about the aroma of Huli-Huli Chicken wafting through the air. This Hawaiian classic takes me back to sun-drenched days on the island of Maui, where I first savored its sweet and savory flavors. On a family vacation, we stumbled upon a small roadside stand, drawn in by the tantalizing smell. With a warm smile, the vendor served us this succulent chicken, grilled to perfection, alongside juicy pineapple slices. This moment, filled with laughter and delicious food, is etched in my memory and has inspired me to recreate this beloved dish at home. Now, I’d love to share this recipe with you, bringing a bit of that island magic to your kitchen.

Why You’ll Love It

Huli-Huli Chicken is a dish that captures the essence of Hawaiian cuisine: vibrant, flavorful, and perfect for sharing. You will love this recipe because:

  • It’s easy to make and requires simple, fresh ingredients.
  • The marinade infuses the chicken with incredible flavor, making each bite a delightful experience.
  • Grilling adds a smoky char that enhances the sweetness of the sauce and pineapple.
  • It’s a crowd-pleaser, perfect for family dinners or summer cookouts.

Ingredients

  • 4 chicken drumsticks
  • 4 chicken thighs
  • 4 cloves garlic, smashed
  • 1 piece of ginger root, smashed
  • 1 tablespoon kosher salt
  • 1 fresh pineapple, sliced

Instructions

  1. Mix together the brine: water, sugar, salt, garlic, ginger, and thyme.
  2. Place the brine in a large resealable bag and add the chicken.
  3. Refrigerate for at least an hour, but not more than four hours.
  4. Put the sauce ingredients into a saucepan, stir, and simmer until the sauce thickens.
  5. Strain off the sauce and place it in a bowl.
  6. Remove the chicken from the brine and grill until medium brown and cooked through to the bone.
  7. Place the pineapple on the grill and lightly baste the chicken and pineapple with the sauce.
  8. Turn and baste 2-3 times every 2-3 minutes.
  9. Remove from grill and serve.

Tips

  • For the best flavor, don’t rush the marinating process. Allow the chicken to soak up the brine fully.
  • Use a meat thermometer to ensure the chicken is cooked through to a safe internal temperature of 165°F (74°C).
  • Keep the grill lid closed while cooking to maintain a consistent temperature.

Variations & Substitutions

Feel free to adapt this recipe to suit your taste:

  • Swap chicken thighs and drumsticks for boneless chicken breasts if you prefer leaner meat.
  • Add a dash of chili flakes to the sauce for a spicy kick.
  • If fresh pineapple isn’t available, canned pineapple rings can be used as a substitute.

Storage

Leftover Huli-Huli Chicken can be stored in an airtight container in the refrigerator for up to 3 days. To reheat, place the chicken in a preheated oven at 350°F (175°C) until warmed through. The grilled pineapple is best eaten fresh but can also be stored for a short period and reheated.

FAQ

Can I make Huli-Huli Chicken without a grill?

Absolutely! If you don’t have a grill, you can use a grill pan or an oven broiler. Cook the chicken in a preheated oven at 400°F (200°C) for about 25-30 minutes, turning and basting occasionally until cooked through.

What can I serve with Huli-Huli Chicken?

Huli-Huli Chicken pairs wonderfully with steamed rice, a side of coleslaw, or a fresh green salad. For a true Hawaiian experience, try serving it with macaroni salad and a slice of chilled watermelon.

Nutrition

While nutritional values can vary based on specific ingredients used, a serving of Huli-Huli Chicken (including a piece of pineapple) typically contains:

  • Calories: 250
  • Protein: 20g
  • Carbohydrates: 15g
  • Fat: 10g
  • Sodium: 400mg

Conclusion

Whether you’re reminiscing about a Hawaiian vacation or simply seeking a new recipe to delight your taste buds, Huli-Huli Chicken is sure to become a favorite. Its blend of sweet, savory, and smoky flavors captures the spirit of the islands and brings a touch of aloha to your table. I hope you enjoy making and sharing this dish as much as I do. Mahalo!

Related update: Huli-Huli Chicken

Related update: Chicken Stew For The Soul

Related update: Parmesan Mashed Potatoes

Corn Chowder with Potatoes, Poblanos, and Smoked Gouda | Made by Meaghan Moineau

Corn Chowder with Potatoes, Poblanos, and Smoked Gouda

Introduction

There’s something incredibly comforting about a warm bowl of chowder on a chilly evening. This Corn Chowder with Potatoes, Poblanos, and Smoked Gouda is a family favorite that takes me back to my grandmother’s kitchen. I remember sitting at her table, my feet barely touching the ground, as she ladled steaming bowls of this creamy soup. The aroma of smoked gouda mingled with sweet corn filled the room, and a hint of spice from the poblanos added a delightful twist. It was the kind of meal that brought everyone together, with laughter and stories flowing as freely as the chowder itself.

Why You’ll Love It

This chowder is the epitome of comfort food. It’s creamy, rich, and bursting with flavor, thanks to the combination of smoked gouda and poblano chiles. The potatoes add a hearty texture, while the fresh corn brings a hint of sweetness that perfectly balances the dish. Whether you’re serving it as a starter or the main course, this chowder is sure to warm you up from the inside out.

Ingredients

  • 1 bay leaf
  • Chives, chopped for garnish
  • 4 cups fresh corn kernels
  • 1 teaspoon fresh thyme leaves
  • 1 cup smoked gouda cheese, shredded, divided
  • 1 cup half-and-half
  • 1 onion, diced
  • 1 can (4 oz) diced poblano chiles
  • 4 cups potatoes, peeled and diced
  • Salt, to taste
  • 2 tablespoons unsalted butter
  • 4 cups water

Instructions

  1. In a large sauté pan, melt the butter over medium heat and sauté the onion for about 10 minutes, or until lightly browned.
  2. Transfer the onion to a 7-quart slow cooker and add the potatoes, bay leaf, thyme, and water.
  3. Cover and cook on LOW for about 4 hours, or until the potatoes are tender.
  4. Mash some of the potatoes against the inside of the cooker or use a handheld immersion blender to puree a small amount of potato and thicken the soup slightly.
  5. Add the corn, chiles, half-and-half, and 1 cup of the smoked gouda. Add salt to taste and continue cooking for 20 to 30 minutes, or just until all the ingredients are hot.
  6. Ladle the soup into bowls and garnish each bowl with the remaining gouda and chopped chives.

Tips

For the best flavor, use fresh corn when it’s in season. If fresh corn isn’t available, frozen corn is a good substitute. Be sure to adjust the salt according to your taste preferences, especially if you’re using canned chiles that may already contain salt.

Variations & Substitutions

If you’re looking to add a bit more heat, consider using fresh jalapeños in place of or in addition to the poblano chiles. For a vegetarian version, replace the half-and-half with coconut milk for a slight tropical twist. You can also substitute sharp cheddar for the smoked gouda if you prefer a more traditional cheesy flavor.

Storage

This chowder stores beautifully. Let it cool to room temperature and transfer it to an airtight container. It will keep in the refrigerator for up to 3 days. You can also freeze it for up to 2 months. Be sure to reheat slowly over low heat to maintain the creamy texture.

FAQ

Can I make this chowder on the stovetop instead of a slow cooker?

Absolutely! Simply follow the same steps using a large pot on the stovetop. Bring the mixture to a simmer and cook until the potatoes are tender, then proceed with the recipe as directed.

Can I use a different type of cheese?

Yes, you can substitute any cheese that melts well. Cheddar, Monterey Jack, or even Pepper Jack would work great if you want to add more spice.

How can I make this chowder dairy-free?

You can substitute the half-and-half with full-fat coconut milk for a creamy, dairy-free option. Use a dairy-free cheese alternative to replace the smoked gouda.

Nutrition

While I don’t have the exact nutritional breakdown, this chowder is a hearty meal that combines the benefits of vegetables like corn and potatoes with the rich flavors of cheese and cream. Adjust the ingredients to suit your dietary needs, and enjoy it as part of a balanced diet.

Conclusion

There’s nothing like a bowl of Corn Chowder with Potatoes, Poblanos, and Smoked Gouda to bring back fond memories and create new ones. Whether you’re sharing it with family or savoring a bowl on your own, this chowder is a celebration of warmth, flavor, and togetherness. I hope this recipe brings as much joy to your table as it has to mine. Enjoy!

Related update: Corn Chowder with Potatoes, Poblanos, and Smoked Gouda

Related update: Huli-Huli Chicken

Grandma Inez’s Pineapple Pie | Made by Meaghan Moineau

Grandma Inez’s Pineapple Pie

Intro

There’s something uniquely comforting about a family recipe that’s been passed down through generations. One of my fondest memories is sitting in my grandmother Inez’s kitchen, watching her skillfully craft her famous pineapple pie. The sweet aroma of pineapples mingling with the buttery crust would fill the air, signaling the beginning of a much-anticipated family gathering. Grandma Inez had a magical way of making everyone feel loved and cherished, and her cooking was no exception. Today, I’m thrilled to share her delightful pineapple pie recipe with you, hoping it brings as much joy to your home as it has to ours over the years.

Why You’ll Love It

This pineapple pie stands out for its perfect balance of sweetness and tang, wrapped in a flaky, buttery crust. The creamy pineapple filling is both refreshing and indulgent, while the light, airy meringue topping adds an elegant touch. It’s a versatile dessert that’s perfect for any occasion, from cozy family dinners to festive celebrations. Plus, it’s surprisingly easy to make, even if you’re not an experienced baker.

Ingredients

  • 1 cup sugar
  • 1/2 cup butter, softened
  • 2 egg yolks
  • 2 tablespoons cornstarch
  • 1 teaspoon vanilla extract
  • 1 cup water
  • 1 can (20 oz) crushed pineapple in juice
  • 1 pre-baked 9-inch pie crust
  • 3 egg whites
  • 1/4 teaspoon cream of tartar
  • 1/4 teaspoon salt
  • 1/4 cup sugar
  • 1/2 teaspoon vanilla extract

Instructions

  1. In a medium saucepan, cream together 1 cup of sugar, butter, and egg yolks using a hand-held electric mixer until smooth and well combined.
  2. Blend in the cornstarch and 1 teaspoon of vanilla extract until fully incorporated.
  3. Add the water and the crushed pineapple along with its juice to the mixture. Blend once more until all ingredients are well mixed.
  4. Transfer the saucepan to the stove and cook over medium heat. Stir the mixture constantly until it thickens to a pudding-like consistency.
  5. Pour the pineapple filling into the pre-baked pie crust, spreading it evenly. Allow it to cool completely.
  6. For the meringue, whip the egg whites in a clean, grease-free bowl until they begin to get foamy.
  7. Add the cream of tartar and salt, then continue to whip the egg whites. Gradually add 1/4 cup of sugar and 1/2 teaspoon of vanilla extract, whipping until the meringue reaches soft peak stage and is smooth and glossy.
  8. Spread the meringue over the cooled pie, ensuring it touches the edges of the crust to seal it.
  9. Bake the pie in a preheated oven at 400°F for just a few minutes, until the meringue is lightly browned.
  10. Allow the pie to cool before serving. Store any leftovers in the refrigerator.

Tips

For the best results, make sure all your ingredients are at room temperature before you start. This will help the components blend together more smoothly. When making the meringue, ensure that your mixing bowl and beaters are completely clean and dry, as any grease or moisture can prevent the egg whites from whipping properly. Finally, when spreading the meringue over the pie, create decorative peaks using the back of a spoon for a stunning presentation.

Variations & Substitutions

If you’re looking to experiment with flavors, consider adding a splash of rum or coconut extract to the filling for a tropical twist. For a slightly different texture, try using fresh pineapple instead of canned. Just make sure to chop it finely and adjust the sweetness if necessary. If you’re avoiding dairy, substitute the butter with a plant-based alternative. Similarly, a gluten-free pie crust can be used for those with dietary restrictions.

Storage

Grandma Inez’s pineapple pie is best enjoyed fresh, but it can be stored in the refrigerator for up to three days. Make sure to cover it with plastic wrap or store it in an airtight container to keep the meringue from absorbing fridge odors. Freezing is not recommended as it can affect the texture of the meringue and filling.

FAQ

Can I use fresh pineapple instead of canned?

Yes, you can use fresh pineapple if you prefer. Just make sure to chop it finely and consider adjusting the sugar content based on the sweetness of the fruit. Keep in mind that fresh pineapple may release more liquid, so you might need to cook the filling a bit longer to achieve the desired thickness.

How can I ensure my meringue doesn’t weep?

To prevent your meringue from weeping, make sure you spread it over the hot filling. This helps the bottom of the meringue cook slightly, which can reduce weeping. Additionally, ensure your mixing bowl is free from any grease and your egg whites are at room temperature before beating.

Can I make this pie ahead of time?

While the pie is best enjoyed the day it’s made, you can prepare the filling and bake the pie crust a day in advance. Store them separately and assemble the pie with fresh meringue on the day you plan to serve it for the best texture and flavor.

Nutrition

Each slice of Grandma Inez’s pineapple pie (based on 8 servings) approximately contains:

  • Calories: 310
  • Carbohydrates: 45g
  • Protein: 4g
  • Fat: 14g
  • Saturated Fat: 8g
  • Cholesterol: 80mg
  • Sodium: 180mg
  • Sugar: 30g

Conclusion

Grandma Inez’s pineapple pie is more than just a dessert; it’s a cherished family tradition that brings warmth and joy to any gathering. With its delightful blend of flavors and textures, it’s sure to become a favorite in your home as well. Whether you’re making it for the first time or the hundredth, this pie promises to deliver a slice of sunshine in every bite. Enjoy the process, savor the memories, and most importantly, share it with those you love.

Related update: Grandma Inez’s Pineapple Pie

Related update: Gluten And Dairy Free Peanut Butter Cups

Coconut Guava Ice cream | Made by Meaghan Moineau

Coconut Guava Ice Cream: A Tropical Delight

Intro

There’s something magical about the fusion of tropical flavors that instantly transports you to a serene beach with every bite. Coconut Guava Ice Cream embodies this essence perfectly. As a child, I remember visiting my grandmother’s house every summer. She had a beautiful guava tree in her backyard, and we would spend lazy afternoons picking ripe guavas and concocting different treats. This ice cream recipe takes me back to those sun-dappled days, filled with laughter, tropical fruits, and the warmth of family gatherings.

Why You’ll Love It

This Coconut Guava Ice Cream is a luscious blend of creamy coconut milk, sweet guavas, and the delightful crunch of peanuts. It’s vegan-friendly, simple to make, and doesn’t require an ice cream maker. The refreshing taste of guava combined with the rich coconut base creates an indulgent yet refreshing dessert. It’s the perfect treat to beat the heat and impress your guests at any gathering.

Ingredients

  • 1 can of coconut milk
  • 1/2 cup condensed milk
  • 2 ripe guavas, chopped and de-seeded
  • 1/2 cup blueberries
  • 1/4 cup crushed peanuts

Instructions

  1. Place the can of coconut milk in the freezer and allow it to solidify. This could take 4-6 hours depending on the temperature of your freezer.
  2. Take out the can of coconut milk and open it completely. The milk and coconut water will have separated, and the coconut water part will be clearer than the milk.
  3. With a very sharp knife, cut through the frozen coconut milk to separate the milk from the coconut water.
  4. Place the frozen coconut milk part in the blender.
  5. Pour in your condensed milk and chopped de-seeded guavas. Blend for about 3-5 minutes at intervals until smooth.
  6. Pour the mixture into a bowl, add your blueberries, stir in, and pop it in the freezer.
  7. Allow your coconut ice cream to freeze for about 3-6 hours.
  8. Serve garnished with the crushed peanuts.

Tips

To ensure the best texture, make sure the coconut milk is fully solidified before opening. Use ripe guavas for maximum flavor. If you prefer a smoother texture, blend the blueberries with the coconut milk and guavas instead of stirring them in.

Variations & Substitutions

If you want to add a citrusy note, consider adding a tablespoon of lime juice before blending. For a nut-free version, skip the peanuts and garnish with toasted coconut flakes instead. If guavas are not in season, substitute with mangoes or papayas for a different tropical twist.

Storage

Store the Coconut Guava Ice Cream in an airtight container in the freezer for up to two weeks. Allow it to soften at room temperature for a few minutes before serving for the best texture.

FAQ

Can I use fresh coconut milk instead of canned?

While fresh coconut milk can be used, canned coconut milk is preferred for its creaminess and consistency, which enhances the texture of the ice cream.

Is this recipe suitable for vegans?

Yes, this recipe is vegan-friendly as long as you use vegan condensed milk or a homemade version made from coconut milk and sugar.

Can I make this recipe without a blender?

A blender is recommended for achieving a smooth texture. However, you can mash the guavas and mix them with the other ingredients using a fork if a blender is unavailable.

Nutrition

This Coconut Guava Ice Cream is a delightful indulgence. While exact nutritional values may vary based on specific ingredients used, it is generally a good source of healthy fats from the coconut milk and provides vitamins from the fruits. It’s a sweet treat best enjoyed in moderation.

Conclusion

Coconut Guava Ice Cream is a celebration of tropical flavors, nostalgia, and simplicity. With just a few ingredients and steps, you can create a delicious and refreshing dessert that will transport you to a sunny paradise with every bite. Whether you’re entertaining guests or treating yourself, this ice cream is sure to impress. So, why not give it a try and create your own tropical memories?

Related update: Coconut Guava Ice cream

Related update: Macaroni and Cheese Gratin

Crisp Winter Salad with Maple Gorgonzola Dressing | Made by Meaghan Moineau

Crisp Winter Salad with Maple Gorgonzola Dressing

Intro

As the leaves begin to fall and the air turns crisp, I’m reminded of cozy family gatherings in my childhood home. My mother would always prepare a fresh, vibrant salad that seemed to mirror the beauty of the winter landscape outside. Her secret? A delightful blend of crunchy vegetables and a rich, creamy dressing that brought warmth to our hearts and smiles to our faces. This Crisp Winter Salad with Maple Gorgonzola Dressing is an homage to those cherished memories and a testament to the joy of sharing simple yet luxurious meals with loved ones.

Why You’ll Love It

This salad is a symphony of flavors and textures, perfect for those chilly months when you crave something fresh yet comforting. The crunchy vegetables provide a satisfying bite, while the maple gorgonzola dressing offers a creamy and tangy contrast. It’s a versatile dish that can be served as a starter, a side, or even a light main course. Whether you’re hosting a festive gathering or enjoying a quiet meal at home, this salad is sure to impress.

Ingredients

  • Broccoli stems, thinly sliced
  • Celery, thinly sliced
  • Cider vinegar
  • Dijon mustard
  • Gorgonzola cheese, crumbled
  • Jicama, julienned
  • Kosher salt
  • Low fat sour cream
  • Maple syrup
  • Olive oil
  • Radishes, thinly sliced
  • Red green apple, thinly sliced
  • Romaine lettuce, chopped
  • Savoy cabbage, shredded
  • Walnuts, toasted
  • White pepper

Instructions

  1. In a large bowl, combine the broccoli stems, celery, jicama, radishes, apple, romaine lettuce, and savoy cabbage. Toss gently to mix.
  2. In a medium bowl, whisk together the low fat sour cream, olive oil, cider vinegar, dijon mustard, maple syrup, kosher salt, and white pepper until smooth.
  3. Gently stir in the gorgonzola cheese, using a fork to combine without mashing the cheese—ensure there are visible chunks in the dressing.
  4. Add the toasted walnuts to the salad mixture, then pour the dressing over the top. Toss everything together until well coated.
  5. Serve immediately or refrigerate for up to an hour to allow the flavors to meld.

Tips

For the best results, use fresh, high-quality ingredients. Ensure your vegetables are crisp and your gorgonzola is flavorful and creamy. Toasting the walnuts enhances their flavor and adds a delightful crunch to the salad. Feel free to adjust the amount of maple syrup in the dressing to suit your taste for sweetness.

Variations & Substitutions

If gorgonzola isn’t your favorite, try substituting it with feta or blue cheese for a different flavor profile. For a vegan version, swap the sour cream with a plant-based alternative and omit the cheese altogether. Add some grilled chicken or roasted chickpeas for extra protein, making this salad a more substantial meal.

Storage

This salad is best enjoyed fresh, but you can store leftovers in an airtight container in the refrigerator for up to two days. If you plan to store the salad, keep the dressing separate and toss it just before serving to maintain the crunchiness of the vegetables.

FAQ

Can I make the dressing ahead of time?

Yes, you can prepare the dressing up to two days in advance. Store it in a sealed container in the refrigerator and give it a good stir before using.

What can I serve with this salad?

This salad pairs beautifully with roasted meats or grilled seafood. It also works well alongside hearty soups or stews, adding a fresh contrast to warm, rich dishes.

Can I use a different type of lettuce?

Absolutely! While romaine offers a nice crunch, you can use mixed greens, arugula, or even spinach for a different texture and flavor.

Nutrition

This salad is packed with nutritious ingredients. The array of vegetables provides fiber, vitamins, and minerals, while the walnuts add healthy fats. The dressing, although creamy, is made with low fat sour cream and olive oil, making it a healthier choice compared to traditional creamy dressings.

Conclusion

Our Crisp Winter Salad with Maple Gorgonzola Dressing is a delightful addition to any meal, bringing together the best of winter’s bounty. It’s a dish that not only nourishes the body but also warms the soul, reminding us of the simple joys of good food and cherished company. Whether you’re gathering around the table with family or treating yourself to a solo feast, this salad promises to deliver comfort and joy with every bite. Enjoy!

Related update: Crisp Winter Salad with Maple Gorgonzola Dressing

Monastery soup | Made by Meaghan Moineau

Monastery Soup: A Simple, Soul-Warming Delight

Intro

There’s something incredibly comforting about a bowl of hot soup, especially when it has a rich history and a story to tell. Monastery Soup is one such dish, with roots deeply embedded in the traditions of monastic cooking. I remember visiting a serene monastery nestled in the hills during my travels in Europe. The air was crisp, and the architecture, simplistic yet awe-inspiring. After a long day of exploration, I was offered a bowl of this humble soup by one of the monks. It was a moment of pure bliss, where the warmth of the soup matched the warmth in my heart. That moment has stayed with me, and today, I want to share this memory and recipe with you.

Why You’ll Love It

Monastery Soup is not just food; it’s an experience. Here’s why you’ll fall in love with this delightful dish:

  • Simplicity: With just a few wholesome ingredients, this soup is easy to prepare yet incredibly nourishing.
  • Heartiness: Packed with vegetables and beans, it’s a meal in itself, perfect for a satisfying lunch or dinner.
  • Customizable: You can easily adjust the ingredients to suit your taste or dietary needs.
  • Comforting: The aroma alone is enough to lift your spirits on a cold day.

Ingredients

  • 2 tablespoons sunflower oil
  • 2 medium potatoes, diced
  • 1 large onion, chopped
  • 3 cloves garlic, minced
  • 2 carrots, sliced
  • 1 leek, sliced
  • 2 stalks celery, chopped
  • 1 cup broad beans
  • 4 cups vegetable stock
  • Fresh parsley, chopped
  • Salt and pepper to taste

Instructions

  1. Heat the sunflower oil in a large pan over medium heat.
  2. Add the diced potatoes, chopped onion, and minced garlic. Sauté, covered, for about 10 minutes until the onions are translucent and the potatoes start to soften.
  3. Stir in the sliced carrots, leek, and chopped celery. Continue to sauté for another 5 minutes, allowing the vegetables to become tender.
  4. Add the broad beans and pour in the vegetable stock. Stir well, cover the pan, and let it simmer gently for another 10 minutes, or until the potatoes and broad beans are soft.
  5. Season with freshly chopped parsley, salt, and pepper according to your taste.
  6. Serve hot with crusty bread for a complete meal.

Tips

  • For a creamier texture, blend a portion of the soup and mix it back in.
  • Use fresh, seasonal vegetables for the best flavor.
  • Adjust the amount of garlic according to your preference for a more robust flavor.

Variations & Substitutions

Monastery Soup is wonderfully adaptable. Here are some variations you might want to try:

  • Vegetables: Swap out the potatoes for sweet potatoes or add some zucchini for a different taste.
  • Beans: If you don’t have broad beans, try using chickpeas or lentils instead.
  • Herbs: Experiment with adding thyme or rosemary for an aromatic twist.

Storage

Monastery Soup stores well, making it perfect for meal prep:

  • Refrigerate: Store in an airtight container for up to 4 days.
  • Freeze: You can freeze the soup for up to 3 months. Thaw in the refrigerator overnight before reheating.

FAQ

Can I make this soup in advance?

Absolutely! This soup tastes even better the next day as the flavors have more time to meld together. Simply reheat on the stove over low heat until warmed through.

Is Monastery Soup vegan?

Yes, as long as you use vegetable stock and avoid any animal-based additives, this soup remains vegan-friendly.

What can I serve with Monastery Soup?

A slice of crusty bread or a fresh green salad makes a perfect accompaniment to this hearty soup.

Nutrition

This soup is not only delicious but also nutritious. It’s packed with fiber from the vegetables and beans, and provides a good source of vitamins and minerals. It’s a guilt-free comfort food that’s perfect for any diet.

Conclusion

Monastery Soup is more than just a meal; it’s a bowl of comfort that carries with it a sense of history and tranquility. Whether you’re enjoying it on a cool evening or sharing it with loved ones, it’s a dish that warms both the body and soul. I hope this recipe brings as much joy to your kitchen as it does to mine. May it become a cherished part of your culinary repertoire, as it has become a staple in my own home.

Related update: Monastery soup

Related update: Corn Chowder with Potatoes, Poblanos, and Smoked Gouda

Cheesy Potato Corn Scones | Made by Meaghan Moineau

Cheesy Potato Corn Scones

Intro

There’s something undeniably comforting about the aroma of freshly baked scones wafting through the kitchen. It instantly takes me back to my grandmother’s cozy farmhouse, where every Sunday morning, she would whip up a batch of her famous scones. Her secret ingredient? Love, of course, but also a touch of creativity that transformed simple ingredients into something extraordinary. Today, I’m sharing a delightful twist on the classic scone recipe—Cheesy Potato Corn Scones. This recipe captures the essence of those cherished mornings with a modern, cheesy twist that will have you reaching for seconds.

Why You’ll Love It

These Cheesy Potato Corn Scones are a perfect blend of savory flavors and soft textures, making them an irresistible treat for any occasion. Whether you’re hosting a brunch, looking for a satisfying snack, or simply want to enjoy a warm, cheesy delight, these scones have got you covered. The addition of potato flakes gives them a unique lightness, while the cheddar cheese and cornmeal provide a rich, hearty flavor. Plus, they’re easy to make and guaranteed to impress your family and friends!

Ingredients

  • 1 cup water
  • 1/2 cup potato flakes
  • 1/3 cup diced unsalted butter
  • 1 1/2 cups all-purpose flour
  • 1/2 cup yellow cornmeal
  • 1 cup shredded cheddar cheese, divided
  • 1 tablespoon baking powder
  • 1 teaspoon salt
  • 1 tablespoon poppy seeds
  • 3/4 cup milk

Instructions

  1. Preheat your oven to 400°F (200°C). Lightly grease a baking sheet and set aside.
  2. In a small saucepan, bring the water just to a simmer; remove from heat.
  3. Stir in the potato flakes until they are moistened.
  4. Add the diced butter to the potato mixture and stir until it is fully incorporated.
  5. In a large bowl, combine the flour, cornmeal, 3/4 cup of the cheddar cheese, baking powder, salt, and poppy seeds.
  6. Stir in the potato mixture and milk until just combined.
  7. With floured hands, gently knead and fold the dough for five to six strokes, or until it comes together in one mass.
  8. Pat the dough lightly to flatten it into a 9-inch circle on the prepared baking sheet.
  9. Using a pizza cutter or a floured knife, cut the dough into eight wedges (do not separate).
  10. Sprinkle the edges with the remaining cheese.
  11. Bake in the preheated oven for about 25 minutes or until lightly browned.
  12. Gently pull or cut the scones to separate. Serve warm and enjoy!

Tips

For the best results, use cold butter and work quickly to keep it from melting before baking. If you notice the dough is too sticky while kneading, feel free to add a little more flour, a tablespoon at a time. Additionally, using freshly grated cheddar cheese will enhance the flavor and melt beautifully in the scones.

Variations & Substitutions

If you want to experiment with flavors, consider adding chopped fresh herbs like chives or rosemary to the dough. For a spicy kick, try mixing in some diced jalapeños. If you’re looking for a gluten-free option, substitute the all-purpose flour with a 1:1 gluten-free flour blend. You can also use any other type of cheese you prefer, such as mozzarella or gouda, to change up the taste.

Storage

These scones are best enjoyed fresh out of the oven, but they can be stored in an airtight container at room temperature for up to two days. To reheat, simply place them in a 350°F (175°C) oven for 5-10 minutes. For longer storage, freeze the scones in a single layer and then transfer them to a resealable freezer bag. They can be reheated straight from the freezer in the oven at 350°F (175°C) for about 15 minutes.

FAQ

Can I make the dough ahead of time?

Yes, you can prepare the dough up to a day in advance. Wrap it tightly in plastic wrap and store it in the refrigerator. When you’re ready to bake, simply shape, cut, and bake the scones as instructed.

Can I use real potatoes instead of potato flakes?

While potato flakes are convenient and help create a fluffy texture, you can use mashed potatoes as a substitute. Just ensure they are smooth and not too wet, and adjust the flour accordingly if the dough becomes too sticky.

Nutrition

Each serving of these Cheesy Potato Corn Scones is approximately 220 calories, with 12g of fat, 22g of carbohydrates, and 6g of protein. They are a delightful indulgence, offering a comforting balance of flavors and textures.

Conclusion

These Cheesy Potato Corn Scones are a testament to the magic that happens when simple ingredients come together with a touch of love and creativity. Whether you’re savoring them with a morning coffee, serving them at a brunch gathering, or enjoying them as a cozy snack, they are sure to bring warmth and joy to your table. I hope this recipe becomes a cherished addition to your collection, just as it has in mine. Happy baking!

Related update: Cheesy Potato Corn Scones

Walnut Pesto | Made by Meaghan Moineau

Walnut Pesto: A Nutty Twist on a Classic

Intro

I remember the first time I tasted homemade pesto at my grandmother’s kitchen table. The aroma of fresh basil mingling with garlic and cheese was heavenly, and it was an instant family favorite. Fast forward to today, I’ve put my own twist on this classic by incorporating walnuts, a nod to the bountiful walnut tree in our backyard. This walnut pesto is not only a homage to my grandmother’s recipe but also a deliciously nutty variation that adds depth and texture to a beloved classic.

Why You’ll Love It

This walnut pesto is a game-changer for several reasons. First, it’s incredibly versatile. Whether you’re tossing it with pasta, spreading it on sandwiches, or using it as a dip, this pesto adds a burst of flavor to any dish. Second, it’s quick and easy to make, taking less than 15 minutes from start to finish. Finally, the walnuts add a rich, earthy flavor and a dose of heart-healthy fats, making this pesto not only tasty but also nutritious.

Ingredients

  • 2 cups fresh basil leaves, packed
  • 2 cloves garlic
  • ½ cup olive oil
  • ½ cup grated Parmesan cheese
  • ½ teaspoon sea salt
  • ½ cup walnuts

Instructions

  1. Combine walnuts, basil, garlic, Parmesan, and salt in a food processor. Process until the mixture forms a coarse puree.
  2. With the machine running, slowly add the olive oil through the feed tube. Continue processing until the pesto is smooth, stopping to scrape down the sides as necessary.
  3. Transfer the pesto to an airtight jar, preferably one that is opaque to keep out the light.
  4. To prevent the pesto from browning, cover its surface with a thin layer of olive oil before sealing the jar.
  5. Store the pesto in the refrigerator and enjoy as needed.

Tips

For the best flavor, use fresh, high-quality ingredients. If your basil leaves are a little wilted, revive them by soaking in ice water for a few minutes. When adding olive oil, go slow to achieve the desired consistency. If your pesto is too thick, add more olive oil, a little at a time. You can also toast the walnuts lightly before processing for an added depth of flavor.

Variations & Substitutions

This recipe is incredibly adaptable. If you’re out of walnuts, try substituting with pine nuts or almonds. For a dairy-free version, omit the Parmesan cheese and add a tablespoon of nutritional yeast for a cheesy flavor. You can also experiment with different herbs; try adding a handful of parsley or cilantro for a unique twist. If you prefer a spicier kick, throw in a pinch of red pepper flakes while processing.

Storage

Store your walnut pesto in the refrigerator for up to a week. To extend its shelf life, freeze it in ice cube trays. Once frozen, transfer the cubes to a zip-top bag and store in the freezer for up to three months. Thaw the cubes in the refrigerator overnight or at room temperature for a couple of hours before using. Always ensure that the surface is covered with a layer of olive oil to prevent browning.

FAQ

Can I make walnut pesto without a food processor?

Yes, you can! If you don’t have a food processor, use a mortar and pestle. It requires a bit more elbow grease but yields a rustic texture that many find appealing. Start by crushing the garlic and salt, then gradually add the basil, walnuts, and cheese, grinding until you achieve a paste. Slowly mix in the olive oil to finish.

How can I use walnut pesto in my meals?

Walnut pesto is incredibly versatile. Toss it with your favorite pasta, spread it on sandwiches or wraps, or use it as a topping for grilled chicken or fish. It’s also a fantastic addition to soups and stews, adding a burst of flavor. Get creative and explore different ways to enjoy this delectable sauce!

Is walnut pesto vegan?

The traditional recipe includes Parmesan cheese, which is not vegan. However, you can make a vegan version by omitting the cheese and adding nutritional yeast to achieve a similar cheesy flavor. Ensure all other ingredients are vegan-friendly, and you’re good to go!

Nutrition

This walnut pesto is not only flavorful but also packed with nutrients. Walnuts are rich in omega-3 fatty acids, which are beneficial for heart health. Basil and garlic offer antioxidants, while olive oil provides healthy fats. This pesto is a nutritious addition to any meal, providing healthy fats, protein, and fiber.

Conclusion

Walnut pesto is a delightful twist on a classic recipe that’s sure to become a staple in your kitchen. Its rich, nutty flavor and versatility make it a must-try for pesto lovers and newcomers alike. Whether you’re making a quick weeknight dinner or looking to impress guests with a gourmet touch, this walnut pesto will not disappoint. I hope this recipe brings as much joy to your table as it has to mine. Enjoy!

Related update: Walnut Pesto

Related update: Quick N' Easy Basil Pesto

Cheesy Bacon Burger with Spicy Chipotle Aiolo Sauce | Made by Meaghan Moineau

Cheesy Bacon Burger with Spicy Chipotle Aioli Sauce

Intro

There’s something about the sizzle of a burger on the grill that takes me back to summer evenings spent in my grandmother’s backyard. The air would be filled with the aroma of sizzling meat and the laughter of family members gathering around the picnic table. It was during those cherished gatherings that I learned the art of creating the perfect burger, one that would be etched in our hearts as a family tradition. Today, I am excited to share with you a modern twist on that classic memory – the Cheesy Bacon Burger with Spicy Chipotle Aioli Sauce. This recipe not only brings back those nostalgic moments but also adds a spicy kick that will surely become a new favorite in your home.

Why You’ll Love It

This Cheesy Bacon Burger is a delightful combination of flavors and textures that will make your taste buds dance with joy. The juicy beef patty encasing a creamy Swiss cheese center is topped with crispy turkey bacon, sautéed bell peppers, and onions, all nestled within a soft whole wheat bun. The real star, however, is the Spicy Chipotle Aioli Sauce, which adds a smoky and tangy kick to every bite. Whether you are hosting a backyard barbecue or simply craving a delicious homemade burger, this recipe is sure to impress.

Ingredients

  • Chipotle chiles in adobo
  • Fat-free mayonnaise
  • Garlic
  • Garlic powder
  • Greek yogurt
  • Green bell pepper
  • Ground cumin
  • Black ground pepper
  • Lean ground beef
  • Fresh lime juice
  • Onion
  • Whole wedges of Laughing Cow Swiss cheese
  • Cooked turkey bacon
  • Whole wheat hamburger buns

Instructions

  1. For the burgers: In a pan, cook turkey bacon according to the directions on the package. Once cooked, remove the bacon and set it aside.
  2. In the same pan, add bell pepper and onion and cook until tender, about 10 minutes.
  3. Add ground beef to a small bowl, along with garlic powder and ground pepper, and mix well.
  4. Divide the raw meat into 8 equal pieces (approximately 2oz each). Flatten each piece, place 1/2 a cheese wedge onto each piece of hamburger, and top with another piece of meat. Seal the edges to prevent the cheese from oozing out during cooking.
  5. Place the burgers on the grill and cook until done, about 5 minutes per side.
  6. Place the cooked burgers on buns and top with bacon, peppers & onions, and Spicy Chipotle Aioli Sauce.
  7. For the Spicy Chipotle Aioli Sauce: In a small bowl, whisk together chipotle chiles in adobo, fat-free mayonnaise, garlic, Greek yogurt, ground cumin, and fresh lime juice until combined. This makes 3/4 cup, or 12 tablespoons, of sauce.

Tips

To ensure your burgers are perfectly cooked, use a meat thermometer to check that the internal temperature reaches 160°F (71°C). If you prefer a milder sauce, reduce the amount of chipotle chiles. For an extra layer of flavor, toast your hamburger buns on the grill for a few minutes before assembling your burgers.

Variations & Substitutions

If you prefer a different cheese, cheddar or pepper jack would work wonderfully in this recipe. You can also substitute ground turkey for the beef if you want a leaner option. For a vegetarian twist, try using a plant-based burger patty and coconut bacon.

Storage

Store any leftover cooked burgers in an airtight container in the refrigerator for up to 3 days. The Spicy Chipotle Aioli Sauce can be stored in a separate container in the fridge for up to a week. Reheat the burgers in a pan or microwave before serving.

FAQ

Can I make the Spicy Chipotle Aioli Sauce in advance?

Absolutely! The sauce can be made a day or two in advance and stored in the refrigerator. This will allow the flavors to meld together even more, enhancing its delicious taste.

What is the best way to cook the burgers if I don’t have a grill?

If you don’t have a grill, you can cook the burgers in a skillet on the stovetop. Simply heat a little oil in the pan over medium-high heat and cook the burgers for about 5 minutes on each side, or until they reach the desired doneness.

Can I freeze the burgers?

Yes, you can freeze the uncooked burger patties. Place them on a baking sheet and freeze until solid, then transfer to a freezer-safe bag or container. They can be stored in the freezer for up to 3 months. Thaw in the refrigerator before cooking.

Nutrition

This Cheesy Bacon Burger recipe, when made with lean ground beef and turkey bacon, is a protein-packed meal. The use of Greek yogurt and fat-free mayonnaise in the aioli sauce also helps to keep the calorie count in check. As with any meal, moderation is key to maintaining a balanced diet.

Conclusion

The Cheesy Bacon Burger with Spicy Chipotle Aioli Sauce is more than just a meal; it’s a culinary experience that brings together the comfort of classic flavors with a modern twist. Whether you’re reminiscing about family gatherings or creating new memories, this burger is sure to be a hit with everyone. So fire up the grill, gather your loved ones, and savor the deliciousness of this mouthwatering creation!

Related update: Cheesy Bacon Burger with Spicy Chipotle Aiolo Sauce

Grilled Garlicky-Herbed Shrimp | Made by Meaghan Moineau

Grilled Garlicky-Herbed Shrimp

Intro

Growing up, summers meant endless family gatherings by the beach, where the air was filled with the tantalizing aroma of grilled seafood. My father, always at the helm of the grill, would prepare his signature shrimp dish. The combination of garlic, fresh herbs, and a hint of lemon always drew everyone to the table. Today, I’m excited to share a recipe that captures that nostalgia: Grilled Garlicky-Herbed Shrimp. It’s a dish that’s simple yet bursting with flavor, perfect for bringing a slice of summer to your table anytime.

Why You’ll Love It

This recipe is a celebration of bold flavors and simplicity. The garlicky-herb marinade infuses the shrimp with a delightful zest, while the grilling process adds a smoky finish that enhances each bite. It’s quick to prepare, requires minimal ingredients, and is versatile enough for both casual family dinners and elegant gatherings. Plus, it’s a healthy, protein-rich dish that complements a variety of sides.

Ingredients

  • 1 teaspoon chili pepper flakes
  • 1/4 cup extra virgin olive oil
  • 1/4 cup finely chopped coriander leaves
  • 4 cloves garlic, minced
  • 1 pound large shrimp, peeled and deveined
  • Zest of 1 lemon
  • 1/4 cup finely chopped parsley

Instructions

  1. In a large bowl, combine chili pepper flakes, olive oil, coriander leaves, garlic, lemon zest, and parsley.
  2. Add the shrimp to the bowl and toss to ensure each piece is thoroughly coated in the marinade.
  3. Cover the bowl with plastic wrap and refrigerate for at least 4 hours or overnight for maximum flavor infusion.
  4. Preheat your grill to medium heat. Once hot, place the shrimp on the grill.
  5. Cook the shrimp for about 5 minutes, turning once, until they turn pink and are slightly charred.
  6. Serve immediately, perhaps with a roasted red pepper salad for a Mediterranean twist.

Tips

For the best results, use fresh shrimp as they tend to absorb flavors better than frozen ones. If using wooden skewers, soak them in water for at least 30 minutes before grilling to prevent burning. Always keep an eye on the shrimp while grilling to avoid overcooking, which can make them tough.

Variations & Substitutions

Feel free to customize this recipe to your liking. You can substitute the coriander leaves with basil or cilantro for a different herby flavor. If you prefer a bit more heat, increase the amount of chili pepper flakes or add a dash of cayenne pepper. For a citrusy twist, add a splash of lime juice to the marinade.

Storage

Store any leftover grilled shrimp in an airtight container in the refrigerator for up to 2 days. Reheat them gently in a skillet over low heat to avoid overcooking. While it’s best to consume them fresh, you can freeze the marinated shrimp before grilling for up to 2 months.

FAQ

Can I use a grill pan instead of an outdoor grill?

Absolutely! A grill pan on the stovetop works perfectly fine. Just ensure it’s preheated before adding the shrimp, and cook them as you would on an outdoor grill.

Is it necessary to marinate the shrimp overnight?

While marinating overnight yields the best flavor, a minimum of 4 hours will still allow the shrimp to absorb the delicious garlicky-herb essence. If you’re short on time, even 1 hour can impart good flavor.

Nutrition

Each serving of Grilled Garlicky-Herbed Shrimp (approximately 4-5 shrimp) provides approximately:

  • Calories: 220
  • Protein: 25g
  • Fat: 12g
  • Carbohydrates: 3g
  • Fiber: 1g

This dish is high in protein and healthy fats, making it a nutritious choice for those seeking a balanced meal.

Conclusion

Grilled Garlicky-Herbed Shrimp is a dish that brings together the warmth of family gatherings and the vibrant flavors of the Mediterranean. It’s easy to prepare, incredibly flavorful, and sure to impress anyone who takes a bite. Whether you’re reminiscing about summer barbecues or simply looking to add a new favorite to your recipe repertoire, this shrimp dish is a delightful choice. Enjoy it with loved ones and create new memories around the table.

Related update: Grilled Garlicky-Herbed Shrimp

Related update: Cheesy Bacon Burger with Spicy Chipotle Aiolo Sauce

Zucchini & Basil Frittata | Made by Meaghan Moineau

Zucchini & Basil Frittata: A Delightful Breakfast or Brunch Dish

Intro

There’s something undeniably comforting about the aroma of a frittata wafting through the kitchen on a lazy Sunday morning. It takes me back to weekends spent with my grandmother, who had an uncanny ability to turn simple ingredients into magical meals. Her kitchen was a place of warmth, filled with laughter and the clatter of pots and pans. One of my favorite dishes that she made was a zucchini and basil frittata, a dish that seemed to capture the essence of summer in every bite. Today, I’m sharing this beloved recipe with you, hoping it brings as much joy to your table as it has to mine.

Why You’ll Love It

This Zucchini & Basil Frittata is a perfect blend of flavors and textures. The zucchini provides a tender, moist base, while fresh basil adds a burst of herby freshness. Cheddar cheese gives it a touch of richness, and green onions offer a hint of sharpness. It’s a dish that’s not only delicious but also incredibly versatile, making it perfect for breakfast, brunch, or even a light dinner. Plus, it’s a great way to use up any extra zucchini you might have on hand during the summer months.

Ingredients

  • 2 medium zucchini
  • 1/4 cup fresh basil, chopped
  • 1 cup cheddar cheese, shredded
  • 6 large eggs
  • 2 tablespoons grapeseed oil
  • 2 green onions, thinly sliced
  • Salt, to taste

Instructions

  1. Shred the zucchini using a box grater or a food processor.
  2. Place the shredded zucchini in a colander with a large bowl underneath. Sprinkle with a little salt and allow some water to seep out, about 20 minutes. You can squeeze some of the water out with your hands if you’re in a hurry. This step can be completed ahead of time, and the shredded zucchini can stay in your refrigerator overnight if you would like to do this recipe in stages.
  3. In a large mixing bowl, add the shredded zucchini, green onion, basil, cheddar cheese, and salt. Stir to combine.
  4. Crack the eggs in a separate bowl and beat them. Pour the egg mixture into the bowl with the veggies and stir to combine all ingredients.
  5. Preheat your oven to 350 degrees F.
  6. In a 10-inch cast iron skillet, heat 1 to 2 tablespoons of grapeseed oil (or olive oil). Spread the oil around, making sure the sides are nicely oiled as well.
  7. Heat to medium, then add the egg/zucchini mixture, ensuring the mixture is evenly distributed.
  8. Cook until the egg begins to set on the sides of the skillet, about 3 to 5 minutes.
  9. Use a potholder to place the skillet in the oven. Bake for 12 to 15 minutes until the center tests clean.

Tips

For the best results, make sure to thoroughly drain the zucchini to prevent the frittata from becoming too watery. If you’re in a rush, you can use a clean kitchen towel to squeeze out the excess moisture more quickly. Also, using a cast iron skillet not only helps with even cooking but also adds a beautiful rustic touch to your presentation.

Variations & Substitutions

Feel free to get creative with this recipe! You can substitute the cheddar cheese with feta or goat cheese for a tangier flavor. If you’re not a fan of basil, try using parsley or dill instead. For a bit of heat, add a pinch of red pepper flakes or a dash of hot sauce. This frittata is also a great way to use up other vegetables you have on hand, such as bell peppers or mushrooms.

Storage

This frittata can be stored in an airtight container in the refrigerator for up to three days. To reheat, simply pop it in the oven at 350 degrees F for about 10 minutes or until warmed through. Alternatively, you can reheat individual slices in the microwave for about 1 minute.

FAQ

Can I make this frittata ahead of time?

Yes, you can prepare the zucchini and store it in the refrigerator, then quickly assemble and bake the frittata when you’re ready to serve. The baked frittata also keeps well, making it a great make-ahead option for busy mornings.

Can I freeze the frittata?

While frittatas are best enjoyed fresh, you can freeze any leftovers. Simply wrap individual slices in plastic wrap and place them in a freezer-safe container. To reheat, bake in the oven at 350 degrees F until heated through, or microwave on a low setting.

What can I serve with this frittata?

This frittata pairs beautifully with a simple green salad or some crusty bread. If you’re serving it for brunch, consider adding a fruit salad or some roasted potatoes to round out the meal.

Nutrition

This zucchini and basil frittata is a nutritious option, packed with protein from the eggs and cheese, along with vitamins and minerals from the zucchini and basil. It’s a satisfying meal that will keep you fueled throughout the day.

Conclusion

The Zucchini & Basil Frittata is more than just a dish; it’s a celebration of simple, fresh flavors that come together to create something truly special. Whether you’re serving it for a leisurely weekend brunch or a quick weekday breakfast, it’s sure to become a favorite in your household. So, gather your ingredients, embrace the comforting process of cooking, and enjoy this delightful frittata with your loved ones. Bon appétit!

Related update: Zucchini & Basil Frittata

Related update: Grilled Garlicky-Herbed Shrimp

Peppermint Hot Chocolate Cupcakes | Made by Meaghan Moineau

Peppermint Hot Chocolate Cupcakes

Intro

There’s something utterly magical about the combination of chocolate and peppermint, especially when the weather turns chilly, and the air is filled with the scent of pine and fireplaces. These Peppermint Hot Chocolate Cupcakes are a delightful treat that transports me back to cozy winter evenings spent in my grandmother’s kitchen. I remember sitting at her wooden table, the room filled with the warm, sweet aroma of melting chocolate and peppermint candies. She would let me help stir the batter, my small hands barely able to grip the whisk. Those moments were filled with laughter, stories, and the kind of love that only a grandmother can give. Now, I carry on that tradition with these cupcakes, hoping to bring some of that warmth and nostalgia to your home.

Why You’ll Love It

These cupcakes are a perfect blend of rich, chocolatey goodness and refreshing peppermint. The luscious ganache filling adds a decadent surprise, while the marshmallow buttercream frosting with a hint of peppermint creates a festive touch. They’re not only delicious but also visually stunning, making them perfect for holiday gatherings or any winter celebration. Whether you’re serving them to family and friends or enjoying one with a cup of hot cocoa by the fire, these cupcakes are sure to be a hit.

Ingredients

  • 1 cup semisweet chocolate chips
  • 1 cup hot-brewed coffee
  • 2 cups sugar
  • 1 3/4 cups all-purpose flour
  • 3/4 cup unsweetened cocoa powder
  • 1 1/2 teaspoons baking soda
  • 1 1/2 teaspoons baking powder
  • 1 teaspoon salt
  • 2 large eggs
  • 1 cup buttermilk
  • 1/2 cup vegetable oil
  • 2 teaspoons vanilla extract
  • 1/2 cup heavy cream
  • 1/4 cup unsalted butter
  • 8 ounces semisweet chocolate, chopped
  • 1/2 cup unsalted butter, softened
  • 2 cups marshmallow creme
  • 1/2 teaspoon peppermint extract
  • 3-4 cups powdered sugar
  • 2 tablespoons milk
  • Crushed peppermint candies, for garnish

Instructions

  1. Preheat the oven to 350 degrees F. Line a cupcake or muffin pan with 24 regular-size cupcake liners.
  2. Combine the chocolate chips and hot coffee together, stirring occasionally until the chocolate is melted and the mixture is smooth.
  3. In a large bowl, sift together the sugar, flour, cocoa powder, baking soda, baking powder, and salt.
  4. In another bowl, beat the eggs with an electric mixer until thickened slightly. Slowly add the buttermilk, oil, and vanilla.
  5. Add the melted chocolate mixture to the eggs, and combine completely.
  6. Add the sugar mixture and beat on medium speed until well combined.
  7. Fill the prepared cupcake liners three-quarters full with the cupcake batter.
  8. Bake until a toothpick inserted in center comes out clean, 18 to 21 minutes. Cool the cupcakes completely.
  9. While the cupcakes are baking, prepare the Chocolate Ganache and the Peppermint Marshmallow Buttercream Frosting (directions below).
  10. To make the Chocolate Ganache, bring the heavy cream and butter to a simmer in a small saucepan. Turn off the heat and add in the chocolate. Stir the mixture until smooth. Set aside to cool.
  11. To make the Peppermint Marshmallow Buttercream Frosting, whip together the butter and marshmallow creme using an electric mixer fitted with a whisk attachment.
  12. Add the peppermint extract. Slowly add 2 cups of the powdered sugar and continue to mix on a slow speed.
  13. Add the milk and additional powdered sugar, up to 2 cups, until desired consistency is reached.
  14. To assemble cupcakes: Using an apple corer, remove the center of each cupcake. Fill each cupcake with a spoonful of the Chocolate Ganache.
  15. Using the frosting-filled pastry bag, frost the cupcakes and sprinkle with crushed peppermint candies.

Tips

For the best results, ensure all your ingredients are at room temperature before you begin. This helps everything blend together more smoothly. Also, when making the ganache, make sure not to let the cream and butter boil; just simmer them gently to avoid a grainy texture.

Variations & Substitutions

If you’re not a fan of peppermint, you can substitute the peppermint extract with almond or vanilla extract for a different twist. You can also use dark chocolate instead of semisweet for a richer flavor. For a dairy-free version, use coconut milk and a vegan butter substitute.

Storage

These cupcakes can be stored in an airtight container in the refrigerator for up to 5 days. Before serving, let them come to room temperature for the best taste and texture. You can also freeze them without frosting for up to 2 months. Just thaw them overnight in the refrigerator before frosting and serving.

FAQ

Can I make these cupcakes gluten-free?

Yes, you can substitute the all-purpose flour with a gluten-free flour blend. Just make sure it’s a 1:1 substitute for best results.

Do I have to use coffee in the recipe?

If you’re not a fan of coffee, you can substitute it with hot water or hot chocolate. The coffee enhances the chocolate flavor, but it’s not essential.

Nutrition

While these cupcakes are a treat and should be enjoyed in moderation, they do contain some nutritional benefits. The cocoa powder provides antioxidants, and using dark chocolate can add a boost of iron and magnesium. However, they are still high in sugar and fat, so enjoy them as an occasional indulgence.

Conclusion

These Peppermint Hot Chocolate Cupcakes are more than just a dessert; they’re a celebration of flavors and memories. Whether you’re making them for a holiday party or simply to indulge in a bit of winter nostalgia, they’re sure to bring joy and warmth to those who taste them. I hope this recipe becomes a cherished part of your holiday traditions, just as it has in my family. Enjoy every sweet, minty bite!

Related update: Peppermint Hot Chocolate Cupcakes

Related update: Grandma Inez's Pineapple Pie

Creamy Cauliflower Chowder | Made by Meaghan Moineau

Creamy Cauliflower Chowder

Intro

There’s something magical about a bowl of steaming chowder on a chilly day. It transports me back to my grandmother’s kitchen, where the aroma of her cooking filled the air, bringing warmth and comfort. Her creamy cauliflower chowder was a family favorite, an irresistible blend of flavors that nourished both body and soul. Today, I’m sharing my version of this classic recipe with you, in hopes that it becomes a staple in your home as well.

Why You’ll Love It

This creamy cauliflower chowder is the epitome of comfort food. It’s rich, flavorful, and incredibly satisfying. Whether you’re looking for a hearty lunch or a cozy dinner, this chowder will not disappoint. Here are a few reasons why you’ll fall in love with it:

  • Simple Ingredients: With everyday ingredients you probably already have in your kitchen, this chowder is easy to whip up on a whim.
  • Rich and Creamy: The combination of cauliflower, cheddar, and parmesan creates a velvety texture that’s hard to resist.
  • Customizable: You can easily adjust the flavors and toppings to suit your preferences.
  • Comforting and Satisfying: It’s perfect for those days when you need a little extra warmth and comfort.

Ingredients

  • 2 tablespoons butter
  • 1 head cauliflower, chopped
  • 1 cup cheddar cheese, shredded
  • 2 teaspoons chicken bouillon
  • 1/2 cup cooked bacon, crumbled
  • 1/2 cup croutons
  • 2 tablespoons flour
  • 3 cloves garlic, minced
  • 1 teaspoon ground mustard
  • 4 cups milk, divided
  • 1 onion, chopped
  • 1/2 teaspoon paprika
  • 1/2 cup parmesan cheese, grated
  • Salt, to taste

Instructions

  1. Add butter, garlic, onion, and cauliflower to a large pot and sauté for 5 minutes until the cauliflower starts to brown.
  2. Add flour, chicken bouillon, ground mustard, paprika, and salt. Mix well to combine.
  3. Pour in 2 cups of milk and stir until everything is well incorporated. Reduce heat and bring the mixture to a boil, simmering for about 10 minutes until the cauliflower is soft.
  4. Carefully transfer the mixture to a blender and blend until smooth. (Alternatively, use an immersion blender directly in the pot.)
  5. Transfer the blended mixture back to the pot and add the remaining milk. Stir well to combine.
  6. Add parmesan cheese and cheddar cheese, stirring continuously until the cheese is melted and the chowder is heated through.
  7. Serve the chowder in bowls, topped with crumbled bacon, croutons, and extra cheese if desired.

Tips

  • Blending: Always let the mixture cool slightly before blending to avoid any accidents.
  • Consistency: If you prefer a thicker chowder, reduce the amount of milk or add a bit more flour.
  • Toppings: Don’t be shy with the toppings; they add wonderful texture and flavor.

Variations & Substitutions

This chowder is highly adaptable to your taste and dietary needs:

  • Vegetarian Version: Use vegetable bouillon instead of chicken bouillon and skip the bacon.
  • Dairy-Free: Substitute the milk with almond or oat milk, and use nutritional yeast instead of cheese.
  • Spicy Twist: Add a pinch of cayenne pepper or a few dashes of hot sauce for some heat.

Storage

Store any leftover chowder in an airtight container in the refrigerator for up to 3 days. To reheat, simply warm it in a pot over medium heat, stirring occasionally. If the chowder thickens too much, add a splash of milk or water to reach your desired consistency.

FAQ

Can I freeze creamy cauliflower chowder?

Yes, you can freeze this chowder. Allow it to cool completely before transferring to a freezer-safe container. Freeze for up to 3 months. Thaw in the refrigerator overnight before reheating.

How can I make this chowder gluten-free?

To make this chowder gluten-free, simply replace the flour with a gluten-free all-purpose flour blend or cornstarch. This will help maintain the creamy texture without the gluten.

What can I serve with this cauliflower chowder?

This chowder pairs wonderfully with a fresh green salad or a slice of crusty bread for dipping. You could also serve it in a bread bowl for a fun and hearty presentation.

Nutrition

This creamy cauliflower chowder is a rich source of calcium and vitamins. Cauliflower is low in calories but high in fiber, vitamin C, and other essential nutrients. Keep in mind that the cheese and bacon add richness and indulgence, so enjoy this dish as a delightful treat!

Conclusion

There you have it, a delightful creamy cauliflower chowder that’s sure to warm your heart and soul. Whether you’re making it for a cozy family dinner or a special occasion, this chowder is sure to impress. I hope it brings as much joy to your table as it has to mine. Enjoy every spoonful!

Related update: Creamy Cauliflower Chowder

Related update: Monastery soup