
So it was one of those Thursday afternoons. You know the kind — when the clock seems to tick extraordinarily slowly, and the chilly breeze outside just makes you crave something deeply satisfying. I found myself staring at a pack of beef short ribs in the fridge, remembering a long-ago failed attempt at a backyard barbecue. But this day was different. I had a plan that didn’t involve open flames but rather the comforting embrace of a dutch oven. These Amazing Braised Beef Short Ribs are perfect for when you want to impress without the stress. They practically cook themselves once they’re in the oven, and trust me, the aroma will fill your home with anticipation.
Jump to Recipe
What You’ll Need
You might already have most of these tucked in your pantry, but a quick trip to grab a few fresh items will make this dish sing.
- 4 strips of bacon
- 3 tablespoons olive oil
- 2 pounds of beef short ribs
- sea salt and fresh ground pepper
- 8 ounces of white button mushrooms, sliced
- 1 cup of yellow diced onions
- 1 cup of diced carrot
- 3 cloves of garlic, minced
- 2 cups of Cabernet Sauvignon wine
- 2 cups of beef stock
- 2 tablespoons of tomato paste
- 1 tablespoon of beef base
- 2 teaspoons of fresh dried thyme
- 2 bay leaves
How to Make Amazing Braised Beef Short Ribs
- Preheat your oven to 300°F. Grab your largest heavy-bottomed pot—I swear by my trusty Le Creuset for this.
- Over medium heat, cook the bacon until crisp, then let it drain on paper towels. You’re gonna crumble this into the sauce later, but for now, keep the bacon fat in the pot.
- Pat the short ribs dry with paper towels. This is crucial for that perfect caramelization. Trim a bit of the excess fat, but don’t go overboard—flavor, remember?
- Season the short ribs liberally with sea salt and fresh ground pepper. Brown them in the pot over medium-high heat in olive oil and bacon fat, making sure to give them space. You might need to do this in batches.
- Once browned, remove the ribs and set them aside in a large bowl. Pour out the used fat, keeping those flavorful bits stuck to the bottom intact.
- Lower the heat to medium, add fresh olive oil, and sauté the mushrooms until crisp and golden, about 7-10 minutes.
- Throw in the onions and carrots, cooking until soft, about 5-7 minutes. Add the garlic and cook for just a minute more.
- Crank up the heat to high and deglaze the pot with the Cabernet Sauvignon. Stir vigorously, scraping up the browned bits. Bring to a boil.
- Add beef stock, tomato paste, beef base, thyme, bay leaves, sea salt, and pepper. Let it boil while stirring for about 3 minutes.
- Snuggle the browned short ribs back into the pot, ensure they’re covered in liquid, and bring it back to a boil for 2 more minutes.
- Put the lid on the pot and transfer it to the oven. Let it cook undisturbed for 3 hours—don’t peek!
- When time’s up, carefully remove the pot from the oven and brace yourself for a steam facial as you take the lid off.
- Gently move the short ribs to a bowl—they’ll be meltingly tender. Skim the fat off the sauce that’s gathered at the top.
- Remove the bay leaves and thyme stems. Bring the pot back to medium-high heat and reduce the sauce by a third, concentrating the flavors.
- Crumble the bacon into the sauce, stirring well. Return the short ribs to the pot, ensuring they’re well-coated in the sauce. Serve immediately over mashed potatoes or polenta. Absolute heaven!
Cook’s Notes
– Bacon lovers, rejoice! The bacon fat really amps up the richness, but if you’re looking for a lighter version, you can skim more of it off before deglazing.
– This dish is even better the next day, so consider making it ahead and letting the flavors meld overnight in the fridge. Just reheat gently on the stovetop.
– If your sauce turns out too salty, don’t worry—add a touch more beef stock or water during the reduction phase to balance it out.
– Leftovers can be stored in an airtight container in the fridge for up to three days. They’re pretty dreamy in a sandwich or tossed with pasta!
Make It Your Own
- Substitute the short ribs with boneless chicken thighs. They’ll cook faster—about 1.5 to 2 hours should do it.
- Swap the carrots for parsnips or sweet potatoes for a different kind of sweetness.
- Use a different red wine like Merlot if Cabernet isn’t your jam.
- Add a handful of chopped fresh herbs like parsley or basil at the end for a fresh, bright twist.
If you try this, I’d love to hear how it turns out—drop a comment or tag me! There’s something so fulfilling about sharing good food, and I hope this becomes one of your go-to comfort dishes. Enjoy every delicious bite!
Related update: Amazing Braised Beef Short Ribs
Related update: Steak with lemon and capers
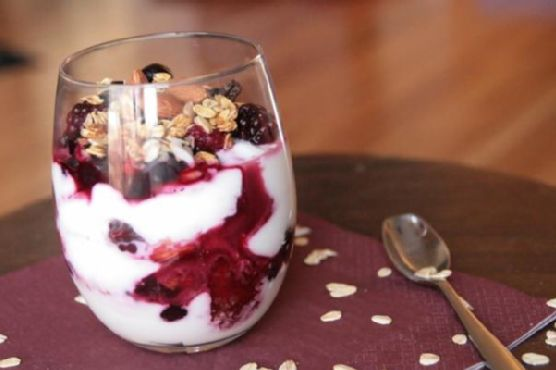
It was one of those mornings where everything seemed to go wrong. I woke up late, the cat knocked over my coffee, and I realized we were out of milk. You know those days, right? But hey, sometimes the universe gives you lemons so you can find a creative and tasty solution. On this particular day, I discovered my savior: Mixed Berry Yogurt with Almonds. It’s the kind of dish that feels luxurious without much effort—perfect for those hectic mornings or even as a healthy dessert when you want something a bit more special. The best part? It’s quick, comforting, and feels like a little scoop of joy.
Jump to Recipe
What You’ll Need
You might already have most of these ingredients nestled in your pantry and freezer, which is a huge win in my book.
- 1 cup frozen mixed berries
- 1/2 cup whole oats
- 1 cup plain Greek yogurt
- 1/4 cup whole almonds
How to Make Mixed Berry Yogurt with Almonds
- Start by toasting the almonds in a dry skillet over medium heat. Shake the skillet occasionally until they turn golden and fragrant. This should take about 3-5 minutes. Keep an eye on them; they can go from perfect to burnt in no time!
- While the almonds are toasting, scoop the Greek yogurt into a bowl or glass cup. I love using a clear glass because it shows off the layers and makes me feel like an artist.
- Evenly sprinkle the oats over the yogurt. If you want them a bit softer, you can let them sit for a minute or two to soak up some of the yogurt’s moisture.
- Microwave the frozen berries for about 30 seconds to thaw them slightly, then layer them over the oats. The warmth from the berries will start to melt into the yogurt, creating a beautiful marbled effect.
- Finally, top it all off with those perfectly toasted almonds. The crunchiness will be a lovely contrast to the creamy yogurt and juicy berries.
Cook’s Notes
This dish is super flexible, so you can tweak it based on what you have. If you want to prepare it in advance, layer the yogurt and oats first and keep the berries and almonds separate until you’re ready to serve. Leftovers can be stored in an airtight container in the fridge for up to two days, but I recommend keeping the almonds separate to maintain their crunch.
Watch out for the almond toasting process—they toast quickly and can easily burn if you’re not paying attention. Trust me, I’ve been there. If you want to make it even quicker in the morning, toast the almonds the night before!
Make It Your Own
- Swap the Greek yogurt for a creamier vanilla yogurt if you’re serving this as a dessert.
- Layer in a drizzle of maple syrup over the yogurt for an extra touch of sweetness.
- Try using walnuts or pecans if you’re out of almonds, toasting them just the same for that essential crunch.
- If berries aren’t your thing, this works beautifully with sliced peaches, bananas, or even a medley of whatever fruits you have hanging out in your fridge.
If you try this, I’d love to hear how it turns out—drop a comment or tag me! There’s nothing quite like seeing your take on these tasty creations. Enjoy every spoonful!
Related update: Mixed Berry Yogurt with Almonds
Related update: Beet Greens and Poached Eggs

Picture this: It’s a chilly Saturday afternoon, and I’m craving something sweet but not too cloying, something that feels like a hug in dessert form. My mind wanders to the bags of fresh cranberries I picked up on a whim during my last grocery run. That’s when inspiration strikes — why not whip up a cheesecake with a tangy cranberry twist? This cheesecake is creamy, bursting with seasonal flavor, and surprisingly easy to make. If you’ve ever thought cheesecake was too complicated for a casual bake, think again. This recipe is as straightforward as it gets and leaves you with a dessert that’s as impressive as it is delicious.
Jump to Recipe
What You’ll Need
The beauty of this cheesecake is that you probably have most of these ingredients on hand. The only thing you might need to grab is the fresh cranberries, but trust me, they’re worth it.
- Fresh cranberries – these are the star of the show.
- Water
- Sugar
- Allspice
- Cloves
- Orange extract
- Mcvitie’s wholewheat digestive cookies – perfect for the crust.
- Butter
- Cream cheese – the foundation of any good cheesecake.
- Sour cream
- Cornstarch
- Eggs
How to Make Cheesecake with Cranberries
- Start by making the cranberry sauce. In a medium saucepan, bring the cranberries and water to a boil. Let them bubble away until you hear the satisfying pop of the berries’ skins bursting, around 5 minutes.
- Once popped, remove the saucepan from the heat and stir in the allspice, cloves, orange extract, and sugar. Mix it all together until it’s thoroughly combined. Pop it in the fridge to cool while you work on the rest.
- For the crust, take those Mcvitie’s digestive cookies and crush them into crumbs. Combine the crumbs with sugar and melted butter in a small bowl. Press this mixture firmly into the bottom of a greased 9-inch springform pan, making sure it’s even. Set it aside.
- In a mixing bowl, beat the cream cheese and sugar together until the mixture is smooth and creamy. Then add the sour cream and cornstarch, beating well to ensure everything is perfectly blended. Add the eggs one at a time, beating on low just until each one is incorporated.
- Drain your cooled cranberry sauce, reserving the cranberries for later. Gently fold one cup of the sauce into the cream cheese mixture, letting the vibrant red sauce ripple through the creamy batter.
- Pour the batter into your prepared crust. Sprinkle the top with the remaining cranberry sauce, letting it swirl and mingle with the batter.
- Bake the cheesecake at 160°C for 30-35 minutes, or until the center is almost set. You’ll know it’s ready when it still has a slight jiggle in the middle.
- Once baked, let the cheesecake cool on a wire rack for about 10 minutes. Run a knife around the edge to loosen the cake from the pan, then let it cool for another hour.
- Refrigerate overnight. I know it’s hard to wait, but this step is crucial for setting the cheesecake properly.
- Before serving, you can top the cake with the reserved cranberries for an extra pop of color and tartness.
Cook’s Notes
Making cheesecake might seem intimidating, but it becomes a cinch once you break it down. A few tips: make sure your cream cheese is at room temperature for easy blending. When adding eggs, less is more — over-beating can lead to those pesky cracks. If you’re pressed for time, the cranberry sauce can be made a day ahead, and stored in the fridge. The cheesecake itself is best made the night before serving, giving it ample time to set in the fridge. Leftovers (if there are any) can be stored covered in the fridge for up to four days. If you’re planning to freeze, wrap the cheesecake tightly and enjoy within a month for best taste.
Make It Your Own
Variations are the spice of life, so here are some ideas to tweak this cheesecake to your liking:
- Swap the fresh cranberries for frozen ones if fresh aren’t available. Just add a couple extra minutes to the cooking time.
- Want a boozy twist? Add a splash of Grand Marnier to the cranberry sauce for an adult-friendly version.
- Make it nutty by adding a pecan crumb topping — mix chopped pecans with brown sugar and sprinkle on before baking.
- If you’re a chocolate lover, fold in a handful of mini chocolate chips into the batter for a choc-berry treat.
If you try this, I’d love to hear how it turns out — drop a comment or tag me! Whether it’s a cozy weekend at home or a dinner party with friends, this cheesecake is sure to be a hit. Enjoy every creamy, tangy bite!
Related update: Cheesecake with cranberries
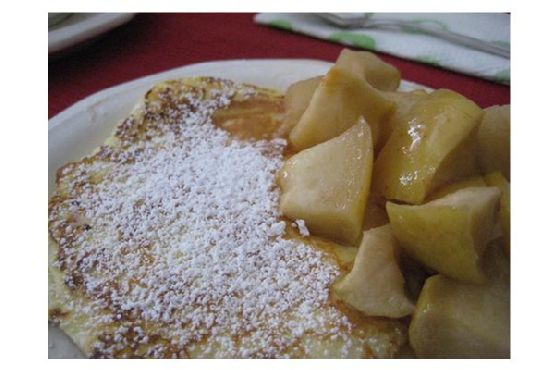
Ever have one of those mornings where you wake up and just know you need something a little extra special to kickstart the day? That was me last Sunday. As I gazed out my window at the crunchy, golden leaves piling up in my yard, it hit me—I needed something cozy and autumnal. You know, the kind of dish that feels like a hug. Enter: Baked Apple Pancake. It’s the ultimate lazy morning treat, perfect for when you want something indulgent but deceptively easy. Think of it as a fluffier, fruitier version of your favorite pancake, but baked to perfection in the oven. It’s the kind of recipe that makes you look like a kitchen pro, even if you just rolled out of bed.
Jump to Recipe
What You’ll Need
This ingredient list is blissfully simple, and chances are you already have most of it sitting in your pantry. Just a few fresh additions, and you’re ready to go!
- 1 whole apple, sliced thin
- 2 tablespoons butter
- 1 tablespoon cinnamon
- 2 whole eggs
- 1/2 cup all-purpose flour
- 1/2 cup milk
- 1/4 cup nuts and raisins
- 1/4 teaspoon salt
- 1 tablespoon sugar
How to Make Baked Apple Pancake
- First things first, preheat your oven to a toasty 450°F. You want that oven nice and hot!
- Grab a skillet and melt 2 tablespoons of butter over medium heat. Add your apple slices to the pan and sauté until they’re tender and just starting to caramelize—think fragrant and golden.
- Sprinkle in the sugar, cinnamon, nuts, and raisins. Stir gently to coat the apples in this sweet and spicy goodness. Once everything is mixed, take it off the heat and set it aside.
- In a separate bowl, beat those eggs until they’re light and frothy. Slowly, because we’re not in a rush, add the flour and salt. Blend until smooth. Beat in the melted butter and milk until your batter is silky.
- Spray your skillet with a generous layer of Pam, then pour the apple filling you set aside back into the skillet. Top this with your batter, spreading it evenly.
- Pop it into the oven and bake for 15 minutes. You’ll want to watch as the edges start to rise and turn a delicious golden brown.
- Reduce the oven temperature to 350°F and let it bake for another five to ten minutes. The pancake should puff up slightly and set in the middle.
- Once baked, remove from the oven and let it cool for just a minute. Cut the pancake into four hearty pieces and serve with your favorite topping. Maple syrup, whipped cream, or even a dollop of yogurt would be heavenly!
Cook’s Notes
This recipe comes from a note marked “good!” by Barbara Michel, and I’ve made a couple of tweaks to honor her enthusiasm.
- If you’re planning to make this ahead of time, you can sauté the apples and set them aside in the fridge. Just bring them back to room temperature before assembling the dish.
- Leftovers (if there are any!) are delightful warmed up the next day. Just pop them in the microwave for a quick reheat.
- Avoid overmixing the batter; it should be smooth, but overmixing can make it dense.
Make It Your Own
Here are a few fun tweaks to shake things up if you feel like experimenting.
- Swap the apple for pear slices and add a touch of ginger for a spiced twist.
- Substitute the nuts and raisins for dried cranberries and pecans for a seasonal flair.
- If you’re feeling indulgent, drizzle the top with a caramel sauce right before serving.
- For a citrus kick, add some orange zest to the batter.
If you try this, I’d love to hear how it turns out—drop a comment or tag me! Whether you stick to the classic or put your own spin on it, I hope this baked apple pancake brings a little extra warmth to your morning. Enjoy every bite!
Related update: Baked Apple Pancake
Related update: Mixed Berry Yogurt with Almonds
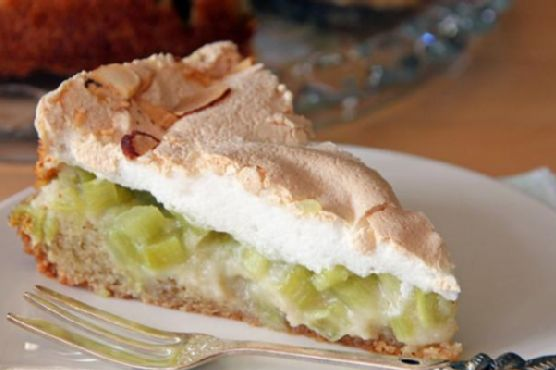
It was one of those indecisive spring days, warm enough in the sun to consider a picnic, but with a breeze that still held a whisper of winter. The rhubarb in my garden had just started to show its rosy stalks, and I felt the irresistible urge to bake something that straddled the seasons just as beautifully. Enter the German Rhubarb Cake with Meringue. It’s the kind of bake that’s both a showstopper and a comfort food, with its tart rhubarb base and fluffy, cloud-like meringue topping. I promise, it’s simpler than it looks, and you probably have most of the ingredients already lounging in your pantry.
Jump to Recipe
What You’ll Need
Trust me, the ingredient list might seem a tad long, but it’s mostly the usual suspects in your kitchen. Plus, the bold flavors that rhubarb and almonds bring to the party are well worth it!
- Rhubarb – Fresh and tart, the star of our cake!
- Sugar – For sweetening everything up.
- Vanilla extract
- Salt
- Eggs – We’ll use both yolks and whites, no waste here!
- Flour
- Roasted almonds
- Baking powder
- Egg whites
- Almonds
How to Make German Rhubarb Cake with Meringue
- First things first, preheat your oven to 350°F convection. It’s the secret to getting that perfect bake.
- Grease a round 26 cm (9 1/2 inch) springform pan. We don’t want any sticking mishaps later!
- Wash, dry, and peel your rhubarb. Slice it into small pieces, sprinkle with 2 tablespoons of sugar, and let it sit for at least half an hour. This draws out the excess water, keeping our cake from getting soggy.
- Once that’s done, give the rhubarb a good pat dry. Prepping well now means a tastier cake later.
- In your trusty kitchen machine, beat together the butter, sugar, and vanilla extract until the mixture is fluffy and the sugar is dissolved. It should look creamy and pale.
- Crack in the eggs, one at a time, mixing well after each addition. We want a silky smooth batter here.
- In a separate bowl, sift together the flour, ground almonds, salt, and baking powder. Slowly incorporate this into the egg mixture. Be gentle; we don’t want to over-mix.
- Pour the dough into your prepared springform pan, smoothing the top. Layer on the rhubarb pieces evenly.
- Pop it in the oven for 25 minutes. Your kitchen will start to smell heavenly about halfway through.
- While the cake is baking, it’s time to whip up the meringue topping. Beat the egg whites until stiff peaks form, then gradually add in the sugar until your meringue is glossy.
- Spread the meringue over the baked cake and decorate with almond slices.
- Return it to the oven for 15 more minutes. Check after 5 minutes and cover with foil if the meringue is getting too toasty.
- Let the cake cool completely before you attempt the big reveal from the springform pan. Patience, my friend, is key!
Cook’s Notes
This cake is a dream to make ahead. Once cooled, it keeps well at room temperature for a day or two, though the meringue might soften a bit. For longer storage, refrigerate it—just let it come back to room temp before serving for the best texture. A common mistake is skipping the step where you let the sugared rhubarb sit. Don’t rush it! Draining the rhubarb is essential for avoiding a watery cake base. Also, if you’re worried about your meringue browning too quickly, keep that aluminum foil close at hand.
Make It Your Own
- Squeeze in some citrus: Add lemon zest to the cake batter for a zingy twist.
- Swap the nuts: Use pistachios instead of almonds for a delightful green contrast and rich flavor.
- Go berry: Sub half the rhubarb with strawberries for a classic combo.
- Spice it up: Add a pinch of cinnamon to the cake batter for a warm, spicy note.
If you give this German Rhubarb Cake with Meringue a spin, I’d love to hear how it turns out! Drop a comment or tag me in your culinary masterpieces. Happy baking! 🌟
Related update: German Rhubarb Cake with Meringue
Related update: Cheesecake with cranberries

It was one of those wild Mondays where nothing seemed to go as planned—spilled coffee, missing socks, you name it. By the time dinner rolled around, I needed something comforting and quick. Enter my Cheddar Polenta with Bacon Wrapped Asparagus. This dish is like a warm hug in a bowl, yet impressive enough to make you feel like a kitchen wizard. It’s the perfect combo of creamy, cheesy polenta topped with crispy bacon and tender asparagus. Trust me, this is comfort food that doesn’t demand hours in the kitchen.
Jump to Recipe
What You’ll Need
If you’re like me, you probably have a lot of this stuff already hanging out in your kitchen. Here’s what you’ll need to pull together this weeknight savior:
- 6 spears of asparagus
- 2 slices of raw bacon
- 2 cups chicken broth
- 1 cup coarse corn grits
- 1 cup extra sharp cheddar cheese, shredded
- 1 bell pepper (optional, for extra crunch)
- Salt and pepper, to taste
How to Make Cheddar Polenta With Bacon Wrapped Asparagus
- Preheat your oven to 400°F (200°C). This is when your kitchen will start smelling promising!
- Take the asparagus spears and wrap them in bacon. I like to use two slices for the full crispy effect. Place these beauties on a small baking sheet.
- Spritz the asparagus bundle lightly with nonstick cooking spray. This helps the salt and pepper stick and adds a hint of flavor.
- Roast for 15-20 minutes. Keep an eye out: the bacon should be crispy and the asparagus fork-tender, with some golden edges peeking through.
- While the asparagus is roasting, bring your chicken broth to a boil in a small saucepan. The bubbling will be music to your ears.
- Once boiling, stir in the polenta. Lower the heat and let it cook slowly for about 5 minutes, stirring occasionally. You’ll know it’s ready when it has thickened and looks like a cozy blanket.
- Stir in the cheddar cheese and a dash of salt and pepper. The cheese should melt into the polenta, creating a creamy, golden mixture.
- To assemble, scoop the polenta into a dish and gently place the bacon wrapped asparagus on top. Serve warm and enjoy every bite!
Cook’s Notes
Alright, let’s get real for a second. Polenta can sometimes turn out lumpy if you rush it. Stir it slowly and give it the attention it deserves. This dish is best enjoyed fresh, but if you have leftovers, store the polenta and asparagus separately in airtight containers in the fridge for up to two days. Reheat the polenta with a splash of water or broth to bring it back to its creamy glory.
Make It Your Own
Feel free to get creative with this recipe! Here are a few ideas to switch things up:
- Swap the bacon for prosciutto if you’re feeling fancy or have it on hand.
- For a vegetarian twist, ditch the bacon and roast the asparagus with a sprinkle of smoked paprika and olive oil.
- Try using Parmesan instead of cheddar for a sharp, nutty flavor.
- Add some heat with a sprinkle of crushed red pepper flakes over the polenta just before serving.
If you give this recipe a try, I’d love to hear how it turns out—drop a comment or tag me on social media! Your kitchen stories make my day. Happy cooking!
Related update: Cheddar Polenta With Bacon Wrapped Asparagus
Related update: Amazing Braised Beef Short Ribs

It was one of those unpredictable Tuesday evenings when the craving for something sweet and comforting hit me like a freight train. I rummaged through my pantry, hoping for inspiration, when my eyes landed on that lonely can of pineapple chunks. It instantly sparked the memory of a gluten-free, dairy-free noodle kugel I had whipped up on a similar night of culinary chaos. This dish is not just a savior for your midweek dessert dilemmas; it’s a luxurious treat that feels indulgent yet light. Plus, it’s a crowd-pleaser that accommodates almost every dietary restriction. So, here it is, an irresistible Noodle Kugel with Pineapple that will have you dreaming about your next slice before you’ve even finished the first.
Jump to Recipe
What You’ll Need
Good news: you likely already have most of these ingredients hiding in your kitchen! This kugel is proof that a few pantry staples can transform into something magical.
- Gluten-free spiral rice pasta
- Canned pineapple chunks (make sure to drain them!)
- Unsweetened vanilla coconut milk or coconut creamer
- Sunflower oil
- Egg yolks
- Xylitol (or regular sugar if you prefer)
- Evaporated cane sugar
- Ground cinnamon
- Ground nutmeg
- Kosher salt
- Cupcake liners
- Earth Balance soy-free margarine
- Red brown rice flour
How to Make Noodle Kugel with Pineapple-Gluten free, Dairy Free
- Preheat your oven to 350 degrees F. It’s about to get cozy in here!
- Fill a medium stockpot with water and set it over high heat. Once boiling, add 2 tablespoons of kosher salt. Toss in the gluten-free spiral rice pasta and stir well to prevent any sticking. Keep stirring occasionally and let it cook for 8-10 minutes. The pasta should have a slight bite to it.
- Once cooked, let the pasta sit in the hot water for a few minutes. Then, transfer it to a large glass or heatproof bowl. This will give it some time to cool off while you prep the other ingredients.
- In the meantime, grab another bowl and mix together the unsweetened vanilla coconut milk, coconut creamer, drained pineapple chunks, xylitol, evaporated cane sugar, a dash of ground cinnamon, ground nutmeg, and sunflower oil. Combine everything well. Trust your intuition and taste it—it should be sweet and spiced just right.
- Add the egg yolks to your mixture and stir until everything is creamy and well combined. The color will be warm and golden.
- Line two cupcake pans with cupcake liners. Fill each liner with the noodle mixture using a dry 1/4 cup measuring spoon, mounding it generously over the top. If some look dry, pour any remaining liquid evenly over them.
- Sprinkle a small amount of crumble over each kugel (about 1/2 teaspoon per kugel). It’s your chance to unleash your inner artist!
- Place the pans in the oven and bake for 40-45 minutes. The kugels should be golden, with a hint of crust on the edges. Allow them to cool for about 10 minutes before removing them from the pans. You can take the liners off before serving if you prefer an elegant presentation.
- Serve your noodle kugel hot or warm. There’s something magical about that first warm bite!
Cook’s Notes
- The key to a perfectly textured kugel is in the pasta. Make sure you don’t overcook it. Slightly al dente is the goal since it will continue cooking while baking.
- If you find yourself with leftovers, they store beautifully in an airtight container in the fridge for about 3 days. Reheat them in the oven to maintain that lovely texture.
- Don’t be shy with the spices. Cinnamon and nutmeg are what give this dish its comforting warmth. Feel free to adjust according to your taste.
Make It Your Own
- Swap the canned pineapple for fresh diced apples or pears for a different fruity twist.
- Replace the sunflower oil with coconut oil for a richer, tropical vibe.
- If you’re out of ground nutmeg, try using pumpkin pie spice for an autumnal flair.
- Add a handful of raisins or dried cranberries to the mixture for a burst of sweetness in every bite.
If you try this, I’d love to hear how it turns out—drop a comment or tag me! Remember, this kugel isn’t just a recipe; it’s a chance to bring warmth and sweetness to the everyday hustle. Happy baking!
Related update: Noodle Kugel with Pineapple-Gluten free, Dairy Free
Related update: German Rhubarb Cake with Meringue

I remember the evening perfectly. It was one of those chilly Tuesday nights when you feel like you’ve barely survived the day and the only thing that could possibly make it better is a big bowl of something soul-warming. I opened my fridge and, like a miracle, the ingredients for this Kale and Chickpea Soup with Lemon seemed to jump out at me. The magic of this soup is in its simplicity. It’s the kind of dish that feels like a hug in a bowl, yet it’s deceptively easy to throw together. A few fresh ingredients, a touch of blending, and you’ve got yourself a soup that’s both nourishing and comforting. Plus, it’s the perfect excuse to use that crusty bread you’ve been meaning to finish.
Jump to Recipe
What You’ll Need
I bet you’ve got most of these lying around already. This list is all about those everyday heroes that transform humble into heartwarming.
- 2 banana shallots
- 1 bay leaf
- 2 cans chickpeas, drained and rinsed
- 2 stalks of celery
- 1/2 teaspoon of chilli flakes
- 1 loaf of crusty bread
- 1 garlic clove
- Lemon (juice of half, plus slices for garnish)
- 1 bunch of kale, stems removed, roughly chopped
- 2 tablespoons of olive oil
- Parmesan cheese, for topping
- 1 sprig of rosemary
- Salt, to taste
- 1.5 liters of stock (vegetable or chicken)
How to Make Kale and Chickpea Soup with Lemon
- Set a Dutch oven or large saucepan over medium heat and pour in the olive oil. Let it warm slightly until it shimmers.
- Finely dice the banana shallots and toss them in, stirring to coat them in the oil. Let them sizzle and become translucent.
- Slice the celery stalks horizontally into long strips, then chop them into small pieces. Add these to the shallots, stirring occasionally.
- Finely chop the rosemary leaves and add them to the pan, along with the bay leaf and chilli flakes. Wait for the fragrance to hit you – it’s a good sign.
- Smash the garlic clove using the flat of your knife and your palm, then toss it in whole. No need to fuss over chopping here.
- Rinse and drain the chickpeas and add them to the pan along with the kale. Stir everything together until it’s all coated nicely.
- Pour in the hot stock and bring it all to a gentle boil, then reduce the heat and let it simmer for about 20 minutes, until the kale is beautifully tender.
- Squeeze in the juice of half a lemon, stirring to blend. Taste and adjust the seasoning with more lemon or salt, depending on your stock.
- Using either a stick blender in the pan or in batches in a regular blender, blitz the soup to your desired texture. I like to set aside a ladleful or two before blending so there are still some chickpeas and kale for texture.
- Serve hot, with a couple of lemon slices floating on top of each bowl, and pass around the parmesan cheese for everyone to sprinkle to their heart’s content. Pair with toasted crusty bread for dipping.
Cook’s Notes
Okay, here’s the lowdown. If you’re planning ahead, this soup is a fantastic make-ahead option. It actually tastes even better the next day once the flavors have had time to marry. Just store it in an airtight container in the fridge for up to three days. Reheat gently on the stove, adding a splash of water if it’s thickened up too much. You can also freeze this soup for up to three months, though I’d recommend freezing before adding the lemon juice to prevent bitterness. Defrost it overnight in the fridge and add the lemon after reheating.
Watch your salt! If your stock is already salted, you might want to wait until the end of cooking to adjust the seasoning. It’s always easier to add than to take away.
Make It Your Own
The beauty of this soup is its flexibility. Here are a few of my favorite variations:
- Swap the chickpeas for white beans: Cannellini or Great Northern beans work beautifully here, offering a creamier texture.
- Add protein with chicken: Shredded rotisserie chicken stirred in at the end makes this a heartier meal.
- Spice it up with chorizo: Cook some diced chorizo in the pan before the shallots and let the spicy oil enrich the soup.
- Go green with spinach or Swiss chard: If kale isn’t your thing, these leafy greens make a great substitute.
If you try this, I’d love to hear how it turns out — drop a comment or tag me! Your feedback is the best part of sharing recipes. Happy cooking!
Related update: Kale and Chickpea Soup with Lemon
Related update: One Soup, Two Ways: Chunky Vegetables and Cream Of Vegetables

It was one of those evenings where the craving for takeout hits hard, but the thought of delivery fees makes you cringe. I remember standing in my kitchen, staring at a lonely chicken breast and a couple of oranges, thinking, “Could I… maybe… make orange chicken from scratch?” Spoiler: I did, and it was magic. It turns out, whipping up a healthier version of this takeout classic is not only doable but downright satisfying. The best part? It’s a whirlwind of citrusy freshness, subtle heat, and a sweet tangy glaze that hugs every bite of tender chicken.
Jump to Recipe
What You’ll Need
So, what’s the secret sauce (pun intended) to this homemade wonder? A lot of it is probably already chillin’ in your pantry or fridge. Here’s what you’ll need:
- Chicken breast – the star; make sure it’s fresh and juicy.
- Vegetable oil
- Orange juice – squeezed or store-bought, but fresh is fab.
- Rice vinegar
- Rice wine
- Soy sauce – it’s gotta be the good stuff.
- Chili sauce
- Garlic – because what is even life without garlic?
- Brown sugar
- Orange zest – that’s where the zing comes from!
- Green onions
- Water
- Corn starch
- Salt and pepper
- White rice – fluffy and perfect for soaking up all that goodness.
How to Make Healthy Orange Chicken
- First, cut the chicken breast into bite-sized cubes. This is where the magic begins.
- In a mixing bowl, combine the chicken with orange juice, rice vinegar, rice wine, chili sauce, brown sugar, and minced garlic. Mix it up and let those flavors marinate.
- Cover the bowl with plastic wrap, pressing it down so the marinade really gets to know the chicken. Pop it in the fridge for about an hour.
- While the chicken is getting cozy in the marinade, chop up your veggies. Cut the onion into square pieces and separate the white and green parts of the green onions. Don’t forget to zest that orange!
- Heat vegetable oil in a sauté pan over high heat. Toss in the marinated chicken and sauté for about a minute. Toss it around and give it another minute until it’s golden and caramelized.
- Transfer the chicken to a dish and, in the same sizzling pan, add the chopped onion. Sauté until they’re soft and aromatic.
- Add the chicken back into the pan along with the white parts of the green onion and your glorious orange zest. Let them mingle for about 30 seconds.
- Pour in the marinade liquid and let it simmer. This is where things get saucy!
- Add the remaining green onion and let the sauce thicken to your liking. A little patience here goes a long way.
- Once the sauce has reached your preferred consistency, season with salt and pepper. Serve it over a bed of fluffy white rice, and voilà, your orange chicken masterpiece is ready!
Cook’s Notes
– Make sure not to skip the marinating process. It’s what gives the chicken all that flavor you love.
– If you’re short on time, you can marinate for less, but an hour is ideal.
– Store leftovers in an airtight container. They’ll keep in the fridge for up to three days, and honestly, the flavors get even better!
– To reheat, just pop it in a pan over medium heat. Add a splash of water if the sauce gets too thick.
Make It Your Own
- Swap the chicken for crispy tofu to keep it vegetarian. Just prep the tofu the same way!
- Add some bell pepper slices or broccoli florets for extra crunch and color.
- Switch up the sauce with a few dashes of sesame oil for a nutty twist.
- Fancy a bit more heat? A sprinkle of crushed red pepper or a drizzle of sriracha should do the trick!
If you try this, I’d love to hear how it turns out — drop a comment or tag me! And remember, cooking is all about experimenting, so don’t be afraid to put your own spin on it. Happy cooking! 🍊🍗
Related update: Healthy Orange Chicken
Related update: Cheddar Polenta With Bacon Wrapped Asparagus

It was one of those classic winter weekends when all you want to do is nestle under a blanket with something hearty and warm. The kind where the wind whistles outside like it’s in on some secret joke. I was in the kitchen, rifling through the pantry, and there it was: a can of black beans. That was the spark for my Superbowl Chili, a dish that’s not just for the big game but perfect for any occasion when you need a comforting, one-pot wonder. It’s rich, robust, and oh-so-satisfying, with a kick that warms you from the inside out. The best part? You probably have most of the ingredients already sitting in your kitchen waiting for their moment to shine.
Jump to Recipe
What You’ll Need
Most of these ingredients are pantry staples, so you might not even need a grocery run. And honestly, any recipe that saves me a trip to the store is already a win in my book.
- Lean ground beef – This is our hearty base.
- Sirloin steak – Adds a nice textural contrast.
- Olive oil
- Yellow onions
- Carrots
- Garlic
- Canned black beans
- Diced canned tomatoes
- Chili powder
- Cumin
- Dried oregano
- Chipotle chile pepper in adobo sauce
- Kosher salt
- Low sodium chicken stock
- Fresh cilantro
- Green onions
- Lime
- Monterey jack cheese
- Sour cream
How to Make Superbowl Chili
- In a large heavy pot set over high heat, add the ground beef and steak chunks. Stir frequently until the meat is browned. This should take about 8 minutes. The kitchen will start to fill with those irresistible, savory aromas.
- Using a slotted spoon, remove the beef to a plate. Pour off the excess liquid from the pot. I like to use a strainer over a bowl to make sure I catch all the leftover juices, leaving the meat nicely drained.
- In the same pot, add a splash of olive oil and set over medium heat. Once it’s shimmering, toss in the carrots, onions, and garlic. Stir these until they’re softened, about 5 minutes, and enjoy how they turn golden and fragrant.
- Return the beef to the pot and sprinkle in the chili powder, cumin, oregano, salt, and chopped chipotle chile. Stir and let these cook for just a minute to unlock all those bold, mouth-watering flavors.
- Add in your diced tomatoes and chicken stock. Bring everything to a simmer, then reduce the heat to keep it at a gentle simmer for 30 minutes. Stir occasionally and watch as the liquid gradually reduces, intensifying the flavors.
- Stir in all but 1/3 cup of the black beans and cook for another 5 minutes. Mash the reserved beans with a fork and mix them into the chili for extra body and thickness.
- If you find the chili too thick, don’t fret. You can stir in up to an additional cup of chicken stock to get your preferred consistency. Let it warm for a few minutes, and you’re ready to serve.
- Ladle the chili into bowls and garnish with your favorite toppings like fresh cilantro, green onions, a squeeze of lime, a sprinkle of Monterey jack cheese, and a dollop of sour cream. Enjoy!
Cook’s Notes
This chili is perfect for making ahead. You can prepare it up to two days before you plan to serve it. Just cool, cover, and refrigerate. When you’re ready to eat, reheat it over medium heat, stirring often to make sure it warms evenly.
Here’s a tip: if you’re making this for a crowd, keep the garnishes in separate bowls so everyone can customize their bowl just the way they like it. Don’t rush the simmering step. It’s crucial for developing that deep, rich flavor that makes this chili so special.
Make It Your Own
This chili is a canvas waiting for your personal touches. Here are a few ideas:
- Swap the beef for crispy tofu to make it vegetarian. Just cube and brown the tofu before adding to the pot.
- Use smoked paprika instead of regular chili powder for a smoky twist.
- Add some bell peppers with the onions and carrots for an extra layer of sweetness.
- For a spicier kick, add an extra chipotle pepper or a teaspoon of cayenne pepper.
If you try this, I’d love to hear how it turns out — drop a comment or tag me! Whether you’re watching the game or just enjoying a cozy night in, I hope this chili warms your heart and home. Enjoy every spoonful!
Related update: Superbowl Chili
Related update: Healthy Orange Chicken

It was one of those evenings when I stared blankly into my fridge, wondering what could possibly come together in 30 minutes or less. A couple of beefsteak tomatoes were teetering on the edge of being too ripe, alongside a baby eggplant that seemed to whisper, “Use me or lose me.” That’s when the idea of Tomato Cutlets hit me—a dish that feels both unexpected and comforting. It’s the kind of meal where crispy meets juicy, with just the right amount of tang from a squeeze of lemon. And the best part? You probably have most of the ingredients already lounging in your pantry or fridge, waiting to shine.
Jump to Recipe
What You’ll Need
Alright, let’s dive into the good stuff. You’ll find this ingredient list both accessible and forgiving. If you cook often, chances are you already have most of this hanging around.
- 2 beefsteak tomatoes, sliced into thick rounds
- 1 baby eggplant, halved
- 1 cup Italian bread crumbs
- 2 eggs, beaten
- Juice of 1 lemon
- 2 tablespoons olive oil
- 1/4 cup fresh Italian parsley, chopped
- Salt and freshly ground pepper to taste
- 1/4 cup grated fresh Romano cheese
How to Make Tomato Cutlets
- Start by setting up your breading station. In one bowl, have your beaten eggs ready. In another, spread out the Italian bread crumbs. This is where the magic begins.
- Dip each tomato slice into the egg wash, letting any excess drip off, and then press it into the bread crumbs. If you’ve got extra egg wash and crumbs, feel free to double-dip for an extra crunchy coating.
- Heat the olive oil in a large frying pan over medium heat. Once it shimmers, carefully place the breaded tomato slices into the pan. You should hear a satisfying sizzle.
- Cook the tomatoes for about 3-4 minutes on each side, until they’re golden and fragrant. Flip gently to keep the breading intact.
- Next, nestle the halved eggplant into the pan. Sprinkle with salt and pepper. Sauté for about 3-4 minutes on each side, aiming for a beautiful golden color.
- Once everything is cooked to perfection, transfer the tomatoes and eggplant to a serving plate. Drizzle with fresh lemon juice, scatter with chopped parsley, and finish with a generous sprinkle of Romano cheese.
Cook’s Notes
Here’s what I’ve learned along the way: When breading, don’t rush. Let the egg wash and crumbs work their coating magic. If you’re running low on egg wash or crumbs, just whisk another egg or toss in more crumbs—it’s not an exact science. As for the frying, medium heat is your friend; too hot, and the crumbs burn before the tomatoes are ready.
Got leftovers? Store them in an airtight container in the fridge, and they’ll last a couple of days. To reheat, a quick stint in the oven will bring back some of that initial crispiness. If you like to plan ahead, you can prep the breaded tomatoes and store them in the fridge for up to a day before frying.
Make It Your Own
Feel free to get creative with these cutlets. Here are a few ideas:
- Swap the tomatoes for zucchini slices for a different take on the cutlet vibe.
- Add a little kick by mixing red pepper flakes into the bread crumbs.
- Try using panko instead of regular bread crumbs for extra crunch.
- Replace Romano with Parmesan if that’s what you have on hand—it’s all about using what you’ve got.
If you try this, I’d love to hear how it turns out—drop a comment or tag me! Your kitchen adventures are what make this fun. Happy cooking!
Related update: Tomato Cutlets

It was one of those blustering autumn afternoons where the wind insisted on swirling the golden leaves into a frenzy just outside my kitchen window. I found myself craving something warm and cozy — the kind of comfort that wraps around you like a favorite sweater. My pantry was my savior, holding a treasure trove of humble ingredients that quickly turned into a hearty Tomato and Lentil Soup. This dish is my weeknight hero; it’s simple, comforting, and comes together faster than the kids can finish their homework. Plus, the aroma of simmering garlic and onions is enough to gather everyone around the kitchen, eagerly waiting for their bowls.
Jump to Recipe
What You’ll Need
This recipe is a celebration of pantry staples. Chances are, you already have most of these tucked away in your kitchen:
- 2 tablespoons of olive oil
- 1 large onion, chopped
- 2 cloves of garlic, minced
- 2 carrots, diced
- 1 can (14 oz) canned tomatoes
- 1 bay leaf
- 4 cups of water
- 1 cup of lentils
- Salt to taste
- Fresh parsley, chopped
How to Make Tomato and Lentil Soup
- Start by heating the olive oil in a large pot over medium heat. Toss in the chopped onion and garlic, letting them sizzle and fill your kitchen with their tantalizing smell. Sauté for about 5 minutes, stirring occasionally, until the onions are soft and translucent.
- Add the diced carrots to the mix. Continue to sauté for another 2 minutes. You’ll know it’s time to move on when the carrots start to soften and their edges look a bit golden.
- Pour in the canned tomatoes and add the bay leaf. Give everything a good stir, then add the water. Crank up the heat and bring it all to a rolling boil.
- Once boiling, stir in the lentils. Sprinkle in some salt, keeping in mind you can adjust later if needed. Lower the heat to a simmer and let the soup cook for 5 minutes, just until the lentils are tender but still holding their shape.
- Before serving, remove the bay leaf and give the soup a taste. Adjust the salt if necessary, and sprinkle generously with chopped parsley for a fresh, vibrant finish.
Cook’s Notes
Let’s talk about some soup wisdom I’ve gathered along the way. First off, don’t rush the onion and garlic sautéing — it lays the groundwork for all the flavors to come alive. If you have leftover soup, it stores beautifully in the fridge for up to 3 days. Reheat it gently on the stove or in the microwave, adding a splash more water if it’s too thick for your liking. You can even make it a day ahead to allow the flavors to meld more deeply.
Make It Your Own
Let’s shake things up a bit! Here are a few ideas to customize your soup:
- Swap the lentils for chickpeas for a creamier texture.
- If you like a bit of heat, add a pinch of red pepper flakes when sautéing the onions.
- For a richer flavor, use vegetable broth instead of water.
- Boost the earthiness by adding a handful of chopped spinach or kale in the last couple of minutes of cooking.
If you try this Tomato and Lentil Soup, I’d love to hear how it turns out — drop a comment or tag me! There’s something so satisfying about turning simple ingredients into something that feels like a warm hug in a bowl. Enjoy every spoonful!
Related update: Tomato and lentil soup
Related update: Kale and Chickpea Soup with Lemon
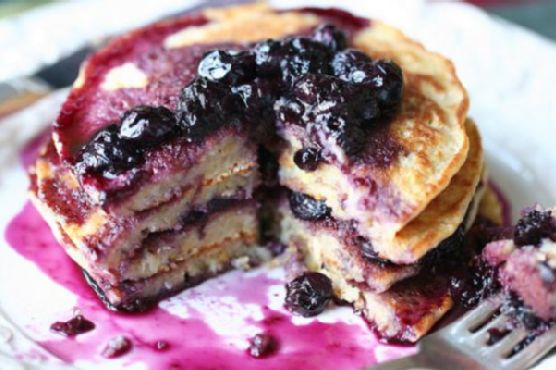
Picture this: it’s a lazy Sunday morning, and the sunlight is peeking through the kitchen window just enough to gently nudge me from my cozy corner on the couch. That’s when the craving hits—something vibrant and refreshing yet comforting to kickstart the day. Enter Lemon Scented Polenta Pancakes with Blueberry Thyme Syrup. This whimsical twist on the classic pancake is my answer to those mornings where you need a dish that feels special but isn’t a hassle to whip up. With the zing of lemon and the earthy sweetness of blueberry thyme syrup, this dish is an absolute keeper. It’s just fancy enough to impress anyone who stumbles into your kitchen but easy enough to make you wonder why you don’t do this every weekend.
Jump to Recipe
What You’ll Need
This recipe is one of those magical ones where you probably have most of the stuff lounging in your pantry, waiting to be turned into something fabulous. Here’s what you’ll need:
- All-purpose flour
- Baking powder
- Fresh blueberries
- Butter
- Cornmeal
- Egg
- Fresh thyme
- Honey
- Lemon zest
- Maple syrup
- Milk
- Salt
- Vanilla extract
- Water
How to Make Lemon Scented Polenta Pancakes with Blueberry Thyme Syrup
- Start by making the syrup. Combine the syrup ingredients: blueberries, maple syrup, and thyme sprigs in a small saucepan. Bring this mixture to a gentle boil. Once boiling, reduce the heat and let it simmer. The blueberries will soften and the thyme will infuse its earthy aroma. Remember to remove the thyme sprigs just before serving.
- For the pancakes, grab a medium saucepan and combine the cornmeal with cold water. Bring this to a boil, whisking constantly so it’s smooth and not lumpy. Reduce the heat and let it simmer until thickened, about 4 to 5 minutes. It should have the consistency of a thick porridge.
- In a small bowl, whisk together the milk, egg, honey, and a splash of vanilla extract. Add this to the thickened cornmeal, transforming it into a creamy polenta custard.
- In your largest mixing bowl, whisk together the all-purpose flour, baking powder, salt, and lemon zest. Make a well in the center of the dry ingredients and pour your polenta custard into the middle. Stir until everything is just combined; over-mixing is a no-go!
- Heat up a large griddle or non-stick pan and give it a good brush of butter. Ladle enough batter onto the griddle for 4-inch pancakes. If the batter seems too thick, a splash more milk will help it along.
- Cook the pancakes over moderate heat until bubbles form on the surface and the edges look a touch dry. This is your cue to flip them. Cook until the other side is beautifully golden and the pancakes have a little puff to them, about 2 minutes more.
- Transfer these golden beauties to warm plates and repeat with the remaining batter. Drench them in the warm blueberry syrup, and you’re set for a morning of deliciousness.
Cook’s Notes
Let’s talk about a few things to keep in mind as you embark on this pancake adventure. First, the syrup is the star—don’t skimp on the thyme unless you’re not a fan of its unique flavor! This syrup can be stored in an airtight container in the fridge for up to a week and reheated gently on the stove. As for the pancakes, if you’ve got leftovers (which is doubtful), they freeze well. Layer parchment paper between them and pop them in a zip-top bag for freezer storage. Defrost in the toaster on a low setting for a quick breakfast. Also, if you’re making these ahead of time, keep them warm in a low oven while you finish up the batch.
Make It Your Own
This recipe is wonderful as is, but who doesn’t love a little culinary improvisation? Here are a few ideas to make these pancakes truly yours:
- Swap the blueberries for raspberries or blackberries if that’s what you have on hand or prefer.
- Add a tablespoon of poppy seeds to the pancake batter for a delightful crunch that complements the lemon zest.
- If you’re dairy-free, use almond milk and vegan butter without sacrificing any of the flavor.
- For a nutty twist, replace half of the cornmeal with almond flour.
If you try this, I’d love to hear how it turns out—drop a comment or tag me! There’s nothing quite like seeing your creations and hearing how these pancakes brightened your day. Enjoy, my friends!
Related update: Lemon Scented Polenta Pancakes with Blueberry Thyme Syrup
Related update: Superbowl Chili
Related update: Baked Apple Pancake

Last Tuesday, somewhere between the hustle of a long workday and the clamor of my kids’ animated dinner table debates, I felt that familiar urge to bake something comforting. It was the kind of chilly autumn evening that practically begs for a cozy, sweet treat — an edible hug, if you will. Enter these Vanilla Coconut Snowball Cupcakes. They’re the perfect blend of fluffy vanilla goodness and tropical coconut flair, transforming a regular weeknight into something a bit more special. The best part? They’re as easy as they are impressive, requiring only pantry staples and a little love. So, while I was elbow-deep in flour, and someone spilled milk all over the kitchen floor (of course), I realized these cupcakes were worth every bit of chaos. Jump to Recipe
What You’ll Need
Chances are, you’ve got most of these tucked away in your pantry or fridge already.
- 1 1/2 cups **flour**
- 1 1/2 teaspoons **baking powder**
- 1/4 teaspoon **salt**
- 1/2 cup **butter**, softened
- 1 cup **sugar**
- 1 teaspoon **vanilla extract**
- 2 large **eggs**
- 1/3 cup **regular milk**
- 1/4 cup **sour cream**
- 1 cup **unsweetened coconut flakes**
- For the frosting:
- 1/2 cup **butter**, softened
- 1/4 cup **sour cream**
- 1 teaspoon **vanilla**
- 2-3 cups **confectioners’ sugar**
- Additional **coconut flakes** for coating
How to Make Vanilla Coconut Snowball Cupcakes
- Preheat your oven to 350°F (175°C) and line a 12-cupcake pan with paper liners or grease it lightly if you’re all out of liners.
- In a small bowl, whisk together the flour, baking powder, and salt. Set this aside to get cozy with itself.
- In a large mixing bowl, beat the butter on medium-high speed until it’s creamy, about 2 minutes. This is where you’ll see magic starting to happen.
- Gradually add sugar to the butter, beating until the mix is light and fluffy — around 3 minutes. Don’t forget to scrape down the sides of the bowl midway.
- Beat in the vanilla extract, imagining the sweet fragrance wrapping around your senses.
- Add the eggs, one at a time, beating well between each addition. Your batter should now resemble a lovely, satiny mix.
- Alternately add the flour mixture and milk, starting and ending with the flour. Beat briefly after each addition just to combine.
- Stir in the sour cream and coconut, feeling the texture change as it all comes together.
- Fill the cupcake wells about 3/4 full. Pop them in the oven and let them bake for about 18 minutes or until a toothpick comes out clean.
- Transfer the pan to a wire rack for 5 minutes, then remove the cupcakes and let them cool completely on the rack.
- For the frosting, beat together the butter, sour cream, and vanilla until fluffy. Slowly add 2 cups of confectioners’ sugar, beating on low until combined. Increase speed and beat until light and fluffy, adding more sugar as needed.
- Fill a shallow bowl with coconut flakes. Frost each cooled cupcake and dip the tops into the coconut, pressing gently to adhere.
Cook’s Notes
Here are a few tidbits to keep in mind as you venture into cupcake bliss:
- Room temperature ingredients are key for that perfect, smooth batter — so don’t skip this step.
- The coconut flakes add a delightful texture and flavor, but if you’re not a fan, simply skip coating the tops. The cupcakes will still shine.
- You can bake these a day ahead. Just keep them unfrosted and stored in an airtight container. Frost them before serving for that fresh, right-out-of-the-oven vibe.
- Leftovers, if you have any, can be stored in the fridge for 3-4 days. Bring them to room temperature before indulging, as the flavors are best when not too cold.
Make It Your Own
- **Nutty Twist:** Substitute the coconut flakes with toasted almonds or pecans for a delightful crunch.
- **Chocolate Lovers’ Dream:** Swap out half the flour for cocoa powder, and add chocolate chips to the batter for a decadent treat.
- **Lemon Coconut Delight:** Add the zest of one lemon to the batter and the frosting for a zingy, fresh take.
- **Berry Bliss:** Gently fold in a handful of blueberries or raspberries into the batter for a burst of fruity goodness in every bite.
If you try these Vanilla Coconut Snowball Cupcakes, I’d love to hear how they turned out! Drop a comment below or tag me in your baking adventures. Happy baking, my friends! 🧁✨
Related update: Vanilla Coconut Snowball Cupcakes
Related update: Noodle Kugel with Pineapple-Gluten free, Dairy Free

It was one of those biting-cold Wisconsin evenings when the wind cut through my coat like a knife, and all my fingers could think about was curling around something warm. I stumbled into the kitchen, cheeks pink from the chill, and had that lightbulb moment: Wisconsin Beer Cheese Soup. It’s one of those recipes that feels like a cozy flannel blanket – indulgent, comforting, and just what you need when the weather’s not cooperating. It’s like a big, cheesy hug in a bowl, and the best part is that it comes together quickly with ingredients you probably already have lurking in your pantry or fridge. Plus, melting cheese into anything just seems to magically fix a bad day, don’t you think?
Jump to Recipe
What You’ll Need
Just a heads-up, this isn’t one of those shopping list monsters. You might already have a lot of these basics on hand, except for maybe the hero of the dish: a good Wisconsin beer.
- 2 tablespoons butter
- 1 medium onion, diced
- 2 carrots, peeled and diced
- 2 celery sticks, chopped
- 2 cloves garlic, minced
- 1/4 cup flour
- 1 cup Wisconsin beer
- 2 cups broth (chicken or vegetable)
- 1 cup half & half
- 2 cups shredded Wisconsin cheddar
- 1 tablespoon mustard
- 1 teaspoon worcestershire sauce
- 1/2 teaspoon black pepper
- 1/4 teaspoon red pepper flakes
- Salt to taste
How to Make Wisconsin Beer Cheese Soup
- Start by melting the butter over medium heat. Once it’s all sizzly and lovely, toss in the onion, carrots, celery, and garlic. Cook everything for about 3-4 minutes until the veggies are soft and the kitchen smells like you’re winning at dinner.
- Sprinkle the flour over your veggie mix and stir until it disappears into the buttery goodness, absorbing all those delicious flavors.
- Pour in the beer and broth, scrapping up any bits sticking to the bottom of the pot, and bring it to a gentle boil. You’ll see some bubbles start to form at the edges – that’s your cue!
- Lower the heat to a simmer and stir in the half & half and the shredded cheddar. Let the cheese melt completely, stirring occasionally. This is where the magic happens, so don’t rush it.
- Add in the mustard, worcestershire sauce, black pepper, and red pepper flakes. Give it a good stir.
- Time to grab your immersion blender and blend the soup until it’s smooth and creamy. No immersion blender? No worries! Carefully blend in batches using a regular blender, but only fill it a third full each time to prevent a hot liquid disaster.
- Taste and add salt as needed. Pour yourself a big bowl, sit back, and enjoy the creamy, cheesy glory.
Cook’s Notes
When it comes to soup, patience is key. Letting the cheese melt slowly into the broth ensures a velvety texture. If you rush this part, you might end up with a grainy soup, and nobody wants that. As for storage, this soup keeps well in the fridge for about 3 days. Just give it a good stir when you reheat it since the cheese and liquid might separate a bit. Unfortunately, this one’s not a great candidate for freezing; the texture changes too much after thawing. If you’re planning ahead, you can chop the veggies a day early and store them in the fridge to make your cooking super speedy.
Make It Your Own
- Swap the beer: If you’re not a beer person, a hard cider can add an interesting twist with a sweet undertone.
- Make it meatier: Stir in some cooked, crumbled bacon for added smokiness and texture.
- Vegetarian version: Use vegetable broth instead of chicken broth and skip the worcestershire sauce or use a veggie-friendly alternative.
- Spice it up: Add a finely chopped jalapeño with the veggies for an extra kick.
If you try this, I’d love to hear how it turns out — drop a comment or tag me! Cooking is all about sharing, after all. Can’t wait to see your delicious creations!
Related update: Wisconsin Beer Cheese Soup
Related update: Tomato and lentil soup

Last Tuesday, I found myself staring at a lonely cabbage and some tomatoes in my fridge, wondering how I was going to transform these humble ingredients into something more exciting than their usual salad gig. I was craving something warm, comforting, and surprisingly quick because, you know, not all weeknight dinners should feel like a marathon. That’s when I remembered my fail-safe stir fry trick. This Stir Fried Cabbage and Tomatoes dish is like a warm hug on a chilly day — it’s savory, a touch sweet, and comes together faster than you can decide what to watch on Netflix. Trust me, this is the kind of dish that makes you look like you’ve got your life together, even if it’s just dinner.
Jump to Recipe
What You’ll Need
Gathering ingredients for this recipe is almost as easy as making it. Most of them are probably sitting quietly in your kitchen, waiting for their moment to shine.
- Beijing cabbage – coarsely shredded
- Diced tomatoes – as fresh as you can get
- Gloves garlic – because garlic is life
- Salt
- Sugar
- Ketchup – yes, the condiment extraordinaire
- Water
How to Make Stir Fried Cabbage and Tomatoes
- Start by giving your cabbage a good rinse and then coarsely shred it. You want the pieces to be bite-sized but not too tiny, allowing them to retain a slight crunch.
- Dice your tomatoes. The juicier, the better, as they’ll add a wonderful freshness to the dish.
- Heat a wok over medium-high heat, adding a splash of oil. When the oil shimmers, toss in the garlic. Sauté until golden and fragrant, about 30 seconds. Your kitchen should smell amazing already!
- Throw in the shredded cabbage. Stir-fry until it begins to soften. If it looks a bit dry, don’t hesitate to add a tablespoon or two of water to help it along.
- Now, add your diced tomatoes along with a pinch of salt, a dash of sugar, and a nice squirt of ketchup for that umami-rich depth. Pour in 2-3 tablespoons of water to create a light sauce.
- Stir everything together until well combined. The mixture should be juicy but not soupy. Cook until the tomatoes have broken down slightly and everything is melded together. This is when you taste and adjust seasoning if needed.
- Serve immediately. Your stir fry should be vibrant and steaming hot.
Cook’s Notes
This dish is all about balance. The sugar helps offset the acidity of the tomatoes and ketchup, so don’t skip it. If your cabbage feels too crunchy, just add a touch more water and give it a few more minutes — patience is key.
- This stir fry doesn’t hold up beautifully as leftovers, so try to enjoy it fresh. But if you do have some left, store it in an airtight container in the fridge and reheat gently.
- If you’re planning a dinner party, you can prep the cabbage and tomatoes ahead of time. Just keep them in separate containers in the fridge until you’re ready to cook.
Make It Your Own
- Add protein: Toss in some sliced chicken or crispy tofu for a heartier version.
- Switch up the veggies: Bell peppers or shredded carrots would be a lovely addition for some color and sweetness.
- Spice it up: Introduce a bit of heat with a sliced chili or a dash of hot sauce if you like things spicy.
- Herb it up: Finish with fresh cilantro or basil for an aromatic lift.
If you try this, I’d love to hear how it turns out — drop a comment or tag me! Cooking is all about experimenting and having fun, so make this stir fry your own and enjoy every bite.
Related update: Stir Fried Cabbage and Tomatoes
Related update: Tomato Cutlets

The other day, I found myself staring at a half-eaten bar of dark chocolate, a stray packet of espresso powder, and a whole lot of nothing for dessert. You know those moments when you just need something gooey and comforting but also want to keep it somewhat aligned with your food goals? Enter the Brownie Cake that’s both gluten-free and dairy-free yet decadently delicious. This isn’t just any dessert; it’s an easy weeknight indulgence that feels special enough for company but straightforward enough to whip up with pantry staples. The magic lies in its cake-like exterior giving way to a molten, pudding-like center. It’s the kind of dish that makes you feel like a kitchen wizard with minimal effort.
Jump to Recipe
What You’ll Need
This ingredient list is refreshingly simple, and chances are you already have most of these staples in your kitchen.
- Earth Balance Soy Free Spread (for that buttery richness without the dairy)
- Eggs (they give it that fluffy cake-like lift)
- Cane Sugar (because, duh, brownies need sweetness)
- Red Dark Chocolate (the star of the show)
- Vanilla Paste (adds a luxurious depth)
- Espresso Powder (just a touch for an extra kick)
- White Gluten Free Flour Blend (the base that keeps it light and gluten-free)
- Cocoa Powder (for that intense chocolate punch)
- Coconut Oil (keeps everything moist and lovely)
How to Make Brownie Cake gluten free, dairy free
- Preheat your oven to 325°F. Trust me, this temperature is key to getting that perfect texture.
- Lightly spread coconut oil in a 9x12x2 inch deep oval baking dish. This ensures nothing sticks and makes for easy serving later.
- Grab a bowl, sift together your flour and cocoa powder, and set aside. This little step ensures no lumps and a smooth batter.
- In the bowl of an electric mixer, beat the eggs and sugar on medium-high for about 5 minutes. You’re aiming for a consistency that’s thick, pale yellow, and reminiscent of cake batter.
- Once your egg and sugar mixture is ready, lower the speed to low and add the vanilla paste and espresso powder. It’ll smell heavenly.
- Slowly incorporate the flour and cocoa powder mixture. A handy tip: throw a dish towel over the mixer to avoid cocoa dust everywhere.
- Add in the Earth Balance Spread and mix for another 10 seconds. Just enough to combine.
- Pour the brownie mixture into your prepared dish. Smooth the top, but don’t obsess over it.
- Place this dish into a bigger roasting pan. Carefully fill the roasting pan with very hot tap water, reaching about halfway up the side of your brownie dish. This water bath technique gives it that unique texture.
- Bake for exactly 65 minutes. Patience is a virtue here. The cake will be set on the outside but fabulously gooey on the inside.
- Allow it to cool for 20 minutes before serving. Serve warm for the best experience.
Cook’s Notes
This Brownie Cake is a dreamy blend of textures, but a few tips will ensure it’s perfect every time. Make sure your eggs are at room temperature before starting; this helps them whip up better and combine more smoothly with the sugar. If you’re making this in advance, store it in the fridge and reheat gently in the oven before serving. It keeps well for about 3 days, not that it’ll last that long once your family gets a taste.
Make It Your Own
- Feeling nutty? Toss in a handful of chopped almonds or pecans for a delightful crunch.
- If dark chocolate isn’t your thing, swap it for semi-sweet or even white chocolate chips.
- Add a swirl of peanut butter into the batter before baking for a nutty flavor twist.
- Infuse the batter with a teaspoon of orange zest for a zesty chocolate-orange experience.
If you try this Brownie Cake, I’d love to hear how it turns out — drop a comment or tag me with your creations! Happy baking, friends!
Related update: Brownie Cake gluten free, dairy free
Related update: Vanilla Coconut Snowball Cupcakes
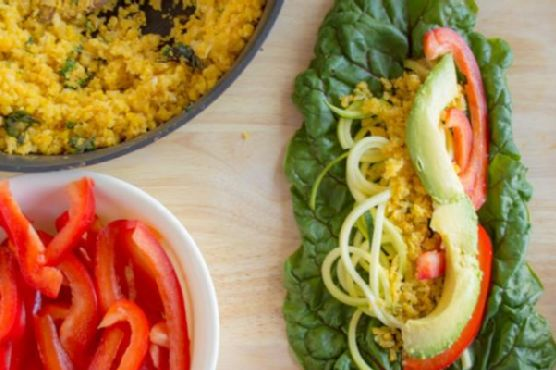
So, the other day, I found myself staring at a lonely bunch of swiss chard in my fridge. You know that moment when you think, “I really should use up those greens before they wilt and vanish into the abyss”? Well, that was me. I wanted something fresh, colorful, and honestly, something quick because who has time on a Tuesday night? Enter, my Swiss Chard Wraps. They’re light, vibrant, and let’s be real, they’re just so satisfying to munch on. These wraps are perfect for those nights when you’re craving something fresh but comforting. Plus, they can totally impress your dinner guests without you breaking a sweat.
Jump to Recipe
What You’ll Need
Most of these ingredients are probably chilling in your kitchen right now — no wild goose chase required. Here’s what you need:
- Dried swiss chard leaves
- Orange cauliflower
- Olive oil
- Garlic
- Salt
- Fresh basil
- Zucchini
- Red bell pepper
- Avocado
- Trader Joe’s spicy peanut vinaigrette
How to Make Swiss Chard Wraps
- First things first, chop off the stems of the swiss chard where they meet the leaf. If you’re feeling adventurous, leave a bit of stem for that extra crunch and structure.
- Take your orange cauliflower, chop it up into small pieces and pulse in a food processor until it resembles rice. Trust me, this orange beauty gives the wraps a gorgeous color and subtle sweetness.
- Heat some olive oil in a sauté pan over medium-high heat. When the oil is shimmering, toss in the garlic. Let it sizzle for a minute or two, releasing that heavenly aroma, until it starts to brown.
- Add the cauliflower rice to the pan. Stir for about 2-3 minutes until it softens and takes on an even more vibrant yellow-orange hue. Season it with a pinch of salt and some fresh basil. Stir it around a bit more so all those flavors mingle.
- Now, spiralize the zucchini using Blade B to make noodles. Don’t worry if you don’t have a spiralizer. Just use a vegetable peeler to create ribbon-like strips.
- To assemble, lay a swiss chard leaf flat. Layer with the sautéed cauliflower, zucchini noodles, red bell pepper slices, and avocado. Drizzle a bit of that spicy peanut vinaigrette over the top.
- Roll it up snugly, and voila! Your wraps are ready to be devoured. Serve them with your favorite protein or just enjoy as is.
Cook’s Notes
These wraps are best when fresh, but if you’ve got leftovers, just pop them in an airtight container and refrigerate them. I’d recommend consuming them within a day to keep the veggies crisp. If you want to prep ahead, you can make the cauliflower rice and spiralize the zucchini a day in advance. Just keep them separated in the fridge and assemble when ready to eat.
Make It Your Own
- Swap the orange cauliflower with purple or white cauliflower for a different hue and flavor profile.
- Try replacing the Trader Joe’s spicy peanut vinaigrette with a tangy balsamic glaze for a sweeter note.
- If you’re feeling like a protein boost, toss in some shredded chicken or crispy tofu.
- For an extra crunch, sprinkle some toasted sesame seeds or chopped nuts over the veggies before wrapping.
Alrighty, that’s all from me! If you give these wraps a whirl, I’d love to hear how they turn out. Drop me a comment or tag me in your wrap-tastic creations! Enjoy every bite, my friends!
Related update: Swiss Chard Wraps
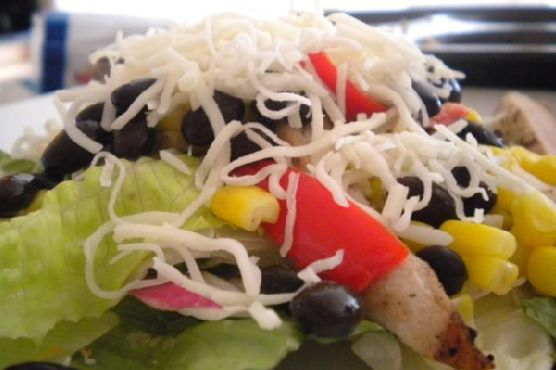
Picture this: It’s midweek, and you’re staring into the abyss of your fridge, seeking inspiration for dinner. We’ve all been there, and that’s precisely how this Garlic Lime Grilled Chicken Salad came to life in my kitchen. It’s that perfect holistic mix of tangy, zesty, and fresh that turns a mundane weeknight into a mini feast. The best part? It’s simple yet impressive enough to make you feel like a culinary genius without breaking a sweat. It’s brightened by the citrusy marinade and packed with vibrant, savory flavors that are sure to elevate your salad game. Plus, it’s a great excuse to fire up the grill! So, if you’re looking for a vibrant, flavor-packed dinner that’s also healthy, this one’s for you. Jump to Recipe
What You’ll Need
Chances are you already have most of these in your pantry or fridge, making this dish delightfully low-fuss. Here’s the lineup:
- Chicken breast
- Limes
- Garlic
- Olive oil
- Cooked refrigerated black beans
- Black pepper
- Cilantro
- Cumin
- Frozen corn
- Kosher salt
- Shredded Mexican cheese
- Onions
- Orange
- Oregano
- Red peppers
- Romaine lettuce
- Vinegar
How to Make Garlic Lime Grilled Chicken Salad
- In a small bowl, mix 1/4 cup of fresh orange juice and 1/4 cup of fresh lime juice with olive oil, a sprinkle of cumin, a dash of oregano, a generous pinch of kosher salt, and minced garlic. Trust me, the aroma is divine!
- Pour half of this citrusy concoction over the chicken breasts, ensuring they get a good soak. Save the rest of the marinade for later. Let those flavors mingle for at least an hour—two if you have the time.
- Prepare your grill and heat it up to a sizzling 425°F. Once hot, sear the marinated chicken on both sides, about 12 minutes, or until you see those lovely grill marks.
- Lower the heat to 350°F and let the chicken cook through for another 7-10 minutes. You’re aiming for juicy, not dry!
- Slice up the red peppers into thin strips and give them a quick grill for about 2-3 minutes, so they’re tender but still have a bit of crunch.
- Warm up the frozen corn—nothing fancy here, just make sure it’s warm to the touch.
- Transform the leftover marinade into a vinaigrette by whisking in 1-2 tablespoons of vinegar. This will be your salad’s secret weapon.
- Start your salad assembly: Start with a bed of fresh romaine lettuce, layer on the grilled chicken, sprinkle with black beans, grilled red peppers, cheese, and a drizzle of your vinaigrette. Voilà!
Cook’s Notes
Here’s the scoop: Marinating is key. The longer you let the chicken hang out in that zingy bath, the better. If you’re in a hurry, even 30 minutes can work. Don’t rush the grill time; those grill marks are where the magic happens, giving that smoky, irresistible taste.
Store any extras in separate containers, if possible, to avoid soggy lettuce—nobody likes a wilted salad! This dish holds up beautifully in the fridge for up to three days, so it’s perfect for meal prep, too.
Make It Your Own
- Swap the chicken for crispy tofu to make it vegetarian-friendly. Just press and marinate the tofu the same way you would the chicken.
- Add some diced avocado for creamy goodness that pairs perfectly with the citrusy zing.
- Not a fan of romaine? Spinach or arugula would be fantastic substitutes, bringing their unique flavors to the table.
- Craving extra crunch? Toss in a handful of tortilla strips or crushed tortilla chips right before serving.
If you try this, I’d love to hear how it turns out—drop a comment or tag me! Whether it’s a weeknight or a weekend grill-out, this salad is a surefire way to brighten up your dinner table. Enjoy!
Related update: Garlic Lime Grilled Chicken Salad
Related update: Swiss Chard Wraps
Related update: Traditional Panzanella

Picture this: It’s midweek, I’ve worked the whole day, and the fridge is looking thin. I peek inside to find some fish fillets, a lonely bell pepper, and a crumbling block of feta cheese. The usual dinner panic begins to set in, but then I remember this Greek-Style Baked Fish recipe. It’s my go-to for those days when I want something fresh and flavorful without the fuss. The beauty of this dish is that it’s both light and deeply satisfying, perfect for when you want a bit of sunshine on your plate, no matter the season. Plus, it comes together faster than you can say “Saganaki!”.
Jump to Recipe
What You’ll Need
This recipe shines with its simplicity and the ingredients you probably already have on hand. Here’s what you’ll need:
- Fish fillets – Choose your favorite white fish.
- Red onion – Adds a sweet crunch.
- Bell pepper – The more colorful, the better.
- Feta cheese – Crumbly and tangy goodness.
- Tomato – Juicy and adds a touch of acidity.
- White wine – For that hint of sophistication.
- Olive oil – The Greek staple.
- Dried basil and oregano
- Salt & pepper
- Cooked rice – To serve alongside.
How to Make Greek-Style Baked Fish: Fresh, Simple, and Delicious
- Preheat your oven to 450 degrees F. You want it hot so the fish cooks quickly and stays tender.
- Grab an oven-proof baking dish that will snugly fit your fish fillets without them overlapping. Give it a light spray with cooking spray to prevent sticking.
- Lay the fish fillets in the dish in a single layer. Season them generously with salt and pepper, because who likes bland fish?
- Top the fish with slices of red onion and bell pepper. The colors should already start to cheer you up.
- Sprinkle dried basil and oregano over the top, followed by diced tomato and crumbled feta cheese. The feta will melt slightly and get creamy in the oven.
- Drizzle the white wine and olive oil over everything. This is the magic moment that brings it all together.
- Finish with a grind of fresh pepper, just before putting it in the oven.
- Bake uncovered for about 12 – 15 minutes. You’ll know it’s done when the fish flakes easily with a fork and the kitchen smells heavenly.
- Once out of the oven, squeeze some lemon wedges over the fish, and if you have fresh basil or oregano, now’s the time to sprinkle them on. Serve immediately with hot cooked rice.
Cook’s Notes
A few things to keep in mind: First, if your fish fillets are particularly thick, you might need a minute or two more in the oven. But keep a watchful eye, overcooked fish is a tragedy! As for leftovers, they’re rare, but if you do have any, this dish microwaves well. Just be gentle, so the fish doesn’t dry out.
If you’re planning ahead, you can chop the vegetables and crumble the feta in advance. Just keep them in the fridge until you’re ready to assemble. This makes an already quick recipe even speedier.
Make It Your Own
This dish is wonderfully versatile. Here are a few ideas to make it your own:
- Switch the fish fillets for chicken breast. Just adjust the cooking time until the chicken is cooked through.
- Try tofu instead of fish for a vegetarian twist. Use firm tofu and bake until it’s golden.
- Throw in some kalamata olives for an extra punch of Mediterranean flavor.
- Use quinoa instead of rice to up your protein and fiber game.
If you try this, I’d love to hear how it turns out — drop a comment or tag me in your photos. Here’s to less dinner panic and more delicious moments!
Related update: Greek-Style Baked Fish: Fresh, Simple, and Delicious
Related update: Stir Fried Cabbage and Tomatoes