Cauliflower, Brown Rice, and Vegetable Fried Rice | Made by Meaghan Moineau

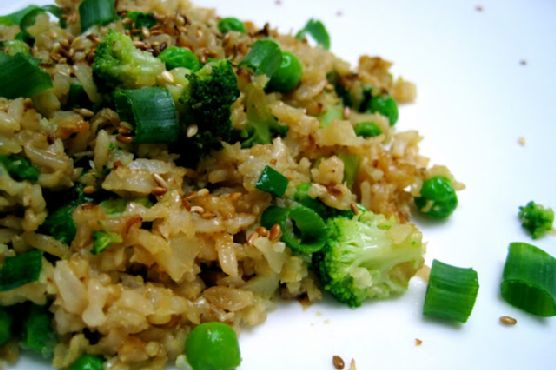
So there I was, standing in the kitchen on a Tuesday night, staring at my pantry like it was a black hole of culinary despair. You know those nights when you crave something satisfying but don’t want to spend an eternity making it? Enter this Cauliflower, Brown Rice, and Vegetable Fried Rice. It’s my go-to when I’m in the mood for something cozy yet packed with veggies. I promise, even if you’re a notorious takeout lover, you’ll want to make this at home. It’s got that perfect balance of taste and texture, and let’s be real, sneaking cauliflower into anything is a win in my book. Plus, it’s a great way to use up leftover rice and that stubborn head of cauliflower that’s been giving you the side-eye from the fridge. Jump to Recipe

What You’ll Need

This ingredient list is your best friend on a busy night. Chances are you already have most of this hanging out in your kitchen.

  • 1 tablespoon grapeseed oil
  • 1 tablespoon coconut oil
  • 4 green dark scallions, sliced (white and green parts separated)
  • 3 cloves garlic, minced
  • 1 medium head of raw cauliflower, cut into florets
  • 2 cups cooked brown rice
  • 1 cup cooked broccoli
  • 1 cup frozen peas
  • 2 tablespoons low sodium soy sauce
  • 1 teaspoon sesame oil
  • 1 tablespoon sesame seeds
  • Additional scallion tops for garnish
  • Salt, to taste

How to Make Cauliflower, Brown Rice, and Vegetable Fried Rice

  1. Start by removing the cauliflower’s tough stem and save it for another day (hello, veggie broth!). Pulse the florets in a food processor until they look like rice or couscous. You’ll end up with about four cups of this magic “cauliflower rice.”
  2. Heat 1 tablespoon of butter and 1 tablespoon of grapeseed oil in a large skillet over medium heat. Add the garlic and the white and light green parts of the scallions. Sauté until they start smelling amazing, about a minute.
  3. Toss the cauliflower rice into the pan. Stir it to coat with oil, then spread it out in the pan. Let it sit so it can caramelize a bit—this is where the sweetness comes out. After a couple of minutes, give it a stir and spread it out again.
  4. Add the cold brown rice to the skillet along with the remaining grapeseed and coconut oil. Crank up the heat to medium-high. Mix everything together and spread it out over the whole pan, pressing it down slightly. This helps it toast up and get a little crispy, which is what we’re going for.
  5. Next, add the peas and broccoli. Mix them in with the rice. Drizzle the soy sauce and sesame oil on top and give it all a good stir. Cook for another minute or so, then turn off the heat.
  6. Top everything with the chopped scallion tops. Toast some sesame seeds in a dry pan until they’re golden, then sprinkle them along with some raw, chopped scallion over the rice. Give it a taste and season with salt if needed. If you’re pairing this with something salty, like teriyaki chicken, keep the salt in check.

Cook’s Notes

For the best results, use day-old rice. Freshly cooked rice tends to be too moist and can turn your dish into a mushy mess. If you make rice specifically for this, spread it out on a baking sheet and pop it in the fridge for an hour to dry it out a bit. You can store leftovers in an airtight container in the fridge for up to 3 days. Just reheat in a pan over medium heat — adding a splash of water helps bring it back to life.

If you’re a meal prepper (is that even a word?), this dish is your friend. The cauliflower ‘rice’ can be made ahead and stored in the fridge for a couple of days. Just keep it in an airtight container, and you’re good to go.

Make It Your Own

  • Swap the broccoli for any other veggie you love — bell peppers and snap peas are excellent choices.
  • If you’re in the mood for protein, add some crispy tofu or a scrambled egg for extra goodies.
  • For a spicy kick, throw in a pinch of red pepper flakes or a drizzle of sriracha.
  • Make it nutty by tossing in a handful of cashews or almonds before serving.

If you try this, I’d love to hear how it turns out — drop a comment or tag me! I’m always here for your kitchen adventures. Happy cooking!

Related update: Cauliflower, Brown Rice, and Vegetable Fried Rice

Pan Seared Salmon | Made by Meaghan Moineau

Tuesday evenings are always a bit of a blur in my house. It’s that mid-week slump where I’m balancing work emails, an errant grocery list, and the perpetual mystery of missing socks. Last week, amidst the chaos, I found myself staring at a couple of salmon fillets I’d picked up on a whim. A lightbulb moment hit—pan seared salmon! It’s the kind of dish that feels fancy enough to celebrate surviving half the week but is effortless enough not to add to the stress. With its crispy skin and tender, flaky interior, it’s comforting yet impressive. Trust me, once you try it, you’ll want it on repeat. Jump to Recipe

What You’ll Need

This recipe is delightfully simple, and chances are you already have most of the ingredients waiting for you in your pantry and fridge.

  • 2 tbsp olive oil
  • Salmon fillets (about 4, skin-on)
  • 1 clove garlic, minced
  • 1 tbsp lemon juice, plus lemon wedges for serving
  • 1 tbsp fresh dill, chopped
  • Salt, to taste
  • Freshly cracked black pepper, to taste

How to Make Pan Seared Salmon

  1. In a medium bowl, whisk together 1 tablespoon of olive oil, salt, black pepper, garlic, lemon juice, and dill. The mixture will smell bright and fresh.
  2. Add the salmon fillets to the bowl, ensuring they’re well coated. Let them marinate for 15 minutes at room temperature. This is your chance to breathe and maybe sip your favorite drink.
  3. Preheat a large skillet over medium heat for about 2 minutes. You want it hot, but not smoking, to get that perfect sear.
  4. Add 1 teaspoon of olive oil to the skillet. Swirl it around to coat the bottom evenly.
  5. Place the salmon fillets skin-side down in the skillet. You should hear a satisfying sizzle. Let them cook undisturbed for about 5 minutes, until the edges start to turn golden and crispy.
  6. Flip the fillets carefully and cook for another 5 minutes. They should flake easily with a fork when done.
  7. Transfer the salmon to plates and serve immediately with lemon wedges. The citrusy burst at the end is a game-changer.

Cook’s Notes

One of the keys to perfect pan-seared salmon is ensuring the fillets are dry before marinating. Pat them with a paper towel—moisture is the enemy of crispiness. Also, don’t rush the marinating process; those 15 minutes make a world of difference in flavor.

If you’re planning ahead, you can marinate the salmon in the fridge for up to 2 hours. Just remember to bring them back to room temperature before you start cooking for even cooking.

Leftovers? Store them in an airtight container in the fridge for up to two days. They’re great flaked over a salad or turned into a salmon sandwich.

Make It Your Own

  • Spicy Twist: Add a pinch of red pepper flakes to the marinade for a subtle kick.
  • Herb Swap: If dill isn’t your favorite, try fresh thyme or basil for a different aromatic profile.
  • Citrus Switch: Substitute lime juice for lemon juice for a tangier twist.
  • Protein Swap: Not in the mood for salmon? This marinade works wonders on chicken breast or crispy tofu, too!

If you try this, I’d love to hear how it turns out—drop a comment or tag me on your socials! Here’s to making mid-week meals a little more delicious.

Related update: Pan Seared Salmon

Related update: Osso Buco

Penne Arrabiata | Made by Meaghan Moineau

It was a Tuesday night, and I found myself staring at the pantry, looking for some inspiration. The day had been long, and the thought of spending hours cooking was just not happening. I needed something quick, with a punch of flavor that would kick away the day’s stress. That’s when I remembered my go-to comfort dish: Penne Arrabiata. This dish is a lifesaver, seriously. It’s one of those recipes that seems almost too easy given how delicious it turns out — a spicy, garlicky tomato sauce that clings lovingly to every piece of penne. Plus, there’s something about the warmth of the spices that feels like a cozy hug after a hectic day. So, if you’re in the same boat and need a little quick comfort, I’ve got you.

Jump to Recipe

What You’ll Need

You probably have most of these ingredients just waiting in your pantry, making this dish all the more inviting. Here’s what’s essential:

  • Canned whole tomatoes – I personally love Pomi tomatoes.
  • Pasta – A packet of penne.
  • Fresh parsley, minced.
  • Garlic – About 5 cloves, freshly minced.
  • Olive oil – 3 tablespoons will do the trick.
  • Dried red peppers – For that spicy kick.
  • Fresh basil – For serving.

How to Make Penne Arrabiata

  1. Start by bringing a large pot of salted water to a boil. This is where your penne will cook, so make sure the water is well-seasoned.
  2. While the water is heating up, grab a large skillet and heat about 3 tablespoons of olive oil over medium heat. Toss in about a teaspoon of dried red pepper flakes, letting them infuse the oil until they’re slightly aromatic but not smoking. Trust your nose here!
  3. Next, add your freshly minced garlic — all five cloves of it. The garlic will start to turn golden and fragrant in no time.
  4. Soon after, sprinkle in a couple of tablespoons of minced fresh parsley, stirring it into the mix. The fragrance should be pretty irresistible by now.
  5. Chop and add the canned whole tomatoes. Stir them in, and then cover the skillet. Let the sauce cook until it’s heated through, the flavors coming together beautifully.
  6. Meanwhile, cook the penne in your boiling water, allowing it to reach that perfect al dente texture — tender with a hint of bite.
  7. Drain the pasta and add it straight into your simmering sauce. Stir thoroughly, so every piece is coated with that spicy, garlicky goodness.
  8. Just before serving, toss in some coarsely chopped fresh basil and a little more parsley. This fresh, herby finish makes all the difference.
  9. Serve immediately, preferably with a good chunk of crusty bread to mop up any sauce left on your plate.

Cook’s Notes

Here’s the deal: the key to a great Penne Arrabiata is balance. Let your senses guide you — the sauce should be spicy but not overwhelmingly so. Feel free to adjust the amount of red pepper flakes depending on your spice tolerance. If you’re making this ahead, you can prep the sauce and store it in the fridge for up to 3 days. Just reheat and toss with freshly cooked pasta when you’re ready to eat. As for leftovers, they keep well in the fridge for about 2 days; just be sure to store the pasta and sauce together in an airtight container.

Make It Your Own

This dish is super adaptable, which is another reason to love it. Here are some fun ways to switch things up:

  • Swap the penne for spaghetti for a different texture experience.
  • If you’re into protein, add some grilled chicken slices or crispy tofu on top.
  • For a veggie boost, toss in some sautéed mushrooms or spinach just before serving.
  • Feeling cheesy? A sprinkle of parmesan or a dollop of ricotta can take this dish to new heights.

If you give this Penne Arrabiata a whirl, I’d love to hear about how it turns out! Drop a comment below or tag me in your spicy pasta creations — let’s share the love for this simple, satisfying meal. Enjoy!

Related update: Penne Arrabiata

Strawberry Mango Green Tea Limeade | Made by Meaghan Moineau

Picture this: it’s one of those sweltering summer afternoons where you can almost see the heat shimmering off the pavement. You’ve spent too much time in the sun, and all you can think about is something cold and refreshing to drink. That’s exactly where I found myself last week, which led me to this delightful concoction of Strawberry Mango Green Tea Limeade. It’s a breezy blend of fruity sweetness and slight tartness, with the earthy undertone of green tea, making it the perfect antidote to any overbearing summer day. And the best part? It’s so incredibly easy to make that you’ll find yourself pouring a second glass before you know it. Jump to Recipe

What You’ll Need

You might already have most of these ingredients lounging in your kitchen, just waiting to be turned into this refreshing treat:

  • 1 cup strawberries, hulled and roughly chopped
  • 1 mango, peeled, pitted, and chopped
  • 1/4 cup lime juice (freshly squeezed is best!)
  • 2 cups chilled green tea
  • 1/2 cup simple syrup (adjust to taste)

How to Make Strawberry Mango Green Tea Limeade

  1. In a blender or food processor, combine the strawberries, mango, lime juice, and simple syrup. Blend until the mixture is smooth and vibrant in color.
  2. Grab a large pitcher and fill it halfway with ice. Pour the fruity puree over the ice, letting the coldness hug the flavors and enhance them.
  3. Add the chilled green tea to the pitcher. Give it a good stir, mingling the tea with the fruit until it becomes a delightful pinkish-orange hue.
  4. Pour the limeade into glasses, ensuring each glass gets a fair share of that icy goodness. Garnish with a wedge of lime and a fresh strawberry for a little extra flair.

Cook’s Notes

Here’s a little secret for you: the simple syrup is your best friend. Too tart? Add a splash more. Too sweet? Balance it out with a touch more lime juice. This recipe is all about finding that perfect harmony of flavors that dance on your taste buds.

If you’re planning ahead, the fruit puree can be made a day in advance. Just store it in an airtight container in the fridge and mix with the tea just before serving. And if you find yourself with leftovers (which, let’s be honest, rarely happens), store them in the fridge and enjoy within a day or two for best results.

Make It Your Own

  • Swap out the green tea for jasmine tea for a floral twist that pairs beautifully with the mango.
  • Use pineapple instead of mango if you want a more tropical punch.
  • For a spiced kick, add a slice of fresh ginger to the blender—just a small one, trust me!
  • If you’re feeling adventurous, a splash of coconut milk will turn this into a creamy, dreamy version that’s like summer in a glass.

If you try this, I’d love to hear how it turns out—drop a comment or tag me! Let’s see where your creativity takes this fruity concoction. Cheers to chilled glasses and sunny days! 🌞🍹

Related update: Strawberry Mango Green Tea Limeade

Related update: Turmeric Ginger Beer

Spicy Salad with Kidney Beans, Cheddar, and Nuts | Made by Meaghan Moineau

Spicy Salad with Kidney Beans, Cheddar, and Nuts | Made by Meaghan Moineau

**Title: Zesty Delight: Spicy Salad with Kidney Beans, Cheddar, and Nuts**


**Description:** Dive into a symphony of flavors with our Spicy Salad featuring kidney beans, cheddar, and a medley of nuts. This vibrant dish is not just a treat for your taste buds but also a wholesome meal that can be whipped up in record time. Perfect for a quick lunch or a light dinner, this salad is both nutritious and satisfying, boasting a tantalizing mix of creamy, crunchy, and spicy elements. Join me as I share a cherished family memory that this delightful salad brings to mind.


---


**The Art of Quick and Healthy: Spicy Salad with Kidney Beans, Cheddar, and Nuts**


When it comes to preparing a meal that's both quick and nourishing, salads often take the spotlight. This Spicy Salad with Kidney Beans, Cheddar, and Nuts is a testament to how simple ingredients can come together to create a dish that's delicious and deeply satisfying. As a bonus, it's a meal that carries with it a personal story from my childhood that makes it even more special.


**Ingredients:**


- 1 cup cooked kidney beans, rinsed and drained


- 1/4 cup almonds


- 1 ripe avocado, sliced


- 2 tablespoons balsamic vinegar


- 1/2 cup cheddar cheese, torn into small pieces


- 4 cups mixed greens


- 2 tablespoons olive oil


- 1/4 cup salted roasted cashews


- 1/4 cup sundried tomatoes, cut into strips


- A dash of Tabasco


**Instructions:**


1. Begin by preparing your ingredients: Rinse and drain the kidney beans, cut the sundried tomatoes into strips, and tear the cheddar cheese into small, bite-sized pieces.


2. In a large salad bowl, lay down a bed of mixed greens. Top the greens with kidney beans, sundried tomatoes, cheddar cheese, almonds, and cashews.


3. In a small mixing bowl, combine olive oil, balsamic vinegar, and a dash of Tabasco sauce. Stir well to create a zesty dressing.


4. Drizzle the dressing over the salad, ensuring every ingredient gets a touch of that spicy, tangy goodness.


5. Give it a gentle toss, ensuring all the flavors meld together beautifully.


This salad is not just a wonderful mix of textures and flavors but also a slice of my family's culinary history. Growing up, Sundays were reserved for family picnics in our local park. My mother would pack a wicker basket with freshly prepared dishes, and this spicy salad was always a staple. I remember the vivid flavors of the kidney beans and cheddar mixing with the crunch of the nuts and the tangy kick from the Tabasco-laced dressing. It was the perfect meal to enjoy on a sunny afternoon, surrounded by laughter and the rustling of leaves.


**Difficulty:** 3/10


**Classification:** Main Dish


With its simple preparation and vibrant flavors, this salad is an excellent choice for anyone looking to enjoy a quick, healthy meal that's rich in protein and fiber. Whether you're reminiscing about family picnics or simply seeking a nutritious lunch option, this Spicy Salad with Kidney Beans, Cheddar, and Nuts is sure to become a favorite. Enjoy the journey of flavors and memories with every bite!

Read more about Appetizers

Read more about Main Dishes

Read more about Desserts

Grilled Ham and Cheese French Toast For A Quick Weeknight Dinner | Made by Meaghan Moineau

Grilled Ham and Cheese French Toast For A Quick Weeknight Dinner | Made by Meaghan Moineau

# Grilled Ham and Cheese French Toast: A Quick and Delicious Weeknight Dinner Delight


## Description


Discover the recipe for Grilled Ham and Cheese French Toast, a delightful twist on a classic sandwich that's perfect for a quick weeknight dinner. With layers of lean turkey ham, low-fat Jarlsberg cheese, and a tangy kick from dill pickles, all enveloped in a crisp, golden French toast crust, this dish is sure to be a family favorite. Follow our step-by-step guide to create this mouthwatering meal that combines the comfort of French toast with the savory satisfaction of a grilled cheese sandwich. Easy to make and full of flavor, this recipe is rated 4 out of 10 in difficulty and is classified as a Main Dish.


## Ingredients


- Buttermilk


- Egg whites


- Dijon mustard


- Wheat bread


- Low-fat Jarlsberg cheese


- Lean turkey ham


- Dill pickles


- Low-fat light Smart Balance Heart Right spread


## Instructions


1. **Preheat and Prepare:** Preheat your oven to 350 degrees Fahrenheit. In a shallow bowl or pie plate, whisk together the buttermilk and egg whites. Set aside.


2. **Assemble the Sandwiches:** Spread Dijon mustard on one side of each slice of wheat bread. On 4 slices, place a slice of low-fat Jarlsberg cheese. Arrange lean turkey ham over the cheese. Add 3-4 thin slices of dill pickle to each sandwich. Top with the remaining slices of bread, mustard side down.


3. **Cook the Sandwiches:** Melt 1 tablespoon of reduced-fat butter in a large nonstick pan over medium heat. Dip 2 sandwiches into the buttermilk mixture, ensuring both sides are coated but not soaked. Allow excess to drip back into the dish. Add the sandwiches to the pan, cover, and cook for 3-5 minutes.


4. **Finish Cooking:** Uncover, flip the sandwiches, press down with a spatula, cover again, and cook for an additional 2-3 minutes until golden brown and the cheese is melted. Remove the sandwiches, place them on a baking sheet, and keep warm in the oven.


5. **Repeat and Serve:** Repeat the cooking process with the remaining sandwiches. Once all are cooked, slice each sandwich in half and serve with a fork and knife.


## A Taste of Nostalgia


Growing up, Sunday evenings were always a special time in our household. After a busy weekend, my family would gather around the kitchen table, eager for the comforting aroma of a home-cooked meal. My mother often made her famous Grilled Ham and Cheese French Toast, and it quickly became a family tradition. We would watch her expertly whip up the buttermilk and egg mixture, spreading mustard with a flourish and layering the ham and cheese with precision. The sound of the sandwiches sizzling in the pan was our cue to gather around, forks in hand, ready to dig in. Those evenings were filled with laughter, shared stories, and the simple joy of a delicious meal. Creating this dish now brings back those cherished memories, and I hope it becomes a beloved tradition for your family too.


## Difficulty and Classification


This Grilled Ham and Cheese French Toast is rated a 4 out of 10 in difficulty, making it an easy-to-follow recipe even for novice cooks. It is classified as a Main Dish, perfect for a satisfying and quick weeknight meal. Enjoy the delightful blend of flavors and the nostalgic comfort it brings to your dinner table.

Read more about Appetizers

Read more about Main Dishes

Read more about Desserts