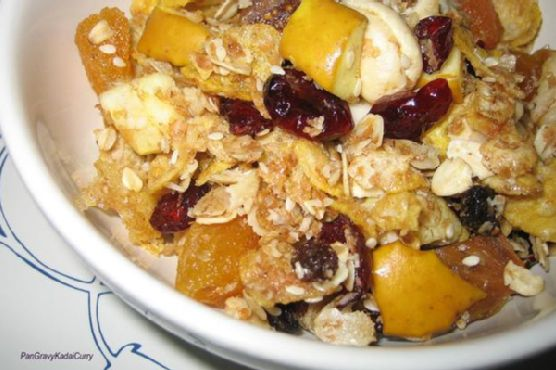
Banana Smoothie Boost | Made by Meaghan Moineau

Banana Smoothie Boost

Intro

There’s something undeniably comforting about a banana smoothie. It takes me back to those golden summer mornings spent at my grandmother’s kitchen table. She would always have a fresh batch of smoothies ready for us kids, blending the perfect mix of delicious fruits and wholesome ingredients. Among these, my favorite was the banana smoothie. Today, I want to share with you a modern twist on this nostalgic beverage – the Banana Smoothie Boost. This delightful recipe combines the natural sweetness of bananas with the rich flavors of chocolate and coffee, creating a refreshing and invigorating drink that’s perfect for any time of the day. Whether you’re looking to kick-start your morning or re-energize in the afternoon, this smoothie is sure to hit the spot.

Why You’ll Love It

This Banana Smoothie Boost is the ultimate blend of taste and nutrition. The creamy texture of almond milk pairs perfectly with the frozen banana, creating a lusciously smooth base. The addition of coffee gives you that much-needed caffeine kick, while chocolate adds an indulgent touch. A hint of honey ties everything together with its natural sweetness. Whether you’re a busy bee needing a quick breakfast or a fitness enthusiast seeking a post-workout snack, this smoothie will fit seamlessly into your lifestyle. Plus, it’s incredibly easy to make and can be customized to suit your taste preferences.

Ingredients

  • 1 cup almond milk
  • 1 frozen banana
  • 1 tablespoon chocolate (shaved for topping)
  • 1/2 cup brewed coffee (cooled)
  • 1 tablespoon honey

Instructions

  1. Gather all your ingredients. Ensure the coffee is brewed and cooled before use.
  2. In a blender, combine the almond milk, frozen banana, brewed coffee, and honey.
  3. Blend on high speed until the mixture is smooth and creamy.
  4. Pour the smoothie into a glass.
  5. Sprinkle the shaved chocolate on top for a delightful garnish.
  6. Serve immediately and enjoy your revitalizing Banana Smoothie Boost!

Tips

For an even creamier texture, consider using a high-power blender. If you prefer a thicker smoothie, you can add a few ice cubes or an extra half banana. For those who like a sweeter taste, a touch more honey can do the trick. To make the process quicker, prep your ingredients the night before, so all you have to do is blend them in the morning.

Variations & Substitutions

If you’re vegan or avoiding honey, agave syrup or maple syrup is a great alternative. For a nut-free version, substitute almond milk with oat milk or coconut milk. If you’re not a fan of coffee, omit it or replace it with a caffeine-free coffee substitute or a teaspoon of cocoa powder for a chocolatey flavor without the caffeine. You can also add a scoop of your favorite protein powder to turn this smoothie into a powerful post-workout drink.

Storage

While this Banana Smoothie Boost is best enjoyed fresh, you can store it in the refrigerator for up to 24 hours. Keep it in a tightly sealed jar or cup to maintain its freshness. Before drinking, give it a good shake or stir, as separation may occur. For those who like to plan ahead, consider freezing individual smoothie portions in airtight containers. Simply let them thaw in the fridge overnight before consuming.

FAQ

Can I use fresh bananas instead of frozen?

Yes, you can use fresh bananas, but keep in mind that frozen bananas contribute to the smoothie’s thick and cold texture. If using fresh bananas, you might want to add a few ice cubes to achieve a similar consistency.

Is it necessary to use cooled coffee?

Using cooled coffee is recommended to prevent the smoothie from becoming too warm. Hot coffee can also impact the texture of the smoothie. If you’re in a hurry, you can use cold brew coffee as a convenient alternative.

Can I prepare this smoothie the night before?

Yes, you can prepare the smoothie the night before, but for the best flavor and texture, it’s ideal to blend it fresh. If you do make it in advance, store it in the fridge and give it a good shake before drinking.

Nutrition

This smoothie is not only delicious but also packed with nutrients. The banana provides potassium and dietary fiber, while almond milk is a great source of calcium and vitamin E. Coffee offers antioxidants, and a touch of honey adds natural energy. Just be mindful of the chocolate topping if you’re watching your sugar intake.

Conclusion

The Banana Smoothie Boost is a delightful fusion of flavors that’s sure to become a staple in your drink repertoire. It combines the nostalgia of a classic banana smoothie with modern flavors, making it perfect for today’s busy lifestyle. Whether you’re reminiscing about childhood summers or simply in need of a tasty pick-me-up, this smoothie is here to brighten your day. Give it a try and let it transport you to a place of comfort and joy with every sip. Happy blending!

Related Recipes

Also try: Banana Smoothie Boost

Related update: Watermelon, Kiwi, Apple and Frozen Banana Smoothie

Water-Cado Salad | Made by Meaghan Moineau

Water-Cado Salad: A Refreshing Summer Delight

Intro

As the summer sun blazes down, nothing quite hits the spot like a refreshing, cool salad. This Water-Cado Salad brings together the unexpected yet delightful pairing of watermelon and avocado, creating a dish that’s both hydrating and satisfying. My first memory of this salad goes back to a lazy summer afternoon at my grandmother’s house. She had an incredible knack for combining ingredients in ways that seemed improbable but tasted absolutely divine. I can still picture her chopping vibrant watermelon cubes with her weathered hands, a small smile tugging at her lips as she shared stories of her childhood summers. Inspired by those cherished memories, I’ve recreated her version of the Water-Cado Salad to share with you.

Why You’ll Love It

This Water-Cado Salad is a love letter to simplicity and flavor. Here’s why you’ll adore it:

  • Easy to Make: With just a handful of ingredients and a few minutes of prep time, this salad is perfect for when you need a quick, delicious addition to your meal.
  • Refreshing: The juicy watermelon and creamy avocado provide a delightful contrast that’ll cool you down on hot days.
  • Healthy: Packed with vitamins, healthy fats, and antioxidants, this salad is as nutritious as it is tasty.
  • Versatile: Serve it as a side dish, a light lunch, or even a healthy snack.

Ingredients

  • 2 ripe avocados, diced
  • 3 cups watermelon, cubed
  • Juice of 1 lime
  • 1/4 cup red onion, finely sliced
  • 2 tablespoons olive oil
  • 1/4 cup fresh cilantro, chopped
  • Salt and pepper to taste

Instructions

  1. In a large bowl, combine the diced avocados and watermelon cubes. Be gentle to avoid mashing the avocados.
  2. Add the red onion slices to the bowl.
  3. Drizzle the olive oil and lime juice over the mixture.
  4. Sprinkle the chopped cilantro on top.
  5. Season with salt and pepper according to your taste.
  6. Toss everything gently to combine, ensuring the avocado and watermelon are coated evenly with the dressing.
  7. Serve immediately and enjoy the refreshing flavors!

Tips

  • Choose Ripe Ingredients: Ensure your avocados are ripe but firm to the touch. Overripe avocados may turn mushy when mixed.
  • Uniform Cuts: Try to dice the watermelon and avocado into similar-sized cubes for a consistent texture and flavor in every bite.
  • Chill Before Serving: For an extra-refreshing treat, chill the watermelon cubes before combining them with the other ingredients.

Variations & Substitutions

Feel free to get creative with this salad. Here are some variations and substitutions you might enjoy:

  • Add Cheese: Crumble some feta or goat cheese over the salad for a creamy, tangy twist.
  • Include Nuts: Add a handful of toasted pine nuts or slivered almonds for extra crunch.
  • Try Different Herbs: Swap cilantro for mint or basil for a different herbal note.
  • Sweeten It Up: Drizzle a little honey over the salad for a touch of sweetness that complements the watermelon.

Storage

This salad is best enjoyed fresh. However, if you have leftovers, store them in an airtight container in the refrigerator for up to a day. Keep in mind that the avocados may brown slightly, but the flavors will remain delicious.

FAQ

Can I make this salad ahead of time?

It’s best to prepare this salad just before serving to ensure the freshest flavors. If you need to prepare in advance, you can chop the watermelon and mix the dressing separately, then combine all the ingredients right before serving.

Is there an alternative to lime juice?

If lime isn’t available, you can use lemon juice as a substitute. It will add a slightly different tang but still complement the salad wonderfully.

Can I use a different type of onion?

Yes, you can substitute red onion with shallots or green onions for a milder flavor.

Nutrition

The Water-Cado Salad is a nutritious dish, providing healthy fats from avocados, hydration and vitamins from watermelon, and essential nutrients from the other fresh ingredients. It’s a great choice for a health-conscious diet, offering fiber, antioxidants, and a spectrum of vitamins and minerals.

Conclusion

Whether you’re lounging by the pool or hosting a summer picnic, this Water-Cado Salad will be a hit with its refreshing flavors and vibrant colors. It’s a perfect representation of how simple ingredients can come together to create something truly delightful. I hope this recipe brings you as much joy and nostalgia as it does for me. Enjoy the taste of summer in every bite!

Related Recipes

Also try: Water-Cado Salad

Related update: Quinoa Tabbouleh Salad

Lentil Salad With Vegetables | Made by Meaghan Moineau

Lentil Salad With Vegetables | Made by Meaghan Moineau

Title: “A Taste of Tradition: Lentil Salad With Vegetables”
Description: Dive into a delightful blend of tradition and taste with our Lentil Salad With Vegetables. This nutritious and flavorful dish is not just a feast for your palate but also a walk down memory lane. Perfect as an appetizer or a healthy main dish, this salad is a testament to the beauty of simple ingredients coming together to create something extraordinary.

A Taste of Tradition: Lentil Salad With Vegetables

In the hustle and bustle of modern life, it’s easy to forget the simple joys of a homemade meal. But every once in a while, a dish comes along that reminds us of home, family, and the comforting flavors of the past. The Lentil Salad With Vegetables is one such dish, hearty and wholesome, perfect for an appetizer or a satisfying main dish. With a difficulty level of just 3 out of 10, it’s accessible even to novice cooks, and its rich flavors will leave you wanting more.

Ingredients:

– 2 tablespoons extra virgin olive oil

– 1 white onion, diced

– 1 cup lentils

– 1 cup tomatoes, chopped

– 1 green bell pepper, diced

– 1 red bell pepper, diced

– 3 green onions, sliced

– 1 teaspoon dried rosemary

– 2 tablespoons balsamic vinegar

– 1 tablespoon red wine vinegar

– Salt and pepper to taste

Instructions:

1. In a saucepan, heat the olive oil over medium-high heat. Add the diced white onion and cook until it becomes translucent.

2. Stir in the lentils, and add enough water to cover them. Cook according to the package directions until the lentils are tender. Drain and allow them to cool.

3. In a large bowl, combine the cooled lentils with the chopped tomatoes, green and red bell peppers, and sliced green onions.

4. Add the rosemary, balsamic vinegar, and red wine vinegar. Drizzle with extra virgin olive oil, and season with salt and pepper to taste.

5. Toss everything together, adjusting the oil or vinegar as desired. Serve the salad cold or at room temperature.

A Nostalgic Family Memory:

Growing up, Sundays were always special in our household. They were a time for family gatherings, laughter, and sharing stories that spanned across generations. My grandmother, with her apron tied securely around her waist, would often prepare a large bowl of Lentil Salad With Vegetables.

The kitchen would fill with the aroma of sautéed onions and rosemary, setting the stage for a heartwarming family meal. As we sat around the table, the salad would be the star, its vibrant colors and fresh taste bringing smiles and sparking conversations.

One particular memory stands out—my little sister, with her eyes wide with curiosity, asked my grandmother why she loved making this salad so much. My grandmother chuckled softly and replied, “Because it reminds me of simplicity and love, and it brings us all together.”

To this day, every time I prepare this salad, I’m transported back to those cherished Sundays, a tradition I hope to continue with my own family.

This Lentil Salad With Vegetables is more than just a recipe; it’s a celebration of family, tradition, and the beautiful simplicity of good food. Whether you’re serving it as an appetizer or a main dish, it’s sure to become a beloved staple in your home, just as it has been in ours.

Read more about Appetizers

Read more about Main Dishes

Read more about Desserts

Also try: Water-Cado Salad

Related update: Agedashi Tofu

Vegetarian Mushroom Shepherd’s Pie | Made by Meaghan Moineau

Vegetarian Mushroom Shepherd's Pie | Made by Meaghan Moineau

Title: Comfort on a Plate: The Heartwarming Magic of Vegetarian Mushroom Shepherd's Pie
Description: Dive into the comforting world of Vegetarian Mushroom Shepherd's Pie, a delightful twist on a timeless classic. With its rich tapestry of flavors and a nostalgic family memory to warm your heart, this recipe is more than just a meal—it's a journey back to cherished moments.

---


Vegetarian Mushroom Shepherd's Pie: A Nostalgic Culinary Journey


Shepherd's Pie has always been a dish that whispers comfort with every bite. Growing up, I remember the aroma wafting through my grandmother's kitchen, drawing everyone to the table. It was a time when family members gathered, stories were shared, and laughter filled the air. Although her version was traditional, my Vegetarian Mushroom Shepherd's Pie captures the same warmth and love, with a modern twist suited for today's plant-based palates.


Ingredients:


- Mashed Potato Layer:

- Red skin potatoes


- Sea salt


- Ground pepper


- Filling:

- Soy granules


- Mushrooms


- Carrot


- Red bell pepper


- Diced onions


- Dill


- Parsley


- Dry eggs (or egg substitute)


- Sweet paprika


- Dry thyme


- Unrefined sunflower oil


Instructions:


1. Prepare the Potatoes:

- Peel the red skin potatoes and place them in a large pot filled with water.


- Boil until tender, then mash and allow them to cool slightly.


2. Prepare the Filling:

- Chop the mushrooms, carrot, and red bell pepper. Add them to your food processor and pulse until well combined.


- Heat unrefined sunflower oil in a large skillet over medium heat.


- Add the blended vegetable mixture, diced onions, chopped dill, parsley, soy granules, dry eggs (or egg substitute), sea salt, ground pepper, sweet paprika, and dry thyme.


- Sauté for approximately 10 minutes. The soy granules will absorb the moisture from the mushrooms, creating a rich, hearty filling.


3. Assemble the Pie:

- Preheat your oven to 390°F (200°C).


- Line a casserole dish with parchment paper.


- Divide the mashed potatoes into two portions. Spread the first half evenly across the bottom of the dish.


- Add the vegetable filling, spreading it out evenly.


- Top with the remaining mashed potatoes, smoothing the surface with a spatula.


4. Bake:

- Place the casserole in the preheated oven and bake for 40 minutes.


- Allow the pie to cool for at least half an hour before serving. This cooling period helps the flavors meld beautifully.


A Walk Down Memory Lane


Every time I prepare this dish, I am transported back to my childhood. I recall sitting around my grandmother's large oak dining table, eagerly anticipating the moment when the pie would be served. My grandmother would regale us with stories of her youth, tales of resilience and joy, as we savored each bite of her lovingly crafted meal. Today, my Vegetarian Mushroom Shepherd's Pie stands as a tribute to those cherished memories, preserving the essence of family gatherings and the comfort of home-cooked meals.


Recipe Difficulty: 4/10


Classification: Main Dish


This Vegetarian Mushroom Shepherd's Pie is more than just an entree; it's a heartfelt nod to the past with a fresh, contemporary twist. Whether you're seeking a comforting family meal or a dish to impress at your next gathering, this recipe promises to deliver warmth and nostalgia with every serving.

Read more about Appetizers

Read more about Main Dishes

Read more about Desserts

Hawaiian Cookie Tarts | Made by Meaghan Moineau

Hawaiian Cookie Tarts | Made by Meaghan Moineau

Title: A Sweet Escape to the Tropics: Hawaiian Cookie Tarts Recipe
Description: Dive into a world of tropical flavors with our Hawaiian Cookie Tarts. This delightful dessert, featuring the irresistible combination of coconut and pineapple, promises a taste of paradise. Perfect for family gatherings or a solo indulgence, these cookie tarts bring a touch of nostalgia and joy to any occasion. Follow our step-by-step guide to create these little bites of heaven in your kitchen.

Hawaiian Cookie Tarts: A Tropical Treat

As the oven warms up our cozy kitchen, the scent of sweet coconut and tangy pineapple transports me back to sun-drenched summer afternoons spent in my grandmother’s garden. There, among the fragrant blooms and the gentle hum of bees, we would gather as a family, sharing stories and laughter while eagerly awaiting the delightful treats she had whipped up for us. One such treat that always held a special place in my heart was her Hawaiian Cookie Tarts.

Ingredients:

– 1 cup all-purpose flour

– 1/2 cup powdered sugar

– 2 tablespoons cornstarch

– 1/4 cup apple sauce

– 1 teaspoon vanilla extract

– 1/4 cup granulated sugar

– 1 large egg

– 1/2 cup shredded coconut

– 1/2 cup pineapple preserves

– Butter (for greasing muffin pans)

– Confectioners’ sugar (for dusting)

Instructions:

1. Preheat and Prep: Start by preheating your oven to 350 degrees Fahrenheit. Lightly grease your muffin pans with a bit of butter to prevent sticking.
2. Make the Dough: In a large mixing bowl, combine 1 cup of all-purpose flour, 1/2 cup of powdered sugar, and 2 tablespoons of cornstarch. Stir these dry ingredients together. Gradually mix in 1/4 cup of apple sauce and 1 teaspoon of vanilla extract until a soft dough forms.
3. Shape and Bake: Roll the dough into 1-inch balls and place one in each muffin cup. Press the dough gently with your fingers to line the bottom and sides of each cup. Bake in the preheated oven for 8-10 minutes, just enough for the crusts to set without browning.
4. Add the Pineapple: Once the crusts are ready, remove the muffin pan from the oven and let them cool for a few minutes. Spoon 1 teaspoon of pineapple preserves into each muffin cup.
5. Coconut Topping: In a small bowl, whisk together 1/4 cup of granulated sugar, 1 large egg, and 1/2 cup of shredded coconut until you have a well-blended mixture. Spoon a teaspoon of this coconut mixture over the preserves in each cup.
6. Final Bake: Return the muffin pan to the oven and bake for another 23-33 minutes, or until the cookie crusts turn a lovely golden brown.
7. Cool and Serve: Allow the cookie tarts to cool in the pans on a cooling rack for about 30 minutes. Gently remove each tart, sprinkle with a dusting of confectioners’ sugar, and serve.

These Hawaiian Cookie Tarts are more than just a dessert; they are a vessel of cherished memories and a reminder of those blissful days spent with family. As you bite into the buttery crust and let the exotic flavors dance on your taste buds, I hope you too can feel the warmth and love that comes with each tart.

Difficulty Rating: 4/10 – These delightful treats are fairly easy to make, perfect for bakers of any skill level.
Classification: Dessert

Relive the nostalgia or create new memories by sharing these Hawaiian Cookie Tarts with your loved ones. Whether you’re hosting a gathering or savoring a quiet evening, these tarts are sure to bring a smile to everyone’s face. Enjoy your sweet escape to the tropics!

Read more about Appetizers

Read more about Main Dishes

Read more about Desserts

Related update: Vegan Banana Nut Muffins

Falafel Burger | Made by Meaghan Moineau

Falafel Burger | Made by Meaghan Moineau

Title: "Savory Nostalgia: Crafting the Perfect Falafel Burger"
Description: Dive into the flavors of the Mediterranean with this Falafel Burger recipe, a delightful fusion of tradition and innovation. With simple ingredients and straightforward instructions, this dish promises to be a crowd-pleaser at any gathering. Join us as we share not only the recipe but also a cherished family memory that makes this dish truly special.

---


Falafel Burger: A Taste of Tradition and Innovation


As the aroma of sizzling chickpea patties fills the kitchen, I am instantly transported back to a warm summer evening at my grandmother's house. Our family would gather in her garden, the air rich with laughter and the scent of blooming jasmine. It was on one such evening that I first experienced the magic of falafel, a dish that would become a cherished part of our family traditions.


Fast forward a few years, and I found myself yearning to recreate that memory in a modern twist with the Falafel Burger. A perfect blend of tradition and contemporary flavors, this dish is an homage to those unforgettable summer nights.


Ingredients


- 1 can of chickpeas, drained and patted dry


- 2 tablespoons tahini


- 1 tablespoon sriracha sauce


- 2 cloves garlic


- A handful of fresh parsley


- 1/2 red onion, diced


- Peanut oil, for frying


- 1 cucumber, sliced


- 1 tomato, sliced


- Hamburger buns


- Tzatziki sauce


Instructions


1. Prepare the Chickpeas: Begin by patting the chickpeas dry with a paper towel. This step is crucial for achieving the perfect texture in your patties.
2. Puree the Base: Place the chickpeas and garlic into a food processor. Puree until smooth, ensuring no chunks remain for a consistent patty.
3. Incorporate the Flavors: Using your clean hands, mix in the tahini, sriracha, fresh parsley, and diced red onion into the chickpea mixture. The combination of these ingredients brings a balance of spice, freshness, and creamy texture.
4. Shape the Patties: Form the mixture into four equal patties. Set aside while you prepare your skillet.
5. Cook to Perfection: Heat peanut oil in a large skillet over medium heat. Once the oil begins to shimmer, carefully add the patties. Cook for three minutes on each side, or until they achieve a golden-brown crust.
6. Assemble the Burger: Remove the patties from the skillet and place each one in a hamburger bun. Top with two slices of tomato, two slices of cucumber, and a generous dollop of tzatziki sauce.
7. Serve Immediately: For the best texture and flavor, serve the burgers immediately while they’re hot and crisp.

A Family Memory


Every bite of this Falafel Burger takes me back to my grandmother's garden, where the simple joy of sharing food brought our family closer. The recipe has evolved, yet the essence remains the same—a celebration of flavor and family.


Difficulty: 4/10


Classification: Main Dish


This Falafel Burger is more than just a meal; it's a connection to the past and a promise of new memories to come. Whether you’re an experienced cook or a beginner, this recipe is both accessible and rewarding. Enjoy crafting these flavorful patties and perhaps, like me, you'll find yourself cherishing the memories they create.


---


Ready to bring a slice of Mediterranean tradition to your table? Try this Falafel Burger recipe today and let it become part of your family's culinary story.

Read more about Appetizers

Read more about Main Dishes

Read more about Desserts

Tuna and Tofu Cold Dish | Made by Meaghan Moineau

Tuna and Tofu Cold Dish | Made by Meaghan Moineau

Title: Refreshing Memories: The Tuna and Tofu Cold Dish That Warms the Heart


Description:

Discover a delightful Tuna and Tofu Cold Dish that not only tantalizes your taste buds but also evokes cherished family memories. This easy-to-make recipe combines the smooth texture of silken tofu with the savory flavors of tuna, tomatoes, and a splash of aromatic sauce, creating the perfect appetizer for any occasion.

---


The Tuna and Tofu Cold Dish: A Taste of Nostalgia


There's something magical about recipes that transport us back in time, evoking cherished family memories with every bite. For me, the Tuna and Tofu Cold Dish does just that. It’s a dish that graced our family table during the hottest summer days, a time when laughter echoed throughout the house and the aroma of delicious meals wafted from the kitchen.


Ingredients:

- 1 block silken tofu


- 1 can tuna in water, drained


- 6-8 white cherry tomatoes, diced


- Dash of white pepper


- Pinch of salt


- 2 tablespoons extra virgin olive oil


- 1 tablespoon vinegar


- 2 tablespoons light Kikkoman soy sauce


- 1 clove garlic, minced


- Black pepper to taste


- Toasted sesame seeds, for garnish


- Diced spring onion, for garnish


Instructions:
1. Prepare the Tofu: Cut the silken tofu into small, bite-sized blocks and carefully place them on a serving plate to create a smooth base for the dish.
2. Tuna Mixture: Drain the water from the canned tuna and gently squash it with a fork to break it into smaller pieces. Mix in a dash of white pepper and a pinch of salt to enhance its flavor.
3. Tomato Slices: Thinly slice the diced white cherry tomatoes and scatter them over the tofu, adding a burst of color and freshness.
4. Assemble the Dish: Place the seasoned tuna on top of the tofu and tomatoes, arranging it evenly for a balanced taste in every bite.
5. Sauce Drizzle: In a small bowl, whisk together the extra virgin olive oil, vinegar, light soy sauce, and minced garlic. Drizzle this aromatic sauce over the assembled dish, allowing it to infuse the ingredients with its savory essence.
6. Final Touches: Sprinkle the top with toasted sesame seeds and a handful of diced spring onion for a touch of crunch and vibrant flavor.
7. Serve Immediately: This dish is best served fresh and chilled, capturing the essence of summer with every forkful.
Difficulty: 3/10
Classification: Appetizer

---


A Nostalgic Story


The first time I tasted this dish was during a family reunion at my grandmother’s house. It was the peak of summer, and the air was warm and thick with humidity. The adults gathered around the dining table, discussing everything from recent travels to childhood anecdotes, while we kids played in the garden, blissfully unaware of the passage of time.


My grandmother, a woman of few words but abundant love, served the Tuna and Tofu Cold Dish with a proud smile. She had learned the recipe from her mother, who had passed it down through generations. With each serving, she shared not just food but a piece of our family’s history. The cool, silky tofu paired with the savory tuna and tangy sauce was a revelation, providing a refreshing contrast to the summer heat.


Even now, whenever I prepare this dish, I am transported back to that day, surrounded by family and laughter. It reminds me that food is not just sustenance but a vessel for memories, carrying with it the power to unite and comfort.


---


Whether you're looking to create new memories or revisit old ones, this Tuna and Tofu Cold Dish is sure to become a beloved staple in your culinary repertoire. Enjoy this simple yet flavorful appetizer that’s rich in nostalgia and taste.

Read more about Appetizers

Read more about Main Dishes

Read more about Desserts

Whole Grain Pumpkin Bread | Made by Meaghan Moineau

Whole Grain Pumpkin Bread | Made by Meaghan Moineau

Title: Warm Memories and Wholesome Flavors: The Timeless Appeal of Whole Grain Pumpkin Bread
Description: Dive into the delightful world of Whole Grain Pumpkin Bread, a scrumptious treat that brings together the warmth of family memories and the heartiness of wholesome ingredients. Perfect for the fall season, this recipe combines the nostalgic aroma of spices with the nutritional benefits of whole grains, making it an irresistible addition to your baking repertoire. Join us as we explore how this beloved bread has become a cherished tradition in our family, offering comfort and joy with every slice.

---


As the leaves begin to turn and the air grows crisp, there’s one thing that always beckons me to the kitchen: the alluring promise of Whole Grain Pumpkin Bread. This delightful bread is more than just a seasonal treat; it is a tapestry of flavors and memories woven together into a timeless family tradition.


A Slice of Nostalgia

Every year, as autumn envelops our town in its golden embrace, my family gathers for our much-anticipated fall reunion. It’s a time for stories, laughter, and, of course, the comforting aroma of spices wafting from the kitchen. My grandmother, the matriarch and master baker of the family, would always be at the helm, orchestrating the creation of our beloved pumpkin bread.


I remember as a child standing on tiptoes, eagerly watching her blend the ingredients with practiced ease. There was magic in how she combined the light firmly packed brown sugar, aromatic cinnamon, and the rich sweetness of molasses to create a batter that promised so much more than just a loaf of bread. As the mixture transformed under her skilled hands, she would tell tales of her childhood, recounting how her mother had taught her the same recipe, passing down not just ingredients, but a legacy of love.


A Recipe Rooted in Tradition

Creating this Whole Grain Pumpkin Bread is a journey back to those cherished days. Start by preheating your oven to 375 degrees and greasing two loaf pans. In a large bowl, beat together the oil, brown sugar, and molasses until well blended, then mix in the eggs and canned pumpkin. The fragrance is sure to evoke memories of family gatherings, with cinnamon, ground cloves, and nutmeg adding their own nostalgic notes.


Next, stir in the whole wheat flour, baking soda, oat bran, wheat bran, and wheat germ, along with a pinch of salt, just until the mixture is moistened. As you fold in chopped pecans, imagine the laughter and chatter that filled the kitchen as my siblings and I waited impatiently for the bread to bake.


Pour the batter into the prepared loaf pans and bake for about an hour, or until a toothpick inserted in the center comes out clean. Let the loaves cool on a rack, though I must confess, the true magic happens when you let them rest overnight. The flavors deepen and meld, creating a bread that is not just food, but a heartfelt connection to those we hold dear.


A Wholesome Dessert for Any Occasion

While Whole Grain Pumpkin Bread is often considered a dessert, its nutritional profile makes it a versatile choice for any time of day. With the goodness of whole wheat flour, oat bran, and pecans, it offers a hearty, satisfying bite that pairs beautifully with a cup of coffee or a dollop of whipped cream.


Difficulty: 4/10

This recipe is delightfully simple, with a difficulty rating of 4 out of 10, making it accessible even to novice bakers. The ingredients are straightforward, and the process is forgiving, allowing you to focus on the joy of baking rather than the intricacies of technique.


Conclusion

Whole Grain Pumpkin Bread is more than just a recipe; it is a bridge between generations, a testament to the enduring power of family traditions. As you savor each slice, may it bring warmth to your heart and a smile to your face, just as it has for my family over the years. Whether you’re creating new memories or revisiting old ones, this bread is sure to become a cherished part of your own culinary story.

Read more about Appetizers

Read more about Main Dishes

Read more about Desserts

Spinach, Tomato & Onion Couscous | Made by Meaghan Moineau

Spinach, Tomato & Onion Couscous | Made by Meaghan Moineau

Title: Savory Memories: Spinach, Tomato & Onion Couscous Delight


Description:

Uncover the warmth of family gatherings with our Spinach, Tomato & Onion Couscous recipe. This simple yet flavorful dish brings together the wholesome goodness of fresh vegetables, creamy feta, and nutty pine nuts, all nestled in fluffy whole-wheat couscous. Easy to prepare and bursting with Mediterranean flavors, this dish is perfect for any occasion. Join us as we dive into a nostalgic family memory while crafting this delightful main dish.

---


A Taste of the Past: Spinach, Tomato & Onion Couscous


When I think of Spinach, Tomato & Onion Couscous, I am instantly transported back to the cozy kitchen of my grandmother's home. The aroma of sautéed onions and the vivid colors of fresh vegetables always remind me of the Sunday afternoons we spent cooking together. It was a tradition that brought our family closer, a ritual that was more about sharing love than just sharing a meal.


Cooking with Grandma was a cherished time. She would let me stir the couscous, teaching me the importance of patience as we waited for it to absorb the boiling water, turning into fluffy grains. Her hands expertly chopped the onions and tomatoes, while I watched, eager to be part of the magic.


As the onions began to brown in the olive oil, their sweet scent filled the air, mingling with the freshness of the spinach and the tangy allure of tomatoes. Grandma’s secret was in the timing—sautéing just enough to wilt the vegetables but keeping the spinach a vibrant green. It was a delicate balance, much like the dance of family life.


The final touch was the addition of pine nuts, their richness contrasting beautifully with the creamy crumbled feta. Tossing everything together was like assembling a symphony of flavors, each ingredient playing its part in harmony. The couscous soaked up the juices of the vegetables, creating a melt-in-your-mouth experience that was both comforting and nourishing.


We would gather around the table, the couscous as the centerpiece, and share stories, laughter, and the warmth of being together. This dish was more than just food; it was a testament to family bonds and the joy of shared memories.


Recipe Difficulty: 3/10


Classification: Main Dish


---


Ingredients:


- 1 cup whole-wheat couscous


- 1 ½ cups water


- ½ teaspoon salt, divided


- 2 tablespoons olive oil


- 1 red onion, thinly sliced


- 2 tomatoes, diced


- 4 cups fresh spinach


- ¼ cup pine nuts


- ½ cup feta cheese, crumbled


- Salt and pepper to taste


Instructions:


1. Prepare the Couscous: In a small pan, bring the water and half of the salt to a boil. Add the couscous, stir, and cover with a lid. Remove from heat and let it sit for 5 to 7 minutes, allowing it to absorb the water.
2. Sauté the Vegetables: Heat a large pan over medium-high heat and add the olive oil. Once hot, add the sliced onions and sauté until they begin to brown. Add the diced tomatoes and the remaining salt, sautéing for another 20 to 30 seconds until the tomatoes start to wilt.
3. Add the Spinach: Stir in the fresh spinach, sautéing just until it wilts but remains bright green.
4. Finish with Pine Nuts: Incorporate the pine nuts into the vegetable mixture, then remove the pan from the heat. Season with salt and pepper to taste.
5. Combine and Serve: Pour the couscous into a large bowl, add the sautéed vegetables, and toss with the crumbled feta cheese. Top with additional feta and serve hot.

Relive the cherished moments of family gatherings with this simple yet heartwarming recipe. Whether it becomes a staple in your home or a special treat, Spinach, Tomato & Onion Couscous is sure to create delicious new memories.

Read more about Appetizers

Read more about Main Dishes

Read more about Desserts

Potato Soup With Peppers and Olives | Made by Meaghan Moineau

Potato Soup With Peppers and Olives | Made by Meaghan Moineau

Title: "A Hearty Embrace: Potato Soup with Peppers and Olives"


Description:

Dive into the comforting warmth of our Potato Soup with Peppers and Olives—a dish that's both soul-soothing and flavor-packed. Infused with the zesty kick of red roasted peppers and the savory depth of black olives, this soup is a tribute to family gatherings and cherished memories around the dinner table.

---


Potato Soup with Peppers and Olives: A Nostalgic Bowl of Comfort
Difficulty Level: 4/10 | Main Dish

In the whirlwind of modern life, there are few things as grounding as a simple, homemade meal. Our Potato Soup with Peppers and Olives is more than just a dish—it's a heartfelt journey back to the comforting embrace of family and the warmth of shared memories. This recipe, with its rich blend of flavors, is perfect not only for a cozy night in but also as a centerpiece for family gatherings.


Ingredients:

- Potatoes


- Garlic


- Olive oil


- Red roasted and marinated peppers


- Black olives


- Dried oregano


- Salt and pepper


Instructions:

1. In a saucepan, fry garlic in olive oil until tender.


2. Add potatoes, oregano, and a pinch of salt. Cover with 300-400 ml of water.


3. Cook for 30 minutes, or until potatoes are soft. For a quicker method, microwave the potatoes with some water for 15 minutes on MAX.


4. Puree the potatoes, peppers or pepper sauce, and 4 olives in a blender.


5. Adjust the consistency by adding water if too thick, and season with pepper and salt.


6. Serve warm or hot, garnished with the remaining olives.


The Story Behind the Soup:

As a child, weekends meant visits to Grandma's house—a place where the air was always thick with the aroma of home-cooked meals. One crisp autumn afternoon, while the leaves danced in hues of amber and gold, I remember sitting in her cozy kitchen, watching her deft hands work magic over the stovetop.


The kitchen was a symphony of sizzling garlic and the earthy scent of potatoes mingling with the sweet, smoky tang of roasted peppers. Grandma would hum a tune, her voice as warm and inviting as the soup she prepared. She’d always let me sneak a taste from the wooden spoon, the rich flavors instantly wrapping me in comfort.


This Potato Soup with Peppers and Olives was her signature dish, a staple that brought the family together, evoking laughter and stories shared around the table. Each bite was a spoonful of nostalgia, a reminder of those cherished moments. Now, as I prepare this dish in my own kitchen, I am transported back to those golden days, and the tradition lives on.


---


Whether you're seeking a taste of nostalgia or a new family favorite, this Potato Soup with Peppers and Olives is a dish that promises comfort and connection. It's a testament to the power of food in weaving together the tapestry of our most treasured memories. Enjoy it as a main dish, and let it be the warm hug you didn’t know you needed.

Read more about Appetizers

Read more about Main Dishes

Read more about Desserts

Pumpkin soup with wine | Made by Meaghan Moineau

Pumpkin soup with wine | Made by Meaghan Moineau

Title: Cozy Autumn Evenings: A Nostalgic Bowl of Pumpkin Soup with Wine
Description: Dive into the warmth of autumn with our delightful Pumpkin Soup with Wine. This creamy, aromatic soup captures the essence of fall and adds a touch of sophistication with a splash of red wine. Perfect as a comforting main dish, this recipe brings together the sweetness of roasted muscat pumpkin, the richness of cream, and the earthiness of fresh sage. Join me as I share the story behind this cherished family recipe, a nostalgic tribute to cozy evenings and cherished moments.

---


As the leaves begin to change color and the air turns crisp, there's nothing quite like the comforting embrace of a warm bowl of soup. Our Pumpkin Soup with Wine is more than just a dish; it's a family tradition, a symbol of togetherness during the cozy autumn months.


I remember, as a child, the anticipation that filled our home as we prepared for our annual family harvest celebration. My grandmother, the heart of our family, would always be at the center of the kitchen, orchestrating a symphony of flavors and aromas. Among her many culinary masterpieces, her pumpkin soup with wine was always the star of the show.


The preparation of the soup was an event in itself. We would gather together, my brothers and I, to help cut the muscat pumpkin into large, rustic chunks. The vibrant orange of the pumpkin, a visual testament to the season, brought a sense of joy and anticipation. Lined on a baking sheet and drizzled with oil, the pumpkin was roasted to perfection, filling the house with an inviting, sweet aroma.


Once the pumpkin was fork-tender and golden, it was time for the magic to happen. My grandmother would blend the roasted chunks into a smooth, velvety puree, a task she entrusted to me once I was old enough to handle the blender. This was my favorite part, watching the transformation of the humble pumpkin into a luxurious base for our soup.


Into the pot went the pumpkin puree, followed by a generous splash of cream and sour cream, creating a rich and creamy texture. The addition of vegetable stock, made conveniently from a cube, added depth to the flavor, while a splash of red wine introduced a touch of elegance and complexity.


As the soup simmered gently, filling the house with its irresistible fragrance, my grandmother would add the final touch: freshly chopped sage leaves, their earthy aroma a perfect complement to the sweet pumpkin and wine. Served with homemade croutons, the soup was a bowl of pure comfort, each spoonful a warm hug on a chilly evening.


This pumpkin soup with wine is more than just a recipe; it's a beloved family tradition, a reminder of those cherished evenings spent together, laughing and sharing stories around the table. It's a dish that brings us back to the simple joys of life, to the warmth of family and the beauty of autumn.


Difficulty: 4/10
Classification: Main Dish

So, as you savor this delightful pumpkin soup, may it bring warmth to your home and create new memories for you and your loved ones. Enjoy the flavors, embrace the nostalgia, and let this dish be a part of your family's autumn tradition.

Read more about Appetizers

Read more about Main Dishes

Read more about Desserts

Vietnamese Pancakes with Vegetables, Herbs and a Fragrant Dipping Sauce (Bánh Xèo) | Made by Meaghan Moineau

Vietnamese Pancakes with Vegetables, Herbs and a Fragrant Dipping Sauce (Bánh Xèo) | Made by Meaghan Moineau

Title: Savoring Tradition: Vietnamese Bánh Xèo with Vegetables, Herbs, and a Fragrant Dipping Sauce
Description: Dive into a delightful culinary journey with Vietnamese Pancakes, or Bánh Xèo. Discover how to create this crispy, savory dish filled with vibrant vegetables, aromatic herbs, and an irresistible dipping sauce. Perfect for family gatherings or a unique dinner night, this traditional recipe is sure to impress.

---


Vietnamese Pancakes with Vegetables, Herbs, and a Fragrant Dipping Sauce (Bánh Xèo)


In the heart of Vietnamese cuisine lies a dish that encapsulates the vibrant flavors and rich traditions of its culture—Bánh Xèo. These savory pancakes, filled with an array of fresh vegetables and herbs, offer a delightful explosion of taste that dances on your palate. With a fragrant dipping sauce to tie it all together, this dish isn't just a meal; it's an experience.


Ingredients:

- For the Pancake Batter:

- 1 cup brown rice flour


- 1 egg


- 1/4 teaspoon sea salt


- 1/4 teaspoon turmeric


- A pinch of cayenne


- 1 green fresh chili, finely chopped


- 1 1/2 cups coconut milk


- For the Fragrant Dipping Sauce:

- 1 lime (juice)


- 1 tablespoon rice vinegar


- 1 tablespoon brown sugar


- 1 garlic clove, minced


- 1 red fresh chili, finely chopped


- 2 tablespoons tamari sauce


- 1 teaspoon sesame oil


- For the Filling:

- 1 carrot, julienned


- 1 daikon radish, julienned


- 4 green onions, sliced


- 2 green fresh chilies, sliced


- 1 cup snow peas, sliced


- 1 cup mung bean sprouts


- 1 cup trimmed enoki mushrooms


- Fresh basil leaves


- Fresh mint leaves


- Fresh parsley


Instructions:


1. Prepare the Pancake Batter:

Begin by whisking together the rice flour, egg, sea salt, turmeric, cayenne, and green chili in a bowl. Gradually add the coconut milk, whisking continuously until you achieve a smooth, semi-thick batter. Adjust with water if needed. Cover and let it rest.


2. Make the Dipping Sauce:

In a separate bowl, combine lime juice, rice vinegar, brown sugar, minced garlic, red chili, tamari sauce, and sesame oil. Mix well and set aside to let the flavors meld.


3. Prepare the Filling:

In a bowl, mix the carrot, radish, green onions, green chilies, and snow peas. Keep the herbs, sprouts, and mushrooms ready in separate bowls.


4. Cook the Pancakes:

Heat a teaspoon of oil in a non-stick skillet over medium heat. Pour 1/2 cup of the batter into the pan, spreading it to form a 6 to 8-inch pancake. Cook for 6 to 8 minutes until holes form and the bottom is crispy brown, then flip and cook for another few minutes. Keep warm in a 150°F oven while preparing the rest.


5. Assemble the Dish:

To serve, place a portion of the vegetable mixture, herbs, and mushrooms on one half of each pancake. Drizzle some dipping sauce over the top, fold the pancake, and finish with a final drizzle of sauce.


Family Nostalgia:


I vividly remember my grandmother’s kitchen filled with the aromatic symphony of fresh herbs and the sizzle of Bánh Xèo hitting the hot pan. Family gatherings were never complete without this beloved dish. As a child, I would eagerly watch my grandmother as she expertly flipped the pancakes, her hands moving with the grace of years of practice. Each bite was a warm reminder of our heritage, a bridge connecting generations through the love of food.


Difficulty: 6/10


Classification: Main Dish


---


Whether you're reconnecting with your roots or exploring a new culinary adventure, Bánh Xèo offers a delicious window into the heart of Vietnamese cuisine. Enjoy crafting this dish and, more importantly, sharing it with loved ones—just as my family has done for generations.

Read more about Appetizers

Read more about Main Dishes

Read more about Desserts

Roasted Beet and Radicchio Salad | Made by Meaghan Moineau

Roasted Beet and Radicchio Salad | Made by Meaghan Moineau

Title: A Taste of Tradition: Roasted Beet and Radicchio Salad with a Twist of Nostalgia
Description: Discover the vibrant flavors and colors of a Roasted Beet and Radicchio Salad that not only delights your taste buds but also stirs fond memories of family gatherings. This easy-to-follow recipe promises a symphony of textures and tastes, perfect for any occasion. Dive into the blend of earthy beets, crisp radicchio, and creamy queso fresco, all tied together with a zesty vinaigrette. Ideal as an appetizer, this dish is rated 5 out of 10 in difficulty and is sure to impress.

---


As the holiday season rolls in, I find myself reminiscing about the lively family dinners at my grandmother's house. Her culinary magic always brought us together, even if it meant squeezing around a table too small for our growing family. One dish that was always a staple on the table was her Roasted Beet and Radicchio Salad. The vibrant colors mirrored the festive atmosphere and the robust flavors matched the lively conversations echoing around the room.


Ingredients:

- Beets


- Olive oil


- Radicchio


- Red onion


- Radishes


- Fresh mint leaves


- Queso fresco


- Red wine vinegar


- Honey


- Garlic clove


- Salt


- Pepper


Instructions:
1. Preheat and Prep: Preheat your oven to 400°F. Trim the beets and place them in a baking dish. Drizzle 1 tablespoon of olive oil over the beets, cover the dish, and roast for 30-35 minutes, or until they are fork-tender.
2. Radicchio Bath: While the beets are roasting, cut the head of radicchio into quarters and remove the core. Slice the radicchio into thin strips and soak them in a bowl of ice water for 20-30 minutes. This trick, handed down from my grandmother, helps reduce its natural bitterness.
3. Slice and Dice: Thinly slice the red onion and radishes. The precision of these cuts is key to balancing the flavors and textures in the salad.
4. Whisk the Dressing: In a small bowl, whisk together 3 tablespoons of olive oil, red wine vinegar, honey, a minced garlic clove, salt, and pepper. This vinaigrette is the heart of the dish, tying all the ingredients together.
5. Assemble the Salad: Once the beets have cooled slightly, peel off their skins and slice them into wedges. Toss the radicchio, beets, onions, radishes, and mint leaves with the vinaigrette in a large bowl.
6. Finishing Touches: Top the salad with crumbled queso fresco. This creamy cheese adds a delightful contrast to the earthy beets and bitter radicchio.
7. Serve and Enjoy: Serve the salad as a vibrant appetizer for four. It's a dish that promises to spark conversation and create memories, just as it did in my grandmother's dining room.

Every time I recreate this salad, I'm transported back to those cherished moments, surrounded by family and laughter. It’s more than just a dish; it’s a bridge to the past, a reminder of the love and warmth that defined our family gatherings. Whether you’re carrying on a tradition or starting a new one, this Roasted Beet and Radicchio Salad is sure to be a hit at your table.

Read more about Appetizers

Read more about Main Dishes

Read more about Desserts

Dandelion pesto | Made by Meaghan Moineau

Dandelion pesto | Made by Meaghan Moineau

Title: "Nostalgic Flavors: Crafting Dandelion Pesto for a Taste of Home"
Description: Dive into the world of unique flavors with our Dandelion Pesto recipe. This simple yet exquisite dish brings together the vibrant essence of dandelion greens and the aromatic allure of fresh basil, creating a culinary masterpiece that's perfect as an appetizer. Discover the joy of crafting this pesto, enriched with family memories and nature's bounty.

---


A Taste from the Past: Dandelion Pesto

There's something magical about stepping into the kitchen with a handful of fresh greens, especially when those greens come from the humble dandelion. This vibrant plant, often overlooked in favor of more conventional herbs, brings a bold, slightly bitter flavor to the table, making it the star of our delightful Dandelion Pesto.


As a child, I remember spending sun-soaked afternoons with my grandmother, wandering through her expansive garden. The air was filled with the sweet scent of blooming flowers and the hum of bees flitting from one bloom to another. Among the neat rows of basil and spinach, dandelions grew wild and free, their bright yellow heads peeking through the greenery.


"Nature's treasures," my grandmother would call them, as she carefully plucked the dandelion greens and petals, her hands gentle yet purposeful. She'd always save the best ones for our pesto, a recipe passed down through generations. It was her secret ingredient, a touch of nostalgia that transformed a simple dish into a familial ritual.


Ingredients:

- Dandelion greens


- Fresh basil leaves


- Spinach


- Petals from dandelion flowers


- Garlic


- Sea salt


- Pine nuts


- Macadamia nuts


- Extra virgin olive oil (enough to bind the sauce together)


- Lemon juice


- Nutritional yeast flakes


Instructions:

1. Begin by washing the dandelion greens in a solution of water and raw cider vinegar, using a couple of tablespoons of vinegar to about a liter of water. This step ensures that your greens are not only clean but also retain their vibrant flavor.


2. Once washed, spin dry all the greens thoroughly. This is crucial to achieving the perfect consistency in your pesto.


3. Combine all the ingredients in a pestle and mortar or a food processor. Pound or blitz until nearly smooth. I like to leave a little texture to my pesto, but feel free to experiment until you find the consistency that delights your palate.


And just like that, you have a bowl of dandelion pesto, ready to be savored. Whether spread over warm, crusty bread, tossed with al dente pasta, or used as a dip for fresh vegetables, each bite is a reminder of simpler times and cherished family memories.


Difficulty: 3/10
Classification: Appetizer

This recipe, with its straightforward preparation and nostalgic allure, is an excellent way to introduce the bold, earthy flavors of dandelions into your culinary repertoire. It's not just a dish; it's a connection to the past, a celebration of nature, and an invitation to explore the rich tapestry of flavors that our world has to offer. So, gather your ingredients, embrace the simplicity of the process, and let the dandelion pesto transport you back to those sunlit days in the garden, where every meal was a story waiting to be shared.

Read more about Appetizers

Read more about Main Dishes

Read more about Desserts

Mango Guacamole | Made by Meaghan Moineau

Mango Guacamole | Made by Meaghan Moineau

Title: Mango Guacamole: A Zesty Twist on a Family Favorite
Description: Dive into the tropical allure of Mango Guacamole, a vibrant twist on the classic dip that promises to elevate your appetizer game. Bursting with flavors of ripe mango, creamy avocados, and zesty lime, this dish is not only a feast for the taste buds but also a nostalgic journey back to cherished family gatherings. Rated 3/10 in difficulty, this delightful appetizer is easy enough for any home cook to master.

---


Mango Guacamole: A Zesty Twist on a Family Favorite

There's something timeless about gathering around the family table, sharing laughter, stories, and delicious food that bridges generations. In my family, guacamole was always a staple at our summer barbecues. But it wasn't until one particular gathering that the humble guacamole was transformed into something truly unforgettable.


The Story Behind the Mango Twist

It was a balmy summer afternoon, and my family was celebrating my grandmother's 70th birthday. As the grill sizzled with an array of delicious meats, my aunt appeared with a bowl of what we thought was the usual guacamole. But as soon as she set it on the table, a sweet and tropical aroma filled the air, piquing everyone's curiosity.


My aunt, known for her adventurous culinary experiments, decided to add a unexpected ingredient: mango. At first, the combination seemed unusual, but as we all gathered around for a taste, the tangy sweetness of the mango perfectly complemented the creamy avocados and spicy serrano chiles. It was an instant hit, and from that day on, Mango Guacamole became a beloved family recipe, a tribute to the creativity that can arise from the simplest of ingredients.


The Perfect Summer Appetizer
Creating this dish at home is as easy as it is rewarding, with a difficulty rating of just 3 out of 10. Here's how you can bring this vibrant appetizer to your own table:
Ingredients:

- 3 ripe Hass avocados


- 1 ripe mango, peeled and chopped


- 1 small red onion, finely chopped


- 2 serrano chiles, seeded and finely chopped


- 2 cloves fresh garlic, minced


- 2 limes, juiced (reserve zest)


Instructions:
1. Prepare the Ingredients: Start by chopping the mango, red onion, and garlic. Seed and finely chop the serrano chiles.
2. Mash the Avocados: Chop the avocados and place them into a medium-sized bowl. Zest the limes and set the zest aside. Roll the limes on your countertop to activate the juice, then cut them in half and squeeze all of the juice into the bowl with the avocados. Give the mixture a good stir to combine.
3. Mix it All Together: Add the chopped mango, red onion, garlic, and serrano chiles to the avocado mixture. Sprinkle in the reserved lime zest and stir everything together until you reach your desired consistency.

And there you have it, a refreshing Mango Guacamole that's perfect for dipping tortilla chips or as a topping for grilled chicken or fish. This appetizer not only brings a vibrant splash of color to your spread but also serves as a delightful reminder of those cherished family moments gathered around the table.


As you enjoy this tropical twist on a classic favorite, consider creating new memories with your loved ones—after all, it's the stories and laughter shared over delicious food that truly make a family recipe special.

Read more about Appetizers

Read more about Main Dishes

Read more about Desserts

Chavrie Caramelized Red Onion Tarts | Made by Meaghan Moineau

Chavrie Caramelized Red Onion Tarts | Made by Meaghan Moineau

Title: Savoring Memories: Chavrie Caramelized Red Onion Tarts
Description: Dive into the rich flavors of Chavrie Caramelized Red Onion Tarts, where sweet meets tangy in a symphony of taste. This appetizer, rated 5 out of 10 in difficulty, brings together goat cheese, red grape jelly, and red onions to create an unforgettable bite-sized delight. Join me as I share not just a recipe, but a cherished family memory that this dish evokes.

---


Savoring Memories: Chavrie Caramelized Red Onion Tarts

In the symphony of culinary delights, there are few recipes that strike a perfect chord of nostalgia and flavor. One such recipe that finds a special place in my heart—and on my palate—is the Chavrie Caramelized Red Onion Tart. This dish is an embodiment of sweet, tangy, and creamy notes, coming together in a deliciously flaky tart shell.


A Family Affair


The memory is as vivid as it was years ago—my family gathered around the kitchen island, laughter and stories filling the air as we prepared for our annual summer picnic. These tarts were always a staple in our picnic basket. The process of making them became a cherished tradition, with each family member contributing their own touch to the final masterpiece.


I remember my grandmother, her hands deftly chopping the red onions while regaling us with tales of her childhood. My mother would gently remind me to stir the onions slowly, letting them turn translucent and soft in the warm embrace of butter and oil. It was a beautiful chaos of chatter, clinking utensils, and the intoxicating aroma of onions caramelizing.


Creating the Magic


Ingredients:

- 1 cup goat cheese


- 2 tablespoons red grape jelly


- 2 large red onions, minced


- 2 tablespoons red wine vinegar


- 1 tablespoon sugar


- 1 tablespoon unsalted butter


- 1 tablespoon vegetable oil


Instructions:
1. Heat the Base: In a heavy gauge skillet, combine the vegetable oil and unsalted butter over medium heat. Allow the mixture to melt and meld together, creating the perfect base for sautéing.
2. Caramelize the Onions: Add the minced red onions to the skillet. Cook them slowly, stirring occasionally, until they turn translucent and soft—about 10 minutes. This step always reminds me of the patience my grandmother taught me; good things take time.
3. Sweet and Tangy Symphony: Introduce the sugar, red grape jelly, and red wine vinegar to the onions. Stir the mixture occasionally and let it cook for about 15 minutes until it reaches a syrupy consistency. The transformation of the ingredients into a rich, aromatic blend is simply magical.
4. Cool Down: Once the mixture is perfectly caramelized, remove it from the heat and let it cool to room temperature. This waiting period was always spent sharing stories, sipping lemonade, and catching up with each other.
5. Assemble the Tarts: Place the tart shells on a baking tray. Spoon a generous tablespoon of the caramelized onion mixture into each shell. Top with crumbled goat cheese for that delightful creamy finish.

A Delightful Appetizer


These Chavrie Caramelized Red Onion Tarts are rated a 5 out of 10 in difficulty, making them an approachable yet impressive dish for any occasion. Classified as an appetizer, they are perfect for setting the stage for a memorable meal, or simply as a delectable snack to enjoy with loved ones.


As I take a bite of these tarts today, I am transported back to those sunny picnics. The flavors are a comforting reminder of family, love, and the simple joys of life. I hope this recipe brings as much joy to your table as it has to mine. Enjoy the journey of making and savoring these little pockets of nostalgia.

Read more about Appetizers

Read more about Main Dishes

Read more about Desserts

How to Cook Sweet Potatoes on the Grill | Made by Meaghan Moineau

How to Cook Sweet Potatoes on the Grill | Made by Meaghan Moineau

Title: Grilled Sweet Potatoes: A Nostalgic Twist on a Classic Comfort Food
Description: Discover the joy of grilling sweet potatoes with our simple, flavor-packed recipe. Perfect for family gatherings, this dish is sure to evoke cherished memories while delighting your taste buds.

---


Grilled sweet potatoes aren't just a delicious treat; they're a bridge connecting us to memories of family gatherings and sun-kissed afternoons. Simple yet profound, this dish embodies the art of transforming humble ingredients into something truly special. In this post, I'll guide you through the process of making this delightful dish while sharing a nostalgic story that makes it even more personal.


Ingredients


- Sweet potatoes


- Butter


- Cinnamon


Instructions


1. Preheat and Prepare: Heat your grill to 350 degrees. The sweet aroma of cinnamon and butter will soon fill the air, creating an inviting atmosphere for family and friends.
2. Slice and Season: Slice the sweet potatoes into 1-inch rounds. Spray both sides generously with butter before sprinkling them with cinnamon. This combination of flavors is utterly irresistible.
3. Grill to Perfection: Place a sheet of foil over the grilling grates to prevent sticking, and lay your sweet potato rounds directly onto the foil. Spray them once more with butter for that golden, crispy finish.
4. Cook with Care: Close the grill lid and let the sweet potatoes cook for about 30 minutes. To ensure they cook evenly, turn and flip the slices every 10 minutes, adding a touch more butter each time.

A Trip Down Memory Lane


Growing up, grilling sweet potatoes was more than just a culinary activity; it was a ritual that brought our family together. Every summer, we'd gather in the backyard, where my grandparents had set up the old grill under the shade of a sprawling oak tree. The air was always filled with laughter and the comforting scent of cinnamon wafting from the grill.


One particular summer afternoon stands out in my memory. My grandmother, with her gentle hands and warm smile, showed me how to slice the sweet potatoes just right. As the grill sizzled, she recounted stories of her youth, of how this simple dish had been a staple during family picnics. The tales of yesteryear, woven with love and nostalgia, added an extra layer of warmth to our meal.


It was during these moments that I learned the true magic of food—it has the power to connect us to our past, to the people we've loved and the memories we've cherished. Every time I grill sweet potatoes, I am transported back to those sun-dappled afternoons, surrounded by family, enveloped in love.


Difficulty Rating: 3/10


This recipe is wonderfully straightforward, perfect for beginners and seasoned grillers alike. Its simplicity allows the natural sweetness of the potatoes to shine, enhanced by the buttery cinnamon glaze.


Classification: Appetizer


While grilled sweet potatoes can certainly serve as a delightful side dish or even a light main course, their sweet and savory profile makes them an ideal appetizer. They set the stage for a meal that's both comforting and memorable.


---


Grilled sweet potatoes are more than just a dish; they're a celebration of family, of cherished memories, and of the joy found in simple pleasures. So, fire up the grill and let this recipe guide you on a delicious journey down memory lane.

Read more about Appetizers

Read more about Main Dishes

Read more about Desserts

Mediterranean Orzo Salad | Made by Meaghan Moineau

Mediterranean Orzo Salad | Made by Meaghan Moineau

Title: A Taste of the Mediterranean: Elevate Your Culinary Skills with a Zesty Orzo Salad
Description: Discover the vibrant flavors of the Mediterranean with our delightful Orzo Salad. This easy-to-follow recipe brings together fresh vegetables, aromatic herbs, and tangy feta for a refreshing meal that will transport your taste buds to sun-soaked shores. Dive into a nostalgic family memory that adds a personal touch to this culinary adventure.

---


There’s something magical about a dish that can transport you to a different place with just one bite. Our Mediterranean Orzo Salad does precisely that, capturing the essence of the sun-drenched Mediterranean region. This recipe combines fresh ingredients like orzo, crisp vegetables, and fragrant herbs, creating a symphony of flavors that’s both refreshing and satisfying.


Ingredients:


- Orzo


- Kosher salt


- Pine nuts


- Extra virgin olive oil (EVOO)


- Green onions


- Italian parsley


- Lemon zest


- Diced cucumber


- Green bell pepper


- Cherry tomatoes


- Red onion


- Pepperoncinis


- Feta cheese


- Red wine vinegar


Instructions:


1. Cook the Orzo: Begin by bringing a pot of water to a rapid boil. Generously salt the water and cook the orzo until tender, approximately 7-9 minutes. Drain and set aside to cool.
2. Toast the Pine Nuts: While the orzo is cooking, spread pine nuts on a baking sheet and toast lightly in the oven at 400°F. Once golden brown, remove from the oven and set aside.
3. Saute Aromatics: Heat two tablespoons of EVOO in a non-stick pan over medium heat. Sauté the chopped green onions for about 2 minutes. Add the parsley, lemon juice, lemon zest, toasted pine nuts, and cooked orzo. Sauté for an additional 3-4 minutes to allow the flavors to meld and absorb into the orzo. Remove from heat.
4. Combine Ingredients: In a large bowl, mix the sautéed orzo with diced cucumber, green bell pepper, cherry tomatoes, red onion, and pepperoncinis. Add the crumbled feta cheese, red wine vinegar, and the remaining six tablespoons of EVOO. Mix well to ensure all ingredients are evenly distributed.
5. Serve: This versatile dish can be refrigerated to let the flavors intensify or served immediately, perfectly fresh and vibrant.

Nostalgic Family Memory:


As I prepare this Mediterranean Orzo Salad, I’m flooded with memories of summer picnics by the sea with my family. Every year, we’d gather at my grandmother’s beach house, where the ocean breeze would mingle with the delicious aromas of her cooking. This salad was always the centerpiece of our picnic table, a dish that brought everyone together. My grandmother would laugh as she watched us devour it, her eyes twinkling with joy. To this day, each bite of this salad reminds me of those sun-drenched afternoons filled with laughter, love, and the simple pleasures of life.


Difficulty: 4/10


This Mediterranean Orzo Salad is straightforward to make, making it a perfect recipe for cooks of all levels. It’s a dish that allows you to enjoy the process and the result, without the stress of complicated techniques or hard-to-find ingredients.


Classification: Appetizer


This vibrant and flavorful salad is perfect as an appetizer, setting the stage for a delightful Mediterranean meal. Its refreshing taste and colorful presentation make it a standout dish that’s sure to impress your guests.


---


Embrace the flavors of the Mediterranean and bring a touch of sunshine to your table with this Mediterranean Orzo Salad. Whether it’s a cherished family gathering or a simple meal for yourself, this dish promises a journey of taste and nostalgia.

Read more about Appetizers

Read more about Main Dishes

Read more about Desserts

Cottage pie with Quorn mince | Made by Meaghan Moineau

Cottage pie with Quorn mince | Made by Meaghan Moineau

Title: Cozy Comfort: Crafting the Perfect Cottage Pie with Quorn Mince
Description: Dive into the heart of culinary nostalgia with our Cottage Pie with Quorn Mince. This vegetarian twist on a beloved classic is not just a feast for the taste buds but a journey down memory lane. Discover the warmth of family gatherings and the simple joy of home-cooked meals with this flavorful main dish, rated 5/10 in difficulty—perfect for both novice and seasoned cooks.

---


Cottage Pie with Quorn Mince: A Slice of Home


There’s something inherently comforting about a well-made cottage pie. The way the mashed potatoes sit like a fluffy cloud atop a savory filling, golden and crisp from the oven, brings back cherished memories of family dinners and laughter-filled evenings. This particular recipe, with its delightful twist using Quorn mince, is a testament to how food can evolve while preserving its heartwarming essence.


Ingredients:


- 4 large potatoes, peeled and diced


- 2 tablespoons butter


- 1/4 cup milk (plus extra if needed)


- 1 teaspoon dried parsley


- 300g Quorn mince


- 1 large onion, finely chopped


- 1 bay leaf


- 2 medium carrots, diced


- 2 garlic cloves, minced


- 2 green chillies, finely chopped


- 1 teaspoon cumin powder


- 1 tablespoon fresh rosemary, chopped


- 1 can (400g) tomatoes, chopped


- 200 ml boiling water


- 1 vegetable stock cube


- 1 egg, beaten


- Salt and pepper, to taste


- 1 tablespoon oil


Instructions:


1. Prepare the Stock: Dissolve the vegetable stock cube in 200 ml of boiling water and set aside.
2. Cook the Potatoes: In a saucepan, bring water to a boil. Add the diced potatoes and cook until tender, about 15 to 20 minutes. Drain and return them to the saucepan. Mash until smooth, then blend in butter, dried parsley, and milk. Add more milk if needed to achieve a creamy consistency. Season with salt and pepper.
3. Preheat the Oven: Set your oven to 200°C (392°F).
4. Prepare the Filling: In a large frying pan, heat oil over medium heat. Sauté the onion, carrots, garlic, green chillies, and bay leaf for 4-5 minutes. Add the Quorn mince and cumin powder, cooking for an additional 5 minutes. Mix in the canned tomatoes, rosemary, and prepared stock. Bring the mixture to a boil, then remove from heat. Discard the bay leaf.
5. Assemble the Pie: Transfer the Quorn mince mixture to an ovenproof dish, spreading it in a single layer. Top with the mashed potatoes, using a fork to fluff the surface. Brush lightly with the beaten egg to encourage browning in the oven.
6. Bake: Place the dish in the preheated oven and cook for 20-25 minutes until the top is golden and crisp. For an extra indulgence, sprinkle grated cheese over the potatoes before baking, omitting the egg if you choose this option.

A Taste of Nostalgia


Cottage pie holds a special place in my heart. Growing up, Sunday afternoons meant gathering around the dinner table with my family, the aroma of a freshly baked pie filling the air. My grandmother, the family’s culinary matriarch, would always let me help with the mashing of the potatoes—a task I took on with great seriousness. As the pie baked, she would tell stories of her own childhood, when her mother would make a similar dish, using whatever ingredients were on hand.


Adapting this family tradition to include Quorn mince has not only made it more inclusive for the vegetarian members of my family but has also added a new layer of flavor that has become a beloved staple. Every bite is a reminder of those cozy afternoons, the warmth of the kitchen, and the love that only a home-cooked meal can convey.


With a difficulty rating of 5/10, this dish is accessible for cooks of all skill levels, ensuring that anyone can bring a piece of this cherished tradition to their own table. Whether it's a simple weeknight dinner or the centerpiece of a family gathering, Cottage Pie with Quorn Mince is sure to delight and comfort, one delicious bite at a time.

Read more about Appetizers

Read more about Main Dishes

Read more about Desserts

Paneer jalfrezi | Made by Meaghan Moineau

Paneer jalfrezi | Made by Meaghan Moineau

Title: A Taste of Home: Reliving Memories with Paneer Jalfrezi
Description: Discover the vibrant flavors of Paneer Jalfrezi, a delightful Indian dish that effortlessly combines fresh ingredients with aromatic spices. Rated 4/10 in difficulty, this main dish is easy enough for a weeknight meal yet impressive enough for a festive gathering. Join me as I take a flavorful journey back to cherished family memories and share a beloved recipe that continues to warm our hearts and homes.

---


There's something incredibly comforting about the aroma of Indian spices sizzling in oil. It transports me back to my childhood, where the kitchen was the heart of our home, filled with laughter, stories, and the mouthwatering scent of my mother's cooking. Paneer Jalfrezi was a staple in our household, a dish that brought everyone together, whether it was a special occasion or just a regular Tuesday night.


Ingredients:

- Paneer


- 2 tbsp oil


- 1 tsp cumin seeds


- 2 tomatoes


- 1 onion


- 1 red bell pepper


- 1 green bell pepper


- 1/2 tsp turmeric powder


- 1/2 tsp chili powder


- 2 green chilies


- 2 kashmiri red dried chilies


- 1 inch ginger, finely sliced


- 1 tsp garam masala


- 1 tsp sugar


- 1 tbsp vinegar


- Fresh coriander, for garnish


- Salt, to taste


Instructions:
1. Prepare the Base: Roughly chop half an onion and two tomatoes. Heat 1 tablespoon of oil in a non-stick pan. Add the onions and fry until they turn lightly brown. Add the tomatoes and cook for 2-3 minutes until softened. Remove from heat, let cool, and blend to a smooth puree.
2. Spice It Up: In the same pan, heat another tablespoon of oil over medium heat. Add cumin seeds and let them sputter to release their aroma. Add the kashmiri red chilies and finely sliced ginger, frying for 30-45 seconds until fragrant.
3. Build the Flavors: Sprinkle in turmeric powder, followed by the remaining chopped onions, bell peppers, chili powder, salt, and two-thirds of the green chilies. Fry for 3-4 minutes, allowing the vegetables to soften and the spices to intermingle.
4. Add the Star Ingredient: Gently add the paneer cubes and cook on low heat for 5 minutes, allowing the paneer to absorb the flavors.
5. Finish with a Flourish: Stir in the tomato puree, garam masala, and sugar, simmering for 2 minutes until the sauce thickens slightly. Add the tomatoes cut into strips and toss everything together. Finally, stir in the vinegar to balance the flavors.
6. Garnish and Serve: Garnish with the remaining green chilies and a generous handful of fresh coriander. Serve hot with naan or rice, and enjoy a meal that’s as heartwarming as it is delicious.
A Family Memory:

Every Sunday, our family would gather at my grandparents' house for a big meal. Paneer Jalfrezi was always on the menu, a dish my grandmother prepared with so much love. I remember sitting on the kitchen floor, watching her expertly slice vegetables while sharing stories from her own childhood. The vibrant colors of the bell peppers, the sizzle of spices hitting hot oil, and the comforting aroma of paneer cooking in rich tomato sauce are memories I cherish deeply. It was in those moments that I learned the true meaning of family and the power of a shared meal.


Difficulty Rating: 4/10
Classification: Main Dish

Paneer Jalfrezi is more than just a meal; it's a celebration of flavors and memories, a tradition I proudly continue with my own family. Whether you're reliving your own nostalgic culinary moments or creating new ones, this dish promises to fill your kitchen with warmth and joy.

Read more about Appetizers

Read more about Main Dishes

Read more about Desserts