Steamed Artichokes With Roasted Red Pepper Aioli
Intro
Growing up, artichokes were a staple at our family dinners. I still remember the excitement of pulling each leaf, savoring its delicate flavor, and dipping it into my grandmother’s secret aioli. The kitchen would fill with laughter and the comforting aroma of freshly steamed artichokes. As I grew older, I decided to add a modern twist to this cherished family recipe by pairing it with a roasted red pepper aioli, a combination that quickly became a new family favorite. Today, I’m thrilled to share this recipe with you, as it brings the warmth of my family’s tradition to your table, with a touch of contemporary flair.
Why You’ll Love It
This recipe for Steamed Artichokes With Roasted Red Pepper Aioli is a delightful combination of simplicity and elegance. Whether you’re hosting a dinner party or enjoying a quiet evening at home, this dish is sure to impress. The artichokes are tender and flavorful, while the roasted red pepper aioli adds a creamy, tangy kick that complements them perfectly. Plus, it’s a healthy and nutritious option, rich in vitamins and heart-healthy fats. You’ll love how easy it is to prepare and the beautiful presentation it offers.
Ingredients
- 2 large artichokes
- 1/4 teaspoon cayenne pepper
- 2 egg yolks
- 1 garlic clove, minced
- 2 tablespoons lemon juice
- 1 cup oil (such as olive or canola)
- 1 roasted red pepper
- Salt, to taste
Instructions
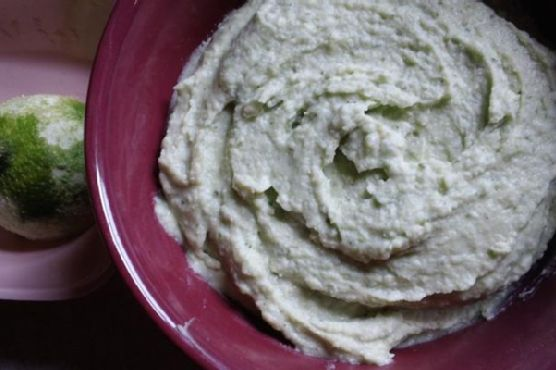
- Place the egg yolks, garlic, cayenne, and salt in a food processor. Puree until smooth.
- Add the roasted red pepper to the mixture, and puree until smooth again.
- While the mixture is pureeing, slowly pour in the oil. Puree until the mixture has emulsified to your desired consistency.
- Taste, then salt as needed. Cover and refrigerate until ready to serve.
- Fill a large pot with 2 inches of water and place a steaming basket over it. Cover and bring to a boil.
- Trim the artichoke stems off, and trim 1/2 inch off the top of the artichoke flower. Pull off any damaged leaves around the base.
- Using kitchen shears, trim each point off the outer leaves.
- Squeeze lemon juice over the cut edges to reduce browning. Sprinkle with salt and place in the steam basket.
- Cover and steam the artichokes for 30-40 minutes, until a center leaf pulls out easily.
- Serve the artichokes with the aioli on the side for dipping! Or try it with fingerling potatoes.
Tips
For the best results, choose artichokes that are firm and have tightly closed leaves. If you’re short on time, you can also use jarred roasted red peppers for the aioli. Be sure to adjust the seasoning to your taste, and feel free to experiment with different oils for unique flavor profiles.
Variations & Substitutions
If you’re looking to change things up, consider adding fresh herbs like basil or parsley to the aioli for an extra burst of flavor. For those who are vegan, you can substitute the egg yolks with a plant-based alternative like aquafaba. Additionally, switching out the cayenne for smoked paprika can give the aioli a smoky depth that’s simply irresistible.
Storage
The steamed artichokes and aioli can be stored separately in the refrigerator. Place the artichokes in an airtight container and consume within 3 days for the best quality. The aioli can be kept in a sealed jar for up to a week. Before serving, let the aioli come to room temperature and give it a good stir.
FAQ
How do I know when the artichokes are done steaming?
The artichokes are perfectly cooked when a center leaf pulls out easily and the base is tender. The color will also become a deeper, more vibrant green.
Can I prepare the aioli in advance?
Yes, the aioli can be made up to two days in advance. This allows the flavors to meld beautifully. Just be sure to store it in the refrigerator and give it a good stir before serving.
What can I serve with steamed artichokes?
Steamed artichokes are quite versatile and pair well with a variety of sides. Consider serving them with roasted potatoes, a fresh green salad, or even grilled fish for a more substantial meal.
Nutrition
This dish is not only delicious but also packed with nutritional benefits. Artichokes are a great source of dietary fiber, vitamin C, and antioxidants. The aioli, made with heart-healthy oils, provides healthy fats that aid in the absorption of fat-soluble vitamins. Overall, it’s a satisfying and nourishing choice for any meal.
Conclusion
Steamed Artichokes With Roasted Red Pepper Aioli is a wonderful way to bring a touch of elegance to your table while staying true to wholesome, homemade flavors. It’s a dish that invites you to slow down, savor each bite, and enjoy the company of those around you. Whether you’re introducing artichokes to your family for the first time or rekindling a love for this classic vegetable, I hope this recipe brings as much joy to your home as it does to mine. Enjoy!
Related update: Steamed Artichokes With Roasted Red Pepper Aioli