Hot Cocaccino | Made by Meaghan Moineau

Hot Cocaccino | Made by Meaghan Moineau

Title: "Hot Cocaccino: A Heartwarming Cup of Memories and Delight"
Description: Dive into the warmth of a deliciously indulgent Hot Cocaccino, a beverage that combines the rich flavors of cocoa and coffee. Perfect for cozy evenings and chilly winter days, this delightful drink is more than just a treat—it's a trip down memory lane.

---


If you're anything like me, the onset of cooler weather means it's time to dust off those cherished warm beverage recipes. Today, I want to share a special concoction that's been a family favorite for generations: the Hot Cocaccino. This delightful drink, with its rich blend of cocoa and coffee, is not only a perfect comfort on a cold day but also a heartwarming reminder of family gatherings and cherished moments.


Ingredients:

- 1 packet of cocoa mix


- 1 cup of milk


- 1/2 cup of light half and half


- 1 tablespoon of instant coffee


- Mini marshmallows


- Chocolate syrup


- Whipped cream


- Sprinkles or a dash of cocoa powder


Instructions:

1. In a medium saucepan, heat the milk and light half and half until very hot, but make sure it doesn’t boil.


2. Remove the saucepan from heat and stir in the hot cocoa mix and instant coffee until well combined.


3. Pour the mixture into mugs or cups, leaving some space at the top for the toppings.


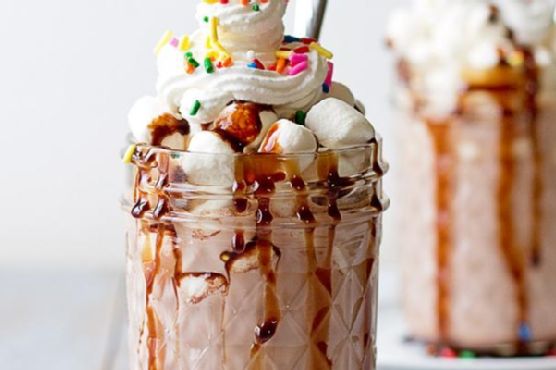
4. Top each serving with a handful of mini marshmallows.


5. Drizzle chocolate syrup over the marshmallows for an extra touch of sweetness.


6. Add a generous dollop of whipped cream on top.


7. Finish with a sprinkle of colorful sprinkles or a dash of cocoa powder for that festive look.


A Nostalgic Journey:

Every sip of this Hot Cocaccino takes me back to winter evenings at my grandmother's house. Her living room was always filled with the faint scent of pine from the Christmas tree, twinkling lights casting a warm glow on our faces. After a long day of sledding with my cousins, we would gather around the fireplace, warming our hands on mugs filled with this comforting beverage.


My grandmother had a knack for turning simple ingredients into something magical. She would tell us stories of how her mother used to make a similar drink during the holidays, using whatever ingredients were available at the time. It was her way of keeping family traditions alive, and now, it’s mine. Each cup of Hot Cocaccino I make is a tribute to those cozy nights and the love that went into every pot.


Difficulty Rating: 3/10
Classification: Dessert

This recipe is not only easy to make but also a wonderful way to create new memories while honoring the old ones. Whether you’re looking to impress guests or just want to indulge yourself, the Hot Cocaccino is a must-try. So, cozy up, take a sip, and let the warmth of this delightful drink transport you back to simpler, happier times.

Read more about Appetizers

Read more about Main Dishes

Read more about Desserts

Roasted Beet and Radicchio Salad | Made by Meaghan Moineau

Roasted Beet and Radicchio Salad | Made by Meaghan Moineau

Title: A Taste of Tradition: Roasted Beet and Radicchio Salad


Description:

Explore the vibrant flavors and rich memories intertwined in our Roasted Beet and Radicchio Salad. This delightful dish combines earthy beets, crispy radicchio, and a tangy vinaigrette, topped with creamy queso fresco. Perfect as an appetizer with a difficulty rating of 4/10, it’s an easy yet impressive addition to any meal.

---


As the cool autumn breeze swept through the trees, painting the landscape with hues of gold and crimson, my family gathered in our cozy kitchen, a tradition that marked the heart of the harvest season. The star of our fall feasts often came in the form of a humble yet exquisite dish: the Roasted Beet and Radicchio Salad. The sight of vibrant beets roasting in the oven, their aroma mingling with the crisp scent of fresh radicchio, always signaled warmth and togetherness.


Ingredients:

- Beets

- Olive oil


- Radicchio


- Red onion


- Radishes


- Fresh mint leaves


- Queso fresco


- Red wine vinegar


- Honey


- Garlic clove


- Salt


- Pepper


Instructions:

1. Preheat your oven to 400°F. Trim the beets and place them in a baking dish. Drizzle with 1 tablespoon of olive oil, cover, and roast for 30-35 minutes, or until they are fork-tender.
2. Prepare the radicchio by cutting it into quarters, removing the core, and slicing into thin strips. Soak the radicchio in a bowl of ice water for 20-30 minutes to mellow its bitterness.
3. Slice the red onion and radishes very thinly. These add a crisp texture and peppery flavor that complement the earthy beets beautifully.
4. Whisk together 3 tablespoons of olive oil, red wine vinegar, honey, minced garlic, salt, and pepper in a small bowl, creating a simple yet flavorful vinaigrette.
5. Peel the cooled beets and cut them into thin wedges. Toss them with the radicchio, onions, radishes, and fresh mint in the vinaigrette.
6. Top your salad with crumbled queso fresco, adding a creamy and slightly tangy finish. Serve immediately to enjoy the fresh, vibrant flavors.

A Nostalgic Touch:

Every autumn, as we prepared this salad, my grandmother would regale us with tales of her childhood. She spoke of her mother’s bustling kitchen, the air filled with laughter and the scent of roasting beets. "It was a time when life was simpler," she’d say, her eyes twinkling with fondness. As we savored each bite of the salad, it was as if we were sharing not just a meal, but a piece of our family's history.

Difficulty Rating: 4/10

Classification: Appetizer


This Roasted Beet and Radicchio Salad is more than just a dish; it’s a cherished tradition, a blend of flavors that echo the love and warmth of family gatherings. Whether you’re looking to recreate a piece of nostalgia or introduce a new classic to your table, this salad is sure to delight both the eyes and the palate.

Read more about Appetizers

Read more about Main Dishes

Read more about Desserts

Coconut-Almond Crusted Tilapia | Made by Meaghan Moineau

Coconut-Almond Crusted Tilapia | Made by Meaghan Moineau

Title: Savor the Islands: Coconut-Almond Crusted Tilapia Recipe

Description: Dive into a culinary escape with our Coconut-Almond Crusted Tilapia, a dish that brings the tropical flavors of the islands right to your kitchen. This delightful main dish is not only simple to prepare but also offers a flavorful experience that will make your taste buds dance. Join us as we explore this recipe's step-by-step guide and share a heartwarming family memory that makes this dish truly special.


---


Coconut-Almond Crusted Tilapia: A Taste of the Tropics


There's something magical about the blend of coconut and almond that transports me back to my grandmother's cozy kitchen. Her little island home always bustled with the scents of tropical spices and fresh seafood, creating a warm haven of delectable aromas. Among her plethora of cherished recipes, the Coconut-Almond Crusted Tilapia stood out as a favorite for our family gatherings.


Ingredients:


- 4 white tilapia fillets


- 1 lemon, halved


- 1/2 cup coconut milk


- 1/2 cup almond flour


- 1/2 cup unsweetened shredded coconut


- Salt, to taste


- Black pepper, to taste


- 1/2 tsp ground ginger


- 1/2 tsp dried mint


- Oil for frying


Instructions:


1. Prep the Fish: Start by patting the tilapia fillets dry with paper towels. Sprinkle both sides of each fillet with a generous pinch of salt and black pepper.
2. Marinate: Squeeze the juice from half a lemon over the fillets and drizzle with coconut milk. Turn the fillets to ensure they're well-coated. Allow them to marinate at room temperature for 15 minutes.
3. Prepare the Breading: In a shallow bowl, combine almond flour, shredded coconut, a touch more salt and pepper, ground ginger, and dried mint. Mix well to create a fragrant breading mixture.
4. Cook the Fish: Heat oil in a large skillet over medium heat. Carefully lay the marinated fillets into the skillet. Cook until both sides are golden brown and the fish flakes easily with a fork—about 3-5 minutes per side for thin fillets, longer for thicker cuts.
5. Drain and Serve: Transfer the cooked fish to a stack of paper towels to drain and cool slightly. Serve immediately for best results, ideally alongside our Tropical Sweets & Reds Mash.

A Nostalgic Family Memory


Every summer, our family would gather at my grandmother's home, nestled by the sea. The highlight of these gatherings was always her Coconut-Almond Crusted Tilapia. I remember as a child, eagerly watching her in the kitchen, fascinated by how she gracefully turned simple ingredients into a meal that united us all. Each bite of the crispy, flavorful fish was a reminder of love, laughter, and shared moments—a tradition I now carry on in my own kitchen.


Difficulty Rating: 4/10


This delightful dish is relatively easy to prepare, making it perfect for both weeknight dinners and special occasions. With minimal ingredients and straightforward instructions, even novice cooks can successfully recreate this island-inspired delight.


Classification: Main Dish


Whether you're hosting a dinner party or looking for a new family favorite, this Coconut-Almond Crusted Tilapia is sure to impress. Pair it with a light salad or our Tropical Sweets & Reds Mash for a complete meal that celebrates the flavors of the tropics.


---


Bring a touch of island magic to your table with this Coconut-Almond Crusted Tilapia. It's more than just a dish—it's a journey to the heart of family traditions and the vibrant flavors of the sea.

Read more about Appetizers

Read more about Main Dishes

Read more about Desserts

Baharat Panko Crusted Albacore Tuna | Made by Meaghan Moineau

Baharat Panko Crusted Albacore Tuna | Made by Meaghan Moineau

Title: "A Taste of Tradition: Baharat Panko Crusted Albacore Tuna"
Description: Dive into the delightful fusion of flavors with Baharat Panko Crusted Albacore Tuna, a dish that marries the spicy warmth of Middle Eastern spices with the delicate freshness of albacore tuna. This recipe not only tantalizes the taste buds but also evokes cherished family memories of culinary traditions passed down through generations. Perfect as an appetizer or a main dish, this recipe is a 6 out of 10 in difficulty, making it an exciting challenge for home cooks.

---


A Taste of Tradition: Baharat Panko Crusted Albacore Tuna

Cooking has always been more than just a culinary exercise for my family—it's a way of preserving stories, traditions, and the essence of who we are. Growing up, the kitchen was the beating heart of our home. The gentle sizzle of oil, the rhythmic chopping of vegetables, and the aromatic symphony of spices were the background music to our family saga.


One dish that particularly stands out is the Baharat Panko Crusted Albacore Tuna. A creation born from the confluence of our diverse heritage, it has become a beloved staple at family gatherings. The combination of the exotic Baharat spice mix and the crispy panko crust always transports me back to those carefree days in my grandmother's kitchen.


Ingredients:

- Sashimi-grade albacore tuna


- Flour


- Coconut milk


- Wedge of lemon


- Panko


- Baharat spice mix


- Fleur de sel


- Black bell pepper


Instructions:

1. Begin by very gently cutting the albacore tuna in half, lengthwise, to ensure it fits comfortably in your pan. Remember, the key is not to push the knife through but to let it glide, using your free hand to stabilize the fish.


2. In a bowl, whisk together the coconut milk and lemon juice. This mixture will provide a subtle, tangy undertone that complements the spicy baharat.


3. In a separate bowl, mix the panko, baharat, fleur de sel, and pepper. This blend will give the tuna its signature crispy crust.


4. Place the flour in a third bowl, ready for dredging.


5. Season the tuna with fleur de sel and pepper, enhancing its natural flavors.


6. Dredge the seasoned tuna in flour, ensuring it's evenly coated.


7. Dip the floured tuna into the coconut milk and lemon mixture, allowing any excess to drip off.


8. Finally, coat the tuna finely with the panko mixture, pressing gently to ensure an even crust.


9. Heat oil in a pan over medium-high heat, and sear each side of the tuna until the panko turns golden brown. For a rare finish, a minute per side is all you need.


10. Once seared, place the tuna on a paper towel to absorb any excess oil and let it set for a few minutes.


Nostalgic Story:

Every bite of this dish takes me back to a particular summer evening when my grandmother first introduced us to it. We were gathered around the long oak table in her sun-dappled dining room, the air rich with laughter and the scent of spices. She recounted stories of her childhood in the Middle East, where Baharat was a staple in her family's kitchen. As we savored the crispy, succulent tuna, it felt like we were participating in a cherished ritual, connecting with our roots through taste and tradition.


Difficulty and Classification:

This recipe is rated a 6 out of 10 in difficulty. It requires some precision and care, especially when handling the delicate tuna and achieving the perfect sear. However, it is well worth the effort. Whether served as a sophisticated appetizer or a standout main dish, Baharat Panko Crusted Albacore Tuna is sure to impress and evoke a sense of nostalgia and warmth at any table.


Embrace the flavors, the memories, and the joy of sharing this dish with those you love. Happy cooking!

Read more about Appetizers

Read more about Main Dishes

Read more about Desserts

Barbecued Shrimp & Grits | Made by Meaghan Moineau

Barbecued Shrimp & Grits | Made by Meaghan Moineau

Savoring Southern Comfort: Barbecued Shrimp & Grits


A Nostalgic Twist on a Southern Classic


Introduction


There’s something undeniably heartwarming about the rich, savory flavors of Southern cuisine. Among the myriad of dishes that capture the essence of Southern hospitality, Barbecued Shrimp & Grits stands out as a true classic. This dish not only tantalizes the taste buds with its delightful combination of textures and flavors but also evokes cherished memories of family gatherings and warm summer evenings. Today, I’m sharing a treasured recipe that brings together the smoky goodness of bacon, the creamy comfort of grits, and the tangy kick of barbecue sauce. Let’s dive into this delectable journey!


Ingredients


- Bacon


- Barbecue sauce


- Butter


- Garlic cloves


- Grits


- Raw shrimp


- Salt


- Scallions


- Sharp cheddar cheese


- Water


Instructions


1. Prepare the Bacon: Fry bacon until crisp, crumble, and set aside. The aroma of sizzling bacon is just the beginning of our culinary adventure.
2. Prep the Shrimp: Peel and devein the shrimp. For that smoky, char-grilled flavor, skewer and grill them for 2-3 minutes on each side, or until they turn a lovely shade of pink. Alternatively, you can fry them over medium heat for about 5-8 minutes total, until perfectly cooked.
3. Sauté the Garlic: In 1 tablespoon of butter, sauté minced garlic until fragrant. This will infuse the dish with a subtle, yet robust flavor.
4. Cook the Grits: Bring water to a boil and stir in the grits. Cover and let them cook for 5 minutes before reducing the heat to low. Stir in sharp cheddar cheese, the remaining butter, sautéed garlic, and a pinch of salt to create a creamy, dreamy base.
5. Toss the Shrimp: Coat the cooked shrimp in your favorite barbecue sauce for that signature tangy and sweet glaze.
6. Assemble the Dish: In a bowl, layer the creamy grits, barbecue shrimp, crispy bacon, and freshly sliced scallions. Serve it piping hot, with an optional drizzle of extra barbecue sauce for added flair.

Family Memory


Every summer, our family would gather at my grandparent’s old farmhouse, a place where time seemed to stand still amidst the rolling hills and sprawling oak trees. My grandmother, a true Southern belle, would prepare her famous Shrimp & Grits, a dish that was as much a part of our family tradition as the laughter and stories shared around the table.


I remember the anticipation building as the aroma of bacon and garlic wafted through the screen doors, signaling the feast that awaited us. My cousins and I would scamper around the porch, while the adults chattered and clinked glasses of sweet tea. As we finally settled down to eat, the first bite of creamy grits paired with the tangy barbecue shrimp would silence the room, if only momentarily, as we all savored the comforting flavors.


Even now, each time I prepare this dish, I’m transported back to those sun-drenched afternoons, surrounded by family, love, and the unmistakable taste of home.


Difficulty Rating


Difficulty: 5/10

This dish is perfect for home cooks looking to impress with minimal effort. It requires basic cooking techniques and simple ingredients that come together beautifully.


Classification


Category: Main Dish

Barbecued Shrimp & Grits is a hearty and satisfying main course that pays homage to the rich culinary heritage of the South. Whether you’re sharing it with family or enjoying a cozy dinner for two, this dish is sure to become a beloved favorite.


Conclusion


Barbecued Shrimp & Grits is more than just a meal; it's a celebration of flavors and memories that bring people together. I encourage you to try this recipe and create your own cherished moments with family and friends. After all, food is not just about nourishment, but also about creating connections and savoring life’s simple pleasures.

Read more about Appetizers

Read more about Main Dishes

Read more about Desserts

Bittersweet chocolate pudding | Made by Meaghan Moineau

Bittersweet chocolate pudding | Made by Meaghan Moineau

Title: Nostalgic Delights: The Bittersweet Chocolate Pudding That Transports You Back in Time
Description: Dive into the heartwarming world of bittersweet chocolate pudding, a dessert that not only tantalizes your taste buds but also evokes cherished family memories. Discover how this simple yet decadent treat, crafted from cocoa powder, cornstarch, and more, can become a staple in your family gatherings. Rated as a 4 out of 10 on the difficulty scale, this dessert is perfect for both novice cooks and seasoned chefs seeking a touch of nostalgia.

---


Nostalgic Delights: The Bittersweet Chocolate Pudding That Transports You Back in Time

There's something incredibly comforting about a rich, velvety bowl of bittersweet chocolate pudding. For many, it's more than just a dessert; it's a portal to cherished family memories and the warmth of home. As the aroma of cocoa and vanilla fills the kitchen, I'm instantly transported back to my grandmother's cozy kitchen, where the magic of pudding-making unfolded.


A Family Tradition

Every Sunday, after a hearty family dinner, my grandmother would bring out her well-worn saucepan, a trusted companion in countless culinary adventures. The recipe was simple—cocoa powder, cornstarch, egg, milk, salt, sugar, unsalted butter, and vanilla extract—but the result was nothing short of magical. As children, my siblings and I would gather around the stove, watching in awe as she expertly whisked the ingredients together.


The moment the milk mixture hit the saucepan, a sense of anticipation filled the air. We knew that soon, the kitchen would be filled with the intoxicating scent of chocolate. The gentle bubbling and thickening of the mixture were signals that the pudding was close to perfection. Once the butter and vanilla were stirred in, the mixture was lovingly poured into molds, each rinsed with cold water to ensure a smooth release.


The Art of Waiting

Chilling the pudding was perhaps the hardest part. As it rested in the refrigerator, we would impatiently count down the minutes, eagerly awaiting the moment we could indulge. But my grandmother always reminded us that patience was a virtue, especially when it came to creating something truly special.


A Bite of Bliss

Finally, the moment would arrive. The pudding, now perfectly set, was gracefully released from its mold onto a plate. The first spoonful was always the best—rich, creamy, and with just the right amount of bittersweet chocolate flavor. It was more than just a dessert; it was a taste of love, crafted with care and shared with family.


Crafting Your Own Memories
Creating your own bittersweet chocolate pudding is a rewarding experience, rated as a 4 out of 10 in difficulty. Whether you're a novice or an experienced cook, this dessert offers a delightful challenge and the opportunity to make your own cherished memories. Simply follow these steps:

1. In a medium saucepan, whisk together the cornstarch, cocoa powder, sugar, and salt.


2. In a separate bowl, combine the milk and egg.


3. Gradually pour the milk mixture into the saucepan, whisking until thoroughly mixed.


4. Heat the mixture over medium heat, stirring constantly until it boils. Cook for 1 minute, then remove from heat.


5. Stir in butter and vanilla extract.


6. Pour the pudding into molds rinsed with cold water and chill until set.


A Sweet Conclusion

Bittersweet chocolate pudding is more than just a dessert—it's an invitation to pause, savor, and celebrate the simple joys of life. Whether you enjoy it alone or share it with loved ones, this pudding is a testament to the power of food to create and evoke precious memories. So, gather your ingredients, embrace the process, and let this delightful dish transport you back to simpler times.

Read more about Appetizers

Read more about Main Dishes

Read more about Desserts

Butternut Squash Gnocchi With Whiskey Cream Sauce | Made by Meaghan Moineau

Butternut Squash Gnocchi With Whiskey Cream Sauce | Made by Meaghan Moineau

Butternut Squash Gnocchi with Whiskey Cream Sauce: A Savory Autumn Delight


Description

Dive into the heart of autumn with our Butternut Squash Gnocchi paired with a rich Whiskey Cream Sauce. This recipe combines the comforting flavors of roasted butternut squash and the warming notes of bourbon, creating a dish that’s perfect for a cozy dinner at home. Whether you're an experienced chef or a home cook looking for a challenge, this dish is sure to impress your family and friends with its unique flavor profile and elegant presentation.

Ingredients

- 1 large butternut squash

- ½ cup Parmesan cheese, grated


- ¼ teaspoon nutmeg


- 1 teaspoon salt


- ½ teaspoon bell pepper


- 2 large eggs


- 2 tablespoons butter


- 1 ½ cups all-purpose flour, plus more for dusting


- 2 diced shallots


- 2 cloves garlic, minced


- ½ cup chicken stock


- ¼ cup bourbon


- 1 cup heavy cream


- Salt and pepper to taste


- Fresh thyme leaves for garnish


Instructions


1. Roasting the Squash: Preheat your oven to 450°F (232°C). Cut the butternut squash in half and remove the seeds. Place the halves on a lightly oiled, rimmed baking sheet. Roast for 30-40 minutes, or until the flesh is soft. Scoop out the squash and puree it in a food processor until smooth.
2. Making the Gnocchi Dough: In a large bowl, combine the pureed squash with Parmesan cheese, nutmeg, salt, pepper, and eggs. Gradually add the flour, mixing by hand until the dough is smooth but sticky.
3. Forming the Gnocchi: Lightly flour a work surface and your hands. Roll a handful of dough into a long strip, about 1 inch in diameter. Cut the strip into 1-inch pieces. To create ridges, gently roll each piece with a fork. Place the formed gnocchi on floured parchment paper.
4. Cooking the Gnocchi: Bring a large pot of salted water to a boil. Cook the gnocchi in batches until they float to the surface, about 5 minutes per batch. Remove with a slotted spoon and set aside.
5. Preparing the Whiskey Cream Sauce: In a large skillet over medium heat, melt butter and whisk in flour until smooth. Add the shallots and garlic, sautéing for about 3 minutes. Pour in the bourbon and chicken stock, whisking as you increase the heat to bring the mixture to a boil. Reduce the sauce to a gravy-like consistency, then lower the heat and stir in the heavy cream. Season with salt and pepper to taste.
6. Combining and Serving: Add the cooked gnocchi to the cream sauce, stirring gently to coat. Serve the gnocchi warm, garnished with fresh thyme leaves.

A Nostalgic Family Memory

As the leaves turned golden and the air grew crisp, our family kitchen became a hub of warmth and laughter. My grandmother, with her apron perpetually dusted with flour, would gather us around the table to make her famous butternut squash gnocchi. The kitchen was filled with the sweet, nutty aroma of roasting squash, a scent that mingled with the laughter of children and the storytelling of the elders.

I remember the sense of accomplishment as I learned to roll the gnocchi under the fork, creating those distinctive ridges for the first time. It was a task that seemed monumental in my young eyes, but my grandmother’s gentle guidance made it seem like magic. Each piece of gnocchi was a testament to our collective effort, and when we finally sat down to eat, the dish was more than just a meal—it was a celebration of family and tradition.


Even now, preparing this recipe brings me back to those cherished times, as if each bite is a bridge to those joyful autumn evenings.


Difficulty: 7/10

Classification: Main Dish


This Butternut Squash Gnocchi with Whiskey Cream Sauce is a delightful main dish that requires a bit of patience and skill but rewards you with a flavorful and elegant meal. Enjoy creating and sharing this dish with your loved ones!

Read more about Appetizers

Read more about Main Dishes

Read more about Desserts

Ancho Chipotle Chili | Made by Meaghan Moineau

Ancho Chipotle Chili | Made by Meaghan Moineau

Title: "Spice Up Your Dinner Table with Ancho Chipotle Chili: A Hearty Family Favorite"
Description: Dive into the rich and smoky flavors of Ancho Chipotle Chili, a dish that brings warmth and nostalgia to any dinner table. Discover how this simple yet robust recipe, rated 6/10 in difficulty, can transform into a cherished family tradition. Perfect as a main dish, this chili combines savory ground beef, vibrant bell peppers, and the deep flavors of ancho and chipotle chiles, offering a symphony of taste in every bite.

---


There’s something uniquely comforting about a pot of chili simmering on the stove, its fragrant spices wafting through the house. For my family, Ancho Chipotle Chili isn't just a meal; it's a treasured tradition that brings us back to simpler times. This dish, rich in flavor and steeped in nostalgia, has been a staple at our family gatherings for generations.


Ingredients You'll Need:


- Dried ancho chile


- Vegetable bouillon powder


- Cumin


- Dried chipotle chile


- Fresh cilantro


- Ground beef


- Mushrooms


- Onion


- Dried oregano


- Red bell pepper


- Salt and pepper


- Tomato sauce


- Water


Instructions:


1. Prepare the Chiles: Start by slicing open the dried ancho and chipotle chiles to remove the seeds and pith. In a warm skillet over medium heat, toast the chiles for a few seconds on each side until they become fragrant—be careful not to burn them! Remember to wear gloves or wash your hands thoroughly after handling the chiles.
2. Soak the Chiles: Place the toasted chiles in a bowl or saucepan, pouring 250ml of boiling water over them. Allow them to soak for at least 15 minutes to soften.
3. Saute the Vegetables: In a large pot, sauté the chopped red bell pepper, onion, and mushrooms over medium heat until they are tender and aromatic.
4. Crisp the Beef: Meanwhile, in a separate skillet, fry the ground beef until it is crispy and browned.
5. Blend the Chiles: Once soaked, blend the chiles along with their soaking liquid to create a smooth paste.
6. Combine Ingredients: Add the crispy beef to the pot with sautéed vegetables, followed by the tomato sauce and blended chiles. If the mixture requires more liquid, add beef or vegetable broth (or water mixed with bouillon powder) until everything is adequately covered.
7. Season and Simmer: Season the chili with salt, pepper, cumin, and oregano to taste. Allow it to simmer gently for about 45 minutes, or until it reaches your desired thickness.
8. Serve: Ladle the chili into bowls and garnish with fresh cilantro for a burst of freshness.

A Taste of Family Tradition


Every time I prepare Ancho Chipotle Chili, I am transported back to my grandmother's kitchen. I remember the joy of watching her work her magic, effortlessly blending spices and ingredients. The kitchen was always filled with the laughter of cousins and the clatter of dishes, a symphony of sounds that signaled a meal made with love.


One particular memory stands out: a chilly autumn evening when the whole family gathered after a day of apple picking. We were all huddled around the table, bowls of steaming chili in front of us, as my grandmother recounted stories of our ancestors' culinary adventures. That night, the warmth of the chili was more than just physical; it was a reminder of our shared history and the love that binds us.


Difficulty Rating: 6/10


This Ancho Chipotle Chili recipe is moderately easy to prepare, making it accessible for both novice and experienced cooks. With a bit of patience and attention to detail, you'll create a dish that's sure to become a beloved staple in your own family tradition.


Classification: Main Dish


Whether served at a family gathering or a casual weeknight dinner, this chili is sure to satisfy and delight. Its robust flavors and hearty ingredients make it the perfect main dish to warm your heart and soul. So, gather your loved ones, share stories, and savor the taste of tradition with every spoonful.

Read more about Appetizers

Read more about Main Dishes

Read more about Desserts

Cheesy Spinach Stuffed Shells | Made by Meaghan Moineau

Cheesy Spinach Stuffed Shells | Made by Meaghan Moineau

Title: A Cheesy Affair: Spinach Stuffed Shells Bringing Families Together
Description: Dive into the delightful world of Cheesy Spinach Stuffed Shells – a comfort dish that's sure to win hearts and taste buds. This blog post not only takes you through a step-by-step guide to creating this delectable main dish but also shares a heartwarming family memory that makes this recipe truly special. With a difficulty level of 5 out of 10, it's perfect for home cooks looking to impress without stress.

---


A Cheesy Affair: Spinach Stuffed Shells Bringing Families Together


There's something undeniably magical about a dish that not only tantalizes your taste buds but also warms your heart with cherished memories. Cheesy Spinach Stuffed Shells is that dish for me. With every bite, I'm transported back to a bustling kitchen filled with laughter and the aroma of melting cheese and fresh basil.


Ingredients List


- Jumbo shells


- Cooked frozen spinach


- Wheat germ


- Shredded Parmesan cheese


- Pecans


- Shredded Mexican cheese


- Diced green onions


- Salt and dried basil


- Eggs


- Water


- Alfredo sauce


- Spaghetti sauce


Nostalgia on a Plate


Growing up, Sunday evenings were a sacred time in our house. It was the one day of the week when my entire family would gather around the table, eager to share stories and, of course, indulge in a delicious meal. One of my favorite dishes during these gatherings was my grandmother's Cheesy Spinach Stuffed Shells. I remember standing on a stool beside her, my small hands eager to help as I watched her create magic with simple ingredients.


Her secret? A sprinkle of nostalgia and a whole lot of love. She would recount tales of her own childhood, where she learned to cook by her mother's side, as we stuffed the shells together. The kitchen would come alive with the sounds of sizzling sauces and bubbling cheese, creating a symphony of flavors that even today, I strive to replicate.


Step-by-Step Instructions


1. Prepare the Shells: Begin by pre-boiling the jumbo shells in a large pot of salted water for about 9 minutes. This ensures they are perfectly al dente, as they will finish cooking in the oven. Once done, drain the shells face down on a paper towel to remove excess water.
2. Create the Filling: While the shells cool, focus on the filling. Cook the frozen spinach in the microwave, following the box instructions, but don't add water. Once cooked, mix the spinach with wheat germ, Parmesan cheese, shredded Mexican cheese, chopped pecans, and diced green onions. Season with salt, pepper, and dried basil. A hint of nutmeg is optional but recommended for an extra layer of warmth.
3. Combine and Stuff: Add two eggs and a splash of water to the spinach mixture, ensuring it's well combined. Stuff each shell generously with the mixture, aiming for about 16-20 shells.
4. Assemble the Dish: Grease an 8x8 pan with cooking spray. Spread a layer of Alfredo sauce on the bottom, followed by spaghetti sauce. Arrange the stuffed shells on top and cover them with the remaining sauce.
5. Bake to Perfection: Preheat your oven to 350 degrees. Bake the shells uncovered for 30-35 minutes, or until the sauce is bubbly. Serve hot and enjoy the cheesy goodness!

A Family Tradition


This main dish, with a difficulty rating of 5 out of 10, is not just a meal – it's a tradition. Every time I prepare Cheesy Spinach Stuffed Shells, I'm reminded of the joy of cooking with family, the laughter echoing in the kitchen, and the love that filled our home. It's a reminder that food can be more than sustenance; it can be a bridge to our past and a way to keep family memories alive.


So, gather your loved ones, roll up your sleeves, and create your own memories with this comforting and delicious recipe. Whether you're a seasoned chef or a beginner, this dish is your ticket to a heartwarming culinary experience.


---


Embrace the nostalgia and enjoy the cheesy delight that is Cheesy Spinach Stuffed Shells. Bon appétit!

Read more about Appetizers

Read more about Main Dishes

Read more about Desserts

Black Bean Brownies | Made by Meaghan Moineau

Black Bean Brownies | Made by Meaghan Moineau

Title: "Decadent Black Bean Brownies: A Sweet Twist on a Classic Treat"
Description:

Dive into the rich, chocolatey world of Black Bean Brownies—a delightful dessert that combines the wholesome goodness of black beans with the indulgent flavors of cocoa and chocolate. Perfect for health-conscious dessert lovers, these brownies are not only tasty but also packed with protein and fiber. Follow our simple recipe, enriched with a touch of nostalgia, to create a treat that will satisfy your sweet tooth and transport you back to cherished family moments.


---


The Magic of Black Bean Brownies: A Family Tradition

Growing up, weekends at Grandma's house were a treasure trove of aromas and laughter. Her kitchen was a sanctuary where culinary magic came alive with every dish she prepared. Among her beloved recipes, her unique twist on brownies stood out—a recipe that has since become a cherished family tradition. Grandma's Black Bean Brownies were a testament to her creativity and knack for infusing love into every bite.


I still vividly remember the first time I helped her make these brownies. The air was filled with the rich scent of cocoa and the faint hint of espresso, mingling with the warmth of family chatter. My little hands were eager to assist, and Grandma patiently guided me through every step. As I watched her skillfully blend the ingredients, she shared stories of her childhood and the origins of her secret recipe, which she discovered in an old cookbook long forgotten on a dusty shelf.


These brownies were more than a dessert; they were a symbol of family unity and the ingenuity that turned simple pantry staples into something extraordinary. The secret, Grandma revealed, was the black beans—an unexpected ingredient that added a creamy texture and a nutritious twist to the classic chocolate treat.


Recipe: Black Bean Brownies
Ingredients:

- 1 can (15 oz) black beans, drained and rinsed


- 2 tablespoons canola oil


- 1/4 cup unsweetened applesauce


- 2 large eggs


- 1 egg yolk


- 3/4 cup sugar


- 1/3 cup unsweetened cocoa powder


- 1 teaspoon espresso powder


- 1/2 cup semi-sweet chocolate, chopped


- 2 tablespoons unsalted butter


- 1 teaspoon vanilla extract


- 1/4 teaspoon salt


- 1/4 cup all-purpose flour


- 1/4 cup walnuts, chopped (optional)


Instructions:

1. Preheat your oven to 350°F (175°C). Line an 8x8-inch baking pan with foil and coat with nonstick cooking spray.


2. In a food processor, combine the black beans, canola oil, applesauce, eggs, egg yolk, sugar, cocoa powder, and espresso powder. Pulse for about 1 minute, or until the mixture is smooth.


3. In a microwave-safe bowl, combine the chopped chocolate and butter. Microwave for 1 minute, stirring halfway through. Continue stirring until smooth. Allow it to cool slightly.


4. Add the melted chocolate mixture, vanilla extract, and salt to the food processor and pulse to blend.


5. Transfer the batter to a large bowl and stir in the flour until fully incorporated.


6. Spread the batter evenly into the prepared baking pan. Smooth the top with a spatula and sprinkle with walnuts, if desired.


7. Bake for 25 to 30 minutes, or until a toothpick inserted into the center comes out clean. Allow the brownies to cool in the pan on a wire rack for 15 minutes before cutting them into squares.


Difficulty Rating: 4/10
Classification: Dessert

These Black Bean Brownies, enriched with memories and love, have become a staple dessert in our family gatherings, evoking nostalgia with every bite. Whether you're introducing them to your loved ones or savoring them alone, may they bring joy and a touch of that familial warmth to your table. Enjoy!

Read more about Appetizers

Read more about Main Dishes

Read more about Desserts

Cranberry Margarita | Made by Meaghan Moineau

Cranberry Margarita | Made by Meaghan Moineau

Title: "Cranberry Margarita: A Festive Twist on a Classic Cocktail"
Description: Discover the perfect blend of tart cranberries and smooth tequila with our Cranberry Margarita recipe. This drink not only delights the taste buds but also brings back cherished family memories. Perfect for holiday gatherings, this cocktail is sure to impress your guests. Easy to prepare and beautifully garnished with sugared cranberry swizzle sticks, it's an elegant addition to any festive occasion.

---


A Festive Cranberry Margarita: Bringing Back Holiday Cheer


As the leaves turn golden and the air becomes crisp, there’s one thing that always signals the start of the holiday season in my family: the making of our beloved Cranberry Margarita. This cocktail has become more than just a drink; it’s a staple of our holiday gatherings, a symbol of joy and togetherness.


Ingredients


- Fresh Cranberries: The star of the show, offering a tart and vibrant flavor.
- Grand Marnier: Adds a hint of orange and depth to the cocktail.
- Orange Juice: Provides a fresh and zesty base for the syrup.
- Light Karo Syrup: Used to create a sweet glaze for the cranberry swizzle sticks.
- Sugar: Essential for both the cranberry puree and the sugared glass rim.
- Tequila: The heart of the margarita, bringing warmth and a kick.

Instructions


1. Prepare the Cranberry Puree: In a saucepan over medium heat, melt a cup of sugar in the orange juice. Add the cranberries, reserving some for the skewers, and simmer over low heat for 10 minutes. Allow it to cool before blending the cranberries into a smooth puree. Strain the mixture to achieve a refined texture.
2. Mix the Margarita: In a shaker filled with crushed ice, combine 1 1/2 ounces of tequila, 1/2 ounce of Grand Marnier, and 2 ounces of the cranberry puree. Shake well to mix all the flavors together.
3. Craft the Swizzle Sticks: Skewer several cranberries onto 10 skewer sticks, leaving one end exposed. Lightly brush each skewer with Karo syrup and sprinkle with sugar. Lay the skewers on wax paper and freeze until set.
4. Serve with Style: Pour the margarita into a sugar-rimmed martini glass. Add a frozen cranberry swizzle stick for an elegant garnish.

A Nostalgic Family Memory


I remember the first Thanksgiving my grandmother introduced this Cranberry Margarita to our family tradition. I was just a child, watching in awe as she skillfully crafted each cocktail with love and precision. The kitchen was filled with laughter, the scent of fresh cranberries, and the soft glow of candlelight. As she handed out the vibrant drinks, each adorned with a sparkling cranberry skewer, she shared stories of holidays past, weaving a tapestry of family history with every sip. This drink became synonymous with our family gatherings, a reminder of her warmth and the festive spirit that brings us all together.


Difficulty Rating: 5/10


While the recipe requires a few steps, such as making the cranberry puree and crafting the swizzle sticks, it's straightforward enough for any home bartender. The result is a stunning, flavorful cocktail that’s sure to impress.


Classification: Appetizer


Perfect as a prelude to a holiday meal, this Cranberry Margarita is an appetizer for the senses, whetting the palate with its vibrant flavors and festive presentation.


---


This Cranberry Margarita isn't just a drink; it's a vessel for memories, a tradition that brings warmth and joy to our family gatherings. Whether you're creating new memories or cherishing old ones, this cocktail is the perfect companion for your holiday celebrations. Cheers to family, tradition, and the festive spirit of the season!

Read more about Appetizers

Read more about Main Dishes

Read more about Desserts

Healthy Mint Brownies | Made by Meaghan Moineau

Healthy Mint Brownies | Made by Meaghan Moineau

Indulge in Healthy Mint Brownies: A Nostalgic Treat with a Wholesome Twist


Description


Dive into a world of rich, decadent flavors with our Healthy Mint Brownies—an irresistible dessert that combines the classic delight of mint and chocolate with a nutritious twist. Made with wholesome ingredients like black beans, avocado, and almond milk, these brownies promise a guilt-free indulgence. Whether you’re a seasoned baker or a curious newbie, this recipe will guide you through creating a dessert that is not only delicious but also packed with healthier ingredients. Perfect for every occasion, these brownies will transport you back to fond memories while making new ones.


---


A Family Tradition Reimagined: The Story Behind the Brownies


Growing up, family gatherings were always a cherished time, filled with laughter, stories, and, of course, food. One of the most anticipated treats during these events was my grandmother's mint brownies—a recipe she had perfected over decades. The moment we walked into her kitchen, the air would be filled with the comforting aroma of chocolate and mint, making it impossible to resist sneaking a taste before dinner.


As I grew older and more health-conscious, I wanted to preserve this beloved family tradition while adapting it to align with a more balanced lifestyle. Thus, the Healthy Mint Brownies were born. By incorporating nutrient-rich ingredients like black beans and avocado, and swapping traditional sugar for coconut sugar and powdered xylitol, I was able to recreate the nostalgic flavors of my grandmother’s recipe with a modern, healthful twist.


Every time I prepare this dessert, I’m reminded of those joyful gatherings and the warmth of family. It’s a testament to how food can connect us to our past, while also allowing us to innovate for the future.


---


Ingredients


- 1/4 cup almond milk


- 1/4 cup unsweetened applesauce


- 1 tablespoon ground flax


- 1/2 cup frozen blueberries


- 1 canned whole unsweetened jar pear


- 1 can black beans, drained and rinsed


- 1/4 cup grape seed oil


- 1 tablespoon natural butter extract


- 1 teaspoon vanilla extract


- 1 teaspoon peppermint extract


- 1/2 cup coconut sugar


- 1/2 cup cocoa powder


- 1 teaspoon baking powder


- 1/2 teaspoon baking soda


- 1/4 teaspoon pink salt


- 1/2 cup white rice flour


- 1/2 cup white spelt flour


- 1/2 cup dark chocolate chunks


- 1 ripe avocado


- 1/2 cup full-fat coconut milk or heavy cream


- 1/2 cup powdered xylitol


- Green drop natural food coloring (optional)


- 1/2 cup dark chocolate, melted


- 2 tablespoons oil


---


Instructions


1. Prepare the Flax Mixture: Combine the ground flax, applesauce, and almond milk in a small bowl. Set aside to thicken.
2. Blend the Base: In a food processor, combine the frozen blueberries, canned pear, black beans, and grape seed oil. Pulse until smooth. Add the butter, vanilla, and peppermint extracts, and blend until fully combined.
3. Mix the Dry Ingredients: Transfer the blended mixture to a medium-sized mixing bowl. Add the coconut sugar, cocoa powder, baking powder, baking soda, and pink salt. Mix well.
4. Form the Batter: Add the white rice flour, white spelt flour, and dark chocolate chunks to the mixture and stir until just combined.
5. Bake: Pour the batter into a prepared baking dish and bake at 350°F (175°C) for 44-45 minutes. Allow the brownies to cool for at least 50 minutes, or speed up the cooling process by refrigerating for 20-30 minutes.
6. Create the Mint Filling: In a small bowl, beat the avocado and coconut milk (or heavy cream) on high for about 5 minutes, until fluffy and smooth. Add the powdered xylitol, peppermint extract, and optional food coloring, beating until well incorporated. Spread the filling evenly over the cooled brownies and refrigerate for 10 minutes to firm.
7. Finish with Chocolate: Melt the dark chocolate and mix with oil. Pour over the brownies, spreading quickly and evenly. Return to the fridge for another 5 minutes until the chocolate is set.
8. Serve: Cut the brownies with a sharp knife and serve chilled or at room temperature. Store leftovers in an airtight container in the refrigerator.

---


Difficulty Rating: 4/10


Classification: Dessert


These Healthy Mint Brownies are a delightful and nutritious take on a classic dessert, perfect for any family gathering or personal indulgence. Enjoy the combination of rich chocolate and refreshing mint while reminiscing about cherished family memories.

Read more about Appetizers

Read more about Main Dishes

Read more about Desserts

Peanut Butter Sriracha Cookies | Made by Meaghan Moineau

Peanut Butter Sriracha Cookies | Made by Meaghan Moineau

Spicy Sweet Nostalgia: Peanut Butter Sriracha Cookies


Description: Dive into a culinary adventure with our Peanut Butter Sriracha Cookies — where the classic comfort of peanut butter meets a fiery twist of sriracha. This unique dessert not only satisfies your sweet tooth but also tickles your taste buds with a subtle heat, making it the perfect conversation starter at any gathering. Rated a 4 out of 10 in difficulty, even novice bakers can tackle this recipe with ease. Join us as we blend flavors and memories, creating a treat that's as heartwarming as it is intriguing.

---


A Sweet and Spicy Family Tradition


Growing up, our family kitchen was always a bustling hub of activity. The scent of freshly baked cookies often filled the air, drawing us in like moths to a flame. My grandmother, the culinary maestro of the family, believed that every recipe told a story — and her Peanut Butter Sriracha Cookies were no exception.


It was the summer of my tenth birthday, and as a tradition, my grandmother let me choose the special treat for our annual family picnic. Having recently discovered the joys of spicy foods, I boldly requested a cookie that matched my newfound adventurous palate. With a twinkle in her eye, Grandma nodded and said, "Let's spice things up a little, shall we?"


The kitchen became our playground. As she expertly creamed together the unsalted butter, crunchy peanut butter, and sugars, I watched in awe, eagerly awaiting my turn to contribute. Slowly, she added the sriracha, its vibrant red swirling into the creamy mixture like a secret waiting to be uncovered. I was entrusted with the task of cracking eggs and measuring out vanilla extract — a responsibility I took very seriously.


In another bowl, we mixed the flour, baking powder, baking soda, and salt, the dry ingredients resembling the sands of a distant desert, waiting to be united with our spicy concoction. I held my breath as we combined the two mixtures, the batter rich with promise.


After an hour of chilling, the dough was ready. I gleefully rolled it into balls, dipping each top in granulated sugar before placing them on the cookie sheet. Grandma guided my hands as we pressed a criss-cross pattern into each one, the fork leaving its indelible mark.


As the cookies baked, the sweet and spicy aroma wafted through the house, drawing curious family members into the kitchen. When they finally emerged from the oven, we placed a Hershey's chocolate kiss atop each one, the final touch of sweetness to balance the heat.


The picnic was a resounding success, and the cookies were the star of the show. Family members marveled at the unexpected yet delightful combination of peanut butter and sriracha, each bite evoking laughter and joy. To this day, whenever I bake these cookies, I'm transported back to that sunlit kitchen, the warmth of my grandmother's love, and the magic of flavors coming together to create something truly special.


The Recipe: Peanut Butter Sriracha Cookies


Ingredients:

- Unsalted butter


- Crunchy peanut butter


- Sugar


- Brown sugar


- Sriracha


- Eggs


- Vanilla extract


- Flour


- Baking powder


- Salt


- Baking soda


- Granulated sugar


- Hershey's chocolate kiss (for topping)


Instructions:

1. Cream together butter, peanut butter, and sugars in a large mixing bowl.


2. Gradually add sriracha, eggs, and vanilla extract. Beat until well combined.


3. In a separate bowl, mix flour, baking powder, baking soda, and salt.


4. Gently combine the dry mixture with the peanut butter mixture until well incorporated.


5. Refrigerate the dough for 1 hour.


6. Preheat your oven to 375°F (190°C).


7. Roll dough into 1-inch balls or use a medium-sized cookie scoop.


8. Dip the top of each dough ball into granulated sugar and place on a cookie sheet.


9. Flatten each ball with a fork, creating a criss-cross pattern.


10. Bake for 8-10 minutes, ensuring not to over-bake.


11. Cool on wire racks and top each with a Hershey's chocolate kiss. Enjoy!


Conclusion


Our Peanut Butter Sriracha Cookies are more than just a treat; they are a testament to the joy of culinary experimentation and the power of family traditions. Whether you're a seasoned baker or a newcomer to the kitchen, this recipe offers a delightful challenge with a rewarding payoff. Happy baking!

Read more about Appetizers

Read more about Main Dishes

Read more about Desserts

Chinese Potstickers | Made by Meaghan Moineau

Chinese Potstickers | Made by Meaghan Moineau

Deliciously Nostalgic: Crafting Perfect Chinese Potstickers at Home


Description

Dive into the rich flavors and textures of Chinese potstickers, a delightful culinary journey wrapped in a delicate dumpling. This detailed guide not only provides a step-by-step recipe but also shares a heartwarming family story that will inspire you to bring a taste of tradition to your kitchen. Perfect as an appetizer or a savory snack, these potstickers will soon become a family favorite.

---


A Taste of Tradition: Chinese Potstickers


The sizzling sound of dumplings hitting the hot pan, the aroma of sesame oil wafting through the kitchen, and the anticipation of that first bite—making Chinese potstickers is more than just preparing a meal; it's about creating memories. For me, these potstickers are a culinary heirloom passed down through generations, each fold and pleat crafted with love.


Ingredients


- 200g lean ground pork (or substitute with ground chicken)


- 100g canned water chestnuts, chopped (or substitute with spinach or cabbage)


- 1 teaspoon sea salt


- 1 teaspoon fine sugar


- 1/2 teaspoon black ground pepper


- 2 teaspoons light soy sauce


- 2 teaspoons sesame oil


- 1 tablespoon Shaoxing Huatiao wine


- 2-3 tablespoons finely chopped scallions


- Dumpling wrappers (thawed if frozen)


- Plain flour for dusting


- 2-3 tablespoons vegetable oil


- 1/3 cup water


Instructions


1. Prepare the Filling:

- In a large mixing bowl, combine the ground pork with sea salt, sugar, ground pepper, soy sauce, sesame oil, and Shaoxing Huatiao wine.


- Add the chopped water chestnuts to the mixture. For a twist, you can use spinach or cabbage instead.


- Stir in the finely chopped scallions and mix all ingredients well.


2. Assemble the Dumplings:

- Dust your working surface with flour. Carefully separate the dumpling wrappers and lay them out.


- Place about 1.5 teaspoons of the pork filling in the center of each wrapper.


- Lightly wet the edges of the wrapper with water. Bring the edges together and pinch at the center.


- Create pleats on one side of the dumpling, folding towards the center and pinching to seal. Repeat on the other side, ensuring three pleats per side.


3. Cooking the Potstickers:

- Heat vegetable oil in a frying pan over high heat.


- Place the dumplings flat-side down in the pan and fry until the bottoms are golden brown.


- Add water, cover the pan, and steam for 4-5 minutes. Remove the cover and let them crisp up for another minute.


4. Serving Suggestion:

- Serve the potstickers with a vinegar dip made of balsamic or black Chinese vinegar and thinly sliced ginger. Enhance the dip with soy sauce, chili oil, or sesame oil for extra flavor.


A Family Memory


Growing up, Sunday afternoons were reserved for dumpling-making in my grandmother's kitchen. Her nimble fingers would work magic, transforming simple ingredients into delectable bites. As children, my siblings and I would gather around the table, our hands dusted with flour, trying to mimic her expert pleats. Laughter and stories filled the room, each dumpling a testament to our shared love and heritage. These potstickers are more than a dish; they're a connection to those cherished days, a reminder that food has the power to bring families together.


Difficulty: 6/10

Classification: Appetizer


Creating Chinese potstickers is a rewarding experience that combines the art of cooking with the joy of tradition. Whether you're new to dumpling-making or a seasoned pro, this recipe promises delicious results that will delight your senses and bring a touch of nostalgia to your dining table. Enjoy!

Read more about Appetizers

Read more about Main Dishes

Read more about Desserts

Spicy Lump Crab and Avocado Salad | Made by Meaghan Moineau

Spicy Lump Crab and Avocado Salad | Made by Meaghan Moineau

Title: A Taste of Nostalgia: Spicy Lump Crab and Avocado Salad
Description: Dive into a flavorful fusion of tender lump crabmeat and creamy avocados with our Spicy Lump Crab and Avocado Salad. This dish, enriched with the zest of fresh lemon juice and a kick of sriracha, is a perfect blend of spice and freshness. Ideal for both a sophisticated appetizer and a light main dish, this recipe holds a special place in my heart, evoking cherished family gatherings by the sea.

---


A Taste of Nostalgia: Spicy Lump Crab and Avocado Salad

As the warm breeze carried the scent of the ocean, our family would gather at the seaside cottage every summer. The sound of waves crashing against the shore was the perfect backdrop for our family tradition—an indulgent feast featuring the Spicy Lump Crab and Avocado Salad. This dish, with its vibrant colors and tantalizing flavors, became a staple at our gatherings, etching unforgettable memories into our hearts.


The Essence of the Dish

Our Spicy Lump Crab and Avocado Salad is a delightful combination of succulent lump crabmeat, creamy avocados, and a spicy dressing that tantalizes the taste buds. The dish is a symphony of textures, with the smoothness of the avocado complementing the delicate sweetness of the crab. The addition of sriracha chile sauce adds a fiery kick, balanced by the tangy freshness of lemon juice.


Ingredients:

- 2 ripe avocados


- 1 red bell pepper, finely chopped


- Fresh parsley, chopped


- 1 tablespoon fresh lemon juice


- 1 pound lump crabmeat


- 2 tablespoons mayonnaise


- Salt and pepper, to taste


- 2 scallions, finely sliced


- 1 tablespoon sriracha chile sauce


- 1 teaspoon Worcestershire sauce


Instructions:
1. Prepare the Spicy Sauce: In a small bowl, combine the mayonnaise, sriracha chile sauce, Worcestershire sauce, lemon juice, salt, and pepper. Stir until well blended, and set aside to let the flavors meld.
2. Mix the Crab Salad: In a medium bowl, gently toss together the crabmeat, scallions, red bell pepper, and fresh parsley. Be careful to maintain the integrity of the crab lumps. Lightly fold in the spicy sauce, ensuring an even coating without breaking the crabmeat.
3. Prepare the Avocados: Slice the avocados in half and remove the pit. Trim a small section from the bottom of each half so they sit flat on a plate. Brush or pour lemon juice over the cut surfaces to prevent browning.
4. Assemble and Serve: Place the avocado halves on a serving plate and generously fill each center with the crab salad. Serve immediately for the freshest flavor.
A Family Memory

Every year, as we prepared this dish, my grandmother would recount the story of how she first learned the recipe from a local fisherman during her honeymoon. She spoke of the joy of discovering new flavors and the warmth of sharing food with loved ones. As we savored each bite, it felt like a tribute to her adventurous spirit and love for family gatherings.


The Spicy Lump Crab and Avocado Salad is more than just a dish; it's a bridge to cherished memories and a reminder of the simple joys in life.


Difficulty Rating: 4/10
Classification: Appetizer or Light Main Dish

This recipe is relatively easy to prepare, making it accessible even for novice cooks. Whether you serve it as an appetizer or a light main dish, it's guaranteed to be a hit, resonating with the warmth of familial love and the excitement of summer days by the sea.

Read more about Appetizers

Read more about Main Dishes

Read more about Desserts

Brown sugar & Spice Sugar cookie frogs | Made by Meaghan Moineau

Brown sugar & Spice Sugar cookie frogs | Made by Meaghan Moineau

Title: Sweet Memories in Every Bite: Brown Sugar & Spice Sugar Cookie Frogs
Description: Dive into the enchanting world of baking with our Brown Sugar & Spice Sugar Cookie Frogs. These delightful treats are more than just cookies; they’re a nostalgic journey back to cherished family gatherings. With a perfect blend of warm spices and a touch of sweetness, these cookies promise to bring warmth and joy to your kitchen. Whether you're a seasoned baker or a beginner, this recipe is sure to captivate your taste buds and your heart.

---


Brown Sugar & Spice Sugar Cookie Frogs: A Recipe Steeped in Family Tradition


Ingredients:


- Unbleached flour


- Baking powder


- Cinnamon


- Ginger


- Nutmeg


- Allspice


- Granulated sugar


- Light brown sugar


- Butter


- Egg


- Vanilla extract


Instructions:


1. Prepare Your Dry Ingredients: Begin by whisking together the flour, baking powder, cinnamon, ginger, nutmeg, and allspice. Set this aromatic mixture aside, letting the spices mingle and infuse their warmth.
2. Creaming Magic: In a separate bowl, cream the granulated sugar and light brown sugar with the butter until light and fluffy. The blend of sugars gives the cookies their distinct, rich flavor.
3. Incorporate Wet Ingredients: Add the egg and vanilla extract to the creamed mixture, mixing until well-blended. The vanilla adds a hint of sweet aroma that perfectly complements the spices.
4. Combine and Conquer: Gradually incorporate the flour mixture into the wet ingredients. Beat just until combined, ensuring to scrape down the bowl, especially the bottom. The dough will be thick; don't hesitate to knead in any stray bits of flour by hand.
5. Shaping Your Frogs: Roll the dough on a floured surface and cut into whimsical frog shapes. Place these playful figures on parchment-lined baking sheets, ready to hop into the oven.
6. Baking to Perfection: Bake in a preheated oven for 9-12 minutes, adjusting the time depending on the size of your cookie cutter. Let them sit on the sheet for a few minutes before transferring them to a cooling rack.

---


A Sweet Nostalgia: The Memory Behind the Recipe


Every time I bake these Brown Sugar & Spice Sugar Cookie Frogs, I am transported back to my grandmother's cozy kitchen. As a child, I’d watch in awe as she effortlessly transformed simple ingredients into magical treats. The aroma of spices wafting through the air was always the first sign that something special was underway.


Grandma had a particular fondness for frogs, often saying they brought good luck. She’d let me help cut out the frog shapes, my small hands struggling to keep the dough intact. We’d laugh at the misshapen ones, claiming they had extra character. Those afternoons filled with laughter and love are some of my most cherished memories.


These cookies were a staple at every family gathering, each bite a reminder of the warmth and joy that surrounded us. Even now, as I bake them for my own family, I feel a connection to those happy days, hoping to create similar memories for my little ones.


---


Difficulty: 3/10


Classification: Dessert


---


Whether you’re creating new memories or reliving old ones, these Brown Sugar & Spice Sugar Cookie Frogs are sure to bring smiles and sweetness to your home. Enjoy the process, savor the flavors, and let the nostalgia wash over you. Happy baking!

Read more about Appetizers

Read more about Main Dishes

Read more about Desserts

Homemade Apple Almond Granola Bars | Made by Meaghan Moineau

Homemade Apple Almond Granola Bars | Made by Meaghan Moineau

Title: Crunchy Nostalgia: Homemade Apple Almond Granola Bars
Description: Dive into the comforting embrace of Homemade Apple Almond Granola Bars, a delightful concoction of wholesome ingredients that bring back the warmth of family gatherings. Easy to make and irresistibly tasty, these bars are perfect for breakfast on-the-go or a guilt-free snack.

---


Homemade Apple Almond Granola Bars: A Family Tradition


Growing up, my family always had a knack for turning simple moments into cherished memories. Among these, Saturday mornings were special. The smell of freshly baked goods wafting through the house was our gentle wake-up call, drawing us out of our slumber and into the kitchen where the magic happened.


One of the most beloved recipes that graced our kitchen was the Homemade Apple Almond Granola Bars. These bars were more than just a treat; they were a symbol of togetherness and the perfect embodiment of autumn afternoons spent with family. The combination of rolled oats, sweet honey, and the crunch of almonds brought a comforting warmth that only a homemade recipe could provide.


Ingredients:


- 2 cups rolled oats


- 1/4 cup ground flax seed


- 1/4 cup oat bran


- 1/4 cup wheat bran


- 1/2 teaspoon salt


- 1 teaspoon baking powder


- 1 teaspoon ground cinnamon


- 1/4 cup sugar substitute


- 1/4 cup unsweetened coconut


- 1/2 cup non-fat milk


- 1/4 cup sweet honey


- 1 egg


- 1 teaspoon vanilla extract


- 1 apple, peeled and diced


- 1/2 cup almonds, chopped


Instructions:


1. Preheat your oven to 350°F (175°C) and spray a 9x13 pan with non-stick cooking spray.
2. Combine in a large bowl the oats, flax seed, oat bran, wheat bran, salt, baking powder, cinnamon, sugar substitute, and coconut. Mix until well combined.
3. Add the milk, honey, egg, and vanilla extract to the dry ingredients. Stir until everything is well incorporated.
4. Fold in the diced apple and chopped almonds, ensuring they are evenly distributed throughout the mixture.
5. Press the mixture firmly into the prepared pan, spreading it out evenly.
6. Bake for 15-20 minutes, or until the edges start to brown lightly.
7. Cool for 10 minutes before cutting into bars. Allow to cool completely before serving or storing.

These granola bars are a perfect example of how food can connect us to our roots and to each other. As we savored these bars, my siblings and I would reminisce about the little things that made our weekend mornings special—like the sound of crunching leaves outside or the laughter that filled the room as we enjoyed our breakfast together.


Difficulty: 3/10 - Easy


Classification: Dessert / Snack


Whether you're yearning for a quick snack or a healthy dessert option, these Homemade Apple Almond Granola Bars are sure to satisfy. They're not just a treat; they're a piece of nostalgia, a way to bring a little bit of my family's warmth into your own home.


So, gather your ingredients and invite your loved ones to the kitchen. Create new memories while indulging in the delightful flavors of this cherished family recipe. Enjoy the simple pleasure of homemade goodness, and perhaps, start a new tradition of your own.

Read more about Appetizers

Read more about Main Dishes

Read more about Desserts

Power Rankings: 107th PGA Championship – PGA Tour | Analysis by Brian Moineau

Power Rankings: 107th PGA Championship - PGA Tour | Analysis by Brian Moineau

Title: A Swing for the Ages: Imagining a World Where Masters Winners Choose PGA Venues

Welcome to the whimsical world of "what ifs" in sports! This week, we're diving into a fascinating concept that is sure to tickle the fancy of golf enthusiasts and casual fans alike: What if the Masters champion had the power to choose the venue for the PGA Championship?

Imagine the scene: fresh off a victory at Augusta, the Masters winner stands at the podium not just with a green jacket, but with a golden ticket to select the next battleground for the PGA Championship. It's a deliciously intriguing thought, isn't it?

From Augusta to Anywhere

The idea is not just a flight of fancy; it’s a testament to the evolving landscape of golf. The Masters, held annually at the revered Augusta National Golf Club, is steeped in tradition. It’s a place where legends are born, and memories are etched into the annals of golf history. But what if this tradition came with an added perk that could potentially shake up the PGA Tour?

Consider the potential impact on the sport. The selection of a PGA Championship venue could turn into a strategic decision, opening up opportunities for under-the-radar courses to shine on a global platform. It could also serve as a tool for promoting golf in regions that are off the beaten path, much like how the FIFA World Cup has brought soccer to new locales around the globe.

Golf's Global Reach

Speaking of global sports, we’ve seen how location choices can influence the popularity and reach of a game. Take the NBA's recent ventures into playing regular-season games overseas or the NFL's London games. These events have not only increased the leagues’ international following but have also given fans worldwide a chance to experience top-tier sports live. The same could be true for golf, should the reigning Masters champion choose to venture beyond the traditional courses.

The Players Behind the Power

Now, let's talk about the players who could wield this hypothetical power. Imagine Jordan Spieth, known for his strategic mind, choosing a venue that complements his precise style of play. Or Rory McIlroy, with his global appeal, selecting a course in Northern Ireland to boost the sport's profile in his homeland. The decision-making would add another layer of intrigue to the Masters win—beyond just personal glory.

Final Thoughts

While this concept remains a delightful daydream for now, it’s a testament to the possibilities inherent in the world of sports. Whether it’s shifting a tournament to a new venue or introducing a fresh twist to an age-old tradition, the essence of sports lies in its ability to evolve and inspire.

So, as we watch the next Masters champion don the green jacket, let's allow ourselves a moment of whimsy to imagine what could be. After all, in the ever-changing world of sports, sometimes the most unexpected ideas can lead to the most exciting changes.

Here's to the dreamers, the innovators, and the champions who keep us all on our toes. Until next time, keep swinging for the stars, golf fans!

Read more about AI in Business

Read more about Latest Sports Trends

Read more about Technology Innovations

Maple-Bacon Corn Muffins | Made by Meaghan Moineau

Maple-Bacon Corn Muffins | Made by Meaghan Moineau

Maple-Bacon Corn Muffins: A Sweet and Savory Delight


Description: Craving a unique twist on a classic comfort food? Our Maple-Bacon Corn Muffins combine the sweet allure of maple syrup with the smoky richness of bacon, creating a mouthwatering balance that captures the essence of home. Perfect as an appetizer or a brunch centerpiece, these muffins are sure to delight your taste buds and warm your heart.

---


A Nostalgic Journey: Family Memories of Maple-Bacon Corn Muffins


Growing up, Saturday mornings in our household were always special. The aroma of freshly brewed coffee would waft through the air, mingling with the irresistible scent of bacon sizzling on the stove. My siblings and I knew that it was time for our beloved family tradition—Maple-Bacon Corn Muffins. This dish holds a cherished place in our hearts, a recipe passed down from my grandmother who had a knack for combining flavors in the most delightful ways.


I remember the excitement of gathering in the kitchen, each of us assigned a task. My brother was in charge of chopping the bacon, my sister whisked the eggs and milk, and I was responsible for stirring the dry ingredients—a job I took very seriously. As we worked, stories flowed as freely as the maple syrup we eagerly poured into the mixture.


Once the muffins were in the oven, the anticipation was palpable. We'd peek through the oven window, watching the muffins rise and turn a perfect golden brown. When the timer chimed, we could hardly wait to liberate the muffins from their tin prisons. Served warm, the first bite was always the best—crispy bacon mingling with the soft, sweet cornmeal, underlined by the deep, rich flavor of maple.


Those mornings were a ritual, a time when our family came together, sharing not just food, but laughter, love, and stories. Even now, as I prepare this dish in my own kitchen, those memories flood back, adding an extra layer of warmth to each batch.


Today, I am thrilled to share this recipe with you, in hopes that it will bring a touch of nostalgia and a whole lot of flavor to your kitchen.


---


Ingredients


- Bacon


- Baking powder


- Butter (melted)


- Eggs


- Flour


- Maple syrup


- Milk


- Salt


- Sugar


- Yellow cornmeal


Instructions


1. Preheat your oven to 400°F.


2. Heat a skillet over medium-high heat. Chop the bacon and cook until slightly crispy. Remove with a slotted spoon and set the skillet aside.


3. In a large bowl, combine all dry ingredients: flour, cornmeal, baking powder, sugar, and salt.


4. Whisk in the milk and eggs until well combined.


5. Stir in the melted butter, maple syrup, and a cup of reserved bacon grease.


6. Add the bacon pieces back into the mixture and stir until evenly distributed.


7. Line a 12-cup muffin tin with muffin liners. Evenly divide the mixture among the liners.


8. Bake for 15 minutes until the muffins are golden brown.


9. Remove from the muffin tin and serve warm. Enjoy!


---


Difficulty: 4/10
Classification: Appetizer

These Maple-Bacon Corn Muffins are more than just a dish; they are a portal to cherished memories and a celebration of comforting flavors. Whether you're sharing them with family or enjoying a quiet morning alone, they promise to bring joy and warmth to any occasion.

Read more about Appetizers

Read more about Main Dishes

Read more about Desserts

Sweet and Spicy Nuts | Made by Meaghan Moineau

Sweet and Spicy Nuts | Made by Meaghan Moineau

Title: Sweet and Spicy Nuts: A Family Tradition with a Fiery Twist
Description: Discover the delightful balance of sweet and spicy flavors in this easy-to-make Sweet and Spicy Nuts recipe. Perfect as an appetizer or a snack, this dish is sure to add a kick to your family gatherings. Reminisce with me as I share a cherished family memory tied to these delectable nuts. Difficulty: 3/10.

---


When I think of Sweet and Spicy Nuts, my mind drifts back to those delightful family gatherings at my grandmother's house. Tucked away in her cozy kitchen, the air was always filled with the comforting aroma of buttery spices, a scent that wrapped around us like a warm hug.


The recipe I'm about to share has become a staple in our family—a perfect blend of sweet and spicy that echoes the warmth of those cherished memories. It's a dish that brings smiles and a bit of nostalgia, as it reminds us of those lively conversations and laughter shared over a bowl of these flavorful nuts.


Sweet and Spicy Nuts Recipe
Ingredients:

- 2 tablespoons butter


- 1/2 teaspoon cayenne pepper


- 1/2 teaspoon ground cinnamon


- 1/2 teaspoon ground cumin


- 1/4 cup light brown sugar


- 2 cups mixed nuts (such as walnuts)


- 1 teaspoon salt


- 1 tablespoon water


Instructions:
1. Mix the Spices: In a small bowl, combine the ground cumin, cayenne pepper, ground cinnamon, and salt. Set aside for later use.
2. Toast the Nuts: Heat a dry skillet over medium heat. Add the mixed nuts and cook, stirring frequently, until they begin to toast, about 4 minutes. Transfer the nuts to a small bowl and set aside.
3. Create the Glaze: In the same hot skillet, add the butter, light brown sugar, water, and the spice mixture. Cook, stirring, until a smooth glaze forms, about 1 minute.
4. Coat the Nuts: Return the toasted nuts to the skillet. Toss them in the glaze, ensuring they are well-coated. Cook for an additional 1 to 2 minutes, or until the nuts are glazed and golden brown.
5. Cool and Store: Remove the skillet from the heat and transfer the glazed nuts to a baking sheet lined with aluminum foil. Use a fork to separate them. Allow the nuts to cool until the sugar hardens, about 10 minutes. Store in an airtight container.
A Nostalgic Note:

The tradition of making Sweet and Spicy Nuts started with my grandmother. She had a knack for turning simple ingredients into something magical. As kids, we would gather around her, eyes wide with anticipation, as she tossed the nuts in the sizzling glaze. The aroma was irresistible, and we eagerly waited for them to cool, often sneaking a few warm morsels when she wasn't looking.


These nuts have now become a symbol of our family's togetherness, a dish that travels with us through generations. Whether it's a holiday party or a casual Sunday afternoon, a bowl of Sweet and Spicy Nuts always makes its way to the table, sparking conversations and creating new memories.


Difficulty: 3/10
Category: Appetizer

---


Next time you're looking for a delightful appetizer to impress your guests or just a snack to enjoy on a cozy afternoon, give these Sweet and Spicy Nuts a try. They are sure to add a fiery twist to your gatherings and maybe even inspire a family tradition of your own.

Read more about Appetizers

Read more about Main Dishes

Read more about Desserts