
It was one of those rainy Tuesday evenings where all you want is something warm and nourishing that hugs you from the inside out. I was staring into my pantry, contemplating the array of tins and boxes, when I stumbled upon a forgotten bag of rice. That was the moment Chicken Porridge became my saving grace. It’s a dish that’s comforting, easy to put together, and just sophisticated enough to impress with its humble roots. You’ll love how straightforward this recipe is, and honestly, it uses things you probably already have lying around – except maybe the fresh ginger, but trust me, it’s worth a trip to the store.
Jump to Recipe
What You’ll Need
You’re going to love how this one simple dish can use up the odds and ends in your kitchen. Let’s raid the pantry and the fridge:
- 1 cup of rice (any kind you have will do, but jasmine is my favorite)
- 2 cups of chicken stock (homemade if you have it; the boxed kind works too!)
- 1 large chicken breast
- 1 medium carrot, diced
- 1 tablespoon of julienne young ginger
- 1 teaspoon of white ground pepper
- 2 tablespoons of chopped parsley
- 2 shallots, thinly sliced
- 1 spring onion, diced
- 2 tablespoons of vegetable oil
- Salt to taste
How to Make Chicken Porridge
- Start by deep-frying the sliced shallots in the vegetable oil until they turn a gorgeous golden brown. The aroma will be irresistible! Drain them on a paper towel and set them aside. Save that shallot-infused oil; it’s liquid gold.
- Wash the rice under cold water until the water runs clear. This helps keep the porridge from becoming too sticky.
- Mix the washed rice with a tablespoon or two of the reserved shallot oil. This gives it an extra layer of flavor that is just divine.
- In a large pot, combine the rice, chicken stock, chicken breast, and diced carrots. Bring everything to a gentle boil over medium heat.
- Once boiling, reduce the heat to low. Let it simmer for around an hour, stirring occasionally. You’ll know it’s ready when the rice breaks down and the porridge thickens to a silky consistency.
- Remove the chicken breast, shred it using two forks, and return the shredded meat to the pot. This ensures every bite has a bit of chicken goodness.
- Warm everything through, then season with salt and white ground pepper. Taste as you go; you might prefer it a bit pepperier.
- Serve the porridge hot, garnished with diced spring onion, chopped parsley, julienne young ginger, and the crispy fried shallots. A few drops of that shallot oil on top, and you have a bowl of bliss.
Cook’s Notes
Don’t rush the simmering process; the longer it simmers, the creamier it gets. If you find your porridge too thick, just stir in a bit more chicken stock or water. This porridge keeps well in the fridge for a couple of days. When reheating, add a splash of water to bring it back to life. The crispy shallots are best fresh, but if you need to, you can store them in an airtight container for a day or two; they may just lose a bit of their crunch.
Make It Your Own
- Swap the chicken for crispy tofu, and you’ve got a vegetarian version that’s just as comforting.
- Use beef stock and thinly sliced beef for a heartier alternative.
- Add a dash of soy sauce or fish sauce for an umami boost.
- Throw in a handful of spinach or kale right before serving for some extra greens.
If you try this, I’d love to hear how it turns out — drop a comment or tag me! Eating your way through a rainy day has never been more delightful. Enjoy every spoonful!
Related update: Chicken Porridge
Related update: Classic French Onion Soup

TL;DR
- Acer’s $699 Swift Air 14 is a colorful 14‑inch Windows laptop positioned against Apple’s $599 MacBook Neo, but it ships with just 8GB RAM and a low‑end Intel Core Series 3 “Wildcat Lake” chip. [1][3][4]
- On paper it beats the Neo on I/O, refresh rate, and battery capacity (70Wh vs 36.5Wh), yet its NPU peaks at 17 TOPS—well below Microsoft’s 40‑TOPS Copilot+ PC bar—so it won’t ship with flagship Windows AI features. [2][4][7]
- The real play isn’t Acer vs Apple; it’s Intel seeding an entry tier OEMs can ship at scale in 2026, trading ceilings from a 64‑bit memory interface and 8GB SKUs that will age quickly under Windows 11’s AI stack. [3][5][7]
What the source said
Acer will launch the Swift Air 14 in North America in August 2026 with Intel’s budget‑oriented Core Series 3 “Wildcat Lake,” including 6‑core Core 5 and Core 7 variants, starting at $699. It weighs about 1.19 kg, is slightly thicker than Apple’s MacBook Neo, and offers a 14‑inch 1920×1200 IPS panel at 120Hz and 350 nits. Base memory is 8GB LPDDR5 (configurable to 16GB). Ports include two Thunderbolt 4 (USB‑C) and one USB‑A. Acer also previewed an Aspire 18 AI (up to Intel Core Ultra Series 3, 32GB RAM, 2TB storage) and a Nitro 16 gaming notebook that can be configured with AMD’s Ryzen 9 9955HX3D; pricing for those remains TBD, with ship dates clustered across July–August 2026. [1][2][6]
Why it matters
Acer Swift Air 14 vs MacBook Neo is this season’s entry‑level laptop cage match under $800 in 2026, with Apple’s tighter macOS power management and fixed 8GB RAM facing Acer’s bigger 70Wh battery, 120Hz panel, and extra ports—still with 8GB at the floor. That baseline collides with Microsoft’s Copilot+ PC requirements, which place a 40‑TOPS NPU threshold on key Windows 11 features such as Recall‑class local semantic search and advanced Studio effects that run offline. [2][4][7]
Stakeholders diverge. Intel needs Wildcat Lake to anchor affordable “AI PCs” after 2024–2025 premium chips pushed average selling prices higher; OEMs need something they can ship amid DDR5 price swings reported by TrendForce; Microsoft wants Copilot+ attach rates but set a 40‑TOPS NPU bar; Apple positions the Neo as a “good‑enough” Mac that feeds Services ARPU without discounting the MacBook Air. [3][5][7][8]
Original analysis
Here’s the uncomfortable truth: the Swift Air 14 looks terrific on a spec card, but several “wins” won’t materialize in daily use once you factor in a 17‑TOPS NPU ceiling and 8GB floor. [2][7]
-
Contrarian read
- Consensus: “Acer’s $699 Swift Air 14 undercuts the $599 MacBook Neo with a bigger battery, faster screen, and more ports—finally, a Windows answer.” [1][4]
- My take: It’s not a real Neo killer because its AI engine and memory ceiling keep it outside Microsoft’s Copilot+ roadmap. The Swift Air’s NPU tops at 17 TOPS; Copilot+ PCs demand 40 TOPS on the NPU. Without that certification, users will miss Windows 11 features that Microsoft gates behind the Copilot+ badge in 2025–2026. [2][7]
-
Back‑of‑envelope battery math (shown work)
- MacBook Neo: Apple and press materials peg ~11 hours of wireless web on a 36.5Wh pack. Average platform draw ≈ 36.5Wh ÷ 11h = ~3.3W. [4][8]
- Swift Air 14: Acer claims up to 16 hours of web on 70Wh. Average draw ≈ 70Wh ÷ 16h = ~4.4W. [2]
- Interpretation: Despite a larger battery, Acer’s Windows platform draw (even in vendor tests) is roughly 1.1W higher than Apple’s. Add a 120Hz panel and typical Windows background tasks and you’ll likely land below the headline figure in mixed use. The capacity advantage is real; the efficiency gap persists. [2][4][8]
-
2×2: Where these machines land in 2026 (typology)
- X‑axis: NPU capability (sub‑40 TOPS vs ≥40 TOPS); Y‑axis: efficiency (web workload <3.8W vs ≥3.8W average draw).
- High NPU / High efficiency: Premium Copilot+ ARM designs (e.g., Qualcomm X‑Elite class) in 2025–2026. [7]
- High NPU / Lower efficiency: Early Copilot+ x86 refreshes with ≥40‑TOPS NPUs but heavier draw. [7]
- Low NPU / High efficiency: Apple MacBook Neo—strong battery behavior but outside the Windows Copilot+ universe by design. [4]
- Low NPU / Lower efficiency: Acer Swift Air 14—17‑TOPS NPU and ~4.4W implied draw put it here until silicon changes. [2]
-
Comparison table (core shopper questions)
| Dimension | Acer Swift Air 14 | Apple MacBook Neo |
| Price (base) | $699 | $599 |
| CPU | Intel Core Series 3 “Wildcat Lake,” up to Core 7 350 (6 cores) | Apple A‑series SoC class (A18 Pro‑derived) |
| RAM | 8GB base, up to 16GB LPDDR5 (onboard) | 8GB unified (fixed) |
| Display | 14" 1920×1200, 120Hz, 350 nits, ~100% sRGB | 13" 2408×1506, 60Hz |
| Battery | 70Wh; up to 16h web (vendor claim) | 36.5Wh; ~11h web (Apple claim) |
| Ports | 2× Thunderbolt 4 (Type‑C), 1× USB‑A | 2× USB‑C |
| Weight | 1.19 kg | ~1.24 kg |
Sources: Acer press materials for Swift Air 14 specs and battery claims; Apple press materials for Neo specs and capacity; RTINGS methodology informs the web‑draw estimate. [1][2][4][8]
-
Architecture fine print that matters at $699
- Wildcat Lake is slimmed for cost and thermals: briefings point to a 64‑bit (single‑channel) memory interface and trimmed last‑level cache—choices that help Intel and OEMs hit price targets but constrain sustained bandwidth. On Windows, that punishes iGPU throughput and RAM‑heavy multitasking, especially at 8GB. [3][5]
- This intersects awkwardly with the 120Hz display. Scrolling is smoother in Office and Edge, yes; but the iGPU and memory path aren’t built for high‑FPS gaming or heavier creative previews. You’ll feel 120Hz in UI smoothness, not in AAA‑title frame rates. [2][3]
-
Historical analogue (year and pattern)
- Apple’s 12‑inch MacBook (Early 2015) paired a fanless Core M with a single USB‑C and tight thermals; reviewers praised portability but flagged sustained performance and port constraints. The Swift Air 14 echoes that 2015 trade: thin‑first design that limits headroom for the workload mix buyers adopt 12–24 months later. [10][11]
-
Named‑stakeholder breakdown
- Acer: Gains shelf presence and margin with an aluminum Windows laptop at $699 in Best Buy and Amazon listings, but risks returns if 8GB SKUs stutter under Windows 11 updates and local AI effects. [1][7]
- Intel: Places Core Series 3 silicon into mass‑market tiers in 2026; it trades peak performance for BOM sanity to counter Apple’s $599 Neo pressure. [3][4]
- Microsoft: Keeps “AI PC” messaging strict—Copilot+ requires 40 TOPS on the NPU while some OEMs trumpet “platform TOPS 40” that mix CPU/GPU/NPU; shoppers will see conflicting badges in U.S. retail. [2][7]
- Apple: Keeps the Neo simple—two ports, one RAM option, strong efficiency; configuration stinginess looks less punitive when Windows peers ship 8GB too, reducing perceived downside at $599. [4]
- AMD (gaming): Wins oxygen at the high end with Acer’s Nitro 16 offering Ryzen 9 9955HX3D with 3D V‑Cache, shifting performance‑per‑dollar chatter toward AMD during back‑to‑school 2026. [6]
What others are missing
The Copilot+ threshold mismatch is the story, not the 120Hz vs 60Hz panel talk. Acer markets “up to 40 platform TOPS,” but the Swift Air 14’s on‑device NPU is rated at 17 TOPS, and Microsoft’s Copilot+ certification demands 40 TOPS on the NPU alone. Platform TOPS (CPU+GPU+NPU) don’t qualify for Copilot+; the NPU’s TOPS gates exclusive Windows features. Expect two $699 Windows laptops on the same Best Buy shelf in November 2026—both with “AI” stickers, but only one with the Copilot+ badge—driving returns, support calls, and negative reviews when Recall‑class features don’t appear. [2][7]
What to watch next
- By September 30, 2026 (Q3), Best Buy or Amazon will list the Swift Air 14 base SKU with 16GB RAM at $699–$749, replacing the 8GB base in U.S. stores due to review pressure and returns.
- By November 30, 2026 (Q4), Acer will announce a Swift Air 14 variant with an NPU rated at ≥40 TOPS and ship it with the Copilot+ PC logo in the same chassis or a minor refresh.
- By December 15, 2026 (holiday), at least two U.S. retailers (Newegg and Micro Center) will advertise Nitro 16 configurations with Ryzen 9 9955HX3D at ≤$1,499 before rebates.
Sources
- Acer press materials (June–August 2026) — Launch timing, pricing for Swift Air 14, Aspire 18 AI, and Nitro 16; panel, port, and battery specs.
- Acer Swift Air 14 spec sheet (2026) — Claims on 70Wh battery, 120Hz display, port layout, weight, and stated “up to 40 platform TOPS” vs 17‑TOPS NPU.
- Intel Core Series 3 “Wildcat Lake” brief (2026) — Positioning, core counts, memory interface notes, and cache trade‑offs for entry‑tier silicon.
- Apple MacBook Neo product materials (2026) — Battery capacity (36.5Wh), weight, panel resolution, and Apple’s web battery estimate.
- TrendForce DRAM price tracker (2025–2026) — DDR5 price volatility context for OEM BOM decisions at the $599–$799 tier.
- AMD Ryzen 9 9955HX3D product page (2026) — 3D V‑Cache positioning and availability in mainstream gaming notebooks like Nitro 16.
- Microsoft Copilot+ PC requirements page (2024–2026) — Explicit 40‑TOPS NPU threshold and feature gating for Windows 11 AI experiences.
- RTINGS battery test methodology and results (2024–2026) — Web browsing test design informing average draw calculations used for cross‑device comparisons.
- The Verge review: Apple MacBook (12‑inch, Early 2015) — Historical thin‑and‑light trade‑offs on thermals, ports, and sustained performance.
- AnandTech deep dive: 12‑inch MacBook (2015) — Analysis of design constraints and performance ceilings that mirror 2026 entry‑tier compromises.
Related update: We recently published an article that expands on this topic: read the latest post.

It was one of those nights when the fridge seemed to mock me with its emptiness, only the defiant glow of the leftover polenta catching my eye. I had no grand plans for dinner, just a craving for something that felt like a hug on a plate without the fuss. Enter Polenta Pie with Italian Toppings — a recipe that marries the comforting, hearty texture of polenta with vibrant, savory toppings. It’s the perfect dish for those evenings when you need a little culinary adventure without a complicated list of steps or ingredients. Plus, it’s a great way to transform humble pantry staples into something that feels a bit fancy.
Jump to Recipe
What You’ll Need
It’s likely that you already have most of these ingredients lingering in your kitchen, making this dish both convenient and delicious. Here’s what you need to gather:
- Water
- Milk
- Olive oil
- Salt
- Yellow corn meal
- Diced pancetta
- Shallot
- Garlic
- Gorgonzola cheese or any blue cheese you love
- Baby spinach
- Sweet bright colored bell pepper
- Pignoli (pine nuts)
How to Make Polenta Pie With Italian Toppings
- Start by making the polenta. In a saucepan, bring water, milk, 1/4 cup of olive oil, and a pinch of salt to a boil. Immediately reduce the heat and gradually pour in the cornmeal while stirring to prevent lumps.
- Keep simmering the cornmeal, stirring very frequently for about 15 minutes. You’ll know it’s ready when it’s thick and holds its shape.
- Line a baking sheet with foil or parchment paper and drizzle it with olive oil. Spread the polenta evenly across the sheet to about 1/2-inch thick, shaping it into a circle like a pizza crust. Let it cool until it’s firm.
- Preheat your oven to 425°F. Once the polenta is set, sprinkle it with freshly ground pepper and bake for 30 minutes, until the edges are beautifully browned.
- While your crust is baking, prepare the toppings. Heat 1 tablespoon of olive oil in a skillet and sauté the diced pancetta, shallots, and garlic for about 7-8 minutes until they are golden and fragrant. Don’t overdo it — you want them just right, not crunchy.
- Remove the pancetta mixture to a bowl. In the same skillet, sauté the baby spinach until it’s wilted and a deep green, about 3 minutes. Remove and set aside.
- Add a touch more oil if needed and sauté the bell pepper slices until they’re slightly wilted, about 3-4 minutes.
- Now, let’s assemble the pie! Start by spreading the gorgonzola crumbs evenly over the baked polenta crust. Then layer the pancetta mix, followed by the spinach, bell peppers, and finally a sprinkle of pine nuts.
- Drizzle a few more drops of olive oil over the top and pop it back in the oven for 4-5 minutes just to warm everything through.
- Slice your polenta pie like a pizza or into neat squares. Serve it hot and enjoy the medley of flavors!
Cook’s Notes
This dish is a great candidate for prepping ahead. You can make the polenta crust a day in advance and store it in the fridge, well-wrapped. Just bring it to room temperature before proceeding with the baking step. If you’re lucky enough to have leftovers, they hold well in the fridge for 2-3 days. Simply reheat in the oven to enjoy a second time with a nice crisp. A common pitfall is undercooking the polenta, so keep an eye on that texture — thick but not cement-like is your sweet spot.
Make It Your Own
Here are a few fun twists to try:
- Swap the pancetta for crispy tofu to make it vegetarian-friendly.
- Try a mix of mushrooms instead of the bell pepper for an earthy depth.
- Use feta if you’re not a fan of blue cheese, it brings a nice tang.
- Replace the pine nuts with toasted almonds for an unexpected crunch.
If you try this Polenta Pie with Italian Toppings, I’d love to hear how it turns out! Drop a comment below or tag me in your creation pics. Let’s share the love for this deliciously comforting dish.
Related update: Polenta Pie With Italian Toppings
Related update: Chicken Porridge
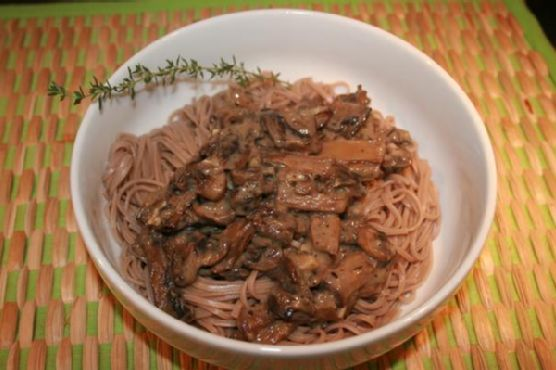
Last Tuesday, I found myself staring into the abyss of my fridge after what felt like the longest day ever. You know the kind — the kind where your brain feels like mush and you just want something cozy and satisfying. That’s when I concocted this dreamy dish: Creamy Mushrooms Over Soba Noodles. It’s a lifesaver for those nights when you crave comfort without the fuss. This recipe is incredibly creamy, perfectly garlicky, and has just the right amount of freshness from the lemon and thyme. Plus, it’s all vegan! Trust me, this is one you’ll want to keep in your back pocket for any occasion.
Jump to Recipe
What You’ll Need
I bet you already have most of these on hand. It’s all about those mushrooms and the creamy sauce that makes this dish sing.
- Earth Balance buttery spread – 2 tablespoons, divided
- Cremini and white mushrooms – a mix, sliced
- Garlic – 3 cloves, minced
- All-purpose flour – 1 tablespoon
- Unsweetened soy milk – 1 cup
- White wine – 1/4 cup (optional, but highly recommended!)
- Fresh thyme – a few sprigs plus more for garnish
- Lemon juice – from half a lemon
- Salt and pepper – to taste
- Soba noodles – 8 ounces
How to Make Creamy Mushrooms Over Soba Noodles (Vegan)
- Start by melting 1 tablespoon of the Earth Balance in a large sauté pan over medium heat. Toss in the mushrooms and garlic, stirring occasionally until the mushrooms are dark, reduced, and oh-so-fragrant. This should take about 5-7 minutes.
- Set those lovely mushrooms aside. In the same pan, melt the remaining tablespoon of Earth Balance. Sprinkle in the flour and stir continuously for about a minute to form a roux. It should smell slightly nutty and golden.
- Slowly pour in the soy milk, whisking as you go to avoid any lumps. Keep stirring until the mixture is smooth and has thickened into a luscious sauce.
- Return the mushrooms to the pan, and add the lemon juice, thyme, salt, and pepper. Pour in the white wine and let the sauce simmer until it’s reduced and has reached a consistency that coats the back of a spoon.
- Meanwhile, cook your soba noodles according to the package instructions. Drain and divide them among your bowls.
- Ladle the creamy mushroom sauce over the noodles, garnish with extra thyme if you’re feeling fancy, and dig in!
Cook’s Notes
Here’s the deal: this dish is forgiving, so don’t stress too much. If you accidentally add too much soy milk, just let it reduce a bit longer. It might be tempting to skip the white wine, but it really adds depth to the sauce. If you’re cooking for one, the leftovers are a blessing — the flavors meld beautifully overnight. Just store them in an airtight container in the fridge, and reheat gently on the stove or microwave with a splash of soy milk to loosen the sauce.
Make It Your Own
- Swap the soba noodles for zucchini noodles if you’re keeping it low-carb.
- Add a handful of spinach or arugula when you add the mushrooms back to the sauce for extra greens.
- If you’re out of white wine, a splash of vegetable broth can add that needed umami punch.
- For a nutty twist, sprinkle toasted sesame seeds over the finished dish.
If you try this, I’d love to hear how it turns out — drop a comment or tag me! Happy cooking, and remember that sometimes the best dishes come from those moments of pure inspiration in front of an open fridge. Enjoy!
Related update: Creamy Mushrooms Over Soba Noodles (Vegan)
Related update: Polenta Pie With Italian Toppings