Cranberry Margarita | Made by Meaghan Moineau

Cranberry Margarita: A Festive Twist on a Classic Cocktail

Intro

There’s something undeniably festive about the tart burst of cranberries, especially when paired with the smooth, citrusy notes of a classic margarita. I vividly remember the first time I tasted this delightful concoction. It was a chilly Thanksgiving evening at my grandmother’s house. The air was filled with the comforting aroma of roasted turkey and spiced pies, and my uncle, known for his cocktail prowess, decided to shake things up with a cranberry twist on his usual margarita. From the first sip, I was hooked, and that memory has since inspired me to recreate the magic every holiday season.

Why You’ll Love It

This Cranberry Margarita is the perfect blend of tart and sweet, offering a refreshing change from the traditional lime-based margarita. It’s easy to make, visually stunning, and perfect for impressing your guests at any gathering. Whether you’re celebrating the holidays or just in the mood for something special, this drink is sure to become a favorite.

Ingredients

  • Fresh cranberries
  • Grand Marnier
  • Orange juice
  • Light Karo syrup
  • Sugar
  • Tequila

Instructions

  1. In a saucepan over medium heat, melt the cup of sugar in the orange juice.
  2. Add the cranberries, reserving some for the skewers, and cook over low heat for 10 minutes. Set aside and let it cool.
  3. Blend the cooked cranberries in a blender, then strain to make the puree.
  4. In a shaker, add crushed ice, 1 1/2 ounces of tequila, 1/2 ounce of Grand Marnier, and 2 ounces of cranberry puree. Shake to mix.
  5. Skewer several cranberries onto 10 skewer sticks but leave enough skewer exposed on one end.
  6. Lightly brush each cranberry skewer with Karo syrup and then sprinkle extra sugar over the cranberry skewers.
  7. Place the cranberry swizzle sticks on wax paper and place in the freezer to set.
  8. Pour the drink into a sugar-rimmed martini glass.
  9. Add a cranberry swizzle stick for garnish.

Tips

For the best flavor, use fresh cranberries if they are in season. You can also adjust the sweetness by adding more or less sugar to the cranberry puree. If you prefer a smoother drink, make sure to strain the pureed cranberries thoroughly.

Variations & Substitutions

If you’re looking to tweak this recipe, here are a few ideas:

  • Alcohol-Free Version: Replace tequila and Grand Marnier with a mix of orange juice and sparkling water for a refreshing mocktail.
  • Spicy Twist: Add a slice of jalapeño to the shaker for a spicy kick.
  • Alternative Sweeteners: Use agave syrup instead of Karo syrup for a different flavor profile.

Storage

The cranberry puree can be stored in an airtight container in the refrigerator for up to three days. The cranberry swizzle sticks can be frozen and kept for up to a month, making them a handy garnish for impromptu cocktail nights.

FAQ

Can I make the cranberry puree in advance?

Absolutely! You can prepare the cranberry puree a day or two in advance. Just store it in the refrigerator until you’re ready to use it.

What can I use instead of Grand Marnier?

If you don’t have Grand Marnier on hand, you can substitute it with triple sec or Cointreau. Each will lend a slightly different citrus note to your margarita.

How do I rim the glass with sugar?

To rim the glass with sugar, simply rub a lime wedge around the edge of the glass, then dip the rim into a plate of sugar. This will give your drink a sweet finish with every sip.

Nutrition

Each serving of Cranberry Margarita contains approximately:

  • Calories: 180
  • Carbohydrates: 20g
  • Sugar: 17g
  • Alcohol: 15g

Note: Nutritional information does not include sugar on the rim.

Conclusion

The Cranberry Margarita is more than just a cocktail; it’s a celebration in a glass. Its vibrant color and tantalizing flavor make it a standout choice for any occasion. Whether you’re sipping it by a cozy fire or sharing it with friends at a festive party, this drink is sure to bring joy and warmth to your gatherings. I hope this recipe brings you as much delight as it has brought to my family and me. Cheers to crafting memorable moments, one sip at a time!

Related update: Cranberry Margarita

Chavrie Caramelized Red Onion Tarts | Made by Meaghan Moineau

Chavrie Caramelized Red Onion Tarts

Intro

There’s something truly magical about the combination of sweet and savory flavors, and these Chavrie Caramelized Red Onion Tarts capture that magic perfectly. I remember the first time I tasted these delightful bites at a family gathering. My grandmother had just pulled them from the oven, and the rich, comforting aroma filled her cozy kitchen, mingling with laughter and stories from loved ones. With one bite, I was transported: the creamy goat cheese, the sweet caramelized onions, and the hint of tangy red grape jelly created an unforgettable flavor experience. That memory is what I hope to share with you today through this recipe.

Why You’ll Love It

These tarts are not just delicious; they are also incredibly easy to make and versatile. Whether you’re hosting a dinner party, looking for a unique appetizer for a holiday gathering, or simply want a special treat for yourself, these tarts will impress. The balance of flavors is impeccable, with the creamy goat cheese pairing beautifully with the sweet and tangy onion mixture.

Ingredients

  • 1 tablespoon vegetable oil
  • 2 tablespoons unsalted butter
  • 2 large red onions, minced
  • 2 tablespoons sugar
  • 2 tablespoons red grape jelly
  • 2 tablespoons red wine vinegar
  • 4 ounces goat cheese
  • Prepared tart shells

Instructions

  1. Heat the vegetable oil and butter over medium heat in a heavy-gauge skillet.
  2. Add the minced onions and cook until they’re translucent, about 10 minutes.
  3. Stir in the sugar, red grape jelly, and red wine vinegar.
  4. Continue cooking the mixture until it reaches a syrupy consistency, about 15 minutes, stirring occasionally.
  5. Remove from heat and allow the mixture to cool to room temperature.
  6. Place the tart shells on a baking tray and spoon 1 tablespoon of the onion mixture into each shell.
  7. Top each tart with a dollop of goat cheese.
  8. Bake in a preheated oven at 350°F (175°C) for 10-15 minutes, or until the tarts are warmed through and the goat cheese is slightly melted.
  9. Serve warm and enjoy!

Tips

Caramelizing onions can be a delicate process. Make sure to keep the heat at medium to avoid burning them. Stir frequently and be patient; the sweet, rich flavor is worth the time. If your onions start to stick, add a splash of water to deglaze the pan and continue cooking.

Variations & Substitutions

If you’re looking to switch things up, consider adding a sprinkle of fresh thyme or rosemary to the onion mixture for an herbal touch. For a different flavor profile, try using fig jam instead of grape jelly. If you or your guests are not a fan of goat cheese, a creamy brie or a sharp cheddar could also work well in this recipe.

Storage

These tarts are best enjoyed fresh, but if you have leftovers, store them in an airtight container in the refrigerator for up to 3 days. Reheat them in the oven at 300°F (150°C) for about 10 minutes before serving to regain their crispness and warmth.

FAQ

Can I make these tarts ahead of time?

Absolutely! You can prepare the onion mixture a day in advance and store it in the refrigerator. Assemble the tarts just before you’re ready to bake them for the best results.

What type of tart shells should I use?

Pre-made tart shells are convenient and work well for this recipe. Look for ones made from puff pastry for a flaky, buttery crust. You can also use phyllo dough or even make your own tart shells if time permits.

Can I freeze these tarts?

Yes, you can freeze the baked tarts. Allow them to cool completely, then wrap them tightly in plastic wrap and store in a freezer-safe bag. Reheat them directly from the freezer in a 350°F (175°C) oven for about 15-20 minutes.

Nutrition

Each tart contains approximately 150 calories, 8 grams of fat, 12 grams of carbohydrates, and 4 grams of protein. They are a delightful indulgence, so enjoy them in moderation as part of a balanced diet.

Conclusion

Chavrie Caramelized Red Onion Tarts are a delightful addition to any occasion. With their rich, savory-sweet flavor and elegant presentation, they are sure to impress your family and friends. I hope this recipe brings a touch of warmth and nostalgia to your table, just as it did for me all those years ago in my grandmother’s kitchen. Happy cooking!

Related update: Chavrie Caramelized Red Onion Tarts

Related update: Baked Scallops With Parma Ham

Mixed Paella | Made by Meaghan Moineau

Mixed Paella: A Hearty Feast for the Soul

Intro

Paella is more than just a dish; it’s a vibrant celebration of flavors and textures that brings people together. This Mixed Paella recipe has been a cherished staple in my family for generations, often making an appearance during our Sunday gatherings. I vividly recall the tantalizing aroma that filled my grandmother’s kitchen as she skillfully prepared the dish, her laughter mingling with the sizzle of chorizo in the pan. It’s a dish that carries with it the warmth and love of home, a culinary tradition I am thrilled to share with you today.

Why You’ll Love It

This Mixed Paella is a delightful medley of seafood, meat, and aromatic spices, making it a complete meal that is sure to satisfy. The harmonious blend of flavors from the saffron-infused rice, savory chorizo, and tender fish and shrimp creates a symphony on your palate. It’s a dish that’s both comforting and impressive, perfect for both casual family meals and special occasions. Plus, it’s a one-pan wonder that simplifies cleanup, allowing you more time to enjoy with your loved ones.

Ingredients

  • 1 bay leaf
  • 4 cups chicken broth
  • 1 chorizo sausage
  • 2 teaspoons extra virgin olive oil
  • 1 white fish fillet
  • 2 cloves garlic, minced
  • 1 lemon, cut into wedges
  • 1 teaspoon lemon zest
  • 1 pound mussels, cleaned
  • 1 Spanish onion, diced
  • 1/4 cup fresh parsley, chopped
  • 1/2 cup peas
  • 1 red bell pepper, diced
  • 1/2 teaspoon crushed red pepper flakes
  • 2 cups dry rice
  • 1/4 teaspoon saffron threads
  • 1/2 pound shrimp, peeled and deveined
  • 1 teaspoon thyme

Instructions

  1. In a very large non-stick skillet or paella pan preheated over medium-high heat, add 2 teaspoons of your oil (you will need more oil if you’re not using non-stick), garlic, red pepper flakes, and rice. Sauté for about 3 minutes.
  2. Add saffron, thyme, bay leaf, and chicken broth, then bring to a boil. Cover and reduce heat to a simmer. Leave covered, do not stir.
  3. In another non-stick skillet, heat to medium-high. Add chorizo and crumble as you sauté. When the sausage is cooked through, add red pepper and onion. Salt and pepper to taste if needed. Sauté until the onion is tender, then remove from heat and set aside.
  4. When the rice is nearly done (about 15 minutes), add fish and shrimp and press into rice. Add mussels, peas, and sprinkle with lemon zest. Cover and continue to simmer until the rice is done and the mussels have opened. Discard any mussels that do not open.
  5. Top with the chorizo mixture and parsley. Serve with lemon wedges and a crusty bread.

Tips

To ensure the perfect paella, resist the urge to stir the rice once the broth is added. This allows the rice to develop a crispy bottom layer known as “socarrat,” which is highly prized in traditional paella. Also, make sure to clean the mussels thoroughly and discard any that are cracked or do not close when tapped.

Variations & Substitutions

Feel free to customize your paella by swapping out ingredients based on your preferences or availability. You can use different types of seafood like clams or scallops, or substitute the chorizo with another type of sausage for a unique twist. For a vegetarian version, omit the meat and seafood entirely and add more vegetables like artichokes and green beans.

Storage

Leftover paella can be stored in an airtight container in the refrigerator for up to 3 days. To reheat, place it in a skillet over medium heat and add a splash of water or broth to retain moisture. Avoid using a microwave, as it may cause the seafood to become rubbery.

FAQ

Can I use brown rice instead of white rice?

Yes, you can use brown rice, but keep in mind that it has a longer cooking time compared to white rice. You’ll need to adjust the cooking time and possibly add more broth to ensure the rice is fully cooked.

Is it necessary to use saffron?

Saffron is a key ingredient in traditional paella, providing a unique flavor and vibrant color. However, if saffron is unavailable, you can substitute with turmeric, although the flavor will be different.

Can I freeze paella?

While it is possible to freeze paella, it’s not recommended as the texture of the seafood and rice may change upon thawing. It’s best enjoyed fresh or stored in the refrigerator for short-term use.

Nutrition

Mixed Paella is a balanced dish that combines proteins, carbohydrates, and healthy fats. With seafood providing omega-3 fatty acids and the addition of vegetables, it’s a nutritious option for a hearty meal. Adjust the portion size based on dietary needs and personal preferences.

Conclusion

This Mixed Paella recipe is a testament to the richness of Spanish cuisine, offering a delightful blend of flavors in every bite. Whether you’re sharing it with family or friends, it’s sure to be a crowd-pleaser. I hope this recipe becomes a treasured addition to your own culinary traditions, just as it has been in mine. Enjoy the process of cooking and savor the joyful moments it brings!

Related update: Mixed Paella

Related update: The Perfect Butter Beans Stew

Pizza bites with pumpkin | Made by Meaghan Moineau

Pizza Bites with Pumpkin: A Delicious Twist on a Classic Favorite

Intro

Growing up, pizza nights were a cherished tradition in our family. The excitement of choosing toppings and watching the dough rise in the oven created an atmosphere of warmth and joy. As the weather turns cooler and pumpkins begin to adorn doorsteps, I am reminded of those cozy evenings shared with loved ones. Today, I’m thrilled to bring you a unique twist on a classic favorite—Pizza Bites with Pumpkin. This recipe combines the rich, earthy flavors of pumpkin with the savory goodness of cheese, creating a delightful treat that transports me right back to those beloved family gatherings.

Why You’ll Love It

These pizza bites are a perfect blend of nostalgia and innovation. They’re bite-sized, making them ideal for parties, snacks, or even a fun family meal. The addition of pumpkin adds a subtle sweetness that pairs beautifully with the savory cheeses and herbs. You’ll love how quick and easy this recipe is, and your guests will adore the surprise ingredient that makes these bites stand out. They’re also a great way to sneak in some extra veggies, making them a hit with both kids and adults alike.

Ingredients

  • Pumpkin
  • Olive oil
  • Feta cheese
  • Mozzarella cheese
  • Eggs
  • Dried oregano
  • Parsley
  • Garlic

Instructions

  1. Using a food processor, chop the pumpkin until it resembles rice-like granules.
  2. In a hot pan, sauté the pumpkin with olive oil for about 3 minutes, then set aside to cool.
  3. In a mixing bowl, combine feta and mozzarella cheeses. Add the eggs one at a time, mixing to combine.
  4. Add the cooled pumpkin and spices to the cheese mixture. Mix well until everything is well blended.
  5. Evenly spoon the mixture into the greased muffin tin molds.
  6. Press pizza dough down evenly and firmly in each mold. This step is crucial to ensure the bites stick together.
  7. Place in the oven and bake for 30 minutes at 200°C (392°F).
  8. Remove the pizza bites from the oven and let them set in the pan for 5-10 minutes before removing to cool completely. This step is important to prevent them from breaking apart.

Tips

To make your pizza bites even more flavorful, try using fresh herbs instead of dried ones. Fresh parsley and oregano can elevate the taste significantly. You can also add a pinch of chili flakes if you fancy a bit of heat. Remember, pressing the dough down firmly is essential to help the bites maintain their shape. Be patient and let them cool properly before removing from the molds.

Variations & Substitutions

If you’re looking to mix things up, try substituting the pumpkin with sweet potato for a different flavor profile. For a dairy-free version, you can use a vegan cheese substitute. Additionally, feel free to experiment with other herbs and spices that you love. Basil or thyme can be great alternatives to oregano and parsley.

Storage

These pizza bites can be stored in an airtight container in the refrigerator for up to 3 days. They can also be frozen for up to a month. If freezing, place them in a single layer on a baking sheet first, then transfer to a freezer-safe container once frozen. To reheat, simply pop them in the oven until warmed through.

FAQ

Can I make these pizza bites ahead of time?

Absolutely! You can prepare the mixture a day in advance and store it in the refrigerator. When ready to bake, simply spoon the mixture into the muffin tin molds and follow the baking instructions.

What can I serve with pizza bites?

These pizza bites pair wonderfully with a fresh green salad or a bowl of tomato soup. They’re also delicious on their own as a snack or appetizer.

Can I use canned pumpkin?

While fresh pumpkin is recommended for the best texture and flavor, canned pumpkin can be used in a pinch. Just make sure it’s not the pumpkin pie filling, as that contains added sugars and spices.

Nutrition

While the exact nutritional content will vary based on specific ingredient brands and quantities used, a typical serving of these pumpkin pizza bites is packed with protein from the cheese and eggs, and essential vitamins from the pumpkin. They provide a balanced snack option with a moderate amount of carbohydrates and fats.

Conclusion

Pizza Bites with Pumpkin are a delightful twist on a classic dish, bringing warmth and comfort to any occasion. They capture the essence of fall with their unique flavor combination and are sure to become a favorite in your household. I hope this recipe brings you as much joy and nostalgia as it has brought me. Happy cooking!

Related update: Pizza bites with pumpkin

Related update: Chavrie Caramelized Red Onion Tarts

Mashed Potatoes with Garlic, Sage & Goat Cheese | Made by Meaghan Moineau

Mashed Potatoes with Garlic, Sage & Goat Cheese

Intro

There’s something about the aroma of garlic and sage that instantly transports me back to my grandmother’s kitchen. I remember the chilly autumn afternoons when I would watch her skillfully mash potatoes with her old hand masher, her movements rhythmic and comforting. She always had a knack for creating the most divine mashed potatoes, and her secret ingredient? A touch of creamy goat cheese that added a delightful tanginess. This recipe for Mashed Potatoes with Garlic, Sage & Goat Cheese is inspired by those cherished memories. It’s a dish that not only fills the belly but also warms the soul, making it perfect for family gatherings or a cozy night in.

Why You’ll Love It

This recipe is a modern twist on a classic comfort food. The creamy texture of the mashed potatoes is beautifully complemented by the rich, earthy flavors of garlic and sage. The addition of goat cheese introduces a subtle tanginess that elevates the dish to a gourmet level. Whether you’re serving these mashed potatoes as a side dish for a holiday feast or as a comforting weeknight dinner, they are sure to be a hit with everyone at the table.

Ingredients

  • 4 large baking potatoes, peeled and quartered
  • 2 cloves of garlic, minced
  • 1 pyramid (about 5.3 oz) Chavrie Goat Cheese
  • 2 tablespoons olive oil
  • 2 teaspoons fresh sage, finely chopped
  • Salt and black pepper to taste

Instructions

  1. In a medium saucepan, cook the potatoes in salted water until tender, about 15 minutes.
  2. Drain the potatoes and return them to the saucepan.
  3. While still warm, add the olive oil, garlic, and Chavrie Goat Cheese.
  4. Whip the potatoes with handheld mixers until the ingredients are blended and the desired consistency is obtained.
  5. Season with salt and black pepper to taste.
  6. Garnish with fresh sage before serving.

Tips

For the creamiest mashed potatoes, make sure to use high-starch potatoes like russets or Yukon Golds. Don’t overmix the potatoes, as this can make them gluey. If you’re mashing by hand, a potato masher or ricer works best. You can also add a splash of milk or cream for extra creaminess.

Variations & Substitutions

If you’re looking to switch things up, try using roasted garlic for a deeper flavor. Substitute the goat cheese with cream cheese or sour cream if you’re not a fan of goat cheese. For a dairy-free version, use a plant-based cheese alternative and coconut cream. You can also add a touch of nutmeg or a handful of chopped chives for additional flavor.

Storage

Leftover mashed potatoes can be stored in an airtight container in the refrigerator for up to 3 days. To reheat, simply microwave or warm them in a saucepan over low heat, adding a splash of milk or broth to bring back the creamy texture. These mashed potatoes can also be frozen for up to a month, making them a convenient make-ahead dish.

FAQ

Can I make these mashed potatoes ahead of time?

Yes, you can prepare these mashed potatoes up to two days in advance. Store them in the refrigerator and reheat gently on the stove or in the microwave before serving. Add a little milk or broth to revive the creamy texture.

How can I make this recipe vegan?

To make these mashed potatoes vegan, substitute the goat cheese with your favorite plant-based cheese and use a dairy-free milk alternative like almond or oat milk. Ensure that the olive oil is your primary fat source.

What can I serve with these mashed potatoes?

These mashed potatoes pair beautifully with a variety of main dishes. Try them alongside roasted chicken, grilled steak, or a hearty mushroom stew. They’re also a fantastic complement to holiday meals like Thanksgiving turkey or Christmas roast.

Nutrition

While nutritional values can vary based on specific ingredients and portion sizes, a serving of these mashed potatoes is roughly 250 calories. They are a good source of potassium and vitamin C from the potatoes, with additional healthy fats from the olive oil. The goat cheese adds a dose of protein and calcium, making this dish both delicious and nutritious.

Conclusion

Mashed Potatoes with Garlic, Sage & Goat Cheese is a dish that brings together the best of comfort and gourmet cooking. It’s a recipe that honors tradition while offering room for creativity and adaptation. Whether you’re cooking for a crowd or enjoying a solo dinner, these mashed potatoes are sure to become a staple in your culinary repertoire. I hope you find as much joy in making and eating them as I do, and that they bring a sense of warmth and nostalgia to your table, just as they do to mine.

Related update: Mashed Potatoes with Garlic, Sage & Goat Cheese

Gene Deckerhoff: Buccaneers’ Voice Retires | Analysis by Brian Moineau

Last Call for an Icon: Gene Deckerhoff Retires After the 2025 Season

There are voices that become part of a place — not just sound, but memory. For Tampa Bay football, Gene Deckerhoff’s is one of those voices. On December 31, 2025 the Buccaneers announced that after 37 seasons behind the microphone, Deckerhoff will retire at the end of the 2025 NFL season. His signature calls — most famously “Touchdown, Tampa Bay!” and the rallying cry “Fire the Cannons!” — have been the soundtrack for generations of Bucs fans.

Why this matters beyond a broadcast booth

  • A team’s identity is shaped as much by the rituals and sounds around it as by players and coaches. Deckerhoff narrated three-quarters of Tampa Bay’s games since 1989 — through expansion growing pains, two Super Bowl championships, and countless local legends — and his cadence and enthusiasm helped seal those moments in memory.
  • Radio play-by-play remains intimate and immediate. For many fans (commuters, road-trippers, older fans, and anyone who grew up with AM/FM on a Saturday night), the radio voice is the primary connection to the team. Gene’s retirement is, in part, the end of an era for that way of experiencing football.
  • His career is historically significant for the NFL: 37 seasons with one club ranks among the longest-tenured announcers in league history, trailing only a couple of legendary contemporaries.

The arc of a long career

  • Joined the Buccaneers radio network in 1989 and completed 37 seasons by the end of 2025.
  • Called more than 800 Buccaneers games and delivered over 1,100 touchdown calls for the franchise (team announcement, Dec 31, 2025).
  • Narrated both Super Bowl runs (2002 season/Super Bowl XXXVII and the 2020s Super Bowl season), plus countless playoff runs and franchise-defining moments.
  • Honors include multiple Florida Sportscaster of the Year awards, the Chris Schenkel Award (2013), and induction into the Florida Sports Hall of Fame.

Memorable calls that live on

  • “There it is! The dagger’s in! We’re going to win the Super Bowl!” — Derrick Brooks’ pick-six sealing Super Bowl XXXVII.
  • “Gone! Coast to Coast, Rondé Barber!” — Rondé Barber’s 92-yard interception return in the 2002 NFC Championship.
  • Simple, human moments like “You go, Joe!” (Joe Jurevicius) that capture emotion as much as the play itself.

These lines aren’t just radio copy; they are part of how fans recall and retell the team’s history.

Transition questions and what comes next

  • Who will succeed a voice so closely tied to the franchise? Replacing Deckerhoff won’t be just about finding someone who can call plays — it will mean finding a broadcaster who can connect with the same breadth of fans and become a steady presence across decades.
  • How will the team honor this legacy? The Buccaneers will likely create tributes during the remaining 2025 games, and there’s potential for hall-of-fame style recognition given his state- and college-level honors.
  • What does this mean for radio-listening culture? Deckerhoff’s retirement highlights how broadcast traditions shift — streaming, TV, and social media shifts audiences, but the appetite for a memorable play-by-play voice endures.

A few takeaways for fans and the franchise

  • Gene’s retirement is both a celebration and a milestone: it closes a chapter that began in 1989 and stretches across the modern rise of the Buccaneers.
  • Emotional continuity matters. Teams that preserve continuity in their audio and visual identities often keep stronger cross-generational fan bonds.
  • The role of a lead play-by-play broadcaster is more than describing action — it’s about framing context, emotion, and lore. Whoever takes over inherits a storytelling mantle.

Final thoughts

It’s tempting to reduce a broadcaster’s value to a list of awards or the tally of games called. The truer measure of Gene Deckerhoff’s impact is in the way entire households and car rides still snap to attention at the cadence of his lines. Retirement is a quiet, graceful curtain call for someone who spent decades turning plays into stories. As the Buccaneers and their fans finish the 2025 season, the last “Touchdown, Tampa Bay!” called by Deckerhoff will feel like the final page of a long, beloved chapter — and the echo of that voice will live on in highlight reels and living-room recollections for many years.

Sources


Related update: We recently published an article that expands on this topic: read the latest post.


Related update: We recently published an article that expands on this topic: read the latest post.

Wisconsin Beer Cheese Soup | Made by Meaghan Moineau

Wisconsin Beer Cheese Soup

Intro

There’s a comforting embrace in every spoonful of this Wisconsin Beer Cheese Soup, a dish that instantly transports me back to the chilly autumn evenings of my childhood. Growing up in Wisconsin, soup was a staple in our household, especially during the frosty months. My mom would always have a pot simmering on the stove, and the aroma of melting cheddar mixed with the rich notes of beer would fill the house, creating an irresistible invitation to gather around the table. This recipe is not just a soup; it’s a nostalgic journey back to those cozy family dinners, paired with laughter, warmth, and the love that only a homemade dish can convey.

Why You’ll Love It

This Wisconsin Beer Cheese Soup is the epitome of comfort food. Here are a few reasons why it will become a favorite in your household:

  • Rich and Creamy: The blend of Wisconsin cheddar with half & half creates a velvety texture that is both satisfying and indulgent.
  • Warm and Hearty: Perfect for cold days, this soup warms you from the inside out with its robust flavors.
  • Easy to Make: With simple ingredients and straightforward instructions, this soup is accessible to cooks of all skill levels.
  • Customizable: You can easily adapt the recipe to suit your taste preferences or dietary needs.

Ingredients

  • Butter
  • Onion
  • Carrots
  • Celery sticks
  • Garlic
  • Flour
  • Wisconsin beer
  • Broth
  • Half & half
  • Shredded Wisconsin cheddar
  • Mustard
  • Worcestershire sauce
  • Pepper
  • Red pepper flakes
  • Salt

Instructions

  1. Melt the butter on medium heat in a large pot.
  2. Add in the onion, carrots, celery, and garlic. Cook for 3-4 minutes until the vegetables are tender.
  3. Stir in the flour, ensuring it’s well incorporated with the vegetables.
  4. Pour in the Wisconsin beer and broth. Bring the soup to a gentle boil.
  5. Reduce the heat to low and add the half & half and shredded Wisconsin cheddar. Stir until the cheese is completely melted.
  6. Mix in the mustard, Worcestershire sauce, pepper, and red pepper flakes.
  7. Use an immersion blender to smooth out the soup. If using a regular blender, puree in batches, ensuring the blender is only a third full each time.
  8. Season with salt to taste, and your Wisconsin Beer Cheese Soup is ready to serve.

Tips

Here are some tips to ensure your soup turns out perfectly every time:

  • Choose the Right Beer: A medium-bodied beer like an amber or lager works best, providing a balanced flavor without overpowering the soup.
  • Cheese Quality Matters: Opt for high-quality Wisconsin cheddar for the best flavor and texture.
  • Blending Safely: If using a blender instead of an immersion blender, allow the soup to cool slightly before blending to prevent any hot splashes.

Variations & Substitutions

This recipe is wonderfully versatile. Here are some variations you might consider:

  • Vegetarian Option: Use vegetable broth instead of chicken broth to make this soup vegetarian.
  • Spice It Up: Add more red pepper flakes or a dash of hot sauce for a spicier kick.
  • Additional Toppings: Top with crispy bacon bits, chives, or a dollop of sour cream for extra flavor.

Storage

To store any leftover soup, allow it to cool completely before transferring it to an airtight container. It will keep well in the refrigerator for up to 3 days. For longer storage, you can freeze the soup for up to 2 months. When reheating, do so gently over low heat to maintain the soup’s creamy texture.

FAQ

Can I make this soup without beer?

Yes, you can substitute the beer with extra broth if you prefer. However, the beer adds a unique depth of flavor that is characteristic of this dish.

What can I use instead of half & half?

If you need a lighter option, you can use whole milk or a mixture of milk and cream. For a dairy-free version, try using coconut milk or a non-dairy creamer.

How can I make this soup gluten-free?

To make this soup gluten-free, replace the flour with a gluten-free all-purpose flour blend. Ensure that your beer and Worcestershire sauce are also gluten-free.

Nutrition

While the exact nutritional content will vary based on specific ingredients and serving sizes, this soup is rich in protein and calcium from the cheddar cheese. Enjoy it in moderation as part of a balanced diet.

Conclusion

Wisconsin Beer Cheese Soup is more than just a dish; it’s a cherished tradition that brings warmth and joy with every bowl. Whether you’re a lifelong local or new to the flavors of Wisconsin, this soup is sure to become a beloved staple in your home. So grab your favorite blanket, cozy up, and enjoy the creamy, cheesy goodness that is Wisconsin Beer Cheese Soup.

Related update: Wisconsin Beer Cheese Soup

Related update: Tomato and Bacon Pizza With Rice Crust

Related update: Lemony Greek Lentil Soup

Zucchini Ribbon Caper Salad | Made by Meaghan Moineau

Zucchini Ribbon Caper Salad

Intro

There’s something inherently magical about the simplicity of summer salads. Growing up, my grandmother’s garden was a vibrant tapestry of colors and textures, where we spent countless summer afternoons. Among her many garden treasures, zucchini was always in abundance, and she had a knack for turning it into the most delightful dishes. This Zucchini Ribbon Caper Salad is a tribute to those cherished moments—filled with fresh, crisp flavors reminiscent of sunny days spent in her backyard.

Why You’ll Love It

This Zucchini Ribbon Caper Salad is a symphony of flavors and textures that will captivate your taste buds. The crispness of the zucchini ribbons, the savory burst from the capers, and the aromatic dance of garlic and lemon zest create a dish that is both refreshing and satisfying. It’s an elegant addition to any meal, and its simplicity is matched only by its deliciousness. Perfect as a light appetizer or a side dish, this salad will become a staple in your culinary repertoire.

Ingredients

  • 2 medium zucchinis, thinly sliced into ribbons
  • 2 tablespoons capers
  • 1 clove garlic, minced
  • Zest of 1 lemon
  • 2 tablespoons olive oil
  • Salt and pepper to taste
  • 1 medium tomato, julienned
  • Dried parsley, for garnish

Instructions

  1. In a large bowl, toss the zucchini strips with the olive oil, lemon zest, lemon juice, garlic, salt, and pepper.
  2. Set aside and allow the mixture to marinate for 30 minutes. This step allows the flavors to meld beautifully and the zucchini to soften slightly.
  3. Divide the marinated zucchini between 2-3 plates.
  4. Top each serving with capers and julienned tomato.
  5. Drizzle any extra dressing over the salad, if desired.
  6. To garnish, sprinkle a pinch of dried parsley over each plate before serving.

Tips

For the best results, use fresh, firm zucchinis and a high-quality olive oil to enhance the flavor. A vegetable peeler or mandoline slicer works wonders for creating perfect zucchini ribbons. Remember to taste the salad before serving to ensure the seasoning is just right—sometimes a little extra lemon juice or a pinch of salt can make all the difference.

Variations & Substitutions

This salad is incredibly versatile, and you can easily adapt it to suit your tastes or what you have on hand:

  • Herbs: Fresh basil or mint can add a delightful twist to this salad. Simply chop and sprinkle over before serving.
  • Cheese: Add a sprinkle of feta or goat cheese for a creamy contrast to the crisp zucchini.
  • Olives: Substitute capers with chopped olives for a different kind of briny bite.

Storage

While this salad is best enjoyed fresh, you can store leftovers in an airtight container in the refrigerator for up to 2 days. Note that the zucchini may become more tender as it sits, but the flavors will continue to develop, making it even more delicious.

FAQ

Can I make this salad ahead of time?

Yes, you can prepare the salad up to a day in advance. Just keep the zucchini marinating in the refrigerator and add the capers and tomato just before serving to maintain their fresh texture.

What can I serve with this salad?

This salad pairs beautifully with grilled chicken, fish, or even a simple pasta dish. It’s also a lovely addition to a summer picnic or barbecue spread.

Is this salad vegan?

Yes, this Zucchini Ribbon Caper Salad is naturally vegan, making it a great choice for those following a plant-based diet.

Nutrition

This salad is not only delicious but also packed with nutrients. Zucchini is a low-calorie vegetable high in antioxidants, vitamin A, and fiber. The olive oil provides healthy fats, while the lemon and garlic contribute additional vitamins and immune-boosting properties.

Conclusion

Our Zucchini Ribbon Caper Salad is more than just a dish—it’s a celebration of fresh, vibrant flavors that bring a touch of brightness to any meal. Whether you’re looking to reminisce about summer days gone by or simply want to enjoy a nutritious, delightful salad, this recipe is sure to please. Gather your ingredients, embrace the simplicity, and savor the taste of summer with every bite. Enjoy!

Related update: Zucchini Ribbon Caper Salad

Related update: Mashed Potatoes with Garlic, Sage & Goat Cheese

Related update: Pizza bites with pumpkin

Related update: Traditional Panzanella

Perfect fish cakes | Made by Meaghan Moineau

Perfect Fish Cakes: A Hearty Homestyle Delight

Intro

There’s something about the aroma of fish cakes sizzling in a pan that instantly transports me back to my grandmother’s cozy kitchen. Every Sunday, she would whip up her famous fish cakes, and the entire family would gather around the table, eagerly waiting for the first bite. These tender, golden-brown cakes were more than just a meal; they were a tradition, a warm embrace on a plate. Today, I’m thrilled to share my version of her beloved recipe with you. These perfect fish cakes are easy to make, delightfully crispy on the outside, and melt-in-your-mouth tender on the inside. Whether you’re looking to recreate a nostalgic favorite or try something new, these fish cakes are sure to become a cherished addition to your recipe collection.

Why You’ll Love It

This recipe is a celebration of simple, fresh ingredients coming together to create something truly special. Here’s why you’ll love it:

  • Easy to prepare: With straightforward steps and minimal prep time, you can have these delicious fish cakes ready in no time.
  • Full of flavor: The combination of fresh herbs, zesty lemon, and a creamy homemade sauce makes these fish cakes incredibly flavorful.
  • Perfect for any occasion: Whether you’re serving them as a weeknight dinner or a party appetizer, these fish cakes are versatile and always impressive.
  • Nostalgic comfort food: These fish cakes bring a touch of home-cooked comfort to your table, reminiscent of cozy family gatherings and cherished memories.

Ingredients

  • 2 tablespoons mayonnaise
  • 1 tablespoon salted capers, rinsed and chopped
  • 1 tablespoon creamed horseradish
  • 1 tablespoon Dijon mustard
  • 1 shallot, finely chopped
  • 2 tablespoons parsley, chopped
  • 400g cod fillets
  • 2 bay leaves
  • 300ml milk
  • 300ml water
  • 400g potatoes, peeled and chopped
  • Salt, to taste
  • Zest of 1 lemon
  • 2 tablespoons fresh parsley, chopped
  • 2 tablespoons chives, finely chopped
  • Freshly ground pepper, to taste
  • Flour, for dusting
  • 1 large egg, beaten
  • 100g breadcrumbs
  • Sunflower oil, for frying
  • Lemon wedges, to serve

Instructions

  1. In a small bowl, mix together the mayonnaise, salted capers, creamed horseradish, Dijon mustard, shallot, and chopped parsley. Set aside.
  2. Place the cod fillets and bay leaves in a frying pan. Pour over the milk and water. Cover, bring to a boil, then lower the heat and simmer for 4 minutes. Remove from heat and let stand, covered, for 10 minutes to gently finish cooking the fish.
  3. Lift the fish out of the milk with a slotted spoon and place on a plate to cool. Discard the bay leaves.
  4. Meanwhile, in a separate pot, cook the potatoes in salted water for 10 minutes or until tender but not broken up. Drain and return them to the hot pan on the lowest heat, letting them dry out for 1 minute. Mash with a fork until light and fluffy.
  5. Remove potatoes from heat and stir in 1 tablespoon of the sauce, lemon zest, fresh parsley, pepper, and chives. Set aside.
  6. Drain any excess liquid from the fish, then flake it into large chunks and add to the mashed potatoes. Gently mix together with your hands until just combined, being careful not to break up the fish too much. Allow to cool.
  7. On a lightly floured board, shape the mixture into 4-6 cakes, each about 2.5 cm thick. Dip each cake in beaten egg, then coat with breadcrumbs.
  8. Transfer the cakes to a plate, cover, and chill for at least 30 minutes or up to a day ahead.
  9. Heat sunflower oil in a pan over medium heat. Fry the fish cakes for about 5 minutes on each side or until crisp and golden.
  10. Serve with the remaining sauce (add a squeeze of lemon zest to taste) and lemon wedges.

Tips

  • For extra crispiness, double-coat the fish cakes by repeating the egg and breadcrumb steps.
  • Ensure the oil is hot enough before frying to achieve the perfect golden crust.
  • Don’t overcrowd the pan while frying; work in batches if necessary.

Variations & Substitutions

Feel free to get creative with this recipe:

  • Fish: While cod is classic, you can also use haddock, salmon, or any firm white fish you prefer.
  • Herbs: Swap parsley and chives for dill or coriander for a different flavor profile.
  • Gluten-Free: Use gluten-free flour and breadcrumbs to accommodate dietary restrictions.

Storage

These fish cakes can be made ahead and stored in the refrigerator for up to 24 hours before frying. After cooking, store leftovers in an airtight container in the fridge for up to 3 days. To reheat, place them in a preheated oven at 180°C (350°F) for about 10 minutes or until heated through. These fish cakes also freeze well; just freeze before frying for up to 3 months.

FAQ

Can I use canned fish for this recipe?

Yes, you can use canned fish, such as salmon or tuna, as a convenient alternative. Just make sure to drain it well before mixing it with the potatoes.

What can I serve with these fish cakes?

These fish cakes pair beautifully with a fresh green salad, steamed vegetables, or a side of tartar sauce. For a heartier meal, serve them with rice or mashed potatoes.

How do I prevent the fish cakes from falling apart?

Ensuring the mixture is cool and not over-mixed will help the fish cakes hold their shape. Chilling them before frying also helps them maintain their form while cooking.

Nutrition

Each serving of these fish cakes is approximately 350 calories, with 15g fat, 35g carbohydrates, and 20g protein. They are a great source of omega-3 fatty acids, essential vitamins, and minerals.

Conclusion

These perfect fish cakes are more than just a meal; they are a tribute to cherished memories and the joy of sharing good food with loved ones. With their crispy exterior and tender, flavorful interior, they are sure to become a favorite in your home. I hope this recipe brings as much warmth and happiness to your table as it has to mine. Enjoy every bite!

Related update: Perfect fish cakes

Related update: All American Sloppy Joes

Shiffrin’s Fifth Straight Slalom Triumph | Analysis by Brian Moineau

Mikaela Shiffrin’s night in Semmering: five-from-five and a reminder that dominance still has edges

There are performances that look effortless on paper and fights that reveal a champion’s guts. Sunday night in Semmering gave us both. Mikaela Shiffrin — the skier who has made technical alpine racing look like a science — added another headline to an already absurd résumé, but this win came with grit, complaint and a reminder that even the best can be pushed to the limit. (fis-ski.com)

Why this race mattered

  • Shiffrin won the Semmering slalom to make it five wins from five slalom starts this 2025–26 season — a perfect start in the discipline that keeps the “Mother of Slalom” label feeling earned. (fis-ski.com)
  • It was career World Cup victory number 106 for Shiffrin, and her sixth consecutive slalom win counting the final race of last season — milestones that stack up into historical territory. (reuters.com)
  • The race was not a stroll: tricky snow, course debates and a razor-thin margin of 0.09 seconds to Camille Rast made this one of the tougher tests she’s faced this season. (fis-ski.com)

The night unfolded like this

The first run felt chaotic. Softer, breaking snow left the lower section especially treacherous and the field visibly frustrated; many racers struggled and race officials even tweaked the course before the second run after skier input. Shiffrin herself called the piste “pretty rotten” and later said parts of the course were “past the limit.” (fis-ski.com)

Shiffrin came out for run two with a different tone — more urgency, fresher aggression. Where the first descent left her fourth and 0.54 seconds behind the leader, her second run was a strategic, full‑throttle masterclass: crisp, snappy turns and one fewer mistake than her nearest rival. That was enough to claw back the deficit and edge ahead by 0.09 seconds for the win. (fis-ski.com)

Camille Rast pushed hard all night and nearly nudged Shiffrin off the top; Lara Colturi continued her breakout season with another podium for Albania, and the race felt like a microcosm of the shifting slalom guard — brilliance from Shiffrin, but not uncontested. (fis-ski.com)

What this says about Shiffrin right now

  • Consistency and adaptability: Winning five slaloms from five starts is about more than speed — it’s judgment, recovery and the ability to read conditions and opponents. This Semmering win highlighted all three when it counted. (fis-ski.com)
  • Experience under pressure: Several rivals matched or even outskied her at points, but Shiffrin’s race management and capacity to deliver when it mattered turned a tense night into another victory. (reuters.com)
  • The narrative is changing around the field: younger names like Lara Colturi are no longer surprises but real threats; Camille Rast’s form shows that margins are getting thinner. That’s good for the sport and makes future matchups more compelling. (fis-ski.com)

The controversy and safety question

This wasn’t just a drama about timing. Skiers criticized the condition of the piste — Shiffrin included — saying parts of the course were beyond acceptable limits and that the snow was breaking down early in the start list. Officials adjusted the course, but the episode revived conversation about athlete safety, course setting and how organizers should respond in night races when temperature swings can wreck the surface. Those debates will likely follow into the next events. (fis-ski.com)

What to watch next

  • Kranjska Gora on 4 January will be the first slalom after the New Year and the next chance to measure whether this perfect slalom run continues. The pressure is accumulating on competitors to find a way past Shiffrin — and on organisers to deliver fair, safe racing. (fis-ski.com)
  • The duel between established dominance (Shiffrin) and rising stars (Colturi, Rast) will be the storyline to follow; the slalom podium is tightening into a true battlefield. (snowindustrynews.com)

My take

Shiffrin’s win in Semmering felt like a hallmark of greatness: not the effortless triumph that becomes a comfortable stat, but a teeth‑gritted, high‑stakes reply to adversity. That’s compelling sport. The race also underlined an important tension for alpine skiing in 2025–26 — the thrill of elite performance versus the real need for consistent, athlete‑first course management. If we get more nights like Semmering, we’ll get drama and historic numbers, but we’ll also have to keep asking where the safety line is drawn.

Sources


Related update: We recently published an article that expands on this topic: read the latest post.


Related update: We recently published an article that expands on this topic: read the latest post.

Vegetarian Ratatouille | Made by Meaghan Moineau

Vegetarian Ratatouille: A Classic French Delight

Intro

Ah, ratatouille! This classic French dish transports me back to my grandmother’s kitchen, where the air was always filled with the comforting aroma of roasted vegetables and fresh herbs. As a child, I would spend summer afternoons on her porch, watching her expertly dice eggplants and zucchini, her hands moving with the rhythm of someone who had perfected the art of cooking over decades. The vibrant colors of the vegetables were as captivating as the dish itself, and the first bite was always a revelation: a warm, hearty medley of flavors that seemed to capture the very essence of summer.

This vegetarian ratatouille recipe is my tribute to those cherished memories. It’s a simple yet flavorful dish that combines fresh vegetables and herbs in a way that epitomizes rustic French cooking. Whether you’re a seasoned chef or a beginner in the kitchen, this recipe is sure to delight your senses and become a cherished addition to your culinary repertoire.

Why You’ll Love It

  • Healthy and Nutritious: Packed with fresh vegetables and herbs, this dish is a nutritious powerhouse that’s perfect for any meal.
  • Easy to Make: With simple ingredients and straightforward instructions, this ratatouille is accessible for cooks of all skill levels.
  • Versatile: Enjoy it as a main dish, a side, or even a topping for pasta or rice.
  • Seasonal Delight: Make the most of summer’s bounty with this recipe that showcases fresh produce at its best.
  • Make-Ahead Friendly: Its flavors deepen over time, making it ideal for meal prep or next-day leftovers.

Ingredients

  • 1 eggplant, diced
  • 1 zucchini, sliced
  • 1 yellow squash, sliced
  • 2 tomatoes, chopped
  • 1 red bell pepper, chopped
  • 1 orange bell pepper, chopped
  • 1 onion, diced
  • 2 cloves garlic, minced
  • Fresh basil leaves, torn
  • 1 teaspoon thyme
  • 1 teaspoon dried oregano
  • 3 tablespoons extra virgin olive oil
  • Sea salt, to taste

Instructions

  1. In a large saucepan over medium-low heat, warm the extra virgin olive oil.
  2. Add the diced onion and minced garlic. Sauté until the onions are translucent, stirring occasionally to prevent sticking.
  3. Stir in the chopped tomatoes and let them cook for about 5 minutes, allowing their juices to release.
  4. Add the diced eggplant, sliced zucchini, yellow squash, and chopped bell peppers to the saucepan.
  5. Sprinkle in the thyme, dried oregano, and sea salt. Stir to combine all the ingredients.
  6. Reduce the heat to low and cover the pan. Let the mixture simmer for about 30 minutes, stirring occasionally, until the eggplant is tender and the flavors have melded together.
  7. Remove from heat and stir in the fresh basil leaves just before serving.
  8. Taste and adjust the seasoning if necessary. Serve warm and enjoy!

Tips

For the best flavor, use fresh, ripe vegetables. If possible, visit your local farmer’s market for ingredients. Cut your vegetables uniformly to ensure even cooking, and be patient with the simmering process to allow the flavors to fully develop. Remember, the key to a good ratatouille is in its simplicity and the quality of its ingredients.

Variations & Substitutions

Feel free to experiment with this recipe by adding or substituting vegetables based on what’s in season or your personal preferences. Mushrooms and carrots can add depth and sweetness. If you prefer a bit of heat, consider adding a pinch of red pepper flakes. For a protein boost, toss in some chickpeas or serve the ratatouille over quinoa.

Storage

Ratatouille stores beautifully. Once cooled, transfer it to an airtight container and refrigerate for up to 5 days. Reheat gently on the stovetop or in the microwave. It can also be frozen for up to 3 months. Thaw in the refrigerator overnight and reheat before serving.

FAQ

Can I make ratatouille ahead of time?

Absolutely! Ratatouille is one of those dishes that tastes even better the next day as the flavors continue to meld. It’s perfect for meal prep or an easy make-ahead option for a gathering.

What should I serve with ratatouille?

Ratatouille is versatile and can be served with a variety of accompaniments. It pairs well with crusty bread, rice, or pasta. You can also serve it as a side dish with grilled fish or chicken for a more substantial meal.

Is ratatouille vegan?

Yes, this ratatouille recipe is completely vegan, making it a great option for those following a plant-based diet. It’s naturally gluten-free as well, accommodating a range of dietary needs.

Nutrition

This dish is not only delicious but also a health-conscious choice. It’s low in calories and rich in vitamins, antioxidants, and fiber. The combination of fresh vegetables provides a wealth of nutrients, while the olive oil adds healthy fats that are beneficial for heart health.

Conclusion

Incorporating this vegetarian ratatouille into your culinary repertoire is like inviting a touch of Provence into your home. It’s a dish that’s not only steeped in tradition but also vibrant with the colors and flavors of fresh produce. Whether you’re savoring it on a warm summer evening or cozying up with it on a cooler day, ratatouille is a celebration of simplicity and flavor. So, gather your ingredients, embrace the art of slow cooking, and enjoy making a dish that’s as delightful to prepare as it is to eat. Bon appétit!

Related update: Vegetarian Ratatouille

Traditional Panzanella | Made by Meaghan Moineau

Traditional Panzanella Recipe: A Taste of Italian Summer

Introduction

There’s something truly magical about the simplicity of Italian cuisine, and nothing epitomizes this more than the traditional Panzanella. I remember the first time I tasted this delightful Tuscan bread salad; it was a warm summer afternoon in Florence, sitting in a quaint trattoria with my grandmother. The vibrant colors of the fresh tomatoes, the aroma of basil, and the satisfying crunch of day-old bread soaked in olive oil and vinegar created an unforgettable symphony of flavors. This dish not only filled our bellies but also our hearts with cherished memories. I hope this recipe brings a little piece of Italy to your table and becomes a staple in your home, just as it has in mine.

Why You’ll Love It

Traditional Panzanella is a celebration of the freshest ingredients and the beauty of rustic cooking. Here’s why it’s sure to become a favorite:

  • Simple Ingredients: Made with just a handful of pantry staples and fresh produce, this recipe is all about quality ingredients shining through.
  • Quick and Easy: With minimal preparation and no cooking required, this dish is perfect for those hot summer days when you want something light yet satisfying.
  • Versatile and Adaptable: Easily customizable to suit your taste preferences, Panzanella is a great way to use up any leftover bread or vegetables you have on hand.
  • Healthy and Delicious: Packed with fresh vegetables and healthy fats from olive oil, it’s a nutritious option for any meal.

Ingredients

  • Six slices of day-old Tuscan bread
  • Extra virgin olive oil
  • Fresh basil leaves
  • One red onion
  • Red wine vinegar
  • Salt and pepper, to taste
  • Four ripe tomatoes

Instructions

  1. In a bowl, combine the bread with water and let it stand for at least 20 minutes or until it’s soft.
  2. Drain the bread and squeeze out as much water as you can. Crumble the bread and place it in a serving bowl.
  3. Scatter the tomatoes, onions, and chopped basil over the top of the bread.
  4. Dress the Panzanella with extra-virgin olive oil and vinegar. Season with salt and pepper and toss well.
  5. Taste and adjust the seasoning with more oil, salt, and vinegar according to your preference.
  6. Leave the Panzanella to stand for 15 minutes to allow the flavors to meld together. Serve at room temperature.

Tips

  • Choose the right bread: A rustic, crusty bread like Tuscan or sourdough works best. It should be slightly stale for the perfect texture.
  • Use the best tomatoes: Opt for ripe, juicy tomatoes for the best flavor. Heirloom varieties can add beautiful color and taste.
  • Let it rest: Allow the salad to sit for at least 15 minutes before serving to let the flavors meld.

Variations & Substitutions

Panzanella is incredibly adaptable, so feel free to make it your own:

  • Add protein: Include grilled chicken or tuna for a more substantial meal.
  • Incorporate more veggies: Cucumbers, bell peppers, or even olives can add extra flavor and texture.
  • Herb it up: Try adding parsley, oregano, or mint for a different aromatic profile.

Storage

Panzanella is best enjoyed fresh, but if you have leftovers, store them in an airtight container in the refrigerator for up to 2 days. Note that the bread will continue to absorb the dressing and may become softer. If you plan on making it ahead, keep the bread separate and combine just before serving.

FAQ

Can I use fresh bread instead of day-old bread?

While day-old bread is traditional and helps to achieve the right texture, you can use fresh bread in a pinch. Simply toast it lightly to dry it out before soaking.

Is there a gluten-free option for Panzanella?

Yes, you can make a gluten-free version by using gluten-free bread. Ensure the bread is sturdy enough to hold up to the soaking process.

Can I prepare Panzanella in advance?

It’s best to prepare Panzanella fresh to maintain the texture of the bread. However, you can chop the vegetables and prepare the dressing ahead of time, then combine just before serving.

Nutrition

This traditional Panzanella is a nutritious option that offers a balance of carbohydrates, healthy fats, and fresh vegetables. A typical serving provides approximately:

  • Calories: 250
  • Fat: 15g
  • Carbohydrates: 26g
  • Protein: 4g
  • Fiber: 3g

Conclusion

Traditional Panzanella is more than just a salad; it’s a testament to the beauty of simple, fresh ingredients coming together to create something extraordinary. Whether you’re enjoying it as a light lunch, a side dish, or a main course with added protein, this Tuscan classic is sure to delight your taste buds and transport you to a sun-drenched Italian countryside. Share it with loved ones, and create your own cherished memories around the table. Enjoy!

Related update: Traditional Panzanella

Related update: Zucchini Ribbon Caper Salad

Butchers Reinvent Menus as Beef Costs Soar | Analysis by Brian Moineau

When the Price of a Ribeye Rises, Small Butchers Reinvent the Counter

It used to be that a stroll into the neighborhood butcher meant two things: a chat with someone who knew the cut by name, and the smell of fresh meat ready for the weekend grill. Lately, that stroll comes with sticker shock. As beef prices climb to multi‑decade highs, small butcher shops are quietly reshaping how they sell, what they recommend, and how they keep customers coming back.

Why this matters now

  • Ground beef and steak prices climbed to record levels in 2025, driven by shrinking U.S. cattle herds, drought, higher feed and production costs, and other supply‑chain strains. (cbsnews.com)
  • Unlike large grocery chains with buying power and vertical integration, independent butchers rely on local supply and customer trust — two things that feel fragile when the cost of a pound of meat jumps dramatically. (cbsnews.com)

If you buy meat regularly — or run a small meat business — this is more than an economic headline. It changes weekly shopping lists, family dinners, and the way small food retailers position themselves in a competitive market.

How small butcher shops are adapting

Butchers are leaning into the advantages they have: craft, relationship, knowledge. The ways they’re responding fall into a few practical, customer‑facing moves:

  • Recommend cheaper cuts and show how to cook them

    • Educating customers about braises, slow roasts, and mince versus steak helps shoppers stretch a dollar without sacrificing flavor. (cbsnews.com)
  • Offer more value through portioning and combo packs

    • Smaller, recipe‑focused packs or mixed‑protein bundles let households get a taste of beef without buying an expensive whole cut.
  • Promote alternative proteins and mixed dishes

    • Increased suggestion of pork, chicken, plant‑based options, and blends (e.g., beef‑pork blends for meatloaf) helps retain customers who want familiar flavors at lower cost. (cbsnews.com)
  • Lean on relationships and local sourcing narratives

    • Customers are willing to pay a premium for traceability and trust; butchers emphasize provenance, seasonal availability, and chef‑style guidance.
  • Adjust pricing strategies and special offers

    • Time‑limited sales, loyalty deals, and highlighting lower‑cost cuts for weeknight meals help balance margins and foot traffic.

The supply picture behind the counter

To make sense of a butcher’s new pitch, you need the behind‑the‑scenes context:

  • Herds are smaller. The U.S. cattle inventory fell to its lowest levels in decades after years of drought and higher costs, shrinking the supply pipeline from ranch to retail. (axios.com)

  • It takes time to rebuild herds. Biological realities and feeding cycles mean relief won’t be immediate; even when ranchers expand, it can be years before more beef reaches grocery aisles. (farmprogress.com)

  • Policy, trade, and extreme weather add volatility. Tariffs, import/export shifts, and persistent climate stressors have amplified price swings for both cattle and feed. (cbsnews.com)

That combo explains why prices remain elevated even when ranchers or processors tweak production: the whole chain is interdependent and slow to rebalance.

For shoppers: smart moves at the meat counter

If you’re feeling the pinch, small changes at the store (or in your kitchen) can reduce cost without losing satisfaction:

  • Ask your butcher for weeknight‑friendly cuts (chuck, brisket, round) and simple recipes for braising or slow cooking.
  • Buy larger, less‑processed cuts and portion at home — it’s often cheaper per pound and gives leftovers for sandwiches or tacos.
  • Mix proteins in recipes (half beef, half turkey or pork) for flavor and savings.
  • Consider frozen or vacuum‑sealed bargains for longer shelf life and bulk savings.
  • Build rapport with a local butcher: they’ll tip you off on sales, day‑of‑cut discounts, or creative substitutions.

For butchers: business lessons from a beef squeeze

Independent meat sellers can survive and even strengthen their position by leaning into differentiation:

  • Become an educator: host demos, share recipes, and show cooking techniques to make lower‑cost cuts desirable.
  • Diversify inventory: sell more pork, poultry, value‑added items, and prepared foods to smooth revenue.
  • Strengthen supply relationships: local sourcing and cooperative purchasing can reduce exposure to volatile national markets.
  • Use storytelling: provenance and trust are powerful — customers pay for connection and honesty.
  • Innovate pricing and packaging: meal‑kits, subscription boxes, and mixed‑protein bundles increase convenience and perceived value.

What this trend might mean longer term

  • Beef may remain relatively expensive for months or years as herd recovery and supply‑chain fixes take hold. (farmprogress.com)
  • Consumer habits can shift permanently: when families learn new ways to cook cheaper cuts or embrace other proteins, demand patterns change.
  • Smaller shops that pivot effectively could win loyal customers who value expertise and personalized service — but those who cling to old assortments may lose traffic.

What to remember

  • Beef prices rose due to tight supply, drought impacts, and production costs; relief will be gradual. (axios.com)
  • Small butchers are responding by educating customers, promoting alternatives, and rethinking packaging and pricing. (cbsnews.com)
  • Practical consumer choices (different cuts, mixing proteins, buying larger portions) can blunt the sting of higher prices.

Final thoughts

Higher beef prices are reshaping more than grocery bills — they’re nudging everyday cooking toward resourcefulness and creativity. That’s a win for home cooks who learn to coax flavor from unexpected cuts, and for independent butchers who double down on craft and customer relationships. In a world where supply shocks and climate stressors are increasingly common, the butcher’s counter is quietly becoming a classroom in resilience.

Sources

Knuth’s Breakthrough: Counting Knight | Analysis by Brian Moineau

The knight that wouldn’t stop: Knuth’s 2025 detour into Knight’s Tours

If you’ve ever watched a knight dance across a chessboard and felt a little shiver of delight, Donald Knuth’s 2025 Christmas lecture was made for you. In early December he stepped away (briefly) from his life’s work and treated a packed Stanford auditorium to a warm, wide-ranging romp through the mathematics and art of Knight’s Tours — and announced new computational censuses that pin down long-standing curiosities about how a knight can visit every square exactly once. (thenewstack.io)

Why this matters (and why it’s beautiful)

  • The Knight’s Tour is both an ancient puzzle and a modern graph‑theory problem: trace a path that visits each of an 8×8 board’s 64 squares exactly once using the knight’s L-shaped move.
  • Beyond recreational math, studying Knight’s Tours touches combinatorics, symmetry, algorithm design, and the kinds of exhaustive enumeration problems that test both theory and computing power.
  • Knuth’s framing emphasizes aesthetics: these tours aren’t just numbers — many are visually striking “snowflakes” or spirals with deep symmetry, and classifying them helps us see structure inside apparent chaos. (thenewstack.io)

Fresh results from the lecture

  • Knuth described how dividing tours by the “wedges” formed at the four central squares reduces the search space (roughly by a factor of eight), letting him classify and count tours more systematically. (thenewstack.io)
  • Using modern census programs and clusters of machines, he presented counts for very specific constrained families of tours — for example, 103,361,771,080 tours with a particular slope distribution among middle moves. (thenewstack.io)
  • He highlighted the total number of Knight’s Tours often quoted in the literature: about 13,267,364,410,532 on an 8×8 board (a result first computed by Brendan McKay in 1997), and explained how the new censuses reveal fine-grained maxima and unique extremal tours (e.g., the only tour with exactly four obtuse angles). (thenewstack.io)
  • Knuth also discussed constructions and surprising extrema: tours maximizing or minimizing certain angle counts, tours with many or few path crossings, and “whirling” tours with coil-like structure (including results on larger boards). (thenewstack.io)

How Knuth’s approach blends old and new

  • Classic intuition: take symmetries, invariants, and small structural observations (like the wedge idea) that mathematicians have used for centuries.
  • Modern tooling: write efficient enumerators, exploit data structures and symmetry reductions, and run massively parallel jobs on clusters to exhaustively search constrained families. Knuth described borrowing a 26‑machine cluster (832 cores) to crank through long runs — a modern echo of the “man vs. machine” era, where mathematical insight guides computation and computation finds structures intuition missed. (thenewstack.io)

Patterns, extremes, and human taste

  • Some of the lecture’s most charming moments weren’t the big counts but the anecdotal extremes: the tours with the most straight lines, the ones with unusually many 37-degree wedges, those with minimal obtuse angles, or the single tour with exactly four obtuse angles.
  • Knuth repeatedly returned to the notion that mathematical work, at its best, looks for beauty. He compared favorite tours to favorite pieces of music — patterns that please both left- and right‑brain sensibilities. (thenewstack.io)

Things this work nudges forward

  • Enumeration practice: Knuth’s censuses are a reminder that clever classification plus raw compute still yields discoveries in classical problems.
  • Visualization and design: the knight’s routes are fertile ground for “geek art” — architectural installations, prints, or teaching aids that make abstract combinatorics tangible (Knuth collaborated on decorations for Case Western’s reopened CS building). (thenewstack.io)
  • New questions: now that many maxima/minima and specific census classes are known, attention can shift to provable constructions, asymptotic behavior on larger boards, and generalizations (3‑D boards, other piece-move graphs, or different topologies). (thenewstack.io)

A few technical highlights

  • Wedge-based classification: analyzing the angles made at the four central squares cuts the enumeration problem into manageable families.
  • Winding-number and darkness/lightness patterns: representing tours by black/white patterns (based on winding parity) gives a helpful invariant for classification and visualization.
  • Parallel census runs: some calculations that would take many months on a desktop were completed in days using dozens of modern cores. Knuth noted running over 800 concurrent jobs for certain searches. (thenewstack.io)

What I find most striking

  • It’s rare to see a living legend like Knuth combine playful curiosity, deep technical craft, and the joy of sharing results that are simultaneously rigorous and whimsical. The Knight’s Tour, an 1891‑era puzzle, remains a testing ground for fresh ideas about enumeration, symmetry, and what we call “beauty” in mathematics. (thenewstack.io)

My take

  • This lecture is a small manifesto for computationally aided mathematics: human insight reduces the problem; machines exhaust the reduced space; both supply new stories and new questions.
  • The work also reminds us that not all important progress looks like earth‑shattering theorems. Sometimes it’s counting, classifying, and revealing hidden patterns in well-worn territory — and that matters. Knuth’s delight in the tours is also an invitation: curiosity plus craft still pays dividends.

Final thoughts

Knuth’s Knight’s Tours lecture is equal parts computation, combinatorics, and gallery show. It’s a pragmatic lesson for researchers and hobbyists alike: embrace constraints that reveal structure, write clean code to enumerate wisely, and don’t forget to enjoy the images your work makes. After all, a solved count is more satisfying when it comes wrapped in symmetry, surprise, and a good story. (thenewstack.io)

Further reading

  • Knuth’s Pre‑Fascicle on Hamiltonian Paths and Cycles (parts referenced in the talk).
  • Historical background on Knight’s Tours and McKay’s 1997 total count.

Sources


Related update: We recently published an article that expands on this topic: read the latest post.


Related update: We recently published an article that expands on this topic: read the latest post.

Japanese Gyoza Pot Stickers | Made by Meaghan Moineau

Japanese Gyoza Pot Stickers

Intro

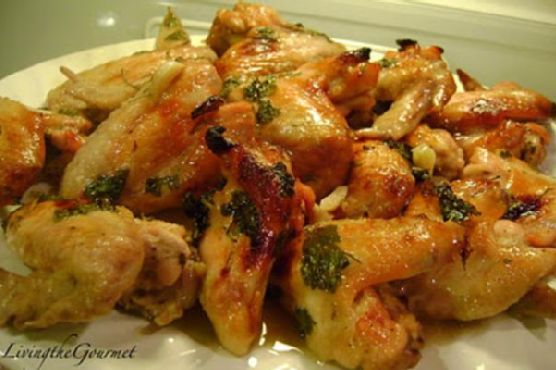
There’s something incredibly comforting about a plate of perfectly cooked gyoza, or Japanese pot stickers, their crispy bottoms contrasting with a tender, juicy filling. I remember visiting my grandmother’s house on weekends, the kitchen filled with the aromatic scent of sizzling gyoza. She would always let me assist, my small hands struggling to pleat the delicate wrappers just right. It was in those moments that I learned the art of cooking and the love that goes into each fold. Today, I’m excited to share this cherished recipe with you, bringing a piece of my childhood into your home.

Why You’ll Love It

This Japanese Gyoza recipe is a delightful blend of savory, spicy, and aromatic flavors. The combination of ground beef, cabbage, and spices wrapped in a delicate shell is truly irresistible. Whether you’re a seasoned cook or a beginner, these pot stickers are easy to make and perfect for any occasion. Plus, you can customize them with ingredients you love or have on hand!

Ingredients

  • 1/2 teaspoon black pepper
  • 2 cups finely chopped cabbage
  • 1 teaspoon chili sesame oil
  • 1/2 cup dried mushrooms, soaked in warm water and chopped
  • 2 teaspoons grated ginger root
  • 3 to 4 green onions, chopped
  • 1/2 pound ground beef
  • 2 tablespoons salad oil
  • 1 tablespoon sesame oil
  • 2 tablespoons Kikkoman soy sauce
  • 1 tablespoon cooking wine
  • Gyoza wrappers

Instructions

  1. Chop the cabbage finely, place it in a colander, and pour boiling water over it. Allow it to cool to the touch, then squeeze the cabbage well to remove excess water.
  2. In a large bowl, mix the cabbage, chopped green onions, chopped mushrooms, and grated ginger.
  3. In a separate bowl, combine the ground beef, cooking wine, soy sauce, sesame oil, and black pepper. Add this mixture to the bowl of vegetables and mix well.
  4. Place about 1 teaspoon of filling in the center of a gyoza wrapper. Fold the wrapper in half and pleat the edges to seal. If the edges don’t stick, dampen the inside edge with a little water, then pleat.
  5. Heat 2 tablespoons of salad oil in a large skillet over medium heat. Place the gyoza into the skillet, flat side down, and cook until the bottoms are golden brown.
  6. At the edge of the pan, carefully pour in a little water, up to 1/4 of the depth of the pot stickers. Cover the skillet, turn the heat to low, and simmer until the water has evaporated.

Tips

For best results, make sure to squeeze out as much water from the cabbage as possible to prevent the filling from becoming too wet. Also, when pleating the gyoza, try to make small, even pleats to ensure they cook uniformly and look appealing.

Variations & Substitutions

If you’re looking to switch things up, consider these variations:

  • Vegetarian: Replace the ground beef with finely chopped tofu or tempeh.
  • Spicy: Add a dash of chili flakes or a bit more chili sesame oil for an extra kick.
  • Different Proteins: Try ground pork or chicken instead of beef for a different flavor profile.

Storage

Leftover gyoza can be stored in an airtight container in the refrigerator for up to 3 days. To reheat, simply pan-fry them again to regain their crispy texture. You can also freeze uncooked gyoza for up to a month; just be sure to place them in a single layer on a baking sheet to freeze initially before transferring to a freezer bag.

FAQ

Can I use store-bought gyoza wrappers?

Absolutely! Store-bought gyoza wrappers are a convenient option and work perfectly for this recipe. Just be sure to keep them covered with a damp cloth to prevent them from drying out while you work.

How do I prevent the gyoza from sticking to the pan?

Make sure your pan is well-oiled and preheated before adding the gyoza. Adding water to the pan and covering it helps to steam the gyoza, which also prevents sticking. If they still stick, let them sit for a moment after cooking to allow them to release naturally.

Nutrition

While exact nutritional values can vary, each gyoza pot sticker typically contains around 70-80 calories, with a good balance of protein from the beef and vegetables. This makes them a tasty yet relatively light appetizer or main dish. For those watching their sodium intake, be mindful of the soy sauce content, or opt for a low-sodium version.

Conclusion

Japanese Gyoza Pot Stickers are a delightful treat that brings warmth and joy to any meal. Whether you’re making them for a family gathering, a dinner party, or simply to enjoy a taste of Japan at home, these pot stickers promise to be a hit. I hope this recipe brings the same joy to your kitchen as it has to mine. Happy cooking!

Related update: Japanese Gyoza Pot Stickers

Related update: Vegetarian Ratatouille

Pan Seared Lamb Loin With Chimichurri & Roasted Trio Squash Salad With Goat Cheese and Pinenuts | Made by Meaghan Moineau

Pan Seared Lamb Loin With Chimichurri & Roasted Trio Squash Salad With Goat Cheese and Pinenuts

Intro

Growing up, Sunday dinners were a special affair in our household. My grandmother would gather us around the table, and there was always an air of anticipation as we eagerly awaited the culinary delight she had prepared. One of my cherished memories is of her lamb dishes, which were always perfectly seasoned and cooked to tender perfection. Inspired by those cherished times, I’ve recreated a modern twist on her classic lamb recipe. This Pan Seared Lamb Loin with Chimichurri and Roasted Trio Squash Salad with Goat Cheese and Pinenuts brings together vibrant flavors and textures, just like those unforgettable Sunday dinners.

Why You’ll Love It

This recipe is a celebration of flavors and textures that will make your taste buds dance with joy. The juicy, tender lamb loin chops are perfectly complemented by the fresh and zesty chimichurri sauce, adding an aromatic flair to the dish. The roasted trio squash salad, with its creamy goat cheese and crunchy pinenuts, provides a delightful contrast in both flavor and texture. This meal is not only a feast for your palate but also a visual delight that will impress any dinner guest.

Ingredients

  • Cilantro
  • Extra virgin olive oil
  • Flat leaf parsley
  • Garlic clove
  • Black ground pepper
  • Kosher salt and pepper
  • Lamb loin chops
  • Lemon
  • Mint
  • Pinenuts
  • Red pepper flakes
  • Shallot

Instructions

  1. Preheat your oven to 400°F (200°C).
  2. For the Chimichurri, combine cilantro, parsley, garlic, lemon juice, olive oil, red pepper flakes, salt, and pepper in a large bowl. Mix well and set aside.
  3. Heat a large, heavy-bottomed pan with a drizzle of olive oil over medium-high heat.
  4. Sprinkle each side of the lamb loin chops evenly with kosher salt and freshly ground black pepper.
  5. Once the oil is hot and begins to smoke slightly, sear the lamb loin chops for approximately 2 minutes on each side.
  6. Transfer the seared lamb chops to the preheated oven. Cook according to your preference:
    • Rare: 2-3 minutes
    • Medium Rare: 6-8 minutes
    • Medium: 9-11 minutes
    • Well Done: 12-14 minutes
  7. Remove the lamb from the oven and let it rest, as it will continue to cook slightly during this time.
  8. Serve the lamb loin chops topped with the chimichurri sauce and accompanied by the roasted trio squash salad.

Tips

To ensure the lamb is cooked to your liking, use a meat thermometer. For rare, aim for an internal temperature of 125°F (51°C), for medium-rare, 135°F (57°C), and for medium, 145°F (63°C). Always allow the lamb to rest for a few minutes before serving to let the juices redistribute, ensuring tender and flavorful meat.

Variations & Substitutions

If you don’t have lamb loin chops on hand, this recipe works beautifully with beef steaks or pork chops as well. For a vegetarian twist, consider using portobello mushrooms as a meaty substitute. You can also customize the chimichurri by adding your favorite herbs or spices, such as oregano or cumin, for a unique flavor profile.

Storage

If you have leftovers, store the lamb and salad separately in airtight containers in the refrigerator. The lamb will keep well for up to 3 days. The chimichurri sauce can be stored in a sealed jar in the fridge for up to a week. When reheating the lamb, do so gently to avoid overcooking.

FAQ

Can I make the chimichurri sauce ahead of time?

Absolutely! Chimichurri can be made a day or two in advance. In fact, allowing it to sit for a few hours or overnight can enhance the flavors as the ingredients meld together. Just store it in an airtight container in the refrigerator.

What can I serve with this dish?

This dish pairs beautifully with a side of crusty bread to mop up any extra chimichurri sauce. You might also consider serving it with roasted potatoes or a simple green salad for a well-rounded meal.

Can I use dried herbs instead of fresh for the chimichurri?

While fresh herbs are recommended for the best flavor, you can use dried herbs in a pinch. Just remember that dried herbs are more concentrated, so use about one-third of the amount of fresh herbs called for in the recipe.

Nutrition

This dish is packed with nutritious ingredients. Lamb is an excellent source of high-quality protein, essential vitamins, and minerals such as iron and zinc. The chimichurri sauce provides healthy fats from olive oil and antioxidants from the fresh herbs. The trio squash salad adds fiber and vitamins A and C, while goat cheese offers calcium and healthy fats. Pinenuts contribute additional protein and healthy fats, making this meal a well-balanced and satisfying option.

Conclusion

There you have it – a delightful dish that brings together the warmth of tradition with the vibrancy of modern flavors. This Pan Seared Lamb Loin with Chimichurri and Roasted Trio Squash Salad is perfect for a special occasion or a comforting family dinner. Whether you’re reminiscing about cherished memories or creating new ones, this dish is sure to become a favorite in your home. Enjoy every bite!

Related update: Pan Seared Lamb Loin With Chimichurri & Roasted Trio Squash Salad With Goat Cheese and Pinenuts

Related update: Slow Cooker Red Beans and Rice

Brussel Sprouts in Bacon and Garlic Sauce | Made by Meaghan Moineau

Brussel Sprouts in Bacon and Garlic Sauce

Intro

When I think of family gatherings during the festive season, one particular dish always stands out in my memory: Brussel Sprouts in Bacon and Garlic Sauce. This recipe was a staple at our holiday table, lovingly prepared by my grandmother. I remember sitting in her cozy kitchen, stealing crispy bacon bits while she wasn’t looking, and watching in awe as she transformed humble ingredients into a dish that even the pickiest eater couldn’t resist. Today, I’m delighted to share this beloved recipe with you, hoping it brings as much warmth and joy to your table as it did to ours.

Why You’ll Love It

This dish is a perfect blend of savory and tangy flavors that complement the natural taste of brussel sprouts. The bacon and garlic sauce add richness, while a hint of lemon juice brightens the dish. It’s quick and easy to prepare, making it an excellent side dish for busy weeknights or special occasions. Plus, the crispy bacon bits add a delightful texture that even those who usually shy away from green vegetables will enjoy.

Ingredients

  • 250g whole brussel sprouts
  • 1/2 teaspoon salt
  • 4 cups water
  • 1 tablespoon salted butter
  • 1 tablespoon minced garlic
  • 1 tablespoon bacon bits
  • Salt and pepper to taste
  • 1 teaspoon lemon juice

Instructions

  1. Wash the brussel sprouts thoroughly and remove any old, hard outer leaves.
  2. Bring 4 cups of water to a boil in a saucepan and add 1/2 teaspoon of salt.
  3. Add the brussel sprouts to the boiling water and cook at medium heat for 4 minutes, or until they are tender but still slightly crunchy.
  4. Drain the brussel sprouts and set them aside.
  5. Return the saucepan to the hot stove and add 1 tablespoon of butter.
  6. While the butter is melting, cut the brussel sprouts in half.
  7. Add 1 tablespoon of minced garlic to the melted butter and sauté for a few seconds until the garlic is fragrant but not brown.
  8. Return the cut brussel sprouts to the saucepan and toss them lightly in the garlic-butter sauce.
  9. Add 1 tablespoon of bacon bits and toss to combine. For convenience, I always keep a jar of ready-to-use bacon bits in the fridge, but freshly pan-fried and crumbled bacon works just as well.
  10. Season to taste with salt and pepper. I personally love using Masterfoods Garlic Pepper for an extra flavor kick.
  11. Add a squeeze of fresh lemon juice (about 1 teaspoon) for a tangy finish.
  12. Toss everything together once more and serve. For an extra touch, garnish with toasted almond flakes or serve with fresh lemon wedges on the side.

Tips

To ensure your brussel sprouts are perfectly cooked, check them after 4 minutes of boiling. They should be tender but still retain a bit of crunch. Overcooking can lead to mushy sprouts, which we want to avoid. If you prefer a smokier flavor, try using smoked bacon bits. Remember, fresh lemon juice is key; it brightens the dish and balances the savory elements beautifully.

Variations & Substitutions

If you’re vegetarian or looking to reduce your meat intake, you can substitute the bacon bits with smoked paprika or sun-dried tomatoes for a similar depth of flavor. For a nutty crunch, consider adding toasted pine nuts or walnuts instead of almond flakes. If garlic isn’t your favorite, shallots or onions can also complement the sprouts nicely. Feel free to experiment with different herbs like thyme or rosemary for an aromatic twist.

Storage

Store any leftovers in an airtight container in the refrigerator for up to 3 days. To reheat, simply warm them in a skillet over medium heat until heated through. You can also use a microwave, though the skillet method will help retain their texture better. Unfortunately, this dish doesn’t freeze well, as the texture of the brussel sprouts can become unappealing when thawed.

FAQ

Can I use frozen brussel sprouts for this recipe?

Yes, you can use frozen brussel sprouts, but the texture might differ slightly. Make sure to thaw them thoroughly and pat them dry before cooking to remove excess moisture. Adjust the boiling time as needed since frozen sprouts might cook faster.

How do I make this dish vegan?

To make this dish vegan, simply replace the butter with a plant-based alternative and omit the bacon bits. You can use smoked paprika or nutritional yeast to add depth of flavor.

Can I prepare this dish ahead of time?

Yes, you can prepare the brussel sprouts and the garlic sauce a day in advance. Store them separately in the fridge. When ready to serve, reheat the sauce, toss in the brussel sprouts, and add the bacon bits and lemon juice for a fresh finish.

Nutrition

This dish is a great source of fiber, vitamins C and K, and antioxidants from the brussel sprouts. The bacon and butter add a dose of healthy fats, while garlic is known for its immune-boosting properties. Keep in mind that the nutritional content will vary based on the specific brands and quantities used.

Conclusion

Brussel Sprouts in Bacon and Garlic Sauce is a dish that has stood the test of time in my family, bringing smiles and satisfied sighs from everyone around the table. I hope this recipe becomes a cherished favorite in your home as well. Its simplicity and delightful flavors make it a winner for any occasion. So, gather your loved ones, share a meal, and create new memories with this heartwarming dish. Enjoy!

Related update: Brussel Sprouts in Bacon and Garlic Sauce

Candied Spiced Pecans | Made by Meaghan Moineau

Candied Spiced Pecans: A Sweet and Savory Delight

Intro

There’s something magical about the aroma of spiced pecans wafting through the house, especially during the holiday season. As a child, I remember my grandmother making batches of these delightful treats for family gatherings. The warmth of the spices combined with the sweetness of the sugar created an irresistible snack that had everyone reaching for more. Today, I’m excited to share this cherished recipe with you, hoping it brings as much joy to your home as it has to ours.

Why You’ll Love It

These Candied Spiced Pecans are a perfect blend of sweet and spicy, offering a crunchy texture that is as satisfying as it is delicious. Whether you’re looking for a quick snack, a topping for salads, or a thoughtful homemade gift, these pecans fit the bill. The combination of spices like cinnamon, cloves, and nutmeg, along with a hint of maple, makes them an irresistible treat that captures the essence of comfort and warmth.

Ingredients

  • 1 tsp allspice
  • 1/2 cup brown sugar
  • 2 tbsp butter
  • 1 tsp cinnamon
  • 1/2 cup granulated sugar
  • 1/4 tsp ground cloves
  • 1 tsp maple extract
  • 1/4 tsp nutmeg
  • 2 cups pecans
  • 1/4 cup water

Instructions

  1. Preheat your oven to 300°F (150°C). Line a cookie sheet with tin foil and coat it with cooking spray. Set aside.
  2. In a shallow bowl, sift together the granulated sugar, cinnamon, allspice, cloves, and nutmeg. Set aside.
  3. In a small bowl, whisk together the maple extract, brown sugar, and water.
  4. Over medium heat, melt the butter in a skillet. Slowly whisk in the brown sugar mixture and bring it to a boil.
  5. Add the pecans to the skillet and stir to coat them thoroughly. Simmer for about 1-2 minutes until well-coated.
  6. Using a slotted spoon, transfer the pecans to the reserved sugar and spice bowl. Coat the pecans evenly with the sugar mixture.
  7. Place the pecans evenly on the prepared cookie sheet and bake for 15 minutes. Stir the pecans and bake for an additional 15 minutes.
  8. Let the pecans cool completely before serving or storing.

Tips

For the best results, make sure to use fresh pecans. Older nuts can lose their natural oils and flavor. Be sure to stir the pecans halfway through the baking process to ensure even coating and roasting. Lastly, allow them to cool completely before storing to maintain their crispiness.

Variations & Substitutions

If you’re looking to switch things up, you can easily substitute walnuts or almonds for the pecans. For a spicier kick, consider adding a pinch of cayenne pepper to the spice mix. If maple extract isn’t available, vanilla extract works as a great alternative, providing a subtly different flavor profile.

Storage

Store your candied spiced pecans in an airtight container at room temperature. They should stay fresh for up to two weeks. You can also freeze them for longer storage, just be sure to let them thaw completely before serving to retain their crisp texture.

FAQ

Can I use salted butter for this recipe?

Yes, you can use salted butter, but it will slightly alter the flavor profile by adding a hint of saltiness. If you prefer to keep the recipe sweet, stick with unsalted butter.

How do I prevent the pecans from sticking together?

Ensure that the pecans are spread out evenly on the baking sheet and stirred halfway through the baking process. This will help prevent clumping and ensure each nut is evenly coated and roasted.

Can I make these pecans in advance?

Absolutely! These candied spiced pecans are perfect for making ahead of time. Just store them in an airtight container as mentioned, and they’ll be ready for any occasion.

Nutrition

While these candied spiced pecans are a treat, they’re also packed with nutrients. Pecans are a great source of healthy fats, fiber, and protein. However, due to the sugar content, it’s best to enjoy them in moderation as part of a balanced diet.

Conclusion

These Candied Spiced Pecans are not just a treat; they’re a tradition that brings warmth and joy to any occasion. Easy to make and incredibly versatile, they’re sure to become a favorite in your home, just as they have in ours. I hope this recipe inspires you to create delicious memories with your loved ones. Enjoy!

Related update: Candied Spiced Pecans

Related update: Medenjaci – Croatian Honey Spice Cookies

Related update: Japanese Gyoza Pot Stickers

Chocolate Peppermint Cookies | Made by Meaghan Moineau

Chocolate Peppermint Cookies

Intro

Chocolate Peppermint Cookies are a holiday favorite in my household, a tradition that brings back fond memories of festive gatherings and cozy winter evenings. I remember the first time I baked these delightful treats was with my grandmother, who had a knack for creating magic in the kitchen. The aroma of chocolate and peppermint swirling through the house signaled the beginning of holiday celebrations. As we sat around the fireplace, enjoying these cookies with a cup of hot cocoa, it felt like all was right with the world. Today, I’m excited to share this cherished recipe with you, so you too can create sweet memories with your loved ones.

Why You’ll Love It

These Chocolate Peppermint Cookies are the perfect blend of rich chocolate and refreshing peppermint. They are soft and chewy with a slight crunch on the outside, making them irresistible to both kids and adults. Whether you’re looking to impress at a holiday party or simply want to treat yourself, these cookies are sure to become a staple in your dessert repertoire. With their delightful glaze and festive flavor, they capture the essence of the holiday season in every bite.

Ingredients

  • 1 teaspoon baking soda
  • 1 cup confectioners sugar
  • 2 large eggs
  • 2 cups all-purpose flour
  • 2 tablespoons half and half
  • 1 cup light brown sugar
  • 1 teaspoon peppermint extract
  • 1/2 teaspoon salt
  • 1 cup sweet semi chocolate chips
  • 1 cup granulated sugar
  • 1 cup unsalted butter, softened
  • 1/2 cup unsweetened cocoa powder
  • 1 teaspoon vanilla extract

Instructions

  1. Preheat your oven to 350 degrees F.
  2. In a medium bowl, sift together the flour, cocoa powder, baking soda, and salt. Set this aside.
  3. In a mixer, beat together the butter with the granulated and light brown sugars until fluffy, about 2 minutes.
  4. Add the eggs one at a time, beating until smooth after each addition and scraping the sides of the bowl as necessary.
  5. Add the vanilla extract and mix well.
  6. On a low speed, gradually beat in the flour mixture a little at a time until well combined.
  7. Gently fold in the chocolate chips with a spatula or wooden spoon.
  8. Drop teaspoons of the batter onto an ungreased cookie sheet, spacing them about 2 inches apart.
  9. Bake the cookies until just cracked on top, about 8 minutes, rotating the pan halfway through the cooking time.
  10. Remove from the oven and flatten the cookies slightly with a spatula. Allow them to cool completely on a wire rack.
  11. For the glaze, mix together the confectioners sugar, peppermint extract, and half and half in a small bowl until smooth.
  12. Transfer the glaze mixture to a medium resealable plastic bag and snip off a tiny bit of the corner.
  13. Drizzle the glaze over the cooled cookies and let them stand until set, about 10-20 minutes.

Tips

To ensure your cookies are perfectly soft and chewy, avoid overbaking. They should just be cracked on top when you take them out of the oven. Also, make sure your butter is at room temperature for easy mixing and a smooth batter. Using a cookie scoop can help in creating uniform cookies, ensuring even baking.

Variations & Substitutions

Feel free to experiment with this recipe to suit your preferences. If you prefer a stronger peppermint flavor, you can increase the peppermint extract in the glaze. For a different twist, try adding crushed candy canes on top of the glaze for extra crunch and color. You can also substitute white chocolate chips for the semi-sweet chocolate chips for a different flavor profile.

Storage

These cookies can be stored in an airtight container at room temperature for up to a week. If you want to enjoy them for longer, they freeze beautifully. Simply layer them between sheets of parchment paper in a freezer-safe container and they’ll keep for up to three months. Thaw at room temperature before serving.

FAQ

Can I use dark chocolate chips instead of semi-sweet?

Absolutely! Dark chocolate chips can provide a richer flavor and work wonderfully in this recipe. Adjust according to your taste preference.

Can I make the dough ahead of time?

Yes, you can prepare the dough in advance and refrigerate it for up to 48 hours. This can actually enhance the flavor as the ingredients have more time to meld together. Just be sure to let the dough come to room temperature before baking.

Nutrition

While these cookies are a treat and should be enjoyed in moderation, they do provide some nutritional value. Each cookie contains approximately 150 calories, 8g of fat, 20g of carbohydrates, and 2g of protein. The exact nutritional content can vary based on specific brands and measurements used.

Conclusion

I hope this Chocolate Peppermint Cookies recipe brings as much joy to your family as it does to mine. Whether you’re baking them for a holiday gathering or simply to indulge your sweet tooth, these cookies are sure to be a hit. With their perfect balance of chocolate and peppermint, they encapsulate the spirit of the season in every bite. Happy baking, and may your home be filled with warmth, love, and delicious cookies this holiday season!

Related update: Chocolate Peppermint Cookies

Related update: Dump Cake

Watercress Salad With Miso-Lime Dressing | Made by Meaghan Moineau

Watercress Salad With Miso-Lime Dressing

Intro

There’s something about the crisp, refreshing bite of a fresh salad that can transport you to a summer day, no matter what the season. This Watercress Salad with Miso-Lime Dressing is not just a dish; it’s a journey back to the lush gardens of my childhood. I fondly remember visiting my grandmother’s garden every summer. Her garden was abundant with vibrant greens, each leaf kissed by the sun. Among the rows of vegetables and herbs, watercress was always my favorite. The spicy, peppery leaves were irresistible, and I would often sneak a handful to munch on while she wasn’t looking. It’s no surprise that watercress remains a beloved ingredient in my kitchen. This recipe is inspired by those summers, combining the freshness of garden greens with a tangy miso-lime dressing that brings everything together in a perfect harmony of flavors.

Why You’ll Love It

This salad is a celebration of flavor and texture. It’s not just a salad; it’s an experience. Here’s why you’ll fall in love with it:

  • Fresh and Nutritious: Packed with vibrant greens and crunchy vegetables, this salad is a powerhouse of nutrients.
  • Easy to Make: With simple steps and readily available ingredients, you can whip this salad up in no time.
  • Flavorful Dressing: The Miso-Lime Dressing is the star, offering a perfect balance of tangy, sweet, and savory flavors.
  • Versatile: Great as a side dish or a light meal, and easily customizable to suit different tastes and dietary needs.

Ingredients

  • Fresh sprouts
  • Fresh mung bean sprouts
  • Entire green onions, sliced
  • Grape tomatoes, halved
  • Diced orange bell pepper
  • Cilantro, chopped
  • Sesame seeds
  • Watercress leaves
  • Miso-lime dressing (recipe follows)
  • Fresh squeezed lime juice
  • Sesame oil
  • White miso

Instructions

  1. In a large bowl, toss together the fresh sprouts, mung bean sprouts, sliced green onions, grape tomatoes, diced orange bell pepper, chopped cilantro, and sesame seeds.
  2. In a small bowl, whisk together the fresh squeezed lime juice, sesame oil, and white miso to create your Miso-Lime Dressing.
  3. Pour the dressing over the mixed sprouts and vegetables in the large bowl. Toss until everything is evenly coated.
  4. Divide the watercress leaves evenly among four plates, creating a bed for the salad.
  5. Top each plate with the mixed sprout salad, evenly distributing the Miso-Lime Dressing among them.
  6. Serve immediately and enjoy the delicious flavors!

Tips

  • Choose Fresh Ingredients: Fresh, high-quality ingredients make all the difference. Look for crisp, vibrant watercress and sprouts for the best flavor and texture.
  • Miso-Lime Dressing Consistency: Adjust the dressing’s consistency by adding a little water if it’s too thick or more lime juice for extra tang.
  • Toast the Sesame Seeds: For an added depth of flavor, lightly toast the sesame seeds before adding them to the salad.

Variations & Substitutions

Feel free to make this salad your own by experimenting with different ingredients and flavors:

  • Protein Boost: Add grilled chicken, shrimp, or tofu for a more filling meal.
  • Nutty Flavor: Swap sesame seeds for toasted almonds or pine nuts for a different crunch.
  • Spicy Kick: Add a dash of chili flakes or sliced jalapeños for some heat.
  • Other Greens: If watercress is unavailable, arugula or baby spinach make excellent substitutes.

Storage

This salad is best enjoyed fresh, but if you have leftovers, store them in an airtight container in the refrigerator for up to two days. Keep the dressing separate if you plan to store the salad for later, to prevent the greens from wilting.

FAQ

Can I make the dressing ahead of time?

Absolutely! The Miso-Lime Dressing can be made in advance and stored in the fridge for up to a week. Just give it a good shake or stir before using.

Is this salad vegan-friendly?

Yes, this salad is naturally vegan. Just ensure that all your ingredients, especially the miso, are vegan-certified if you follow a strict vegan diet.

Can I use another type of miso?

White miso is recommended for its mild flavor, but if you prefer a stronger taste, yellow or red miso can be used. Keep in mind that they will affect the overall flavor of the dressing.

Nutrition

This refreshing salad is not only delicious but also packed with nutrients. Watercress is a superfood rich in vitamins A, C, and K, while the sprouts provide a good source of protein and fiber. The Miso-Lime Dressing adds a healthy dose of probiotics thanks to the fermented miso, making this dish both tasty and nourishing.

Conclusion

Whether you’re looking to add more greens to your diet or simply searching for a delightful salad to brighten up your meals, this Watercress Salad with Miso-Lime Dressing is a fantastic choice. With its refreshing flavors, easy preparation, and health benefits, it’s a dish that you’ll want to make again and again. I hope this salad brings a bit of the garden’s joy to your table, just as it does to mine. Enjoy every crunchy, flavorful bite!

Related update: Watercress Salad With Miso-Lime Dressing

Related update: Yorkshire Pudding

Related update: Traditional Panzanella