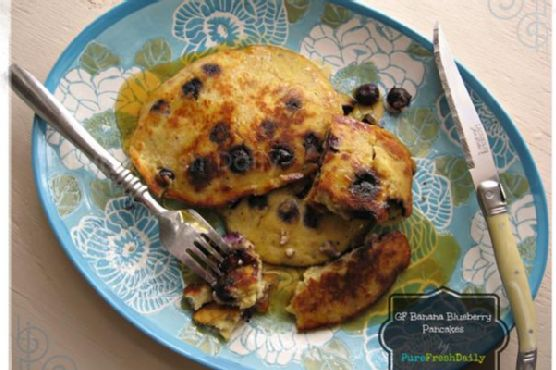
Mini Ham Omelets | Made by Meaghan Moineau

Mini Ham Omelets | Made by Meaghan Moineau

Title: "Mini Ham Omelets: A Heartfelt Recipe Packed with Flavor and Memories"
Description: Dive into the delightful world of Mini Ham Omelets, a simple yet flavorful dish that brings a sense of nostalgia and warmth. Perfect as an appetizer, this easy-to-make recipe is bursting with the vibrant flavors of cherry tomatoes, parmesan cheese, and prosciutto, all wrapped in a soft, eggy embrace. Join me as I share a cherished family memory tied to this beloved dish and guide you through creating your very own batch. Rated 3/10 in difficulty, this recipe is a breeze for cooks of all levels.

---


Mini Ham Omelets: A Heartfelt Recipe Packed with Flavor and Memories

Growing up, Sunday mornings were a sacred ritual in our household. The kitchen would awaken with the sizzle of pans and the harmonious chatter of family, all eagerly anticipating a hearty breakfast. Among the many dishes that graced our table, Mini Ham Omelets were a standout favorite. They were more than just a meal; they were a testament to the love and togetherness that Sundays embodied.


A Taste of Tradition

These Mini Ham Omelets are not just a treat for the taste buds; they are a journey back in time. My grandmother, the matriarch of our family, first introduced them to us. Her kitchen was her canvas, and every dish she created was a masterpiece. The smell of prosciutto crisping in the oven, the vibrant colors of fresh cherry tomatoes, and the creamy blend of eggs and parmesan were the defining notes of our Sunday symphony.


The Recipe
Ingredients:

- Cherry tomatoes


- Eggs


- Milk


- Onions


- Parmesan cheese


- Bell pepper


- Prosciutto


Instructions:

1. Begin by washing and chopping the spring onions. Set them aside.


2. In a mixing bowl, whisk the eggs together with the grated Parmesan cheese until well combined.


3. Add the chopped onions, milk, and a sprinkling of pepper to the egg mixture, stirring gently to incorporate.


4. Line six cavities of a silicone muffin mold with slices of prosciutto, creating a delicate, savory nest.


5. Fill each cavity with a couple of tablespoons of the egg mixture.


6. Place a washed and dried cherry tomato in the center of each mold.


7. Bake in a preheated oven at 180°C (356°F) for 12-15 minutes, until the omelets are set and the prosciutto is crisp.


A Nostalgic Twist

As these mini omelets baked, the aroma would fill the air, drawing everyone into the kitchen. We'd gather around the table, each bite a harmonious blend of flavors that told the story of our family. The tangy burst of cherry tomatoes complemented the savory richness of the prosciutto, while the parmesan cheese added a touch of elegance to the soft, fluffy eggs.


These omelets were more than a meal; they were a reminder of the simple joys of life and the importance of family. Every bite was filled with laughter, stories, and the warmth of shared memories.


Difficulty Rating: 3/10

Creating these Mini Ham Omelets is a delightful experience that cooks of all levels can enjoy. With a difficulty rating of just 3 out of 10, this recipe is perfect for anyone looking to recreate a piece of culinary nostalgia with ease.


Classification: Appetizer

Perfect as an appetizer, these Mini Ham Omelets are a versatile dish that can be served at brunch, as a starter for a dinner party, or as a delightful snack during family gatherings.


---


So, gather your ingredients, preheat your oven, and join me in creating these Mini Ham Omelets. Whether you're sharing them with family or enjoying a quiet morning alone, these little bites of nostalgia are sure to bring warmth and joy to your table.

Read more about Appetizers

Read more about Main Dishes

Read more about Desserts

Baked Cinnamon Apple Wedges | Made by Meaghan Moineau

Baked Cinnamon Apple Wedges | Made by Meaghan Moineau

Title: Warm Memories and Sweet Aromas: Baked Cinnamon Apple Wedges
Description: Unveil the heartwarming simplicity of Baked Cinnamon Apple Wedges, a dessert that marries the comforting flavors of fall with cherished family memories. Dive into this easy-to-make recipe that is sure to fill your home with the nostalgic aroma of cinnamon and apples.

---


As the crisp autumn air begins to wrap around us, there's nothing quite like the smell of cinnamon and apples wafting through the house. One bite of these Baked Cinnamon Apple Wedges, and you're instantly transported back to family gatherings where laughter was abundant, and the tables were laden with comfort food. This dessert is not just a treat for the taste buds, but a heartfelt journey back to simpler times.


A Nostalgic Family Memory:

I remember the first time I tasted these delightful apple wedges was at my grandmother's house. It was an annual tradition for the family to gather for Sunday dinners, and as the evening approached, the kitchen would start buzzing with activity. My grandmother had a knack for creating the most delicious desserts with the simplest of ingredients.


One fall evening, as the leaves painted the ground with hues of orange and gold, she decided to make Baked Cinnamon Apple Wedges. The apples, fresh from the orchard, were sliced with loving precision. I watched as she drizzled them with golden maple syrup and dusted them generously with cinnamon and nutmeg, her hands moving deftly, as if conducting an age-old symphony.


As the apples baked, the kitchen was enveloped in a warm, sweet aroma that drew the family together. We gathered around the table, eagerly awaiting the treat. Served warm, the apple wedges were a revelation—soft and tender, with a touch of spice that danced on the palate. It was a moment of pure joy and the perfect end to a cozy family meal.


The Recipe:

*Ingredients:*


- 1 apple


- 2 tablespoons of maple syrup


- 1 teaspoon of cinnamon


- 1/4 teaspoon of nutmeg


*Instructions:*


1. Preheat your oven to 180 degrees Celsius (approximately 350 degrees Fahrenheit).


2. Cut the apple into 10-12 wedges, ensuring they are evenly sized for consistent baking.


3. In a mixing bowl, combine the apple wedges with maple syrup, cinnamon, and nutmeg. Toss them gently to ensure each piece is well-coated.


4. Arrange the apple wedges in a single layer in a small baking dish or on a baking tray.


5. Bake in the preheated oven for about 10 minutes, or until the apples are golden brown and tender.


6. Serve the Baked Cinnamon Apple Wedges while they are warm, either on their own or with a scoop of vanilla ice cream for added indulgence.


Difficulty Rating: 2/10

This recipe is delightfully simple, making it accessible to both novice and experienced cooks.


Classification: Dessert

These Baked Cinnamon Apple Wedges are the perfect dessert for any occasion, embodying the flavors of fall and the warmth of family traditions. Whether you're hosting a large gathering or enjoying a quiet evening at home, this dish is sure to bring a touch of sweetness and nostalgia to your table. Enjoy the taste of cherished memories and the comforting embrace of fall flavors with every bite.

Read more about Appetizers

Read more about Main Dishes

Read more about Desserts

Creamy Lime Pie Square Bites | Made by Meaghan Moineau

Creamy Lime Pie Square Bites | Made by Meaghan Moineau

Creamy Lime Pie Square Bites: A Zesty Delight for Every Occasion


Description: Dive into the refreshing world of citrus with our Creamy Lime Pie Square Bites! Perfectly balanced between tangy and sweet, these bite-sized treats are bound to become your go-to dessert. Whether you're a seasoned baker or a beginner, this recipe is both simple and rewarding. Plus, it's packed with the nostalgic flavors of family gatherings and summer picnics. Let's create some new memories together!

---


Ingredients


- Crust:

- 1 cup all-purpose flour


- 1 cup graham cracker crumbs


- 1 tablespoon lime zest


- 1/4 cup sugar


- 1/2 cup unsalted butter, melted


- Filling:

- The rest of the ingredients as listed above


Instructions


1. Preheat and Prepare:

- Preheat your oven to 350°F (175°C).


- Line an 8x8 glass square dish with foil for easy removal later.


2. Make the Crust:

- In a medium bowl, whisk together all the crust ingredients until you achieve a grainy consistency.


- Firmly press the mixture into the prepared dish, ensuring the bottom and edges are evenly covered.


3. Bake the Crust:

- Place the dish in the oven and bake for 10-15 minutes, or until the crust is golden brown.


- Remove from the oven and allow it to cool for about an hour.


4. Prepare the Filling:

- Combine all filling ingredients in a medium bowl.


- Mix well for about 30 minutes, then reduce speed and mix on low for an additional 3 minutes.


5. Assemble and Bake:

- Pour the filling over the cooled crust, ensuring it reaches all edges.


- Bake in the oven for 5-10 minutes, until the filling is just set.


6. Cool and Chill:

- Place the dish on a cooling rack for 15 minutes.


- Transfer to the refrigerator for 45 minutes to set completely.


7. Serve:

- Carefully lift the foil to remove the pie from the dish.


- Cut into bite-sized squares and serve.


A Taste of Nostalgia


Growing up, every summer my family would gather at my grandmother's house for a weekend of fun, laughter, and of course, food. My grandmother had a sprawling garden filled with citrus trees, and the air was always infused with the fresh scent of limes and lemons. One of my fondest memories is helping her make these Lime Pie Square Bites. I would zest the limes, and she would tell me stories of her own childhood. Those moments in the kitchen taught me more than just cooking; they were lessons in love, patience, and the joy of sharing a meal with family.


Difficulty Rating: 3/10


Category: Dessert

---


Whether you're reliving cherished memories or creating new ones, these Creamy Lime Pie Square Bites are the perfect treat. They offer a delightful balance of creamy and zesty flavors that are sure to impress your guests. Don't forget, if you have lime essential oil on hand, it can add an extra punch of citrus to your dish. Just ensure you're using a high-quality, food-grade oil.


Explore More Lime-Infused Delights:


- Coconut Lime Spritzer


- Blackberry Lime Margaritas


- Strawberry Limeade


Note: Always ensure that any essential oils used in cooking are labeled as food-grade, as not all oils are safe for consumption.

Join our community of over 500,000 subscribers to receive more delicious recipes and exclusive content. Sign up today and start your culinary adventure with us!


---


Thank you for stopping by! If you try these Creamy Lime Pie Square Bites, leave a comment and let us know how they turned out. Happy baking!

Read more about Appetizers

Read more about Main Dishes

Read more about Desserts

Jam Tarts | Made by Meaghan Moineau

Jam Tarts | Made by Meaghan Moineau

Title: Sweet Nostalgia: Crafting Timeless Jam Tarts


Description:

Dive into the heartwarming world of homemade Jam Tarts—a delicious dessert that not only tantalizes your taste buds but also weaves a tapestry of cherished family memories. Discover how these delightful treats can transform a simple day into a celebration of love and tradition.

---


The Heartfelt Journey of Jam Tarts


There's something profoundly comforting about the aroma of Jam Tarts wafting through the kitchen. This classic dessert, with its golden, flaky crust and sweet, luscious jam center, has been a staple in my family for generations. It's more than just a recipe; it's a story, a tradition, a piece of home.


Ingredients:

- 1 cup butter, melted- 4 oz cream cheese, softened

- 2 tbsp maple syrup


- 1 tbsp lemon juice


- 2 cups unbleached flour


- Your favorite jam (strawberry, raspberry, or apricot work wonderfully)


Instructions:

1. Begin by melting the butter in a saucepan over low heat.2. Once melted, blend in the cream cheese, maple syrup, and lemon juice until the mixture is smooth and well combined.

3. Gradually add the unbleached flour, stirring continuously until the dough is smooth and pliable.


4. Chill the dough overnight to ensure a firm texture.


5. Preheat your oven to 450°F (232°C).


6. Roll the chilled dough out to a 1/4-inch thickness on a lightly floured surface.


7. Using a 3-inch round cutter, cut out circles from the dough.


8. Make a small indentation in the center of each round and spoon a dollop of your chosen jam into it.


9. Place the prepared rounds on oiled cookie sheets.


10. Bake for 15 minutes or until the crusts are golden brown and slightly flaking.


11. If the crusts are not perfectly golden, return them to the oven for a few additional minutes.


12. Allow the tarts to cool slightly before serving.


Memories in Every Bite

I remember the first time I made Jam Tarts with my grandmother. It was a rainy Saturday afternoon, the kind of day that calls for baking. As she guided me through the process, her kitchen filled with laughter and the sweet scent of tradition. I was just a child, thrilled at the prospect of creating something so delicious from scratch.

As we pulled the tarts from the oven, their golden crusts gleaming with promise, my grandmother shared stories of how this recipe was a favorite during her childhood. She spoke of summer picnics and holiday gatherings where these tarts took center stage. Each bite was a reminder of simpler times and the love that binds us across generations.


A Dessert for All Occasions

Jam Tarts are a delightful dessert, perfect for any occasion—from family gatherings to casual afternoon tea. They are simple to make yet impressive enough to charm your guests. With a difficulty rating of 4 out of 10, these tarts are an excellent choice for both novice and experienced bakers alike.

In the end, Jam Tarts are more than just a dessert. They are a symbol of continuity and connection, a sweet reminder that the best recipes are those shared with love. Whether you are creating new memories or honoring old ones, these tarts are sure to bring joy to your table.


So, next time you find yourself yearning for a taste of nostalgia, roll up your sleeves, gather your ingredients, and let the magic of Jam Tarts fill your home—and your heart.

Read more about Appetizers

Read more about Main Dishes

Read more about Desserts

Baked Eggs With Asparagus and Sun Dried Tomatoes | Made by Meaghan Moineau

Baked Eggs With Asparagus and Sun Dried Tomatoes | Made by Meaghan Moineau

Title: "A Taste of Spring: Baked Eggs with Asparagus and Sun-Dried Tomatoes"
Description: Dive into the delightful world of baked eggs with this savory recipe featuring asparagus, sun-dried tomatoes, and parmesan cheese. Perfect as a brunch centerpiece or a light main dish, this recipe is a mouthwatering blend of flavors and textures. Join me as I share not only the step-by-step guide to creating this dish but also a cherished family memory tied to its deliciousness.

---


As the first hints of spring began to peek through the frost-covered windows of my grandmother's kitchen, a familiar and comforting aroma would often fill the air. It was the unmistakable scent of her signature baked eggs with asparagus and sun-dried tomatoes—a dish that has graced our family gatherings for generations.


This recipe, with its roots deeply embedded in our family tradition, is an ode to those early spring mornings spent around the breakfast table. The vibrant colors of the asparagus and sun-dried tomatoes mimic the awakening landscape outside, and the dish itself is a celebration of seasonal freshness.


Ingredients:

- 4 whole eggs


- 2 egg whites


- 1 cup steamed asparagus, cut into bite-sized pieces


- 1/4 cup sun-dried tomatoes, chopped


- 1 small onion, finely chopped


- 1 teaspoon dried thyme


- 1/2 cup canned quark


- 1/4 cup shredded parmesan cheese


- 1 cup fresh spinach


- Salt and pepper to taste


- Cooking spray


Instructions:
1. Preheat & Prepare: Preheat your oven to 375°F (190°C). Begin by steaming the asparagus until tender, about 3-4 minutes. Set aside.
2. Mix the Eggs: In a mixing bowl, whip together the whole eggs, egg whites, canned quark, thyme, and a pinch of salt and pepper. The quark adds a creamy texture that elevates the dish to new heights.
3. Sauté the Base: Heat a non-stick skillet over medium heat. Spray with cooking spray and add the chopped onion and sun-dried tomatoes. Sauté for about 4 minutes until the onions turn translucent and fragrant.
4. Assemble the Dish: Lightly spray a small baking dish with cooking spray. Layer the sautéed onion and tomato mixture at the bottom. Pour the egg mixture over them.
5. Top & Bake: Arrange the steamed asparagus and fresh spinach on top of the egg mixture. Sprinkle with shredded parmesan cheese for an added layer of richness. Bake in the preheated oven for 10-15 minutes, or until the eggs are set to your liking.
6. Serve & Enjoy: Once baked to perfection, remove from the oven and let it cool slightly before serving. This dish can be enjoyed warm or at room temperature, making it versatile for any mealtime.
Difficulty Rating: 4/10
Classification: Main Dish

As I prepare this dish today, I am reminded of those cherished mornings with my family. My grandmother would tell stories of how her mother taught her this recipe, using fresh ingredients from their garden. Each forkful is not just a bite of deliciousness but a trip down memory lane, reminding me of the warmth and love of family gatherings.


Whether you're looking to recreate a memory or start a new tradition of your own, this baked eggs recipe is a delightful way to welcome the joys of the spring season into your home. Enjoy every bite, and perhaps, create a new memory to pass down through the generations.

Read more about Appetizers

Read more about Main Dishes

Read more about Desserts

Easy Eggplant Parmesan | Made by Meaghan Moineau

Easy Eggplant Parmesan | Made by Meaghan Moineau

Savoring Simplicity: Easy Eggplant Parmesan for Cozy Family Dinners


Description

Delve into the flavors of Italy with our Easy Eggplant Parmesan recipe—a heartwarming dish that brings the taste of tradition to your table without the fuss. Discover how this delightful main dish, with a difficulty rating of just 4 out of 10, can transform any evening into a memorable culinary experience. Perfect for family gatherings or a comforting solo meal, this recipe is a nod to cherished family memories and the joy of home-cooked meals.

---


A Nostalgic Whiff of Eggplant Parmesan


There's something magical about the aroma of eggplant, cheese, and basil mingling in the oven. It takes me back to Sundays spent in my grandmother's rustic kitchen. As a child, I would eagerly await the moment when the rich scent of eggplant parmesan would signal that dinner was near. My grandmother, with her apron dusted in flour and a perpetual smile, would tell stories of her own childhood in Italy, where eggplants grew abundantly in her family's garden.


Her version of eggplant parmesan was always a labor of love, involving hours of preparation and an unspoken rule that every slice of eggplant be cooked to perfection. My siblings and I would gather around the kitchen table, helping with what little tasks we could manage, like tearing fresh basil leaves or grating cheese. It wasn't just about the food; it was about the laughter, the stories, and the warmth of being together.


This Easy Eggplant Parmesan recipe captures those cherished memories, delivering the same soulful flavors with a fraction of the effort. Whether you’re a seasoned chef or a kitchen novice, its simplicity ensures you can enjoy a taste of Italy right at home.


---


Ingredients


- Olive oil


- 1 onion, finely chopped


- 1 garlic clove, minced


- 2 cups pasta sauce


- 2 medium eggplants, sliced


- 2 cups Italian style cheese, shredded


- Fresh basil leaves, for garnish


---


Instructions


1. Prepare the Eggplant: Preheat your broiler and arrange the eggplant slices on a baking sheet. Brush each slice generously with olive oil. Place under the broiler until the eggplants become soft and tender. Once done, remove them from the oven and allow them to cool slightly.
2. Make the Sauce: In a small saucepan, gently heat the pasta sauce. Meanwhile, heat additional olive oil in a skillet over medium heat. Add the chopped onion and cook for about 5 minutes until translucent. Stir in the minced garlic and sauté for an additional minute. Combine the sautéed onion and garlic with the warm pasta sauce.
3. Assemble the Dish: In an 8 x 6 baking dish, create a layer of eggplant slices. Sprinkle a generous amount of Italian style cheese over the eggplant. Repeat these layers until all the eggplant is used, finishing with a final coating of sauce, fresh basil leaves, and the remaining cheese.
4. Bake: Preheat your oven to 375°F (190°C). Bake the assembled dish for approximately 40 minutes, until the cheese is golden and bubbly.
5. Optional Method: For a richer flavor, you can fry the eggplant slices in olive oil instead of broiling them. If you choose this method, be sure to let them drain on a paper towel to remove excess oil.

---


Enjoy this Easy Eggplant Parmesan as a main dish, either on its own or alongside a fresh salad or crusty bread. With its comforting flavors and simple preparation, it’s a dish that's sure to become a staple in your home, just as it has in ours.

Read more about Appetizers

Read more about Main Dishes

Read more about Desserts

Mushroom Tarragon Fish | Made by Meaghan Moineau

Mushroom Tarragon Fish | Made by Meaghan Moineau

Savory Elegance: Mushroom Tarragon Fish Recipe


A Nostalgic Dance of Flavors


In the bustling kitchen of my childhood home, the aroma of fresh herbs and sizzling butter often mingled with laughter and stories from generations past. One dish that holds a special place in my heart is the Mushroom Tarragon Fish—a recipe that captures the essence of simplicity and elegance, yet is rich in flavor and family tradition.


A Family Tradition


I remember my grandmother, with her gentle hands and wise eyes, preparing this dish on special occasions. She would regale us with tales from her youth, where every ingredient had a story, and every meal was a celebration of life. The Mushroom Tarragon Fish was her secret weapon; a dish she claimed could win over the fiercest critic with its delicate balance of flavors.


As a child, I was often tasked with arranging the fish fillets in the baking pan, carefully overlapping the thinner ends as instructed. It was a small but significant role, making me feel part of the culinary magic that unfolded in our family kitchen.


Recipe: Mushroom Tarragon Fish


Ingredients:

- 4 to 6 lean white fish fillets


- 1 cup dry bread crumbs


- 1/4 cup butter, melted


- 1/2 cup green onions, chopped


- 1 cup mushrooms, sliced


- Salt, to taste


- Pepper, to taste


- 2 teaspoons Spice Islands tarragon


- 1/2 cup white wine


Instructions:
1. Preheat Oven: Start by preheating your oven to 400 degrees F.
2. Prepare Fish: Arrange the fish fillets at the bottom of a 13 x 9-inch baking pan. Overlap the thinner ends of the fish to prevent overcooking.
3. Season: Evenly sprinkle the white wine over the fish, followed by tarragon, salt, and pepper to your taste.
4. Add Toppings: Spread the mushrooms and green onions over the seasoned fish. Next, sprinkle with dry bread crumbs for a crunchy texture.
5. Drizzle with Butter: Drizzle melted butter over the top to enhance the flavors and ensure a golden crust.
6. Bake: Place in the oven and bake for 15 to 20 minutes or until the fish flakes easily when tested with a fork.
7. Serve and Enjoy: This dish serves as a delightful main course, perfect for 4 to 6 servings.

Culinary Memories


The beauty of the Mushroom Tarragon Fish lies in its simplicity—it's a quick and stylish entrée that effortlessly impresses. Each bite takes me back to those cherished moments in my grandmother's kitchen, where love was the main ingredient.


This dish is rated 3 out of 10 for difficulty, making it an accessible yet sophisticated choice for any aspiring home chef. Classified as a Main Dish, it pairs beautifully with a side of roasted vegetables or a fresh garden salad.

Conclusion


In a world that often rushes by, the Mushroom Tarragon Fish is a gentle reminder to savor the simple joys of life and the warmth of family traditions. Whether you're preparing it for a cozy dinner at home or a special gathering, this recipe promises to bring a touch of nostalgia and a whole lot of flavor to your table.

Read more about Appetizers

Read more about Main Dishes

Read more about Desserts

Avocado Egg Salad | Made by Meaghan Moineau

Avocado Egg Salad | Made by Meaghan Moineau

Title: Avocado Egg Salad: A Nostalgic Twist on a Classic Recipe
Description: Dive into the creamy, zesty world of Avocado Egg Salad, a delightful dish that combines wholesome ingredients with a touch of nostalgia. Perfect as an appetizer or a light main dish, this recipe is easy to prepare and bursting with flavor. Let's explore this culinary journey that’s not just about taste but also about cherished family memories.

---


When I think of Avocado Egg Salad, I am transported back to sunlit Sunday afternoons at my grandmother's house. The kitchen would be filled with laughter and the tantalizing aroma of freshly toasted whole wheat bread, a scent that promised comfort and warmth. Sundays were special, a day when our family would gather and share stories over meals that were simple yet profound in their ability to bring us all together.


One particular Sunday, when I was about ten years old, stands out vividly. It was the first time I was entrusted with helping make the Avocado Egg Salad, a dish my grandmother had perfected over the years. She believed in the magic of food, how it could evoke memories and strengthen bonds. As she handed me a ripe avocado, she shared stories of her childhood, of how avocados were a luxury during her time and how she would savor every bite.


The preparation began with boiling the eggs, a task I performed with great seriousness, knowing that these eggs would soon be transformed into something delicious. Once boiled, we immersed them in cold water to cool, a step that never failed to intrigue me with its simplicity and effectiveness.


Grandma's hands, though weathered with time, moved with grace and precision as she peeled the avocado and mashed it in a bowl, a task I eagerly took over. She taught me to squirt a bit of lemon over the mashed avocado, explaining that it not only enhanced the flavor but also kept the vibrant green color intact.


Together, we peeled and chopped the cooled eggs, mixing them gently with the avocado until they were well combined. The addition of black pepper, a crumbled seasoning cube, and a finely chopped scotch bonnet pepper added a kick that was both surprising and delightful. It was this unique blend of flavors that made the dish a family favorite.


As I toasted the whole wheat bread, Grandma showed me how to roll it out with a rolling pin, a trick she had learned from her mother. Cutting off the edges, we placed a generous serving of the avocado egg mixture on the bread, creating a simple yet elegant presentation.


These moments, filled with love and togetherness, are what make cooking such a treasured activity. The Avocado Egg Salad was more than just a meal; it was a symbol of our family's bond, a recipe passed down through generations, each with its own story to tell.


Difficulty Rating: 3/10
Classification: Appetizer/Main Dish

With its creamy texture and rich flavors, the Avocado Egg Salad is a dish that can easily transition from a light appetizer to a satisfying main course. It's a breeze to prepare, making it ideal for both novice cooks and seasoned chefs alike. Whether you're looking to recreate a cherished family memory or simply enjoy a nutritious and delicious meal, this recipe is sure to become a beloved staple in your kitchen.

Read more about Appetizers

Read more about Main Dishes

Read more about Desserts

Easy Turtle Pumpkin Pie | Made by Meaghan Moineau

Easy Turtle Pumpkin Pie | Made by Meaghan Moineau

Title: Indulge in Autumn Bliss: Easy Turtle Pumpkin Pie Recipe
Description: Dive into the comforting flavors of fall with our Easy Turtle Pumpkin Pie. This gluten-free dessert is a delightful blend of luscious pumpkin, velvety caramel, and crunchy pecans, all nestled in a rich chocolate cookie crust. Perfect for family gatherings or a cozy evening treat, this recipe promises to be a crowd-pleaser.

---


A Slice of Autumn: Easy Turtle Pumpkin Pie


There’s something about the crisp air of autumn that beckons for a cozy evening with family, wrapped in the warmth of shared stories and laughter. In my family, fall has always been synonymous with baking, particularly the sweet, lingering aroma of pumpkin pie wafting through the house. This tradition was lovingly passed down from my grandmother, whose kitchen was a haven of delectable treats and heartfelt memories.


One recipe that stands out in this cherished collection is the Easy Turtle Pumpkin Pie. It’s more than just a dessert; it’s a symbol of our family’s culinary lineage, adapted and refined over the years to suit our evolving tastes.


Ingredients:

- Crust:

- Gluten-free chocolate sandwich cookies


- Butter


- Filling:

- Heavy whipping cream


- Sugar


- Vanilla pudding mix


- Canned pumpkin puree


- Milk


- Cinnamon


- Toppings:

- Caramel sauce


- Pecans


Instructions:

1. Preheat your oven to 350°F (175°C). In a large mixing bowl or the bowl of a stand mixer, combine heavy whipping cream and sugar. Beat until stiff peaks form and set aside.
2. Crust Creation: In a food processor, pulse the gluten-free chocolate sandwich cookies and butter until finely ground. Press this mixture into a 9-inch pie plate and bake for 10 minutes. Once baked, set aside to cool.
3. Filling: In a large bowl, combine vanilla pudding mix, canned pumpkin puree, milk, and cinnamon. Stir until well combined. Gently fold in half of the whipped cream and pour the mixture into your prepared crust.
4. Toppings: Spread the remaining whipped cream over the pie. Drizzle with caramel sauce and sprinkle pecans generously on top.
5. Refrigerate for at least 1 hour, or prepare a day ahead and let it chill overnight for optimal flavor melding.

During our family gatherings, the unveiling of the Easy Turtle Pumpkin Pie was always a moment of excitement. The rich, chocolatey crust combined with the creamy pumpkin filling and the delightful crunch of pecans was a recipe for pure joy. My grandmother would often recount tales of her childhood, sharing anecdotes of how she first learned to make this pie, her stories intertwining with the sweet aroma of cinnamon and caramel.


The pie was a centerpiece, not just of our table, but of our conversations, sparking nostalgia and creating new memories simultaneously. Each bite was a reminder of the love and warmth that enveloped our family, especially during the cooler months.


Difficulty:

This recipe is straightforward and beginner-friendly, with a difficulty rating of 3 out of 10. Perfect for novice bakers or those short on time, it’s classified as a Dessert.

So, as the leaves turn and the days grow shorter, gather your loved ones, dust off your apron, and share in the magic of this Easy Turtle Pumpkin Pie. It’s more than just a dessert; it’s a tradition, a memory, and an invitation to savor the essence of fall.

Read more about Appetizers

Read more about Main Dishes

Read more about Desserts

Fat Free Gingerbread Cookies | Made by Meaghan Moineau

Fat Free Gingerbread Cookies | Made by Meaghan Moineau

Title: A Heartwarming Holiday Treat: Fat-Free Gingerbread Cookies


Description: Dive into the festive spirit with these delightful Fat-Free Gingerbread Cookies, a guilt-free indulgence that's perfect for the holiday season. Infused with aromatic spices and a touch of nostalgia, this recipe is sure to bring warmth and joy to your family gatherings.


---


As the holiday season approaches, the aroma of freshly baked cookies wafts through our homes, bringing with it the warmth of cherished memories and the promise of new ones. Among the myriad of holiday treats, gingerbread cookies hold a special place in my heart. These Fat-Free Gingerbread Cookies are not just a healthier alternative; they're a delicious reminder of festive gatherings filled with laughter, love, and the comforting scent of spices.


Ingredients:

- 1 cup all-purpose flour


- 1 cup whole wheat flour


- 1 1/2 teaspoons baking soda


- 1/4 teaspoon salt


- 1 tablespoon ground ginger


- 1 tablespoon cinnamon


- 1/2 teaspoon ground cloves


- 1/4 teaspoon black pepper


- 1/4 teaspoon fresh ground nutmeg


- 1/4 teaspoon ground allspice


- 1/2 cup dark brown sugar


- 1/2 cup blackstrap molasses


- 1/4 cup apple sauce


- 1 teaspoon vanilla extract


- 1 teaspoon maple extract


- 2 tablespoons chai concentrate


- 2 egg whites


- 1/2 cup candied ginger, finely chopped


- 1/4 cup granulated sugar


- 1 tablespoon cinnamon


Instructions:
1. Prepare the Dry Ingredients:

Begin by sifting together the all-purpose flour, whole wheat flour, baking soda, salt, ground ginger, cinnamon, ground cloves, black pepper, fresh ground nutmeg, and ground allspice. Set this aromatic mixture aside.


2. Mix the Wet Ingredients:

In a large bowl, combine the dark brown sugar, blackstrap molasses, apple sauce, vanilla extract, maple extract, and chai concentrate. Using an electric mixer, beat the mixture for about four minutes until it becomes smooth and well-blended.


3. Incorporate Egg Whites:

Add the egg whites to the wet mixture and beat for another minute until everything is well combined.


4. Combine Wet and Dry Ingredients:

Gradually whisk the dry ingredients into the wet mixture, beating until completely incorporated. Stir in the finely chopped candied ginger.


5. Chill the Dough:

Chill the dough for at least one hour. For a more intense flavor, consider chilling it overnight.


6. Prepare for Baking:

Preheat your oven to 350°F (175°C). Line a cookie sheet with parchment paper or grease it with cooking spray. In a shallow bowl, mix the granulated sugar with cinnamon.


7. Shape and Bake:

Scoop a tablespoon of cookie dough and roll it in the cinnamon sugar mixture. Shape it into a ball and place it on the prepared cookie sheet, leaving about 3 inches between each cookie. Bake for 10-12 minutes.


8. Cooling:

Once baked, remove the cookies from the oven and transfer them to a rack to cool completely.


Yield: Approximately 20 cookies
Difficulty: 4/10
Classification: Dessert

---


A Nostalgic Touch:

Every year, as the first snowflakes began to fall, my family would gather in the kitchen for our annual cookie-baking tradition. My grandmother, with her gentle hands and warm smile, would lead the way, sharing tales of her childhood as we eagerly awaited the first batch of gingerbread cookies to emerge from the oven.


The rich scent of spices enveloped us, creating a cozy cocoon against the chilly winds outside. We would sit around the table, decorating cookies with colorful icing and sprinkles, our laughter mingling with the crackling fire. These moments, steeped in love and joy, are the essence of the holiday season.


This recipe for Fat-Free Gingerbread Cookies is an homage to those cherished times. It captures the spirit of togetherness, offering a healthier twist without compromising on the flavors that transport us back to those nostalgic family gatherings. So, gather your loved ones, and let the magic of baking create new memories for generations to come.

Read more about Appetizers

Read more about Main Dishes

Read more about Desserts

Spicy Seasoned Loaded Guacamole | Made by Meaghan Moineau

Spicy Seasoned Loaded Guacamole | Made by Meaghan Moineau

Title: A Taste of Home: Spicy Seasoned Loaded Guacamole
Description: Dive into the vibrant and flavorful world of Spicy Seasoned Loaded Guacamole. This zesty appetizer, rich in texture and taste, combines fresh ingredients with a touch of nostalgia. Perfect for family gatherings or simply indulging your cravings, this guacamole is sure to be a hit. Discover the recipe that brings back cherished family memories and learn how to create this easy yet unforgettable dish.

---


There's something incredibly magical about the ability of food to transport us back in time. For me, Spicy Seasoned Loaded Guacamole is more than just a delightful appetizer; it's a bridge to countless summers spent in my grandparents' backyard. The mingling scents of fresh cilantro and sizzling peppers would waft through the air as preparations for our family barbecue commenced.


Ingredients:

- 3 ripe avocados


- 2 tablespoons lime juice


- 1 tablespoon white wine vinegar


- 1/4 cup finely chopped red onion


- 1 finely chopped serrano pepper (adjust to taste)


- 1/4 cup chopped fresh cilantro


- 1 diced Roma tomato


- 1 teaspoon salt


- 1/2 teaspoon black pepper


- 1/2 teaspoon cumin


- 1/2 teaspoon garlic powder


Instructions:

1. In a medium bowl, mash the avocados to your desired consistency. I prefer mine a little chunky, just like Grandma used to make them.


2. Mix in the lime juice and white wine vinegar, ensuring the avocado stays vibrant and green.


3. Stir in the salt, black pepper, cumin, and garlic powder. The aroma alone will transport you to a sunny afternoon.


4. Fold in the red onion, serrano pepper, cilantro, and diced Roma tomato. Each ingredient adds a layer of flavor and texture, creating a symphony of taste that dances on your palate.


A Nostalgic Family Memory:

Every family gathering at my grandparents' place was a feast for the senses. As the adults bustled around the grill, we kids would sneak into the kitchen, eager to help—or perhaps just to steal a taste of whatever was being prepared. My grandmother would always set aside the avocados for me, knowing how much I loved mashing them with a fork. Her secret, she claimed, lay in the perfect balance of lime and vinegar, ensuring the guacamole was both refreshing and tangy.


One summer, as the sun dipped below the horizon, I remember sitting on the porch with my grandfather. We shared a bowl of guacamole and tortilla chips while he told me stories of his own childhood in Mexico. Those moments, filled with laughter and familial warmth, have stayed with me. Each scoop of this Spicy Seasoned Loaded Guacamole brings back the joy and love of those evenings, making every bite a nostalgic journey.


Difficulty Rating: 3/10
Classification: Appetizer

Whether you're looking to impress at your next gathering or simply wish to indulge in a flavorful snack, this Spicy Seasoned Loaded Guacamole is your go-to recipe. With its easy preparation and rich taste, it's bound to become a staple in your culinary repertoire. So, grab those avocados and get ready to create a dish that not only delights the taste buds but also warms the heart.

Read more about Appetizers

Read more about Main Dishes

Read more about Desserts

Peanut butter ice cream | Made by Meaghan Moineau

Peanut butter ice cream | Made by Meaghan Moineau

Indulge in Nostalgia: Homemade Peanut Butter Ice Cream


Description: Dive into the creamy, dreamy world of homemade peanut butter ice cream. This luscious dessert combines the rich flavors of smooth peanut butter and the subtle crunch of unsalted peanuts, perfectly complemented by bits of bitter chocolate. Easy to make and utterly irresistible, this recipe will transport you back to cherished family moments. Whether you're a novice in the kitchen or a seasoned chef, this dessert is sure to become a household favorite.

---


A Taste of Memories: The Irresistible Peanut Butter Ice Cream


There's something truly magical about homemade ice cream. It's not just the creamy texture or the delightful burst of flavors that captivates you; it's also the nostalgia it evokes. For me, peanut butter ice cream is a portal to some of my fondest childhood memories.


I remember the summers spent at my grandparents' house, where the kitchen was always buzzing with activity. My grandmother, a culinary enthusiast, would often pull out her well-worn ice cream maker, a device that seemed like a relic from another era. On one particularly warm afternoon, she decided to make peanut butter ice cream. The aroma of milk and sugar simmering on the stove still lingers in my mind.


As she stirred the ingredients with care, I was entrusted with the important task of whisking the eggs until they were frothy. My grandfather, ever the chocolate lover, insisted on adding bits of bitter chocolate and a generous handful of chopped peanuts to the mix. The result? A creamy, nutty delight that was both familiar and novel.


We'd gather around the table, each with a scoop of the freshly churned ice cream nestled in chilled bowls. The anticipation was palpable as we waited for it to soften just enough to dig in. The first bite was pure bliss—a harmonious blend of sweet and savory, creamy and crunchy.


Even now, every spoonful of peanut butter ice cream takes me back to those carefree days, a reminder of the love and laughter we shared.


---


Recipe: Peanut Butter Ice Cream


Ingredients:

- 2 cups milk

- 1 cup sugar


- A pinch of salt


- 3 large eggs


- 1 cup smooth peanut butter


- 2 cups heavy cream


- 2 teaspoons vanilla extract


- 1/2 cup unsalted peanuts, chopped


- 1/2 cup bits of bitter chocolate


Instructions:

1. Prepare the Base: In a saucepan, combine milk, sugar, and salt. Cook over medium heat, stirring occasionally until the mixture almost boils. Reduce the heat to low.
2. Whisk the Eggs: Beat the eggs with a hand mixer or whisk for 2 minutes until frothy. Gradually stir about 1/4 cup of the hot milk mixture into the beaten eggs.
3. Thicken the Mixture: Add the egg mixture back into the saucepan with the remaining milk mixture. Cook over low heat, stirring constantly until slightly thickened, about 2-3 minutes. Remove from heat.
4. Incorporate the Flavors: Whisk in the peanut butter until well combined. Refrigerate for at least 3 hours.
5. Churn the Ice Cream: Combine the cream, vanilla extract, and chilled mixture, stirring with a whisk. Pour the mixture into an ice cream machine and churn until frozen.
6. Freeze and Serve: Transfer the ice cream to a plastic container and place it in the freezer for an hour before serving. For optimal texture, let it sit out for 5-10 minutes before serving. Sprinkle with chopped peanuts and chocolate bits.
Serving Suggestion: Serve in chilled glass or porcelain bowls. For effortless scooping, use a hot, dry ice-cream spoon (soak it in boiling water, then wipe dry).
Difficulty Rating: 5/10
Category: Dessert

---


This peanut butter ice cream recipe not only satisfies your sweet tooth but also invites you to create memories of your own. Whether enjoyed on a sun-drenched porch or shared with family around the dinner table, it's a dessert that brings joy and nostalgia to every scoop. Enjoy the journey of making and savoring this delightful treat!

Read more about Appetizers

Read more about Main Dishes

Read more about Desserts

Nutella Stuffed French Toast | Made by Meaghan Moineau

Nutella Stuffed French Toast | Made by Meaghan Moineau

Title: Indulge in Nostalgia with Nutella Stuffed French Toast


Description: Dive into a symphony of flavors with our Nutella Stuffed French Toast recipe. Perfectly balancing the creamy richness of Nutella and the warm, spiced notes of cinnamon, this dish is a delightful way to start your day or to savor as a sweet treat. Discover an easy recipe that captures the essence of comfort food and evokes heartwarming family memories.


---


Introduction


In the realm of breakfast indulgences, few dishes command as much attention as French toast. When you elevate this classic with a sumptuous Nutella filling, it becomes a culinary masterpiece that sings with nostalgia and warmth. Nutella Stuffed French Toast is not just a recipe; it's a heartfelt journey back to treasured family mornings.


A Nostalgic Family Memory


Growing up, Sunday mornings were a sacred ritual in our household. The aroma of cinnamon and sugar would waft through the air, guiding us like a beacon to the kitchen where my grandmother, with her gentle smile and knowing eyes, worked her magic. It was her special treat for us, a dish that spoke of love in every bite.


I remember sitting at the table, my feet dangling off the chair, eagerly watching as she prepared her famous Nutella Stuffed French Toast. She'd tell stories of her childhood in a small French village, where meals were a celebration of togetherness. It was during these moments that I learned that the secret ingredient was not just Nutella, but the love and care she folded into each slice.


Ingredients


- 2 large eggs


- 1/2 cup milk


- 2 tablespoons sugar


- 1 teaspoon cinnamon powder


- 4 slices of bread


- 4 tablespoons Nutella


- 2 tablespoons butter


- Powdered sugar for dusting


Instructions


1. Prepare the Egg Mixture: In a deep, large bowl, whisk together the eggs, milk, sugar, and cinnamon powder until well combined. Set aside to let the flavors meld.
2. Assemble the Toast: Generously spread Nutella on one side of two slices of bread. Top with the remaining slices, creating a Nutella sandwich.
3. Soak the Sandwich: Immerse the Nutella-stuffed sandwich into the egg mixture. Use a knife to gently press down, ensuring the bread is thoroughly coated. Allow it to soak for 3-5 minutes before flipping and repeating on the other side. Don’t forget to coat the edges!
4. Cook to Perfection: Preheat a pan over medium heat and melt the butter. Cook the soaked sandwiches for about 5 minutes on each side, or until they are golden brown and cooked through, being careful not to burn them.
5. Serve with Flair: Dust with powdered sugar before serving. This dish pairs beautifully with a strong cup of black coffee, just like my grandmother used to enjoy.

Conclusion


Nutella Stuffed French Toast is a dish that transcends mere sustenance, offering a taste of cherished memories and familial love. It's a testament to the power of food in connecting us to our past and nurturing our present. Whether enjoyed as a luxurious breakfast or a decadent dessert, this French toast is sure to create new memories for you and your loved ones.


Difficulty Rating: 3/10


Classification: Dessert


Embrace the comfort and joy of Nutella Stuffed French Toast, and let each bite transport you to a place where time slows down, and love fills every corner of your heart.

Read more about Appetizers

Read more about Main Dishes

Read more about Desserts

Chicken Farfalle with Low-Fat Alfredo Sauce | Made by Meaghan Moineau

Chicken Farfalle with Low-Fat Alfredo Sauce | Made by Meaghan Moineau

A Taste of Tradition: Chicken Farfalle with Low-Fat Alfredo Sauce


Description

Take a delightful culinary journey with our Chicken Farfalle with Low-Fat Alfredo Sauce, a dish that marries rich flavors and a touch of nostalgia. This main dish is an easy-to-make recipe perfect for family dinners, offering a healthy twist on a classic favorite. With tender chicken breasts and perfectly cooked farfalle pasta enveloped in a creamy, low-fat Alfredo sauce, this dish is sure to become a household staple. Rated at a 5 out of 10 for difficulty, this recipe is ideal for both novice and seasoned cooks looking to create something special.

Ingredients

- 2 boneless chicken breasts

- 8 oz farfalle pasta


- 2 tbsp butter


- 2 tbsp all-purpose flour


- 2 cups skim milk


- 1/4 cup white wine


- 1/4 cup fresh lemon juice


- 1/2 tsp garlic powder


- Salt and black pepper to taste


- 1/2 cup grated Parmesan cheese


- Olive oil (for sautéing chicken)


- Optional: black bell pepper, extra salt, and pepper for seasoning


Instructions

1. Prepare the Chicken: Season the boneless chicken breasts with salt and pepper. In a skillet, heat a small amount of olive oil over medium heat. Sauté the chicken until golden brown and cooked through. Set aside to cool slightly before slicing into strips.
2. Cook the Pasta: While the chicken is cooking, bring a pot of salted water to a boil and cook the farfalle pasta according to package instructions. Drain and set aside.
3. Make the Alfredo Sauce: In a saucepan, melt butter over medium heat. Stir in flour to create a roux, cooking for about 1 minute. Gradually whisk in the skim milk, ensuring there are no lumps. Add salt, black pepper, garlic powder, lemon juice, and white wine. Bring the mixture to a boil, whisking constantly until the sauce begins to thicken. Reduce the heat and let it simmer for an additional 5 minutes.
4. Combine and Serve: In a large sauté pan, combine the cooked pasta and chicken. Pour the Alfredo sauce over the mixture and toss gently to coat. Sprinkle with grated Parmesan cheese and any additional salt and pepper if needed. Serve immediately.

A Nostalgic Family Memory


Growing up, Sunday dinners at my grandmother’s house were a cherished tradition. Her kitchen was always filled with the enticing aromas of her cooking. One of my favorite dishes was her Chicken Farfalle with Alfredo Sauce. I remember the warmth of the kitchen as she stood over the stove, expertly whisking the sauce while sharing stories from her childhood. The laughter and love shared around the dining table made every bite taste even better. Recreating this dish today brings those fond memories to life, blending the past with the present in every savory bite.


Conclusion


This Chicken Farfalle with Low-Fat Alfredo Sauce is more than just a meal; it's a slice of family history and tradition. With its simple preparation and delicious results, it's a dish that's sure to bring joy and nourishment to your family table. Try it out and make your own memories with this comforting and flavorful recipe.

Read more about Appetizers

Read more about Main Dishes

Read more about Desserts

Brown Sugar and Balsamic Glazed Pork Loin | Made by Meaghan Moineau

Brown Sugar and Balsamic Glazed Pork Loin | Made by Meaghan Moineau

A Nostalgic Feast: Brown Sugar and Balsamic Glazed Pork Loin


A Dish That Brings Family Together


There's something truly magical about a dish that not only tantalizes the taste buds but also warms the soul with cherished memories. Our Brown Sugar and Balsamic Glazed Pork Loin is one such recipe, combining succulent flavors with a touch of nostalgia. This main dish, with its perfect blend of sweet and savory, has been a centerpiece of family gatherings for generations. Its simplicity belies the profound impact it has on those who share it, making it a timeless favorite.


The Recipe


Ingredients:

- 1 boneless pork loin

- 1 teaspoon ground sage


- 1 teaspoon salt


- 1/2 teaspoon pepper


- 1 clove garlic, minced


- 1/2 cup water


For the Glaze:

- 1/2 cup brown sugar

- 1 tablespoon cornstarch


- 1/4 cup balsamic vinegar


- 1/2 cup water


- 2 tablespoons soy sauce


Instructions:

1. In a small bowl, combine the ground sage, salt, pepper, and minced garlic. Rub this aromatic mixture evenly over the pork loin.

2. Place the seasoned pork loin in a slow cooker and add 1/2 cup of water. Cook on low for 6 to 8 hours, allowing the flavors to meld and the meat to become tender and juicy.


3. About an hour before the pork loin is done, prepare the glaze. In a small saucepan, combine the brown sugar, cornstarch, balsamic vinegar, water, and soy sauce. Heat over medium heat, stirring constantly until the mixture thickens into a smooth, glossy glaze.


4. Brush the pork loin with the glaze two or three times during the last hour of cooking to infuse it with that irresistible sweet and tangy flavor.


5. Serve the pork loin with the remaining glaze on the side for a dish that is sure to delight.


A Taste of Nostalgia


Every time I prepare this Brown Sugar and Balsamic Glazed Pork Loin, I am transported back to my grandmother's cozy kitchen. The aroma of sage and garlic would fill the air, enticing everyone to gather around the table. My grandmother, with her warm smile and gentle hands, would tell stories of her own childhood while expertly preparing the glaze. It was during these moments that I learned the true value of family and the joy of sharing a meal made with love.


One particular memory stands out—Thanksgiving Day, many years ago. The house was bustling with relatives, laughter echoing through the rooms. As the afternoon sun streamed through the windows, we all sat down to a feast that included this beloved pork loin. The glaze shimmered under the soft light, and the first bite was nothing short of divine. It was a moment of connection, a reminder of the bonds that food can strengthen.


Recipe Difficulty and Classification


Difficulty: 3/10
Classification: Main Dish

This recipe is easy to follow, making it accessible even to novice cooks. The key lies in the slow cooking process, which allows the pork loin to absorb the rich flavors of the glaze. It's the perfect main dish for special occasions or simply for when you want to create a meal that's both delicious and memorable.


Conclusion


Brown Sugar and Balsamic Glazed Pork Loin is more than just a dish—it's a journey through time, a tribute to family traditions, and a celebration of flavors that never fail to impress. Whether you're creating new memories or reminiscing about old ones, this recipe is a surefire way to bring warmth and joy to your table. So gather your loved ones, prepare this delightful dish, and savor the moments that truly matter.

Read more about Appetizers

Read more about Main Dishes

Read more about Desserts

Guacamole | Made by Meaghan Moineau

Guacamole | Made by Meaghan Moineau

Title: Savoring Family Moments: Crafting the Perfect Guacamole
Description: Dive into the delightful world of guacamole with this easy-to-follow recipe that combines traditional flavors with a nostalgic twist. Discover how this simple dish can serve as a bridge to cherished family memories, all while tantalizing your taste buds.

---


Guacamole has always been more than just a delicious appetizer in my family; it's a symbol of togetherness and cherished memories. As I share this recipe with you, I am taken back to countless summer gatherings at my grandmother's house, where the aroma of fresh avocados and herbs filled the air. This guacamole recipe captures those nostalgic moments with each creamy bite.


Ingredients:

- 3 ripe Haas avocados

- 1 small onion, finely chopped


- 1 jalapeño pepper, seeded and minced


- A handful of fresh cilantro, chopped


- 1 teaspoon salt


- 1/2 teaspoon black pepper


- Juice of 1 fresh lime


- Fresh basil, chopped (about 1 tablespoon)


- Fresh oregano, chopped (about 1 tablespoon)


Instructions:


1. Prepare the Avocados: Begin by cutting the avocados in half lengthwise. Carefully drive a chef's knife into the large pit and twist to remove it. Scoop the avocado flesh out from the skin into a mixing bowl.
2. Mash and Mix: Using a fork, gently mash the avocados to your desired consistency. I prefer my guacamole with a bit of texture rather than completely smooth. Add the finely chopped onion, jalapeño, cilantro, basil, and oregano into the bowl. Mix thoroughly to incorporate all the flavors.
3. Season to Perfection: Season the mixture to taste with salt, black pepper, and freshly squeezed lime juice. The lime juice not only adds a tangy zest but also helps to keep the guacamole vibrant green.
4. Serve or Store: For the best flavor, serve the guacamole immediately with your favorite tortilla chips or as a topping for tacos. If you need to store it, press a piece of plastic film wrap directly onto the surface of the guacamole to prevent browning, and refrigerate.

A Taste of Nostalgia


Every time I make this guacamole, I'm reminded of those warm summer days at grandma's house. The kitchen was always filled with laughter and the sounds of family catching up. My grandmother would show us how to carefully remove the avocado pit, a trick passed down through generations. We would gather around the table, each contributing to the guacamole-making process, and share stories of our day.


This guacamole recipe is rated a 3 out of 10 in difficulty, making it an easy yet rewarding appetizer that anyone can enjoy crafting. It's not just about the taste—although that's undeniably delicious—but about the joy of creating something together, a tradition I proudly pass on to the next generation.


Conclusion


Crafting the perfect guacamole is more than just mixing ingredients; it's about connecting with loved ones and reliving cherished memories. Whether you're a seasoned cook or a kitchen novice, this simple dish invites you to enjoy the flavors of tradition while creating new moments to remember. Enjoy your guacamole, and may it bring your family as much joy as it has brought mine.

Read more about Appetizers

Read more about Main Dishes

Read more about Desserts

Garlic & Spice Plantain Chips | Made by Meaghan Moineau

Garlic & Spice Plantain Chips | Made by Meaghan Moineau

Title: Crispy and Flavorful: Garlic & Spice Plantain Chips for Every Occasion
Description: Discover the irresistible blend of spices in our Garlic & Spice Plantain Chips recipe. With just a few simple ingredients and steps, you can create a delicious and nostalgic appetizer that brings a taste of home to any gathering.

---


Garlic & Spice Plantain Chips: A Nostalgic Crunch at Your Fingertips


When it comes to comfort food, few things compare to the crisp, aromatic delight of plantain chips. Growing up in a bustling household, plantain chips held a special place in our family gatherings. I vividly remember my grandmother's kitchen, filled with the inviting aroma of spices, as she skillfully prepared these chips with love. This Garlic & Spice Plantain Chips recipe not only brings those cherished memories to life but also adds a modern twist with its bold flavors.


Ingredients:

- 2 large plantains

- 2 tablespoons olive oil


- 1 teaspoon garlic powder


- 1 teaspoon paprika


- 1/2 teaspoon cumin


- 1/4 teaspoon cayenne pepper (adjust to taste)


- 1/2 teaspoon salt


Instructions:

1. Preheat the Oven: Begin by preheating your oven to 400°F (200°C). Line a baking sheet with parchment paper or silicone mats to prevent sticking.
2. Prepare the Plantains: Cut off both ends of the plantains. Make a lengthwise slit along the skin and peel it off. Slice each plantain into thin, even pieces. Don't worry if they aren't perfect; rustic is charming!
3. Season the Slices: In a medium-sized bowl, toss the plantain slices with olive oil, garlic powder, paprika, cumin, cayenne pepper, and salt. Stir well to ensure each slice is coated with the flavorful mix.
4. Bake to Perfection: Arrange the seasoned plantain slices in a single layer on the prepared baking sheets. Bake for 15-20 minutes, flipping them at the 8- or 9-minute mark for even crispiness. For optimal results, swap the baking sheets between the top and bottom racks halfway through the baking time.
5. Golden Goodness: Remove the chips from the oven once the edges turn a lovely golden brown. Allow them to cool slightly before serving.

A Taste of Home


Every bite of these plantain chips transports me back to my grandmother's kitchen, where laughter echoed and stories were shared over bowls of crispy snacks. Her gentle hands would guide mine as we sliced plantains together, teaching me not just a recipe, but a tradition. These moments, filled with warmth and love, are what make food truly special.


Difficulty Rating: 3/10


This recipe is straightforward and ideal for cooks of all skill levels. The hardest part might be peeling and slicing the plantains, but the reward is well worth it.


Perfect for Any Occasion


Classified as an appetizer, these Garlic & Spice Plantain Chips are perfect for any gathering—whether as a side dish at a family dinner or a snack at a lively party. Their nostalgic flavor and crunchy texture make them an irresistible treat that everyone will love.


Explore the magic of simple, flavorful ingredients and create your own cherished memories with this delightful recipe. Enjoy the journey of taste and tradition with every crunch!

Read more about Appetizers

Read more about Main Dishes

Read more about Desserts

Peach & Brown Sugar Pancakes | Made by Meaghan Moineau

Peach & Brown Sugar Pancakes | Made by Meaghan Moineau

Title: Sunday Morning Bliss: The Irresistible Allure of Peach & Brown Sugar Pancakes
Description: Dive into the comforting embrace of Peach & Brown Sugar Pancakes, a delightful twist on a breakfast classic that will transport you back to cherished family weekends. With a hint of nostalgia and a splash of sweetness, this dish is a testament to the timeless joy of sharing a meal with loved ones. Join us as we explore this easy-to-make treat, perfect for creating new memories around the breakfast table.

---


As the sun peeked through the curtains on Sunday mornings, the aroma of breakfast filled our home, heralding the start of a day rich with family warmth and laughter. Those cherished mornings were marked by the sizzle of batter hitting the griddle and the sweet, comforting scent of Peach & Brown Sugar Pancakes. This delightful recipe, passed down through generations, holds the secret to transforming any morning into a special occasion.


Ingredients:

- 1/4 cup brown sugar

- 1 egg


- 3/4 cup milk


- 1 1/2 cups pancake mix


- 1 can of peaches (3/4 can for puree)


- 2 tablespoons shortening


- 2 tablespoons vegetable oil


Instructions:

1. Prepare the Peaches: Begin by pureeing 3/4 of the canned peaches. Place the slices, without the juice, into a blender or food processor. Pulse a couple of times to achieve a chunky, applesauce-like texture.
2. Heat the Griddle: Warm up your skillet or griddle over medium-high heat, adding the shortening to prepare for cooking.
3. Mix the Wet Ingredients: In a small bowl or cup, whisk the egg together with the vegetable oil until well combined.
4. Create the Batter: In a medium mixing bowl, combine the pancake mix, milk, egg and oil mixture, and brown sugar. Whisk the ingredients until the batter is smooth but still slightly lumpy—overmixing can make the pancakes tough. Gently fold in the peach puree to infuse the batter with fruity goodness.
5. Cook the Pancakes: Pour the batter onto the hot skillet, using about 1/4 cup for each pancake to create large puddles of dough. Cook until bubbles form on the surface of the pancakes, then flip once to ensure even browning. Continue cooking until the pancakes are golden brown.
6. Serve and Enjoy: Serve the pancakes hot, topped with butter and syrup if desired, to enhance their flavor.

A Stroll Down Memory Lane


Every bite of these pancakes takes me back to those cozy mornings spent in my grandmother's kitchen, where stories flowed as freely as the maple syrup. I remember sitting on a stool, eagerly watching her skillfully flip each pancake, marveling at how she could turn simple ingredients into something magical. Her laughter filled the room, making those moments unforgettable. Sharing this recipe with my own family now, I see the same joy light up their faces, and it feels like a beautiful continuation of our family's culinary legacy.


Difficulty Rating: 3/10


Classification: Main Dish


These Peach & Brown Sugar Pancakes are not just a treat for the taste buds but a heartfelt reminder of the power of food to bring families together. Easy to prepare and delightful to eat, they are perfect for creating new traditions while honoring old ones. So gather your loved ones, and let the magic of these pancakes make your mornings a little sweeter.

Read more about Appetizers

Read more about Main Dishes

Read more about Desserts

Dried Cranberry Chocolate Cookies | Made by Meaghan Moineau

Dried Cranberry Chocolate Cookies | Made by Meaghan Moineau

Nostalgic Delights: Dried Cranberry Chocolate Cookies


Description

Dive into the warm embrace of nostalgia with our Dried Cranberry Chocolate Cookies recipe. Perfectly nestled between the sweet tang of cranberries and the rich decadence of chocolate, these cookies are the ideal dessert to accompany cherished family moments. Simple to make yet irresistibly delicious, they promise to fill your home with the comforting aroma of love and togetherness.

Ingredients

- 1 cup unsalted butter, softened

- 1 cup granulated sugar


- 1 cup light brown sugar, packed


- 2 large eggs


- 1 egg yolk


- 2 teaspoons vanilla extract


- 3 cups plain flour


- 1 teaspoon baking powder


- 1 teaspoon baking soda


- 1/2 teaspoon kosher salt


- 2 cups old-fashioned rolled oats


- 1 cup semisweet chocolate chips


- 1 cup white chocolate chips


- 1 cup dried cranberries


Instructions

1. Preparation: Preheat your oven to 350°F (175°C). Line two baking sheets with parchment paper.
2. Mix Dry Ingredients: In a medium bowl, whisk together the flour, baking powder, baking soda, and kosher salt.
3. Cream Butter and Sugars: In a standing mixer fitted with the paddle attachment, beat the butter, granulated sugar, and brown sugar on medium speed until creamy and smooth.
4. Incorporate Eggs and Vanilla: Add the eggs one at a time, followed by the egg yolk, beating well between each addition. Mix in the vanilla extract.
5. Combine Ingredients: Gradually add the dry ingredients to the wet mixture, beating until just combined.
6. Add Oats, Chocolate, and Cranberries: Stir in the rolled oats, semisweet chocolate chips, white chocolate chips, and dried cranberries until evenly distributed throughout the dough.
7. Shape Cookies: Spoon heaping teaspoons of dough onto the prepared baking sheets, spacing them about 2 inches apart.
8. Bake: Bake for 12 to 15 minutes, or until the cookies begin to brown at the edges.
9. Cool: Allow the cookies to cool on the baking sheets for a few minutes before transferring them to a wire rack to cool completely.

Family Memory

Growing up, these Dried Cranberry Chocolate Cookies were a staple in our household, especially during the festive seasons. I vividly remember the first time my grandmother taught me how to make them. Her kitchen would transform into a wonderland of scents—sweet, buttery, and slightly tangy, with a hint of chocolate.

On chilly winter afternoons, my siblings and I would huddle around the kitchen table, eagerly awaiting our turn to mix or taste-test the dough. Grandma would always sneak a few extra cranberries and chocolate chips into our mouths, winking conspiratorially as if it were our little secret. Those moments, filled with laughter and the gentle hum of family chatter, are etched in my memory, reminding me of the love and warmth that food can bring to our lives.


Difficulty: 4/10

Classification: Dessert


Indulge in these Dried Cranberry Chocolate Cookies, and may they bring you as much joy and fond memories as they have brought to our family. Whether you're creating new traditions or celebrating old ones, these cookies are sure to become a beloved staple in your home.

Read more about Appetizers

Read more about Main Dishes

Read more about Desserts

Boiled Egg Curry | Made by Meaghan Moineau

Boiled Egg Curry | Made by Meaghan Moineau

Title: A Taste of Tradition: Crafting the Perfect Boiled Egg Curry
Description: Dive into the rich flavors of Boiled Egg Curry, a classic dish that blends aromatic spices with the comforting presence of hardboiled eggs. Perfectly served with rice or flatbread, this main dish is a nostalgic journey into family gatherings and cherished memories.

---


A Taste of Tradition: Crafting the Perfect Boiled Egg Curry

Growing up, Sundays were a special affair in our household. The day would start with the tantalizing aroma of spices wafting through the air, signaling that my grandmother was in the kitchen, preparing her famous Boiled Egg Curry. This dish wasn’t just a meal; it was a symbol of family togetherness, laughter, and shared stories around the dining table.


The recipe, handed down through generations, is a beautiful blend of simple ingredients and vibrant spices. It begins with the humble egg, boiled to perfection and enveloped in a rich, spicy gravy that excites the palate and warms the heart.


Ingredients:

- 4 hardboiled eggs


- 4 tablespoons canola oil


- 2 onions, chopped


- 2 big tomatoes, chopped


- 2 green chillies


- 2 garlic cloves, minced


- 1 tablespoon fresh ginger, grated


- 1 teaspoon ground cumin


- 1 teaspoon ground coriander


- 1/2 teaspoon turmeric powder


- 1 teaspoon red chilli powder


- 1 teaspoon garam masala


- Salt to taste


- Fresh coriander for garnish


Instructions:
1. Boil the Eggs: Begin by boiling 4 eggs in a pot of water for about 10 minutes. Once done, cool them under running water, peel, and set aside.
2. Prepare the Paste: Heat 2 tablespoons of canola oil in a deep pan over medium heat. Add the chopped onions and fry until they turn golden brown. Remove from heat and transfer the fried onions to a food processor. Add the tomatoes and green chillies, grinding them into a smooth paste.
3. Cook the Gravy: In the same pan, heat the remaining 2 tablespoons of canola oil over medium heat. Add the onion-tomato paste and fry for 2-3 minutes. Stir in the ginger, garlic, cumin, coriander, turmeric, red chilli powder, and garam masala. Continue to fry until the oil begins to separate from the mixture.
4. Simmer: Add 2 cups of water to the pan, bringing the mixture to a boil on medium flame. Cut the boiled eggs into halves lengthwise and gently add them to the gravy. Allow the curry to simmer for 10 minutes or until the gravy reduces to about three-quarters of its original quantity.
5. Garnish and Serve: Finish by garnishing the curry with fresh coriander leaves. Serve hot with rice or soft flatbread, indulging in the rich flavors and aromas.
Difficulty Rating: 5/10
Classification: Main Dish

---


I remember the anticipation as we gathered around the table, eagerly awaiting the first bite of the sumptuous Boiled Egg Curry. The dish, vibrant in color and rich in flavor, was always the centerpiece of our Sunday gatherings. Each spoonful was a journey through the cherished spices that my grandmother expertly balanced, and the perfectly cooked eggs that provided comfort and satisfaction.


As I recreate this dish today, I am reminded of those family gatherings where stories were shared, laughter resonated, and love was the secret ingredient. This Boiled Egg Curry is more than just a recipe; it is a cherished family tradition that continues to bring us together, one meal at a time.


Whether you’re looking to explore a new dish or create lasting memories with loved ones, Boiled Egg Curry is a delightful choice that promises warmth and flavor in every bite.

Read more about Appetizers

Read more about Main Dishes

Read more about Desserts