
I was having one of those days where everything seemed to go sideways. You know the kind — you spill your morning coffee, forget your umbrella, and then it starts pouring on your way home. I needed a pick-me-up, pronto. That’s when I remembered these Flour-Less Peanut Butter Cookies. They’re everything I needed: sweet, comforting, and ridiculously easy to make. The best part? You can whip them up with just a few pantry staples, and they’re done in under 20 minutes. Perfect for those days when you need a win, no matter how small.
Jump to Recipe
What You’ll Need
The beauty of these cookies lies in their simplicity. Chances are you have these ingredients tucked away in your kitchen already. Here’s what you need:
- Peanut butter – smooth or chunky, your call
- Honey – adds the perfect sweetness
- Egg – binds it all together
- Baking soda – gives them a little lift
- Vanilla extract – just a splash for depth
How to Make Flour-Less Peanut Butter Cookies
- Preheat your oven to 350°F (175°C). This is crucial to get that perfectly soft center.
- In a large mixing bowl, combine the peanut butter, honey, egg, baking soda, and vanilla extract. Stir until everything is smooth and well-blended.
- Using a spoon, drop dollops of the dough onto a lightly greased cookie sheet. Keep them about 2 inches apart since they’ll spread a little.
- Bake for about 12 minutes. You’ll know they’re ready when the edges are set but the centers are still soft to the touch.
- Let the cookies cool on the sheet for a few minutes, then transfer them to a rack to cool completely. They’ll firm up as they cool, so resist the urge to eat them straight away!
Cook’s Notes
These cookies are incredibly forgiving, but a few tips can ensure they turn out perfect every time. If your peanut butter is particularly oily, give it a good stir before measuring. When mixing, ensure everything is well-combined but don’t overdo it; overmixing can make the cookies tough. If you like your cookies on the sweeter side, you can increase the honey slightly or add a touch of sugar.
Store these cookies in an airtight container at room temperature for up to a week — if they last that long! You can also freeze the dough balls to bake later; just add a couple of minutes to the baking time.
Make It Your Own
Want to mix things up? Here are some tasty variations:
- Chocolate Lovers: Stir in some chocolate chips or chunks before baking for a rich, decadent treat.
- Nuts About Nuts: Swap half the peanut butter for almond butter for a nutty twist.
- Spice It Up: Add a sprinkle of cinnamon or a pinch of cayenne for a warm, spicy note.
- Salty Sweet: Top each cookie with a sprinkle of sea salt right before baking for that perfect salty-sweet balance.
If you try this, I’d love to hear how it turns out — drop a comment or tag me! There’s nothing better than sharing a little cookie joy. Happy baking!
Related update: Flour-Less Peanut Butter Cookies

One evening, after a long day of juggling work and kids’ activities, I found myself staring at a couple of lonely zucchinis in the fridge, wondering what on Earth I could make for dinner that everyone would actually eat. There was no time for anything elaborate, and I really didn’t want to resort to cereal again. That’s when it hit me: Mini Zucchini Bites, or as I affectionately call them, Cuadritos De Calabacin. These little guys are a lifesaver — quick to throw together, they make the perfect savory snack or side, and they’ve got enough bacon and cheese to keep the pickiest eaters happy. Plus, I mean, they’re bite-sized, and who doesn’t love a good two-bite treat?
Jump to Recipe
What You’ll Need
Trust me, chances are you already have most of this in your kitchen, which makes it even better for those spontaneous dinner decisions.
- 2 slices of diced bacon
- 1/2 cup white onion, chopped
- 2 cups grated zucchini
- 1 cup grated gouda cheese
- 1/2 cup flour
- 1 teaspoon baking powder
- 1/4 cup vegetable oil
- 2 eggs
- Salt & pepper to taste
- 1 tablespoon butter, melted
- 1/4 cup plain bread crumbs
How to Make Mini Zucchini Bites (Cuadritos De Calabacin)
- Preheat your oven to 375°F, because nothing kills dinner momentum like a cold oven.
- In a sauté pan, cook the diced bacon until it’s perfectly crisp. The goal here is crispy, not soggy, so let it do its thing. Once done, set the bacon aside but don’t ditch the bacon fat.
- With about 2 tablespoons of that glorious bacon fat, sauté the white onion until it turns transparent. You’ll know it’s ready when your kitchen smells heavenly. Set aside.
- In a large mixing bowl, combine the grated zucchini, gouda cheese, flour, baking powder, vegetable oil, eggs, bacon, and onion. Season generously with salt and pepper and mix it until everything is just combined. The mixture will be slightly thick and that’s exactly what you want.
- Grab a 10 x 7-inch baking pan and brush it thoroughly with the melted butter. Then, sprinkle plain bread crumbs to coat — this will give you a nice, crispy edge.
- Pour the zucchini mixture evenly into the prepared pan, spreading it out as needed. Pop it in the oven and let it bake for 45-60 minutes. It’s done when it’s firm and the top is golden brown.
- Once baked, let it rest for about 10 minutes. This resting time is key to letting everything set before you slice them into 2-inch cubes. Serve them warm or cold, they’re delicious either way!
Cook’s Notes
For best results, make sure to squeeze out any excess moisture from your grated zucchini. You want your bites to be perfectly firm, not soggy. If you’re planning ahead, you can mix the ingredients a few hours early, cover it, and keep it in the fridge until you’re ready to bake. As for leftovers, they store well in an airtight container in the fridge for up to 3 days. Just pop them in the oven to reheat, or enjoy them cold, straight from the fridge.
Make It Your Own
- Swap the gouda for sharp cheddar if you’re after a bolder cheese flavor.
- Replace bacon with crispy tofu for a vegetarian twist that’s still hearty and delicious.
- Add a handful of chopped fresh herbs like parsley or dill for an added burst of freshness.
- For a bit of heat, toss in a finely diced jalapeño or a pinch of red pepper flakes.
If you try this, I’d love to hear how it turns out. Drop a comment or tag me in your photos — especially if you’ve made it your own with any fun variations! Enjoy!
Related update: Mini Zucchini Bites (Cuadritos De Calabacin)
Related update: Garlic & Spice Plantain Chips

So last Tuesday, I found myself staring at a bowl full of apples on my countertop, leftovers from my overly ambitious farmer’s market haul. My mind was set on something sweet and indulgent, but I didn’t want to spend ages prepping a fancy dessert or making a mess of my kitchen. Enter: Easy Homemade Apple Fritters. These little nuggets of joy are perfect for those times when you need a quick treat that feels special but doesn’t involve a ton of effort. They’re crispy on the outside and filled with warm, cinnamon-spiced apple goodness on the inside. Trust me, they’re like a cozy hug on a plate.
Jump to Recipe
What You’ll Need
You’ll love this recipe because chances are, you already have most of the ingredients in your pantry. Plus, it’s really all about letting those apples shine.
- 1 cup all-purpose flour
- 1 apple, peeled, cored, and diced
- 1 teaspoon baking powder
- 1 teaspoon cinnamon
- 1 egg
- 1/3 cup milk
- 1 tablespoon sugar
- 1/4 teaspoon salt
- Oil, for frying (I used vegetable oil)
- 1 cup powdered sugar
- 2 tablespoons milk (for the glaze)
How to Make Easy Homemade Apple Fritters
- In a mixing bowl, whisk together the flour, sugar, salt, baking powder, and cinnamon. You’ll want to inhale deeply because that cinnamon is going to smell divine.
- Gently stir in the milk and egg until the mixture is just combined. Over-mixing is the enemy here! We want it to stay light and fluffy.
- Fold in the diced apple. Make sure those apple pieces are well distributed—every fritter deserves its apple moment!
- Pour oil into a skillet so that it’s about 1 1/2 inches deep. Heat the oil on high. You’ll know it’s ready when a little dough thrown in pops right back up to the surface.
- Carefully drop heaping teaspoons of the dough into the hot oil. Watch them sizzle! Cook until the fritters are brown, about 2 minutes, then flip. Give them another 1-2 minutes to get golden on the other side.
- Transfer the fritters to paper towels to soak up any excess oil. A quick pit stop before they head to a cooling rack.
- For the glaze, stir the powdered sugar and milk together in a small bowl. It’ll be smooth and silky.
- Drizzle the glaze over the fritters. Wait about 3 minutes for the glaze to harden a bit, flip the fritters, and drizzle over the other side. They’re best served warm, so dive in!
Cook’s Notes
Here’s a few things I learned while making these fritters:
- Keep an eye on your oil temperature. If it’s too hot, your fritters will brown too quickly on the outside and stay raw on the inside.
- If you’re making these ahead of time, store them at room temperature in an airtight container for up to a day. Reheat in the oven to crisp them back up.
- Leftovers can be revived by popping them in a toaster oven for a few minutes. They won’t be as good as fresh, but still tasty.
Make It Your Own
- Swap the apple for another fruit like pears or peaches if you’re feeling adventurous!
- Add a pinch of nutmeg or ginger to the batter for an extra layer of spice.
- Try using maple syrup instead of powdered sugar for the glaze for a deeper, richer sweetness.
- For a savory twist, omit the sugar and cinnamon, and add sharp cheddar cheese and bacon bits to the batter.
If you try this, I’d love to hear how it turns out — drop a comment or tag me! Seriously, nothing makes my day more than seeing your kitchen creations. Enjoy every crispy, warm, and cinnamon-sweet bite!
Related update: Easy Homemade Apple Fritters
Related update: Old Fashioned Vanilla Buttercream Frosting

It was one of those mornings when I wanted something warm and filling but couldn’t face another bowl of cereal. I peeked into the fridge and found a half-used bag of broccoli and a carton of eggs. Inspiration struck, and soon my kitchen was filled with the comforting smell of baking oats and the savory tang of broccoli. This Broccoli Oatmeal Breakfast Casserole is exactly what you need when you want something nutritious and satisfying without spending your entire morning in the kitchen. Plus, it’s surprisingly easy to make, so you can enjoy a leisurely breakfast even on a busy day.
Jump to Recipe
What You’ll Need
This recipe is beautifully simple and calls for ingredients you likely have sitting in your pantry. You know I love a recipe where a quick rummage through the cupboard delivers everything you need.
- Broccoli florets
- Dry oats
- Eggs
- Low-fat milk
- Olive oil
- Baking powder
- Salt
- Cayenne pepper
How to Make Broccoli Oatmeal Breakfast Casserole
- Start by preheating your oven to 350°F (175°C). While it warms up, grab your trusty 8-inch square baking dish and give it a light misting of cooking spray to prevent sticking.
- Chop the broccoli florets roughly and blitz them in a food processor until they resemble coarse crumbs. The earthy smell of fresh broccoli will fill the air.
- In a large mixing bowl, combine the ground broccoli, dry oats, a pinch of baking powder, a sprinkle of salt, and a dash of cayenne pepper. Give it a good mix — this is the foundation of your casserole.
- In a separate bowl, whisk together the eggs, low-fat milk, and a generous tablespoon of olive oil. The mixture should be smooth and slightly frothy.
- Pour the wet ingredients into the bowl of dry ingredients. Stir everything together until the oats are fully coated and the broccoli is evenly distributed.
- Spoon the mixture into your prepared baking dish, smoothing the top with a spatula. Slide it into the oven and bake for 25-30 minutes, or until the edges are golden and a fork inserted into the center comes out clean.
- Let it cool slightly before cutting into your desired size and serving it warm. The casserole will be firm yet tender, with a delicious crust formed by the oats.
Cook’s Notes
This casserole is forgiving, so don’t stress if you’re missing an ingredient. If you’re prepping in advance, you can assemble the night before and bake it fresh in the morning—just cover and store in the fridge. Leftovers? Refrigerate them, and they’ll keep for up to three days. Reheat portions in the microwave or the oven. Watch out for over-baking; once it’s golden and a fork comes out clean, it’s ready. The texture should be moist but not soggy.
Make It Your Own
- Cheese Lover’s Twist: Add a handful of grated cheddar or parmesan to the dry ingredients for a cheesy kick.
- Protein Boost: Toss in some cooked, crumbled sausage or crispy bacon bits to the batter for extra protein.
- Veggie Variety: Swap half the broccoli for finely chopped spinach or kale for an extra green boost.
- Spice It Up: Substitute cayenne pepper with smoked paprika or add a pinch of chili flakes for a different heat profile.
If you try this Broccoli Oatmeal Breakfast Casserole, I’d love to hear how it turns out for you. Drop a comment below or tag me in your breakfast creations! Here’s to starting the day with something nutritious and delicious. 🥦✨
Related update: Broccoli Oatmeal Breakfast Casserole

Picture this: It’s a Tuesday evening, and the week’s already wearing me down. I’m craving something cheesy, comforting, and a little indulgent. You know, the kind of meal where the smell alone makes you feel like you’ve just wrapped yourself in a warm, delicious hug. Enter the Easy Cheesy Pizza Casserole. It’s like a giant pizza in a pan but with all the cozy vibes of a casserole. Plus, it’s a crowd-pleaser, perfect for family dinners or casual get-togethers with friends. The best part? It’s as easy as it is cheesy. Grab your apron, and let’s dive in!
Jump to Recipe
What You’ll Need
Trust me, this ingredient list reads like a love letter to your pantry. Chances are, you already have most of these on hand:
- Ground beef or bulk sausage mix
- Ricotta cheese
- Oregano
- Basil
- Parmesan cheese
- Pasta sauce or canned pizza sauce
- Crushed red pepper flakes
- Pepperoni
- Shredded mozzarella cheese
- Shredded aged provolone cheese
- Herbed parmesan drop biscuits (recipe follows)
- Baking mix
- Italian seasoning
- Milk
How to Make Easy Cheesy Pizza Casserole
- Preheat your oven to 375°F. This is a crucial step, so your biscuits start cooking right away.
- Brown the ground beef or sausage in a skillet over medium heat until it’s no longer pink. Drain the fat because nobody likes greasy casseroles.
- Stir in the pasta or pizza sauce and a pinch of crushed red pepper flakes. Let it simmer until everything is well-blended and smells heavenly.
- In a separate bowl, mix the ricotta cheese with oregano, basil, and Parmesan cheese. This will be your creamy layer of deliciousness.
- Prepare the biscuit dough by combining the baking mix with Italian seasoning and milk. Stir until just blended; lumps are okay here.
- Spray a 13 x 9-inch pan with non-stick spray. Drop the biscuit dough by teaspoons into the pan, spacing them evenly. Don’t worry about gaps; the dough will spread out beautifully in the oven.
- Layer the ground beef mixture over the biscuits, then dot with the ricotta mixture. You should start to see the makings of a masterpiece.
- Bake at 375°F for about 20 minutes or until the biscuits are puffed and just starting to turn golden. Your kitchen should smell like a dream by now.
- Increase the oven temperature to 425°F. Sprinkle mozzarella and provolone cheeses over the top and lay out pepperoni slices like you’re decorating a pizza.
- Return the casserole to the oven for about 10 minutes, until the cheese is melted and bubbling slightly. This is the moment you’ve been waiting for.
- Let it stand for 5 minutes before slicing. Patience is a virtue, and it’ll pay off when your slices come out picture-perfect.
- Optionally, sprinkle additional Parmesan cheese on top before serving. More cheese is always the right choice.
Cook’s Notes
A few quick tips to make sure your casserole is a hit:
- If you want to make this ahead, prepare the beef and ricotta mixtures and store them in the fridge. When ready to bake, just assemble everything, and you’re good to go.
- This casserole keeps well in the fridge for up to three days. Just cover and reheat in the oven to keep the biscuits from getting soggy.
- Be sure not to over-mix your biscuit dough; a gentle stir is all it takes. Over-mixing can make them tough.
Make It Your Own
Feel free to get creative and put your spin on this cozy dish:
- Swap the pepperoni for crispy tofu slices for a vegetarian twist that still packs plenty of flavors.
- Use spicy Italian sausage in place of ground beef for an extra kick.
- Try adding a layer of sautéed mushrooms and onions for an earthy depth of flavor.
- Go Hawaiian and add pineapple chunks along with ham or Canadian bacon for a sweet and savory combo.
If you give this Easy Cheesy Pizza Casserole a whirl, I’d be thrilled to hear how it turned out for you. Drop a comment or tag me on social media with your delicious creations. Happy cooking!
Related update: Easy Cheesy Pizza Casserole
Related update: My Drunken Fish Fillet

Picture this: it’s a chilly Tuesday evening, and I’m staring into my fridge, which is looking kind of bare except for a few odds and ends. Ever been there? Yeah, me too. But then, I spot a half-used can of pumpkin puree and some cheese. Suddenly, the idea hits me like a ton of bricks—Pizza Bites with Pumpkin! It’s the ultimate weeknight wonder, combining the cozy vibes of fall with the all-time favorite comfort food: pizza. These little bites are quick, comforting, and yes, they are bound to impress even the pickiest of eaters without much fuss. Plus, they’re made in a muffin tin, which automatically makes them adorable and somehow more delicious. Ready to give it a whirl? Grab your apron!
Jump to Recipe
What You’ll Need
The best part? You probably have most of these in your pantry already.
- 1 cup of pumpkin
- 2 tablespoons of olive oil
- 1/2 cup of feta cheese
- 1/2 cup of mozzarella
- 2 eggs
- 1 teaspoon of dried oregano
- Fresh parsley, chopped, for garnish
- 1 clove of garlic, minced
- Your favorite pizza dough
How to Make Pizza Bites with Pumpkin
- Start by chopping the pumpkin into rice-sized bits using a food processor. This gives you the right texture for the bites.
- Heat up the olive oil in a pan over medium heat. Sauté the pumpkin for about 3 minutes, just until it starts to soften and turns a lovely golden hue. Set it aside to let it cool.
- In a mixing bowl, combine the feta and mozzarella cheeses. Crack in the eggs, one at a time, stirring after each addition until you have a smooth mixture.
- Add the cooled pumpkin and the minced garlic, along with the oregano and parsley. Mix everything until well combined. Your kitchen should start to smell amazing right about now!
- Grease a muffin tin and evenly spoon the mixture into each mold.
- Now, press the pizza dough down evenly and firmly into each mold. This step is crucial to ensure the bites stick together nicely.
- Bake in a preheated oven at 200°C (about 400°F) for 30 minutes, or until the tops are golden brown and the edges are slightly crisp.
- Once done, remove from the oven and let them cool in the pan for 5 to 10 minutes. Trust me, this waiting game is critical so they hold their shape when you take them out.
Cook’s Notes
Okay, let’s talk details. First, make sure to squeeze the pumpkin mixture firmly into the muffin tin. This ensures they hold their cute little bite shape once baked. And seriously, resist the urge to pop them out of the tin too soon. Letting them cool for about 5 to 10 minutes is like letting them gather their strength to hold together.
As for storage, these bites are best enjoyed fresh, but if you have leftovers (unlikely!), pop them in an airtight container in the fridge. Reheat them in the oven to retain that crisp factor.
Make It Your Own
- Swap feta for goat cheese if you’re feeling fancy and want a tangy kick.
- Looking for a veggie boost? Add some finely chopped spinach or kale to the mix.
- For a meatier option, toss in some cooked bacon bits or pepperoni.
- If you’re not a fan of pumpkin, butternut squash is a fantastic alternative.
If you try this, I’d love to hear how it turns out — drop a comment or tag me! Can’t wait to see your pumpkin pizza bite creations. Enjoy every cheesy, pumpkin-y bite!
Related update: Pizza bites with pumpkin
Related update: Bing's Mango Salsa

So, there I was last Tuesday, staring into the fridge, wondering what to make for dinner that wouldn’t take an eternity. You know those days when all you want is something delicious but quick enough that you won’t be stuck in the kitchen all night? Enter: Eggplant pizzette. It’s that magical intersection of pizza cravings and veggie goodness. Plus, it’s one of those recipes that looks fancy enough to impress but is secretly super simple to throw together. Trust me, once you smell that cheese bubbling away, you’re going to thank yourself for making these little guys.
Jump to Recipe
What You’ll Need
Let’s talk about the ingredient list — it’s mercifully short and sweet. Chances are, you already have most of this at home, especially if you’re a basil hoarder like me.
- Round eggplant – the base for our pizzette
- Tomatoes – fresh or canned, your choice!
- Swiss cheese – for that perfect melty goodness
- Fresh basil leaves
- Oregano leaves
- Olive oil
How to Make Eggplant pizzette
- Preheat your oven to 230°C. Trust me, getting this right from the start saves you from impatiently watching the oven later.
- Grab your round eggplant and slice it into rounds, about half an inch thick. You want them thin enough to cook quickly but thick enough to hold all that topping.
- Place the eggplant rounds on a non-stick pan greased with olive oil. A light coating will do; no one wants oily pizzette.
- Bake the eggplant in the oven for about 10 minutes. You’ll know it’s ready for the next step when the edges start looking golden and slightly crispy.
- Carefully remove the pan from the oven — the eggplant stays, so it keeps warm and toasty.
- Spoon a generous amount of chopped tomatoes onto each eggplant round. If you’re using canned, make sure they’re well-drained to avoid sogginess.
- Sprinkle fresh basil and oregano leaves over the tomatoes. The aroma will start to hit you about now, and it’s divine.
- Top everything with grated Swiss cheese. Go ahead and be generous here; a good layer ensures that melty, bubbly finish.
- Pop the pan back in the oven for another 5 minutes. Keep an eye out — you want that cheese to turn a lovely golden brown.
- Remove from the oven and let them cool for a minute or two. These are fab served warm or even cooled down a bit as a snack.
Cook’s Notes
Alright, a few things to keep in mind. First, if you slice the eggplant too thin, it might turn into a mushy mess, so aim for that half-inch thickness. If you’re worried about bitterness, sprinkle a bit of salt on the eggplant slices and let them sit for 10 minutes before rinsing and patting dry. Also, feel free to adjust the herbs based on what you have—dried oregano works if fresh isn’t available. These pizzette can be stored in the fridge for up to two days, though they’re best enjoyed fresh.
Make It Your Own
Want to switch things up? Here are some ideas:
- Swap the Swiss cheese for mozzarella for a more classic pizza flavor.
- Add a layer of pesto under the tomatoes for an herbaceous kick.
- Use zucchini slices instead of eggplant if you prefer a different base.
- Try adding thin slices of pepperoni or mushrooms for extra toppings.
If you try this, I’d love to hear how it turns out — drop a comment or tag me! Happy cooking, and may your kitchen adventures be as tasty as they are fun!
Related update: Eggplant pizzette
Related update: Maple & Curry Acorn Squash

It was one of those chaotic Tuesday afternoons when everything seemed to be happening all at once. My inbox was overflowing, the laundry was threatening to become a second couch, and the dog was doing her best to convince me that she hadn’t been fed in weeks with those soulful eyes. As I rummaged through my pantry, I stumbled upon a forgotten stash of chocolate chips and suddenly, the only logical thing to do was to bake. Enter: Neiman Marcus Oatmeal Chocolate Chip Cookies. This recipe is that perfect balance between a comforting classic and a little twist that makes it feel special. It’s the kind of cookie that makes a regular Tuesday feel like a mini celebration. And the best part? These cookies are incredibly easy to whip up, even when life feels a bit like a juggling act.
Jump to Recipe
What You’ll Need
Trust me, chances are you already have most of these hanging out in your kitchen, just waiting to become something amazing.
- 1 cup unsalted butter, softened
- 1 cup granulated sugar
- 1 cup brown sugar, packed
- 2 large eggs
- 1 teaspoon vanilla extract
- 2 cups all-purpose flour
- 2 ½ cups blended oatmeal (measure before blending)
- ½ teaspoon salt
- 1 teaspoon baking powder
- 1 teaspoon baking soda
- 12 ounces chocolate chips
- 1 4-ounce chocolate bar, grated
- 1 ½ cups chopped walnuts
How to Make Neiman Marcus Oatmeal Chocolate Chip Cookies
- Preheat your oven to 375 degrees F. The anticipation of warmth is part of the magic.
- In a large bowl, cream together the butter, granulated sugar, and brown sugar until the mixture is light and fluffy. You’re aiming for a dreamy, creamy consistency here.
- Add in the eggs, one at a time, and beat until just incorporated. Don’t forget the vanilla — it’s the unsung hero that ties everything together.
- Gradually mix in the flour, blended oatmeal, salt, baking powder, and baking soda. The dough will start to smell like a promise of good things to come.
- Fold in the chocolate chips, grated chocolate bar, and walnuts. You’ll want to use a spatula to make sure everything is evenly distributed and each scoop is a treasure trove of goodies.
- Roll the dough into balls and place them about two inches apart on a cookie sheet. This gives them room to spread and become their best cookie selves.
- Bake for about 10 minutes. Keep an eye out for those edges to turn golden and the aroma to fill your kitchen. That’s when you know they’re ready.
Cook’s Notes
Let’s be real — these cookies are hard to mess up. But here are a few thoughts to keep in mind. If your butter isn’t soft enough, you can microwave it for a few seconds, but watch closely — nobody wants half-melted butter. When blending your oatmeal, aim for a texture that’s slightly coarser than flour; it adds a delightful chewiness to the cookies. These cookies are at their most divine fresh out of the oven, but they’ll keep well in an airtight container for up to a week, if they last that long. You can even freeze the dough balls to bake later. Just add a couple of minutes to the bake time.
Make It Your Own
- Swap the walnuts for pecans or almonds if that’s your jam. Each nut brings its own character to the party.
- If you’re not a fan of oats, try substituting with crushed cornflakes for a different kind of crunchy texture.
- Go wild and use white chocolate chips instead of the regular ones if you’re feeling fancy.
- Add a teaspoon of cinnamon or espresso powder for a little extra depth in flavor. It’s like giving your cookies a secret superpower.
If you try this, I’d love to hear how it turns out — drop a comment or tag me! Happy baking, and may your Tuesday be as sweet as these cookies.
Related update: Neiman Marcus Oatmeal Chocolate Chip Cookies
Related update: Fall Fruit Compote

One chilly Tuesday evening last fall, I found myself digging through the fridge, craving something crisp and refreshing amidst all the usual comfort foods. The dilemma? It was one of those weeks where time seemed to vanish, and I needed something quick yet satisfying. That’s when it dawned on me: my favorite Southern 7 Layer Salad — but with a twist! Instead of the classic trifle dish, I opted for a mason jar presentation. Not only does it make for an easy, transportable lunch, but there’s something so charming about seeing those vibrant layers through glass. Plus, let’s be real, salads in mason jars just make you feel like you’ve got your life together. Ready to dive in?
Jump to Recipe
What You’ll Need
Here’s the beauty of this recipe: most of these ingredients are pantry regulars. If you don’t have them all, don’t worry — substitutions are a breeze!
- Bacon – because everything’s better with bacon, right?
- Black pepper
- Eggs – hard-boiled and chopped
- Lettuce – crisp and refreshing
- Mayo
- Frozen peas – they make the salad pop!
- Red diced bell pepper
- Sour cream
- Sugar
- Yellow or red diced onion
How to Make Southern 7 Layer Salad in a Mason Jar
- Prepare the dressing by mixing the mayo, sour cream, sugar, and a dash of black pepper in a small bowl. Give it a good whisk until smooth. Pop it in the fridge to chill while you prep everything else.
- Cook the bacon in a skillet over medium heat until it’s wonderfully crisp and the kitchen smells like breakfast heaven. Let it cool on a paper towel-lined plate, then chop it into bite-sized pieces.
- Hard-boil your eggs if you haven’t already, then dice them into little chunks. I love using an egg slicer for this — it’s oddly satisfying.
- Grab your large mason jars (21oz works beautifully). Start with a couple of spoonfuls of the chilled dressing at the bottom of each jar. This way, when you tip it out to eat, everything ends up nicely coated.
- Layer in this order: chopped lettuce, a sprinkle of diced onions, a cheerful scatter of red bell peppers, those poppy little peas, the diced eggs, and finally, the crispy bacon.
- Screw the lid on tightly, give it a little shake if you’re feeling adventurous, and either dig in straight from the jar or pour it into a bowl. Enjoy the crunchy, creamy goodness!
Cook’s Notes
Let’s talk practicalities:
– This salad is a fantastic prep-ahead option. You can make all the components the night before. Just wait to add the dressing until you’re ready to dig in to avoid anything getting soggy.
– Storing the salad in the fridge will keep it fresh for up to two days, but honestly, it’s so tasty it’ll probably disappear way before then.
– One potential trip-up: overcooking the bacon or eggs. Keep a close eye on both to ensure they’re just right.
Make It Your Own
Want to mix things up? Here are a few ideas:
- Swap the bacon for crispy tofu for a vegetarian twist.
- Use Greek yogurt instead of sour cream for a tangier, lighter dressing.
- Add shredded cheddar cheese for an extra savory kick.
- Include sliced avocado for a creamy texture and added health benefits.
So there you have it — my trusty Southern 7 Layer Salad in a Mason Jar! If you try this, I’d love to hear how it turns out. Drop a comment below or tag me on social media with your layered creations. Happy crunching!
Related update: Southern 7 Layer Salad in a Mason Jar
Related update: Avocado and Orange Salad With Orange-Ginger Dressing

Okay, picture this: It’s a lazy Sunday morning, and the sun is peeking through the kitchen window, but you’re still in your pajamas and not quite ready to embrace the day. You crave something sweet but are not in the mood for a mess of bowls and measuring cups. Enter Blueberry Almond Crescent Rolls, the savior for those who want to feel fancy without the fuss. These little guys are like a bakery treat you can whip up faster than you can say “brunch,” and I promise, they’ll make your kitchen smell like a dream. Plus, they’re guaranteed to impress anyone lounging around in their PJs with you! 🍇🥐
Jump to Recipe
What You’ll Need
This is one of those recipes where you might peek into your pantry and realize you’ve got most of it already. Here’s the lineup:
- 1 can of regular crescent rolls
- 1/4 cup blueberry jam
- 4 ounces cream cheese, softened
- 1/2 cup confectioner’s sugar, divided
- 1/4 teaspoon almond extract, divided
- 1 tablespoon flour
- Pinch of sea salt
- 1 egg
- 1 tablespoon water
- 1 tablespoon milk
- 2 tablespoons turbinado sugar
How to Make Blueberry Almond Crescent Rolls
- Preheat your oven to 375 degrees F. Line a large baking sheet with parchment paper or a silicone baking mat. Trust me, it’s worth it for easy cleanup!
- In the bowl of your stand mixer with the paddle attachment—or just a handheld mixer if you’re like me and can’t be bothered—mix together the cream cheese, blueberry jam, 2 tablespoons of confectioner’s sugar, flour, sea salt, and 1/4 teaspoon of almond extract. Blend until smooth, which should take about 30 seconds.
- Spread your crescent roll wedges out on a clean work surface. You know the drill: take a generous tablespoon of that heavenly cream cheese mixture and plop it on the wide end of each wedge.
- Roll ’em up! Start from the wide end and roll until the narrow end is snug underneath. Nestle them onto your prepared baking sheet.
- Whisk the egg and water together to create an egg wash, then brush it over your crescent rolls. Don’t skip this step—it gives them that gorgeous golden glow.
- Sprinkle with turbinado sugar. This stuff is like edible glitter, trust me.
- Bake for 13-15 minutes, or until they’re puffed and golden. The anticipation will build as your kitchen fills with the scent of warm blueberries and almond.
- While they cool slightly on a wire rack, prepare the glaze. In a medium bowl, combine the remaining 1/2 cup of confectioner’s sugar, remaining 1/4 teaspoon of almond extract, and milk. Whisk until smooth. Taste and add a pinch of sea salt if it’s too sweet for your liking.
- Drizzle that silky glaze over your crescent rolls and serve immediately. Enjoy the blissful combo of flaky, sweet, and creamy!
Cook’s Notes
- Don’t overfill the crescent rolls. It may be tempting, but too much filling can cause a messy overflow.
- If you don’t have turbinado sugar, regular sugar works in a pinch, though it won’t have the same crunch.
- The rolls are best enjoyed fresh but can be stored in an airtight container at room temperature for up to two days.
- For make-ahead magic, prepare the cream cheese filling a day in advance and store it covered in the fridge. Let it come to room temp before using.
Make It Your Own
- Swap the blueberry jam for raspberry or strawberry if that’s more your jam (pun intended!).
- Add a dash of cinnamon to the cream cheese mixture for an extra layer of flavor.
- Use orange marmalade and replace the almond extract with vanilla for a citrusy twist.
- Feeling nutty? Add a sprinkle of chopped almonds inside or on top for added crunch.
If you try this, I’d love to hear how it turns out—drop a comment or tag me! Let’s make every breakfast feel like a special occasion, one crescent roll at a time. 🌟
Related update: Blueberry Almond Crescent Rolls
Related update: Neiman Marcus Oatmeal Chocolate Chip Cookies
Related update: Soft Croatian corn bread – proja
Related update: Avocado Nests

Last Tuesday was one of those days. You know the kind—when work drags, the laundry pile is a mountain, and the fridge looks like a post-apocalyptic wasteland. I needed something quick, fresh, and healthy, but my brain was too fried to concoct anything elaborate. As I rummaged through the crisper drawer, I found some vibrant swiss chard and an orange cauliflower that had somehow survived the week. With a handful of other ingredients, I whipped up some Swiss Chard Wraps. They were the perfect antidote to a hectic day: simple, fresh, and surprisingly satisfying. Plus, they look as good as they taste, which is always a bonus when you’re trying to convince your family (or yourself) to eat more greens.
Jump to Recipe
What You’ll Need
Chances are you already have most of this, but there are a few stars that make all the difference.
- Dried swiss chard leaves
- Orange cauliflower (it’s just a bit sweeter and cuter)
- Olive oil
- Garlic
- Salt
- Fresh basil
- Zucchini
- Red bell pepper
- Avocado
- Trader Joe’s spicy peanut vinaigrette
How to Make Swiss Chard Wraps
- Begin by chopping off the stems of the swiss chard right where they meet the leaf. I like to leave a bit of stem for extra crunch and structure, but feel free to stem them entirely if that’s your jam.
- Chop the cauliflower into small bits and toss them into a food processor. Give it a few pulses until it resembles rice. Yes, even the stalks!
- Heat up some olive oil in a sauté pan over medium-high heat. Once it’s shimmering, add the garlic and let it sizzle for a minute or two, until you can smell its toasty aroma.
- Add the cauliflower rice to the pan. Cook it for about 2-3 minutes until it turns a bright, cheerful orange. Stir in a pinch of salt and some chopped basil, letting the flavors mingle.
- Spiralize the zucchini using Blade B to make noodles. No spiralizer? No problem—use a vegetable peeler to create ribbons.
- To assemble, lay a swiss chard leaf flat. Pile on a bit of the sautéd cauliflower, zucchini noodles, slices of red bell pepper, and creamy avocado along the stalk.
- Drizzle some spicy peanut vinaigrette over everything (don’t be shy!) and wrap it all up snugly.
Cook’s Notes
Here’s the thing with these wraps: they really shine fresh. The swiss chard will wilt if you let it sit too long, so try to make just what you’ll eat in one go. However, if you find yourself with leftovers, pop them in an airtight container and store them in the fridge. They’ll last a day or two, but the flavors will meld and mellow a bit.
- Make the cauliflower rice a day ahead if you’re in a time crunch!
- If you’re not into raw red bell peppers, give them a quick sauté with the cauliflower rice to soften them up.
- Be generous with the vinaigrette; it’s the secret sauce that ties everything together.
Make It Your Own
- Swap the avocado: If you’re not an avocado fan, try hummus or a dollop of Greek yogurt for creaminess.
- Spice it up: Add some sliced jalapeños or a sprinkle of chili flakes to give your wraps a kick.
- Change up the greens: If you can’t find swiss chard, collard greens or large kale leaves work as excellent substitutes.
- Protein punch: Add grilled chicken, tofu, or shrimp for a more filling meal.
If you try this, I’d love to hear how it turns out—drop a comment or tag me on social media! Your kitchen adventures always brighten my day, and who knows? You might inspire the next variation. Enjoy your leafy, crunchy bites of happiness!
Related update: Southern 7 Layer Salad in a Mason Jar

I was knee-deep in a midwinter slump, the kind where you just crave a burst of sunshine, when I stumbled upon this idea: Braid sweet citrus-flavored licorice. It’s a bit of a departure from your typical licorice, and honestly, it’s more of a pastry with a playful twist. Picture this: a light, flaky puff pastry with a zesty citrus glaze that dances on your taste buds. Perfect for those days when you need a little joy but aren’t in the mood for anything too fussy or time-consuming.
One of the best things about this recipe is its versatility. It’s a delightful treat that can play the part of a breakfast snack, a tea-time companion, or the unexpected star of a dessert platter. The secret weapon here is the citrus glaze, which brings this pastry to life with a sweet-tart zing. If you’ve got some puff pastry lingering in the freezer and a stash of citrus in the fruit bowl, you’re basically halfway there.
Jump to Recipe
What You’ll Need
Chances are you already have most of this sitting in your kitchen. Let’s keep it simple, shall we?
- Puff pastry Buitoni – the flaky base of our braids
- Fresh cream – to add richness to the glaze
- Grand cru muscovado sugar – for that deep, molasses-like sweetness
- Lemon – zest and juice will do wonders here
- Lime – for that extra citrus punch
- Orange – more zest, more flavor
How to Make Braid Sweet Citrus Flavored Licorice
- Roll out the puff pastry and use a sharp knife to etch designs of strips about 10 cm high and 1 cm wide. Precision isn’t key here, just have fun with it.
- Gently twist each strip on itself. It doesn’t have to be perfect; the twists will bake into beautiful, rustic braids.
- Place the twisted strips spaced apart on a sheet of parchment paper. This prevents them from sticking together as they bake.
- Bake in a preheated oven at 200°C for about 12 minutes, or until they’re golden brown and your kitchen smells like heaven.
- While the braids cool on a wire rack, zest your citrus fruits, and set the zest aside.
- Juice the lime, half of the orange, and half of the lemon. Boil the juices until you reduce it down to about two tablespoons of liquid.
- Remove from heat and stir in the cream and brown sugar until it’s well mixed and dreamy.
- Let the glaze cool until it thickens, then brush it generously over the cooled braids.
- Sprinkle the reserved citrus zest over the glazed braids while they’re still a bit wet to ensure it sticks well.
- Allow the glaze to dry on the wire rack until it hardens slightly. Then, go ahead and devour them!
Cook’s Notes
Don’t stress if your twists aren’t perfect—imperfections add character! Make sure to space them well on the parchment paper to allow for expansion. If your glaze seems too runny, let it cool a bit more; it thickens as it cools. Want to save time? You can make the glaze ahead of time and refrigerate it for up to two days. Just warm it slightly before using. Leftovers can be stored in an airtight container for a couple of days, but honestly, they probably won’t last that long.
Make It Your Own
- Try using blood orange instead of the regular orange for a more intense flavor and color.
- Add a splash of vanilla extract to the glaze for a warm, comforting undertone.
- For a spiced twist, sprinkle a little ground cardamom in with your citrus zest.
- If you’re feeling adventurous, drizzle a bit of melted white chocolate over the top once the glaze has set.
If you try this, I’d love to hear how it turns out—drop a comment or tag me! Enjoy the bright and citrusy vibes these braids bring, no matter what the weather outside is doing. Happy baking!
Related update: Braid sweet citrus flavored licorice
Related update: Basil Coconut Ice Cream

Picture this: it’s a Tuesday evening, and the week is already feeling like one long, chaotic whirlwind. I’m staring at the contents of my pantry, trying desperately to remember that elusive thing called “meal planning.” But instead of a dinner brainstorm, my mind wanders to something sweet and zesty—something that feels like sunshine on a plate. That’s when I remember the Lemonade Bundt Cake, a marvel of citrusy goodness and simplicity. This cake is like a mood booster in dessert form—tangy, moist, and delightfully easy to whip up with a handful of pantry staples. Whether you need a midweek pick-me-up or a show-stealing dessert for your next get-together, this cake is your answer.
Jump to Recipe
What You’ll Need
This recipe is delightfully straightforward, and chances are you already have most of these ingredients in your kitchen. Here’s what you’ll need:
- Lemon cake mix
- Lemon pudding mix
- 3 eggs
- Sour cream
- Vegetable oil
- Water
- Frozen lemonade concentrate
- Powdered sugar
How to Make Lemonade Bundt Cake
- First up, preheat your oven to 350 degrees. Take a moment to prepare your 10-inch bundt pan by greasing and flouring it. Trust me, this little step saves the cake from dreaded sticking disasters later on.
- Next, grab a large mixing bowl and combine the lemon cake mix, lemon pudding mix, eggs, sour cream, vegetable oil, and water. Mix everything together until you have a smooth, luscious batter that smells like pure lemony magic.
- Pour this gorgeous batter into your prepared bundt pan, smoothing the top with a spatula. Pop it into the oven and let it bake for 50-60 minutes. You’ll know it’s done when a toothpick inserted in the center comes out clean and the cake is a lovely golden hue.
- Once baked, let the cake cool in the pan for about 10-15 minutes. During this time, your kitchen will fill with a tantalizing lemony aroma that’s hard to resist.
- While the cake cools, make the glaze by combining the frozen lemonade concentrate with 1 cup of powdered sugar. Stir in more powdered sugar until the glaze reaches your desired consistency—thick enough to coat but still drizzle-friendly.
- Carefully turn your cake out onto a wire rack. Spoon the glaze generously over the top, allowing it to drip down the sides like a candied waterfall. For an added touch, dust the cake with more powdered sugar if you’re feeling fancy.
Cook’s Notes
This cake is as forgiving as it is delicious. You can make it a day ahead, and it will still taste fresh and fabulous. Just cover it tightly and store it at room temperature. If you’re in a rush, speed up the cooling process by placing the cake in the fridge for a few minutes before glazing. One common mistake is overmixing the batter, which can make the cake dense. Mix just until everything is combined, and you’ll be golden. Leftovers (if there are any!) can be kept in an airtight container for up to three days.
Make It Your Own
Here are a few fun ways to switch things up with this recipe:
- Replace the lemon cake mix with a white or vanilla cake mix for a subtler lemon flavor.
- Swap the lemon pudding mix for vanilla pudding mix if you prefer a less tangy cake.
- Add a handful of poppy seeds to the batter for a delightful crunch and a hint of nuttiness.
- For a berry twist, fold in fresh raspberries or blueberries before pouring the batter into the pan.
If you try this, I’d love to hear how it turns out — drop a comment or tag me! This Lemonade Bundt Cake is a little slice of sunshine, and I hope it brightens your day as much as it does mine. Enjoy every zesty bite!
Related update: Lemonade Bundt Cake
Related update: Braid sweet citrus flavored licorice

One chilly Sunday morning, I found myself staring at a nearly empty pantry, craving something cozy and sweet without stepping out into the biting cold. That was the day my homemade organic maple granola was born, and let me tell you, it was like a warm hug in a bowl. There’s just something magical about the way the house smells when this granola is baking—sweet, nutty, and comforting. The best part? It’s ridiculously easy to make. You’ll end up with hearty, golden clusters that are perfect to pair with fresh, juicy fruit. Now, this recipe is a staple in my home, perfect for those days when you want something wholesome and satisfying, without a lot of fuss.
Jump to Recipe
What You’ll Need
The beauty of this granola lies in its simplicity and versatility. You might already have most of these ingredients lurking in your kitchen!
- Rolled oats
- Dark brown sugar
- Maple syrup
- Vegetable oil; peanut oil is preferred
- Salt
- Cashew pieces
- Slivered almonds
- Dried cranberries
- Dried raisins
- Fresh fruit (to serve)
How to Make Home made organic maple granola with fresh fruit
- Preheat your oven to 250°F. This low temperature ensures the granola dries out rather than burns, for that perfect crunch.
- In a large bowl, combine the rolled oats, cashew pieces, slivered almonds, salt, and dark brown sugar. Give it a good stir to distribute the sugar evenly.
- Pour in the maple syrup and vegetable oil. Mix everything until the oats and nuts are well coated. You should be able to smell the sweetness already!
- Spread the mixture thinly and evenly onto two baking sheets with sides about an inch high. Trust me, the thin layer is key for even baking.
- Bake for 45 to 60 minutes, stirring carefully every 15 minutes. Don’t forget to swap the positions of the trays each time you stir them. This little dance ensures even browning.
- You’ll know it’s done when the granola looks tan—not dark—and feels slightly crisp to the touch. It will harden more as it cools.
- Remove the trays from the oven and let the granola cool completely. Once cooled, mix in the dried cranberries and raisins.
- Store your granola in sealed plastic bags or containers. It’ll stay fresh for up to two weeks, unrefrigerated.
- Serve your granola with a handful of fresh fruit. Enjoy every crunchy, sweet bite!
Cook’s Notes
This granola is super forgiving, but here are a few tips to keep it foolproof. Remember to stir it gently to keep those lovely clusters intact. If you don’t have peanut oil, any neutral oil like canola will work in a pinch, but peanut oil does add a subtle, nutty flavor that’s just divine. Make sure to let it cool completely before storing, as any trapped heat can make it soggy. If you somehow don’t finish this in two weeks (but let’s be real, you will), just pop it in an airtight container in the freezer for longer storage.
Make It Your Own
Here are some fun tweaks to make this granola truly yours:
- Swap the cashews and almonds for your favorite nuts like walnuts or pecans for a different flavor profile.
- Add a teaspoon of cinnamon or a pinch of nutmeg to the oat mixture for a warm spice kick.
- Try using honey instead of maple syrup for a different kind of sweetness.
- Sprinkle some coconut flakes into the mix before baking for a tropical twist.
If you try this, I’d love to hear how it turns out — drop a comment or tag me! Happy granola-making, friends!
Related update: Home made organic maple granola with fresh fruit
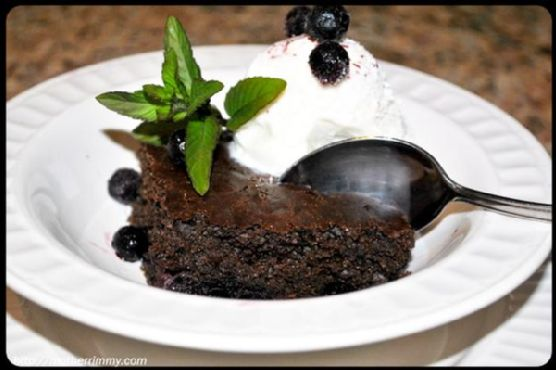
It was one of those days where the clouds just wouldn’t quit, and the afternoon seemed to stretch on forever. I was staring at a ridiculously overripe banana when inspiration struck — not banana bread, but something unexpected, and maybe even a little healthier. That’s when I thought of these Whole Wheat Blueberry Brownies. They’re the perfect mix of indulgence and nourishment, with a tangy twist thanks to the blueberries. A little dense, definitely chocolaty, and oh-so-simple to whip up. You’re gonna love the way the whole wheat adds a subtle nuttiness, and if you happen to have a pint of fresh blueberries sitting around, well then, my friend, you’re in for a treat.
Jump to Recipe
What You’ll Need
Most of these goodies are probably hanging out in your pantry already, just waiting to become besties in this delightful treat. Let’s make it happen:
- 1 cup whole wheat pastry flour
- 1/2 cup cocoa powder
- 1/2 teaspoon salt
- 1/2 teaspoon baking powder
- 1/4 teaspoon baking soda
- 1/2 teaspoon cinnamon
- 1/2 cup sugar
- 1/2 cup brown sugar
- 1 large egg
- 1/2 cup low fat sour cream
- 1/4 cup almond milk
- 1 teaspoon vanilla extract
- 1 cup fresh blueberries
How to Make Whole Wheat Blueberry Brownies
- Preheat your oven to a cozy 350 degrees Fahrenheit. While it warms up, grab an 8 x 8 x 2-inch baking pan and give it a good coat of cooking spray. You don’t want these beauties sticking!
- In one bowl, whisk together the dry stuff: whole wheat pastry flour, cocoa powder, salt, baking powder, baking soda, and cinnamon. Take a moment to marvel at the chocolatey goodness forming already.
- In a separate bowl, beat the egg, then mix in the low fat sour cream, almond milk, and vanilla extract. It should be smooth and slightly glossy.
- Now, gently fold the wet ingredients into the dry mix. Stir until you can no longer see streaks of flour, and everything looks like a harmonious, silky batter.
- Time to bring in the stars of the show — fold in those plump blueberries with the same care you’d show a friend running a relay race. You want them evenly distributed but not squished.
- Pour the batter into your prepared pan, spreading it with a spatula so it’s nice and even. Slide it into your preheated oven and let it bake for 20-25 minutes. You’ll know it’s ready when a toothpick inserted in the center comes out clean.
- Let them cool in the pan for a bit. The waiting is hard, but trust me, it’s worth it for that first bite that won’t burn your tongue.
Cook’s Notes
These brownies are a bit more rustic (in a good way) due to the whole wheat flour. If your taste buds are a little shy of tang, swap the low fat sour cream for full-fat or even Greek yogurt. They’ll keep in an airtight container for about four days, assuming there are any leftovers. If you’re planning ahead, you can make the batter the night before and bake them fresh in the morning. Just fold in the blueberries right before you bake!
Make It Your Own
- For a more decadent treat, replace the almond milk with full-fat coconut milk and get a subtle tropical twist.
- Substitute the fresh blueberries with raspberries for a tart and tangy variation that cuts through the chocolate beautifully.
- If you’re feeling nutty, toss in a handful of chopped walnuts or pecans for some extra crunch.
- For a touch of spice, add a pinch of cayenne pepper to the mix. Chocolate and spice are a match made in dessert heaven.
If you try this, I’d love to hear how it turns out — drop a comment or tag me! There’s nothing better than sharing a sweet success. Enjoy every chewy, blueberry-filled bite!
Related update: Whole Wheat Blueberry Brownies
Related update: Chocolate Crinkle Cookies
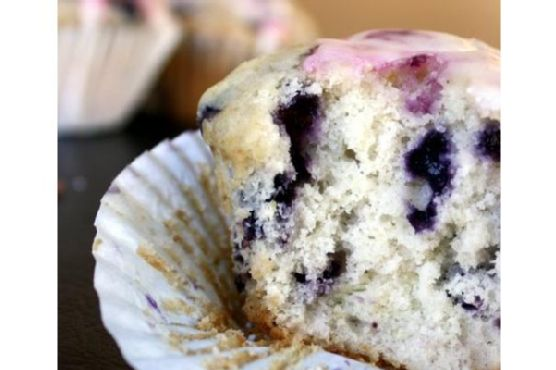
I was having one of those hectic weeks—work deadlines piling up, laundry mountain growing taller by the minute—and all I wanted was a moment of pure joy. Enter my savior: these Wild Blueberry Lemon Muffins. A burst of tart lemon and sweet summer blueberries wrapped up in a soft, buttery muffin. They’re the perfect blend of comforting and feel-good indulgence, but super easy to put together. The best part? They make your kitchen smell like heaven and taste even better! Whether you’re whipping them up for a weekend brunch or a quick weekday treat, these muffins are a little slice of bliss.
Jump to Recipe
What You’ll Need
You’re going to love how most of these ingredients are probably already sitting in your pantry or fridge. Here’s what you need:
- 2 1/2 cups all-purpose flour
- 2 1/2 teaspoons baking powder
- 1/2 teaspoon salt
- 1 cup granulated sugar
- 1/2 cup unsalted butter, softened
- 1 large egg
- 1/2 cup buttermilk
- 1 teaspoon vanilla extract
- 1 tablespoon fresh lemon juice
- 1 tablespoon lemon zest
- 1/8 cup sugar (for mashing with lemon zest)
- 1 can wild blueberries, drained
- 1/2 cup powdered sugar (for glaze)
How to Make Wild Blueberry Lemon Muffins
- Start by preheating your oven to 375°F (190°C). Line 16 muffin cups with paper liners to make cleanup a breeze.
- In a small bowl, mash 1/8 cup sugar with the lemon zest until the sugar is moistened and fragrant. This will amp up the lemony goodness.
- In a medium-sized bowl, whisk together the flour, baking powder, and salt. This dry mix is the backbone of your muffins.
- Using an electric mixer, cream the cup of sugar and butter together until light and fluffy, about 3 minutes. Add the egg, buttermilk, vanilla, and the fragrant lemon sugar, beating each in one at a time.
- Slowly incorporate the flour mixture into the wet ingredients. The batter should be smooth and inviting at this point.
- Gently fold in the wild blueberries with a large spatula. Try not to crush them—you’re aiming for bursts of berry goodness!
- Divide the batter equally into the prepared muffin tins, filling each about 3/4 full. This leaves room for them to rise beautifully.
- Bake in the preheated oven for about 35 minutes, or until a cake tester comes out clean and muffins are golden.
- Let the muffins cool for a few minutes in the pan before transferring them to a wire rack.
- While the muffins cool, whip up your glaze by combining the lemon juice, zest, and powdered sugar. Stir until smooth.
- Spoon about 1 tablespoon of glaze over each muffin, allowing it to drizzle down the sides for that enticing sweet-tangy finish.
Cook’s Notes
If you can, use wild blueberries—they have a more intense flavor and smaller size, making them perfect for muffins. Make sure to drain them well before adding to the batter to keep it from getting too wet. Store your muffins in an airtight container; they stay fresh on the counter for up to three days or can be frozen for up to a month. If you want to prepare ahead, mix the dry ingredients the night before to save time.
Make It Your Own
- Swap canned wild blueberries for fresh ones if they’re in season for a less sugary taste.
- Replace the lemon with orange zest and juice for a citrusy twist.
- Use almond extract instead of vanilla for a nutty undertone.
- Try adding a teaspoon of poppy seeds to the batter for an extra crunch.
If you try this, I’d love to hear how it turns out—drop a comment or tag me on social media! Happy baking, and may your week be as sweet as these muffins.
Related update: Wild Blueberry Lemon Muffins
Related update: Penne Arrabiata
Related update: Fast Tiramisu
Related update: Blueberry Almond Crescent Rolls

Imagine this: it’s a rainy Tuesday evening, and I’m staring into my pantry like it’s going to magically whip up dinner for me. You know those days when the fridge is playing hard to get and the clock is laughing in your face? Well, that’s when I turn to my trusty Hush Puppies recipe. These little golden nuggets save the day every time — they’re crispy, comforting, and the kind of simple that feels like a win even when everything else is chaos. Plus, they come together in a flash, which is exactly what you need when the hangry hits.
Jump to Recipe
What You’ll Need
There’s a good chance you’ve already got most of these on standby. That’s the beauty of this dish: minimal ingredients with maximum flavor payoff. Check out what you’ll need:
- 1 small onion, finely chopped
- 1 cup cornmeal
- 1/4 cup flour
- 1 tablespoon baking powder
- 1 teaspoon salt
- 1 egg
- 1/2 cup milk
- Oil for frying (vegetable or canola works best!)
How to Make Hush Puppies
- Start by grabbing a large mixing bowl and toss in your cornmeal, flour, baking powder, and salt. Give it a good stir until everything is well combined.
- In a separate medium bowl, crack in the egg and beat it with a fork until it’s all mixed up. Add in the chopped onion and milk, then stir until it’s nice and smooth.
- Pour the eggy onion mixture into the dry ingredients. Stir until it’s all combined into a thick, slightly lumpy batter. You’re aiming for a texture that holds its shape.
- Heat up about 2-3 inches of oil in your deep-fat fryer or a heavy skillet over medium-high heat. You want it to shimmer but not smoke — that’s your cue it’s hot enough.
- Once the oil is ready, drop heaping teaspoons of batter into the pan. They’ll plummet to the bottom but magically rise to the top as they cook. Fry about 5-6 at a time without overcrowding.
- Keep an eye out — after 1-2 minutes, the puppies should be a gorgeous golden brown. That’s when you’ll know they’re done. Use a slotted spoon to fish them out and let them drain on paper towels.
Cook’s Notes
Don’t overmix the batter; a few lumps are perfectly fine and keep the texture just right. The oil needs to be hot enough to ensure the hush puppies cook quickly and don’t soak up excess oil. If you’re making them ahead, you can fry them lightly and finish them off in a hot oven just before serving. They’re best enjoyed fresh but keep well in an airtight container for a day or two. Reheat them in the oven to maintain that crunch.
Make It Your Own
Here’s where you can get creative:
- Spice it up: Add a pinch of cayenne pepper or a chopped jalapeño for a kick.
- Cheesy twist: Stir in a handful of shredded cheddar cheese to the batter for some gooey goodness.
- Herbal accents: Mix in some chopped chives or parsley for a fresh pop of flavor.
- Sweet spin: Swap out the onion for corn kernels and add a teaspoon of sugar for a sweet-savory combo.
If you try this, I’d love to hear how it turns out — drop a comment or tag me! Remember, the best recipes are the ones you make your own. Enjoy your hush puppies and all the cozy vibes they bring.
Related update: Hush Puppies

The other night I found myself staring at a package of ground beef and the clock ticking closer to dinner. You know that moment when you want something comforting but don’t want to commit to a culinary marathon? Well, meatloaf was calling my name. But not just any meatloaf—this was going to be the kind that gets the family excited, the kind that leaves everyone asking for seconds. It’s not just easy; it’s tasty, satisfying, and oh-so-worth it. A perfect blend of savory and a hint of sweet, this meatloaf turns the usual into the extraordinary.
Jump to Recipe
What You’ll Need
If you’re like me, chances are you already have most of this tucked away in your kitchen. Let’s make this as fuss-free as possible!
- 1 lb ground beef
- 1/2 lb bulk sausage
- 1/2 cup breadcrumbs
- 1 small diced onion
- 1 egg
- 1 teaspoon salt
- 1/2 teaspoon pepper
- 1 teaspoon cumin
- 1 teaspoon garlic powder
- 1 cup canned tomato sauce, divided
- 2 tablespoons cider vinegar
- 2 tablespoons brown sugar
- 2 tablespoons whole grain mustard
- 2 tablespoons Worcestershire sauce
- 1/4 cup water
How to Make Tasty Easy Meatloaf
- Preheat your oven to 350°F (175°C). This is the start of something wonderful.
- In a large bowl, mix together the ground beef, sausage, breadcrumbs, onion, egg, salt, pepper, cumin, garlic powder, and half of the tomato sauce. The trick is not to over-mix—keep it gentle to avoid a dense loaf.
- Shape your mixture into a loaf and place it in a shallow ovenproof pan. The sides should slope down gently, like a little hill of deliciousness.
- In a separate bowl, combine the remaining tomato sauce, cider vinegar, brown sugar, mustard, Worcestershire sauce, and water. Stir until the sugar is dissolved and the sauce is smooth.
- Pour this sauce over the meatloaf, letting it cascade down like a savory waterfall.
- Pop the pan into the oven and let it bake for about 1 hour. Every 20 minutes, spoon some of the sauce resting in the pan over the top of the loaf. This keeps it moist and full of flavor.
- Once baked through, the edges will look caramelized and the top glossy. Take it out of the oven and let it rest for 10 minutes. This pause lets the juices settle so each slice stays juicy.
Cook’s Notes
Making a meatloaf isn’t rocket science, but a few tips can make all the difference. First, don’t overwork the meat mixture; it’s tempting, but less is more for a tender loaf. If you like your meatloaf with a bit more of a kick, add a dash more Worcestershire sauce to the mix. Leftovers? Store them in an airtight container in the fridge for up to 3 days. They make wicked meatloaf sandwiches, trust me.
Make It Your Own
Here are some simple swaps to keep things interesting:
- Go Turkey: Substitute the ground beef and sausage with ground turkey for a lighter version.
- Spice It Up: Add a chopped jalapeño to the meat mixture if you like a bit of heat.
- Cheesy Delight: Mix in a cup of shredded cheddar cheese for an oozy surprise.
- Herby Twist: Toss in some chopped fresh herbs like parsley or thyme for an extra layer of flavor.
If you try this, I’d love to hear how it turns out—drop a comment or tag me in your meatloaf adventure! Happy cooking!
Related update: Tasty Easy Meatloaf
Related update: Moroccan Spiced Chicken Under A Brick

It was one of those whirlwind Wednesday evenings where everything seemed to be happening at once. My kitchen was a mess of grocery bags, half-empty coffee cups, and a laptop precariously perched on the edge of the counter streaming my latest binge-worthy show. Between juggling work calls and taming the chaos that had taken over my living space, I needed dinner to be quick, satisfying, and ideally nutritious enough to make me feel like I was winning at adulthood. Enter the Greek Yogurt Chicken Salad. It’s a reliable hero for those nights when you need something comforting yet refreshing, and it doesn’t hurt that the cleanup is a breeze! The creamy, tangy dressing paired with the tender chicken and the occasional sweet zing from the craisins is just what you need to hit reset.
Jump to Recipe
What You’ll Need
Just a heads up, this is the kind of recipe where you might already have most of the ingredients lounging around in your kitchen. It’s simple yet flavorful.
- 2-3 whole chicken breasts
- 4 cups chicken broth or water
- 1 cup plain Greek yogurt
- 1 tablespoon Dijon mustard
- 1 teaspoon garlic powder
- 1/2 cup craisins (or raisins)
- 1/2 cup roasted cashews
- Salt, to taste
- Pepper, to taste
How to Make Greek Yogurt Chicken Salad
- Start by bringing your chicken broth or water to a boil in a medium pot. Once it’s bubbling, add in your whole chicken breasts. Let them cook until there’s no pink left in the middle; this usually takes about 15-20 minutes depending on their size.
- While your chicken is having its spa treatment, whisk together the Greek yogurt, Dijon mustard, and garlic powder in a bowl. You’re aiming for a smooth, well-mixed sauce here. Add a dash of salt and pepper, adjusting to your taste.
- Stir in the craisins and cashews. If you love a bit more crunch, hold off on the cashews until just before serving. This way, they maintain their delightful crunch!
- Once the chicken is done, let it rest for about 5 minutes. Trust me, this little pause keeps all those flavorful juices locked in.
- Dice the chicken into bite-sized chunks and toss it into your prepared sauce. Give everything a good mix so each piece of chicken is generously coated.
- Serve your chicken salad chilled or at room temperature. It’s perfect in a sandwich, on a bed of greens, or just straight from the bowl.
Cook’s Notes
– Boiling the chicken in broth instead of water really takes the flavor up a notch, but if you’re in a pinch, water works just fine.
– This chicken salad keeps well in the fridge for about 3 days, making it a great make-ahead lunch option. Just store it in an airtight container to keep it fresh.
– If you’re planning to eat it over a few days, consider adding the cashews just before serving each time to maintain that satisfying crunch.
– Be mindful not to overcook the chicken, as it can become a bit rubbery. You want it tender and juicy!
Make It Your Own
- Swap the chicken for crispy tofu if you’re going for a vegetarian vibe. Just cube it and toss it in!
- Love a bit of heat? Add a pinch of cayenne pepper or some chopped jalapeños to the sauce.
- For an extra tangy twist, try tossing in some diced green apples. They add a delightful crunch and zing.
- Switch the craisins for chopped dried apricots for a different kind of sweetness if you’re feeling adventurous.
If you give this Greek Yogurt Chicken Salad a whirl, I’d love to hear how it turns out for you! Drop a comment below or tag me in your kitchen creations. Let’s keep those weeknight dinners delicious and stress-free!
Related update: Greek Yogurt Chicken Salad
Related update: Strawberry-Mango Quinoa Salad

Picture this: it’s a Wednesday evening, and I’m knee-deep in that midweek slump, feeling like a bit of a sweet escape. The kind where comfort meets simplicity. I glanced at the calendar and saw it was nearing August 10th—National S’mores Day. Immediately, a light bulb moment struck! Why not combine the nostalgia of campfire s’mores with a fruity twist to lift my spirits? Enter: S’mores-n-berry Bars. They’re as indulgent as they sound, with a crispy graham cracker base, rich brownie layer, and gooey marshmallow topping that’s lightly kissed by the oven’s broiler for that perfect toasted finish. It’s the kind of treat that’s easy to whip up, yet impressive enough to satisfy any sweet tooth. Jump to Recipe
What You’ll Need
You probably have most of these ingredients lounging in your pantry already. Here’s what you’ll need:
- 1 box of cooked brownie mix
- 1 egg
- 1 cup graham cracker crumbs
- 2 whole graham crackers
- 1 cup mini marshmallows
- 1/2 cup fresh dried raspberries
- 1/4 cup sugar
- 1/2 cup unsalted butter, melted
- 1/4 cup vegetable oil
- 1/4 cup water
How to Make S’mores-n-berry Bars for National S’mores Day – August 10
- Preheat your oven to 325°F. Line an 8-inch-square baking pan with foil, making sure the foil hangs over the edges for easy removal later. Give it a spritz of nonstick cooking spray to make doubly sure nothing sticks.
- In a medium-sized bowl, combine the melted butter, graham cracker crumbs, and sugar until it resembles wet sand. Press this mixture evenly into the bottom of your prepared pan. Bake for about 20 minutes, or until it looks golden and smells like heaven. Set aside.
- Crank up your oven to 350°F. Meanwhile, grab another bowl and mix together the brownie mix, vegetable oil, water, and egg until smooth. Gently fold in the fresh dried raspberries. Pour this luscious batter over the cooled graham cracker crust.
- Bake the brownie layer for about 25 minutes, or until a toothpick inserted into the center comes out clean. This is your cue to remove it from the oven.
- Break up the two graham crackers into small pieces and scatter them artfully atop the brownie layer.
- Scatter the mini marshmallows over the graham crackers. Return the pan to the oven, this time setting it to broil. Watch carefully, as the marshmallows can quickly go from toasty to burnt in a flash! Once they’re golden and bubbly, pull the pan out.
- Allow the bars to cool completely in the pan. Lift them out using the overhanging foil and cut into squares. Enjoy the ooey-gooey goodness!
Cook’s Notes
These bars are as versatile as they are delicious. The graham cracker crust adds an incredible texture contrast to the fudgy brownie and gooey marshmallow topping. Here are a few tips to ensure they turn out perfect:
- If you prefer a denser brownie, add an extra egg to the brownie mixture.
- Store any leftovers in an airtight container at room temperature for up to 3 days. They’ll stay delicious, though the marshmallows might lose a bit of their chew.
- To make these ahead, you can prepare the graham cracker crust and brownie layer a day in advance. Add the graham crackers and marshmallows just before serving for the best texture.
Make It Your Own
- Nutty Twist: Swap out the raspberries for chopped toasted almonds or pecans for a crunchy surprise.
- Berry Medley: Use a mix of freeze-dried strawberries and blueberries instead of just raspberries for a more fruity experience.
- Chocolate Lovers: Add chocolate chips to the brownie mix for extra gooeyness. You can never have too much chocolate, right?
- Salted Caramel: Drizzle caramel sauce over the marshmallows before broiling. A sprinkle of sea salt can elevate these bars to gourmet status.
If you try this, I’d love to hear how it turns out — drop a comment or tag me! S’mores day or not, these bars are a crowd-pleaser every time.
Related update: S’mores-n-berry Bars for National S’mores Day – August 10
Related update: Cherry-Berry Pie With Agave Nectar All-Butter Crust