
It was one of those early fall evenings when the chill starts to creep through the windows, and you find yourself craving something warm and comforting but don’t want to spend hours in the kitchen. The kind of night where you’re too lazy to do anything complicated but still want something that feels like a hug on a plate. That’s when I first made these Philly Cheesesteak Grilled Wraps. They’re a perfect blend of flavors with juicy steak, melty cheese, and a little kick of hot sauce, all rolled up into a crispy tortilla. They’re quick to assemble and hit all the right notes for a cozy meal. Plus, there’s something so satisfying about getting a little char on that wrap. Trust me, this recipe is going to be your new weeknight hero.
Jump to Recipe
What You’ll Need
I love how simple this ingredient list is. Chances are you already have most of this hanging out in your fridge or pantry:
- Steaks – Choose your favorite cut; just slice it thin!
- Vegetable oil – For those beautiful caramelized onions.
- Onions – The backbone of flavor here!
- Better Than Bouillon Beef Base – My little secret for that extra punch.
- Portobello mushrooms – Meaty and delicious.
- Bell peppers – Adds color and sweetness.
- Mayonnaise – Trust me on this one, it’s the glue.
- Hot sauce – For that essential kick.
- Tortillas – The wrap that holds it all together.
How to Make Philly Cheesesteak Grilled Wraps
- In a frying pan over medium-low heat, add your onions and give them their time to shine. Let them caramelize slowly, stirring occasionally, until they transform into sweet, golden ribbons. This should take about 30 minutes.
- Once the onions are just right, stir in the Better Than Bouillon Beef Base with a tablespoon of water. This creates a faint gravy that coats everything beautifully.
- Next, introduce the mushrooms and bell peppers. Cook until they’ve softened and their flavors have melded, about 5 minutes. You’ll know they’re ready when the mushrooms are tender and the peppers are vibrant.
- Lay out a tortilla and spread a thin layer of mayonnaise over it. Add a few squirts of hot sauce for that necessary zing.
- Pile on the steak slices and the savory vegetable mix. Roll it up tightly, ensuring the ends are sealed so nothing escapes.
- Heat a griddle or large frying pan over medium heat and give it a light spray of cooking oil. Place your wraps seam side down, and press them with something heavy—think a smaller frying pan weighted down. Grill until the tortilla is toasty and golden.
- Flip the wraps and repeat the process on the other side. If you have a panini press or a George Foreman grill, these work wonders too.
- Once they’re grilled to perfection, pull them off and let them sit for a minute before slicing them in half. Enjoy watching happy faces around the table!
Cook’s Notes
Slow and steady wins the race with those onions. Rushing them will lose all that sweet, caramelized goodness. If you’re planning ahead, you can make the steak and veggie mix earlier in the day and just assemble and grill the wraps when you’re ready to eat. Leftovers? Pop them in the fridge and when you’re ready to reheat, a few minutes in a toaster oven will bring back that lovely crunch.
Make It Your Own
- Swap the steak for crispy tofu to make it vegetarian-friendly. Just make sure to season the tofu well!
- Try adding some provolone cheese or your favorite melty cheese for an extra layer of richness.
- Incorporate some jalapeños if you want to amp up the heat—just slice them thinly and add them alongside the peppers.
- Use whole wheat or spinach tortillas for a heartier, healthier twist.
If you try this, I’d love to hear how it turns out—drop a comment below or tag me on social media. Can’t wait to see your delicious creations!
Related update: Philly Cheesesteak Grilled Wraps
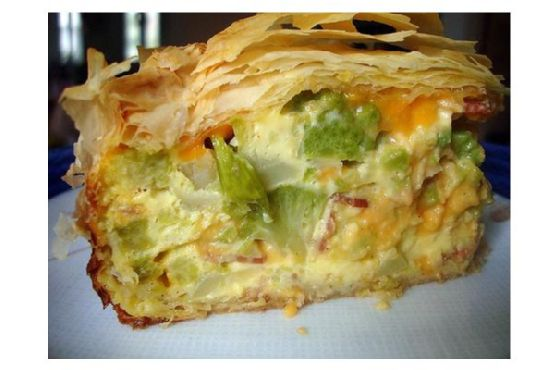
Last Tuesday, I found myself staring into the fridge, a little lost and a lot hungry, after a long day of work and an unexpected detour when my grocery bag tore open on the way home. There it was, my knight in shining armor: a half-eaten broccoflower and some leftover bacon from the weekend breakfast. Inspiration struck, and here we are with this Broccoli and Cheese Phyllo Pie. It’s surprisingly easy, deliciously comforting, and had the added bonus of making me feel like a culinary genius without breaking much of a sweat. Plus, who doesn’t love a dish wrapped in layers of flaky, buttery phyllo? Trust me, this is the kind of recipe that saves your night while winning you major points with anyone lucky enough to share it with you. Jump to Recipe
What You’ll Need
This pie is all about using what you likely already have mingling in your pantry and fridge. It’s unpretentious with a twist of sophistication, thanks to that golden, flaky phyllo.
- 1 broccoflower
- 5 large eggs
- 4 slices of cooked bacon, chopped
- 1 teaspoon salt
- 2 tablespoons all-purpose flour
- 1 cup milk
- 1/2 cup mayonnaise
- 3 green onions, chopped
- 1/4 teaspoon cayenne pepper
- 1/4 teaspoon black pepper
- 2 cups shredded smoked cheddar cheese
- 1 package of phyllo dough sheets (about 20 sheets)
- Butter, melted (for brushing)
How to Make Broccoli and Cheese Phyllo Pie
- Begin by preheating your oven to 350°F (175°C). This ensures it’s ready to go once your pie is assembled.
- Place your broccoflower in a pot, cover with water, and let it cook for about 5 minutes. Drain it well and set it aside to cool.
- In a large bowl, combine your chopped bacon, green onions, and shredded cheese. Give it a good mix so the flavors can start mingling.
- In a separate medium bowl, whisk together the eggs, salt, cayenne, black pepper, flour, mayonnaise, and milk. An immersion blender will help achieve a silky smooth texture, especially since mayo can seize up in cold mixtures.
- Unroll your phyllo dough and keep it covered with a damp paper towel to prevent it from drying out while you work.
- Prep an 8-inch springform pan by greasing it with cooking spray or melted butter, ensuring nothing sticks.
- Working quickly, lay two sheets of phyllo in the pan and gently brush with butter. Repeat this process, rotating the pan with each addition, until about 3/4 of your roll is used, creating a thick, pastry ‘nest.’
- Now that your broccoflower is cool, roughly chop it and fold it into your bacon mixture. Pour this mixture into your phyllo nest and pat it down gently.
- Give your egg mixture a quick remix before pouring it over the broccoli mix. You’ll want to ensure it’s evenly distributed.
- Layer the remaining phyllo sheets on top, two at a time, buttering in between. Roll any overhanging edges to create a neat crust. Brush the top with butter for that golden finish.
- Bake in the preheated oven for about 1 hour and 15 minutes. Keep an eye on it and cover with foil after an hour if the phyllo browns too quickly.
- Once baked, allow the pie to rest for 15 minutes before slicing. This prevents a lava flow of filling escaping. Use a serrated knife to cut through the delicate layers.
Cook’s Notes
Phyllo can be a bit of a diva, so keep it under a damp towel to avoid dryness. The immersion blender trick keeps your mixture velvety and avoids those pesky mayo clumps. If you’re making this ahead of time, the assembled pie can sit in the fridge for a few hours before baking. Leftovers? Store them in the fridge and reheat in the oven to bring back that crispiness.
Make It Your Own
- Vegetarian Delight: Swap the bacon for sautéed mushrooms or sun-dried tomatoes for a meatless version that’s still packed with umami.
- Cheese Swaps: If you’re out of smoked cheddar, try using a sharp cheddar or Gruyère for a different but equally mouthwatering experience.
- Spice It Up: Add a teaspoon of smoked paprika or a pinch of red pepper flakes for a pie with a little extra kick.
- Mix Up the Greens: No broccoflower? Broccoli, cauliflower, or even a mix of both work just as well, each bringing a unique flavor to the pie.
If you try this, I’d love to hear how it turns out — drop a comment or tag me! Your kitchen victories brighten my day more than you know.
Related update: Broccoli and Cheese Phyllo Pie

It was one of those gloomy Tuesday evenings when the thought of another sad salad was just too much to bear. I glanced at the dozen eggs I had forgotten in my fridge and thought, “We can do better than this, guys!” Thus, the Hard-Boiled Egg Gratin In A Béchamel Sauce was born. This dish is the perfect marriage of creamy comfort and accessible elegance. It’s like giving your humble eggs a posh makeover, and believe me, it’s way easier than you’d think. Plus, it’s the kind of dish that makes you feel like you can handle anything the week throws at you.
Jump to Recipe
What You’ll Need
You might already have most of this in your kitchen, just waiting to become something delightfully decadent. Here’s what you’ll gather:
- 6 large eggs
- 4 tablespoons butter, divided
- 1 small onion, finely chopped
- 3 tablespoons flour
- 2 cups milk
- Nutmeg, a pinch
- Salt and white pepper to taste
- 1 cup grated gruyère cheese
How to Make Hard-Boiled Egg Gratin In A Béchamel Sauce
- Start with hard-boiling your eggs. Bring a saucepan of salted water to a boil, add the eggs gently, then reduce the heat and let them simmer for 10 minutes. Once done, transfer the eggs to a bowl of cold water to cool slightly, then peel them. Trust me, rolling them gently with your palm on a hard surface makes peeling a breeze.
- In a small frying pan, melt 2 tablespoons of the butter over low heat and add the chopped onion. Cook, stirring frequently, until the onion is tender but not colored — you want that sweet onion aroma wafting through your kitchen.
- Now for the béchamel sauce: In a medium saucepan, melt the remaining 2 tablespoons of butter over low heat. Add the flour and whisk it for about 2 minutes. Keep an eye on it; you want a smooth blend without any color change.
- Slowly whisk in the milk and bring the mixture to a boil. Keep whisking to avoid lumps. Season the sauce with nutmeg, salt, and white pepper to your liking. Lower the heat and let it simmer for 10 minutes, continuing to whisk and scrape the sides for a silky finish.
- Stir in the cooked onions and let it all meld together for another 5 minutes, stirring occasionally.
- Preheat your grill. While it heats, slice the eggs about 1 cm thick. Spread a thin layer of béchamel sauce on the bottom of a gratin dish, then layer in the sliced eggs. Coat the slices generously with the remaining sauce.
- Top it all off with a generous sprinkle of grated gruyère cheese. Pop it under the grill and watch closely — turn the dish if needed to ensure an even, golden-brown crust. Serve immediately and bask in the glory of your culinary creation.
Cook’s Notes
A few things to keep in mind: The béchamel can be made ahead and stored in the fridge for up to two days. Just reheat gently before assembling the gratin. If you find your sauce is too thick after reheating, add a splash of milk to loosen it up. Leftovers (if you have any!) can be kept in the fridge and reheated in the oven at a low temperature. Just be mindful that the eggs can toughen slightly as they are reheated.
Make It Your Own
The joy of this dish is in its flexibility. Here are some fun variations:
- For a smoky twist, swap the gruyère for smoked gouda.
- If you’re feeling fancy, add a layer of sautéed mushrooms between the eggs and the sauce.
- For a fresh hit, sprinkle chopped chives or parsley over the top before serving.
- Try adding a thin layer of spinach under the eggs for a pop of color and nutrition.
If you try this, I’d love to hear how it turns out — drop a comment or tag me! Whip it up, make it your own, and most importantly, enjoy every creamy forkful. Happy cooking, friends!
Related update: Hard-Boiled Egg Gratin In A Bechamel Sauce

Last Tuesday, after a long day at work and an unexpected downpour that left me semi-drenched on my way home, I found myself craving something warm and hearty but also a little adventurous. That’s when I remembered my go-to Apple Cheddar Turkey Burgers with Chipotle Yogurt Sauce. They’re a delicious twist on your classic burger — a little bit cozy, a little bit spicy, and deeply satisfying. Plus, they’re quick enough to whip up on a weeknight without losing any of that “special dinner” vibe. Perfect for when you need comfort food that feels like a treat. Trust me, your taste buds will thank you. Jump to Recipe
What You’ll Need
This recipe is a gem because most of these ingredients are pantry staples, with a few stars that elevate the whole dish. It’s likely you already have everything you’ll need.
- 1 whole diced apple
- 1 cup bread crumbs
- 1 pound ground turkey
- 1 tablespoon chipotle hot sauce
- 1 small onion, finely chopped
- 1/2 cup plain yogurt
- Salt and pepper, to taste
- 1 cup shredded sharp cheddar cheese
- Diced garnish (optional, but recommended for extra crunch!)
How to Make Apple Cheddar Turkey Burgers With Chipotle Yogurt Sauce
- In a large bowl, mix together the diced apple, bread crumbs, ground turkey, chipotle hot sauce, chopped onion, salt, and pepper. Get in there with your hands — it’s the best way to ensure everything is evenly combined.
- Once everything is well mixed, shape the mixture into 4-6 patties, depending on your preferred size. You want them to be about 1 inch thick so they cook evenly.
- Preheat your grill or skillet over medium heat. Add the patties and cook for about 2 minutes on each side. You’ll know they’re done when the juices run clear, and the outside is golden brown and slightly crispy.
- While the burgers are cooking, stir together the plain yogurt and chipotle hot sauce in a small bowl. Adjust the heat level with more sauce if you like it spicier.
- Once the burgers are cooked, top each with a generous sprinkle of shredded cheddar cheese. Allow it to melt slightly before removing the patties from the grill or pan.
- Serve the burgers topped with a dollop of chipotle yogurt sauce and a sprinkle of your favorite diced garnish. Enjoy immediately while they’re warm and melty!
Cook’s Notes
These burgers are as versatile as they are tasty. If you find yourself with leftovers, they store well in the fridge for up to three days. Just reheat them in a pan over low heat to avoid drying out the turkey. To make these ahead, you can prepare the patties and sauce the night before and keep them refrigerated until you’re ready to cook.
- Ensure your apple is diced finely to mix well with the turkey and keep the patties from falling apart.
- Don’t rush the cooking. Medium heat is key to achieving that perfect golden crust while keeping the inside juicy.
Make It Your Own
- Swap the turkey for beef if you’re feeling more traditional but still want that apple-cheddar flair.
- Try using smoked gouda in place of cheddar for a deeper, smokier flavor.
- For a vegetarian twist, use a black bean and quinoa mix instead of turkey. It pairs surprisingly well with the apple and cheddar!
- If you’re not into chipotle, substitute with your favorite barbecue sauce for a different kind of smoky heat.
If you try this, I’d love to hear how it turns out — drop a comment or tag me! Your feedback means the world and inspires my next kitchen adventure. Happy cooking! 🍔
Related update: Apple Cheddar Turkey Burgers With Chipotle Yogurt Sauce
Related update: Baked Eggs and Bacon Cream In Spinach Fettuccine Nests
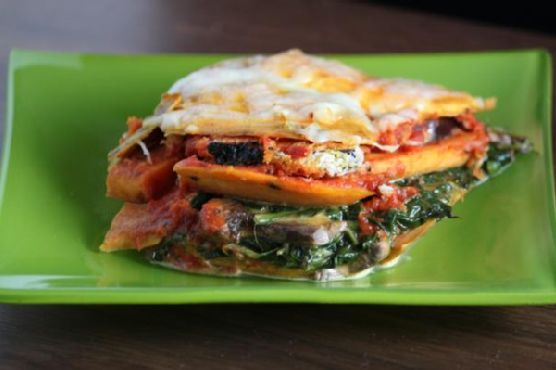
So there I was, staring at my pantry on a chilly Tuesday evening, fingers drumming impatiently on the counter. You know those nights when you crave something cheesy and delightful but also want to sneak in some veggies? Yeah, that was me. Enter: How Sweet It Is Sweet Potato Lasagne. This baby is the answer to those midweek blues — a marriage of hearty, comforting layers with a hint of spice and a whole lot of veggies. It’s one of those dishes that sounds fancy but is surprisingly straightforward. You get to play around with flavors a little, and honestly, who doesn’t like the idea of lasagne that feels a little healthier but still indulgent?
Jump to Recipe
What You’ll Need
So, here’s the kicker with this recipe: chances are you already have most of what you need right at home. A few staples, a couple of fresh picks, and voilà!
- Sweet Potatoes – the star of the show, sliced into 1/4 inch pieces.
- Baby Portabella Mushrooms – because mushrooms are the unsung heroes of any good veggie lasagne.
- Dry curry powder – gives our dish a lovely kick.
- Dried basil leaves – for that aromatic pop.
- Eggplants – sliced just like the sweet potatoes, they add a lovely texture.
- Frozen spinach – convenience meets nutrition.
- Heavy cream – for when you want things creamy, not watery.
- Monterey jack & cheddar cheese mix – because, cheese.
- Jalapeños – optional, but a little spice never hurt anyone.
- Marinara sauce – your favorite brand or homemade, up to you.
- Salt & pepper – always necessary.
- Vegetable cooking oil – canola or your oil of choice.
How to Make How Sweet It Is Sweet Potato Lasagne
- Start by slicing your sweet potatoes into 1/4 inch thick slices. Boil them until they’re just about tender but still a tad firm, around 10 minutes. You don’t want them too mushy.
- Mix together the dry curry powder and olive oil. Rub this aromatic mixture onto your semi-cooked sweet potatoes and let them marinate for at least 10 minutes, soaking in all that spicy goodness.
- Next, slice your eggplants just like the sweet potatoes. Rub them with a mix of olive oil, dried basil, and a pinch of salt and pepper. Let these beauties marinate for at least 15 minutes.
- Heat up some vegetable oil in a pan. Sauté your frozen spinach and baby portabella mushrooms for about 3-5 minutes, until fragrant and slightly softened.
- Add in the jalapeños (if you’re feeling adventurous) and season with salt and pepper. Turn the heat down and stir in some heavy cream and about half of your cheese mix until it’s creamy, but not runny.
- It’s time to assemble the masterpiece! In a baking dish, layer in this order: sweet potatoes, spinach/mushroom mix, eggplants, and a generous pour of marinara sauce. Repeat with sweet potatoes, spinach/mushroom mix, and eggplants.
- Sprinkle the remaining cheese mix on top like you’re raining down cheesy love.
- Bake at 350-375°F for about 35-45 minutes. You’ll know it’s ready when the cheese is bubbly and you can easily pierce through all the layers with a fork.
- Let it rest for a few minutes before serving to let everything meld together. Then, devour with passion!
Cook’s Notes
Let’s talk leftovers. This lasagne is a delight even the next day. Store it in an airtight container in the fridge for up to 3 days, and when you’re ready to reheat, just pop it in the oven at a low temperature until warm.
A word of caution: don’t overcook the sweet potatoes. We want them to hold their shape and add a bit of bite to the lasagne. If you’re prepping ahead, you can have your veggies sliced and marinated in advance, making assembly a breeze when you’re ready to bake.
Make It Your Own
This recipe is your canvas, so paint away:
- Swap the eggplants for zucchini if you prefer a lighter bite.
- Use crispy tofu instead of mushrooms for extra protein.
- Add a layer of ricotta cheese for extra creaminess.
- If curry isn’t your thing, try using smoked paprika for a different flavor profile.
So, if you give this sweet potato lasagne a spin, I’d love to hear how it turns out. Drop a comment or tag me! I’m always ready to chat about all things delicious. Enjoy every cheesy, veggie-packed bite! 🧡
Related update: How Sweet It Is Sweet Potato Lasagne
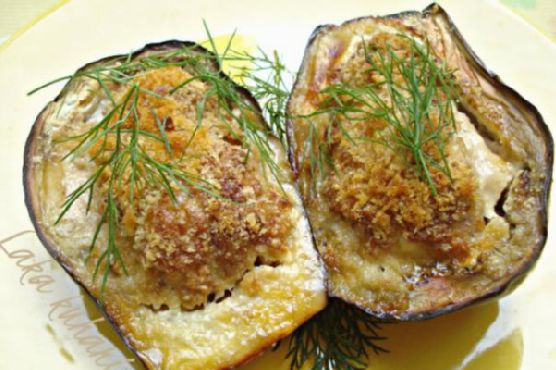
Picture this: It’s a Wednesday evening, and I’m staring at a couple of eggplants sitting forlornly in my fridge. They’re giving me that “use us before we wilt away” look. I had originally bought them with grand plans of making something elaborate, but let’s be real, life happened, and here we are. So, in the spirit of keeping things simple yet utterly delicious, I decided to whip up my go-to Mediterranean eggplants. This dish is like a warm hug—comforting yet bright, with the kind of flavors that make you feel like you’ve just dined at a cozy little seaside café. Plus, it’s a one-pan wonder that’ll save you from a pile of dish-nightmares.
Jump to Recipe
What You’ll Need
Chances are you already have most of this lying around, which is perfect because who wants to make a grocery run for a weeknight meal?
- Eggplants – the stars of the show, make sure they’re fresh and firm.
- Fresh sausage without the casing – it adds savoriness and richness.
- Almonds – for that unexpected crunch.
- Egg – to bring everything together.
- Feta cheese – for that tangy creaminess we all love.
- Mozzarella cheese – because melted cheese is life.
- Pepper – freshly ground, of course.
- Bread crumbs – gets all crispy and delightful on top.
- Olive oil – don’t skimp on this, it’s the liquid gold that makes everything better.
- Fresh dill – for a pop of freshness to finish.
How to Make Mediterranean Eggplants
- Start by washing the eggplants thoroughly. Cut off the stems and slice them in half lengthwise. You’ll want to scoop out the middle, leaving about a half-inch shell. It’s like carving a little canoe for all the tasty fillings.
- In a mixing bowl, combine the sausage meat, egg, feta cheese, mozzarella, almonds, and a few cracks of pepper. Use your hands to mix it all up until everything is just combined. It should smell irresistible already.
- With a spoon, generously stuff this mixture into your eggplant halves. Don’t worry about being too precise; rustic is charming, right?
- Sprinkle each stuffed eggplant with breadcrumbs, about a tablespoon each, then drizzle with olive oil. This will give your eggplants a delectable golden crust.
- Place them all on a baking sheet lined with parchment paper. Bake in a preheated oven at 230°C (that’s about 450°F) for 25 minutes. You’re looking for bubbling cheese, golden tops, and the edges of the eggplant to be slightly charred.
- Serve hot, sprinkled with fresh, chopped dill, or if you’ve got some chives or basil hanging out, they’ll work beautifully too.
Cook’s Notes
A couple of things to keep in mind: When scooping out the eggplant, don’t take too much flesh out, or else you’ll end up with a floppy mess. If you scoop out a bit of extra flesh, you can mix it into the sausage filling for zero waste. These eggplants are best eaten fresh out of the oven, but if you’ve got leftovers, store them in an airtight container in the fridge. They’ll keep for about 2-3 days, and you can reheat them in the oven or a skillet to keep that delightful crispiness intact.
Make It Your Own
- Swap the sausage for crispy tofu if you’re going the vegetarian route. Just crumble and sauté it with some smoked paprika for extra flavor.
- Switch out the almonds for walnuts if that’s what you have on hand. They add a lovely depth of flavor.
- If you’re out of feta, try using goat cheese for a similarly tangy kick.
- No dill? No worries! Parsley or cilantro can step in as a fresh finisher.
If you try this, I’d love to hear how it turns out — drop a comment or tag me! Happy cooking, and may your eggplants never languish in the fridge again. 🌿
Related update: Mediterranean eggplants
Related update: How Sweet It Is Sweet Potato Lasagne

Picture this: it’s one of those hectic Tuesday nights where you’ve got about 45 minutes to get something on the table before the whole evening devolves into chaos. The fridge is looking sparse, but you’ve got a pack of chorizo, some eggs, and a block of cheddar that’s been patiently waiting for its moment in the spotlight. That’s when this Chorizo and Egg Bake comes to the rescue. It’s one of those dishes that’s deceptively simple but packs a punch of flavor that’s sure to convince everyone you planned it all along. Plus, it’s all about that melty cheese and spicy kick that makes life feel just a bit more exciting.
Jump to Recipe
What You’ll Need
The beauty of this recipe is its simplicity—you’re likely to have almost everything you need ready to go!
- 4 large eggs
- 1 cup grated cheddar cheese
- 200g smoked chorizo sausage, diced
- 1 medium onion, finely chopped
- 2 cloves garlic, minced
- 1 can red and green chillies, drained
- Salt and pepper to taste
How to Make Chorizo and Egg Bake
- Preheat your oven to 170°C. You’ll want it nice and warm to get that cheese melted just right.
- In a mixing bowl, crack the eggs and whisk them until the yolks and whites are fully combined. This is going to ensure a fluffy texture.
- Add the grated cheddar cheese, chopped onion, diced chorizo, minced garlic, and chopped chillies to the bowl. Give it all a good stir until everything’s evenly mixed. The aroma should already be enticing!
- Season generously with salt and pepper. Remember, the chorizo will add a bit of saltiness, so don’t go too wild.
- Lightly grease a baking dish to prevent sticking. Pour your eggy mixture into the dish, spreading it out evenly.
- Pop it into the oven and bake for about 20 minutes. You’ll know it’s ready when the edges start to bubble and turn a light golden brown.
Cook’s Notes
This dish is wonderfully forgiving, so feel free to tweak the ingredient amounts based on what you have. If you’re preparing it in advance, you can whisk together all the ingredients the night before and store them in the fridge. Just pour it into the baking dish and bake when you’re ready. Leftovers can be stored in an airtight container in the fridge for up to three days and are just as delicious when reheated—perfect for a quick lunch or a lazy breakfast.
Make It Your Own
- Vegetarian Twist: Swap the chorizo for your favorite meat-free sausage or sautéed mushrooms.
- Extra Veggies: Throw in some bell peppers or spinach for added color and nutrients.
- Spicy Kick: Add a pinch of cayenne pepper or a few dashes of hot sauce to the egg mixture.
- Different Cheese: Try swapping the cheddar with Monterey Jack or pepper jack for a different flavor profile.
If you give this recipe a whirl, I’d love to hear how it turns out for you! Drop a comment below or tag me on social media to share your delicious creations. Happy cooking!
Related update: Chorizo and egg bake
Related update: Broccoli Rabe with Tomatoes, Anchovies & Spaghetti

Last Tuesday, I found myself staring into the fridge at 7 PM, wondering what on earth I could whip up for a little evening gathering with friends. You know those days when you just need a recipe that’s not only impressive but also stress-free? That’s when I stumbled upon the forgotten block of *blue cheese* nestled next to a jar of *fig jam*. A brainwave hit me: Blue Cheese Tartlets with Fig Jam and Walnuts! These beauties are the perfect blend of savory and sweet, and trust me, they’re much easier to make than you’d think. Each bite is a little symphony of flavors and textures. Plus, they’re great for making ahead and pop in the oven the moment your guests ring the doorbell.
Jump to Recipe
What You’ll Need
The ingredient list for these tartlets is refreshingly simple. Chances are you already have most of these in your pantry:
- Blue cheese
- Butter
- Flour
- Fig jam
- Walnuts
- Orange zest
- (Optional) Fresh thyme leaves
How to Make Blue Cheese Tartlets With Fig Jam and Walnuts
- Preheat your oven to 350°F (175°C). Lightly grease the cups of your mini muffin pans unless they’re non-stick. No one wants a sticky situation!
- In a medium bowl, cream together the *blue cheese* and *butter*. The mixture should be smooth and creamy, with that unmistakable aroma of rich cheese.
- Add the flour to the bowl and use your hands to bring the dough together. It might take a little coaxing, but be patient — the dough will reward you with a tender crust.
- Divide the dough into 30 pieces and roll them into balls. If you prefer a more delicate shell, go for 36 pieces.
- Using lightly floured fingers, press each dough ball against the sides of the mini tart pan until the dough rises slightly above the rim. This ensures that lovely shell shape.
- Bake the shells for 15 minutes, until they are golden brown and smell like heaven. Let them cool in the pans for about 5 minutes, then transfer to a wire rack to finish cooling completely.
- Once cooled, spoon a dollop of *fig jam* into each tartlet shell. Top with a sprinkle of toasted *walnuts*, a touch of *orange zest*, and a few thyme leaves if you like.
Cook’s Notes
These tartlets are surprisingly versatile. You can prepare the tartlet shells ahead of time and store them in an airtight container. If you’re planning a party, they freeze beautifully — just bake frozen shells for 8 minutes at 325°F before filling them. Pro tip: when pressing the dough into the pan, keep a small bowl of flour nearby to dust your fingers and prevent sticking. And if you’re cooking for a big crowd, consider doubling the recipe because they disappear fast!
Make It Your Own
- Swap the blue cheese for *goat cheese* if you prefer something milder.
- Replace *fig jam* with a spicy *pepper jelly* for a kick.
- Use *pecans* or *hazelnuts* instead of walnuts for a different nutty flavor.
- Add a thin slice of prosciutto to each tartlet for a touch of saltiness.
If you try this, I’d love to hear how it turns out — drop a comment or tag me! These tartlets are really something special and I hope they bring a bit of joy to your kitchen and your taste buds. Enjoy every bite!
Related update: Blue Cheese Tartlets With Fig Jam and Walnuts
Related update: Cucumber Mint Tea Sandwiches

I remember the first time I tried to grill potato skins. It was a balmy summer evening, and my friends and I had decided on an impromptu barbecue to celebrate the end of a long workweek. We were short on the usual grilling staples, and I found myself rummaging through the pantry, just hoping to find anything that could be charred over an open flame. In a stroke of serendipitous genius—or desperation, depending on how you look at it—I stumbled upon a bag of baking potatoes. And so began my love affair with crispy, gooey, and utterly addictive grilled potato skins. They’re the perfect combination of crispy potato goodness and creamy, cheesy decadence, making them a crowd-pleaser that’s surprisingly easy to throw together. You won’t believe how fast these disappear once they hit the table.
Jump to Recipe
What You’ll Need
The beauty of this recipe is its simplicity. Chances are you already have most of these ingredients on hand.
- Baking potatoes
- Cooked bacon or finely-chopped ham
- Picante sauce
- Shredded cheddar cheese
- Sour cream
- Unsalted butter
How to Make Grilled Potato Skins
- First, preheat your oven to 375 degrees. Prick your baking potatoes all over with a fork to let them vent, then bake them for 50 to 60 minutes until they’re tender and can be easily pierced.
- Once the potatoes are cool enough to handle, cut each one in half lengthwise. Scoop out most of the insides, leaving a sturdy 1/4-inch shell. Save the scooped-out potato for mash or soup later!
- Melt some unsalted butter and brush the inside of each potato shell generously. This will help them get that delicious golden crispiness we’re after.
- Spoon about 2 teaspoons of picante sauce into each shell, spreading it around to coat the bottom. This adds a delightful zesty kick.
- Next, sprinkle a hearty amount of shredded cheddar cheese into each potato, followed by bits of your cooked bacon or ham. Really pack it in there—no one likes a stingy potato skin.
- Fire up your grill to medium heat. Place the potato skins directly over the coals, and let them grill uncovered for 10 to 12 minutes. You’ll know they’re ready when the skins are crisp and the cheese is bubbly and golden.
- If you’re feeling fancy, sprinkle with diced tomato and green onions right before serving. Finish with a generous dollop of sour cream on top.
Cook’s Notes
Grilled potato skins are pretty forgiving, but here are a few things to keep in mind:
- If you’re making these ahead of time, follow all the steps up to grilling and then store them in the fridge. When you’re ready to eat, pop them on the grill straight from the fridge. Just add a couple of extra minutes to the grill time.
- Leftovers can be stored in an airtight container in the fridge for up to three days. Reheat them in a 350-degree oven or a toaster oven until they’re heated through and crispy again.
- Make sure your grill is properly preheated before you start cooking. This ensures the skins get crispy rather than just drying out.
Make It Your Own
- Swap the bacon for crispy tofu to make it vegetarian-friendly.
- Use Monterey Jack or pepper jack cheese for a different flavor profile.
- Try adding black beans or corn for a southwestern twist.
- If you’re not a fan of picante sauce, substitute it with a mild salsa or even BBQ sauce for a smoky vibe.
If you try this, I’d love to hear how it turns out—drop a comment or tag me on social media! There’s nothing more satisfying than seeing your spin on these tasty potato skins. Enjoy every crispy, cheesy bite!
Related update: Grilled Potato Skins
Related update: Blue Cheese Tartlets With Fig Jam and Walnuts

It was one of those wild Mondays where nothing seemed to go as planned—spilled coffee, missing socks, you name it. By the time dinner rolled around, I needed something comforting and quick. Enter my Cheddar Polenta with Bacon Wrapped Asparagus. This dish is like a warm hug in a bowl, yet impressive enough to make you feel like a kitchen wizard. It’s the perfect combo of creamy, cheesy polenta topped with crispy bacon and tender asparagus. Trust me, this is comfort food that doesn’t demand hours in the kitchen.
Jump to Recipe
What You’ll Need
If you’re like me, you probably have a lot of this stuff already hanging out in your kitchen. Here’s what you’ll need to pull together this weeknight savior:
- 6 spears of asparagus
- 2 slices of raw bacon
- 2 cups chicken broth
- 1 cup coarse corn grits
- 1 cup extra sharp cheddar cheese, shredded
- 1 bell pepper (optional, for extra crunch)
- Salt and pepper, to taste
How to Make Cheddar Polenta With Bacon Wrapped Asparagus
- Preheat your oven to 400°F (200°C). This is when your kitchen will start smelling promising!
- Take the asparagus spears and wrap them in bacon. I like to use two slices for the full crispy effect. Place these beauties on a small baking sheet.
- Spritz the asparagus bundle lightly with nonstick cooking spray. This helps the salt and pepper stick and adds a hint of flavor.
- Roast for 15-20 minutes. Keep an eye out: the bacon should be crispy and the asparagus fork-tender, with some golden edges peeking through.
- While the asparagus is roasting, bring your chicken broth to a boil in a small saucepan. The bubbling will be music to your ears.
- Once boiling, stir in the polenta. Lower the heat and let it cook slowly for about 5 minutes, stirring occasionally. You’ll know it’s ready when it has thickened and looks like a cozy blanket.
- Stir in the cheddar cheese and a dash of salt and pepper. The cheese should melt into the polenta, creating a creamy, golden mixture.
- To assemble, scoop the polenta into a dish and gently place the bacon wrapped asparagus on top. Serve warm and enjoy every bite!
Cook’s Notes
Alright, let’s get real for a second. Polenta can sometimes turn out lumpy if you rush it. Stir it slowly and give it the attention it deserves. This dish is best enjoyed fresh, but if you have leftovers, store the polenta and asparagus separately in airtight containers in the fridge for up to two days. Reheat the polenta with a splash of water or broth to bring it back to its creamy glory.
Make It Your Own
Feel free to get creative with this recipe! Here are a few ideas to switch things up:
- Swap the bacon for prosciutto if you’re feeling fancy or have it on hand.
- For a vegetarian twist, ditch the bacon and roast the asparagus with a sprinkle of smoked paprika and olive oil.
- Try using Parmesan instead of cheddar for a sharp, nutty flavor.
- Add some heat with a sprinkle of crushed red pepper flakes over the polenta just before serving.
If you give this recipe a try, I’d love to hear how it turns out—drop a comment or tag me on social media! Your kitchen stories make my day. Happy cooking!
Related update: Cheddar Polenta With Bacon Wrapped Asparagus
Related update: Amazing Braised Beef Short Ribs

It was one of those biting-cold Wisconsin evenings when the wind cut through my coat like a knife, and all my fingers could think about was curling around something warm. I stumbled into the kitchen, cheeks pink from the chill, and had that lightbulb moment: Wisconsin Beer Cheese Soup. It’s one of those recipes that feels like a cozy flannel blanket – indulgent, comforting, and just what you need when the weather’s not cooperating. It’s like a big, cheesy hug in a bowl, and the best part is that it comes together quickly with ingredients you probably already have lurking in your pantry or fridge. Plus, melting cheese into anything just seems to magically fix a bad day, don’t you think?
Jump to Recipe
What You’ll Need
Just a heads-up, this isn’t one of those shopping list monsters. You might already have a lot of these basics on hand, except for maybe the hero of the dish: a good Wisconsin beer.
- 2 tablespoons butter
- 1 medium onion, diced
- 2 carrots, peeled and diced
- 2 celery sticks, chopped
- 2 cloves garlic, minced
- 1/4 cup flour
- 1 cup Wisconsin beer
- 2 cups broth (chicken or vegetable)
- 1 cup half & half
- 2 cups shredded Wisconsin cheddar
- 1 tablespoon mustard
- 1 teaspoon worcestershire sauce
- 1/2 teaspoon black pepper
- 1/4 teaspoon red pepper flakes
- Salt to taste
How to Make Wisconsin Beer Cheese Soup
- Start by melting the butter over medium heat. Once it’s all sizzly and lovely, toss in the onion, carrots, celery, and garlic. Cook everything for about 3-4 minutes until the veggies are soft and the kitchen smells like you’re winning at dinner.
- Sprinkle the flour over your veggie mix and stir until it disappears into the buttery goodness, absorbing all those delicious flavors.
- Pour in the beer and broth, scrapping up any bits sticking to the bottom of the pot, and bring it to a gentle boil. You’ll see some bubbles start to form at the edges – that’s your cue!
- Lower the heat to a simmer and stir in the half & half and the shredded cheddar. Let the cheese melt completely, stirring occasionally. This is where the magic happens, so don’t rush it.
- Add in the mustard, worcestershire sauce, black pepper, and red pepper flakes. Give it a good stir.
- Time to grab your immersion blender and blend the soup until it’s smooth and creamy. No immersion blender? No worries! Carefully blend in batches using a regular blender, but only fill it a third full each time to prevent a hot liquid disaster.
- Taste and add salt as needed. Pour yourself a big bowl, sit back, and enjoy the creamy, cheesy glory.
Cook’s Notes
When it comes to soup, patience is key. Letting the cheese melt slowly into the broth ensures a velvety texture. If you rush this part, you might end up with a grainy soup, and nobody wants that. As for storage, this soup keeps well in the fridge for about 3 days. Just give it a good stir when you reheat it since the cheese and liquid might separate a bit. Unfortunately, this one’s not a great candidate for freezing; the texture changes too much after thawing. If you’re planning ahead, you can chop the veggies a day early and store them in the fridge to make your cooking super speedy.
Make It Your Own
- Swap the beer: If you’re not a beer person, a hard cider can add an interesting twist with a sweet undertone.
- Make it meatier: Stir in some cooked, crumbled bacon for added smokiness and texture.
- Vegetarian version: Use vegetable broth instead of chicken broth and skip the worcestershire sauce or use a veggie-friendly alternative.
- Spice it up: Add a finely chopped jalapeño with the veggies for an extra kick.
If you try this, I’d love to hear how it turns out — drop a comment or tag me! Cooking is all about sharing, after all. Can’t wait to see your delicious creations!
Related update: Wisconsin Beer Cheese Soup
Related update: Tomato and lentil soup

It was a typical Tuesday evening, and I found myself staring into the depths of my fridge, hoping for inspiration to magically appear. You know those days when you just want something cozy and satisfying without embarking on a full-blown culinary adventure? That’s when I stumbled across a lonely head of cauliflower. With a little bit of cheese and some pantry staples, I knew I could transform it into something special. My Cheesy Cauliflower recipe is the perfect blend of comfort and simplicity. It’s one of those dishes that feels indulgent but won’t have you spending hours in the kitchen. Curious yet? Trust me, one bite of this creamy, cheesy goodness and you’ll be hooked.
Jump to Recipe
What You’ll Need
This recipe is super forgiving, and chances are, you already have most of these ingredients hanging out in your kitchen:
- Cauliflower – a medium head, about 2 pounds
- 2 tablespoons unsalted butter
- 2 tablespoons all-purpose flour
- 1 teaspoon mustard powder
- A pinch of cayenne pepper
- 2 cups whole milk
- Cheese – 1 ½ cups shredded, plus 2 tablespoons for topping (cheddar works great!)
- Salt and black pepper to taste
How to Make Cheesy Cauliflower
- Preheat your oven to 400°F (200°C). This gives you the perfect time to prep everything else.
- Trim the cauliflower florets from the stalk and discard the stalk. Aim to cut the florets into 1-2 inch pieces so they cook evenly.
- Steam the cauliflower for about 10 minutes. You want them firm but tender — think al dente if cauliflower could be pasta.
- Spread the steamed florets out onto a paper towel. This ensures they’re not waterlogged when the cheese sauce coats them.
- In a medium saucepan, melt the butter over medium-high heat. Add the flour and whisk to combine, cooking for 1-2 minutes to get rid of that raw flour taste.
- Stir in the mustard powder, a pinch of cayenne (or more if you like a kick), and black pepper. Feel that aroma dancing around?
- Gradually drizzle in the milk, whisking continuously to keep things smooth and creamy. Bring this mixture to a simmer while stirring; it should thicken beautifully.
- Once thickened, add the cheese one handful at a time. Let each addition melt fully before the next. Taste and adjust with salt and pepper if needed.
- Spread the cauliflower into a 2-quart baking dish or an iron skillet, then spoon the rich cheese sauce over the top. Oh, yes!
- Sprinkle the reserve 2 tablespoons of cheese over everything, then bake for about 30 minutes or until it’s browned and bubbly.
- Garnish with fresh herbs if you fancy, and enjoy every cheesy, comforting bite!
Cook’s Notes
Don’t rush the sauce; taking your time to whisk it ensures a creamy consistency without lumps. If you’re making this ahead of time, you can assemble everything and then pop it in the fridge. Just extend the baking time slightly if you’re starting from cold. Leftovers (if there are any!) keep well in the fridge for up to three days. Reheat them gently in the oven to keep the texture lovely.
Make It Your Own
- Swap out the cauliflower for broccoli or do a mix of both for a bit of variety.
- If you’re in the mood for something heartier, add cooked chicken pieces before pouring over the cheese sauce.
- Want more kick? Replace the cayenne with smoked paprika for a smoky twist.
- Try sprinkling in some crisped bacon bits before baking for a savory boost.
If you try this, I’d love to hear how it turns out — drop a comment or tag me! This Cheesy Cauliflower is a little slice of happiness, and I hope it brings some warmth to your table. Enjoy!
Related update: Cheesy Cauliflower
It was one of those busy weeknights when I craved something comforting but didn’t have the time or energy for an elaborate meal. As I reached for a box of lasagna noodles, I had a lightbulb moment: Lasagna Roll Ups! They’re as indulgent and satisfying as regular lasagna but way more fun to assemble and serve. These little guys are perfect for when you want to impress with minimal fuss—plus, they make portion control a breeze. Trust me, once you try this recipe, you’ll never look at lasagna quite the same way again.
Jump to Recipe
What You’ll Need
Before you panic about a long list of ingredients, let me assure you: you probably have most of this stuff lurking in your kitchen. This dish is all about basics with a twist, relying on a few stars to shine.
- Lean ground beef
- Italian sausage
- Extra virgin olive oil
- Onion
- Garlic
- Italian seasoning
- Dried basil
- Canned tomato sauce
- Fire roasted diced canned tomatoes
- Canned tomato paste
- Water
- Black ground pepper
- Fresh parsley
- Ricotta cheese
- Egg
- Salt
- Parmesan Reggiano
- Mozzarella cheese
- Lasagna noodles
How to Make the World’s Greatest Lasagna Roll Ups
- In a large saucepan over medium heat, start browning your ground beef and Italian sausage. The aroma will make your taste buds dance with anticipation.
- In a separate pan, heat 1 tablespoon of olive oil on medium heat. Add in the onion, garlic, Italian seasoning, and basil. Let them cook for about 6-8 minutes until the onion is translucent and your kitchen smells like an Italian bistro.
- Combine the onion and garlic mixture with the meat. Stir in the fire roasted diced tomatoes, canned tomato sauce, tomato paste, water, black pepper, and 2 tablespoons of fresh parsley. Allow this symphony of flavors to simmer uncovered for 1 hour, letting it thicken and become deliciously fragrant.
- Meanwhile, bring a large pot of water to boil and cook the lasagna noodles for 8-10 minutes. Drain and rinse them with cold water to stop the cooking process.
- Preheat your oven to 375°F (190°C). In a small mixing bowl, mix together the remaining parsley, ricotta cheese, egg, and 1/2 teaspoon salt until everything is beautifully combined.
- Pour a thin layer of meat sauce into the bottom of a 9 x 13 glass baking dish—this is your tasty foundation.
- To assemble the roll ups, lay a noodle flat and spread with the cheese mixture. Sprinkle a bit of Parmesan Reggiano over the top, then roll it up snugly like a delicious little sleeping bag.
- Arrange all your roll ups in the baking dish, and generously cover them with more of the meat sauce. Top each roll with a slice of mozzarella cheese, and then cover the dish with foil.
- Bake in the oven for 20 minutes. Remove the foil and bake for an additional 10 minutes, letting the cheese turn golden and bubbly.
- Take them out and allow them to cool for at least 10 minutes before serving. This will help them firm up and makes serving a breeze.
Cook’s Notes
A few things to keep in mind: Don’t rush the sauce. Letting it simmer gives the flavors time to deepen. If you’re in a hurry, you can prep the sauce the day before—it only gets better with time! Lasagna Roll Ups also freeze beautifully. Just assemble them without baking, wrap tightly, and freeze. To cook, thaw in the fridge overnight and bake as directed.
Make It Your Own
If you feel like experimenting, here are a few ways to mix things up:
- Swap the ground beef for ground turkey or chicken for a lighter version.
- Make it vegetarian by using mushrooms and zucchini instead of meat.
- Add a kick by stirring some red pepper flakes into the cheese mixture.
- Use whole wheat or gluten-free noodles for a different texture or dietary needs.
If you try this, I’d love to hear how it turns out—drop a comment or tag me! Whether it’s a weeknight dinner or a casual get-together, these roll ups are sure to win hearts and palates alike. Enjoy!
Related update: How to make the World’s Greatest Lasagna Roll Ups
Related update: Stuffed Pork Tenderloin with Marsala-Port Sauce

Last Tuesday, in the middle of a chaotic week, I found myself staring at the fridge, desperate for something that felt like a hug in meal form. With a 7 PM deadline looming and my brain fried from Zoom meetings, I needed comfort food that wouldn’t take forever. Enter: Cheesy Pasta in a Pot. This dish is my go-to for those nights when I crave something hearty and fuss-free. It’s got layers of rich flavors wrapped in gooey cheese, and the best part is that I can make it with pantry staples I already have on hand. It’s the kind of meal that turns a hectic evening into a cozy, personal retreat. Trust me, one bite and you’ll feel like you’re wrapped in a warm blanket.
Jump to Recipe
What You’ll Need
You might find that you already have most of these ingredients waiting for you. It’s a pantry-friendly recipe, with the kind of ingredients that beg to be transformed into something special.
- 1 pound lean ground beef
- 1 medium onion, chopped
- 2 cloves garlic, minced
- 1 jar (24 ounces) spaghetti sauce
- 1 can (14.5 ounces) stewed tomatoes, undrained
- 1 can (4 ounces) sliced mushrooms, undrained
- 12 ounces shell pasta
- 4 slices provolone cheese
- 2 cups shredded mozzarella cheese
How to Make Cheesy Pasta in a Pot
- Preheat your oven to 350°F (175°C). This sets the stage for the magic to happen.
- In a large pan, heat a little oil over medium-high heat and add the ground beef. Cook, stirring often, until the meat is browned and crumbly. The kitchen should start to smell amazing as the beef sizzles away.
- Drain any excess fat from the pan, because nobody likes greasy pasta.
- Add the chopped onions and minced garlic to the pan. Stir them in and let everything cook until the onions are soft and fragrant.
- Pour in the jar of spaghetti sauce, stewed tomatoes, and the undrained mushrooms. Stir well to combine all these saucy elements. Let this simmer for about 20 minutes, stirring occasionally, until the onions are tender and everything is melded together beautifully.
- Meanwhile, cook the shell pasta according to the package directions. Once cooked, drain and rinse the pasta with cold water to stop the cooking process.
- In a deep casserole dish, layer half of the pasta. Top that with half of the meat sauce mixture.
- Cover this first layer with slices of provolone cheese. It’s like laying a cheesy blanket over the pasta.
- Repeat with the remaining pasta and meat sauce, finishing with an ample topping of mozzarella cheese.
- Cover the casserole with foil and bake in your preheated oven for 35-40 minutes. The anticipation should be building as the kitchen fills with mouth-watering aromas.
- Remove the cover and continue baking until the mozzarella is melted and just begins to brown, about 5 more minutes.
- Serve hot, and enjoy the cheesy, comforting goodness.
Cook’s Notes
Here are a few things I’ve learned along the way. First, don’t skimp on letting the sauce simmer — the flavors deepen beautifully during this time. If you’re prepping this dish ahead of time, assemble everything, cover it, and pop it into the fridge. When you’re ready to bake, just add a few extra minutes to the cooking time. Leftovers, if there are any, reheat nicely in the oven; just cover with foil to prevent the cheese from getting too brown.
Make It Your Own
Feel free to tweak this recipe to suit your taste buds or dietary needs:
- Swap the ground beef for ground turkey or chicken for a lighter version.
- Use whole wheat or gluten-free pasta if you’re looking for a healthier or allergy-friendly option.
- Add a handful of fresh spinach or kale to the sauce for an extra boost of greens.
- For a vegetarian version, replace the meat with a can of drained and rinsed chickpeas or black beans.
If you try this Cheesy Pasta in a Pot, I would love to hear how it turns out for you! Drop a comment below or tag me on social media with your cheesy creations. Enjoy every comforting bite!
Related update: Cheesy Pasta in a Pot
Related update: Brown Rice Mushroom Pilaf
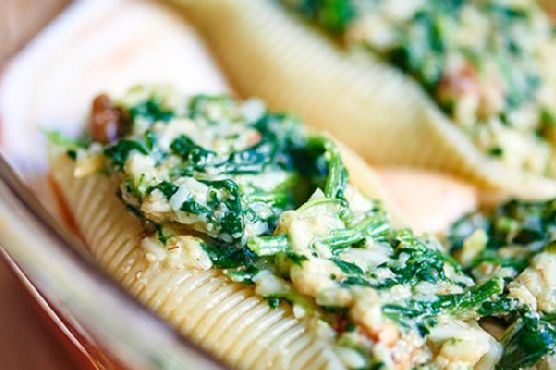
Picture this: it’s a chilly Tuesday evening, and you’re staring into the depths of your fridge, hoping for dinner inspiration to leap out at you. That’s when you remember those jumbo pasta shells you bought on impulse, sitting in the pantry like a promise of comfort. Enter the magic of Cheesy Spinach Stuffed Shells — a dish that ticks all the boxes when you want something warm, cheesy, and convincingly fancy without the fuss. This recipe is the kind of thing you can whip up with stuff you’ve probably already got lying around. It’s got the creamy, melty goodness of cheese, the nutritious punch of spinach, and the satisfying bite of perfectly cooked pasta — all drenched in a dreamy layer of sauce. Whether you’re feeding the family or impressing a date, these stuffed shells are your ticket to a happy, full belly.
Jump to Recipe
What You’ll Need
The beauty of this recipe is in its simplicity — we’re talking ingredients you likely have on hand, with a few star players you can grab on your next grocery run. Here’s what you’ll need:
- Jumbo shells
- Cooked frozen spinach
- Wheat germ
- Shredded parmesan cheese
- Chopped pecans
- Shredded Mexican cheese blend
- Diced green onions
- Salt and dried basil
- Eggs
- Water
- Alfredo sauce
- Spaghetti sauce
How to Make Cheesy Spinach Stuffed Shells
Ready for the good stuff? Let’s dive in!
- Start by bringing a large pot of salted water to a boil. Add in the jumbo shells and cook them for about 9 minutes — they should be al dente, as they’ll finish cooking in the oven. Drain them and let them sit face down on a paper towel to get rid of excess water.
- While those shells are having their moment, pop your frozen spinach in the microwave, following the box instructions, but skip adding water. Once cooked, squeeze out as much water as you can.
- In a large mixing bowl, combine the cooked spinach with wheat germ, parmesan cheese, Mexican cheese blend, chopped pecans, and finely diced green onions. Toss in some salt, a dash of pepper, and about a teaspoon of dried basil — feel free to adjust this to taste, and if you’re adventurous, a pinch of nutmeg could be interesting!
- Crack in two eggs and add a splash of water to the mixture. Stir until everything is well combined — the eggs should be incorporated smoothly into the mix.
- Stuff each shell generously with the spinach mixture. You’ll have enough filling for about 16 to 20 shells.
- Preheat your oven to 350 degrees. Grab an 8×8 or a 9×11 inch baking dish and give it a good spray with cooking spray.
- Spread a thin layer of Alfredo sauce on the bottom of the dish, followed by a layer of spaghetti sauce. This double-sauce base is what dreams are made of!
- Arrange the stuffed shells over the sauce base, then drape them with the remaining sauce. Make sure each shell gets some sauce love!
- Bake in the preheated oven for 30-35 minutes, or until the sauces are bubbly and make your kitchen smell like a cozy Italian bistro.
Cook’s Notes
Here’s the scoop: this dish is forgiving, so don’t stress if your shells aren’t perfectly stuffed or your sauce layers are a bit uneven. If you’re making it ahead, you can assemble everything, cover, and stash it in the fridge for a day or two. When you’re ready, just pop it in the oven and extend the baking time by about 10-15 minutes. Leftovers? Lucky you! They reheat beautifully in the microwave or oven. Just sprinkle a splash of water if you’re microwaving to keep things nice and saucy.
Make It Your Own
Here’s where you can get creative:
- Go nut-free: If pecans aren’t your thing, swap them out for sunflower seeds for that crunch.
- Protein punch: Mix in some cooked chicken sausage into the filling for a meatier bite.
- Gluten-free option: Use gluten-free pasta shells and ensure your sauces are gluten-free too.
- Spicier spin: Add a pinch of chili flakes into the filling or use a spicy Mexican cheese blend.
If you try this, I’d love to hear how it turns out — drop a comment or tag me! Cooking should be fun and delicious, so play with it and make it yours. Happy cooking, friend!
Related update: Cheesy Spinach Stuffed Shells
Related update: Mango Fried Rice

Picture this: it’s a drizzly Tuesday evening, and you’ve just returned from a long day that felt like a relentless blur of meetings and errands. You’re craving something comforting and hearty, yet adventurous enough to pull you out of the weekday monotony. Enter Khachapuri — the pillowy, cheese-filled bread boat that hails from Georgia (the country, not the state). I’ve always found Khachapuri to be the perfect marriage of comfort and culinary curiosity, with its gooey center and golden, flaky crust. Making it is like giving yourself a cozy hug in bread form, and it’s surprisingly doable even when you’re running on fumes. Let’s dive into creating this cheesy delight that’s sure to warm your soul.
Jump to Recipe
What You’ll Need
What’s fantastic about this recipe is that you might already have most of these ingredients lounging in your pantry or fridge. Let’s get you prepped:
- Dry yeast
- Sugar
- Water
- Milk
- Butter
- Salt
- White Swiss cheese – 8 ounces
- Cheddar
- 2 eggs
- Muenster cheese
- Parsley
- White pepper
How to Make Khachapuri
- Dissolve the yeast and 1 teaspoon of sugar in 1/4 cup of warm water. Let it stand for 5-10 minutes until it becomes foamy and alive with little yeast bubbles.
- In a mixing bowl, combine the proofed yeast with milk, 2 tablespoons of sugar, butter, and salt. Gradually mix in enough flour to form a soft, slightly tacky dough.
- Transfer the dough to a greased bowl, turning it so it’s coated on all sides. Cover with a damp cloth and let it rise in a warm spot until it doubles in size — about an hour.
- While your dough is having its beauty rest, shred the cheeses and mix them with the eggs, parsley, and a pinch of white pepper. Pop this filling in the fridge to chill and mingle.
- Grease a 9-inch springform pan generously. Punch down the risen dough, shape it into a ball, and roll it out to a 20-inch circle.
- Gently fold the dough circle in half to lift it, then unfold it into the pan, allowing the edges to drape over. Pile the cheese filling into the dough-lined pan.
- Bring the draped edges of the dough up and over the filling, creating 8-12 evenly spaced pleats around the perimeter. Twist and pinch the ends together in the center to form a rustic knob.
- Cover the loaf with a buttered square of waxed paper and let it rise again until doubled in bulk.
- Preheat your oven to 375°F. Brush the top with a glaze made of 1 egg white mixed with 1 tablespoon of water, or simply use margarine.
- Bake for 40-50 minutes until the Khachapuri is deeply golden brown. Remove from the pan and place directly on the oven rack for an additional 5 minutes to crisp the bottom crust.
- Let it cool on a rack for about 45 minutes before slicing into wedges and basking in all the cheesy goodness.
Cook’s Notes
Here’s where the magic and little nuances come into play:
- Proofing patience: If your yeast doesn’t foam, give it another try with fresh yeast and slightly warmer water. It’s worth the wait to get that dough rising right!
- Cheese choices: Feel free to tailor the cheese mix to your liking. I find the combination of Swiss, Cheddar, and Muenster to be a dreamy balance between sharp and creamy.
- Leftovers: Khachapuri does great as leftovers. Wrap it tightly in foil and reheat it in the oven at 350°F for about 10-15 minutes to refresh that crispy crust.
- Make-ahead: You can prepare the dough and filling up to a day in advance — just keep them chilled and separate until you’re ready to assemble and bake.
Make It Your Own
- Herb It Up: Add fresh dill or cilantro to the filling for an herbal twist.
- Meaty Marvel: Toss in crispy bacon bits or diced ham for a protein-packed version.
- Spice Things Up: Mix in a pinch of red pepper flakes into the cheese for a touch of heat.
- Go Green: Layer in some sautéed spinach or kale for a veggie boost.
If you try this Khachapuri recipe, I’d love to hear all about your cheesy adventures! Drop me a comment or tag me on social media with your delicious creations. Let’s connect over this cozy, cheesy masterpiece!
Related update: Khachapuri
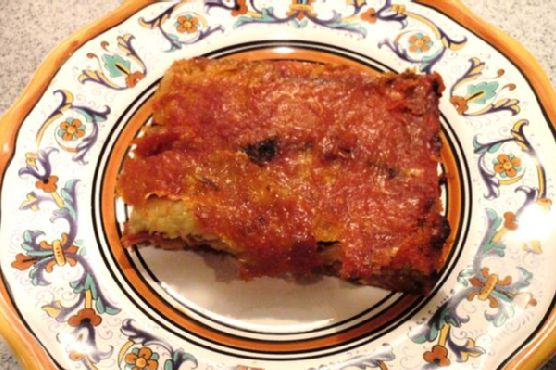
Last Tuesday, I found myself staring at a lone eggplant sitting forlornly in my fridge. It had been a long day, and I needed something comforting and satisfying. Eggplant Parmesan popped into my head, and I couldn’t shake the craving. There’s something about the gooey cheese, the tangy tomato sauce, and the crispy eggplant layers that makes everything right in the world. Plus, it’s one of those dishes that tastes like it took hours, but really it’s pretty straightforward. I promise, even if you’re working with a fridge that’s almost as empty as mine was, you can make this happen.
Jump to Recipe
What You’ll Need
A lot of these ingredients are pantry staples or things you probably have around. This recipe is all about turning humble ingredients into something magic.
- Eggplant – the star of the show, obviously.
- Eggs – for dipping and making a perfect crispy crust.
- Dried bread crumbs – because who’s got the time to make fresh ones?
- Olive oil – my go-to for sautéing.
- Parmesan cheese – gotta get that sharp, nutty flavor.
- Mozzarella cheese – for maximum cheese pull satisfaction.
- Canned tomato sauce – keeping it easy and simple.
- Garlic – because duh, it’s garlic.
- Yellow onions – they bring that sweet, savory base note.
- Oregano – dried is fine, fresh if you’ve got it.
How to Make Eggplant Parmesan
- Preheat your oven to 350 degrees. Trust me, this is the perfect temp.
- Slice your eggplant into 1/4 inch thick rounds. Sprinkle with salt and let them sit for 30 minutes. It’s all about drawing out that extra moisture.
- In a saucepan, sauté the onions and garlic in a tablespoon of oil until they’re soft and fragrant. Then add in your canned tomato sauce and a good sprinkle of oregano. Simmer until it thickens slightly. The smell will have you dreaming of Italy.
- Set up a dipping station with beaten eggs in one bowl and bread crumbs in another. Dip each eggplant slice in the eggs, then coat them in crumbs. You want them perfectly covered.
- Heat some olive oil in a pan over medium heat. Sauté the eggplant slices until they’re golden brown on both sides. The kitchen will smell like heaven.
- In a 2-quart casserole dish, start with a layer of eggplant slices. Sprinkle with Parmesan, some more oregano, and a bit of mozzarella. Cover with tomato sauce. Repeat layers until you’ve used everything up, finishing with a good layer of mozzarella. It’s a cheesy masterpiece.
- Bake in your preheated oven until the sauce bubbles and the cheese is melted and browned, about 30 minutes. You’ll know it’s ready when the edges are sizzling with cheesy goodness.
Cook’s Notes
Keep an eye on your eggplant slices while sautéing. Too much oil, and they’ll be soggy instead of crispy. If you’re making this ahead, you can assemble the entire dish, cover it, and pop it in the fridge. When you’re ready to bake, just add a few extra minutes to the cooking time. Leftovers (if you have any!) keep well in the fridge for a couple of days. Just reheat in the oven to keep that crispiness.
Make It Your Own
- Swap the mozzarella for smoked provolone for a deeper flavor.
- Use gluten-free bread crumbs if you’re skipping gluten.
- Try adding a layer of spinach or mushrooms between the eggplant for extra veggies.
- Fancy a twist? Drizzle with a bit of balsamic glaze just before serving.
If you try this, I’d love to hear how it turns out — drop a comment or tag me! There’s nothing quite like sharing good food stories. Happy cooking!
Related update: Eggplant Parmesan
Related update: Classic Boeuf Bourguignon