
Picture this: It’s one of those afternoons when the craving for something sweet is impossible to ignore. Not just any sweet, but a slice of cake smothered in creamy, luscious frosting. I was halfway through baking a batch of cupcakes when disaster struck—no frosting in sight! With minutes to spare, I whipped out this trusty Old Fashioned Vanilla Buttercream Frosting recipe, and voilà, my cupcakes were saved. It’s quick and easy, with ingredients you probably have on hand, and it never fails to impress with its smooth, rich texture. Plus, there’s something about homemade frosting that just feels like a hug in dessert form.
Jump to Recipe
What You’ll Need
I love this recipe because it uses simple ingredients that work magic together. Chances are you already have most of this sitting in your pantry or fridge:
- Solid vegetable shortening
- Butter
- Vanilla extract
- Confectioners sugar
- Milk
How to Make Old Fashioned Vanilla Buttercream Frosting
- In a large mixing bowl, cream the butter and shortening together using an electric mixer. You’re aiming for a smooth, unified blend that’s a pale yellow in color.
- Add the vanilla extract, and continue mixing. The aroma will instantly start to fill your kitchen.
- Gradually sift in the confectioners sugar, adding it one cup at a time. Beat on medium speed, and scrape down the sides and bottom of the bowl often. This ensures everything is well incorporated.
- Once all the sugar is mixed in, the icing will seem a bit dry—don’t worry, this is normal!
- Add the milk to the mixture. Beat on medium speed for about 3 minutes. You’re looking for a light, fluffy texture that’s easy to spread.
- Keep the icing covered with a damp cloth until you’re ready to use it. This prevents it from drying out.
Cook’s Notes
A little tip I’ve picked up: Keeping the mixing bowl in the fridge when you’re not using it helps maintain the frosting’s consistency, especially if your kitchen tends to be on the warmer side. If you’re making this ahead of time, store it in an airtight container in the fridge for up to a week. When you’re ready to use it, just give it a quick re-whip in your mixer to bring back its creamy texture. Also, be generous with that vanilla—for that classic flavor, it’s key!
Make It Your Own
Here are a few fun variations to try if you’re feeling adventurous:
- Swap out the vanilla for almond extract for a nutty twist.
- Add a few tablespoons of cocoa powder to create a chocolate buttercream.
- Substitute the milk with heavy cream for a richer, thicker frosting.
- Mix in some food coloring to match the theme of your dessert or party.
If you try this, I’d love to hear how it turns out—drop a comment or tag me! There’s nothing more rewarding than seeing your creations come to life. Enjoy every sweet, frosted bite!
Related update: Old Fashioned Vanilla Buttercream Frosting
Related update: Apothic Granita and Vanilla Panna Cotta
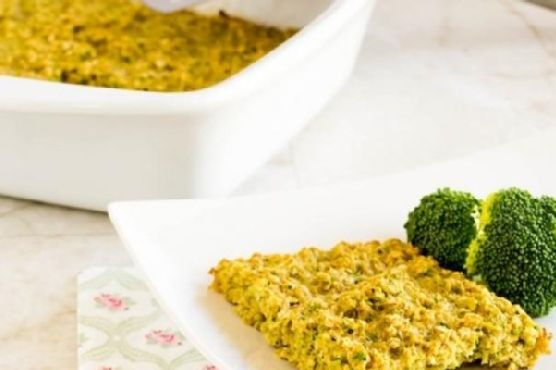
It was one of those mornings when I wanted something warm and filling but couldn’t face another bowl of cereal. I peeked into the fridge and found a half-used bag of broccoli and a carton of eggs. Inspiration struck, and soon my kitchen was filled with the comforting smell of baking oats and the savory tang of broccoli. This Broccoli Oatmeal Breakfast Casserole is exactly what you need when you want something nutritious and satisfying without spending your entire morning in the kitchen. Plus, it’s surprisingly easy to make, so you can enjoy a leisurely breakfast even on a busy day.
Jump to Recipe
What You’ll Need
This recipe is beautifully simple and calls for ingredients you likely have sitting in your pantry. You know I love a recipe where a quick rummage through the cupboard delivers everything you need.
- Broccoli florets
- Dry oats
- Eggs
- Low-fat milk
- Olive oil
- Baking powder
- Salt
- Cayenne pepper
How to Make Broccoli Oatmeal Breakfast Casserole
- Start by preheating your oven to 350°F (175°C). While it warms up, grab your trusty 8-inch square baking dish and give it a light misting of cooking spray to prevent sticking.
- Chop the broccoli florets roughly and blitz them in a food processor until they resemble coarse crumbs. The earthy smell of fresh broccoli will fill the air.
- In a large mixing bowl, combine the ground broccoli, dry oats, a pinch of baking powder, a sprinkle of salt, and a dash of cayenne pepper. Give it a good mix — this is the foundation of your casserole.
- In a separate bowl, whisk together the eggs, low-fat milk, and a generous tablespoon of olive oil. The mixture should be smooth and slightly frothy.
- Pour the wet ingredients into the bowl of dry ingredients. Stir everything together until the oats are fully coated and the broccoli is evenly distributed.
- Spoon the mixture into your prepared baking dish, smoothing the top with a spatula. Slide it into the oven and bake for 25-30 minutes, or until the edges are golden and a fork inserted into the center comes out clean.
- Let it cool slightly before cutting into your desired size and serving it warm. The casserole will be firm yet tender, with a delicious crust formed by the oats.
Cook’s Notes
This casserole is forgiving, so don’t stress if you’re missing an ingredient. If you’re prepping in advance, you can assemble the night before and bake it fresh in the morning—just cover and store in the fridge. Leftovers? Refrigerate them, and they’ll keep for up to three days. Reheat portions in the microwave or the oven. Watch out for over-baking; once it’s golden and a fork comes out clean, it’s ready. The texture should be moist but not soggy.
Make It Your Own
- Cheese Lover’s Twist: Add a handful of grated cheddar or parmesan to the dry ingredients for a cheesy kick.
- Protein Boost: Toss in some cooked, crumbled sausage or crispy bacon bits to the batter for extra protein.
- Veggie Variety: Swap half the broccoli for finely chopped spinach or kale for an extra green boost.
- Spice It Up: Substitute cayenne pepper with smoked paprika or add a pinch of chili flakes for a different heat profile.
If you try this Broccoli Oatmeal Breakfast Casserole, I’d love to hear how it turns out for you. Drop a comment below or tag me in your breakfast creations! Here’s to starting the day with something nutritious and delicious. 🥦✨
Related update: Broccoli Oatmeal Breakfast Casserole
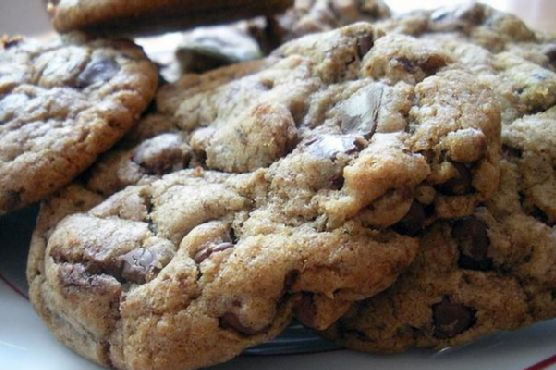
It was one of those chaotic Tuesday afternoons when everything seemed to be happening all at once. My inbox was overflowing, the laundry was threatening to become a second couch, and the dog was doing her best to convince me that she hadn’t been fed in weeks with those soulful eyes. As I rummaged through my pantry, I stumbled upon a forgotten stash of chocolate chips and suddenly, the only logical thing to do was to bake. Enter: Neiman Marcus Oatmeal Chocolate Chip Cookies. This recipe is that perfect balance between a comforting classic and a little twist that makes it feel special. It’s the kind of cookie that makes a regular Tuesday feel like a mini celebration. And the best part? These cookies are incredibly easy to whip up, even when life feels a bit like a juggling act.
Jump to Recipe
What You’ll Need
Trust me, chances are you already have most of these hanging out in your kitchen, just waiting to become something amazing.
- 1 cup unsalted butter, softened
- 1 cup granulated sugar
- 1 cup brown sugar, packed
- 2 large eggs
- 1 teaspoon vanilla extract
- 2 cups all-purpose flour
- 2 ½ cups blended oatmeal (measure before blending)
- ½ teaspoon salt
- 1 teaspoon baking powder
- 1 teaspoon baking soda
- 12 ounces chocolate chips
- 1 4-ounce chocolate bar, grated
- 1 ½ cups chopped walnuts
How to Make Neiman Marcus Oatmeal Chocolate Chip Cookies
- Preheat your oven to 375 degrees F. The anticipation of warmth is part of the magic.
- In a large bowl, cream together the butter, granulated sugar, and brown sugar until the mixture is light and fluffy. You’re aiming for a dreamy, creamy consistency here.
- Add in the eggs, one at a time, and beat until just incorporated. Don’t forget the vanilla — it’s the unsung hero that ties everything together.
- Gradually mix in the flour, blended oatmeal, salt, baking powder, and baking soda. The dough will start to smell like a promise of good things to come.
- Fold in the chocolate chips, grated chocolate bar, and walnuts. You’ll want to use a spatula to make sure everything is evenly distributed and each scoop is a treasure trove of goodies.
- Roll the dough into balls and place them about two inches apart on a cookie sheet. This gives them room to spread and become their best cookie selves.
- Bake for about 10 minutes. Keep an eye out for those edges to turn golden and the aroma to fill your kitchen. That’s when you know they’re ready.
Cook’s Notes
Let’s be real — these cookies are hard to mess up. But here are a few thoughts to keep in mind. If your butter isn’t soft enough, you can microwave it for a few seconds, but watch closely — nobody wants half-melted butter. When blending your oatmeal, aim for a texture that’s slightly coarser than flour; it adds a delightful chewiness to the cookies. These cookies are at their most divine fresh out of the oven, but they’ll keep well in an airtight container for up to a week, if they last that long. You can even freeze the dough balls to bake later. Just add a couple of minutes to the bake time.
Make It Your Own
- Swap the walnuts for pecans or almonds if that’s your jam. Each nut brings its own character to the party.
- If you’re not a fan of oats, try substituting with crushed cornflakes for a different kind of crunchy texture.
- Go wild and use white chocolate chips instead of the regular ones if you’re feeling fancy.
- Add a teaspoon of cinnamon or espresso powder for a little extra depth in flavor. It’s like giving your cookies a secret superpower.
If you try this, I’d love to hear how it turns out — drop a comment or tag me! Happy baking, and may your Tuesday be as sweet as these cookies.
Related update: Neiman Marcus Oatmeal Chocolate Chip Cookies
Related update: Fall Fruit Compote

It was one of those sticky summer afternoons when the air conditioner just couldn’t keep up, and I found myself craving something cool and refreshing. I’d been eyeing the basil plants on my kitchen windowsill, their leaves lush and inviting, and it hit me — basil coconut ice cream. It’s a little unusual, sure, but that’s part of its charm. This recipe is perfect when you’re in the mood for something a bit different yet incredibly easy to whip up. If you’re ready for a creamy, herby delight that tastes like a tropical breeze, you’re in the right place.
Jump to Recipe
What You’ll Need
The best part? You probably already have most of these ingredients in your kitchen. Just a few stars of the show to gather up, and you’re all set for a culinary adventure.
- Fresh basil leaves
- Canned full-fat coconut milk
- Honey
- Half & half
- Salt
How to Make Basil Coconut Ice Cream
- Start by heating the coconut milk and half & half in a saucepan over medium-high heat until it’s hot and just beginning to bubble gently. You’ll want to catch it right before a full boil.
- Add in the honey and a pinch of salt, stirring until they dissolve completely, giving the mixture a lovely sweet-salty balance.
- Drop in the fresh basil leaves and stir them through until they wilt down, infusing the liquid with their aromatic goodness. Remove the saucepan from heat.
- Pour the mixture into a blender, and blend until it’s silky smooth and no chunks of basil remain. If your blender leaves bits, strain the mixture through a fine sieve.
- Let the basil-infused cream cool for about 20 minutes, allowing the flavors to deepen.
- Transfer the mixture to a large container, cover, and chill it in the fridge for a few hours until completely cool.
- If you have an ice cream maker, follow your machine’s instructions to churn the mixture. If not, pour it into a freezer-safe container, and stir it every hour for about 8-10 hours to achieve the best texture possible.
Cook’s Notes
Making ice cream at home is as much about patience as it is about flavor. If you can, use fresh basil for the most vibrant taste. You can make the base a day ahead and chill it overnight, which can deepen the flavors even more. When it comes to leftovers, freeze them in a tightly sealed container. Just remember, the ice cream will harden significantly, so let it sit out for 10 minutes before scooping.
- If you don’t have an ice cream maker, don’t fret! While the texture won’t be as smooth, frequent stirring during the freezing phase will help prevent too many ice crystals from forming.
Make It Your Own
- Swap out the basil for mint leaves if you’re craving a more classic flavor combo.
- For a richer taste, replace half of the half & half with heavy cream.
- Substitute honey with maple syrup for a deeper, earthier sweetness.
- If you’re feeling adventurous, toss in a handful of dark chocolate chips during the churning process for a hint of bitterness against the sweetness.
If you try this, I’d love to hear how it turns out — drop a comment or tag me! Whether you’re enjoying it in the heat of summer or dreaming of warmer days, this basil coconut ice cream is sure to be a hit. Enjoy every refreshing scoop!
Related update: Basil Coconut Ice Cream
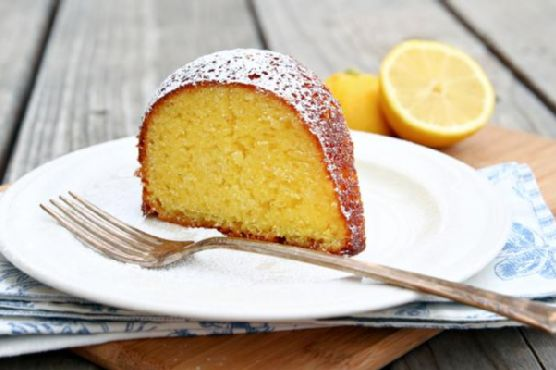
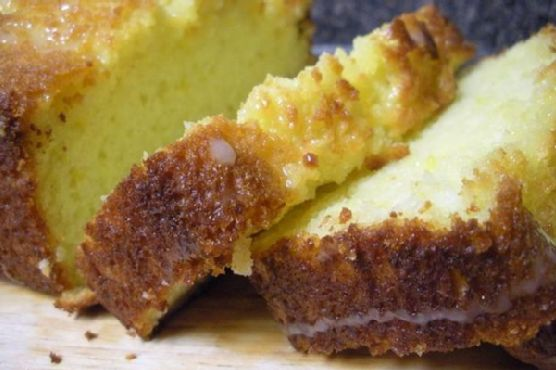
Picture this: it’s a Tuesday evening, and the week is already feeling like one long, chaotic whirlwind. I’m staring at the contents of my pantry, trying desperately to remember that elusive thing called “meal planning.” But instead of a dinner brainstorm, my mind wanders to something sweet and zesty—something that feels like sunshine on a plate. That’s when I remember the Lemonade Bundt Cake, a marvel of citrusy goodness and simplicity. This cake is like a mood booster in dessert form—tangy, moist, and delightfully easy to whip up with a handful of pantry staples. Whether you need a midweek pick-me-up or a show-stealing dessert for your next get-together, this cake is your answer.
Jump to Recipe
What You’ll Need
This recipe is delightfully straightforward, and chances are you already have most of these ingredients in your kitchen. Here’s what you’ll need:
- Lemon cake mix
- Lemon pudding mix
- 3 eggs
- Sour cream
- Vegetable oil
- Water
- Frozen lemonade concentrate
- Powdered sugar
How to Make Lemonade Bundt Cake
- First up, preheat your oven to 350 degrees. Take a moment to prepare your 10-inch bundt pan by greasing and flouring it. Trust me, this little step saves the cake from dreaded sticking disasters later on.
- Next, grab a large mixing bowl and combine the lemon cake mix, lemon pudding mix, eggs, sour cream, vegetable oil, and water. Mix everything together until you have a smooth, luscious batter that smells like pure lemony magic.
- Pour this gorgeous batter into your prepared bundt pan, smoothing the top with a spatula. Pop it into the oven and let it bake for 50-60 minutes. You’ll know it’s done when a toothpick inserted in the center comes out clean and the cake is a lovely golden hue.
- Once baked, let the cake cool in the pan for about 10-15 minutes. During this time, your kitchen will fill with a tantalizing lemony aroma that’s hard to resist.
- While the cake cools, make the glaze by combining the frozen lemonade concentrate with 1 cup of powdered sugar. Stir in more powdered sugar until the glaze reaches your desired consistency—thick enough to coat but still drizzle-friendly.
- Carefully turn your cake out onto a wire rack. Spoon the glaze generously over the top, allowing it to drip down the sides like a candied waterfall. For an added touch, dust the cake with more powdered sugar if you’re feeling fancy.
Cook’s Notes
This cake is as forgiving as it is delicious. You can make it a day ahead, and it will still taste fresh and fabulous. Just cover it tightly and store it at room temperature. If you’re in a rush, speed up the cooling process by placing the cake in the fridge for a few minutes before glazing. One common mistake is overmixing the batter, which can make the cake dense. Mix just until everything is combined, and you’ll be golden. Leftovers (if there are any!) can be kept in an airtight container for up to three days.
Make It Your Own
Here are a few fun ways to switch things up with this recipe:
- Replace the lemon cake mix with a white or vanilla cake mix for a subtler lemon flavor.
- Swap the lemon pudding mix for vanilla pudding mix if you prefer a less tangy cake.
- Add a handful of poppy seeds to the batter for a delightful crunch and a hint of nuttiness.
- For a berry twist, fold in fresh raspberries or blueberries before pouring the batter into the pan.
If you try this, I’d love to hear how it turns out — drop a comment or tag me! This Lemonade Bundt Cake is a little slice of sunshine, and I hope it brightens your day as much as it does mine. Enjoy every zesty bite!
Related update: Lemonade Bundt Cake
Related update: Braid sweet citrus flavored licorice
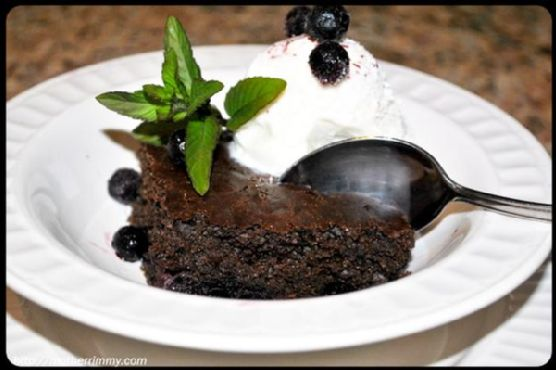
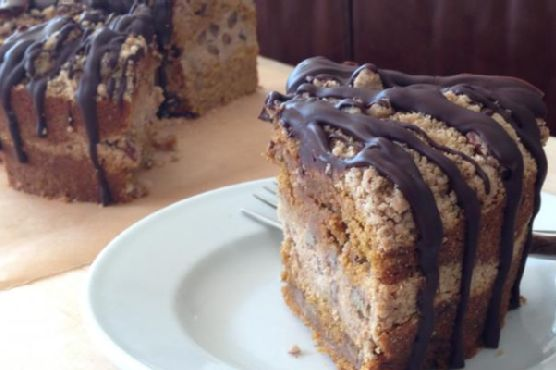
It was one of those days where the clouds just wouldn’t quit, and the afternoon seemed to stretch on forever. I was staring at a ridiculously overripe banana when inspiration struck — not banana bread, but something unexpected, and maybe even a little healthier. That’s when I thought of these Whole Wheat Blueberry Brownies. They’re the perfect mix of indulgence and nourishment, with a tangy twist thanks to the blueberries. A little dense, definitely chocolaty, and oh-so-simple to whip up. You’re gonna love the way the whole wheat adds a subtle nuttiness, and if you happen to have a pint of fresh blueberries sitting around, well then, my friend, you’re in for a treat.
Jump to Recipe
What You’ll Need
Most of these goodies are probably hanging out in your pantry already, just waiting to become besties in this delightful treat. Let’s make it happen:
- 1 cup whole wheat pastry flour
- 1/2 cup cocoa powder
- 1/2 teaspoon salt
- 1/2 teaspoon baking powder
- 1/4 teaspoon baking soda
- 1/2 teaspoon cinnamon
- 1/2 cup sugar
- 1/2 cup brown sugar
- 1 large egg
- 1/2 cup low fat sour cream
- 1/4 cup almond milk
- 1 teaspoon vanilla extract
- 1 cup fresh blueberries
How to Make Whole Wheat Blueberry Brownies
- Preheat your oven to a cozy 350 degrees Fahrenheit. While it warms up, grab an 8 x 8 x 2-inch baking pan and give it a good coat of cooking spray. You don’t want these beauties sticking!
- In one bowl, whisk together the dry stuff: whole wheat pastry flour, cocoa powder, salt, baking powder, baking soda, and cinnamon. Take a moment to marvel at the chocolatey goodness forming already.
- In a separate bowl, beat the egg, then mix in the low fat sour cream, almond milk, and vanilla extract. It should be smooth and slightly glossy.
- Now, gently fold the wet ingredients into the dry mix. Stir until you can no longer see streaks of flour, and everything looks like a harmonious, silky batter.
- Time to bring in the stars of the show — fold in those plump blueberries with the same care you’d show a friend running a relay race. You want them evenly distributed but not squished.
- Pour the batter into your prepared pan, spreading it with a spatula so it’s nice and even. Slide it into your preheated oven and let it bake for 20-25 minutes. You’ll know it’s ready when a toothpick inserted in the center comes out clean.
- Let them cool in the pan for a bit. The waiting is hard, but trust me, it’s worth it for that first bite that won’t burn your tongue.
Cook’s Notes
These brownies are a bit more rustic (in a good way) due to the whole wheat flour. If your taste buds are a little shy of tang, swap the low fat sour cream for full-fat or even Greek yogurt. They’ll keep in an airtight container for about four days, assuming there are any leftovers. If you’re planning ahead, you can make the batter the night before and bake them fresh in the morning. Just fold in the blueberries right before you bake!
Make It Your Own
- For a more decadent treat, replace the almond milk with full-fat coconut milk and get a subtle tropical twist.
- Substitute the fresh blueberries with raspberries for a tart and tangy variation that cuts through the chocolate beautifully.
- If you’re feeling nutty, toss in a handful of chopped walnuts or pecans for some extra crunch.
- For a touch of spice, add a pinch of cayenne pepper to the mix. Chocolate and spice are a match made in dessert heaven.
If you try this, I’d love to hear how it turns out — drop a comment or tag me! There’s nothing better than sharing a sweet success. Enjoy every chewy, blueberry-filled bite!
Related update: Whole Wheat Blueberry Brownies
Related update: Chocolate Crinkle Cookies
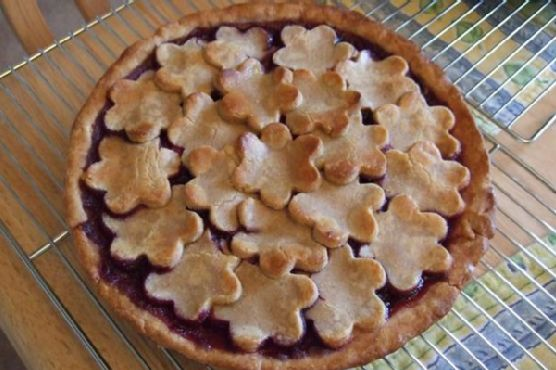
It was one of those lazy Sunday afternoons when the world seemed to move a little slower, a gentle breeze fluttering through the open window, the kind that makes you crave something comforting and sweet but not too complicated. My sweet tooth was whispering “pie” in my ear, but I wasn’t up for a full-blown kitchen marathon. Enter my Cherry-Berry Pie with Agave Nectar All-Butter Crust—a delightful, not-too-sweet pie that’s as satisfying to make as it is to eat. It’s my go-to when I need that perfect mix of summery fruitiness and buttery crust without spending all day in the kitchen. Trust me, this pie is a game-changer, and the addition of agave nectar gives it a uniquely mellow sweetness that pairs beautifully with the tart berries. Jump to Recipe
What You’ll Need
The beauty of this pie is its simple ingredient list, many of which you likely have on hand. Plus, the mix of flours and agave nectar gives the crust an irresistible texture and flavor.
- Agave nectar
- Sweet agave nectar
- Almond flour
- Frozen mixed berries
- Butter
- Frozen cherries
- Coconut flour
- Flour
- Lemon juice
- Orange extract
- Tapioca flour
- Whole wheat pastry flour
How to Make Cherry-Berry Pie With Agave Nectar All-Butter Crust
- Start by making the crust: In a food processor, pulse the dry ingredients about 5-6 times. This helps them blend evenly.
- Add 2 sticks of very cold butter, which you’ve cut into cubes. Pulse until the mixture resembles a very coarse meal, tiny butter bits are a good thing here!
- Add the agave nectar and either the fiore di Sicilia flavoring or its substitute, orange extract, one tablespoon at a time. Watch carefully for the dough to just come together.
- Divide the dough into two parts, one slightly larger than the other. This larger portion will be your base.
- Form each into a flat, round shape, wrap tightly in plastic, and refrigerate for at least 2 hours to let the butter firm up and flavors meld.
- While the dough is chilling, whip up the filling. In a large bowl, combine all the filling ingredients thoroughly. It’s going to be quite soupy, so don’t worry!
- Once the dough has chilled, let it sit out just long enough to be rollable. Roll out the larger dough disk to fit your pie dish, patching as needed.
- Wrap the pie dish with the crust in plastic and chill for another 30 minutes to set.
- Pour the berry filling into the chilled crust, then wrap the whole pie in plastic again and pop it back in the fridge.
- Roll out the remaining dough disk and use cookie cutters to cut pieces for the top crust. Get creative with shapes!
- Remove the pie from the fridge and decorate with your cut-out dough pieces, leaving some gaps for steam to escape.
- Cover the edges with foil to prevent over-browning and bake in a preheated 325°F oven for 40 minutes.
- Remove the foil and continue baking until the top is golden brown and the filling is bubbling enticingly.
- Let the pie cool slightly before slicing in to let the filling set a bit more. Enjoy!
Cook’s Notes
Here’s the scoop: keeping the butter super cold is crucial for that flaky crust we all adore. I like to freeze mine and work quickly to keep it from warming up. If you find the dough a bit too firm after chilling, let it sit out a few minutes until it’s manageable. When it comes to storage, this pie is a champ! Cover it well and it keeps nicely in the fridge for up to 4 days. If you’re making it ahead, bake it a day early; the flavors meld beautifully overnight.
Make It Your Own
Feel free to play around with the recipe a bit to suit your taste or pantry:
- Swap out the frozen cherries for fresh ones if they’re in season; just pit and halve them.
- Try maple syrup instead of agave for a more robust sweetness.
- Use a gluten-free flour blend in place of the wheat and pastry flours for a gluten-free version.
- Add a teaspoon of cinnamon or nutmeg to the filling for a spiced twist.
I hope you give this pie a whirl and let it bring a bit of sunshine into your kitchen. If you try this recipe, I’d love to hear how it turns out—drop a comment or tag me on social media! Happy baking, friends!
Related update: Cherry-Berry Pie With Agave Nectar All-Butter Crust

Picture this: it’s a Wednesday evening, and I’m knee-deep in that midweek slump, feeling like a bit of a sweet escape. The kind where comfort meets simplicity. I glanced at the calendar and saw it was nearing August 10th—National S’mores Day. Immediately, a light bulb moment struck! Why not combine the nostalgia of campfire s’mores with a fruity twist to lift my spirits? Enter: S’mores-n-berry Bars. They’re as indulgent as they sound, with a crispy graham cracker base, rich brownie layer, and gooey marshmallow topping that’s lightly kissed by the oven’s broiler for that perfect toasted finish. It’s the kind of treat that’s easy to whip up, yet impressive enough to satisfy any sweet tooth. Jump to Recipe
What You’ll Need
You probably have most of these ingredients lounging in your pantry already. Here’s what you’ll need:
- 1 box of cooked brownie mix
- 1 egg
- 1 cup graham cracker crumbs
- 2 whole graham crackers
- 1 cup mini marshmallows
- 1/2 cup fresh dried raspberries
- 1/4 cup sugar
- 1/2 cup unsalted butter, melted
- 1/4 cup vegetable oil
- 1/4 cup water
How to Make S’mores-n-berry Bars for National S’mores Day – August 10
- Preheat your oven to 325°F. Line an 8-inch-square baking pan with foil, making sure the foil hangs over the edges for easy removal later. Give it a spritz of nonstick cooking spray to make doubly sure nothing sticks.
- In a medium-sized bowl, combine the melted butter, graham cracker crumbs, and sugar until it resembles wet sand. Press this mixture evenly into the bottom of your prepared pan. Bake for about 20 minutes, or until it looks golden and smells like heaven. Set aside.
- Crank up your oven to 350°F. Meanwhile, grab another bowl and mix together the brownie mix, vegetable oil, water, and egg until smooth. Gently fold in the fresh dried raspberries. Pour this luscious batter over the cooled graham cracker crust.
- Bake the brownie layer for about 25 minutes, or until a toothpick inserted into the center comes out clean. This is your cue to remove it from the oven.
- Break up the two graham crackers into small pieces and scatter them artfully atop the brownie layer.
- Scatter the mini marshmallows over the graham crackers. Return the pan to the oven, this time setting it to broil. Watch carefully, as the marshmallows can quickly go from toasty to burnt in a flash! Once they’re golden and bubbly, pull the pan out.
- Allow the bars to cool completely in the pan. Lift them out using the overhanging foil and cut into squares. Enjoy the ooey-gooey goodness!
Cook’s Notes
These bars are as versatile as they are delicious. The graham cracker crust adds an incredible texture contrast to the fudgy brownie and gooey marshmallow topping. Here are a few tips to ensure they turn out perfect:
- If you prefer a denser brownie, add an extra egg to the brownie mixture.
- Store any leftovers in an airtight container at room temperature for up to 3 days. They’ll stay delicious, though the marshmallows might lose a bit of their chew.
- To make these ahead, you can prepare the graham cracker crust and brownie layer a day in advance. Add the graham crackers and marshmallows just before serving for the best texture.
Make It Your Own
- Nutty Twist: Swap out the raspberries for chopped toasted almonds or pecans for a crunchy surprise.
- Berry Medley: Use a mix of freeze-dried strawberries and blueberries instead of just raspberries for a more fruity experience.
- Chocolate Lovers: Add chocolate chips to the brownie mix for extra gooeyness. You can never have too much chocolate, right?
- Salted Caramel: Drizzle caramel sauce over the marshmallows before broiling. A sprinkle of sea salt can elevate these bars to gourmet status.
If you try this, I’d love to hear how it turns out — drop a comment or tag me! S’mores day or not, these bars are a crowd-pleaser every time.
Related update: S’mores-n-berry Bars for National S’mores Day – August 10
Related update: Cherry-Berry Pie With Agave Nectar All-Butter Crust
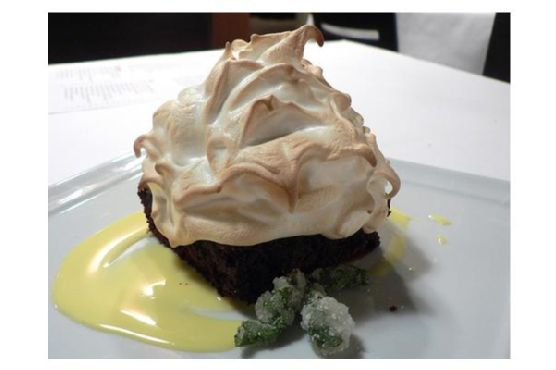
Picture this: It’s a Friday night, and you’ve had one of those weeks where everything felt like a never-ending to-do list. You’re craving something special, a little dramatic even, to kick off your weekend with flair. That’s when I remembered Baked Alaska. It’s one of those desserts that looks like a total showstopper but is actually super manageable to whip up. I love how it combines the coolness of ice cream, the soft texture of cake, and a toasty meringue that you can’t help but admire. It’s great because you can make it ahead of time, and it doesn’t require any fancy equipment. Seriously, if I can do it, anyone can. You just have to get over the idea that baking something on top of ice cream is somehow impossible — spoiler: it’s not, and it’s ridiculously fun. Jump to Recipe
What You’ll Need
Let’s be real: you’ve probably got most of this stuff on hand already, except maybe the ice cream. But hey, any excuse to grab a pint, right?
- A round cake (store-bought or homemade, your call!)
- Ice cream (about 1/2 gallon of your favorite flavor)
- Egg whites (from about 3 large eggs)
- Cream of tartar
- Powdered sugar
How to Make Baked Alaska
- Start by greasing a 7-inch bowl with a flavorless oil or unsalted butter. This bowl should be just big enough to snugly hold half a gallon of ice cream, but no wider than your cake round.
- Let your ice cream soften a bit so it’s workable. Then pack it tightly into the bowl. Pop it back into the freezer until it hardens — about an hour should do.
- For the meringue, beat your egg whites until they are foamy. Add a pinch of cream of tartar and keep whipping until you see stiff peaks. This is when the meringue holds its shape firmly.
- Gently fold in the powdered sugar, a bit at a time, to avoid deflating all that nice air you just whipped in.
- Once you’re ready to assemble, place your round cake on a plate that’s slightly larger than the cake itself.
- To unmold the ice cream, center it over the cake. If it’s being stubborn and won’t release from the bowl, run a bit of warm water over the outside of the bowl for a few seconds.
- Time to “frost” it! Cover the cake and ice cream completely with meringue, going wild with a spoon to create peaks and swirls. Don’t be shy — more is more with meringue.
- Bake your masterpiece in a preheated oven at 450°F for about 6-7 minutes, until those meringue peaks are beautifully golden brown.
- Pop it back in the freezer until you’re ready to serve. It’ll keep just fine for a day or two.
Cook’s Notes
A couple of quick tips to save your sanity: First, make sure your bowl is really cold to help the ice cream set faster. If you’re nervous about the meringue deflating, sift the powdered sugar first; it makes a surprising difference. And for those moments when the ice cream just won’t release, a quick dip in warm water works like magic!
Baked Alaska is a dream to make ahead. You can do all the components a day or two before and just assemble it the day of. Leftovers can be stored in the freezer, but they might lose a bit of their magic.
Make It Your Own
- Switch out the vanilla ice cream for something more adventurous like coffee or pistachio for a gourmet spin.
- Use a chocolate or lemon cake base instead of vanilla to complement or contrast your ice cream choice.
- Add a layer of jam between the cake and ice cream for a fruity surprise that cuts through the richness.
- Feeling nutty? Toss some toasted almonds or hazelnuts into the meringue for a crunchy texture.
If you try this, I’d love to hear how it turns out — drop a comment or tag me in your photos! Let’s see how your Baked Alaska stacks up. Happy baking, friends!
Related update: Baked Alaska
Related update: Rugelach
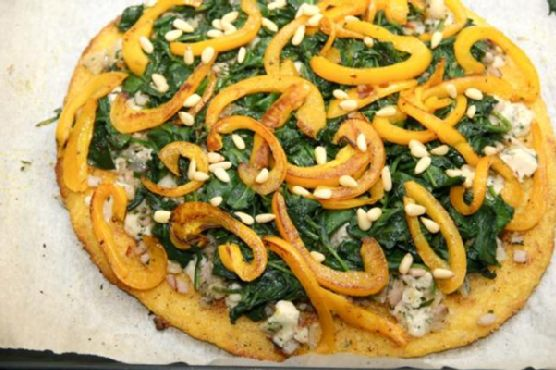
It was one of those nights when the fridge seemed to mock me with its emptiness, only the defiant glow of the leftover polenta catching my eye. I had no grand plans for dinner, just a craving for something that felt like a hug on a plate without the fuss. Enter Polenta Pie with Italian Toppings — a recipe that marries the comforting, hearty texture of polenta with vibrant, savory toppings. It’s the perfect dish for those evenings when you need a little culinary adventure without a complicated list of steps or ingredients. Plus, it’s a great way to transform humble pantry staples into something that feels a bit fancy.
Jump to Recipe
What You’ll Need
It’s likely that you already have most of these ingredients lingering in your kitchen, making this dish both convenient and delicious. Here’s what you need to gather:
- Water
- Milk
- Olive oil
- Salt
- Yellow corn meal
- Diced pancetta
- Shallot
- Garlic
- Gorgonzola cheese or any blue cheese you love
- Baby spinach
- Sweet bright colored bell pepper
- Pignoli (pine nuts)
How to Make Polenta Pie With Italian Toppings
- Start by making the polenta. In a saucepan, bring water, milk, 1/4 cup of olive oil, and a pinch of salt to a boil. Immediately reduce the heat and gradually pour in the cornmeal while stirring to prevent lumps.
- Keep simmering the cornmeal, stirring very frequently for about 15 minutes. You’ll know it’s ready when it’s thick and holds its shape.
- Line a baking sheet with foil or parchment paper and drizzle it with olive oil. Spread the polenta evenly across the sheet to about 1/2-inch thick, shaping it into a circle like a pizza crust. Let it cool until it’s firm.
- Preheat your oven to 425°F. Once the polenta is set, sprinkle it with freshly ground pepper and bake for 30 minutes, until the edges are beautifully browned.
- While your crust is baking, prepare the toppings. Heat 1 tablespoon of olive oil in a skillet and sauté the diced pancetta, shallots, and garlic for about 7-8 minutes until they are golden and fragrant. Don’t overdo it — you want them just right, not crunchy.
- Remove the pancetta mixture to a bowl. In the same skillet, sauté the baby spinach until it’s wilted and a deep green, about 3 minutes. Remove and set aside.
- Add a touch more oil if needed and sauté the bell pepper slices until they’re slightly wilted, about 3-4 minutes.
- Now, let’s assemble the pie! Start by spreading the gorgonzola crumbs evenly over the baked polenta crust. Then layer the pancetta mix, followed by the spinach, bell peppers, and finally a sprinkle of pine nuts.
- Drizzle a few more drops of olive oil over the top and pop it back in the oven for 4-5 minutes just to warm everything through.
- Slice your polenta pie like a pizza or into neat squares. Serve it hot and enjoy the medley of flavors!
Cook’s Notes
This dish is a great candidate for prepping ahead. You can make the polenta crust a day in advance and store it in the fridge, well-wrapped. Just bring it to room temperature before proceeding with the baking step. If you’re lucky enough to have leftovers, they hold well in the fridge for 2-3 days. Simply reheat in the oven to enjoy a second time with a nice crisp. A common pitfall is undercooking the polenta, so keep an eye on that texture — thick but not cement-like is your sweet spot.
Make It Your Own
Here are a few fun twists to try:
- Swap the pancetta for crispy tofu to make it vegetarian-friendly.
- Try a mix of mushrooms instead of the bell pepper for an earthy depth.
- Use feta if you’re not a fan of blue cheese, it brings a nice tang.
- Replace the pine nuts with toasted almonds for an unexpected crunch.
If you try this Polenta Pie with Italian Toppings, I’d love to hear how it turns out! Drop a comment below or tag me in your creation pics. Let’s share the love for this deliciously comforting dish.
Related update: Polenta Pie With Italian Toppings
Related update: Chicken Porridge

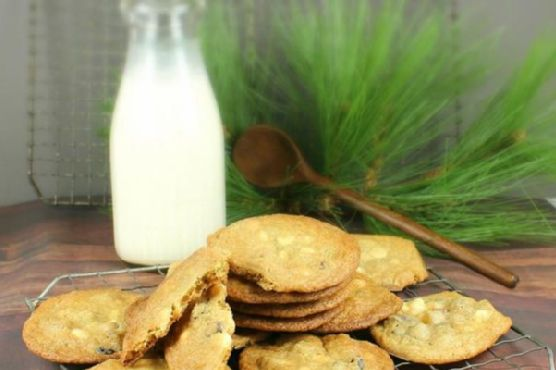
It was one of those random Tuesday nights when my sweet tooth orchestrated a full-blown coup d’état. You know the kind—no amount of Netflix snacking could quell the uprising. I needed something decadent, something with a little kick. Enter: Chocolate and Szechuan Peppercorn Brownies. These brownies aren’t just another chocolate fix; they dance on your taste buds with a spicy, aromatic surprise. Imagine the rich, fudgy goodness of classic brownies with a cheeky Szechuan twist. Intrigued? You should be.
Jump to Recipe
What You’ll Need
When I say you probably have most of this already, I mean it. The secret stars here are the **Szechuan peppercorns** and **cinnamon stick**. Trust me; they make all the difference.
- 1 cup **brown sugar**
- 1/2 cup **butter**
- 1 **cinnamon stick**
- 3 **eggs**
- 1 tablespoon **espresso** (brewed or powder)
- 3/4 cup **flour**
- 1/2 cup granulated sugar
- 1/2 cup **heavy cream**
- 1 teaspoon **kosher salt**
- 1/4 cup milk
- 1 tablespoon **Szechuan peppercorns**
- 1 cup semisweet chocolate chips
- 4 ounces **unsweetened chocolate**
- 1/4 cup unsweetened cocoa powder
- 1 teaspoon **vanilla extract**
How to Make Chocolate and Szechuan Peppercorn Brownies
- Preheat your oven to 350°F (175°C) and grease an 8×8 baking dish.
- In a large sauté pan over medium heat, melt the butter. Add the **Szechuan peppercorns** and **cinnamon stick**. You’ll know it’s ready when the butter stops foaming and you see those lovely browned bits at the bottom—around 5 minutes.
- Meanwhile, in a double boiler or microwave, melt the **unsweetened chocolate** and semisweet chocolate together. Stir in the **espresso** for that extra depth.
- Remove the peppercorns and cinnamon stick from the butter (straining works wonders). Return the butter to the pan and stir in the sugars, milk, vanilla, and salt. Then mix in the chocolate-espresso concoction along with the cocoa powder.
- Beat in the eggs one at a time, ensuring each is well incorporated. Finally, fold in the flour gently until the batter is just mixed.
- Pour the batter into your prepared dish and bake for 25-30 minutes. A tester should come out mostly clean—feel free to underbake for extra gooeyness.
- Once the brownies are cooled, it’s ganache time! Simmer the heavy cream and peppercorns in a small pot. Strain out the peppercorns and stir in the semisweet chocolate chips until you’ve got a silky ganache. Spread this over the brownies and, for pro-level firmness, refrigerate them until the ganache sets.
Cook’s Notes
These brownies are best enjoyed the day they’re made, but let’s be real—brownies never last long, do they? If they somehow do, keep them in an airtight container in the fridge for up to a week. The ganache will harden a bit, but it just adds to the chewy texture when you bite into them. If you’re a make-ahead kind of person, you can make the brownies a day in advance and ganache them right before serving.
If you find your brownies a bit too spicy or not spicy enough, play around with the amount of Szechuan peppercorns next time. Some like it hot!
Make It Your Own
- **Nutty Variation**: Swap half the flour for almond meal for a nutty, chewy twist.
- **Milk Chocolate Fans**: Use milk chocolate chips in the ganache instead of semisweet for a creamier topping.
- **Coffee Lovers**: Double the espresso for an intensely rich mocha brownie.
- **Spice It Up**: Toss a pinch of cayenne into the batter for those who crave a more pronounced kick.
If you try this, I’d love to hear how it turns out—drop a comment or tag me! And remember, life is too short to skip dessert. Enjoy every fudgy, peppery bite!
Related update: Chocolate and Szechuan Peppercorn Brownies
Related update: Homemade Banana Bread
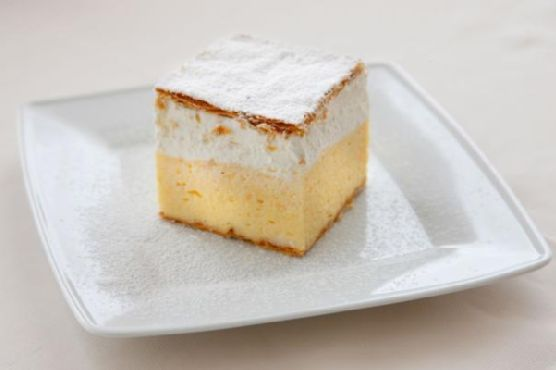
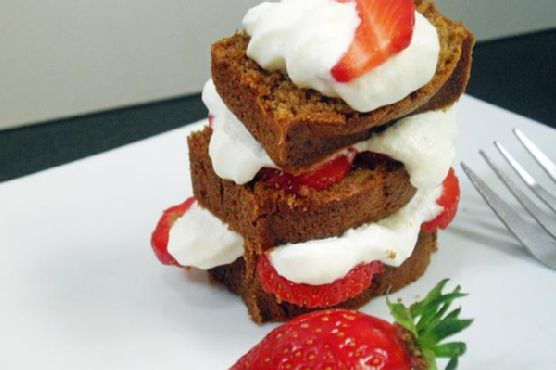
Picture this: it’s a chilly December evening, and the house smells like winter spices and cozy warmth. My hands were still a bit sticky from wrestling with a stubborn puff pastry earlier that day. I had this sudden craving for something decadent yet comforting, something that would pair perfectly with the hot cocoa I was planning to sip by the fireplace. That’s when these Vanilla Cream Cakes came to life. They’re light, fluffy, and simply divine—a perfect blend of holiday spirit and simple elegance. Not only are they surprisingly easy to whip up, but they also look impressive enough to serve up at any festive gathering or cozy night in.
Jump to Recipe
What You’ll Need
I bet you already have most of these in your pantry. Just a few essentials and a couple of special touches to make these cakes sing.
- Puff pastry – This is our quick and easy cake base.
- 6 large eggs
- 200g sugar – Sweetness is key here.
- 50g vanilla sugar – It adds a lovely vanilla aroma.
- 2 tablespoons of rum – For that warm, festive touch.
- 6 liters of whole milk – It’s a lot, but trust me, it’s worth it.
- 150g all-purpose flour
- 200g heavy whipping cream – Fluff it up!
- Powdered sugar – A dusting of snow on top.
How to Make Vanilla Cream Cakes, Easy and Fluffy Holiday Cakes
- Preheat your oven to 200°C (about 390°F). Your kitchen should feel like a warm hug in no time.
- Roll out the puff pastry nice and thin, just slightly larger than your baking dish (around 14×10 inches). Split the pastry in two—half for the bottom, half for the top.
- Bake the pastry for about 10-15 minutes until it’s gloriously golden brown. Let the top layer cool completely while the bottom one stays snug in the dish.
- Separate the egg yolks from the whites, setting the whites aside in a larger bowl.
- For the yolk mixture, combine the yolks, sugar, vanilla sugar, and rum in a smaller bowl. Mix until it’s smooth and dreamy.
- Add the flour and a quarter of the milk to the yolk mix. Keep mixing until it’s silky smooth.
- Whisk the egg whites in the large bowl until they form firm peaks. Add sugar and whisk until the peaks are super firm and glossy.
- Meanwhile, bring the remaining milk to a boil in a large pot. Slowly pour the yolk mixture into the boiling milk, whisking continuously. Cook for 5 minutes until it’s thick and gives your arm a workout!
- Now for the tricky bit. Pour the boiling yolk mix into the egg whites, starting gradually. Keep whisking until both mixtures are beautifully blended.
- Pour this luscious mixture into the baking dish over the bottom pastry. Give the dish a gentle shake to fill every corner. Let it cool overnight in the fridge for best results.
- Whip up the heavy cream with some sugar until it’s light and airy. Spread this over the cooled cake mixture.
- Cut the cooled top pastry into 15 squares and place them on the whipped cream. Slice the cakes into squares and give them a nice dusting of powdered sugar before serving.
Cook’s Notes
Just a little heads up: when you’re pouring the boiling mixture into the egg whites, it’s helpful to have an extra pair of hands nearby. It’s all about the smooth incorporation to make sure you get that perfect fluffiness. If you’re making these ahead, they store well in the fridge for up to three days—ideal if you want to get a jump on holiday prep! Just keep them covered to maintain their freshness.
Make It Your Own
Here’s how you can play around with these cakes:
- Swap the rum for your favorite liqueur, like Baileys or Amaretto, for different flavor twists.
- Add a tablespoon of cocoa powder to the yolk mixture for a chocolatey spin.
- Switch out vanilla sugar with a teaspoon of almond extract for a nutty aroma.
- Top with fresh berries before serving for a burst of color and tang.
If you try this, I’d love to hear how it turns out—drop a comment or tag me! And remember, imperfections add character, especially when surrounded by good company. Happy baking!
Related update: Vanilla Cream Cakes, Easy and Fluffy Holiday Cakes
A few weekends ago, I had one of those mornings where you wake up craving something fresh and sunny to get your day going. It was gray and drizzly outside, and I wanted to bring a bit of brightness into the day. As I scanned my pantry, I spotted a forgotten lime yogurt, an orange rolling around with a couple of lemons in the fruit drawer, and a plan began to form. This Triple Citrus Cake is the kind of bake that feels like an instant mood-lifter. It’s got that perfect balance of tangy and sweet, and it’s way simpler than it sounds. Plus, it’s the kind of cake where you might already have most of the ingredients just hanging around. Every bite is like a little burst of sunshine, which sometimes is just what you need.
Jump to Recipe
What You’ll Need
Let me tell you, the best part about this ingredient list is that it’s the kind of thing you probably already have on hand. Here’s what you’ll need to create your own slice of citrusy heaven:
- 1 1/2 cups flour
- 2 teaspoons baking powder
- 1/2 teaspoon salt
- 3/4 cup lime yogurt
- 1 cup sugar
- 3 whole eggs
- 1 teaspoon vanilla extract
- 1/2 cup grapeseed oil
- Zest of 1 lemon
- 1/4 cup orange juice
- 1 cup powdered sugar
How to Make Triple Citrus Cake
- Preheat your oven to 350 degrees. You want it nice and warm, ready to give your cake a cozy bake.
- In a medium bowl, whisk together the flour, baking powder, and salt. This is your dry team; they’ll hang out together until called.
- Grab your electric mixer and in a larger bowl, beat together the lime yogurt, eggs, sugar, vanilla, oil, and lemon zest. It’ll look silky smooth and smell divine.
- Gently fold the dry ingredients into the wet mixture using a spatula. You’re aiming for a batter that’s just combined; over-mixing is a no-go here.
- Coat a 9 x 5 loaf pan with floured baking spray or line with parchment paper and spray. Pour the batter in, smoothing the top so it’s even.
- Bake for 40-50 minutes, or until a cake tester comes out clean. The top will be golden brown and your kitchen will smell like citrus heaven.
- Let the cake cool in the pan for at least an hour. Patience, my friend. The wait is worth it.
- Once cool, transfer to a serving plate. Mix the powdered sugar with orange juice until you have a smooth glaze, then drizzle it over the cake. Watch as it glistens invitingly.
Cook’s Notes
When it comes to baking, patience is key, especially in letting the cake cool before you apply the glaze. Trust me, you don’t want to rush it or you’ll end up with a soggy mess. The cake keeps well for 3-4 days if covered tightly and stored at room temperature, though I doubt it’ll last that long! If you’re planning to make it ahead, bake the cake and store the glaze separately. Glaze just before serving for the best texture.
Make It Your Own
Looking to switch things up? Here are a few ideas:
- Swap the lime yogurt for Greek yogurt and add a bit more lemon zest for an extra lemony punch.
- Replace grapeseed oil with melted coconut oil for a subtle coconut twist.
- Add a handful of poppy seeds to the batter for a delightful texture and a bit of visual flair.
- Use a mix of blood orange juice for the glaze if you want a richer color and slightly different taste.
If you try this, I’d love to hear how it turns out — drop a comment or tag me in your cake pics! It always makes my day to see your creations. Happy baking! 🍋🍊🍋
Related update: Triple Citrus Cake
Related update: Roasted Strawberry Coconut Milk Ice Cream
The other day, I found myself in one of those classic kitchen dilemmas. It was a chilly autumn afternoon, I was craving something warm and spicy, and I swear, every recipe I came across called for ingredients I didn’t have on hand. Determined not to let my sweet tooth win, I started rummaging through my pantry, and that’s when it hit me: fat-free gingerbread cookies! Yes, you read that right. These cookies are just what you need when you crave that cozy, ginger-spiced goodness but want to keep things light. Trust me, these cookies are packed with bold flavors, and you might already have most of these ingredients at home. Plus, they’re soft, chewy, and perfect for an afternoon treat or a holiday gathering.
Jump to Recipe
What You’ll Need
Okay, so these cookies are awesome because aside from being fat-free, they use simple ingredients that pack a punch. Here’s what you’ll need:
- All-purpose flour
- Whole wheat flour
- Baking soda
- Salt
- Ground ginger
- Cinnamon
- Ground cloves
- Black pepper
- Fresh ground nutmeg
- Ground allspice
- Dark brown sugar
- Blackstrap molasses
- Apple sauce
- Vanilla extract
- Maple extract
- Chai concentrate
- Egg whites
- Candied ginger
- Granulated sugar
- Cinnamon (for rolling)
How to Make Fat Free Gingerbread Cookies
- Start by sifting together the all-purpose flour, whole wheat flour, baking soda, salt, and all your spices. You’ll know it’s ready when the spices smell like a warm hug.
- In a large mixing bowl, combine the dark brown sugar, blackstrap molasses, apple sauce, vanilla extract, maple extract, and chai concentrate. Use an electric mixer and beat it for about four minutes until everything’s smooth and luscious.
- Add the egg whites into your molasses mixture. Beat for another minute until the whites are completely mixed in.
- Slowly incorporate your sifted dry ingredients into the wet mixture. Beat until everything is fully combined, creating a rich, aromatic dough. Stir in the candied ginger bits for that extra zing.
- Cover the dough and let it chill in the fridge for at least an hour. I personally prefer letting it chill overnight for a deeper flavor.
- When you’re ready to bake, preheat your oven to 350°F (175°C). Line a baking sheet with parchment paper or lightly grease it.
- Mix the granulated sugar with a dash of cinnamon in a shallow bowl. Scoop a tablespoon of dough, coat it in the cinnamon sugar, and shape it into a ball.
- Place each dough ball on the prepared baking sheet, leaving about three inches of space between them. They will spread out as they bake.
- Bake the cookies for 10-12 minutes until they’re beautifully puffed and you start to smell that delightful gingerbread aroma.
- Once out of the oven, transfer the cookies to a wire rack to cool. Trust me, waiting for them to cool is the hardest part!
Cook’s Notes
Baking these cookies is pretty straightforward, but here are a few tips to ensure they turn out perfect every time. First, don’t skip the chilling step. It helps the flavors meld together and keeps the dough from spreading too much. If you’re planning ahead, you can make the dough and keep it in the fridge for up to two days. Just remember to let it sit at room temperature for a few minutes if it’s too hard to scoop. For leftovers, these cookies stay fresh for about a week if kept in an airtight container. You can also freeze them for longer storage—just thaw before serving.
Make It Your Own
These cookies are versatile, so feel free to experiment with these ideas:
- Swap the candied ginger for chocolate chips if you’re feeling a chocolate craving coming on.
- Use pumpkin pie spice instead of the individual spices for a quicker spice mix.
- Replace the chai concentrate with a strong brewed tea of your choice for a subtle flavor twist.
- If you want a little crunch, add some finely chopped nuts like pecans or walnuts.
If you try this, I’d love to hear how it turns out—drop a comment or tag me! Baking is all about experimenting and having fun, so don’t be afraid to make these cookies your own. Enjoy every spicy, soft bite!
Related update: Fat Free Gingerbread Cookies
Related update: Triple Citrus Cake
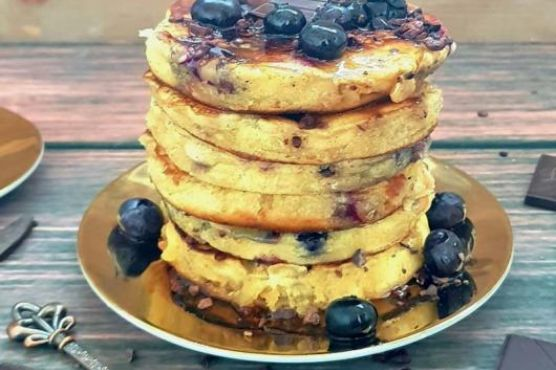
Last Tuesday morning was one of those days where I just needed a little something extra to kickstart the day. You know the ones — when your brain is stuck somewhere between sleep and waking, your mug of coffee is feeling more like a warm hug than a caffeine fix, and breakfast needs to be something special but not overly demanding. That’s when these Blueberry, Chocolate & Cacao Superfood Pancakes came to the rescue. They’re those perfect pancakes that feel like you’re treating yourself to something really indulgent, yet they’re totally guilt-free. Plus, they’re gluten-free, paleo, and vegan! It’s like a breakfast trifecta. Ready to dive in? Trust me, these are worth the short time it takes to whip them up.
Jump to Recipe
What You’ll Need
Here’s the best part: chances are you already have most of these goodies hanging out in your pantry. No need for a special trip to the store when the craving hits!
- Almond flour
- Coconut flour
- Tapioca or arrowroot flour
- Nut, hemp, or coconut milk
- Baking powder
- Vanilla bean paste or extract
- Himalayan sea salt
- Frozen blueberries
- Cacao nibs
- Dark chocolate
How to Make Blueberry, Chocolate & Cocao Superfood Pancakes – Gluten-Free/Paleo/Vegan
- Grab a mixing bowl and combine the almond flour, coconut flour, and tapioca or arrowroot flour with the baking powder and a pinch of Himalayan sea salt. Give it a good mix until everything is nicely blended.
- Pour in the nut, hemp, or coconut milk along with the vanilla bean paste or extract, and whisk it all together until you have a smooth, dreamy batter. Let this beauty sit for 10-15 minutes. It’s like letting the batter take a mini-vacation to thicken up.
- Heat a smidge of coconut oil in your favorite skillet over medium heat. Once it’s warm and cozy, pour just enough batter into the center to form a pancake.
- Cook until the edges start to brown and you see bubbles gracing the surface. This is your cue to sprinkle a few blueberries on the pancake.
- Flip the pancake with confidence, cook for another minute or two, then immediately sprinkle cacao nibs and dark chocolate on the top. Let them melt and meld into pure bliss.
- Remove the pancake once fully cooked and repeat with the rest of the batter. Stack them up, drizzle with a little agave if you’re feeling it, and savor the moment!
Cook’s Notes
These pancakes are wonderfully adaptable, so don’t stress if you’re missing an ingredient. You can even mix the dry ingredients the night before to save a few precious minutes in the morning rush. Storing leftovers? Just pop them in an airtight container in the fridge, and they’re good for a couple of days. Reheat in a skillet over low heat or simply enjoy them cold. Making a larger batch and freezing them is also an option; just layer parchment paper between each pancake to keep them from sticking together.
Make It Your Own
- Swap out the frozen blueberries for fresh raspberries or chopped strawberries for a berry twist.
- Substitute the cacao nibs with crushed pecans or walnuts for a nutty crunch.
- If you’re not strictly vegan, a spoonful of Greek yogurt with honey makes an unbeatable topping.
- For a tropical flair, toss in a handful of shredded coconut before flipping.
If you try this, I’d love to hear how it turns out — drop a comment or tag me! Enjoy every delicious bite of these pancakes, knowing you’re starting the day in the best way possible. 😊
Related update: Blueberry, Chocolate & Cocao Superfood Pancakes – Gluten-Free/Paleo/Vegan
Related update: Breakfast Biscuits and Gravy
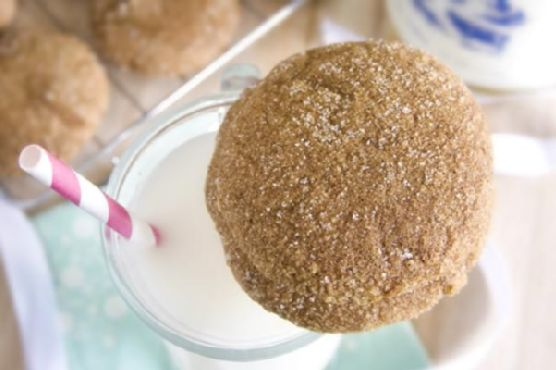
It was one of those chilly October afternoons where the air feels crisp and the leaves are doing that magical thing they do—turning into a vibrant sea of reds, oranges, and yellows. I was craving something cozy but with a twist, something that fit the season without being a pumpkin-flavored cliché. That’s when the idea for Cranberry-Orange Pistachio Chip Cookies came to me. These cookies are the perfect blend of tart cranberries and zesty orange, with the unexpected crunch of pistachios and creamy white chocolate morsels. They’re a little bit fancy, but still easy enough to whip up on a whim. I promise, once you try them, you’ll want to make them part of your regular cookie rotation.
Jump to Recipe
What You’ll Need
I bet you already have most of these ingredients lounging in your pantry, just waiting to be transformed into something wonderful.
- 2 1/4 cups all-purpose flour
- 1 teaspoon baking soda
- 1/2 teaspoon salt
- 1 cup (2 sticks) butter, softened
- 3/4 cup granulated sugar
- 3/4 cup packed brown sugar
- 1 teaspoon vanilla extract
- 2 large eggs
- 2 cups white nestlé® toll house® premier morsels
- 1 cup chopped pistachios
- 1 cup dried craisins
- 1/2 cup chopped candied orange peel
How to Make Cranberry-Orange Pistachio Chip Cookies
- Preheat your oven to 375°F (190°C). The anticipation starts now as the kitchen warms up and gets ready for some cookie magic.
- In a small bowl, whisk together the flour, baking soda, and salt. This is your dry mix—it’s the base that holds all the other goodies together.
- In a large bowl, beat the butter, granulated sugar, brown sugar, and vanilla extract until creamy. You want it smooth and luscious, like frosting but thicker.
- Add the eggs one at a time, beating well after each addition. The batter will start to look pale and fluffy.
- Gradually beat in the flour mixture. Go slow here; you don’t want a flour storm in your kitchen.
- Fold in those beautiful white morsels, pistachios, dried cranberries, and orange peel. This is where the magic happens—the cookies are getting their personality.
- Drop rounded tablespoonfuls of dough onto parchment-lined baking sheets. Space them out, they need room to spread their deliciousness.
- Bake for 9 to 11 minutes or until golden brown. You’ll know they’re ready by the dreamy aroma and the slight browning at the edges.
- Cool on the baking sheets for a couple of minutes before moving to wire racks. This is the hardest part—waiting for them to cool completely.
Cook’s Notes
These cookies are a bit of a showstopper, but they’re really straightforward. A few tips:
- Use the freshest pistachios you can find; their flavor really shines here.
- If you don’t have candied orange peel, you can make your own or use fresh zest in a pinch—just a little extra sugar will balance the tartness.
- These cookies are perfect for making ahead. You can freeze the dough balls, then bake as needed for a fresh cookie fix.
- Leftovers will stay delicious in an airtight container for about a week, but honestly, they’ll probably disappear way before then.
Make It Your Own
Want to tweak these cookies to better suit your taste buds or pantry stash? Here are some ideas:
- Swap the pistachios for almonds or walnuts if you prefer a different nutty note.
- Try semi-sweet chocolate chips instead of white morsels for a deeper chocolate experience.
- If dried craisins aren’t your thing, swap them out for dried cherries or even chopped dried apricots.
- Add a hit of spice with a teaspoon of ground cinnamon or cardamom for a warm, cozy vibe.
If you try this, I’d love to hear how it turns out—drop a comment or tag me! Happy baking, and may your kitchen be filled with the sweet scent of these glorious cookies.
Related update: Cranberry-Orange Pistachio Chip Cookies
Related update: Fat Free Gingerbread Cookies
It was one of those dreary, chilly afternoons when all I wanted was to bury myself under a blanket with something sweet and comforting. My pantry was a hodgepodge of half-empty flours, a lonely can of pumpkin puree, and the remnants of a bag of chocolate chips. But somehow, out of that chaos, a masterpiece was born: the Pumpkin Pecan Streusel Cake. It’s like fall in every bite and the best part? You won’t find any gluten, soy, or animal products here. This cake is not only ridiculously delicious but also caters to almost every dietary restriction. And let’s be honest, anything with a streusel that’s crunchy with pecans and a drizzle of chocolate glaze is bound to be a crowd-pleaser.
Jump to Recipe
What You’ll Need
You probably have most of these ingredients lurking around your kitchen already. It’s a collection of pantry staples and a few key items, so grab your measuring spoons and let’s dive in.
- **Red brown rice flour**
- **Gluten free oat flour**
- White rice flour
- Sorghum flour
- Tapioca flour
- Light firmly brown sugar
- **Roasted pumpkin puree**
- Coconut yogurt
- Bananas
- Earth Balance soy-free spread
- **Pecans**
- Enjoy Life brand chocolate chips
- **Ground ginger**
- **Ground nutmeg**
- **Aluminum-free baking soda**
- **Aluminum-free baking powder**
- Kosher salt
- Apple cider vinegar
How to Make Pumpkin Pecan Streusel Cake – gluten free, soy free, vegan
- First things first, preheat your oven to 350°F (175°C). Let’s get this cake going!
- Mix the flours, brown sugar, cinnamon, and kosher salt in a small bowl. Add the Earth Balance spread and get your hands in there until the mix looks like coarse crumbs. Toss in the pecans and mix. Set aside this delightful streusel topping.
- Next up, measure your coconut milk and add the apple cider vinegar. Let it sit and work its magic till it looks all sour-creamy.
- In a medium bowl, whisk together the remaining flours, baking powder, baking soda, ground ginger, ground nutmeg, and kosher salt.
- In your mixer bowl, beat the Earth Balance and brown sugar together until they’re best friends, fluffy and well-mixed. Add the mashed banana, scraping down the sides of the bowl as needed. Follow with the pumpkin puree and your sour cream-esque coconut milk mixture. Mix on low speed till smooth.
- Throw in your flour mixture and stir until combined. The batter’s going to be thick, but that’s what we’re aiming for here.
- Spread half of this gloriously thick batter into a prepared cake pan. Sprinkle with half of that irresistible streusel. Layer on the remaining batter and spread it out evenly before topping with the rest of the streusel.
- Bake for 55-60 minutes. You’re looking for a clean toothpick when inserted into the center. Cool in the pan on a stovetop for 40 minutes. Patience, my friend.
- Once cooled, gently loosen the sides of the cake with a non-scratch knife, lift it out, and let it chill in the fridge for an hour.
- Meanwhile, melt the chocolate chips with Earth Balance over simmering water for a glossy glaze. Let it cool for a bit before drizzling over the cake.
- Remove the protective parchment paper and voila! You’ve got yourself a cake that’s ready to be devoured. Serve chilled or at room temp — your call!
Cook’s Notes
Now here’s the scoop: this cake loves a good chill in the fridge. It helps the flavors meld and makes slicing a breeze. Got leftovers? Keep them wrapped up in the fridge and they’ll stay fabulous for up to five days. If you prefer to prepare in parts, make the streusel in advance and keep it in the fridge for up to two days. Just don’t try to rush the cooling process. Trust me, it’s worth the wait for that perfect slice.
Make It Your Own
These swaps will keep things interesting, so don’t be shy about experimenting:
- Swap out the pecans for walnuts if you’re feeling nutty in a different way.
- Use mashed sweet potatoes instead of pumpkin for a twist on flavor.
- Try adding a teaspoon of espresso powder to the glaze for a mocha flair.
- If chocolate chips aren’t your thing, drizzle with a simple sugar glaze instead.
If you try this, I’d love to hear how it turns out — drop a comment or tag me! This cake has become a personal favorite, and I hope it brings as much joy to your table as it does to mine. Happy baking!
Related update: Pumpkin Pecan Streusel Cake – gluten free, soy free, vegan
Related update: Cranberry-Orange Pistachio Chip Cookies
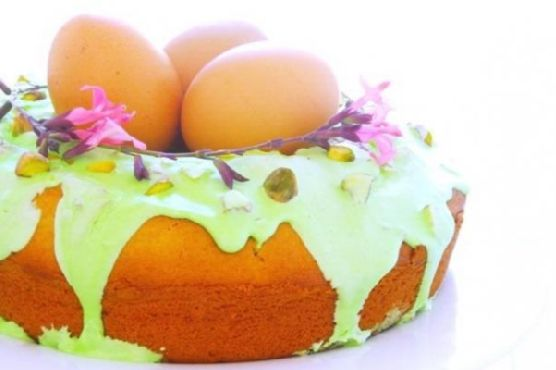
It was one of those early spring afternoons when the sun was just starting to peek through the clouds, promising warmer days ahead. I was rifling through my pantry, craving something sweet but not overly indulgent. You know, a little treat to go with my afternoon tea. That’s when I remembered this Easter Nest Sweet Cake recipe. It’s a delightful blend of flavors and textures — a soft cake topped with a tangy sour cream-royal icing and the crunch of pistachios. Perfect for those days when you want something that feels special but comes together without too much fuss. Plus, it makes for a show-stopping centerpiece at any Easter gathering or spring brunch.
Jump to Recipe
What You’ll Need
You might find that most of these ingredients are already in your kitchen, just waiting to be transformed into something magical. Here’s what you’ll want to gather:
- Unsalted butter – because decadent is the way to go.
- Brown sugar – for that rich, caramel-like sweetness.
- Eggs
- Flour
- Baking powder
- Sour cream – adds a moist and tangy kick to the cake.
- Icing sugar
- Lemon juice – brings brightness to the icing.
- Egg white
- Pistachios, unshelled – for a nutty crunch.
- Green food coloring – optional, but it gives the icing a festive touch.
How to Make Easter Nest Sweet Cake With Sour Cream-Royal Icing and Pistachios
- Preheat your oven to 190°C/375°F. Lightly grease a ring cake pan and set it aside. The anticipation starts here.
- In a medium bowl, use an electric mixer to beat the brown sugar, eggs, and unsalted butter until creamy — think smooth and dreamy. The sugar granules should almost disappear.
- Add the sour cream and flour to the mixture. Beat for a couple of minutes until everything is well combined. The batter should be thick and luscious.
- Pour the batter into your prepared cake pan, smoothing the top with a spatula. Bake for about 20 minutes. The cake should be golden brown and a skewer inserted in the center should come out clean.
- Let the cake cool in the pan for a few minutes, then transfer to a wire rack. The aroma is irresistible, but patience will pay off.
- For the icing, beat the egg white using a standard mixer until soft peaks form. Add lemon juice, icing sugar, and a drop of green food coloring if you’re feeling festive. Beat for a few more seconds until everything is just combined.
- Once the cake is cool, pour the royal icing generously over the top, letting it cascade down the sides. There’s something so satisfying about this step.
- Sprinkle with chopped pistachios, and get creative with your decorations. The crunch and subtle saltiness of the pistachios are a game-changer.
Cook’s Notes
Here’s the thing about this cake — it’s quite forgiving. If you find yourself without a ring pan, a regular cake pan or even a loaf pan will do in a pinch. Just keep an eye on the baking time. Store leftovers (if there are any!) in an airtight container at room temperature for up to three days. The icing may lose a little of its shine, but the flavor remains on point. If you’re planning ahead, bake the cake a day before and ice it on the day of serving for maximum freshness.
Make It Your Own
With a few tweaks, you can tailor this cake to suit different tastes or occasions:
- Swap the pistachios for toasted almonds for a different nutty flavor.
- If you’re not a fan of sour cream, try using Greek yogurt for a similar tanginess.
- Feeling adventurous? Add a tablespoon of shredded coconut to the batter for extra texture.
- For a citrus twist, incorporate the zest of one lemon into the cake batter.
If you try this, I’d love to hear how it turns out — drop a comment or tag me! And if you have any creative twists on this recipe, don’t keep it to yourself; I’m always on the lookout for new ideas. Happy baking!
Related update: Pumpkin Pecan Streusel Cake - gluten free, soy free, vegan
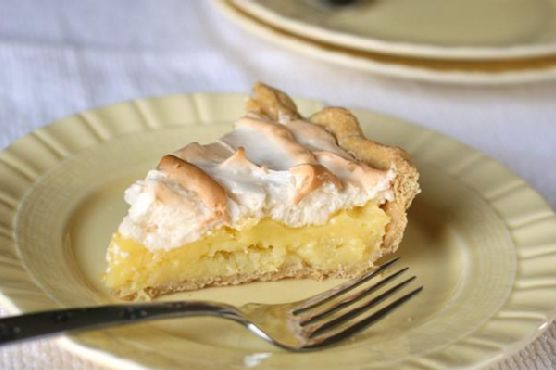
Picture this: it’s a Tuesday evening, and the only thing standing between me and a total kitchen meltdown is the comforting prospect of pulling together Grandma Inez’s Pineapple Pie. I was staring down a pantry that looked more like a post-tornado disaster zone than the well-stocked haven I imagined. But there it was, hidden among the cans of neglected beans and a jar of something unrecognizable — a lone can of pineapple. That’s when I remembered this pie, a dessert that feels like a tropical vacation and a cozy hug all rolled into one. It’s quick, it’s a little quirky, and it’s a whole lot of delicious. A pie so luscious and breezy, it practically makes the kitchen clean itself. Well, almost.
Jump to Recipe
What You’ll Need
If you’ve got a stocked baking cupboard, you’re probably halfway there. The beauty of this pie is that it doesn’t ask for much — just a bit of finesse and a lot of love.
- 1 pre-baked pie crust
- 1 can crushed pineapple (keep the juice!)
- 1 cup sugar (divided)
- 1/4 cup butter
- 3 tablespoons cornstarch
- 1 teaspoon vanilla
- 3 egg yolks
- 3 egg whites
- 1/4 teaspoon cream of tartar
- 1/4 teaspoon salt
- 1/2 cup water
How to Make Grandma Inez’s Pineapple Pie
- Start by creaming 3/4 cup of the sugar, butter, and egg yolks in a medium saucepan. Use a hand-held mixer to make it fluffy — a workout for your good arm, just until it’s pale and dreamy.
- Blend in the cornstarch and vanilla until smooth. It should look like a creamy potion, sweet and inviting.
- Add the water and that whole can of crushed pineapple, juice and all. Mix again, until everything feels like it’s come to a tropical accord.
- Transfer your saucepan to the stove and set it over medium heat. Stir constantly — think of it as a zen exercise — until the mix thickens. You’ll know it’s ready when it can coat the back of a spoon.
- Pour this luscious filling into your pre-baked pie crust, spreading it out like you’re tucking it into bed.
- Now, whip the egg whites until they’re foamy, like the top of a cappuccino. Gradually add the remaining 1/4 cup sugar, cream of tartar, and salt. Keep whipping until soft peaks form and the mixture is glossy like a magazine finish.
- Spread the meringue over the cooled pie. Use the back of a spoon to create little peaks, like waves on an ocean.
- Bake in a preheated 400°F oven for just a few minutes. Stay close! You want the meringue to be golden, not torched.
- Let it cool completely before slicing — if you can wait that long. Store in the fridge and sneak slices whenever you need a pick-me-up.
Cook’s Notes
A few tips to keep this pie from veering off course:
– Make sure your pie crust is completely cool before adding the filling — we want a crispy base, not a soggy one.
– Meringue can be a bit temperamental. Avoid making it on a humid day, or it might weep. No one likes a sad pie.
– The pie is best eaten within a day or two, but trust me, it rarely makes it that long. If you’ve got leftovers, keep them covered in the fridge. The meringue might lose its crispness, but it’ll still taste divine.
Make It Your Own
Here’s where you get to flex your creative muscles:
- Swap the pineapple for mango or passion fruit for a different tropical twist.
- Add a hint of ginger or nutmeg to the filling for a warm-spiced version.
- Use almond extract instead of vanilla for a nutty, nuanced flavor.
- Try topping with coconut flakes post-bake for an extra layer of texture and flavor.
If you try this, I’d love to hear how it turns out — drop a comment or tag me! Your kitchen is about to smell amazing, and I can’t wait for you to taste this slice of sunshine. Enjoy every bite!
Related update: Grandma Inez’s Pineapple Pie
Related update: How to Make OREO Turkeys for Thanksgiving
It was one of those blustery autumn afternoons when the wind just howls around your windows, and all you want is something to make the house smell amazing and your soul feel cozy. I was rummaging through my pantry, craving something spicy and sweet, when I realized I had everything I needed for gingerbread. You know that feeling when you stumble upon a recipe that makes your kitchen feel like a warm hug? This gingerbread is exactly that. It’s quick enough for a weeknight treat but feels special with its aromatic spices and deep molasses goodness. Plus, the glaze? Pure magic. Once you make it, you’ll want to drizzle it over everything.
Jump to Recipe
What You’ll Need
This gingerbread recipe is so forgiving and made with ingredients you probably already have hanging out in your kitchen.
- Molasses
- Salt
- Eggs
- Salad oil
- Sugar
- Soda
- Water
- Flour
- Ginger
- Cinnamon
How to Make Gingerbread
- In a large bowl, mix together the molasses, salad oil, sugar, ginger, cinnamon, and salt until the sugar dissolves and everything smells like holiday cheer.
- Add the eggs and beat the mixture until it becomes smooth and glossy.
- Dissolve the soda in 1/8 cup of boiling water, then stir it into the molasses mixture. You’ll see the batter start to bubble a little.
- Gradually add in the flour, alternating with the remaining water, stirring gently until the batter is smooth. It will be pretty thin, almost like pancake batter, but trust the process!
- Pour the batter into a greased 9″x13″ pan and bake at 350 degrees until the top is firm and a toothpick comes out clean. The edges will pull away slightly from the sides of the pan.
- While the gingerbread bakes, make the glaze: melt the butter, then stir in the milk and brown sugar. Bring to a boil and let it bubble away for about 4 minutes, stirring occasionally. It’ll thicken a bit as it cools.
- Once the gingerbread is done, let it cool slightly before drizzling the glaze over the top. Serve warm or wait until it’s cold—your call!
Cook’s Notes
This gingerbread can be stored covered at room temperature for up to 3 days, though it’s usually gone by day two in my house! If you want to make it ahead, it freezes beautifully. Just wrap it tightly in plastic wrap, and when you’re ready to enjoy, let it thaw at room temperature.
Watch out for overbaking. Because the batter is thin, it might cook faster than you think, especially if your oven runs hot. Check it a bit earlier than you’d expect.
- For extra flavor depth, consider adding a pinch of nutmeg or cloves along with the ginger and cinnamon.
- If you want to make the glaze ahead of time, you can reheat it gently before drizzling over the gingerbread.
Make It Your Own
- Swap the salad oil with melted butter for a richer flavor.
- Replace half of the flour with whole wheat flour for a heartier texture.
- Add a handful of chopped walnuts or pecans for a nutty crunch.
- Add a teaspoon of vanilla extract to the glaze for a hint of vanilla sweetness.
If you try this, I’d love to hear how it turns out—drop a comment or tag me! I promise this gingerbread will make your kitchen feel like the coziest place on earth.
Related update: Gingerbread
Related update: 2 Minute Chocolate Yum