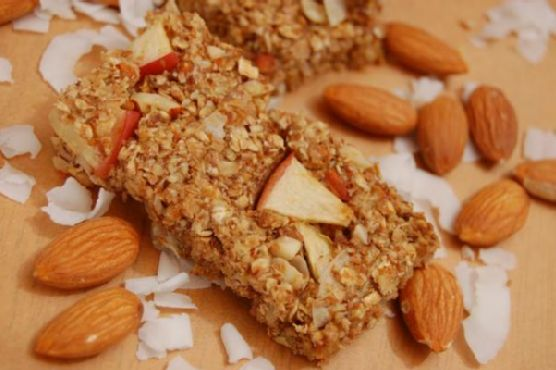
Peanut Butter Sriracha Cookies | Made by Meaghan Moineau

Picture this: It’s a Wednesday evening, the kind where you’ve been hustling all day but still crave something that feels like a hug on a plate. That’s when these Peanut Butter Sriracha Cookies waltzed into my chaotic kitchen. A little sweet, a little heat, these cookies tick all the boxes for something spectacularly different yet comfortingly familiar. It’s the kind of dessert that makes you feel like you’ve got your life together, even if just for a moment. Trust me, they’re worth the mini adventure of adding a spicy twist to our beloved peanut butter classic.

Jump to Recipe

What You’ll Need

So, here’s the good news: you probably have almost everything you need chilling in your pantry. This isn’t one of those recipes that sends you on a wild goose chase for exotic ingredients. But don’t underestimate the magic here; it’s all about that surprise kick of sriracha.

  • 1/2 cup unsalted butter, softened
  • 1 cup crunchy peanut butter
  • 1/2 cup sugar
  • 1/2 cup brown sugar
  • 1 tablespoon sriracha
  • 2 large eggs
  • 1 teaspoon vanilla extract
  • 1 3/4 cups all-purpose flour
  • 1 teaspoon baking powder
  • 1/2 teaspoon baking soda
  • 1/2 teaspoon salt
  • Granulated sugar, for rolling
  • Hershey’s chocolate kisses, for topping

How to Make Peanut Butter Sriracha Cookies

  1. Start by creaming together the unsalted butter, crunchy peanut butter, sugar, and brown sugar in a spacious mixing bowl. You’re looking for a smooth, creamy dream here.
  2. Slowly drizzle in the sriracha, then add the eggs and vanilla. Beat until everything is well combined and you have a beautifully cohesive mixture.
  3. In another bowl, whisk together the flour, baking powder, baking soda, and salt. This step is key to ensuring everything rises just enough.
  4. Gently mix the dry ingredients into the peanut butter concoction until you have a consistent dough. It should feel like the softest playdough ever.
  5. Here’s where it gets serious: refrigerate the dough for about an hour. This chill time helps the flavors meld and makes the dough easier to handle.
  6. Preheat your oven to a cozy 375 degrees Fahrenheit.
  7. Scoop the dough into 1-inch balls (a cookie scoop works wonders here). Dip the tops into granulated sugar for that sparkle and place on a cookie sheet.
  8. Use a fork to flatten each ball, creating that classic criss-cross pattern we all know and love.
  9. Bake for 8-10 minutes, just until the cookies start to brown. Keep an eye on them – do not over-bake unless you like cookies that double as hockey pucks.
  10. As soon as you pull them out of the oven, press a Hershey’s chocolate kiss into the center of each cookie. Let them cool on wire racks and then, my friend, indulge!

Cook’s Notes

Let me offer some pearls of wisdom: First, don’t skimp on the chill time—it’s essential for preventing spread. If you’re planning to bake ahead, you can make the dough and freeze it; just roll the dough into balls and freeze them on a tray before transferring to a bag. Bake them directly from frozen but add a couple more minutes to the baking time. As for leftovers, if there are any, store them in an airtight container at room temp for up to a week, though they rarely last that long in my house!

Make It Your Own

Why not put your own spin on these cookies? Here are a few ideas:

  • Substitute the peanut butter with almond butter if you’re feeling fancy or have a nut allergy to consider.
  • Kick it up a notch with more sriracha if you’re a heat seeker.
  • Try dark chocolate kisses instead of milk chocolate for a richer taste.
  • Add a handful of chopped peanuts for extra crunch if texture is your thing.

And there you have it! If you try this recipe, I’d love to hear how it turns out for you — drop a comment or tag me on social media. Can’t wait to hear what you think about this sweet and spicy twist!

Related update: Peanut Butter Sriracha Cookies

Related update: Chocolate Hazelnut Mousse

Chive and dill muffins | Made by Meaghan Moineau

One chilly autumn afternoon, I found myself digging through the fridge, searching for something — anything — that could transform into a warm, comforting snack. The day had that crisp edge that makes you want to cozy up with something fresh out of the oven. That’s when I spotted a lonely bunch of fresh chives and dill, remnants from last night’s dinner. An idea sparked, one that felt both adventurous and familiar: Chive and Dill Muffins. These little savory gems are the perfect answer to a craving for something cozy yet bright, offering a delightful mix of herbal freshness and subtle, buttery richness. And let’s be honest, they’re also a great way to justify eating a muffin at any time of day.

Jump to Recipe

What You’ll Need

Chances are you already have most of these ingredients lounging in your pantry, just waiting to become something delicious.

  • 1 cup all-purpose flour
  • 1/2 cup yellow cornmeal
  • 2 tablespoons sugar
  • 2 teaspoons baking powder
  • 1 teaspoon salt
  • 1/2 teaspoon baking soda
  • 1/4 teaspoon cayenne pepper
  • 1/4 cup fresh chives, chopped
  • 1/4 cup fresh dill, chopped
  • 1 cup plain yogurt
  • 2 large eggs
  • 1/2 cup (1 stick) unsalted butter, melted and slightly cooled

How to Make Chive and Dill Muffins

  1. Preheat your oven to 220°C (425°F). This high heat will give your muffins that beautiful rise and golden top.
  2. In a medium bowl, whisk together the flour, cornmeal, sugar, baking powder, salt, baking soda, and cayenne pepper. Once combined, gently stir in the chopped chives and dill, letting their fresh aroma fill your kitchen.
  3. In another medium bowl, whisk together the yogurt, eggs, and melted butter until smooth and creamy. The mixture should be a pale yellow, with small bubbles forming from the whisking.
  4. Add the yogurt mixture to the dry ingredients and stir just until blended. Be careful not to overmix; it’s okay if the batter is a bit lumpy. Those lumps will work themselves out during baking.
  5. Divide the batter among greased or silicone muffin cups, using about 1/3 cup batter for each. They should be about two-thirds full, giving them room to puff up beautifully.
  6. Bake in the preheated oven for 20 minutes, or until the muffins are puffed and golden. You’ll know they’re done when a toothpick inserted into the center comes out clean or with just a few crumbs attached.
  7. Let the muffins cool in their cups for a few minutes before removing. This brief wait allows them to set up perfectly. Serve warm for the best experience.

Cook’s Notes

Here’s where the magic happens — or at least where you avoid any potential hiccups. First, make sure your baking powder and soda are fresh; nothing’s worse than flat muffins. These muffins can be stored in an airtight container at room temperature for up to two days, but they’re best enjoyed fresh. If you want to make them ahead, you can freeze them for up to a month. Just thaw at room temperature and pop them in a warm oven for a few minutes to refresh their golden tops.

Make It Your Own

These muffins are already a little party of flavors, but if you’re feeling experimental, here are a few ideas:

  • Swap the chives for green onions for a milder flavor with a slight crunch.
  • Add 1/2 cup of grated cheddar cheese to the batter for an extra savory kick.
  • Mix in some finely chopped sun-dried tomatoes for a slightly sweet, tangy twist.
  • Replace the dill with fresh parsley and thyme for a different herbal profile.

If you try this, I’d love to hear how it turns out — drop a comment or tag me! Let’s swap stories about these delightful muffins and all their delicious variations.

Related update: Chive and dill muffins

Related update: Penne Arrabiata

Buttermilk Pound Cake | Made by Meaghan Moineau

Introduction

There’s something truly magical about a classic buttermilk pound cake. It takes me back to lazy Sunday afternoons in my grandmother’s kitchen, where the smell of freshly baked cake would fill the house, drawing everyone together. This recipe has been in our family for generations, cherished and passed down with love. The beauty of this cake lies in its simplicity, each ingredient playing a crucial role in creating a perfectly tender crumb and a rich, buttery flavor that leaves you reaching for just one more slice.

Why You’ll Love It

This buttermilk pound cake is the epitome of comfort baking. It’s wonderfully moist with a soft, dense crumb and a delightful hint of lemon and nutmeg that sets it apart from other pound cakes. Whether you’re a novice baker or a seasoned pro, this cake is straightforward and rewarding to make. Perfect for any occasion, it can be dressed up with a drizzle of glaze or enjoyed plain with a cup of tea or coffee. The versatility and timeless appeal of this cake make it a must-have recipe in your baking repertoire.

Ingredients

  • 2 cups all-purpose flour
  • 1/2 teaspoon baking soda
  • 1/2 teaspoon salt
  • 1 cup unsalted butter, softened
  • 2 cups white sugar
  • 4 large eggs
  • 1 tablespoon lemon zest
  • 1/4 teaspoon nutmeg
  • 1 teaspoon vanilla extract
  • 1 cup buttermilk

Instructions

  1. Preheat your oven to 325°F (165°C). Prepare a 9- or 10-inch tube pan by buttering it generously, lining the bottom with parchment paper, and buttering it again. For an extra special touch, coat the sides with sugar after buttering.
  2. In a medium bowl, sift together the flour, baking soda, and salt. Set this dry mixture aside for later.
  3. In a large mixing bowl, beat the softened butter and sugar together until creamy and light. This should take about 5 minutes of mixing.
  4. Add the eggs to the butter mixture one at a time, ensuring each egg is fully incorporated before adding the next. Mix in the lemon zest, nutmeg, and vanilla extract.
  5. Begin adding the dry ingredients and buttermilk alternately to the batter. Start with one-third of the flour mixture, mixing until just combined. Add half of the buttermilk, mixing again until just combined. Repeat, alternating between the dry ingredients and buttermilk, and finish with the last third of the flour mixture.
  6. Pour the batter into the prepared tube pan, smoothing the top with a spatula.
  7. Bake in the preheated oven for 70 to 75 minutes, or until a toothpick inserted into the center comes out clean.
  8. Allow the cake to cool in the pan for about 15 minutes before turning it out onto a wire rack to cool completely.

Tips

To ensure your pound cake is a success, here are a few tips: Make sure all your ingredients are at room temperature before you start; this helps them blend more smoothly and evenly. Don’t rush the creaming of the butter and sugar; this step is critical for incorporating air and achieving that perfect cake crumb. Lastly, be careful not to overmix once you begin adding the flour, as this can lead to a dense cake.

Variations & Substitutions

This buttermilk pound cake is wonderfully versatile. Feel free to swap the lemon zest for orange zest if you prefer a different citrus note. For a more spiced flavor, a pinch of cinnamon can be added along with the nutmeg. If you’re out of buttermilk, you can make a quick substitute by adding a tablespoon of lemon juice or vinegar to a cup of milk and letting it sit for 5 minutes.

Storage

Your buttermilk pound cake will stay fresh for up to 3 days if stored in an airtight container at room temperature. If you wish to keep it longer, wrap the cake tightly in plastic wrap and store it in the refrigerator for up to a week. This cake also freezes beautifully; wrap individual slices in plastic wrap, then aluminum foil, and store them in a freezer-safe bag for up to 3 months.

FAQ

Can I use a different type of pan?

Yes, you can use a loaf pan or bundt pan if you prefer. Just be sure to adjust the baking time accordingly and check for doneness with a toothpick.

Is it okay to use salted butter?

If you only have salted butter, you can use it, but omit the additional salt in the recipe to balance the flavors.

Nutrition

While I don’t have the exact nutritional breakdown, this recipe yields a rich and buttery cake. Keep in mind that it’s a treat best enjoyed in moderation. For those counting calories or managing dietary restrictions, consider using a sugar substitute or reducing the sugar by a third.

Conclusion

Making this buttermilk pound cake is like baking a slice of nostalgia. Its rich flavor, tender crumb, and delightful aroma will have you falling in love from the first bite. Whether you enjoy it plain or with a scoop of ice cream, this cake is a delightful reminder of life’s simple pleasures. I hope this recipe brings as much joy to your kitchen as it does to ours. Happy baking!

Related update: Buttermilk Pound Cake

Related update: Peanut Butter Sriracha Cookies