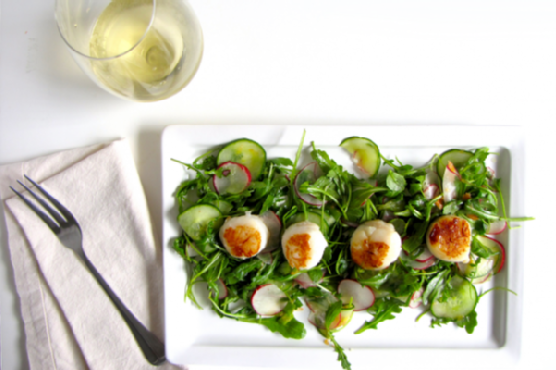
Picture this: It’s a Tuesday evening. You’ve just kicked off your shoes after a whirlwind day, and all you want is something fresh, zesty, and sophisticated on your plate without spending more time in the kitchen than you did in traffic. That’s where my Citrus Arugula Salad with Seared Scallops swoops in to save the day. It’s got that crisp, peppery bite from the arugula that I absolutely crave, the juicy pop of a Cara Cara orange, and the tender, buttery goodness of perfectly seared scallops. It sounds fancy, but trust me, it’s a cinch to throw together—and it’s bound to impress whoever’s lucky enough to join you at the table.
Jump to Recipe
What You’ll Need
Chances are you already have most of this in your kitchen, aside from maybe the scallops. But it’s the simple ingredients that really let those scallops shine.
- Arugula
- Cara Cara orange
- Radish
- English or Persian cucumber
- Green onion
- Salt
- Scallops
How to Make Citrus Arugula Salad with Seared Scallops
- First, thinly slice the radishes and cucumber. You want them delicate enough to complement the scallops, not overshadow them. Dice up the green onion, too.
- In a bowl, squeeze the juice and pulp from half of the Cara Cara orange. Add a pinch of salt and whisk it all together until it’s beautifully blended.
- Add in your radish and cucumber slices, along with a healthy handful of arugula. Toss it all together until every leaf and slice glistens with that citrusy goodness.
- Now, for the scallops: Heat a splash of oil in a pan over high heat. The pan needs to be hot, hot, hot—like sizzling enough that you can almost hear it pleading for the scallops.
- Gently place the scallops flat-side down in the pan. Space is key here, so if you have a lot of scallops, do them in batches. Crowding the pan is the enemy of that golden sear we’re aiming for.
- Let them sear undisturbed. The temptation to peek and prod is real, but resist! After a couple of minutes, check for that caramel-colored crust. Once you see it, flip them over.
- Plate your salad and place about four scallops on top. They should be served immediately to avoid any rubbery disappointments.
Cook’s Notes
Seared scallops are one of those things where less is more. Don’t overdo the seasoning; let their natural sweetness shine. Also, scallops are quick to cook and quick to turn rubbery if left too long. Watch them like a hawk, and you’ll be fine. If you want to make this ahead, prepare the salad components in advance and just sear the scallops right before serving. As for leftovers, the salad keeps well for a day, but the scallops are best enjoyed fresh out of the pan.
Make It Your Own
- Swap the arugula for spinach if you prefer a milder green.
- Replace the Cara Cara orange with blood orange for a deeper color and flavor.
- Try grilling the scallops for a smoky twist.
- For a vegetarian version, swap the scallops for crispy tofu slices.
If you try this, I’d love to hear how it turns out—drop a comment or tag me! Whether it’s a quick weeknight dinner or a date night delight, I hope you find this as much of a joy to make as it is to eat. Enjoy!
Related update: Citrus Arugula Salad with Seared Scallops
Related update: Vegetarian Ratatouille
Related update: Pear Salad With Walnuts and Blue Cheese

Picture this: It’s one of those afternoons when the craving for something sweet is impossible to ignore. Not just any sweet, but a slice of cake smothered in creamy, luscious frosting. I was halfway through baking a batch of cupcakes when disaster struck—no frosting in sight! With minutes to spare, I whipped out this trusty Old Fashioned Vanilla Buttercream Frosting recipe, and voilà, my cupcakes were saved. It’s quick and easy, with ingredients you probably have on hand, and it never fails to impress with its smooth, rich texture. Plus, there’s something about homemade frosting that just feels like a hug in dessert form.
Jump to Recipe
What You’ll Need
I love this recipe because it uses simple ingredients that work magic together. Chances are you already have most of this sitting in your pantry or fridge:
- Solid vegetable shortening
- Butter
- Vanilla extract
- Confectioners sugar
- Milk
How to Make Old Fashioned Vanilla Buttercream Frosting
- In a large mixing bowl, cream the butter and shortening together using an electric mixer. You’re aiming for a smooth, unified blend that’s a pale yellow in color.
- Add the vanilla extract, and continue mixing. The aroma will instantly start to fill your kitchen.
- Gradually sift in the confectioners sugar, adding it one cup at a time. Beat on medium speed, and scrape down the sides and bottom of the bowl often. This ensures everything is well incorporated.
- Once all the sugar is mixed in, the icing will seem a bit dry—don’t worry, this is normal!
- Add the milk to the mixture. Beat on medium speed for about 3 minutes. You’re looking for a light, fluffy texture that’s easy to spread.
- Keep the icing covered with a damp cloth until you’re ready to use it. This prevents it from drying out.
Cook’s Notes
A little tip I’ve picked up: Keeping the mixing bowl in the fridge when you’re not using it helps maintain the frosting’s consistency, especially if your kitchen tends to be on the warmer side. If you’re making this ahead of time, store it in an airtight container in the fridge for up to a week. When you’re ready to use it, just give it a quick re-whip in your mixer to bring back its creamy texture. Also, be generous with that vanilla—for that classic flavor, it’s key!
Make It Your Own
Here are a few fun variations to try if you’re feeling adventurous:
- Swap out the vanilla for almond extract for a nutty twist.
- Add a few tablespoons of cocoa powder to create a chocolate buttercream.
- Substitute the milk with heavy cream for a richer, thicker frosting.
- Mix in some food coloring to match the theme of your dessert or party.
If you try this, I’d love to hear how it turns out—drop a comment or tag me! There’s nothing more rewarding than seeing your creations come to life. Enjoy every sweet, frosted bite!
Related update: Old Fashioned Vanilla Buttercream Frosting
Related update: Apothic Granita and Vanilla Panna Cotta

So last Tuesday, I found myself staring at a bowl full of apples on my countertop, leftovers from my overly ambitious farmer’s market haul. My mind was set on something sweet and indulgent, but I didn’t want to spend ages prepping a fancy dessert or making a mess of my kitchen. Enter: Easy Homemade Apple Fritters. These little nuggets of joy are perfect for those times when you need a quick treat that feels special but doesn’t involve a ton of effort. They’re crispy on the outside and filled with warm, cinnamon-spiced apple goodness on the inside. Trust me, they’re like a cozy hug on a plate.
Jump to Recipe
What You’ll Need
You’ll love this recipe because chances are, you already have most of the ingredients in your pantry. Plus, it’s really all about letting those apples shine.
- 1 cup all-purpose flour
- 1 apple, peeled, cored, and diced
- 1 teaspoon baking powder
- 1 teaspoon cinnamon
- 1 egg
- 1/3 cup milk
- 1 tablespoon sugar
- 1/4 teaspoon salt
- Oil, for frying (I used vegetable oil)
- 1 cup powdered sugar
- 2 tablespoons milk (for the glaze)
How to Make Easy Homemade Apple Fritters
- In a mixing bowl, whisk together the flour, sugar, salt, baking powder, and cinnamon. You’ll want to inhale deeply because that cinnamon is going to smell divine.
- Gently stir in the milk and egg until the mixture is just combined. Over-mixing is the enemy here! We want it to stay light and fluffy.
- Fold in the diced apple. Make sure those apple pieces are well distributed—every fritter deserves its apple moment!
- Pour oil into a skillet so that it’s about 1 1/2 inches deep. Heat the oil on high. You’ll know it’s ready when a little dough thrown in pops right back up to the surface.
- Carefully drop heaping teaspoons of the dough into the hot oil. Watch them sizzle! Cook until the fritters are brown, about 2 minutes, then flip. Give them another 1-2 minutes to get golden on the other side.
- Transfer the fritters to paper towels to soak up any excess oil. A quick pit stop before they head to a cooling rack.
- For the glaze, stir the powdered sugar and milk together in a small bowl. It’ll be smooth and silky.
- Drizzle the glaze over the fritters. Wait about 3 minutes for the glaze to harden a bit, flip the fritters, and drizzle over the other side. They’re best served warm, so dive in!
Cook’s Notes
Here’s a few things I learned while making these fritters:
- Keep an eye on your oil temperature. If it’s too hot, your fritters will brown too quickly on the outside and stay raw on the inside.
- If you’re making these ahead of time, store them at room temperature in an airtight container for up to a day. Reheat in the oven to crisp them back up.
- Leftovers can be revived by popping them in a toaster oven for a few minutes. They won’t be as good as fresh, but still tasty.
Make It Your Own
- Swap the apple for another fruit like pears or peaches if you’re feeling adventurous!
- Add a pinch of nutmeg or ginger to the batter for an extra layer of spice.
- Try using maple syrup instead of powdered sugar for the glaze for a deeper, richer sweetness.
- For a savory twist, omit the sugar and cinnamon, and add sharp cheddar cheese and bacon bits to the batter.
If you try this, I’d love to hear how it turns out — drop a comment or tag me! Seriously, nothing makes my day more than seeing your kitchen creations. Enjoy every crispy, warm, and cinnamon-sweet bite!
Related update: Easy Homemade Apple Fritters
Related update: Old Fashioned Vanilla Buttercream Frosting

Last Tuesday evening, I was standing in my kitchen, staring into the fridge like it was an oracle with all the answers to my dinner dilemmas. It had been a long day, and I needed to whip up something that felt like a reward for surviving it. That’s when I spotted the pack of pork chops tucked away on the bottom shelf, right beside a wedge of Gruyère cheese that had almost been forgotten. The idea of Cheese Pork Chops was born, and let me tell you, this dish is a midweek savior. It’s got that special touch of comfort with gooey cheese and rich mustard cream, yet it’s simple enough to throw together while you’re half-distracted by a podcast or the kids’ homework.
Jump to Recipe
What You’ll Need
This is one of those recipes where you might just have everything you need already. It’s all about bold flavors with just a handful of ingredients.
- 2 tablespoons olive oil
- 2 tablespoons unsalted butter
- 4 pork chops (about 1 inch thick)
- Salt and pepper, to taste
- 1/2 cup heavy cream
- 2 tablespoons dijon mustard
- 1 cup shredded Gruyère cheese
How to Make Cheese Pork Chops
- Heat a heavy-bottom skillet over medium-high heat. Add the olive oil and butter, swirling them together until the butter melts and starts to slightly foam.
- Carefully place the pork chops in the skillet. Sauté for about 3 minutes on each side, letting them develop a lovely golden crust.
- Reduce the heat to medium. Cook the pork chops for an additional 5 to 6 minutes per side, until they’re just cooked through. Sprinkle with salt and pepper to taste. Remember, the juices should run clear when you test them.
- While the chops finish cooking, preheat your broiler. In a small bowl, whisk together the heavy cream, dijon mustard, and shredded Gruyère cheese until well combined.
- Transfer the cooked pork chops to an ovenproof dish. Spread the cheese-cream mixture generously over each chop.
- Place the dish under the preheated broiler for about 5 minutes. Keep a close eye on them—the cheese should be bubbly and slightly browned.
Cook’s Notes
One of the best things about this dish is how forgiving it is. If your chops are a bit thicker or thinner, just adjust cooking time accordingly. You want them juicy, not dry.
If you’re making this ahead of time, you can prepare the cheese mixture in advance and even sear the chops the night before. Just store them separately in the fridge and bring to room temperature before broiling.
Got leftovers? Lucky you! They’re fabulous sliced thin and tossed into a salad, or reheated gently in the microwave for a next-day lunch that will make your coworkers jealous.
Make It Your Own
- Spice it up: Add a teaspoon of chili flakes to the cheese mixture for a spicy kick.
- Herbaceous twist: Mix a tablespoon of chopped fresh herbs like thyme or rosemary into the cheese mixture.
- Cheese swap: Try shredded sharp cheddar or even blue cheese for a different flavor profile.
- Dijon alternative: Experiment with whole grain mustard for a bit more texture and tang.
If you try this, I’d love to hear how it turns out — drop a comment or tag me in your cheesy creations! Happy cooking, friends!
Related update: Cheese Pork Chops
Last Tuesday was one of those days where everything felt a little off-kilter. You know, the kind where your morning coffee just doesn’t hit right, and your afternoon is a blur of tasks that never seem to end? By the time dinner rolled around, I was craving something that would transport me far from the daily grind—something warm, comforting, and just a tad exotic. Enter: paella. Not only is it a dish that sounds fancy enough to impress, but it’s surprisingly simple to whip up. It’s got this amazing way of bringing a little Spanish sunshine to your table, even on the dreariest of evenings. Plus, it’s a one-pan wonder, so less time spent cleaning up means more time for Netflix or a good book. Trust me, once you’ve tasted this, you’ll see what all the fuss is about. Jump to Recipe
What You’ll Need
If your pantry’s got some basics and your local grocery store has a seafood section, you’re pretty much set. I love that this recipe starts with stuff you likely already have on hand!
- Smoky paprika
- Dried oregano
- Kosher salt
- Black pepper
- Chicken wings
- Littleneck clams
- Solid chorizo sausage
- Shrimp
- Extra virgin olive oil
- White diced onion
- Diced garlic
- Italian parsley leaves
- Whole .5 oz tomatoes
- Canned Spanish short grain rice
- Water
- Saffron
- Salt and pepper
- Green peas
- Lemon wedges
How to Make Paella for Four; A Wonderful Spanish Mixed Seafood Stew
- Start by mixing the smoky paprika, dried oregano, kosher salt, and black pepper. Rub this spice mix all over the chicken wings and let them chill in the fridge for an hour. This is where the magic begins—infusing the chicken with all those bold, earthy flavors.
- Take the chicken out of the fridge about 30 minutes before you’re ready to cook. They should be close to room temp, which helps them cook evenly.
- Heat half of the olive oil in your trusty 12-inch All-Clad stainless steel pan over medium-high heat. Toss in the chorizo rounds and let them sizzle away until they’re browned and fragrant. Remove them from the pan and set aside.
- Add the rest of the oil to the pan, then brown the chicken on all sides, savoring that sizzling sound. Once they’re golden brown, take them out and keep them with the chorizo.
- Turn the heat down to medium and add the onions, garlic, and parsley. This is your sofrito—a flavor-packed base that’s the heart of the dish. Cook until the onions are translucent and everything smells irresistible, about 2-3 minutes.
- Next, add the crushed and drained tomatoes. Give everything a good stir and let it cook for about 3 minutes until the flavors meld together.
- Stir in the rice, making sure it’s all cozy with the sofrito, for about 2 minutes. You want each grain to be coated with that delicious base.
- Return the sausage and chicken to the pan. Pour in the hot water and bring the mixture to a gentle simmer, cooking for about 5 minutes. Give it a stir now and then to keep everything mingling nicely.
- Now, place the clams artfully atop the rice. Resist the urge to stir! You want them just so.
- Let the paella cook for another 5 minutes, then position the shrimp, tails up, so they can steal the show. Continue to cook for about 10 minutes, until the clams have popped open, the shrimp are a lovely pink, and the rice is fluffy yet moist.
- Finally, check for socarrat. With a fork, gently feel the bottom of the pan. If you detect that legendary crispy crust, you’re golden. If not, crank up the heat for 30-45 seconds to get that perfect crackling finish, then serve immediately.
Cook’s Notes
Here are a few little nuggets of wisdom to ensure your paella is perfecto:
- If you’re short on time, you can season the chicken and let it sit while you prep the rest of the ingredients. It won’t be exactly the same, but life necessitates shortcuts sometimes!
- Leftovers? Pop them in an airtight container and they’ll keep in the fridge for up to two days. Paella is one of those dishes that tastes even better the next day, I promise.
- Be patient with the socarrat. It’s the best bit, but it requires a little trust in the process. If you don’t hear a slight crackle when you turn up the heat, give it a bit more time.
Make It Your Own
Feeling creative? Here are some twists to make this paella uniquely yours:
- Swap out the chicken wings for crispy tofu to make a pescatarian version.
- Substitute the clams with mussels if that’s what you’ve got on hand or prefer.
- Feeling spicy? Use a hot chorizo for an extra kick.
- Not a fan of saffron? Add a pinch of turmeric for a golden hue without the floral notes.
If you try this, I’d love to hear how it turns out—drop a comment or tag me! Your feedback keeps this kitchen creativity going. Enjoy the taste of Spain at your own table!
Related update: Paella for Four; A Wonderful Spanish Mixed Seafood Stew
Related update: Cheese Pork Chops

Picture this: it’s a rainy Wednesday evening, and I’m staring at my fridge like it’s going to magically suggest what I should make for dinner. Ever have those moments when nothing feels right, but takeout seems too tragic? That’s when I stumbled upon the perfect antidote — My Drunken Fish Fillet. It’s this crispy, golden, comforting dish that feels like a hug on a plate, without the takeout guilt. The beer in the batter makes everything delightfully light and airy, and honestly, it’s low-key impressive when you pull it off. Plus, who doesn’t love cooking with wine and beer? The kitchen smells divine, and it’s as much fun to make as it is to devour.
Jump to Recipe
What You’ll Need
Okay, so let’s talk about the magic ingredient list. The cool part? You probably have a bunch of this stuff hanging out in your pantry already. Here’s the breakdown:
- Fish – whatever fillet you’ve got; think tilapia or cod.
- Salt – to season the fish and the batter.
- White ground pepper – trust me, it adds just the right kick.
- Rice wine – this is where the magic (and the name) starts.
- Beer – pick something light, like a lager.
- White eggs – you’ll need both the yolk and the whites, separately.
- All-purpose flour – plus a little more for dusting if you’re feeling fancy.
- Oil – for frying, of course.
How to Make My Drunken Fish Fillet
Let’s break this down step-by-step so you can nail it every time:
- Start by combining your beer, egg yolk, flour, and half a teaspoon of salt. Whisk it well until you’ve got a thick, smooth batter. Pop this into the fridge for a good hour. This rest is crucial for texture!
- Meanwhile, sprinkle your fish fillets with salt and white ground pepper. Give them a pat so they’re nicely coated. Then, splash on the rice wine and let them marinate for about 15 to 20 minutes. The fragrance alone will brighten your day!
- When you’re ready to fry, beat the egg whites until they’re soft and foamy. Gently fold these into your chilled batter. This is where the light, airy magic happens.
- Heat up your oil until it’s shimmering. Dip your marinated fish fillets into the batter, ensuring they’re fully enveloped in that luscious mix. Fry them three pieces at a time, so they’re not overcrowded. Cook until they’re a beautiful golden brown and oh-so-crispy.
- For a quick dip, mix Yamasa soy sauce with a bit of wasabi from the tube and a squeeze of lemon juice. Simple but absolute perfection.
Cook’s Notes
Here’s the tea on making this dish truly sing. First off, make sure your oil is hot enough before you start frying. You want that sizzle! If it’s too cool, the batter soaks up oil and gets greasy. You can make the batter ahead (up to a day), just keep it covered in the fridge because that chill time is key. Leftover fillets (if you have any!) can be reheated in an oven to crisp them back up — avoid the microwave unless you love soggy regrets.
Make It Your Own
Want to switch things up? Here are some variations that keep things exciting:
- Swap the fish for crispy tofu. Just be sure to press the tofu well before marinating.
- Go gluten-free by using a gluten-free flour blend in place of all-purpose flour.
- Add a spicy twist by mixing a pinch of cayenne into the batter for a bit of heat.
- Try an Asian twist with panko breadcrumbs mixed into the batter for extra crunch.
If you try this, I’d love to hear how it turns out — drop a comment or tag me! I’m always here for your kitchen triumphs and even the occasional mishap. Happy frying!
Related update: My Drunken Fish Fillet
Related update: Paella for Four; A Wonderful Spanish Mixed Seafood Stew
Related update: Crunchy Prawn Skewers With Lemony Avocado Dip

Picture this: It’s a Tuesday evening, and the week’s already wearing me down. I’m craving something cheesy, comforting, and a little indulgent. You know, the kind of meal where the smell alone makes you feel like you’ve just wrapped yourself in a warm, delicious hug. Enter the Easy Cheesy Pizza Casserole. It’s like a giant pizza in a pan but with all the cozy vibes of a casserole. Plus, it’s a crowd-pleaser, perfect for family dinners or casual get-togethers with friends. The best part? It’s as easy as it is cheesy. Grab your apron, and let’s dive in!
Jump to Recipe
What You’ll Need
Trust me, this ingredient list reads like a love letter to your pantry. Chances are, you already have most of these on hand:
- Ground beef or bulk sausage mix
- Ricotta cheese
- Oregano
- Basil
- Parmesan cheese
- Pasta sauce or canned pizza sauce
- Crushed red pepper flakes
- Pepperoni
- Shredded mozzarella cheese
- Shredded aged provolone cheese
- Herbed parmesan drop biscuits (recipe follows)
- Baking mix
- Italian seasoning
- Milk
How to Make Easy Cheesy Pizza Casserole
- Preheat your oven to 375°F. This is a crucial step, so your biscuits start cooking right away.
- Brown the ground beef or sausage in a skillet over medium heat until it’s no longer pink. Drain the fat because nobody likes greasy casseroles.
- Stir in the pasta or pizza sauce and a pinch of crushed red pepper flakes. Let it simmer until everything is well-blended and smells heavenly.
- In a separate bowl, mix the ricotta cheese with oregano, basil, and Parmesan cheese. This will be your creamy layer of deliciousness.
- Prepare the biscuit dough by combining the baking mix with Italian seasoning and milk. Stir until just blended; lumps are okay here.
- Spray a 13 x 9-inch pan with non-stick spray. Drop the biscuit dough by teaspoons into the pan, spacing them evenly. Don’t worry about gaps; the dough will spread out beautifully in the oven.
- Layer the ground beef mixture over the biscuits, then dot with the ricotta mixture. You should start to see the makings of a masterpiece.
- Bake at 375°F for about 20 minutes or until the biscuits are puffed and just starting to turn golden. Your kitchen should smell like a dream by now.
- Increase the oven temperature to 425°F. Sprinkle mozzarella and provolone cheeses over the top and lay out pepperoni slices like you’re decorating a pizza.
- Return the casserole to the oven for about 10 minutes, until the cheese is melted and bubbling slightly. This is the moment you’ve been waiting for.
- Let it stand for 5 minutes before slicing. Patience is a virtue, and it’ll pay off when your slices come out picture-perfect.
- Optionally, sprinkle additional Parmesan cheese on top before serving. More cheese is always the right choice.
Cook’s Notes
A few quick tips to make sure your casserole is a hit:
- If you want to make this ahead, prepare the beef and ricotta mixtures and store them in the fridge. When ready to bake, just assemble everything, and you’re good to go.
- This casserole keeps well in the fridge for up to three days. Just cover and reheat in the oven to keep the biscuits from getting soggy.
- Be sure not to over-mix your biscuit dough; a gentle stir is all it takes. Over-mixing can make them tough.
Make It Your Own
Feel free to get creative and put your spin on this cozy dish:
- Swap the pepperoni for crispy tofu slices for a vegetarian twist that still packs plenty of flavors.
- Use spicy Italian sausage in place of ground beef for an extra kick.
- Try adding a layer of sautéed mushrooms and onions for an earthy depth of flavor.
- Go Hawaiian and add pineapple chunks along with ham or Canadian bacon for a sweet and savory combo.
If you give this Easy Cheesy Pizza Casserole a whirl, I’d be thrilled to hear how it turned out for you. Drop a comment or tag me on social media with your delicious creations. Happy cooking!
Related update: Easy Cheesy Pizza Casserole
Related update: My Drunken Fish Fillet
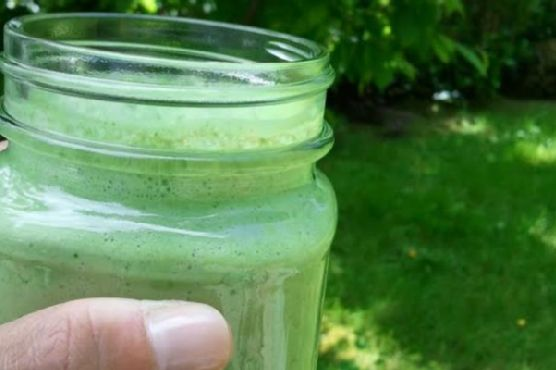
It was one of those mornings where hitting the snooze button was more tempting than ever. The kind of morning where a little pick-me-up is not just a want but a necessity. As I shuffled into the kitchen, I thought about something quick, healthy, and invigorating. Enter the Skinny Green Monster Smoothie. It’s like a jolt of energy in a glass, and it comes together in minutes. Trust me, this smoothie is both a morning lifesaver and a delightful way to sneak in those greens without sacrificing flavor. Just one sip, and you’ll be hooked—it’s the kind of recipe that keeps you coming back, not just for the taste, but for how it makes you feel: ready to tackle anything the day throws at you.
Jump to Recipe
What You’ll Need
I’ve gathered a list of ingredients that are both simple and likely already in your kitchen, so you can whip this up without a special trip to the grocery store. Here’s what you need:
- Frozen banana – it makes the smoothie creamy and naturally sweet.
- Baby spinach – don’t worry, you won’t even taste it!
- Peanut butter – adds a delicious richness and nutty flavor.
- Unsweetened vanilla almond milk – keeps it light and dairy-free.
- Fat-free plain Greek yogurt – for that extra creaminess and a protein boost.
How to Make Skinny Green Monster Smoothie
- Start by placing the frozen banana in your blender. It’s best to break it into chunks so it blends smoothly.
- Add a generous handful of baby spinach. Don’t worry—it’ll blend in seamlessly, giving you all the green goodness without overpowering the taste.
- Spoon in the peanut butter. This is where the magic happens as it brings richness and a subtle sweetness to the mix.
- Pour in the unsweetened vanilla almond milk. This will help everything blend together and give the smoothie a lovely vanilla hint.
- Add the fat-free plain Greek yogurt for an extra creamy texture. This also ups the protein quotient, making the smoothie more filling.
- Blend everything on high until it’s completely smooth and creamy. You should see a beautiful green hue and a velvety texture. If needed, scrape down the sides and blend again.
- Taste and adjust if necessary. Need it a bit sweeter? Add a touch more banana or a splash of honey. Too thick? A little more almond milk will do the trick.
Cook’s Notes
There’s not much that can go wrong with this smoothie, but here are a few pointers to keep it perfect every time. If your blender is having trouble with the frozen banana, let it thaw for a few minutes before blending. This smoothie is best enjoyed fresh, but you can refrigerate leftovers for up to a day. Just give it a good shake or stir before drinking. If you prefer it colder, throw in a few ice cubes before blending, but keep in mind this might dilute the flavors slightly.
Make It Your Own
There are plenty of ways to tweak this smoothie to suit your taste:
- Swap the peanut butter for almond or cashew butter if you’re feeling adventurous.
- Use coconut milk instead of almond milk for a tropical twist.
- Add a scoop of your favorite protein powder to make it a post-workout powerhouse.
- For a berry boost, toss in a handful of frozen blueberries or strawberries.
If you try this, I’d love to hear how it turns out—drop a comment or tag me! Whether you’re rushing out the door or lounging with a good book, this smoothie is a perfect companion. Enjoy and embrace your inner green monster! 🥤💚
Related update: Skinny Green Monster Smoothie
Related update: Easy Cheesy Pizza Casserole
Related update: Banana Milo Milkshake

Picture this: It’s a hectic Wednesday evening, and you’ve just walked through the door, shoes off, contemplating what to make for dinner. The fridge hums with half-empty bottles of condiments, and there’s a lone pack of pork chops staring back at you. This is the moment you realize the magic of Bruschetta Style Pork & Pasta. It’s the perfect blend of comforting pasta and savory pork, all wrapped in the tangy-sweet goodness of bruschetta flavors. It’s one of those dishes that feels fancy enough to impress but is wonderfully simple to throw together, ideal for those mid-week dinners when time is not on your side.
Jump to Recipe
What You’ll Need
This recipe is a lifesaver because chances are you already have most of the ingredients hanging around your kitchen. Here’s what you’ll need to whip up this delight:
- One package of bow tie pasta
- Freshly grated parmigiano reggiano
- A jar of Recipe Makers Chicken Bruschetta Pasta sauce
- 4-6 pork chops
How to Make What to make for dinner tonight?? Bruschetta Style Pork & Pasta
- First, give those pork chops a good wash and rinse. Pat them dry, then plop them into your skillet. You’ll want to cut them into bite-sized pieces so they cook quickly and soak up all those delicious flavors.
- Add half of the Basil Garlic simmer sauce from your Bruschetta Pasta kit into the skillet with the pork. You’ll know it’s working its magic when the kitchen starts to fill with a seriously drool-worthy aroma.
- Meanwhile, bring a pot of water to a boil and get your bow tie pasta cooking. Aim for al dente—that perfect balance of tender but still with a bit of bite.
- Once your pasta is done, drained, and ready, toss it into the skillet with the pork. Pour in the rest of the Basil Garlic Simmering Sauce, giving everything a nice mix so the pasta is well-coated.
- Now for the pièce de résistance: top the whole thing with the Chunky Bruschetta Finishing Sauce. Sprinkle generously with Parmesan, then cover the skillet. Let it all cook on low heat for 2 to 3 minutes, just until everything’s heated through and the cheese melts into gooey perfection.
Cook’s Notes
Here’s the deal: when cutting your pork, keep the pieces uniform in size to ensure even cooking. You want them golden but not overcooked. If you’re making this ahead, stop just before adding the Parmesan and Finishing Sauce. Store it in the fridge, and when you’re ready to eat, layer on the sauce and cheese, then heat through. Leftovers? They’re a dream. Just store them in an airtight container, and they’ll be good for up to three days. Reheat gently on the stove or in the microwave with a splash of water to keep everything from drying out.
Make It Your Own
Here are some ways you can switch things up:
- Swap the pork for crispy tofu for a vegetarian twist. Just pan-fry the tofu until golden before adding the sauces.
- Use zoodles or spaghetti squash instead of bow tie pasta for a low-carb version.
- Add a handful of fresh spinach to the skillet before serving for a pop of color and extra nutrients.
- For a spicy kick, toss in some red pepper flakes along with the Parmesan.
If you try this, I’d love to hear how it turns out—drop a comment or tag me! Cooking should be fun, stress-free, and delicious, so let’s make that happen. Happy cooking, friends!
Related update: What to make for dinner tonight?? Bruschetta Style Pork & Pasta

There was this one Thursday evening when I felt the chill in the air turning my fingers just a bit numb, and I craved something that felt like a warm hug. I was rifling through my pantry, hoping to discover a forgotten treasure, when I stumbled upon a jar of sauerkraut and a pack of knockwurst sitting in the fridge. Suddenly, inspiration struck. This dish is the epitome of comfort food — cozy, hearty, and surprisingly easy to throw together with a few pantry staples. The combination of savory knockwurst and tangy sauerkraut, all tied together with a hint of sweetness from molasses and the earthy warmth of spices, truly hits the spot on those brisk evenings when you just need a little extra comfort.
Jump to Recipe
What You’ll Need
This recipe is all about layering flavors with a minimal ingredient list — you’ll likely find many of these in your pantry already!
- 1 tablespoon butter
- 1 medium onion, chopped
- 1 cup beer
- 1 cup water
- 1 tablespoon cornstarch
- 2 tablespoons brown mustard
- 1 tablespoon molasses
- 1 teaspoon caraway seed
- 1/4 teaspoon ground allspice
- 1/4 teaspoon ground black pepper
- 1 medium rutabaga, peeled and chopped
- 1 pound cooked knockwurst
- 2 cooking apples, peeled, cored, and cut into wedges
- 1 can (about 14 ounces) sauerkraut
How to Make Knockwurst with Sauerkraut
- In a medium frying pan, melt the butter over medium heat. Add the knockwurst and cook, turning occasionally, until they’re browned and the edges are just starting to crisp — about 10-12 minutes.
- Meanwhile, drain the sauerkraut in a colander, rinse it under cold water, and let it drain again thoroughly. This step is crucial to avoid an overly sour dish.
- In a large pot, sauté the chopped onion over medium heat until the pieces are tender and translucent, but not browned. You’ll know it’s ready when the kitchen fills with that sweet, savory onion aroma.
- Pour in the beer and let it come to a gentle simmer. Meanwhile, in a separate bowl or measuring cup, mix together the water, cornstarch, brown mustard, molasses, caraway seed, ground allspice, and black pepper until smooth.
- Stir this mixture into the onion and beer in the pot. Cook and stir consistently until the sauce thickens and becomes bubbly. You’ll see it start to coat the back of a spoon — that’s when you know it’s ready for the next step.
- Add the chopped rutabaga to the pot, cover with a lid, and let it simmer for 15 minutes, allowing the rutabaga to become just tender.
- Finally, stir in the browned knockwurst, apple wedges, and sauerkraut. Cover the pot again and let everything simmer together for another 15 to 20 minutes, until the apples have softened and the flavors have melded beautifully.
Cook’s Notes
- When browning the knockwurst, be patient and let them get a nice brown crust. It adds a lovely depth of flavor that you don’t want to miss.
- The molasses adds a touch of sweetness but doesn’t overpower. If you prefer slightly less sweetness, you can reduce the amount to 1 teaspoon.
- This dish can be made ahead and actually tastes better the next day as the flavors have more time to develop. Simply store it in an airtight container in the fridge for up to 3 days. Reheat on the stove over low heat until warmed through.
Make It Your Own
- For a vegetarian twist, swap the knockwurst with crispy tofu cubes. You’ll get that savory satisfaction without the meat.
- Use sweet potatoes in place of rutabaga for a sweeter, more colorful dish.
- Add a handful of chopped kale or spinach at the end for a burst of color and nutrients.
- If you’re a spice lover, a pinch of red pepper flakes will add a nice kick.
If you try this recipe, I’d love to hear how it turns out for you! Drop a comment below or tag me in your culinary adventures. Enjoy every bite of this cozy, delicious meal!
Related update: Knockwurst with sauerkraut
Related update: What to make for dinner tonight?? Bruschetta Style Pork & Pasta

There I was, standing in my tiny kitchen on a Tuesday afternoon, staring at a leg of lamb I’d ambitiously bought during my last grocery run. It was one of those moments where you think, “What have I gotten myself into?” But then inspiration hit me like a delicious lightning bolt: Yogurt Marinated Lamb Skewers. It’s one of those recipes that sounds fancy enough to impress a dinner guest but is secretly simple enough for a weeknight. The magic is all in the marinade, full of spices that soak into the lamb, turning it tender and flavorful. So if you’re looking to impress someone (or just yourself), keep reading.
Jump to Recipe
What You’ll Need
I’m willing to bet you’ve already got most of this stuff hanging out in your pantry. The marinade is what truly makes this dish shine, infusing the lamb with a fragrant mix of spices and creamy yogurt.
- Vegetable oil
- Cumin
- Leg of lamb
- Nutmeg
- Paprika
- Plain yogurt
- Salt
- Turmeric
How to Make Yogurt Marinated Lamb Skewers
- Start by boning the leg of lamb, if it isn’t already done, and cut it into 1-inch cubes. This size is perfect for skewers and ensures even cooking.
- In a large bowl, combine the vegetable oil, cumin, nutmeg, paprika, plain yogurt, salt, and turmeric. Mix until everything is nicely blended and the mixture is aromatic.
- Add the lamb cubes to the marinade. Toss them until they’re well-coated. Cover the bowl and pop it into the refrigerator overnight. This is where the magic happens, as the lamb soaks up all those wonderful flavors.
- The next day, thread the marinated lamb cubes onto skewers. If you’re using wooden skewers, don’t forget to soak them in water for at least 30 minutes to prevent burning.
- Grill the skewers over charcoal, which gives them that beautiful smoky flavor. Cook them for about 7 minutes on each side, until they’re a rich, golden-brown and fragrant.
Cook’s Notes
So, here’s the thing: patience is key! Letting the lamb marinate overnight is what makes it so tender and flavorful. If you’re in a rush, a few hours will do, but try not to skimp on marinating time. As for grilling, charcoal gives the best flavor, but a grill pan on the stovetop works in a pinch. Once cooked, these skewers are best enjoyed fresh, but any leftovers can be stored in an airtight container in the fridge for up to three days. Reheat them gently to avoid drying out the meat.
Make It Your Own
Want to put your own spin on these skewers? Here are some ideas:
- Swap out the lamb for chicken thighs if you’re looking for a more budget-friendly option.
- Add a little lemon juice to the marinade for a citrusy kick that pairs beautifully with the spices.
- Try tossing in some fresh herbs like mint or cilantro at the end for a fresh pop of flavor.
- For a vegetarian twist, use crispy tofu instead of lamb, letting it marinate just as you would the meat.
If you give these Yogurt Marinated Lamb Skewers a go, I’d love to hear how they turned out for you. Drop a comment or tag me on social media. Let’s make deliciousness together!
Related update: Yogurt Marinated Lamb Skewers
Related update: Knockwurst with sauerkraut
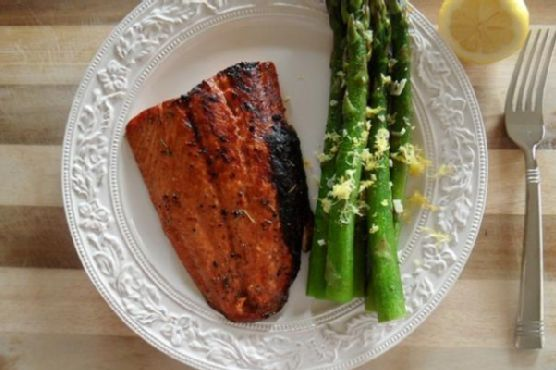
Picture this: It’s Tuesday evening, and you just got home from a day that felt longer than it had any right to be. You’re staring into the fridge, willing it to offer up some inspiration. Then, like a beacon of hope, you spot a lonely salmon fillet tucked behind last night’s leftovers. A lightbulb moment strikes: Balsamic & Honey Glazed Salmon with Lemony Asparagus. Deliciously sweet and tangy salmon, paired with asparagus that’s just the right amount of zesty. It’s the perfect blend of “fancy enough for company” and “easy enough for a weeknight.” This dish is a favorite because it’s quick yet feels special, and it hits all the right notes from tangy to savory. Trust me, your taste buds will thank you.
Jump to Recipe
What You’ll Need
You probably have most of these at home already, with maybe just a quick spice cabinet dive for a few aromatics. Here’s the lineup for this easy-peasy dinner:
- Salmon fillet
- Balsamic vinegar
- Apple cider vinegar
- Honey
- Dried dill
- Herbs de Provence
- Salt and pepper
- Grapeseed oil
- Lemon (juice and zest)
- Asparagus
- Garlic
- Vegetable stock
How to Make Balsamic & Honey Glazed Salmon with Lemony Asparagus
- In a small mixing bowl or blender, throw together all the balsamic marinade ingredients except the lemon juice: balsamic vinegar, apple cider vinegar, 1 tablespoon grapeseed oil, honey, dried dill, herbs de Provence, salt, and pepper. Whisk or blend until the mixture loses its vinegar-and-oil identity crisis.
- Lay the salmon fillet in a cozy little baking dish — I usually opt for a small casserole dish. Pour your freshly mingled marinade over the salmon, letting it settle in for at least 15 minutes. If patience is your virtue, up to 24 hours in the fridge is even better.
- Crank your oven to high broil. Just before the salmon gets its turn in the oven spotlight, drizzle the lemon juice over the top for that extra zing.
- Slide the salmon onto the top rack and broil for 10 to 12 minutes. You’re looking for glazed, browned, and a sizzle that says, “Dinner is almost ready!”
- While the salmon works its magic, prep your asparagus. Wash and trim off the tough ends — about an inch and a half will do. Lay them in a large skillet, as if sunbathing.
- Drizzle grapeseed oil over the asparagus, and use your hands to ensure every stalk gets some love. Sprinkle with salt and pepper, then sauté over medium heat for about 5 minutes.
- Add 2 tablespoons of vegetable stock, cover, and let them steam for 4 minutes. Lift the lid, introduce the minced garlic, and cover again. Let cook for another 3 to 5 minutes, just until tender but with a little bite.
- Finish with a flourish of freshly grated lemon zest over the asparagus, adding a citrusy brightness that ties the whole dish together.
Cook’s Notes
Let’s talk salmon: It should flake easily with a fork when it’s done. If you’re new to broiling, remember that it’s super quick and can go from perfect to overdone in a flash. As for leftovers (if there are any!), this dish reheats beautifully. Store the salmon and asparagus separately in airtight containers for up to two days. Reheat gently, so you don’t dry out that beautiful fish. If you’re meal prepping, the marinade is a fantastic make-ahead step. Whip it up and keep it in the fridge for when inspiration (or hunger) strikes.
Make It Your Own
Here are a few ways to switch things up:
- Swap salmon for crispy tofu if you’re going plant-based. Marinate and bake it the same way for a protein-packed treat.
- Try maple syrup instead of honey for a deeper, earthier sweetness.
- Substitute broccoli for asparagus if that’s more your jam — just adjust the cooking time to keep it crisp-tender.
- Add a sprinkle of red pepper flakes to the marinade for a little heat if you like things spicy.
Hey, if you try this, I’d love to hear how it turns out for you! Drop a comment below or tag me in your delicious photos. Happy cooking!
Related update: Balsamic & Honey Glazed Salmon with Lemony Asparagus
Related update: Yogurt Marinated Lamb Skewers

Last Tuesday night, I found myself elbow-deep in a fridge raid, eyeing a pack of chicken drumsticks that had been giving me the side-eye all week. It was one of those evenings where time was not on my side. I needed something quick, but I also craved something that felt a little special. That zingy, sweet, and sticky combination of balsamic vinegar and honey popped into my mind like a lightbulb moment, and let me tell you, it did not disappoint. These Balsamic-Honey Chicken Drumsticks are not only ridiculously easy to throw together but they make your kitchen smell like you’ve been cooking for hours. You know that feeling when a dish makes you look like a kitchen wizard with minimal effort? Yeah, this is one of those recipes. Bonus: The leftovers are a gift that keeps on giving.
Jump to Recipe
What You’ll Need
Let’s be real, the magic here lies in a few pantry staples that you probably already have lurking in your cupboards. Here’s your shopping list:
- Chicken drumsticks
- Balsamic vinegar
- Honey
- Brown sugar
- Soy sauce
- Rosemary sprigs
- Garlic cloves
- Sesame seeds
- Fresh flat-leaf parsley
How to Make Balsamic-Honey Chicken Drumsticks
- Grab a large, resealable plastic bag and toss in the balsamic vinegar, honey, brown sugar, soy sauce, rosemary, and garlic cloves. Now, shake it like a Polaroid picture until the honey and sugar dissolve. You’ll know it’s ready when it’s all shiny and smooth.
- Add the chicken drumsticks to the bag. Try to squeeze out as much air as you can before sealing it up. Give the drumsticks a little massage to make sure they’re all cozy in the marinade. Let them chill in the fridge for about two hours. Trust me, the wait is worth it.
- Preheat your oven to a toasty 450°F. Line a baking sheet with foil — it makes clean-up a breeze later. Lay out the marinated drumsticks, making sure they have some space to breathe.
- Bake the drumsticks for 30 to 35 minutes. You’re looking for that gorgeous caramelized skin, dark in spots, with the smell wafting through your home.
- While the drumsticks are in the oven, pour the leftover marinade into a small saucepan. Bring it to a bubbly boil, then simmer on low until it thickens up, about 15 minutes. This is your golden glaze.
- Once the drumsticks are out of the oven, brush them with the boiled marinade. It’s like giving them a glossy topcoat. Arrange them on a serving platter and sprinkle with sesame seeds and parsley. Voilà!
Cook’s Notes
A few words of wisdom from my kitchen to yours: If you accidentally leave the drumsticks to marinate a bit longer than two hours, it’s no biggie. It’s all about that flavor infusion. Just don’t go beyond 24 hours. This dish is perfect for making ahead; just stop before baking and keep the marinated chicken in the fridge until you’re ready to cook. Leftovers can be stored in an airtight container in the fridge for up to three days. Reheat them in the oven to keep that skin crispy.
Make It Your Own
- Swap the drumsticks for chicken thighs or wings — adjust cooking time accordingly.
- If you’re avoiding soy, coconut aminos make a great substitute.
- Not a fan of rosemary? Try thyme or oregano for a different aromatic twist.
- For a vegetarian option, replace the chicken with crispy tofu squares.
If you try this, I’d love to hear how it turns out — drop a comment or tag me! Whether it’s a weeknight dinner or an impromptu gathering, I promise these drumsticks will steal the show. Happy cooking!
Related update: Balsamic-Honey Chicken Drumsticks
Related update: Balsamic & Honey Glazed Salmon with Lemony Asparagus

One chilly Sunday morning, I found myself staring at a nearly empty pantry, craving something cozy and sweet without stepping out into the biting cold. That was the day my homemade organic maple granola was born, and let me tell you, it was like a warm hug in a bowl. There’s just something magical about the way the house smells when this granola is baking—sweet, nutty, and comforting. The best part? It’s ridiculously easy to make. You’ll end up with hearty, golden clusters that are perfect to pair with fresh, juicy fruit. Now, this recipe is a staple in my home, perfect for those days when you want something wholesome and satisfying, without a lot of fuss.
Jump to Recipe
What You’ll Need
The beauty of this granola lies in its simplicity and versatility. You might already have most of these ingredients lurking in your kitchen!
- Rolled oats
- Dark brown sugar
- Maple syrup
- Vegetable oil; peanut oil is preferred
- Salt
- Cashew pieces
- Slivered almonds
- Dried cranberries
- Dried raisins
- Fresh fruit (to serve)
How to Make Home made organic maple granola with fresh fruit
- Preheat your oven to 250°F. This low temperature ensures the granola dries out rather than burns, for that perfect crunch.
- In a large bowl, combine the rolled oats, cashew pieces, slivered almonds, salt, and dark brown sugar. Give it a good stir to distribute the sugar evenly.
- Pour in the maple syrup and vegetable oil. Mix everything until the oats and nuts are well coated. You should be able to smell the sweetness already!
- Spread the mixture thinly and evenly onto two baking sheets with sides about an inch high. Trust me, the thin layer is key for even baking.
- Bake for 45 to 60 minutes, stirring carefully every 15 minutes. Don’t forget to swap the positions of the trays each time you stir them. This little dance ensures even browning.
- You’ll know it’s done when the granola looks tan—not dark—and feels slightly crisp to the touch. It will harden more as it cools.
- Remove the trays from the oven and let the granola cool completely. Once cooled, mix in the dried cranberries and raisins.
- Store your granola in sealed plastic bags or containers. It’ll stay fresh for up to two weeks, unrefrigerated.
- Serve your granola with a handful of fresh fruit. Enjoy every crunchy, sweet bite!
Cook’s Notes
This granola is super forgiving, but here are a few tips to keep it foolproof. Remember to stir it gently to keep those lovely clusters intact. If you don’t have peanut oil, any neutral oil like canola will work in a pinch, but peanut oil does add a subtle, nutty flavor that’s just divine. Make sure to let it cool completely before storing, as any trapped heat can make it soggy. If you somehow don’t finish this in two weeks (but let’s be real, you will), just pop it in an airtight container in the freezer for longer storage.
Make It Your Own
Here are some fun tweaks to make this granola truly yours:
- Swap the cashews and almonds for your favorite nuts like walnuts or pecans for a different flavor profile.
- Add a teaspoon of cinnamon or a pinch of nutmeg to the oat mixture for a warm spice kick.
- Try using honey instead of maple syrup for a different kind of sweetness.
- Sprinkle some coconut flakes into the mix before baking for a tropical twist.
If you try this, I’d love to hear how it turns out — drop a comment or tag me! Happy granola-making, friends!
Related update: Home made organic maple granola with fresh fruit

Picture this: It’s a chilly Tuesday evening, and I’ve just walked in from a day that felt three years long. My stomach is grumbling louder than my thoughts, and the last thing I want is a kitchen marathon. That’s when my trusty Crock-Pot and this Asian-Style Country Ribs with Black Bean Garlic Sauce recipe save the day. It’s one of those magical dishes that feels like a warm hug—comforting and flavorful yet deceptively simple. I swear, the first time I made it, I was convinced it was a culinary miracle. Not only does it take just 10 minutes to prep, but the result is rich and complex, like you’ve been slaving away for hours. Seriously, if you can operate a can opener, you can make this. Jump to Recipe
What You’ll Need
You’ll love how this recipe leans on pantry staples, with just a couple of special ingredients that pack a punch. Chances are you already have most of this. Here’s what you’ll need:
- Boneless pork ribs
- Cooked black bean garlic sauce from a jar
- Low sodium soy sauce
- Chicken stock
- Dark sesame oil
- Fresh garlic
- Ginger root
- Honey
- Black coarsely cracked pepper
- Cornstarch
- Green scallions
How to Make Crock-Pot: Asian-Style Country Ribs with Black Bean Garlic Sauce
- Begin by mincing your fresh garlic and ginger root. Trust me, the aroma is going to be your first reward.
- In a small bowl, mix together the black bean garlic sauce, low sodium soy sauce, chicken stock, dark sesame oil, honey, and the minced garlic and ginger. This is your magic potion.
- Place your boneless pork ribs into the Crock-Pot. Pour the sauce mixture over them, ensuring each rib is drenched in deliciousness.
- Add cracked black pepper over the top. It will give a subtle heat that ties everything together.
- Set your Crock-Pot on low and let it work its magic for 5 to 6 hours. You’ll know it’s ready when the meat is tender and falling apart.
- In the last 15 minutes of cooking, whisk together cornstarch with a bit of cold water. Stir it into the sauce in the Crock-Pot to thicken it slightly.
- Just before serving, sprinkle sliced green scallions over the top. They’ll add a fresh crunch and a pop of color.
Cook’s Notes
Okay, a couple of things to keep in mind: Don’t let the ribs go past the 6-hour mark, or you’ll end up with mushy meat instead of that perfect fall-apart texture. If you’re juggling tasks, you can prep everything the night before, store it in the fridge, and just dump it all into the Crock-Pot in the morning.
Leftovers are gold! Store them in an airtight container, and they’ll keep in the fridge for up to three days. Just reheat slowly on the stovetop or microwave. If the sauce thickens too much, a splash of chicken stock will do the trick.
Make It Your Own
- Swap the pork for chicken thighs: They cook beautifully in the sauce and stay juicy.
- Add a kick with Sriracha: Mix a tablespoon into the sauce for some heat.
- Go vegetarian with tofu: Use firm tofu, cut into large cubes, and reduce cooking time to 3 hours.
- Try a citrus twist: Add a tablespoon of orange zest to the sauce for a fresh, zesty note.
If you try this, I’d love to hear how it turns out—drop a comment or tag me! Your kitchen deserves this kind of effortless magic, and so do you.
Related update: Crock-Pot: Asian-Style Country Ribs with Black Bean Garlic Sauce
Related update: Balsamic-Honey Chicken Drumsticks

Picture this: It’s a Wednesday night, and I have exactly 45 minutes to whip up something that feels a little fancy but won’t leave me with a mountain of dishes. That’s when I remember my trusty cream cheese stuffed chicken breasts. It’s the kind of meal that sounds like it took hours, but really, it’s a bit of kitchen magic that you can pull together with everyday ingredients. And let’s be honest, who doesn’t love a good creamy-cheesy-bacon combo? The first time I made it, I almost skipped the tarragon — but trust me, it’s the game-changer that makes this dish sing.
Jump to Recipe
What You’ll Need
This list is pretty much pantry-basics-plus-bacon. You might even have everything you need already, minus a quick trip to the fridge:
- Skinless boneless chicken breasts
- Cream cheese
- Bacon
- Olive oil or unsalted butter
- Diced onion
- Garlic
- Salt
- Black pepper
- Fresh tarragon
How to Make Cream Cheese Stuffed Chicken Breasts
- Preheat your oven to 350°F. This is your moment to take a deep breath and envision the golden deliciousness to come.
- In a small skillet, warm the butter or olive oil over medium-low heat. Add the diced onions and let them sweat it out until they’re soft and translucent, about 5 minutes. Toss in the garlic and stir for another minute until it’s fragrant enough to make you weak in the knees.
- While that cools, grab another skillet and give the bacon a gentle sauté over low heat. You want it soft and a little bit rendered, not crispy. Paper towel it up and let it chill.
- Place the chicken breasts between two sheets of waxed paper, and give them a good, even pounding to about 1/4-inch thickness. Channel your inner zen and season them with salt and pepper.
- Combine the cooled onion-garlic mix with the cream cheese. Spread a generous dollop of this goodness in the center of each chicken breast.
- Roll or fold the chicken around the cream cheese mixture. Tuck the ends under and secure these delightful little packages with toothpicks. Don’t worry if they look a bit rustic, that’s part of the charm.
- Sprinkle fresh tarragon over the rolled chicken. Wrap each piece with bacon, giving them a cozy little blanket.
- Place your chicken rolls in an 8×11 baking dish and drizzle with melted butter. Pop them in the oven for 25 to 30 minutes. They’re done when the chicken is cooked through, the bacon is browned, and the cream cheese is irresistibly melty.
- Serve immediately and watch them disappear. Seriously, they’re magic.
Cook’s Notes
A few things to keep in mind while you’re chef-ing it up:
– Make sure the onions and garlic are cool before mixing them with the cream cheese. Otherwise, things might get a bit too melty too soon.
– If you’re making this ahead, you can assemble the chicken rolls and keep them in the fridge for a few hours. Just bake them right before you’re ready to eat.
– Leftovers? Store them in an airtight container in the fridge for up to two days. Reheat gently in the oven to keep that bacon crisp.
Make It Your Own
Here’s where you can get a little playful:
- Swap the chicken for crispy tofu for a vegetarian twist that still brings all the creamy-bacon vibes (yep, vegetarian bacon exists!).
- Add some chopped spinach to the cream cheese mixture for a pop of color and a little extra nutrition.
- Try prosciutto instead of bacon for a slightly saltier, more gourmet flavor.
- Experiment with herbs — basil or rosemary could take this dish in a deliciously different direction.
If you try this, I’d love to hear how it turns out — drop a comment or tag me! Your kitchen adventures are what make this all so fun. Happy cooking!
Related update: Cream Cheese Stuffed Chicken Breasts
Related update: Crock-Pot: Asian-Style Country Ribs with Black Bean Garlic Sauce
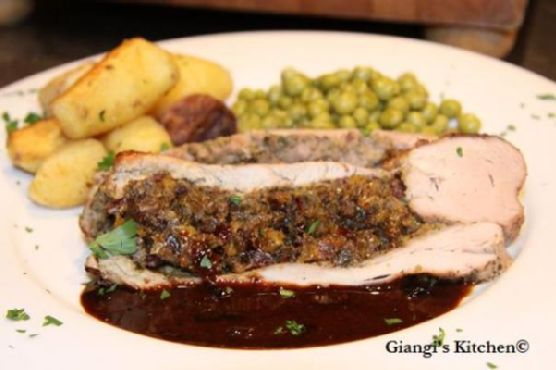
The other night, I found myself aimlessly scrolling through my pantry, wanting something that felt both fancy and comforting. You know those days when takeout just won’t do, but you don’t want to slave away in the kitchen either? Well, that was me. I stumbled on this Stuffed Pork Tenderloin with Marsala-Port Sauce recipe, and let me tell you, it hit every craving. It’s one of those dishes that sounds impressive (trust me, it is), but it’s actually pretty straightforward. Plus, talk about using up those dried fruits that have been lingering in the cupboard! Juicy pork, rich sauce, and a stuffing that makes you feel like you’re indulging at a fancy restaurant—all without breaking a sweat.
Jump to Recipe
What You’ll Need
The magic of this recipe lies in its simplicity—most of these ingredients might already be lounging in your kitchen. It’s all about those pantry staples coming together in the most delightful way. Check it out:
- 1 shallot, finely chopped
- 1 yellow onion, diced
- 1 cup mushrooms, chopped
- 1/4 cup dried apricots
- 1/4 cup raisins
- 1/4 cup dried cranberries
- 1/4 cup flat leaf parsley, chopped
- 2 pounds pork tenderloin
- 1/2 cup Marsala wine
- 1/2 cup Port wine
- 2 tablespoons butter
- 1/4 cup heavy cream
- 2 tablespoons olive oil
- Salt and pepper to taste
How to Make Stuffed Pork Tenderloin with Marsala-Port Sauce
- Preheat your oven to 450°F (230°C). This is crucial to get that perfect sear and juicy interior.
- Warm 1 tablespoon of olive oil in a large skillet over medium heat. Toss in the onions, shallots, and mushrooms. Stir occasionally until the onions are translucent and everything smells mouthwateringly fragrant.
- Remove the skillet from heat. In a small food processor, combine the cooked onion mixture with the dried apricots, raisins, cranberries, and parsley. Pulse just enough to achieve a minced, well-combined filling.
- Cut the pork tenderloin in half crosswise. Butterfly each section, being careful not to cut all the way through the meat. Generously season both sides with salt and pepper.
- Spread the onion-mushroom mixture onto one side of each butterflied section. Place the other half over the mixture, sealing the edges with toothpicks. Give both sides another generous seasoning with salt and pepper.
- In the same skillet, warm another teaspoon of olive oil over medium heat. Carefully sear the pork tenderloin on each side for 3-5 minutes until it’s gorgeously brown.
- Transfer the skillet to your hot oven. Roast for 20-30 minutes, or until the juices run clear. This is your cue that the pork is perfectly cooked.
- Remove from the oven, transferring the pork to a dish. Cover it with foil to let it rest and lock in those juicy flavors.
- Discard any excess fat or stubborn bits in the skillet. Pour in the Marsala and Port wines. Bring to a boil, gently scraping up those flavorful browned bits from the bottom.
- Pour in any juices from the resting pork, reducing the sauce until it measures about 1/2 cup. Remove from heat and swirl in the butter and cream until melted and luxurious.
- Remove the toothpicks from the pork, slice it crosswise, and plate it up. Drizzle that divine sauce over the top or serve it on the side for dipping.
Cook’s Notes
Let’s chat practicalities! This dish is perfect for a special dinner, but it can definitely be prepped ahead. You can assemble the pork with the stuffing a day before—just wrap it up tightly and refrigerate, then bring it to room temperature before cooking. Keep an eye on your sauce; don’t let it reduce too much, or you’ll end up with something more akin to caramel than sauce. Leftovers? They’re even better the next day. Store them in an airtight container in the fridge for up to three days. Reheat gently, so the pork doesn’t dry out.
Make It Your Own
You can totally switch things up depending on what you’ve got lying around or what you’re in the mood for. Here are a few ideas:
- Swap the pork for chicken breast if you’re feeling poultry. Just adjust the cooking time accordingly.
- No Marsala? A dry sherry or even a splash of brandy can stand in beautifully.
- Try adding some crushed walnuts to the stuffing for a crunchy surprise.
- If dried fruit isn’t your thing, substitute with chopped apples for a fresh twist.
If you give this a whirl, let me know how it turns out! Drop a comment or tag me in your culinary creations. I can’t wait to hear what you think. Enjoy every flavorful bite!
Related update: Stuffed Pork Tenderloin with Marsala-Port Sauce
Related update: Cream Cheese Stuffed Chicken Breasts
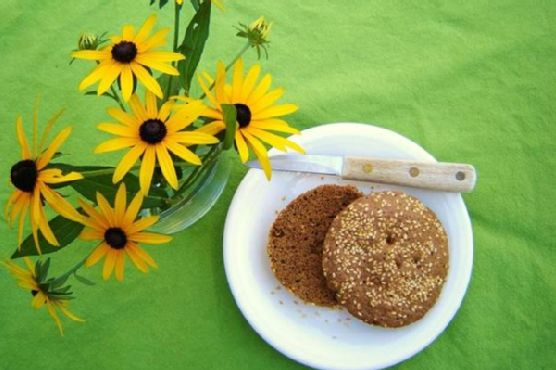
It was one of those days where I had absolutely nothing planned for dinner. You know the kind — when you open the fridge door for the third time hoping something magical will appear? Well, inspiration didn’t strike until I dug through my pantry and found a bag of sorghum flour tucked behind the lentils. It was like a lightbulb went off. I needed something quick and easy, and what’s better than a warm, freshly made bun that’s gluten-free and takes just five minutes? This recipe is not only a lifesaver for those rushed evenings but also a bit like magic in a mug. It’s comforting, satisfying, and, let’s be honest, it feels like a tiny victory to whip up bread in mere minutes.
Jump to Recipe
What You’ll Need
The beauty of these buns lies in their simplicity. Most of these ingredients are likely sitting in your pantry already, making this recipe a great go-to without a trip to the store. Here’s what you’ll gather:
- Almond meal
- Baking powder
- Cocoa powder
- Egg
- Ground flax seed
- Molasses
- Salt
- Sesame seeds
- Sorghum flour
How to Make 5 Minute Gluten Free Wonder Buns
- In a small bowl, crack open an egg and whisk it together with the molasses until well combined. You’ll smell the sweet earthy aroma of molasses starting to come through.
- In another small bowl, combine the sorghum flour, almond meal, ground flax seed, baking powder, and cocoa powder. Stir thoroughly, ensuring the mixture is even and free of clumps. The last thing you want is a surprise burst of bitter baking soda or unmixed cocoa powder.
- Pour the whisked eggs into the dry ingredient mixture and stir until the batter is smooth and glossy.
- Grab a 10 oz Pyrex custard cup, oil it lightly, and sprinkle sesame seeds on the bottom and sides. This not only prevents sticking but also adds a delightful nutty crunch to every bite.
- Pour the batter into the prepared cup, smoothing the top with a spoon. Sprinkle more sesame seeds on top for good measure.
- Pop the cup into the microwave and cook for 90 seconds. Watch as the batter rises and sets, emitting a warm and inviting aroma. Once done, let it cool for a moment before diving in.
Cook’s Notes
This recipe is pretty forgiving, but here are a few tips to keep in mind. Make sure your baking powder is fresh; otherwise, your buns won’t rise as much. If you don’t have a Pyrex custard cup, any microwave-safe mug should work, though cooking times may vary a bit. Feel free to experiment with the amount of molasses if you prefer a sweeter or less sweet bun. As for storage, these buns are best enjoyed fresh out of the microwave, but they can be stored in an airtight container for up to a day. Reheat them in the microwave for a few seconds to bring back that fresh-baked warmth.
Make It Your Own
These wonder buns are a blank canvas, ready for your culinary creativity. Here are a few ideas:
- Swap the cocoa powder for cinnamon to create a spiced bun that pairs beautifully with morning coffee.
- Add a tablespoon of grated cheese to the batter for a savory twist.
- Replace sesame seeds with sunflower seeds for a different crunch and flavor.
- For a sweeter treat, add a handful of chocolate chips before microwaving.
If you try this, I’d love to hear how it turns out — drop a comment or tag me! Whether you stick to the original recipe or put your spin on it, these wonder buns are sure to become a staple in your gluten-free recipe repertoire. Enjoy every bite!
Related update: 5 Minute Gluten Free Wonder Buns
Related update: Stuffed Pork Tenderloin with Marsala-Port Sauce

So there I was, standing in my kitchen on a chilly Tuesday evening, feeling like a culinary daredevil — or maybe just a hungry one. My pantry was looking a bit sparse, but fate (or my recent grocery run) had left me with the essentials for one of my all-time favorite dishes: Penne Arrabiata. This spicy, comforting pasta is like a warm hug with a side of sass. It’s perfect for those nights when you need something quick but full of flavor, and it definitely delivers. I promise, even if your spice tolerance is on the lower side, this dish has a way of pulling you in. Grab your apron, and let’s dive in!
Jump to Recipe
What You’ll Need
The beauty of Penne Arrabiata is in its simplicity. Chances are, you already have most of the ingredients, but it’s the combination that makes the magic happen.
- 1 packet of penne pasta
- 1 can of whole tomatoes (Pomi boxed tomatoes work well too)
- 5 cloves of fresh garlic, minced
- 3 tablespoons of olive oil
- 1 teaspoon of red dried peppers
- 2 tablespoons of fresh Italian parsley, minced
- Coarsely chopped fresh basil (optional, but highly recommended)
- Salt, to taste
How to Make Penne Arrabiata
- First, get a large pot of water on the stove and bring it to a boil. Add a generous pinch of salt. This is your pasta’s time to shine.
- In a skillet, heat 3 tablespoons of olive oil over medium heat. Toss in about a teaspoon of dried red pepper. Let it sizzle gently, releasing its spicy aroma, but keep it from burning.
- Add the minced garlic and 2 tablespoons of parsley to the oil. Stir it around until the garlic is golden and fragrant, filling your kitchen with the most tantalizing, spicy scent.
- Now, it’s time for the star of the show: add the can of chopped tomatoes to the skillet. Stir everything together, cover, and let it cook until the sauce is heated through. The edges will start to bubble, and that’s your cue!
- Meanwhile, the pasta water should be boiling. Add the penne and cook until it’s al dente — tender but with a firm bite.
- Drain the pasta and add it straight into the sauce. The penne will soak up all that spicy, garlicky goodness as you mix it thoroughly.
- Just before serving, sprinkle some coarsely chopped fresh basil and a bit more parsley on top. Serve immediately and enjoy the aroma of fresh herbs mingling with the rich, spicy sauce.
Cook’s Notes
Ah, the joys and perils of making Penne Arrabiata! A couple of things to keep in mind: don’t go overboard with the dried red pepper unless you’re ready for a fiery experience. Also, be patient with your garlic; you want it golden, not brown. If your sauce seems too thick, a splash of the pasta cooking water can help thin it out without losing flavor.
Got leftovers? Lucky you! This dish reheats beautifully, just make sure to add a splash of water before microwaving to keep it from drying out. You could even make the sauce ahead of time and store it in the fridge for up to three days. When you’re ready, just cook the pasta and combine — dinner done in a snap.
Make It Your Own
Here are a few ways to switch things up if you’re feeling adventurous:
- For a protein boost, swap the penne for a whole-grain version. The nutty flavor pairs wonderfully with the spicy sauce.
- Make it vegan by adding sautéed mushrooms instead of cheese for an umami hit.
- Swap the penne for zucchini noodles if you’re in the mood for something lighter and low-carb.
- For a heartier dish, add cooked and crumbled Italian sausage just before serving.
If you try this, I’d love to hear how it turns out! Drop a comment or tag me in your culinary creations. Happy cooking, and may your pasta always be perfectly saucy!
Related update: Penne Arrabiata

I was having one of those hectic weeks—work deadlines piling up, laundry mountain growing taller by the minute—and all I wanted was a moment of pure joy. Enter my savior: these Wild Blueberry Lemon Muffins. A burst of tart lemon and sweet summer blueberries wrapped up in a soft, buttery muffin. They’re the perfect blend of comforting and feel-good indulgence, but super easy to put together. The best part? They make your kitchen smell like heaven and taste even better! Whether you’re whipping them up for a weekend brunch or a quick weekday treat, these muffins are a little slice of bliss.
Jump to Recipe
What You’ll Need
You’re going to love how most of these ingredients are probably already sitting in your pantry or fridge. Here’s what you need:
- 2 1/2 cups all-purpose flour
- 2 1/2 teaspoons baking powder
- 1/2 teaspoon salt
- 1 cup granulated sugar
- 1/2 cup unsalted butter, softened
- 1 large egg
- 1/2 cup buttermilk
- 1 teaspoon vanilla extract
- 1 tablespoon fresh lemon juice
- 1 tablespoon lemon zest
- 1/8 cup sugar (for mashing with lemon zest)
- 1 can wild blueberries, drained
- 1/2 cup powdered sugar (for glaze)
How to Make Wild Blueberry Lemon Muffins
- Start by preheating your oven to 375°F (190°C). Line 16 muffin cups with paper liners to make cleanup a breeze.
- In a small bowl, mash 1/8 cup sugar with the lemon zest until the sugar is moistened and fragrant. This will amp up the lemony goodness.
- In a medium-sized bowl, whisk together the flour, baking powder, and salt. This dry mix is the backbone of your muffins.
- Using an electric mixer, cream the cup of sugar and butter together until light and fluffy, about 3 minutes. Add the egg, buttermilk, vanilla, and the fragrant lemon sugar, beating each in one at a time.
- Slowly incorporate the flour mixture into the wet ingredients. The batter should be smooth and inviting at this point.
- Gently fold in the wild blueberries with a large spatula. Try not to crush them—you’re aiming for bursts of berry goodness!
- Divide the batter equally into the prepared muffin tins, filling each about 3/4 full. This leaves room for them to rise beautifully.
- Bake in the preheated oven for about 35 minutes, or until a cake tester comes out clean and muffins are golden.
- Let the muffins cool for a few minutes in the pan before transferring them to a wire rack.
- While the muffins cool, whip up your glaze by combining the lemon juice, zest, and powdered sugar. Stir until smooth.
- Spoon about 1 tablespoon of glaze over each muffin, allowing it to drizzle down the sides for that enticing sweet-tangy finish.
Cook’s Notes
If you can, use wild blueberries—they have a more intense flavor and smaller size, making them perfect for muffins. Make sure to drain them well before adding to the batter to keep it from getting too wet. Store your muffins in an airtight container; they stay fresh on the counter for up to three days or can be frozen for up to a month. If you want to prepare ahead, mix the dry ingredients the night before to save time.
Make It Your Own
- Swap canned wild blueberries for fresh ones if they’re in season for a less sugary taste.
- Replace the lemon with orange zest and juice for a citrusy twist.
- Use almond extract instead of vanilla for a nutty undertone.
- Try adding a teaspoon of poppy seeds to the batter for an extra crunch.
If you try this, I’d love to hear how it turns out—drop a comment or tag me on social media! Happy baking, and may your week be as sweet as these muffins.
Related update: Wild Blueberry Lemon Muffins
Related update: Penne Arrabiata
Related update: Fast Tiramisu
Related update: Blueberry Almond Crescent Rolls