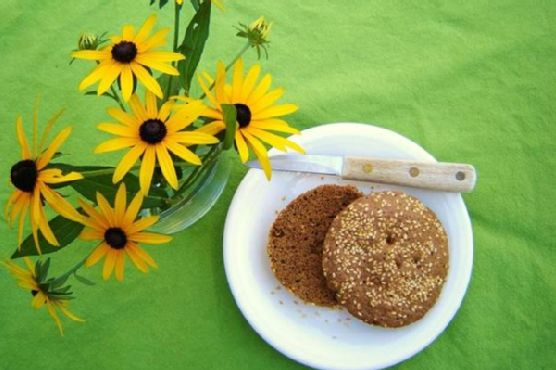
It was one of those days where I had absolutely nothing planned for dinner. You know the kind — when you open the fridge door for the third time hoping something magical will appear? Well, inspiration didn’t strike until I dug through my pantry and found a bag of sorghum flour tucked behind the lentils. It was like a lightbulb went off. I needed something quick and easy, and what’s better than a warm, freshly made bun that’s gluten-free and takes just five minutes? This recipe is not only a lifesaver for those rushed evenings but also a bit like magic in a mug. It’s comforting, satisfying, and, let’s be honest, it feels like a tiny victory to whip up bread in mere minutes.
Jump to Recipe
What You’ll Need
The beauty of these buns lies in their simplicity. Most of these ingredients are likely sitting in your pantry already, making this recipe a great go-to without a trip to the store. Here’s what you’ll gather:
- Almond meal
- Baking powder
- Cocoa powder
- Egg
- Ground flax seed
- Molasses
- Salt
- Sesame seeds
- Sorghum flour
How to Make 5 Minute Gluten Free Wonder Buns
- In a small bowl, crack open an egg and whisk it together with the molasses until well combined. You’ll smell the sweet earthy aroma of molasses starting to come through.
- In another small bowl, combine the sorghum flour, almond meal, ground flax seed, baking powder, and cocoa powder. Stir thoroughly, ensuring the mixture is even and free of clumps. The last thing you want is a surprise burst of bitter baking soda or unmixed cocoa powder.
- Pour the whisked eggs into the dry ingredient mixture and stir until the batter is smooth and glossy.
- Grab a 10 oz Pyrex custard cup, oil it lightly, and sprinkle sesame seeds on the bottom and sides. This not only prevents sticking but also adds a delightful nutty crunch to every bite.
- Pour the batter into the prepared cup, smoothing the top with a spoon. Sprinkle more sesame seeds on top for good measure.
- Pop the cup into the microwave and cook for 90 seconds. Watch as the batter rises and sets, emitting a warm and inviting aroma. Once done, let it cool for a moment before diving in.
Cook’s Notes
This recipe is pretty forgiving, but here are a few tips to keep in mind. Make sure your baking powder is fresh; otherwise, your buns won’t rise as much. If you don’t have a Pyrex custard cup, any microwave-safe mug should work, though cooking times may vary a bit. Feel free to experiment with the amount of molasses if you prefer a sweeter or less sweet bun. As for storage, these buns are best enjoyed fresh out of the microwave, but they can be stored in an airtight container for up to a day. Reheat them in the microwave for a few seconds to bring back that fresh-baked warmth.
Make It Your Own
These wonder buns are a blank canvas, ready for your culinary creativity. Here are a few ideas:
- Swap the cocoa powder for cinnamon to create a spiced bun that pairs beautifully with morning coffee.
- Add a tablespoon of grated cheese to the batter for a savory twist.
- Replace sesame seeds with sunflower seeds for a different crunch and flavor.
- For a sweeter treat, add a handful of chocolate chips before microwaving.
If you try this, I’d love to hear how it turns out — drop a comment or tag me! Whether you stick to the original recipe or put your spin on it, these wonder buns are sure to become a staple in your gluten-free recipe repertoire. Enjoy every bite!
Related update: 5 Minute Gluten Free Wonder Buns
Related update: Stuffed Pork Tenderloin with Marsala-Port Sauce

Imagine this: it’s a rainy Tuesday evening, and I’m staring into my pantry like it’s going to magically whip up dinner for me. You know those days when the fridge is playing hard to get and the clock is laughing in your face? Well, that’s when I turn to my trusty Hush Puppies recipe. These little golden nuggets save the day every time — they’re crispy, comforting, and the kind of simple that feels like a win even when everything else is chaos. Plus, they come together in a flash, which is exactly what you need when the hangry hits.
Jump to Recipe
What You’ll Need
There’s a good chance you’ve already got most of these on standby. That’s the beauty of this dish: minimal ingredients with maximum flavor payoff. Check out what you’ll need:
- 1 small onion, finely chopped
- 1 cup cornmeal
- 1/4 cup flour
- 1 tablespoon baking powder
- 1 teaspoon salt
- 1 egg
- 1/2 cup milk
- Oil for frying (vegetable or canola works best!)
How to Make Hush Puppies
- Start by grabbing a large mixing bowl and toss in your cornmeal, flour, baking powder, and salt. Give it a good stir until everything is well combined.
- In a separate medium bowl, crack in the egg and beat it with a fork until it’s all mixed up. Add in the chopped onion and milk, then stir until it’s nice and smooth.
- Pour the eggy onion mixture into the dry ingredients. Stir until it’s all combined into a thick, slightly lumpy batter. You’re aiming for a texture that holds its shape.
- Heat up about 2-3 inches of oil in your deep-fat fryer or a heavy skillet over medium-high heat. You want it to shimmer but not smoke — that’s your cue it’s hot enough.
- Once the oil is ready, drop heaping teaspoons of batter into the pan. They’ll plummet to the bottom but magically rise to the top as they cook. Fry about 5-6 at a time without overcrowding.
- Keep an eye out — after 1-2 minutes, the puppies should be a gorgeous golden brown. That’s when you’ll know they’re done. Use a slotted spoon to fish them out and let them drain on paper towels.
Cook’s Notes
Don’t overmix the batter; a few lumps are perfectly fine and keep the texture just right. The oil needs to be hot enough to ensure the hush puppies cook quickly and don’t soak up excess oil. If you’re making them ahead, you can fry them lightly and finish them off in a hot oven just before serving. They’re best enjoyed fresh but keep well in an airtight container for a day or two. Reheat them in the oven to maintain that crunch.
Make It Your Own
Here’s where you can get creative:
- Spice it up: Add a pinch of cayenne pepper or a chopped jalapeño for a kick.
- Cheesy twist: Stir in a handful of shredded cheddar cheese to the batter for some gooey goodness.
- Herbal accents: Mix in some chopped chives or parsley for a fresh pop of flavor.
- Sweet spin: Swap out the onion for corn kernels and add a teaspoon of sugar for a sweet-savory combo.
If you try this, I’d love to hear how it turns out — drop a comment or tag me! Remember, the best recipes are the ones you make your own. Enjoy your hush puppies and all the cozy vibes they bring.
Related update: Hush Puppies

It was one of those evenings when you open the fridge and just sigh, you know what I mean? It had been a long day, and I wanted something delicious but low-key. There it was, a can of shrimp I had almost forgotten about. That’s when inspiration hit—breaded shrimp with a spicy mayo dip! It’s the kind of dish that feels like a cheat: super quick to make, but everyone will think you’re some kind of kitchen wizard. Perfect for when friends drop by unannounced or when you’re just craving something crispy and spicy. Trust me, this Breaded Shrimp and Spicy Mayo Appetizer is about to become your new go-to.
Jump to Recipe
What You’ll Need
You probably have most of these ingredients hanging out in your pantry already, and if not, they’re easy enough to grab at any grocery store. Here’s what you’ll need:
- All-purpose flour
- Bread crumbs
- Chili powder
- Egg
- Garlic powder
- Mayonnaise
- Onion powder
- Suya pepper
- Salt
- Canned shrimps
- Sriracha sauce
How to Make Breaded Shrimp and Spicy Mayo Appetizer
- Start by peeling and deveining your shrimp. You can leave the tails on for a bit of extra crunch and a nicer presentation if you like.
- Season the shrimp with suya pepper and set them aside to let the flavors sink in.
- Whisk the egg in a small bowl and set it aside as your dipping station.
- In another bowl, combine your all-purpose flour with onion powder, garlic powder, salt, and chili powder.
- Take each seasoned shrimp and dredge it in the seasoned flour, making sure it’s well-coated. The spices should cling to every curve.
- Dunk the floured shrimp into the egg mixture, ensuring they’re nice and gooey.
- Coat them in the bread crumbs; press gently so the crumbs stick fully.
- Heat up a pan with oil for frying until it’s hot but not smoking. Fry the shrimp until golden brown on both sides, about 2-3 minutes per side.
- For the spicy mayo, mix 2 tablespoons of mayonnaise with 1 tablespoon of sriracha sauce until well combined. It should be a lovely salmon pink color.
- Serve your crispy shrimp with the spicy mayo on the side for dipping. Enjoy the crunchy, spicy goodness!
Cook’s Notes
You want to make sure your oil is hot enough before you start frying; otherwise, your shrimp will absorb too much oil and become soggy. If you’re making this for a crowd, you can fry the shrimp earlier and keep them warm in a low oven. Leftovers can be stored in an airtight container in the fridge and reheated in the oven to keep them crispy. I wouldn’t recommend microwaving them—no one likes limp shrimp!
Make It Your Own
- Swap the shrimp for crispy tofu if you’re catering to vegetarians. Just make sure to press the tofu well before seasoning.
- If you love extra heat, add more sriracha or even a dash of hot sauce to the spicy mayo.
- Try using panko instead of regular bread crumbs for an extra-crunchy texture.
- If you’re out of suya pepper, a mix of cayenne and paprika can add that smoky heat.
If you try this, I’d love to hear how it turns out—drop a comment or tag me! I’m always excited to see how you guys make these recipes your own. Happy cooking!
Related update: Breaded Shrimp and Spicy Mayo Appetizer
Related update: Hush Puppies

Picture this: it’s a sweltering summer afternoon, and you’re yearning for something refreshing yet a little out of the ordinary. You’ve already got one foot in the kitchen, rifling through the freezer, when you stumble upon a forgotten stash of frozen raspberries. Suddenly, inspiration hits you like a cool breeze. Why not whip up a sorbet that’s as tart as your mood and just a tad mischievous, with a spicy kick to keep things interesting? This Tart Raspberry Sorbet with a Hint of Heat is exactly what you need. It’s the kind of recipe that doesn’t just cool you down but also gives your taste buds a little wake-up call. Plus, it’s ridiculously easy to make—perfect for those moments when you want to impress but can’t be bothered with a culinary masterpiece.
Jump to Recipe
What You’ll Need
You might already have most of these tucked away in your pantry and freezer, which makes this sorbet a breeze to throw together on a whim.
- Frozen raspberries – The star of the show, bringing their tart and vibrant flavor.
- Raspberry jam – For an extra burst of raspberry goodness and a bit of sweetness.
- White grape juice – To lend a subtle sweetness and some liquid gold.
- Cardamom powder – Adds an exotic warmth that pairs beautifully with the raspberries.
- Green chili – Just a little, for that unexpected kick.
- Lime juice – To enhance the tartness and add a citrusy zing.
How to Make Tart Raspberry Sorbet with a Hint of Heat
- In your food processor, combine the frozen raspberries, raspberry jam, and white grape juice. Add a pinch of cardamom powder, a small piece of green chili, and a generous squeeze of lime juice.
- Process the mixture until it’s smooth and vibrant. Listen for the change in sound as the chunks of raspberry become a luscious puree.
- Push the mixture through a fine strainer to remove most of the seeds. This part might seem tedious, but trust me, your teeth will thank you later.
- Transfer the silky mixture to a container, cover, and pop it in the freezer. Every couple of hours, check on it and give it a good stir. This keeps the texture smooth and prevents large ice crystals from forming.
- As the sorbet nears the end of its freezing journey, consider shaping it into enticing balls using an ice cream scoop or a large spoon. It’s not just about looks—it helps the sorbet melt evenly when served.
- Once frozen, let your sorbet thaw for a few minutes before serving. This little pause is crucial, especially if your freezer tends to be overzealous.
Cook’s Notes
Let’s talk about some nuances that can take this sorbet from good to unforgettable. First off, if you’re worried about the heat, start by adding just a sliver of green chili. You can always add more, but you can’t take it out. As for storage, this sorbet keeps well in the freezer for up to two weeks, though it’s best enjoyed within the first few days when the flavors are at their peak.
If you’re planning ahead, make the sorbet the day before you want to serve it. This allows it to firm up perfectly. If you end up with leftovers (unlikely, but it happens), let them soften a bit before diving back in.
Make It Your Own
This sorbet is a canvas for your creativity. Here are a few ideas to make it uniquely yours:
- Swap the raspberries for frozen strawberries for a sweeter, less tart version.
- If you’re a mint fan, add a handful of fresh mint leaves to the food processor for a refreshing twist.
- Looking for an adult-only version? Replace the white grape juice with a splash of Prosecco or a sweet white wine.
- For a nutty contrast, sprinkle a handful of toasted pistachios over your sorbet before serving.
If you try this, I’d love to hear how it turns out—drop a comment or tag me! Your adventures in sorbet-land might just inspire someone else to give it a whirl. Enjoy your chill time!
Related update: Tart Raspberry Sorbet with a Hint of Heat
Related update: S’mores-n-berry Bars for National S’mores Day – August 10
Related update: Pumpkin gnocchi with basil and Parmesan

Picture this: it’s a lazy Sunday afternoon, and I’m in my kitchen staring down a couple of eggplants that have been lounging in my crisper drawer for a bit too long. It’s one of those days where I desperately want something crispy and satisfying, but without the guilt that comes with a giant bowl of fries. Enter: Eggplant Fries with Tzatziki Sauce. These little guys are a revelation—they’re crunchy, flavorful, and come with a cool, tangy dipping sauce that just hits the spot. The best part? They’re baked, not fried, so you get all the crunch with none of the extra oil. They’re also perfect for when you’re hosting friends and need an appetizer that’s impressively delicious yet deceptively simple to make. Seriously, your friends will be raving about these.
Jump to Recipe
What You’ll Need
What’s great about this recipe is that it’s likely you already have most of these ingredients lounging in your pantry. The secret is in the mix of spices and the creamy yogurt that coats the eggplant before it bakes to crispy perfection. Here’s the crew you’ll need:
- Eggplants – the star of the show!
- Italian seasoning mix – for that herby kick.
- Bread crumbs – to give our fries that crispy crunch.
- Low fat plain yogurt – adds creaminess and tang.
- Egg – helps bind everything together.
How to Make Eggplant Fries with Tzatziki Sauce
- Preheat your oven to 450°F. This is key for achieving that glorious crunchy exterior on the fries. Trust me, a hot oven is your best friend here.
- Mix together a pinch of salt, garlic powder, Italian seasonings, and a dash of paprika in a bowl. This mixture will become your flavor-packed coating.
- In another bowl, whisk together the yogurt and egg until you have a smooth mixture. This will act as the glue to hold those delicious breadcrumbs.
- Slice your eggplants into strips—think classic fry shape. Dunk each strip into the yogurt and egg mix, allowing any excess to drip off.
- Roll the coated eggplant strips in the breadcrumb mix, making sure each piece is covered well. This is what’s going to give you that irresistible crunch.
- Place the breaded eggplant strips onto a parchment-lined or greased baking pan, making sure they have some breathing room. You want them to bake, not steam.
- Pop them into the oven and bake for about 10-15 minutes, rotating once halfway through. They’re done when they’re slightly brown and smell absolutely divine.
Cook’s Notes
- Don’t overcrowd your baking sheet. The eggplant needs space to crisp up, so if you’re making a big batch, use two sheets or bake in batches.
- If you find your eggplant fries aren’t browning as much as you’d like, you can pop them under the broiler for a minute or two—just keep a close eye to prevent burning.
- These fries are best enjoyed fresh out of the oven, but if you have leftovers, they can be stored in an airtight container in the fridge for up to two days. To reheat, just pop them back into the oven at 400°F for a few minutes.
Make It Your Own
- Want to go gluten-free? Swap out the bread crumbs for a gluten-free variety, or try crushed cornflakes for an extra crunch.
- For a spicy twist, add a teaspoon of cayenne pepper to the breadcrumb mix. It’ll give your fries a nice kick.
- If you’re out of Italian seasoning, get creative with what you have on hand—oregano, thyme, or even a hint of rosemary can work wonders.
- No yogurt? No problem. Buttermilk or a splash of milk with a squeeze of lemon can substitute in a pinch.
If you try this, I’d love to hear how it turns out—drop a comment or tag me! Your kitchen adventures always make my day. Happy cooking, friends!
Related update: Eggplant Fries with Tzatziki Sauce
Related update: Breaded Shrimp and Spicy Mayo Appetizer

It was one of those freakishly warm spring afternoons when I first craved something light but satisfying. You know, when the sun teases you into thinking it’s okay to pack away your sweaters, only for the evening chill to remind you it’s not quite summer yet. I was rummaging through my fridge, hoping for inspiration, when I stumbled upon some swai fillets tucked behind the carton of eggs. Cue lightbulb moment: ceviche. Fresh, tangy, and with a bit of a kick, this swai ceviche is the kind of dish that feels fancy but comes together with minimal effort. Perfect for those nights when you want to impress without breaking a sweat. Jump to Recipe
What You’ll Need
Most of these ingredients are things you might already have lounging around in your kitchen. The magic is in the freshness and the little kick of spice.
- 1 pound of diced swai fillets
- Lime juice from about 4-5 limes
- 1 red diced shallot
- 1 cup of diced avocado
- 1 tomato, diced
- 1 tablespoon of chile-garlic paste
- 2 tablespoons of olive oil
- 1/4 cup of cilantro, chopped
- Salt and pepper to taste
How to Make Fresh and Simple Swai Ceviche
- Place the diced swai fillets in a bowl and cover them with half of the lime juice. Make sure each piece is submerged, then cover and pop it in the fridge for at least 3 hours. This allows the fish to “cook” in the acidity of the lime juice. You’re looking for it to turn opaque and tender.
- Once the fish is ready, strain it to remove excess lime juice. Don’t rush this step; too much moisture will make the ceviche soupy.
- In another bowl, combine the diced tomato, red shallot, and avocado with the remaining lime juice. Toss gently, so the avocado stays in lovely chunks.
- Stir in the swai and chopped cilantro. Give it all a good, gentle mix.
- Drizzle with olive oil and add the chile-garlic paste. The sauce gives it that spicy, garlicky punch that makes you go back for more.
- Season with salt and pepper to taste. Remember, a little goes a long way, so keep tasting as you go.
- Serve immediately with tortilla chips or over a fresh salad. Enjoy the vibrant flavors in every bite!
Cook’s Notes
Don’t skimp on the lime juice – it’s both the cooking agent and flavor base. If you’re not a fan of too much heat, start with half the amount of chile-garlic paste and adjust. This ceviche is best enjoyed fresh, but if you have leftovers, store them in an airtight container for up to a day. The avocado might brown slightly, but the taste will still be lovely.
Make It Your Own
- Swap the swai for shrimp or scallops if you’re feeling fancy.
- Add some diced cucumber for extra crunch and freshness.
- If cilantro isn’t your thing, try using fresh mint or basil for a different herbal note.
- For a sweeter twist, toss in some diced mango or pineapple.
If you try this, I’d love to hear how it turns out — drop a comment or tag me in your creations! Happy ceviche making!
Related update: Fresh and Simple Swai Ceviche

Last winter, I found myself staring down a half-eaten box of candy canes—a festive gift from my overly enthusiastic neighbor. I adore peppermint, but there’s only so much peppermint tea one can drink! Desperate to create something my friends and family would devour, it hit me: those candy canes needed a sweet partner. Enter my Candy Cane Chocolate Marshmallows. Perfect for a cozy evening in your favorite fuzzy socks, these treats are surprisingly easy to make and look infinitely more impressive than the effort they require. They’re the kind of thing you whip up to wow guests during holiday gatherings or to simply satisfy that post-dinner sweet tooth while binge-watching your favorite show. Trust me, they’re a hit! Jump to Recipe
What You’ll Need
This recipe is like a scavenger hunt in your pantry; chances are you already have most of the goodies tucked away. Here’s what you’ll need:
- Candy canes – the stars of the show!
- Dark chocolate – for that rich, bittersweet contrast.
- Marshmallows – go for the big, fluffy kind.
- Milk chocolate – adds a creamy sweetness to balance the dark chocolate.
How to Make Candy Cane Chocolate Marshmallows
- First, let’s get those candy canes ready. Grab a few and crush them using the bottom of a sturdy glass or a mallet. You want pieces small enough to stick but not so tiny that they turn to dust. Set them aside.
- Set up a double boiler by placing a heat-safe bowl over a pot of simmering water. Make sure the bottom of the bowl doesn’t touch the water. Add the dark and milk chocolate to the bowl, stirring occasionally until the mixture is smooth and glossy.
- Now for the fun part—dip each marshmallow into the melted chocolate, ensuring it’s nicely coated but not drowning. Let the excess drip off back into the bowl.
- Immediately roll the chocolate-dipped marshmallow into the crushed candy canes. The pieces should stick to the chocolate, creating a delightful crunchy coating.
- Place each finished marshmallow on a sheet of wax paper. They’ll need to chill in the fridge for at least an hour, or until the chocolate has fully hardened.
Cook’s Notes
These little delights are pretty forgiving, so don’t stress if things get a bit messy. Here are a few pointers to keep you on track:
- If you don’t have a double boiler, don’t sweat it. Use a microwave in short bursts to melt the chocolate, stirring in between.
- Store your marshmallows in an airtight container in a cool, dry place. They should last up to a week, but honestly, they’ll probably disappear much sooner!
- To make ahead, prepare them up to two days in advance. They’re the perfect treat to have waiting for last-minute guests or unexpected sweet cravings.
Make It Your Own
- Try using white chocolate for a sweeter, milder twist. It pairs beautifully with peppermint!
- For a nutty crunch, roll the chocolate-coated marshmallows in finely chopped hazelnuts instead of candy canes.
- If you’re feeling adventurous, add a pinch of cayenne pepper to the melted chocolate for a spicy kick.
- Not a fan of peppermint? Substitute with crushed graham crackers and sprinkle with a touch of cinnamon for a s’mores vibe.
If you try this, I’d love to hear how it turns out—drop a comment or tag me in your marshmallow masterpiece! Happy indulging, and may your winter be as sweet as these treats!
Related update: Candy Cane Chocolate Marshmallows
Related update: Grandma Inez’s Pineapple Pie
Related update: Tuna and Tofu Cold Dish
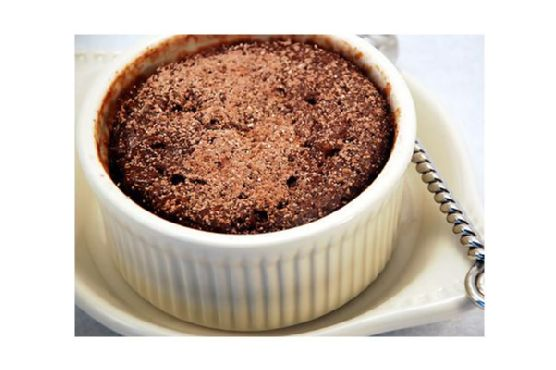
It was one of those evenings where you stare into your pantry hoping for a miracle, and it just magically happens! I had a sweet tooth that just wouldn’t quit, but the thought of baking a whole cake felt like running a marathon in heels. Ever been there? Enter: the 2 Minute Chocolate Yum. It’s that indulgent treat that saves you from dessert FOMO when you’re short on time and ingredients. Seriously, it’s like a chocolate hug in a mug. Imagine something that’s as easy as making a cup of coffee but infinitely more rewarding. Just a quick whip and zap, and you’ve got a dessert that feels like it took way more effort than it did. Also, if you’ve got a sudden guest or a cranky kid demanding sweets, this is your lifesaver.
Jump to Recipe
What You’ll Need
This recipe is a pantry hero; chances are, you’ve got most of these on hand. Here’s what you’ll need to whip up some chocolate magic:
- Cocoa powder
- Egg
- Flour
- Milk
- Oil
- Salt
- Sugar
- Vanilla
How to Make 2 Minute Chocolate Yum
- In a small mixing bowl, combine the cocoa powder, egg, flour, milk, oil, salt, sugar, and vanilla. Whip them together until the mixture is smooth and glossy, much like a velvety chocolate drizzle.
- Divide the batter evenly between two 6-8 oz. ramekins. Fill them a little over halfway full so they have room to puff up in the microwave.
- Microwave one ramekin at a time for about 2 minutes. You’ll know it’s done when the cake is puffed and looks like it’s ready to burst with chocolatey goodness.
- Serve immediately. Top with a scoop of ice cream, a dollop of whipped cream, or just a sprinkle of powdered sugar and cocoa for that minimalist vibe.
Cook’s Notes
Let’s keep it real: microwaves vary, so you might need to adjust the cooking time based on your machine’s mood swings. Start with 90 seconds if you’re unsure and then zap it in 10-second intervals until perfect. If you want to save some batter for later, it holds up well covered in the fridge for a day. Just give it a good stir before microwaving. Stuck with leftovers? Unlikely, but if that happens, you can refrigerate and reheat gently. The texture might change a bit, but it’ll still hit the spot.
Make It Your Own
- Black Forest Twist: Add a spoonful of cherry pie filling in the middle of the batter before cooking for a luscious surprise.
- Nutty Buddy: Stir in a tablespoon of peanut butter for a chocolate-peanut butter dream.
- Minty Fresh: A few drops of peppermint extract can turn this into a festive treat.
- Spice It Up: Add a pinch of cinnamon or chili powder for a surprising kick.
If you try this, I’d love to hear how it turns out! Drop a comment or tag me on social media with your chocolatey creations. Keep those sweet moments coming!
Related update: 2 Minute Chocolate Yum
Related update: Candy Cane Chocolate Marshmallows
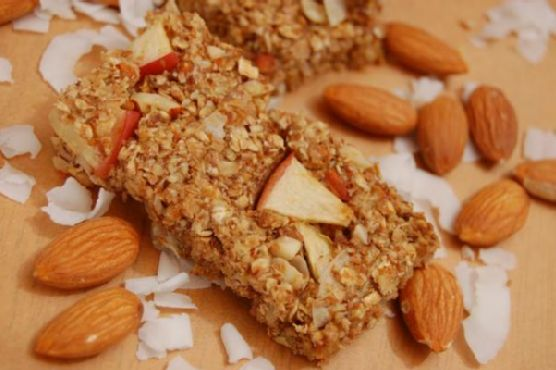
It was one of those late-summer afternoons, the kind where the sun hangs a little lower in the sky and you can just feel fall whispering from around the corner. I found myself digging through the pantry, looking for something to munch on that wouldn’t make me feel guilty later. You know that feeling, right? When you’re just done with salads but not quite ready to dive into pumpkin-everything? That’s when I decided to whip up these Homemade Apple Almond Granola Bars. They’re the perfect transition snack — hearty enough to curb hunger, sweet enough to feel indulgent, but packed with ingredients that say, “Hey, I’m still being healthy!”
Jump to Recipe
What You’ll Need
I love this recipe because you likely already have most of the ingredients lounging in your kitchen. Trust me, it’s all pretty basic, but with a few key players that make these bars special.
- 2 cups rolled oats
- 1/4 cup ground flax seed
- 1/4 cup oat bran
- 1/4 cup wheat bran
- 1/2 teaspoon salt
- 1 teaspoon baking powder
- 1 teaspoon cinnamon
- 1/2 cup sugar substitute
- 1/4 cup unsweetened coconut
- 1 cup non-fat milk
- 2 tablespoons sweet honey
- 1 large egg
- 1 teaspoon vanilla extract
- 1 large apple, chopped
- 1/2 cup sliced almonds
How to Make Homemade Apple Almond Granola Bars
- First things first, preheat your oven to 350°F. Grab a 9×13 pan and give it a good spray with non-stick cooking spray. You don’t want any sticking drama later.
- In a big mixing bowl, stir together the oats, ground flax seed, oat bran, wheat bran, salt, baking powder, cinnamon, sugar substitute, and coconut. This mixture should look sandy and smell like a cozy cinnamon dream.
- Pour in the milk, honey, egg, and vanilla extract. Stir until everything is nice and combined. The mixture will be wet but not soupy.
- Fold in the chopped apple and sliced almonds. You want those chunks to be well distributed so every bar gets a piece of the action.
- Press the mixture evenly into your prepared pan. Make sure it’s packed tightly, so the bars hold together after baking.
- Bake for 15-20 minutes. You’ll know they’re done when the edges are just starting to brown and the kitchen smells like heaven.
- Let the bars cool in the pan for about 10 minutes. Then cut them into your desired bar size. Be careful, they’ll still be warm!
- Finally, let them cool completely before removing from the pan. This helps them set up nicely.
Cook’s Notes
These granola bars are super forgiving. If your apple is more tart, it pairs beautifully with the sweet honey. The bars are pretty adaptable — you can tweak them based on what you have on hand. Store them in an airtight container, and they’ll stay fresh for about a week, perfect for tucking into lunch boxes or grabbing on your way out the door. If you’re making them ahead, they freeze well too. Just wrap each bar individually and pull one out when you need a quick snack.
Make It Your Own
- Pumpkin Spice Swap: Trade the cinnamon for an equal amount of pumpkin spice to usher in those autumn vibes.
- Nutty Buddy: Swap almonds for pecans or walnuts. They add a different crunch and flavor.
- Chunky Monkey: Throw in some mini chocolate chips or dried banana pieces for a sweeter treat.
- Berry Burst: Substitute the apple with dried cranberries or raisins for a fruity twist.
If you try this, I’d love to hear how it turns out — drop a comment or tag me! Whether you stick to the script or put your own spin on it, these bars are bound to become a favorite. Happy snacking!
Related update: Homemade Apple Almond Granola Bars

It was one of those weeks where everything felt just a bit off. You know the kind — when you drop your phone in the sink, forget your keys, and somehow leave a trail of bread crumbs throughout the entire house. I needed some comfort food, but not the kind that takes hours to prepare. Enter: Crawfish Cake Sliders. These little gems are a weeknight savior — quick to whip up, yet bold and satisfying. Perfect for when you need a little culinary escape without the fuss. Plus, they pack that southern charm that makes you feel like you’re right at home, sitting by a bayou.
Jump to Recipe
What You’ll Need
Here’s the best part: you likely have most of these ingredients hanging out in your pantry. Just a few fresh items and you’re golden.
- 1 teaspoon oil (plus more for frying)
- 1 pound crawfish tails, chopped
- 1 small red onion, finely chopped
- 1 clove garlic, minced
- 1 teaspoon Creole spice (or more to taste)
- 1 large egg
- 1/2 cup bread crumbs
- 8 slider buns
- Tartar sauce for serving
How to Make Crawfish Cake Sliders
- In a sauté pan, heat 1 teaspoon of oil over medium heat. Add the chopped red onion and cook until tender, about 2-3 minutes. The kitchen will start to smell amazing, like the beginning of a great meal.
- Once the onion is tender, remove the pan from the heat and add the minced garlic, chopped crawfish tails, and 1 teaspoon of Creole spice. Give it a quick toss to awaken those flavors.
- Transfer the mixture to a mixing bowl and let it cool for a bit. This is the perfect time to take a breather and maybe sip some iced tea.
- Once cooled, mix in the egg and just enough bread crumbs to bind everything together. You want the mixture to hold its shape, so feel free to adjust with more crumbs if needed. Season with salt, pepper, and more Creole spice if you’re feeling bold.
- Form the mixture into 8 equal patties and flatten them to about 3/4-inch thick. They should feel firm but not too dense.
- Heat more oil in the sauté pan over medium heat. Fry the patties on each side until they’re brown and crispy — about 3-4 minutes per side. You’ll know they’re ready when they smell irresistible.
- Serve these beauties on slider buns with a generous dollop of tartar sauce, and watch them disappear as quickly as you made them.
Cook’s Notes
A few things to keep in mind:
- If your mixture feels too wet, sprinkle in more bread crumbs until it binds correctly.
- Worried about the patties falling apart? Let them chill in the fridge for 15 minutes before frying. It makes them easier to handle.
- These sliders can be made ahead of time. Just prepare the patties and store them in the fridge. Cook them when you’re ready to serve.
- Leftovers can be stored in an airtight container in the fridge for up to two days. Reheat them in a skillet to bring back that lovely crispiness.
Make It Your Own
Want to put your spin on these sliders? Here are a few ideas:
- Add some heat: Chop up a jalapeño and add it to the mix for a spicy kick.
- Go green: Mix in some chopped fresh parsley or cilantro for a burst of freshness.
- Cheesy delight: Add a slice of your favorite cheese on top of each patty just before they’re done frying.
- Gluten-free option: Swap the bread crumbs for gluten-free crumbs and use gluten-free buns.
If you try this, I’d love to hear how it turns out — drop a comment or tag me in your delicious creations! Let’s make sure those off weeks are few and far between, my fellow food adventurers. Happy cooking!
Related update: Crawfish Cake Sliders
Related update: Easy Vegetable Fried Rice
Related update: Homemade Apple Almond Granola Bars

Picture this: It’s a chilly Wednesday evening, and I’ve got exactly 15 minutes before my friends show up for our weekly Wine & Whine night. The fridge is looking a bit sparse, but I spot some leftover brie from last weekend and a carton of raspberries that are starting to look a tad too ripe. As I rummage through my pantry, I stumble upon a forgotten stash of phyllo shells. A lightbulb moment strikes—why not whip up some White Chocolate Raspberry Brie Cups? They’re quick, ooze class with minimal effort, and the combination of creamy, tangy, and sweet is an absolute game-changer. Trust me, these little bites are what every Wednesday evening dreams of becoming.
Jump to Recipe
What You’ll Need
You might already have most of these on hand, which means fewer trips to the store—score!
- Brie – The creamy heart of our cups.
- Athens phyllo shells – Crunchy, flaky, ready-to-go lifesavers.
- Raspberries – Fresh and slightly tart.
- Raspberry preserves – For that extra berry punch.
- White chocolate – The sweet base to balance it all out.
How to Make White Chocolate Raspberry Brie Cups
- Preheat your oven to 350 degrees. This gives us just enough time to assemble everything.
- Line a baking sheet with parchment paper. This helps prevent any sticky messes and makes cleanup a breeze.
- Place 1 teaspoon of white chocolate in the bottom of each phyllo shell. The chocolate will melt into a sweet, gooey foundation.
- Top with chunks of brie. Go generous here—the brie should be the star of the show.
- Add about 1/2 teaspoon of raspberry preserves on top of the cheese. This layer should start to glisten.
- Bake for 8 minutes, or until the corners of the phyllo shells turn golden and the cheese is bubbling away.
- Carefully remove from the oven and top with a small dollop of extra raspberry jam. Trust me, it’s worth it.
- Place back in the oven for just 1 more minute to let the jam settle.
- Finally, crown each cup with a fresh raspberry. Serve them hot—the contrast of temperatures is divine.
Cook’s Notes
Don’t overstuff the shells; they need some space to breathe and bake properly. If you’re prepping for a party, you can assemble these up to a day in advance. Just cover and refrigerate them, then bake right before serving. These cups are best enjoyed fresh, but if you have leftovers (unlikely!), store them in an airtight container in the fridge. Pop them back in a warm oven for a few minutes to re-crisp.
Make It Your Own
- Swap the brie for camembert if you’re feeling adventurous—another creamy delight.
- Try a darker chocolate for a less sweet, more sophisticated bite.
- Substitute the raspberry preserves with apricot jam for a surprise twist.
- Add a thin slice of prosciutto under the brie for a savory kick.
If you try this, I’d love to hear how it turns out—drop a comment or tag me! Wine & Whine nights are my favorite, and I hope these cups make yours special too.
Related update: White Chocolate Raspberry Brie Cups

It was one of those Tuesday evenings where everything felt a little upside down. My oven was on the fritz, my dinner plans had gone awry, and yet, that familiar sweet craving hit me like clockwork. As I rummaged through my pantry, the thought of something warm and comforting felt like the perfect antidote to my topsy-turvy day. Enter, cinnamon sugar fried apples. Not only are these little guys a quick fix for any sweet tooth, but they also bring a cozy vibe that feels like a warm hug on a plate. And honestly, who doesn’t love a recipe that transforms humble ingredients into something downright delicious?
Jump to Recipe
What You’ll Need
This recipe is all about simplicity — chances are you’ve got most of this in your kitchen already. Here’s what you’ll need:
- All-purpose flour
- Apples (crisp varieties like Granny Smith or Honeycrisp work great!)
- Brown sugar
- Cinnamon
- Eggs
- Granulated sugar
- Lemon zest
- Milk
- Oil (for frying)
- Salt
- Unsalted butter
How to Make Cinnamon Sugar Fried Apples
- In a large bowl, whisk together the all-purpose flour, a pinch of salt, granulated sugar, milk, lightly beaten eggs, lemon zest, and melted unsalted butter until the batter is smooth to the touch. Cover the bowl with plastic wrap and let it rest for 30 minutes to ensure the flour fully hydrates and the flavors meld beautifully.
- While the batter is resting, core and slice your apples into 1 cm thick rings. Aim for even slices as this will help them cook uniformly. Set them aside and start heating the oil in your preferred frying vessel over medium heat.
- Once your batter has rested and your oil is shimmering and ready, dip each apple slice into the batter, allowing any excess to drip back into the bowl. Gently lay the slices into the hot oil.
- Fry the apple slices until they are golden and fragrant, about 2-3 minutes per side. You’ll know they’re ready when the edges turn a beautiful golden hue and your kitchen is filled with the nostalgic aroma of apples and cinnamon.
- As each batch finishes, transfer the fried apples to a plate lined with double-layered paper towels to drain any excess oil.
- In a small bowl, combine the brown sugar and cinnamon. Sprinkle this delightful cinnamon sugar mixture generously over the warm apple slices. Serve immediately for that perfect combination of crispy, sweet, and spiced.
Cook’s Notes
Here’s the thing: frying can be a bit of a mess, but it’s so worth it. Make sure your oil is hot enough before dipping in the apples; otherwise, they’ll soak up too much oil and get soggy. A small kitchen thermometer can be handy if you’re unsure. If you’re planning to make these ahead of time, I’d recommend just prepping the batter and slicing the apples. Frying is best done right before serving to maintain that delightful crispiness. If you do end up with leftovers, a quick reheat in the oven at 350°F should do the trick.
Make It Your Own
Want to put your own spin on these cinnamon sugar fried apples? Here are some fun ideas:
- Instead of apples, try using firm pears for a slightly different but equally delicious twist.
- For a nutty crunch, toss in some chopped pecans or walnuts after sprinkling the cinnamon sugar.
- Want a caramel vibe? Drizzle some homemade or store-bought caramel sauce over the fried apples for an extra indulgent treat.
- Looking for a boozy kick? Add a splash of spiced rum to the batter for a grown-up version.
If you try this recipe, I’d love to hear how it turns out — drop a comment or tag me in your delicious creations! Whatever you do, make sure to enjoy each crispy, sweet bite. Happy cooking! 🍏✨
Related update: Cinnamon Sugar Fried Apples
Related update: Roasted Red Pepper & Tomato Salsa
Related update: Bacon Brownie Cupcakes

On one of those bustling weekday evenings when time seems to slip away faster than you can say “dinner,” I found myself staring into the fridge, hoping for a miracle. What I really wanted was something fresh and light but also satisfying. That’s when I remembered these Easy To Make Spring Rolls. They’re perfect for those nights when you want something delicious and impressive-looking without the fuss. Plus, they have this uncanny ability to make you feel like you’ve got your life together. Not bad for a dish that’s ready in under 30 minutes!
Jump to Recipe
What You’ll Need
This recipe is the epitome of a grab-and-go grocery list. Most of these ingredients are probably already lounging in your kitchen. Here’s what you’ll need to whip up these fresh bites of joy:
- Rice paper wrappers
- Cooked shrimp, halved
- Boston lettuce leaves
- Fresh basil, mint, and coriander leaves
- Red bell pepper, sliced into thin strips
- Chili pepper, thinly sliced (optional for a kick)
- Garlic, minced
- Fresh lime juice
- Nuoc cham for dipping
- Fish sauce
- Rice vinegar
- Sugar
- Water
How to Make Easy To Make Spring Rolls
- First, get all your ingredients prepped and within arm’s reach. Trust me, this will save you a lot of scrambling later.
- Fill a large bowl with warm water. Dip a rice paper wrapper in the water just until it softens—this means a couple of swishes should do it. It might feel slightly stiff as you take it out, but don’t worry.
- Lay the softened wrapper flat on a clean surface. In the center, line up two shrimp halves. It’s like creating a little shrimp runway!
- Top the shrimp with a few leaves of basil, mint, and cilantro. Add a layer of Boston lettuce, and maybe some red bell pepper strips and a slice of chili if you’re feeling spicy.
- Fold the sides of the wrapper inward over the filling. Start rolling from the end with the lettuce, tucking in the filling as you go for a snug little spring roll.
- Repeat with the remaining wrappers and ingredients. Once you’ve got your little spring roll soldiers lined up, cut them in half for easy handling.
- Serve them at room temperature with some nuoc cham for dipping. Don’t skip the dipping sauce—it’s the secret weapon!
Cook’s Notes
Dealing with rice paper wrappers can be a bit like handling a delicate flower. Too much time in the water and they’ll become a soggy mess. Not enough and they’ll tear when you try to roll. My trick? A quick dip and a confident hand. They’ll soften up perfectly by the time you start rolling. These rolls are best enjoyed fresh, but you can prepare all the components ahead of time and roll them just before serving. If you have leftovers, wrap them tightly in plastic wrap to keep them from drying out.
Make It Your Own
Feel free to get creative with these spring rolls. Here are some variations to consider:
- Swap the shrimp for crispy tofu to make it vegetarian-friendly.
- Add in slivers of cooked pork or chicken for a meatier bite.
- Include julienned carrots for an extra crunch and pop of color.
- Spice things up by adding a dash of Sriracha to the dipping sauce.
If you try this, I’d love to hear how it turns out—drop a comment or tag me on social media! Whether you’re a spring roll pro or a first-timer, I hope these become a fun and tasty part of your meal rotation. Enjoy every bite!
Related update: Easy To Make Spring Rolls

It was one of those frantic weeknights when the thought of cooking anything complicated felt like a Herculean task. The kids were hungry, my partner was stuck in traffic, and the fridge looked like it had been raided by a group of snack-hungry gremlins. That’s when I spotted the package of rice paper hiding behind the milk. In a flash, I knew what to do. These Vegetarian Spring Rolls with Garlic Lime Sauce were going to be our savior. They’re colorful, crunchy, and somehow manage to make you look like a culinary genius with minimal effort. Perfect for a quick dinner fix or when you want to impress without breaking a sweat.
Jump to Recipe
What You’ll Need
The beauty of this recipe is its simplicity — chances are, you already have most of these ingredients lurking around.
- Rice paper
- Butter leaf lettuce
- Carrots
- Jicama
- Red bell pepper
- Yellow bell pepper
- Thai basil
- Ginger
- Garlic
- Lime
- Hoisin sauce
- Sriracha
How to Make Vegetarian Spring Rolls With Garlic Lime Sauce
- First, julienne the red and yellow bell peppers, carrots, jicama, and Thai basil. Aim for strips about 1/8 inch thick and 2 inches long, like colorful little matchsticks.
- Fill a round pie pan or shallow plate with warm water. Delicately dip one piece of rice paper in the water, ensuring both sides are soaked — but no need to drown them!
- Carefully lay the rice paper on a flat, flour towel cloth. Wait about ten seconds for it to soften — it should feel silky and pliable.
- Gently peel the rice paper off the cloth and place half a butter leaf lettuce on top. Discard the ribbing to keep things smooth and easy to roll.
- Add a delicate layer of each vegetable on top of the lettuce, finishing with a sprinkle of Thai Basil. It’s like art — have fun with it!
- To roll: start at one end, fold the edge toward the middle, and repeat with the parallel side. Give it a little 90-degree turn and roll it snugly, like wrapping up a little gift.
- Cut each roll diagonally and arrange them on a serving platter, so they look all fancy and inviting.
- For the Garlic Lime Hoisin Sauce, use a mortar and pestle to crush the garlic and ginger together until fragrant. The aroma should make you smile.
- Whisk in fresh lime juice and a modest splash of Sriracha for that zingy, spicy kick. Finally, add the hoisin sauce and whisk until combined. Taste and adjust as needed.
Cook’s Notes
Rolling these can be a bit of a learning curve, but once you get the hang of it, you’re golden. Rice paper can be temperamental, so if it tears, just keep going — a little imperfection never hurt anyone. If you want to prep these in advance, keep the veggies prepped in the fridge and roll them just before serving to keep everything fresh. Leftover rolls can be stored in an airtight container in the fridge for a day, but the rice paper will lose some of its magic over time. The sauce, however, can be made days ahead and will only get better as the flavors mingle.
Make It Your Own
- Swap the jicama for cucumber for a refreshing twist.
- Replace Thai basil with cilantro if that’s more your vibe.
- For a protein boost, add slices of crispy tofu or tempeh.
- Feeling nutty? Toss in some crushed peanuts for extra crunch.
If you try this, I’d love to hear how it turns out — drop a comment or tag me! Whether it’s a weeknight fix or a dinner party appetizer, these spring rolls are sure to brighten your table and your tastebuds. Enjoy!
Related update: Vegetarian Spring Rolls With Garlic Lime Sauce
Related update: Easy To Make Spring Rolls
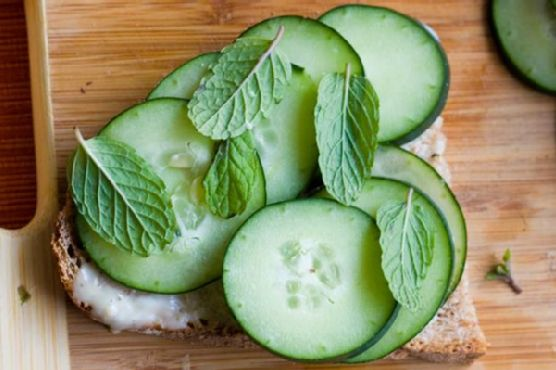
It was one of those gloriously lazy Sunday afternoons when the sun was streaming through the kitchen window, painting everything in a warm, golden hue. I found myself craving something simple yet sophisticated to nibble on while sipping a freshly brewed pot of Earl Grey. That’s when the idea of Cucumber Mint Tea Sandwiches popped into my head. These little bites are like a garden party in your mouth — refreshing, slightly spicy, and with a hint of sweet earthiness. They’re perfect for when you want to impress your friends but also fit perfectly into a no-fuss, no-mess vibe. Trust me, once you try these, they’ll become your go-to for every casual gathering or solo indulgence.
Jump to Recipe
What You’ll Need
Honestly, you probably have most of these ingredients lounging in your pantry or fridge already. And if not, they’re super easy to find on your next grocery run.
- Bread (your choice – think classy yet sturdy)
- Cucumber (cool, crisp, and refreshing)
- Wasabi Maple Spread (the secret zing)
- Black pepper grinder (for that fresh, subtle heat)
- Fresh mint leaves (fragrant and cooling)
- Fresh dill (herbaceous and bright)
- Vegenaise (creamy and delightful)
- Maple syrup (just a touch of sweetness)
- Wasabi powder (for that kick)
How to Make Cucumber Mint Tea Sandwiches
- Start by whipping together the wasabi maple spread. Combine vegenaise, a dash of maple syrup, and a sprinkle of wasabi powder until it’s smooth and slightly spicy.
- Thinly slice the cucumber. You can go for thick, crunchy slices if you’re feeling bold, or thin, silky ones for a more delicate bite. Either way, they should be refreshingly crisp.
- Gather your fresh mint leaves and dill. Rinse them under cold water and pat them dry with a clean kitchen towel. You want them to be fresh and vibrant.
- Spread a very thin layer of your wasabi maple spread on all the inside surfaces of the bread slices. It’s all about that flavor balance, not overpowering.
- Layer your cucumber slices neatly on top of the spread. Feel free to overlap them slightly. It’s like building a little cucumber brick wall.
- Add a layer of mint and dill. You can mix them up in each sandwich or go half mint, half dill if you like to keep your flavors organized.
- Grind some fresh black pepper over the top of the herbs and cucumbers. This will tie all the flavors together beautifully.
- Close each sandwich with another piece of bread and gently press down. Then, slice them into charming quarter cubes or triangles. Presentation is key!
- Plate the sandwiches, and if you’re feeling fancy, sprinkle a few edible flowers around for a pop of color and whimsy.
Cook’s Notes
These sandwiches are meant to be a fresh and light snack, so fresh ingredients are key. Make sure your cucumber is firm and your herbs are not wilting. Want to make them a few hours ahead? No problem! Just cover the platter with a slightly damp paper towel and wrap tightly with plastic wrap to keep everything moist and fresh. Leftovers (if you have any, which I doubt) can be stored in an airtight container in the fridge for up to a day — but they’re best fresh.
Make It Your Own
- Swap out the bread for a whole grain or seed variety for extra texture and flavor.
- Replace the wasabi maple spread with a spicy sun-dried tomato spread for a Mediterranean twist.
- Add a layer of thinly sliced radishes for an extra peppery crunch.
- Sprinkle a dash of red pepper flakes inside for those who love an extra spicy kick.
If you try this, I’d love to hear how it turns out — drop a comment or tag me in your tea-time creations! Happy sandwich making!
Related update: Cucumber Mint Tea Sandwiches
Related update: Vegetarian Spring Rolls With Garlic Lime Sauce

Last Tuesday, I found myself staring into the fridge at 7 PM, wondering what on earth I could whip up for a little evening gathering with friends. You know those days when you just need a recipe that’s not only impressive but also stress-free? That’s when I stumbled upon the forgotten block of *blue cheese* nestled next to a jar of *fig jam*. A brainwave hit me: Blue Cheese Tartlets with Fig Jam and Walnuts! These beauties are the perfect blend of savory and sweet, and trust me, they’re much easier to make than you’d think. Each bite is a little symphony of flavors and textures. Plus, they’re great for making ahead and pop in the oven the moment your guests ring the doorbell.
Jump to Recipe
What You’ll Need
The ingredient list for these tartlets is refreshingly simple. Chances are you already have most of these in your pantry:
- Blue cheese
- Butter
- Flour
- Fig jam
- Walnuts
- Orange zest
- (Optional) Fresh thyme leaves
How to Make Blue Cheese Tartlets With Fig Jam and Walnuts
- Preheat your oven to 350°F (175°C). Lightly grease the cups of your mini muffin pans unless they’re non-stick. No one wants a sticky situation!
- In a medium bowl, cream together the *blue cheese* and *butter*. The mixture should be smooth and creamy, with that unmistakable aroma of rich cheese.
- Add the flour to the bowl and use your hands to bring the dough together. It might take a little coaxing, but be patient — the dough will reward you with a tender crust.
- Divide the dough into 30 pieces and roll them into balls. If you prefer a more delicate shell, go for 36 pieces.
- Using lightly floured fingers, press each dough ball against the sides of the mini tart pan until the dough rises slightly above the rim. This ensures that lovely shell shape.
- Bake the shells for 15 minutes, until they are golden brown and smell like heaven. Let them cool in the pans for about 5 minutes, then transfer to a wire rack to finish cooling completely.
- Once cooled, spoon a dollop of *fig jam* into each tartlet shell. Top with a sprinkle of toasted *walnuts*, a touch of *orange zest*, and a few thyme leaves if you like.
Cook’s Notes
These tartlets are surprisingly versatile. You can prepare the tartlet shells ahead of time and store them in an airtight container. If you’re planning a party, they freeze beautifully — just bake frozen shells for 8 minutes at 325°F before filling them. Pro tip: when pressing the dough into the pan, keep a small bowl of flour nearby to dust your fingers and prevent sticking. And if you’re cooking for a big crowd, consider doubling the recipe because they disappear fast!
Make It Your Own
- Swap the blue cheese for *goat cheese* if you prefer something milder.
- Replace *fig jam* with a spicy *pepper jelly* for a kick.
- Use *pecans* or *hazelnuts* instead of walnuts for a different nutty flavor.
- Add a thin slice of prosciutto to each tartlet for a touch of saltiness.
If you try this, I’d love to hear how it turns out — drop a comment or tag me! These tartlets are really something special and I hope they bring a bit of joy to your kitchen and your taste buds. Enjoy every bite!
Related update: Blue Cheese Tartlets With Fig Jam and Walnuts
Related update: Cucumber Mint Tea Sandwiches

I remember the first time I tried to grill potato skins. It was a balmy summer evening, and my friends and I had decided on an impromptu barbecue to celebrate the end of a long workweek. We were short on the usual grilling staples, and I found myself rummaging through the pantry, just hoping to find anything that could be charred over an open flame. In a stroke of serendipitous genius—or desperation, depending on how you look at it—I stumbled upon a bag of baking potatoes. And so began my love affair with crispy, gooey, and utterly addictive grilled potato skins. They’re the perfect combination of crispy potato goodness and creamy, cheesy decadence, making them a crowd-pleaser that’s surprisingly easy to throw together. You won’t believe how fast these disappear once they hit the table.
Jump to Recipe
What You’ll Need
The beauty of this recipe is its simplicity. Chances are you already have most of these ingredients on hand.
- Baking potatoes
- Cooked bacon or finely-chopped ham
- Picante sauce
- Shredded cheddar cheese
- Sour cream
- Unsalted butter
How to Make Grilled Potato Skins
- First, preheat your oven to 375 degrees. Prick your baking potatoes all over with a fork to let them vent, then bake them for 50 to 60 minutes until they’re tender and can be easily pierced.
- Once the potatoes are cool enough to handle, cut each one in half lengthwise. Scoop out most of the insides, leaving a sturdy 1/4-inch shell. Save the scooped-out potato for mash or soup later!
- Melt some unsalted butter and brush the inside of each potato shell generously. This will help them get that delicious golden crispiness we’re after.
- Spoon about 2 teaspoons of picante sauce into each shell, spreading it around to coat the bottom. This adds a delightful zesty kick.
- Next, sprinkle a hearty amount of shredded cheddar cheese into each potato, followed by bits of your cooked bacon or ham. Really pack it in there—no one likes a stingy potato skin.
- Fire up your grill to medium heat. Place the potato skins directly over the coals, and let them grill uncovered for 10 to 12 minutes. You’ll know they’re ready when the skins are crisp and the cheese is bubbly and golden.
- If you’re feeling fancy, sprinkle with diced tomato and green onions right before serving. Finish with a generous dollop of sour cream on top.
Cook’s Notes
Grilled potato skins are pretty forgiving, but here are a few things to keep in mind:
- If you’re making these ahead of time, follow all the steps up to grilling and then store them in the fridge. When you’re ready to eat, pop them on the grill straight from the fridge. Just add a couple of extra minutes to the grill time.
- Leftovers can be stored in an airtight container in the fridge for up to three days. Reheat them in a 350-degree oven or a toaster oven until they’re heated through and crispy again.
- Make sure your grill is properly preheated before you start cooking. This ensures the skins get crispy rather than just drying out.
Make It Your Own
- Swap the bacon for crispy tofu to make it vegetarian-friendly.
- Use Monterey Jack or pepper jack cheese for a different flavor profile.
- Try adding black beans or corn for a southwestern twist.
- If you’re not a fan of picante sauce, substitute it with a mild salsa or even BBQ sauce for a smoky vibe.
If you try this, I’d love to hear how it turns out—drop a comment or tag me on social media! There’s nothing more satisfying than seeing your spin on these tasty potato skins. Enjoy every crispy, cheesy bite!
Related update: Grilled Potato Skins
Related update: Blue Cheese Tartlets With Fig Jam and Walnuts
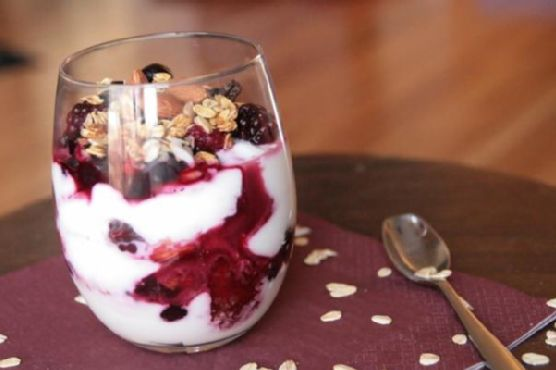
It was one of those mornings where everything seemed to go wrong. I woke up late, the cat knocked over my coffee, and I realized we were out of milk. You know those days, right? But hey, sometimes the universe gives you lemons so you can find a creative and tasty solution. On this particular day, I discovered my savior: Mixed Berry Yogurt with Almonds. It’s the kind of dish that feels luxurious without much effort—perfect for those hectic mornings or even as a healthy dessert when you want something a bit more special. The best part? It’s quick, comforting, and feels like a little scoop of joy.
Jump to Recipe
What You’ll Need
You might already have most of these ingredients nestled in your pantry and freezer, which is a huge win in my book.
- 1 cup frozen mixed berries
- 1/2 cup whole oats
- 1 cup plain Greek yogurt
- 1/4 cup whole almonds
How to Make Mixed Berry Yogurt with Almonds
- Start by toasting the almonds in a dry skillet over medium heat. Shake the skillet occasionally until they turn golden and fragrant. This should take about 3-5 minutes. Keep an eye on them; they can go from perfect to burnt in no time!
- While the almonds are toasting, scoop the Greek yogurt into a bowl or glass cup. I love using a clear glass because it shows off the layers and makes me feel like an artist.
- Evenly sprinkle the oats over the yogurt. If you want them a bit softer, you can let them sit for a minute or two to soak up some of the yogurt’s moisture.
- Microwave the frozen berries for about 30 seconds to thaw them slightly, then layer them over the oats. The warmth from the berries will start to melt into the yogurt, creating a beautiful marbled effect.
- Finally, top it all off with those perfectly toasted almonds. The crunchiness will be a lovely contrast to the creamy yogurt and juicy berries.
Cook’s Notes
This dish is super flexible, so you can tweak it based on what you have. If you want to prepare it in advance, layer the yogurt and oats first and keep the berries and almonds separate until you’re ready to serve. Leftovers can be stored in an airtight container in the fridge for up to two days, but I recommend keeping the almonds separate to maintain their crunch.
Watch out for the almond toasting process—they toast quickly and can easily burn if you’re not paying attention. Trust me, I’ve been there. If you want to make it even quicker in the morning, toast the almonds the night before!
Make It Your Own
- Swap the Greek yogurt for a creamier vanilla yogurt if you’re serving this as a dessert.
- Layer in a drizzle of maple syrup over the yogurt for an extra touch of sweetness.
- Try using walnuts or pecans if you’re out of almonds, toasting them just the same for that essential crunch.
- If berries aren’t your thing, this works beautifully with sliced peaches, bananas, or even a medley of whatever fruits you have hanging out in your fridge.
If you try this, I’d love to hear how it turns out—drop a comment or tag me! There’s nothing quite like seeing your take on these tasty creations. Enjoy every spoonful!
Related update: Mixed Berry Yogurt with Almonds
Related update: Beet Greens and Poached Eggs

It was one of those grey, lazy Sundays when the weather had no intention of letting you out of the house. My kids were bored, the couch had become a kingdom of pillows, and we were in desperate need of a fun kitchen project that would end with something delightful to snack on. That’s how we landed on making homemade animal crackers. It’s the perfect rainy-day activity that promises not just giggles and flour-covered noses but also a batch of wonderfully crunchy, subtly spiced crackers that beat anything from a box. Plus, they’re surprisingly simple to whip up with ingredients that are probably lounging in your pantry right now. Jump to Recipe
What You’ll Need
The beauty of these animal crackers is in their simplicity. Chances are you already have most of this hanging around in your kitchen. Here’s what you’ll need:
- Butter – the base of flavor and texture
- Brown sugar – for that slight caramel sweetness
- Egg – to bind it all together
- Vanilla – a warm aroma booster
- Cinnamon – the spice that whispers “home”
- Allspice – for a hint of mystery spice
- Salt – because sweet needs balance
- Baking powder – to lift them ever so slightly
- Oats – for a bit of texture
- Flour – the backbone of the dough
- Cocoa powder – optional, but oh what it adds!
How to Make Homemade Animal Crackers
Ready to dive in? Let’s do this!
- In a mixing bowl, cream together the butter and brown sugar until the mixture is light and fluffy. You should see it lighten in color slightly.
- Add in the egg and vanilla, and mix until everything is well combined and smooth.
- Sprinkle in the cinnamon, allspice, and salt. The dough will start to smell like a cozy autumn afternoon.
- Mix in the baking powder, oats, and flour. If you’re going the chocolatey route, replace some of the flour with cocoa powder as you measure.
- Once everything is incorporated, form the dough into a ball. It will be a bit sticky, but that’s okay!
- Wrap it in plastic wrap and let that dough chill in the fridge for at least an hour, but overnight is perfectly fine too.
- When you’re ready, preheat your oven to 350°F. Pull the dough from the fridge, grab a hunk, and roll it out to a 1/4″ thickness. Think of it as your edible crafting clay.
- Use your favorite animal-shaped cookie cutters to stamp out shapes and place them on a cookie sheet lined with parchment paper. Give them a little breathing room—they need space to grow!
- Bake for 5-7 minutes. Keep an eye out—once they turn golden and fragrant, you’re in business.
Cook’s Notes
Here’s the deal: don’t skip the chilling. It makes the dough easier to handle and helps the flavors meld together nicely. If you’re planning ahead, this dough holds well in the fridge for about 24 hours. Once baked, keep the crackers in an airtight container. They should stay crunchy and delicious for about a week, if they last that long. Remember to roll the dough evenly, so all your crackers bake at the same rate. And if they get a little too golden, don’t worry, that just means more crunch.
Make It Your Own
Feel free to play around with the recipe. Here are some ideas:
- Swap the cinnamon for nutmeg or ginger for a different kind of spice.
- Add a handful of mini chocolate chips to the dough for a surprise treat.
- Replace the oats with shredded coconut for a tropical twist.
- Use almond extract instead of vanilla for a nuttier flavor.
If you try this, I’d love to hear how it turns out—drop a comment or tag me! These little guys are a joy to make and even more fun to eat, so I hope they bring a bit of joy to your table too. Happy baking!
Related update: Homemade Animal Crackers
Related update: Brownie Cake gluten free, dairy free
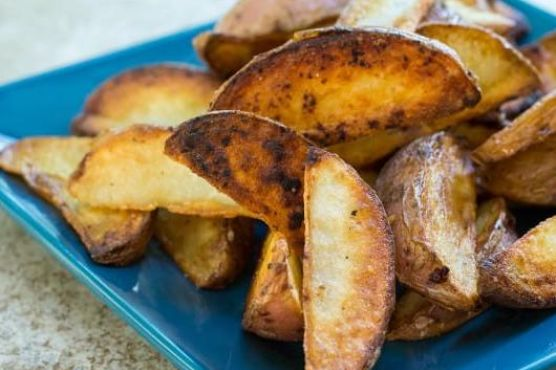
The other night, I was in one of those classic “stare into the fridge and hope something inspiring jumps out” moments. You know the ones — it’s midweek, the craving for takeout battles with my desire to not change out of my sweatpants. That’s when my eyes landed on a bag of red potatoes sitting unassumingly on the shelf. A lightbulb went off, and I remembered the simple joy of pan-fried potato wedges. They’re the perfect mix of indulgent and straightforward, and they come together faster than you’d expect. Crispy on the outside, soft on the inside, these are the kind of potatoes that make you feel like you’ve done something miraculous with very little effort. They’re comforting, and you always have the ingredients on hand. Plus, they make your kitchen smell like a dream.
Jump to Recipe
What You’ll Need
Not to brag, but chances are you already have most of this in your pantry or fridge, which makes this recipe a real lifesaver when you need something quick and satisfying.
- Red potatoes – The star of the show. Their texture is perfect for that crispy outside and soft inside.
- Seasoning salt – A bit of savory magic that levels up the flavor.
- Garlic powder – Adds a hint of earthy aroma.
- Onion powder – Because who can say no to a touch of oniony goodness?
- Black pepper – Just a pinch for a subtle heat.
- Canola oil – For frying to that perfect golden brown.
How to Make Pan Fried Potato Wedges
- Start by preheating your canola oil in a good-quality nonstick pan over medium heat. You want the oil to shimmer but not smoke — that’s when you know it’s ready.
- While the oil is heating, slice your red potatoes into wedges. Think thick enough to hold their shape, but thin enough to cook through.
- In a bowl, season those wedges with seasoning salt, garlic powder, onion powder, and black pepper. Toss them until they’re well-coated and you can smell the spices mixing together.
- Carefully place the potatoes in a single layer in the pan. This is key — crowding the pan will steam them instead of giving them that sought-after crispiness.
- Let them cook on one side without turning until they’re golden brown and crispy. You’ll know they’re ready to flip when they release easily from the pan.
- Flip the wedges and repeat on the other side. Your kitchen will smell amazing at this point, and your patience will be rewarded!
- Once both sides are perfectly crispy, remove the wedges from the pan and serve them hot. Trust me, they lose their magic if left to cool for too long.
Cook’s Notes
These potato wedges are pretty forgiving, but here are a few things to keep in mind. Make sure not to rush the cooking time; the key is to let them get really crispy on that first side before you flip them. If you don’t have red potatoes, Yukon Golds are a solid alternative. Store any leftovers in an airtight container in the fridge and reheat them in a hot oven to bring back some of their initial crispiness. But honestly, leftovers are rare because they tend to disappear the moment they hit the table.
Make It Your Own
Feeling adventurous? Here are some fun ideas to make these wedges uniquely yours:
- Spicy Kick: Mix some cayenne pepper in with the seasoning for a spicy version that’ll warm you up from the inside out.
- Herb Infusion: Sprinkle some dried rosemary or thyme over the wedges before frying for an aromatic twist.
- Cheesy Delight: After frying, toss the hot wedges with freshly grated Parmesan for an irresistible cheesy layer.
- Sweet & Savory: Swap garlic powder for cinnamon and add a sprinkle of sugar for a sweet and savory take.
If you give these pan-fried potato wedges a whirl, I’d love to hear how they turned out! Drop me a comment below or tag me in your crispy potato pics. Let’s make weeknight dinners a little more delicious together!
Related update: Pan Fried Potato Wedges
Related update: Homemade Animal Crackers