
Picture this: it’s a chilly December evening, and the house smells like winter spices and cozy warmth. My hands were still a bit sticky from wrestling with a stubborn puff pastry earlier that day. I had this sudden craving for something decadent yet comforting, something that would pair perfectly with the hot cocoa I was planning to sip by the fireplace. That’s when these Vanilla Cream Cakes came to life. They’re light, fluffy, and simply divine—a perfect blend of holiday spirit and simple elegance. Not only are they surprisingly easy to whip up, but they also look impressive enough to serve up at any festive gathering or cozy night in.
Jump to Recipe
What You’ll Need
I bet you already have most of these in your pantry. Just a few essentials and a couple of special touches to make these cakes sing.
- Puff pastry – This is our quick and easy cake base.
- 6 large eggs
- 200g sugar – Sweetness is key here.
- 50g vanilla sugar – It adds a lovely vanilla aroma.
- 2 tablespoons of rum – For that warm, festive touch.
- 6 liters of whole milk – It’s a lot, but trust me, it’s worth it.
- 150g all-purpose flour
- 200g heavy whipping cream – Fluff it up!
- Powdered sugar – A dusting of snow on top.
How to Make Vanilla Cream Cakes, Easy and Fluffy Holiday Cakes
- Preheat your oven to 200°C (about 390°F). Your kitchen should feel like a warm hug in no time.
- Roll out the puff pastry nice and thin, just slightly larger than your baking dish (around 14×10 inches). Split the pastry in two—half for the bottom, half for the top.
- Bake the pastry for about 10-15 minutes until it’s gloriously golden brown. Let the top layer cool completely while the bottom one stays snug in the dish.
- Separate the egg yolks from the whites, setting the whites aside in a larger bowl.
- For the yolk mixture, combine the yolks, sugar, vanilla sugar, and rum in a smaller bowl. Mix until it’s smooth and dreamy.
- Add the flour and a quarter of the milk to the yolk mix. Keep mixing until it’s silky smooth.
- Whisk the egg whites in the large bowl until they form firm peaks. Add sugar and whisk until the peaks are super firm and glossy.
- Meanwhile, bring the remaining milk to a boil in a large pot. Slowly pour the yolk mixture into the boiling milk, whisking continuously. Cook for 5 minutes until it’s thick and gives your arm a workout!
- Now for the tricky bit. Pour the boiling yolk mix into the egg whites, starting gradually. Keep whisking until both mixtures are beautifully blended.
- Pour this luscious mixture into the baking dish over the bottom pastry. Give the dish a gentle shake to fill every corner. Let it cool overnight in the fridge for best results.
- Whip up the heavy cream with some sugar until it’s light and airy. Spread this over the cooled cake mixture.
- Cut the cooled top pastry into 15 squares and place them on the whipped cream. Slice the cakes into squares and give them a nice dusting of powdered sugar before serving.
Cook’s Notes
Just a little heads up: when you’re pouring the boiling mixture into the egg whites, it’s helpful to have an extra pair of hands nearby. It’s all about the smooth incorporation to make sure you get that perfect fluffiness. If you’re making these ahead, they store well in the fridge for up to three days—ideal if you want to get a jump on holiday prep! Just keep them covered to maintain their freshness.
Make It Your Own
Here’s how you can play around with these cakes:
- Swap the rum for your favorite liqueur, like Baileys or Amaretto, for different flavor twists.
- Add a tablespoon of cocoa powder to the yolk mixture for a chocolatey spin.
- Switch out vanilla sugar with a teaspoon of almond extract for a nutty aroma.
- Top with fresh berries before serving for a burst of color and tang.
If you try this, I’d love to hear how it turns out—drop a comment or tag me! And remember, imperfections add character, especially when surrounded by good company. Happy baking!
Related update: Vanilla Cream Cakes, Easy and Fluffy Holiday Cakes
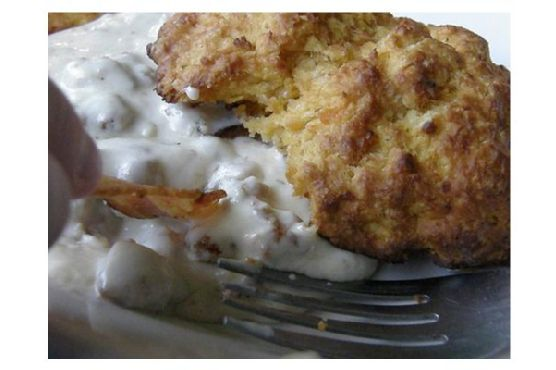
So, there I was on a lazy Sunday morning, craving something indulgent yet homey, and oh-so-satisfying. The kind of comfort food that just wraps you up in a warm hug — you know what I mean? That’s when I decided to whip up one of my go-to favorites: Breakfast Biscuits and Gravy. I mean, who can resist flaky biscuits smothered in rich, savory sausage gravy? Not me! They’re perfect for those mornings when you want to treat yourself without spending hours in the kitchen. Jump to Recipe
What You’ll Need
If you’ve got a well-stocked pantry, you’re already halfway there. This recipe relies on some everyday staples, along with a few flavor-boosting stars:
- Flour — unbleached for the best texture
- Baking powder
- Salt — regular and a pinch of black salt for depth
- Unsalted butter — because you can never have too much
- Plain yogurt
- Whole milk
- Fresh sage leaves
- Paprika
- Ground allspice
- Pork sausage
- Black pepper
How to Make Breakfast Biscuits and Gravy
- Preheat your oven to 425°F. Trust me, getting that oven nice and hot is crucial for achieving biscuit perfection.
- Line a baking sheet with parchment paper — no one likes a sticky mess.
- In a large bowl, sift together the flour, baking powder, and salt. This is where the magic starts.
- Grab your pastry blender or two knives and cut in the butter. You’re aiming for a texture ranging from cornmeal to pea-sized bits. A quick blitz in the food processor works if you’re feeling fancy.
- Using a fork, mix in the yogurt followed by the milk. The dough should be soft and slightly sticky, so don’t sweat it if it feels a bit wet.
- Turn the dough onto a lightly floured surface and knead briefly — just enough to hold everything together. Roll it out about 1 1/4 inches thick and cut into rounds.
- While your biscuits are getting golden in the oven, let’s tackle the sausage. Combine all the sausage ingredients in a large bowl, mixing them up with your hands. Don’t be shy!
- Form small patties and cook them in a skillet over medium-high heat until crisp and browned on the outside, cooked through inside. About 8 minutes per side should do it.
- As the sausage sizzles, inhale that aromatic blend of sage and spices. It’s a thing of beauty!
Cook’s Notes
Here’s the deal: biscuits are one of those things that get better with practice, so don’t stress if your first batch isn’t perfect. Keep the butter cold for the flakiest layers, and don’t overwork the dough. You can make the sausage mixture ahead of time and keep it in the fridge for up to a day — just form and fry when ready. Leftover biscuits? Pop them in an airtight container, and they’ll last a couple of days; they’re great reheated in the oven.
Make It Your Own
Switch things up and put your own spin on this classic dish with these ideas:
- Swap the pork sausage for turkey sausage if you’re leaning towards a lighter option.
- Add a pinch of red pepper flakes if you crave a bit of heat in your morning.
- For a vegetarian twist, use crispy tofu instead of sausage.
- Throw in some cheddar cheese into the biscuit dough for an extra layer of flavor.
If you try this, I’d love to hear how it turns out — drop a comment or tag me! Cooking is all about sharing the love, and I can’t wait to see your versions and hear your stories. Enjoy every bite! 🍽️
Related update: Breakfast Biscuits and Gravy
Related update: Easy Baked Parmesan Chicken
Related update: Loaded Veggie Omelet
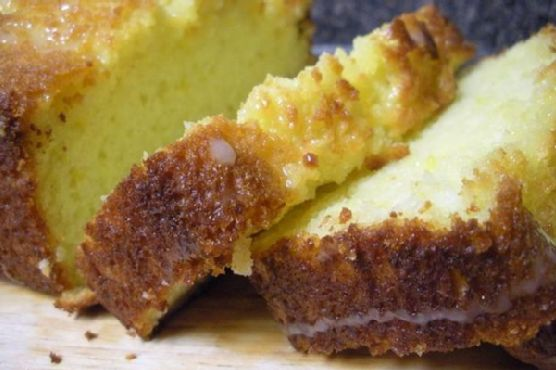
A few weekends ago, I had one of those mornings where you wake up craving something fresh and sunny to get your day going. It was gray and drizzly outside, and I wanted to bring a bit of brightness into the day. As I scanned my pantry, I spotted a forgotten lime yogurt, an orange rolling around with a couple of lemons in the fruit drawer, and a plan began to form. This Triple Citrus Cake is the kind of bake that feels like an instant mood-lifter. It’s got that perfect balance of tangy and sweet, and it’s way simpler than it sounds. Plus, it’s the kind of cake where you might already have most of the ingredients just hanging around. Every bite is like a little burst of sunshine, which sometimes is just what you need.
Jump to Recipe
What You’ll Need
Let me tell you, the best part about this ingredient list is that it’s the kind of thing you probably already have on hand. Here’s what you’ll need to create your own slice of citrusy heaven:
- 1 1/2 cups flour
- 2 teaspoons baking powder
- 1/2 teaspoon salt
- 3/4 cup lime yogurt
- 1 cup sugar
- 3 whole eggs
- 1 teaspoon vanilla extract
- 1/2 cup grapeseed oil
- Zest of 1 lemon
- 1/4 cup orange juice
- 1 cup powdered sugar
How to Make Triple Citrus Cake
- Preheat your oven to 350 degrees. You want it nice and warm, ready to give your cake a cozy bake.
- In a medium bowl, whisk together the flour, baking powder, and salt. This is your dry team; they’ll hang out together until called.
- Grab your electric mixer and in a larger bowl, beat together the lime yogurt, eggs, sugar, vanilla, oil, and lemon zest. It’ll look silky smooth and smell divine.
- Gently fold the dry ingredients into the wet mixture using a spatula. You’re aiming for a batter that’s just combined; over-mixing is a no-go here.
- Coat a 9 x 5 loaf pan with floured baking spray or line with parchment paper and spray. Pour the batter in, smoothing the top so it’s even.
- Bake for 40-50 minutes, or until a cake tester comes out clean. The top will be golden brown and your kitchen will smell like citrus heaven.
- Let the cake cool in the pan for at least an hour. Patience, my friend. The wait is worth it.
- Once cool, transfer to a serving plate. Mix the powdered sugar with orange juice until you have a smooth glaze, then drizzle it over the cake. Watch as it glistens invitingly.
Cook’s Notes
When it comes to baking, patience is key, especially in letting the cake cool before you apply the glaze. Trust me, you don’t want to rush it or you’ll end up with a soggy mess. The cake keeps well for 3-4 days if covered tightly and stored at room temperature, though I doubt it’ll last that long! If you’re planning to make it ahead, bake the cake and store the glaze separately. Glaze just before serving for the best texture.
Make It Your Own
Looking to switch things up? Here are a few ideas:
- Swap the lime yogurt for Greek yogurt and add a bit more lemon zest for an extra lemony punch.
- Replace grapeseed oil with melted coconut oil for a subtle coconut twist.
- Add a handful of poppy seeds to the batter for a delightful texture and a bit of visual flair.
- Use a mix of blood orange juice for the glaze if you want a richer color and slightly different taste.
If you try this, I’d love to hear how it turns out — drop a comment or tag me in your cake pics! It always makes my day to see your creations. Happy baking! 🍋🍊🍋
Related update: Triple Citrus Cake
Related update: Roasted Strawberry Coconut Milk Ice Cream

It was one of those early spring afternoons when the sun was just starting to peek through the clouds, promising warmer days ahead. I was rifling through my pantry, craving something sweet but not overly indulgent. You know, a little treat to go with my afternoon tea. That’s when I remembered this Easter Nest Sweet Cake recipe. It’s a delightful blend of flavors and textures — a soft cake topped with a tangy sour cream-royal icing and the crunch of pistachios. Perfect for those days when you want something that feels special but comes together without too much fuss. Plus, it makes for a show-stopping centerpiece at any Easter gathering or spring brunch.
Jump to Recipe
What You’ll Need
You might find that most of these ingredients are already in your kitchen, just waiting to be transformed into something magical. Here’s what you’ll want to gather:
- Unsalted butter – because decadent is the way to go.
- Brown sugar – for that rich, caramel-like sweetness.
- Eggs
- Flour
- Baking powder
- Sour cream – adds a moist and tangy kick to the cake.
- Icing sugar
- Lemon juice – brings brightness to the icing.
- Egg white
- Pistachios, unshelled – for a nutty crunch.
- Green food coloring – optional, but it gives the icing a festive touch.
How to Make Easter Nest Sweet Cake With Sour Cream-Royal Icing and Pistachios
- Preheat your oven to 190°C/375°F. Lightly grease a ring cake pan and set it aside. The anticipation starts here.
- In a medium bowl, use an electric mixer to beat the brown sugar, eggs, and unsalted butter until creamy — think smooth and dreamy. The sugar granules should almost disappear.
- Add the sour cream and flour to the mixture. Beat for a couple of minutes until everything is well combined. The batter should be thick and luscious.
- Pour the batter into your prepared cake pan, smoothing the top with a spatula. Bake for about 20 minutes. The cake should be golden brown and a skewer inserted in the center should come out clean.
- Let the cake cool in the pan for a few minutes, then transfer to a wire rack. The aroma is irresistible, but patience will pay off.
- For the icing, beat the egg white using a standard mixer until soft peaks form. Add lemon juice, icing sugar, and a drop of green food coloring if you’re feeling festive. Beat for a few more seconds until everything is just combined.
- Once the cake is cool, pour the royal icing generously over the top, letting it cascade down the sides. There’s something so satisfying about this step.
- Sprinkle with chopped pistachios, and get creative with your decorations. The crunch and subtle saltiness of the pistachios are a game-changer.
Cook’s Notes
Here’s the thing about this cake — it’s quite forgiving. If you find yourself without a ring pan, a regular cake pan or even a loaf pan will do in a pinch. Just keep an eye on the baking time. Store leftovers (if there are any!) in an airtight container at room temperature for up to three days. The icing may lose a little of its shine, but the flavor remains on point. If you’re planning ahead, bake the cake a day before and ice it on the day of serving for maximum freshness.
Make It Your Own
With a few tweaks, you can tailor this cake to suit different tastes or occasions:
- Swap the pistachios for toasted almonds for a different nutty flavor.
- If you’re not a fan of sour cream, try using Greek yogurt for a similar tanginess.
- Feeling adventurous? Add a tablespoon of shredded coconut to the batter for extra texture.
- For a citrus twist, incorporate the zest of one lemon into the cake batter.
If you try this, I’d love to hear how it turns out — drop a comment or tag me! And if you have any creative twists on this recipe, don’t keep it to yourself; I’m always on the lookout for new ideas. Happy baking!
Related update: Pumpkin Pecan Streusel Cake - gluten free, soy free, vegan

Picture this: it’s a Tuesday evening, and the only thing standing between me and a total kitchen meltdown is the comforting prospect of pulling together Grandma Inez’s Pineapple Pie. I was staring down a pantry that looked more like a post-tornado disaster zone than the well-stocked haven I imagined. But there it was, hidden among the cans of neglected beans and a jar of something unrecognizable — a lone can of pineapple. That’s when I remembered this pie, a dessert that feels like a tropical vacation and a cozy hug all rolled into one. It’s quick, it’s a little quirky, and it’s a whole lot of delicious. A pie so luscious and breezy, it practically makes the kitchen clean itself. Well, almost.
Jump to Recipe
What You’ll Need
If you’ve got a stocked baking cupboard, you’re probably halfway there. The beauty of this pie is that it doesn’t ask for much — just a bit of finesse and a lot of love.
- 1 pre-baked pie crust
- 1 can crushed pineapple (keep the juice!)
- 1 cup sugar (divided)
- 1/4 cup butter
- 3 tablespoons cornstarch
- 1 teaspoon vanilla
- 3 egg yolks
- 3 egg whites
- 1/4 teaspoon cream of tartar
- 1/4 teaspoon salt
- 1/2 cup water
How to Make Grandma Inez’s Pineapple Pie
- Start by creaming 3/4 cup of the sugar, butter, and egg yolks in a medium saucepan. Use a hand-held mixer to make it fluffy — a workout for your good arm, just until it’s pale and dreamy.
- Blend in the cornstarch and vanilla until smooth. It should look like a creamy potion, sweet and inviting.
- Add the water and that whole can of crushed pineapple, juice and all. Mix again, until everything feels like it’s come to a tropical accord.
- Transfer your saucepan to the stove and set it over medium heat. Stir constantly — think of it as a zen exercise — until the mix thickens. You’ll know it’s ready when it can coat the back of a spoon.
- Pour this luscious filling into your pre-baked pie crust, spreading it out like you’re tucking it into bed.
- Now, whip the egg whites until they’re foamy, like the top of a cappuccino. Gradually add the remaining 1/4 cup sugar, cream of tartar, and salt. Keep whipping until soft peaks form and the mixture is glossy like a magazine finish.
- Spread the meringue over the cooled pie. Use the back of a spoon to create little peaks, like waves on an ocean.
- Bake in a preheated 400°F oven for just a few minutes. Stay close! You want the meringue to be golden, not torched.
- Let it cool completely before slicing — if you can wait that long. Store in the fridge and sneak slices whenever you need a pick-me-up.
Cook’s Notes
A few tips to keep this pie from veering off course:
– Make sure your pie crust is completely cool before adding the filling — we want a crispy base, not a soggy one.
– Meringue can be a bit temperamental. Avoid making it on a humid day, or it might weep. No one likes a sad pie.
– The pie is best eaten within a day or two, but trust me, it rarely makes it that long. If you’ve got leftovers, keep them covered in the fridge. The meringue might lose its crispness, but it’ll still taste divine.
Make It Your Own
Here’s where you get to flex your creative muscles:
- Swap the pineapple for mango or passion fruit for a different tropical twist.
- Add a hint of ginger or nutmeg to the filling for a warm-spiced version.
- Use almond extract instead of vanilla for a nutty, nuanced flavor.
- Try topping with coconut flakes post-bake for an extra layer of texture and flavor.
If you try this, I’d love to hear how it turns out — drop a comment or tag me! Your kitchen is about to smell amazing, and I can’t wait for you to taste this slice of sunshine. Enjoy every bite!
Related update: Grandma Inez’s Pineapple Pie
Related update: How to Make OREO Turkeys for Thanksgiving
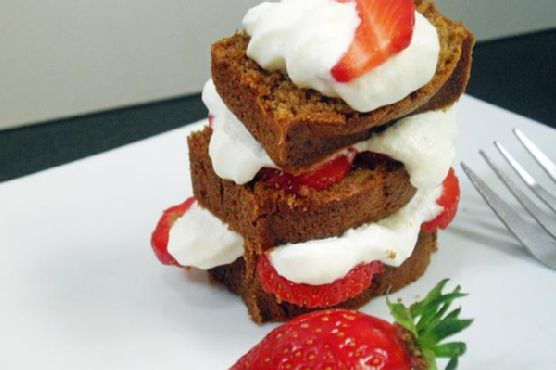
It was one of those blustery autumn afternoons when the wind just howls around your windows, and all you want is something to make the house smell amazing and your soul feel cozy. I was rummaging through my pantry, craving something spicy and sweet, when I realized I had everything I needed for gingerbread. You know that feeling when you stumble upon a recipe that makes your kitchen feel like a warm hug? This gingerbread is exactly that. It’s quick enough for a weeknight treat but feels special with its aromatic spices and deep molasses goodness. Plus, the glaze? Pure magic. Once you make it, you’ll want to drizzle it over everything.
Jump to Recipe
What You’ll Need
This gingerbread recipe is so forgiving and made with ingredients you probably already have hanging out in your kitchen.
- Molasses
- Salt
- Eggs
- Salad oil
- Sugar
- Soda
- Water
- Flour
- Ginger
- Cinnamon
How to Make Gingerbread
- In a large bowl, mix together the molasses, salad oil, sugar, ginger, cinnamon, and salt until the sugar dissolves and everything smells like holiday cheer.
- Add the eggs and beat the mixture until it becomes smooth and glossy.
- Dissolve the soda in 1/8 cup of boiling water, then stir it into the molasses mixture. You’ll see the batter start to bubble a little.
- Gradually add in the flour, alternating with the remaining water, stirring gently until the batter is smooth. It will be pretty thin, almost like pancake batter, but trust the process!
- Pour the batter into a greased 9″x13″ pan and bake at 350 degrees until the top is firm and a toothpick comes out clean. The edges will pull away slightly from the sides of the pan.
- While the gingerbread bakes, make the glaze: melt the butter, then stir in the milk and brown sugar. Bring to a boil and let it bubble away for about 4 minutes, stirring occasionally. It’ll thicken a bit as it cools.
- Once the gingerbread is done, let it cool slightly before drizzling the glaze over the top. Serve warm or wait until it’s cold—your call!
Cook’s Notes
This gingerbread can be stored covered at room temperature for up to 3 days, though it’s usually gone by day two in my house! If you want to make it ahead, it freezes beautifully. Just wrap it tightly in plastic wrap, and when you’re ready to enjoy, let it thaw at room temperature.
Watch out for overbaking. Because the batter is thin, it might cook faster than you think, especially if your oven runs hot. Check it a bit earlier than you’d expect.
- For extra flavor depth, consider adding a pinch of nutmeg or cloves along with the ginger and cinnamon.
- If you want to make the glaze ahead of time, you can reheat it gently before drizzling over the gingerbread.
Make It Your Own
- Swap the salad oil with melted butter for a richer flavor.
- Replace half of the flour with whole wheat flour for a heartier texture.
- Add a handful of chopped walnuts or pecans for a nutty crunch.
- Add a teaspoon of vanilla extract to the glaze for a hint of vanilla sweetness.
If you try this, I’d love to hear how it turns out—drop a comment or tag me! I promise this gingerbread will make your kitchen feel like the coziest place on earth.
Related update: Gingerbread
Related update: 2 Minute Chocolate Yum
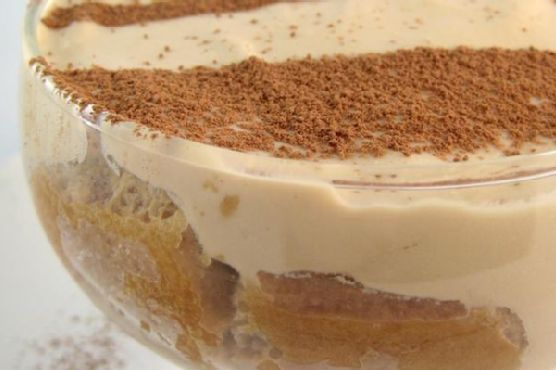
It was one of those rainy Wednesday nights when the craving hit hard. You know the type — the kind where you just need something indulgent to take the edge off the mid-week blues. My mind immediately went to tiramisu, but not just any tiramisu. I wanted something with a little extra kick, a little something-something to make it feel like more than just a dessert. Enter Kahlua Tiramisu. This dish is luxurious yet surprisingly easy, a balance of creamy mascarpone and velvety espresso with a splash of Kahlua for that extra oomph. The best part? You don’t need to be a pastry chef to whip this up. It’s perfect for those nights when you want to impress with minimal effort.
Jump to Recipe
What You’ll Need
Before diving in, take a peek at the ingredient list. Chances are you already have most of this sitting around, just waiting to transform into dessert magic.
- Mascarpone cheese
- Vanilla extract
- Kahlua
- Espresso
- Whipping cream
- Icing sugar
- Ladyfingers (pick a pack that will fit snugly in an 11×7 dish)
- Cocoa powder
How to Make Kahlua Tiramisu
- In a medium mixing bowl, combine the mascarpone cheese with vanilla extract, Kahlua, and just under half of your freshly brewed espresso. Blend it well until you achieve a smooth, lush mixture.
- In another medium bowl, whip the cream with the icing sugar until it holds soft peaks. You want it smooth, like a cloud. Gently fold in the mascarpone mixture until it’s fully incorporated.
- Pour the remaining espresso into a wide, shallow dish, ready to soak those ladyfingers. Quickly dip each ladyfinger in, flipping it to coat both sides. Don’t let them soak too long — you want them soft but not mushy.
- Arrange the soaked ladyfingers to form a single layer at the bottom of an 11×7 casserole dish. Spread half of your mascarpone mixture over the ladyfingers, covering them evenly.
- Repeat the dipping and layering process with the rest of the ladyfingers and mascarpone mixture.
- Refrigerate for at least 4 hours, preferably overnight, to let the flavors meld. Just before you’re ready to serve, dust a generous layer of cocoa powder over the top using a fine sieve. For an extra treat, scatter some grated bittersweet chocolate or chocolate curls over the top.
Cook’s Notes
This dessert is a dream for planners. You can make it a day ahead, and it actually tastes better the next day as the flavors have time to develop and deepen. Store leftovers in the fridge, tightly covered, for up to three days. Avoid freezing; it messes with the creamy texture that makes tiramisu so delightful. When dipping ladyfingers, keep it quick! A mere second or so in the espresso will keep them from getting too soggy and disintegrating.
Make It Your Own
- For a boozier version, swap some of the espresso for extra Kahlua. Your call!
- Not a fan of Kahlua? Try using a hazelnut liqueur or even a shot of Baileys for a different flavor profile.
- For a nutty twist, add a layer of crushed toasted almonds in between the mascarpone layers. It adds a lovely crunch.
- If you’re watching sugar intake, reduce the amount of icing sugar in the whipped cream, or use a sugar substitute that blends well.
If you try this, I’d love to hear how it turns out — drop a comment or tag me! There’s nothing quite like sharing a sweet success. Enjoy your little slice of indulgence!
Related update: Kahlua Tiramisu
Related update: Gingerbread

The other day, I found myself standing in my kitchen at 10 PM, staring longingly at the empty ice cream tub in my freezer. It was one of those evenings where you just need a little something sweet and comforting to wind down. I glanced over at my coffee maker, and a light bulb went off in my head. Why not combine my love of coffee with my undeniable ice cream addiction? And so, my homemade coffee ice cream was born. This recipe is worth the extra few steps because it’s creamy, full of java flavor, and doesn’t require anything fancy. Just a bit of time and patience, and you’ll be savoring the smoothest, most delightful treat you can imagine.
Jump to Recipe
What You’ll Need
This isn’t one of those ingredient lists that sends you on a wild goose chase. Chances are, you already have most of these goodies hanging out in your kitchen:
- 2 cups of cream
- 3/4 cup of sugar
- 1 tablespoon of coffee granules
- 1 cup of milk
- 4 large egg yolks
- 1 teaspoon of vanilla extract
How to Make Home made coffee ice cream
- In a medium, heavy saucepan, combine the cream, milk, sugar, and coffee granules. Bring the mixture to a gentle boil over medium heat, watching for those tiny bubbles at the edges and a heavenly coffee aroma, then remove from the heat and set aside.
- In a medium bowl, beat the egg yolks until they’re smooth and slightly frothy. Slowly whisk 1 cup of the hot cream mixture into the yolks, then stir in the vanilla extract.
- Pour the egg mixture back into the saucepan with the remaining hot cream mixture. Over low heat, cook the custard, stirring constantly with a wooden spoon or spatula until it thickens enough to coat the back of the spoon, about 4-5 minutes.
- Remove the custard from the heat and strain it through a fine mesh strainer into a clean bowl or container, catching any sneaky little bits of cooked egg. Press plastic wrap directly onto the surface to prevent a skin from forming.
- Chill the custard in the refrigerator for at least 2 hours to make it nice and cold. The anticipation will be worth it, trust me!
- Once chilled, pour the custard into your ice cream machine and churn according to the manufacturer’s instructions. The mixture will transform into a creamy, dreamy delight.
- Transfer the churned ice cream to a plastic container and pop it in the freezer for a few hours to firm up. When you’re ready to serve, let it sit out for 5-10 minutes to get to that perfect scoopable stage.
Cook’s Notes
There’s something magical about homemade ice cream, but it can be a bit tricky if you’re not careful. Always keep stirring the custard to prevent it from curdling. If you don’t have an ice cream maker, a bit of patience and elbow grease will do the trick—just freeze the mixture and stir it every 30 minutes until it’s frozen. Store the ice cream in an airtight container, and it should keep well for up to two weeks. That is, if you can resist finishing it off sooner!
Make It Your Own
Want to jazz things up a bit? Here are some simple swaps and additions:
- For a mocha twist, melt 1/2 cup of chocolate chips into the cream mixture before boiling.
- Add a teaspoon of cinnamon to the egg yolks for a spicy kick that pairs perfectly with the coffee.
- Mix in crushed biscotti or chocolate-covered espresso beans during the last few minutes of churning for a crunchy surprise.
- Swap the milk with almond milk for a nutty note that sings with the coffee flavor.
If you try this, I’d love to hear how it turns out—drop a comment or tag me! Enjoy every heavenly bite.
Related update: Home made coffee ice cream
Related update: Kahlua Tiramisu
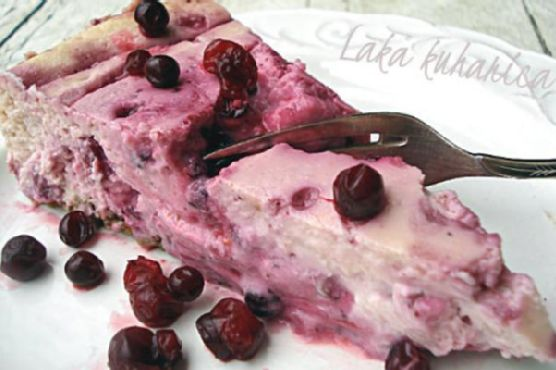
Picture this: It’s a chilly autumn evening, and I’m staring at a bag of cranberries sitting on the counter, just begging to be transformed into something fabulous. The leaves are turning that gorgeous burnt orange, and I’ve got this urge to whip up something that screams cozy. Enter, my Cheesecake with Cranberries. It’s not just any cheesecake; it’s that magical blend of tart cranberries meeting creamy, dreamy cheesecake all bundled up in a hug of buttery, crumbly crust. If you’re in the mood for something that feels like a warm sweater for your taste buds but seems way more impressive than the effort it takes, this is your go-to. And the best part? You might already have most of these ingredients skulking in your pantry. So let’s dive right in.
Jump to Recipe
What You’ll Need
You know those recipes that call for exotic spices and ingredients that you’ll probably only use once? Yeah, this isn’t one of them. Chances are, your cupboards are already harboring most of these goodies.
- Cranberries – fresh is best, trust me on this one!
- Water – the unsung hero
- Allspice – gives it that warm, cozy vibe
- Cloves – just a pinch for depth
- Orange extract – for that zingy, citrusy kick
- Sugar – duh! Sweetness is key
- McVitie’s wholewheat digestive cookies – the foundation of our crumbly crust
- Butter – because buttery crust is life
- Cream cheese – the heart of the cheesecake
- Sour cream – adds a tangy creaminess
- Cornstarch – to hold it all together
- Eggs – the glue that binds
How to Make Cheesecake with Cranberries
- First things first, take those cranberries and toss them into a medium saucepan with some water. Bring it to a boil until the skins burst open. It’s like nature’s way of telling you they’re ready—about 5 minutes should do it.
- Take the pan off the heat and stir in allspice, cloves, orange extract, and sugar. Mix it all up until it’s just right, then pop it into the fridge to cool. Patience, my friend.
- Now, for the crust. Crush those digestive cookies into fine crumbs, mix them with sugar and melted butter, and press the lot into the bottom of a greased 9-inch springform pan. There, the base of our cheesecake empire!
- In a mixing bowl, beat the cream cheese and sugar together until they’re smooth like a jazz sax solo. Add the sour cream and cornstarch, beating until well combined.
- Gently add the eggs, beating on low speed. This is crucial—overbeating could deflate your cake, and nobody wants that.
- Drain the cranberry sauce and reserve those plump cranberry bits. Fold a cup of that sauce into the cheesecake mixture, pour it over your crust, and drizzle with the remaining sauce.
- Bake at 160°C for about 30-35 minutes, just until the center is almost set. A little jiggle is fine—it’ll firm up as it cools.
- Cool it on a wire rack for about 10 minutes. Run a knife around the edge to loosen it, then let it cool for another hour. Then, into the fridge it goes overnight. Yes, waiting is the hardest part.
- When you’re ready to serve, top with those reserved cranberries if you want to get fancy.
Cook’s Notes
Here’s the deal: Cheesecake is one of those things that just gets better with a little time chillin’ in the fridge. If you can, make it the day before. It gives the flavors more time to get together and party. Store leftovers in the fridge, tightly covered, for up to 4 days—if it lasts that long! When making the cranberry sauce, make sure it’s cool before folding it in. Warm sauce can curdle the cream cheese mixture, and we don’t want that drama.
Make It Your Own
Want to put your own spin on this cheesecake wonder? Here are some ideas:
- Swap the cranberries for raspberries if you’re feeling a different kind of tart.
- Try ginger snaps instead of digestive cookies for a spicier kick.
- Feeling nutty? Add a handful of chopped walnuts to the crust mixture for some crunch.
- For a citrus twist, add a tablespoon of lemon zest to the cream cheese mixture.
If you try this, I’d love to hear how it turns out—drop a comment or tag me in your delicious creations! Your kitchen adventures are what make this all worthwhile. 🍰
Related update: Cheesecake with cranberries
Related update: Home made coffee ice cream

It was one of those gloomy Tuesday evenings when the thought of another sad salad was just too much to bear. I glanced at the dozen eggs I had forgotten in my fridge and thought, “We can do better than this, guys!” Thus, the Hard-Boiled Egg Gratin In A Béchamel Sauce was born. This dish is the perfect marriage of creamy comfort and accessible elegance. It’s like giving your humble eggs a posh makeover, and believe me, it’s way easier than you’d think. Plus, it’s the kind of dish that makes you feel like you can handle anything the week throws at you.
Jump to Recipe
What You’ll Need
You might already have most of this in your kitchen, just waiting to become something delightfully decadent. Here’s what you’ll gather:
- 6 large eggs
- 4 tablespoons butter, divided
- 1 small onion, finely chopped
- 3 tablespoons flour
- 2 cups milk
- Nutmeg, a pinch
- Salt and white pepper to taste
- 1 cup grated gruyère cheese
How to Make Hard-Boiled Egg Gratin In A Béchamel Sauce
- Start with hard-boiling your eggs. Bring a saucepan of salted water to a boil, add the eggs gently, then reduce the heat and let them simmer for 10 minutes. Once done, transfer the eggs to a bowl of cold water to cool slightly, then peel them. Trust me, rolling them gently with your palm on a hard surface makes peeling a breeze.
- In a small frying pan, melt 2 tablespoons of the butter over low heat and add the chopped onion. Cook, stirring frequently, until the onion is tender but not colored — you want that sweet onion aroma wafting through your kitchen.
- Now for the béchamel sauce: In a medium saucepan, melt the remaining 2 tablespoons of butter over low heat. Add the flour and whisk it for about 2 minutes. Keep an eye on it; you want a smooth blend without any color change.
- Slowly whisk in the milk and bring the mixture to a boil. Keep whisking to avoid lumps. Season the sauce with nutmeg, salt, and white pepper to your liking. Lower the heat and let it simmer for 10 minutes, continuing to whisk and scrape the sides for a silky finish.
- Stir in the cooked onions and let it all meld together for another 5 minutes, stirring occasionally.
- Preheat your grill. While it heats, slice the eggs about 1 cm thick. Spread a thin layer of béchamel sauce on the bottom of a gratin dish, then layer in the sliced eggs. Coat the slices generously with the remaining sauce.
- Top it all off with a generous sprinkle of grated gruyère cheese. Pop it under the grill and watch closely — turn the dish if needed to ensure an even, golden-brown crust. Serve immediately and bask in the glory of your culinary creation.
Cook’s Notes
A few things to keep in mind: The béchamel can be made ahead and stored in the fridge for up to two days. Just reheat gently before assembling the gratin. If you find your sauce is too thick after reheating, add a splash of milk to loosen it up. Leftovers (if you have any!) can be kept in the fridge and reheated in the oven at a low temperature. Just be mindful that the eggs can toughen slightly as they are reheated.
Make It Your Own
The joy of this dish is in its flexibility. Here are some fun variations:
- For a smoky twist, swap the gruyère for smoked gouda.
- If you’re feeling fancy, add a layer of sautéed mushrooms between the eggs and the sauce.
- For a fresh hit, sprinkle chopped chives or parsley over the top before serving.
- Try adding a thin layer of spinach under the eggs for a pop of color and nutrition.
If you try this, I’d love to hear how it turns out — drop a comment or tag me! Whip it up, make it your own, and most importantly, enjoy every creamy forkful. Happy cooking, friends!
Related update: Hard-Boiled Egg Gratin In A Bechamel Sauce

I once found myself in the middle of a weeknight conundrum—my sweet tooth was hollering louder than a toddler missing nap time, and my pantry was looking a little sparse. Cue the genius idea: Bacon Brownie Cupcakes. This is the kind of recipe that was born out of necessity, a craving, and a little slice of bacon heaven left over from breakfast. What’s better than combining the gooey richness of brownies with the savory crunch of bacon? This dish dances the line between dessert and daring, and let me tell you, it’s worth every single bite. Plus, it’s all done using familiar pantry staples, so you’ll feel like a kitchen wizard in no time.
Jump to Recipe
What You’ll Need
When I say this ingredient list will make you feel like you’ve hit the jackpot, I mean it. With just a few special touches, you’ll be whipping up a treat that feels both classic and adventurous.
- Unsweetened chocolate
- Sweetened chocolate
- Butter
- Sugar
- Salt
- Eggs
- All-purpose flour
- Cocoa powder
- Bacon
How to Make Bacon Brownie Cupcakes
- Preheat your oven to 350°F, and let’s get that muffin pan greased well. Trust me, you want these to come out looking fab, not stuck like a toddler’s fist in a cookie jar.
- Fry up your bacon until it’s crispy perfection, but avoid any charred bits. You want that savory crunch without the burnt taste. Pat it dry and crumble it up, discarding any overly fatty pieces.
- In a double boiler, melt the unsweetened chocolate and butter together. Stir occasionally until smooth, then let it cool slightly. This mixture will become the soul of your brownie cupcakes.
- Whisk in the sugar and salt into the melted chocolate. Add the eggs one at a time, making sure each is fully incorporated before adding the next. This gives them that fudgy texture we adore.
- Sift the flour and cocoa powder together, then gently fold it into the chocolate mixture. This is where the magic happens—don’t rush this step!
- Stir in the bacon pieces and sweetened chocolate bits. Pour the batter into your prepared muffin pan, filling each cup about ¾ full.
- Bake for around 30 minutes. You’ll know they’re ready when a toothpick inserted in the center comes out with a few moist crumbs. Let them cool before attempting to remove them from the pan.
Cook’s Notes
These little beauties can be stored in an airtight container for up to four days, but let’s be real—they’ll probably vanish much sooner. If you’re making them ahead for a party or just because, you can prepare the batter and refrigerate it for up to 24 hours before baking. Just bring it to room temperature before popping it in the oven. Sometimes the bacon can be a bit tricky; ensure it’s well-drained so you don’t end up with greasy cupcakes. And whatever you do, resist the urge to gobble them up straight from the oven—you’ll want them to firm up a bit first.
Make It Your Own
- Feeling nutty? Swap out half the bacon for toasted walnuts for a crunchy twist.
- Prefer a spicy kick? Add a pinch of cayenne pepper to the batter for a surprising heat that pairs beautifully with the chocolate.
- Not a fan of bacon (gasp!)? Substitute with crispy tofu bits seasoned with smoked paprika for a vegetarian-friendly version.
- Craving a bit of extra sweetness? Sprinkle some sea salt caramel bits on top before baking for a salty-sweet sensation.
If you try this, I’d love to hear how it turns out—drop a comment or tag me! Whether you stick to the script or put your own twist on it, these Bacon Brownie Cupcakes are bound to be a story in the making. Happy baking!
Related update: Bacon Brownie Cupcakes
Related update: Hard-Boiled Egg Gratin In A Bechamel Sauce
Related update: Cheesecake with cranberries

It was one of those evenings when I craved something that felt indulgent but didn’t require hours of kitchen labor. You know the days—when the sun sets a bit too early, and your energy to cook dwindles with it. That’s when my Baked Eggs and Bacon Cream In Spinach Fettuccine Nests came to the rescue. With its luscious bacon cream sauce, the comfort of pasta, and the elegance of a baked egg, this dish feels like a warm hug in a bowl. Plus, it’s surprisingly quick to whip up, leaving you time to savor a glass of wine (or two) while it bakes. Jump to Recipe
What You’ll Need
This recipe is perfect for when your pantry is doing most of the work. Chances are you already have most of these staples on hand.
- Bacon – the smoky heart of the dish
- Butter – for richness
- Parmigiano-Reggiano – freshly shredded, please
- Heavy cream – because we’re not skimping on comfort
- Fresh eggs – the crowning glory
- Nests of spinach fettuccine – adds a pop of color and nutrition
- Salt and pepper – the classic duo
- Scallions – for that fresh finish
How to Make Baked Eggs and Bacon Cream In Spinach Fettuccine Nests
- Start by slicing your bacon into small pieces. Cook them in a skillet over medium heat until they’re crispy and golden. The smell will be irresistible!
- Meanwhile, bring a pot of salted water to a boil. Drop in your spinach fettuccine nests and cook until just shy of al dente, about 10 minutes.
- In a separate large pan, melt the butter over high heat. Once melted, pour in the heavy cream and whisk to combine. Let it simmer gently.
- Add three-quarters of your shredded Parmigiano-Reggiano to the cream, stirring until it melts into a smooth, fragrant sauce. Throw in most of the crispy bacon, stirring to integrate all those flavors.
- Drain the pasta, reserving a bit of the cooking water. Toss the pasta into the cream sauce, adding a splash of the pasta water to keep things silky. Mix until well coated.
- Butter two medium ramekins and twirl half of the pasta mixture into each, leaving a small well in the center. Sprinkle with the remaining bacon pieces.
- Crack an egg into the center of each pasta nest. Be gentle, aiming to keep the yolk whole for that perfect Instagram moment.
- Bake in a preheated 350°F oven for about 15 minutes, or until the egg whites are set but the yolks remain tantalizingly runny.
Cook’s Notes
This dish is best enjoyed fresh out of the oven when the eggs are still runny and the pasta is perfectly creamy. If you need to prepare parts in advance, you can make the bacon and sauce ahead of time and store them separately in the fridge. Just reheat gently before proceeding with the recipe.
- Storage Tips: Leftovers can be stored in an airtight container for up to two days. Reheat in the oven to preserve the texture of the egg.
- Common Pitfall: Don’t overcook the pasta initially, as it will continue to cook while baking.
- Make-Ahead Tip: Prepare the pasta nests and bacon cream sauce the night before, then assemble and bake when ready to serve.
Make It Your Own
- Vegetarian Twist: Swap crispy tofu for bacon, seasoning it with smoked paprika to mimic that smoky flavor.
- Cheese Swap: Try Pecorino Romano instead of Parmigiano-Reggiano for a sharper bite.
- Herbal Boost: Add fresh thyme or basil to the sauce for an added layer of aroma.
- Spicy Kick: Toss in a pinch of red pepper flakes or drizzle some hot sauce over the top before serving.
If you try this recipe, I’d love to hear how it turns out! Drop a comment below or tag me when you share your delicious results. Happy cooking, my friends! 🍳🥓
Related update: Baked Eggs and Bacon Cream In Spinach Fettuccine Nests
Related update: Vegetarian Mushroom Shepherd's Pie

It was one of those chilly fall afternoons when the idea of a cozy dinner just felt right. I had spent the morning raking leaves, my nose cold, my fingers tingling, and all I could think about was something warm and comforting for dinner. My mind wandered to sweet potatoes, with their vibrant orange hue and naturally sweet flavor. And that’s how this Sweet Potato Casserole came to be. It’s the perfect blend of creamy, sweet, and crunchy, thanks to a delightful pecan topping that just makes it irresistible. Whether you’re preparing for a family gathering or simply want to treat yourself to a homemade delight, this casserole is bound to bring warmth and smiles to the table.
Jump to Recipe
What You’ll Need
This dish is a breeze to make, and chances are you already have most of these ingredients tucked away in your pantry or fridge. Here’s what you’ll need:
- 5 sweet potatoes (or you can use cooked yams)
- 2 eggs
- 1 teaspoon ground cinnamon
- 1 cup heavy cream
- Sugared pecans (make these the day before for best results)
- 1/2 teaspoon salt
- 1/2 cup unsalted butter
- 2 teaspoons vanilla extract
- 1 cup white sugar
How to Make The BEST Sweet Potato Casserole
- Preheat your oven to 350°F (175°C). Prepare a 9 x 13 glass baking dish with a light coat of butter or cooking spray.
- In a medium-sized mixing bowl, place your cooked sweet potatoes. Add the salt, butter, eggs, vanilla extract, ground cinnamon, white sugar, and heavy cream. Mix thoroughly for about a minute until smooth and well-combined.
- Take your sugared pecans and place them in a blender or food processor. Chop them until they’re small and easy to sprinkle, but be careful not to turn them into dust!
- Spoon the sweet potato mixture into the prepared baking dish, spreading it out evenly. Then, cover the top with your finely chopped sugared pecans, making sure every inch is covered.
- Bake in the preheated oven for 30 minutes or until the topping is lightly browned and the edges start to bubble slightly. Let it cool for a few minutes before serving to allow the casserole to set.
Cook’s Notes
Here’s a little secret: if you boil your sweet potatoes rather than bake them, they become super easy to mash, and the flavor remains delightfully sweet. If you’re running short on time, you can even prep the sweet potatoes and pecans a day ahead. Just keep them in airtight containers in the fridge. When it comes to leftovers, they can be stored in the fridge for up to three days and reheated in the oven at 325°F (160°C) for about 15 minutes. Avoid the microwave, as it tends to make the topping less crunchy.
Make It Your Own
- Nut swap: If pecans aren’t your thing, try using chopped walnuts or almonds for a slightly different texture and flavor.
- Spice it up: Add a pinch of nutmeg or cloves to the sweet potato mixture for an extra layer of warmth and spice.
- Go dairy-free: Swap the heavy cream with coconut milk and use a plant-based butter alternative. Still totally delicious!
- Add a twist: Mix in a handful of shredded coconut to the pecan topping for a tropical touch.
If you try this, I’d love to hear how it turns out — drop a comment or tag me on social media! Let your kitchen adventures begin!
Related update: The BEST Sweet Potato Casserole
Related update: Curried Cauliflower Gratin
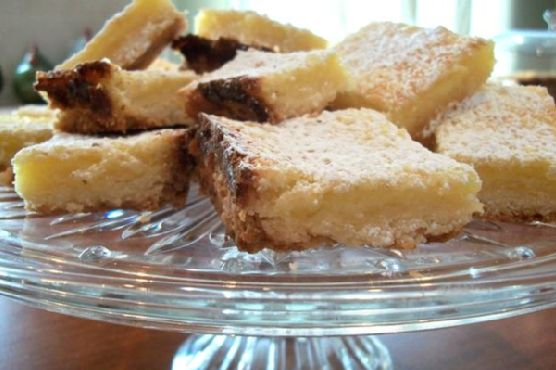
Picture this: it’s a lazy Sunday afternoon, and I’m inevitably in the mood for something sweet and tangy that won’t monopolize my entire day. My eyes wander to the lemons on my counter, practically begging to be transformed into something divine. Enter: Luscious Lemon Bars. These bars hit the sweet spot between indulgent and refreshingly light—they’re the perfect antidote to a gray day or a midweek slump. Plus, with a buttery crust and a gooey lemony filling, it’s one of those recipes that’s way more impressive than the effort you put in. Intrigued yet? Let’s get those lemons going.
Jump to Recipe
What You’ll Need
The beauty of this recipe is that it relies on staple ingredients that are probably already lounging in your pantry. We’re talking about those trusty items you turn to when the craving strikes. Here’s what you’ll need:
- 1 cup of flour
- 1/2 cup of softened butter
- 1/4 cup of white sugar
- 2 large eggs
- 1 cup of white sugar
- 1/4 cup of flour
- 1/2 teaspoon of baking powder
- Juice of 2 lemons (about 1/3 cup)
- Zest of 2 lemons
- Powdered sugar for dusting
How to Make Luscious Lemon Bars
- First things first: PREHEAT your oven to 350°F. While it’s getting toasty, GREASE a 9×13-inch rectangular cake pan. This ensures your bars will pop out without a fuss later on.
- Next, COMBINE the crust ingredients—flour, butter, and white sugar—in a mixing bowl. Use your fingertips to press this crumbly heaven into the pan evenly. No need to overthink it; rustic is our aim here.
- Once smooth and even, BAKE the crust for about 20 minutes. You’re aiming for a pale golden brown, the kind of color that tells you it’s ready for the spotlight.
- While your crust is getting cozy in the oven, let’s talk FILLING. In a bowl, whisk together the remaining ingredients: eggs, sugar, flour, baking powder, lemon juice, and zest. Whisk it up until it’s smooth and well combined, a sunny yellow mixture that smells irresistible.
- When your crust is ready, REMOVE it from the oven and pour the lemon filling over the top. Return the pan to the oven and BAKE for an additional 23-25 minutes. Keep an eye on it; you want the top to be set but not too brown.
- Once baked, REMOVE the pan from the oven and allow the bars to cool on a wire rack for about 30 minutes. They need this time to firm up.
- To get those perfect squares, CUT the bars in half and use a large flexible spatula to lift each half out. This makes the final cutting much easier and less messy.
- Finally, DUST with a good amount of sifted powdered sugar. This isn’t just for looks—it adds a sweet layer that complements the tangy filling. And just like that, you’re DONE!
Cook’s Notes
Don’t rush the cooling process—these bars need it to set properly. If you’re in a hurry, pop them in the fridge after they’ve cooled on the rack a bit. They can be stored in an airtight container for up to a week, but honestly, they’re usually gone by day two. If you’re making them ahead of time, they freeze beautifully. Just wrap them tightly before dusting with sugar, and thaw in the fridge overnight when you’re ready to indulge.
Make It Your Own
Cooking is all about making a recipe fit your tastes. Here are a few ways to tweak these bars:
- Swap out the lemon for lime for a zesty twist.
- Mix in some raspberries to the filling for a fruity burst.
- Use gluten-free flour for a GF-friendly treat.
- Add a pinch of sea salt to the crust for a salty-sweet contrast.
If you try this, I’d love to hear how it turns out—drop a comment or tag me! Your feedback makes my day and I always enjoy seeing your delicious creations come to life. Happy baking!
Related update: Luscious Lemon Bars
Related update: Oreo Cake

Picture this: it’s a sunny Saturday morning, and I’m wandering through my backyard, coffee in hand, when I notice these bright, cheerful dandelion heads smiling up at me. Normally, I’d think of them as weeds, but today, they spark an idea. What if I harness their vibrant energy into something delicious? That’s how I stumbled upon the magic of dandelion pesto. It’s one of those recipes that sounds a bit daring, but trust me, it’s a total game-changer. Perfect for when you want something quick but with a twist of the unexpected. The fresh bite of dandelion greens mixed with the nutty richness of pine and macadamia nuts, rounded off with a zesty lemon kick—seriously, you’ve got to try this.
Jump to Recipe
What You’ll Need
I love this recipe because it’s both adventurous and practical. Chances are, you’ll already have most of these ingredients hanging out in your kitchen or garden, just waiting to show off.
- Dandelion greens — freshly foraged, if you can!
- Fresh basil leaves
- Spinach
- The petals from dandelion flowers
- Garlic — the more, the merrier!
- Sea salt — to taste
- Pine nuts
- Macadamia nuts — they add a buttery smoothness
- Enough extra virgin olive oil to bind the sauce together
- Lemon — juice, not zest
- Nutritional yeast flakes — for that cheesy vibe without the cheese
How to Make Dandelion Pesto
- Start by washing the dandelion greens well in a solution of water and raw cider vinegar. Use a couple of tablespoons of vinegar to about a litre of water. This will help remove any lingering bitterness.
- Wash and spin dry all the greens. You want them dry enough to not water down your pesto but still glistening with freshness.
- Pop all the ingredients into a pestle and mortar or, for a quicker route, a food processor. Blitz until nearly smooth, but I like to leave it a bit chunky. The texture gives it a homemade charm.
- Taste and adjust the seasoning. Maybe a pinch more salt or a drop more lemon juice? It’s all about finding that balance that dances on your tongue.
- And that’s it! It’s simple, a little bit scrummy, and oh so rewarding.
Cook’s Notes
Here’s the deal with dandelions: you want them young and tender. As they age, they can turn bitter, and no one wants that. Also, make sure you’re picking from areas that aren’t sprayed with pesticides—keep it organic! If you’re making this ahead, store your pesto in the fridge in an airtight container with a slick of olive oil on top to keep it from browning. It’ll last about a week, but I doubt it’ll stay uneaten for that long. And if you have leftovers, toss it with pasta, spread it on a sandwich, or even swirl it into soup for an herby punch.
Make It Your Own
- Swap the pine nuts for walnuts if you want a more robust, earthy flavor.
- Add a handful of parmesan if you’re not keeping it vegan—it adds a creamy depth.
- If you’re out of spinach, arugula can step in for a peppery twist.
- Feeling spicy? Throw in a pinch of red pepper flakes for a little heat.
If you try this, I’d love to hear how it turns out—drop a comment or tag me in your pesto adventures! Happy foraging and blending!
Related update: Dandelion pesto

Picture this: it’s a lazy Saturday morning, and I’ve got the whole day stretched out ahead of me. No rush, no plans, just that perfect kind of weekend vibe that begs for a cozy breakfast. Enter: my Simple Whole Wheat Crepes. The first time I whipped these up, I was honestly just trying to avoid a trip to the grocery store. But now, they’ve become a staple. Quick to make, with a texture that’s both tender and slightly nutty, these crepes are fancy enough for brunch but easy enough for a weekday breakfast with the kiddos.
Jump to Recipe
What You’ll Need
These crepes come together with ingredients you probably already have lurking in your fridge and pantry. No need for a special trip to the store—unless you’re out of eggs, in which case, let’s talk.
- 2 tablespoons butter, melted
- 2 eggs
- 1 tablespoon maple syrup
- 1 ½ cups milk
- ½ teaspoon sea salt
- 1 cup white whole wheat flour
How to Make Simple Whole Wheat Crepes
- In your blender, combine the melted butter, eggs, maple syrup, milk, sea salt, and flour. Blend until the mixture is smooth and the batter is thin.
- Let the batter sit for at least 30 minutes. This is the perfect moment to sip your coffee slowly, or, if you’re me, lose yourself in a podcast.
- When ready to cook, heat your crêpe pan over medium heat. If you don’t have a crêpe pan, an electric crêpe maker works perfectly too. Either way, it’s all about that golden brown finish!
- Pour a small amount of batter onto the hot surface, swirling it around to evenly coat the pan. Cook until the edges start to lift and lightly brown, about 1 to 2 minutes.
- Flip the crêpe and cook for another 30 seconds to a minute until done to your liking. Repeat with the remaining batter, keeping finished crêpes warm in a low oven, if needed.
Cook’s Notes
Here’s a little secret: letting the batter rest is where the magic happens. This rest time allows the flour to fully hydrate and gives the gluten a chance to relax, resulting in the tenderest crepes. If you’re super organized or just love a breakfast shortcut, mix the batter the night before and let it hang out in the fridge. Just give it a quick stir before cooking. Store leftover crepes in an airtight container in the fridge for up to three days. You can also freeze them by placing wax paper between each crepe to prevent sticking, and pop them in a zip-top bag.
Make It Your Own
- Sweet Twist: Add a teaspoon of vanilla extract and a sprinkle of cinnamon to the batter for a warm, cozy flavor.
- Savory Spin: Omit the maple syrup and add chopped fresh herbs like chives or parsley to the batter.
- Gluten-Free Option: Swap the white whole wheat flour for a gluten-free flour blend. Just make sure it’s one meant for baking!
- Dairy-Free Delight: Use almond milk or another plant-based milk, and substitute the butter with coconut oil or a dairy-free butter substitute.
If you try this, I’d love to hear how it turns out—drop a comment or tag me! Let’s keep the breakfast magic alive, one crepe at a time. 🥞💛
Related update: Simple Whole Wheat Crepes
Related update: Coconut Flour Pancakes with Blueberry Honey Compote

Picture this: It’s a crisp Saturday morning in late October, and the air smells like fallen leaves and the promise of something delicious bubbling on the stove. I’d just come back from the local farmers’ market with a basket full of honeycrisp apples and ripe pears, when I had this sudden inspiration to make something that feels like a warm hug for your taste buds. That’s how this Fall Fruit Compote came to life! It’s the perfect combination of sweet and tangy with a hint of spice from the cinnamon, making it a cozy companion for just about any dish. Whether you’re spooning it over pancakes, pairing it with savory potato latkes, or just nibbling it straight from the jar (guilty as charged), this compote is a must-try for the season.
Jump to Recipe
What You’ll Need
This recipe is all about embracing the flavors of fall, with ingredients that are probably hanging out in your pantry already or easy to snag at the store.
- Butter – for that rich, dreamy base
- Diced honeycrisp apples – sweet and crispy, the star of this show
- Diced pears – a soft, juicy partner for the apples
- Dried cherries – they add a pop of color and tartness
- Apple cider vinegar – just a splash to bring out the flavors
- Apple juice – keeps everything juicy and flavorful
- Brown sugar – for a deep, molasses-y sweetness
- Cinnamon stick – the essential fall spice
How to Make Fall Fruit Compote
- Melt the butter in a medium saucepan over high heat until it starts to bubble and sizzle. You want that nutty aroma to fill the air.
- Toss in the diced apples, pears, and dried cherries, followed by the apple cider vinegar, apple juice, brown sugar, and cinnamon stick. Give it all a good stir to make sure everyone’s getting along in the pot.
- Cook this fruit medley for about 5 minutes. The apples and pears should start to soften, and the cherries will begin plumping up.
- Lower the heat to medium. Let it cook for a few minutes more, keeping a watchful eye as the liquid reduces and the fruit becomes tender. Stir occasionally to prevent sticking.
- If the mixture looks like it’s drying out too quickly, trickle in a bit more apple juice. You want the fruit tender and the liquid mostly gone, leaving a thick, syrupy goodness.
Cook’s Notes
Alright, here’s the scoop on perfecting this compote. First off, keep an eye on your heat levels. It’s easy for the sugars to burn if the heat’s too high, especially towards the end when the liquid is nearly evaporated. If you’re making this ahead, know that it keeps wonderfully in the fridge for up to a week. Just pop it in a jar or airtight container. When you’re ready for a warm serving, a quick zap in the microwave or a gentle reheat on the stove works like a charm. And remember, if you find yourself with leftovers (rare, but it happens), this compote is a dream swirled into yogurt or spread over toast.
Make It Your Own
Get creative and switch things up with these ideas:
- Swap the dried cherries for dried cranberries for a tarter twist.
- Add a splash of bourbon or rum for a grown-up, boozy version.
- For a spicier kick, throw in a pinch of ground ginger or nutmeg with the cinnamon.
- Use maple syrup instead of brown sugar for a different layer of sweetness.
If you try this, I’d love to hear how it turns out — drop a comment or tag me! Enjoy the cozy vibes, and happy cooking! 🍎🍐
Related update: Fall Fruit Compote
Related update: Ginger Cookies- gluten free, soy free, vegan
Related update: Dandelion pesto

I remember that evening vividly. It was a Wednesday, and the kind of humid that makes your hair curl up at the edges. I was standing in my kitchen, staring at the half-empty fridge, and wondering what on earth I could throw together without making a trip to the grocery store. That’s when I spotted the zucchini and eggplant I’d been meaning to use. The idea clicked like a lightbulb switching on—vegetarian ratatouille! It’s the kind of dish that feels like a warm hug at the end of a long day: rustic, hearty, and packed with seasonal veggies. Plus, it’s surprisingly simple, with most ingredients already hanging out in the pantry or crisper drawer. Let’s dive in!
Jump to Recipe
What You’ll Need
This recipe is blessedly straightforward. Chances are, you already have most of these in your kitchen. Here’s what you’ll gather:
- 1 eggplant, diced
- 2 zucchinis, sliced
- 1 yellow squash, sliced
- 3 large tomatoes, chopped
- 1 red bell pepper, diced
- 1 orange bell pepper, diced
- 1 onion, finely chopped
- 3 cloves of garlic, minced
- A handful of fresh basil leaves, torn
- 1 tsp thyme
- 1 tsp dried oregano
- 2 tbsp extra virgin olive oil
- Sea salt, to taste
How to Make Vegetarian Ratatouille
- Heat the extra virgin olive oil in a large saucepan over medium-low heat. Toss in the chopped onion and minced garlic. Sauté until the onions turn translucent and the garlic is fragrant, about 5 minutes.
- Add the chopped tomatoes to the pan and give it a good stir, letting them meld with the onion and garlic for about 2 minutes.
- Add the diced eggplant, zucchini, yellow squash, and both bell peppers to the pan. Stir everything together and lower the heat to low.
- Sprinkle in the thyme, dried oregano, and sea salt. Stir to coat all the veggies in the herby goodness.
- Cover the saucepan and let it all simmer for about 30 minutes, stirring occasionally. You’ll know it’s ready when the eggplant is tender and the flavors have melded beautifully.
- Finish it off with those fresh torn basil leaves right before serving, for a burst of fresh flavor.
Cook’s Notes
Here’s the thing about ratatouille — it’s a forgiving dish. You can let it simmer a bit longer if you prefer your veggies softer, just keep an eye on the moisture level. If it starts to dry out, add a splash of water or stock. Store any leftovers in an airtight container in the fridge, and they’ll be even more flavorful the next day. Just reheat on the stove over low heat or enjoy it cold as a salad topping — it’s surprisingly versatile. If you’re planning ahead, you can chop the veggies the night before and store them in the fridge, so you just have to toss them in the pan when you’re ready.
Make It Your Own
Feeling adventurous or just need a change? Here are a few ways to mix things up:
- Add some heat: Throw in a pinch of red pepper flakes when adding the spices for a little kick.
- Protein punch: Toss in a can of drained chickpeas with the tomatoes for extra protein and heartiness.
- Herb swap: If you’re out of fresh basil, a touch of fresh parsley or even cilantro can give it a unique twist.
- Cheesy finish: Sprinkle some crumbled feta or grated Parmesan on top when serving for a tangy finish.
If you try this, I’d love to hear how it turns out — drop a comment or tag me! Whether you stick to the basics or put your own spin on it, I hope this ratatouille brings a little warmth and simplicity to your table. Enjoy!
Related update: Vegetarian Ratatouille
Related update: Fall Fruit Compote
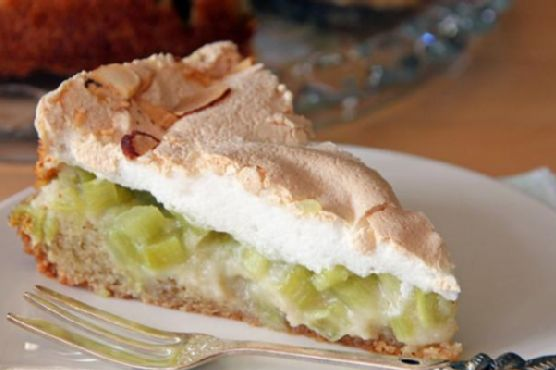
It was one of those indecisive spring days, warm enough in the sun to consider a picnic, but with a breeze that still held a whisper of winter. The rhubarb in my garden had just started to show its rosy stalks, and I felt the irresistible urge to bake something that straddled the seasons just as beautifully. Enter the German Rhubarb Cake with Meringue. It’s the kind of bake that’s both a showstopper and a comfort food, with its tart rhubarb base and fluffy, cloud-like meringue topping. I promise, it’s simpler than it looks, and you probably have most of the ingredients already lounging in your pantry.
Jump to Recipe
What You’ll Need
Trust me, the ingredient list might seem a tad long, but it’s mostly the usual suspects in your kitchen. Plus, the bold flavors that rhubarb and almonds bring to the party are well worth it!
- Rhubarb – Fresh and tart, the star of our cake!
- Sugar – For sweetening everything up.
- Vanilla extract
- Salt
- Eggs – We’ll use both yolks and whites, no waste here!
- Flour
- Roasted almonds
- Baking powder
- Egg whites
- Almonds
How to Make German Rhubarb Cake with Meringue
- First things first, preheat your oven to 350°F convection. It’s the secret to getting that perfect bake.
- Grease a round 26 cm (9 1/2 inch) springform pan. We don’t want any sticking mishaps later!
- Wash, dry, and peel your rhubarb. Slice it into small pieces, sprinkle with 2 tablespoons of sugar, and let it sit for at least half an hour. This draws out the excess water, keeping our cake from getting soggy.
- Once that’s done, give the rhubarb a good pat dry. Prepping well now means a tastier cake later.
- In your trusty kitchen machine, beat together the butter, sugar, and vanilla extract until the mixture is fluffy and the sugar is dissolved. It should look creamy and pale.
- Crack in the eggs, one at a time, mixing well after each addition. We want a silky smooth batter here.
- In a separate bowl, sift together the flour, ground almonds, salt, and baking powder. Slowly incorporate this into the egg mixture. Be gentle; we don’t want to over-mix.
- Pour the dough into your prepared springform pan, smoothing the top. Layer on the rhubarb pieces evenly.
- Pop it in the oven for 25 minutes. Your kitchen will start to smell heavenly about halfway through.
- While the cake is baking, it’s time to whip up the meringue topping. Beat the egg whites until stiff peaks form, then gradually add in the sugar until your meringue is glossy.
- Spread the meringue over the baked cake and decorate with almond slices.
- Return it to the oven for 15 more minutes. Check after 5 minutes and cover with foil if the meringue is getting too toasty.
- Let the cake cool completely before you attempt the big reveal from the springform pan. Patience, my friend, is key!
Cook’s Notes
This cake is a dream to make ahead. Once cooled, it keeps well at room temperature for a day or two, though the meringue might soften a bit. For longer storage, refrigerate it—just let it come back to room temp before serving for the best texture. A common mistake is skipping the step where you let the sugared rhubarb sit. Don’t rush it! Draining the rhubarb is essential for avoiding a watery cake base. Also, if you’re worried about your meringue browning too quickly, keep that aluminum foil close at hand.
Make It Your Own
- Squeeze in some citrus: Add lemon zest to the cake batter for a zingy twist.
- Swap the nuts: Use pistachios instead of almonds for a delightful green contrast and rich flavor.
- Go berry: Sub half the rhubarb with strawberries for a classic combo.
- Spice it up: Add a pinch of cinnamon to the cake batter for a warm, spicy note.
If you give this German Rhubarb Cake with Meringue a spin, I’d love to hear how it turns out! Drop a comment or tag me in your culinary masterpieces. Happy baking! 🌟
Related update: German Rhubarb Cake with Meringue
Related update: Cheesecake with cranberries

I remember the evening perfectly. It was one of those chilly Tuesday nights when you feel like you’ve barely survived the day and the only thing that could possibly make it better is a big bowl of something soul-warming. I opened my fridge and, like a miracle, the ingredients for this Kale and Chickpea Soup with Lemon seemed to jump out at me. The magic of this soup is in its simplicity. It’s the kind of dish that feels like a hug in a bowl, yet it’s deceptively easy to throw together. A few fresh ingredients, a touch of blending, and you’ve got yourself a soup that’s both nourishing and comforting. Plus, it’s the perfect excuse to use that crusty bread you’ve been meaning to finish.
Jump to Recipe
What You’ll Need
I bet you’ve got most of these lying around already. This list is all about those everyday heroes that transform humble into heartwarming.
- 2 banana shallots
- 1 bay leaf
- 2 cans chickpeas, drained and rinsed
- 2 stalks of celery
- 1/2 teaspoon of chilli flakes
- 1 loaf of crusty bread
- 1 garlic clove
- Lemon (juice of half, plus slices for garnish)
- 1 bunch of kale, stems removed, roughly chopped
- 2 tablespoons of olive oil
- Parmesan cheese, for topping
- 1 sprig of rosemary
- Salt, to taste
- 1.5 liters of stock (vegetable or chicken)
How to Make Kale and Chickpea Soup with Lemon
- Set a Dutch oven or large saucepan over medium heat and pour in the olive oil. Let it warm slightly until it shimmers.
- Finely dice the banana shallots and toss them in, stirring to coat them in the oil. Let them sizzle and become translucent.
- Slice the celery stalks horizontally into long strips, then chop them into small pieces. Add these to the shallots, stirring occasionally.
- Finely chop the rosemary leaves and add them to the pan, along with the bay leaf and chilli flakes. Wait for the fragrance to hit you – it’s a good sign.
- Smash the garlic clove using the flat of your knife and your palm, then toss it in whole. No need to fuss over chopping here.
- Rinse and drain the chickpeas and add them to the pan along with the kale. Stir everything together until it’s all coated nicely.
- Pour in the hot stock and bring it all to a gentle boil, then reduce the heat and let it simmer for about 20 minutes, until the kale is beautifully tender.
- Squeeze in the juice of half a lemon, stirring to blend. Taste and adjust the seasoning with more lemon or salt, depending on your stock.
- Using either a stick blender in the pan or in batches in a regular blender, blitz the soup to your desired texture. I like to set aside a ladleful or two before blending so there are still some chickpeas and kale for texture.
- Serve hot, with a couple of lemon slices floating on top of each bowl, and pass around the parmesan cheese for everyone to sprinkle to their heart’s content. Pair with toasted crusty bread for dipping.
Cook’s Notes
Okay, here’s the lowdown. If you’re planning ahead, this soup is a fantastic make-ahead option. It actually tastes even better the next day once the flavors have had time to marry. Just store it in an airtight container in the fridge for up to three days. Reheat gently on the stove, adding a splash of water if it’s thickened up too much. You can also freeze this soup for up to three months, though I’d recommend freezing before adding the lemon juice to prevent bitterness. Defrost it overnight in the fridge and add the lemon after reheating.
Watch your salt! If your stock is already salted, you might want to wait until the end of cooking to adjust the seasoning. It’s always easier to add than to take away.
Make It Your Own
The beauty of this soup is its flexibility. Here are a few of my favorite variations:
- Swap the chickpeas for white beans: Cannellini or Great Northern beans work beautifully here, offering a creamier texture.
- Add protein with chicken: Shredded rotisserie chicken stirred in at the end makes this a heartier meal.
- Spice it up with chorizo: Cook some diced chorizo in the pan before the shallots and let the spicy oil enrich the soup.
- Go green with spinach or Swiss chard: If kale isn’t your thing, these leafy greens make a great substitute.
If you try this, I’d love to hear how it turns out — drop a comment or tag me! Your feedback is the best part of sharing recipes. Happy cooking!
Related update: Kale and Chickpea Soup with Lemon
Related update: One Soup, Two Ways: Chunky Vegetables and Cream Of Vegetables