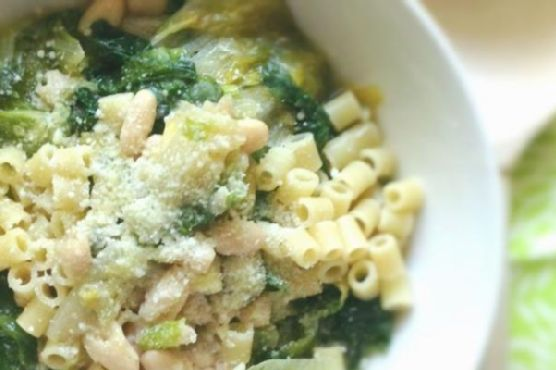
Picture this: it’s a dreary Tuesday evening, and the rain won’t let up. You’re standing in the kitchen, craving something warm and comforting but also something that won’t require an entire evening of chopping, stirring, and watching the pot. That’s when this Escarole & Beans recipe becomes your best friend. This dish is like a cozy blanket in a bowl—hearty, savory, and surprisingly simple to whip up. A few pantry staples, a quick simmer, and voila: you’re transported to a place where the rain feels less dreary and dinner feels a little more special. And trust me, the addition of escarole gives it just the right touch of freshness and bite.
Jump to Recipe
What You’ll Need
This dish thrives on simplicity, using ingredients you probably already have, with a couple of stars that elevate it from your typical pantry meal.
- 8 oz of ditilini pasta
- 3 diced garlic cloves
- 3 tablespoons of olive oil
- 1 can of cannellini beans, with its juice
- 1 cup of vegetable broth
- Salt & pepper to taste
- 1 head of escarole, washed and chopped
- 1 teaspoon of crushed red pepper flakes
- Freshly grated parmesan cheese for garnish
How to Make Escarole & Beans
- Start by cooking the ditilini pasta according to the package directions. You want it al dente, so it holds up in the broth later.
- In a large pot, heat the olive oil over medium heat. Add the diced garlic and sauté just until it starts to turn golden and fragrant—don’t let it burn!
- Pour in the cannellini beans, juice and all. Add a sprinkle of salt, a crack of black pepper, and the crushed red pepper flakes. Stir it all together and let it heat through for a few minutes.
- Stir in the vegetable broth. Let the mixture simmer gently for about 10 minutes. You’ll notice the edges start to bubble, and it smells heavenly.
- Toss in the chopped escarole and cover the pot with a lid. You’re aiming to wilt the escarole, not stew it, so check every couple of minutes and give it a stir until it’s just wilted.
- Once the escarole is tender but still vibrant, turn off the heat. Taste and adjust the seasoning if needed—sometimes it just needs that little extra pinch of salt.
- To serve, spoon some pasta into each bowl and ladle the escarole and bean mixture over top. Don’t skimp on the broth—it’s the best part! Finish with a generous sprinkle of parmesan cheese.
Cook’s Notes
This dish is all about balance. The escarole should be wilted but not mushy, and the pasta al dente. If you’re making it ahead, you might want to store the pasta and the bean mixture separately, so the pasta doesn’t soak up all the broth and get soggy. Just combine them when you’re ready to eat.
- If you’re not a fan of spicy, you can reduce or even omit the crushed red pepper flakes. It’s still delicious without the heat!
- Leftovers can be stored in an airtight container in the fridge for up to three days. Reheat gently on the stove, adding a splash of water or broth if it’s too thick.
Make It Your Own
- Swap out the escarole for kale or spinach if that’s what you have on hand or prefer. Both hold up beautifully in the broth.
- If you’re looking for a heartier meal, add some Italian sausage to the pot when you sauté the garlic. Cook it through before proceeding with the recipe.
- For a vegetarian twist with a protein kick, throw in some crispy tofu cubes just before serving.
- Fancy a change from pasta? Try serving the beans and escarole over a slice of crusty, toasted sourdough bread for a rustic feel.
If you try this, I’d love to hear how it turns out—drop a comment or tag me! Cooking is all about sharing the love, after all. Bon appétit!
Related update: Escarole & Beans
Related update: Philly Cheesesteak Grilled Wraps

It was one of those rainy Wednesday nights when the craving hit hard. You know the type — the kind where you just need something indulgent to take the edge off the mid-week blues. My mind immediately went to tiramisu, but not just any tiramisu. I wanted something with a little extra kick, a little something-something to make it feel like more than just a dessert. Enter Kahlua Tiramisu. This dish is luxurious yet surprisingly easy, a balance of creamy mascarpone and velvety espresso with a splash of Kahlua for that extra oomph. The best part? You don’t need to be a pastry chef to whip this up. It’s perfect for those nights when you want to impress with minimal effort.
Jump to Recipe
What You’ll Need
Before diving in, take a peek at the ingredient list. Chances are you already have most of this sitting around, just waiting to transform into dessert magic.
- Mascarpone cheese
- Vanilla extract
- Kahlua
- Espresso
- Whipping cream
- Icing sugar
- Ladyfingers (pick a pack that will fit snugly in an 11×7 dish)
- Cocoa powder
How to Make Kahlua Tiramisu
- In a medium mixing bowl, combine the mascarpone cheese with vanilla extract, Kahlua, and just under half of your freshly brewed espresso. Blend it well until you achieve a smooth, lush mixture.
- In another medium bowl, whip the cream with the icing sugar until it holds soft peaks. You want it smooth, like a cloud. Gently fold in the mascarpone mixture until it’s fully incorporated.
- Pour the remaining espresso into a wide, shallow dish, ready to soak those ladyfingers. Quickly dip each ladyfinger in, flipping it to coat both sides. Don’t let them soak too long — you want them soft but not mushy.
- Arrange the soaked ladyfingers to form a single layer at the bottom of an 11×7 casserole dish. Spread half of your mascarpone mixture over the ladyfingers, covering them evenly.
- Repeat the dipping and layering process with the rest of the ladyfingers and mascarpone mixture.
- Refrigerate for at least 4 hours, preferably overnight, to let the flavors meld. Just before you’re ready to serve, dust a generous layer of cocoa powder over the top using a fine sieve. For an extra treat, scatter some grated bittersweet chocolate or chocolate curls over the top.
Cook’s Notes
This dessert is a dream for planners. You can make it a day ahead, and it actually tastes better the next day as the flavors have time to develop and deepen. Store leftovers in the fridge, tightly covered, for up to three days. Avoid freezing; it messes with the creamy texture that makes tiramisu so delightful. When dipping ladyfingers, keep it quick! A mere second or so in the espresso will keep them from getting too soggy and disintegrating.
Make It Your Own
- For a boozier version, swap some of the espresso for extra Kahlua. Your call!
- Not a fan of Kahlua? Try using a hazelnut liqueur or even a shot of Baileys for a different flavor profile.
- For a nutty twist, add a layer of crushed toasted almonds in between the mascarpone layers. It adds a lovely crunch.
- If you’re watching sugar intake, reduce the amount of icing sugar in the whipped cream, or use a sugar substitute that blends well.
If you try this, I’d love to hear how it turns out — drop a comment or tag me! There’s nothing quite like sharing a sweet success. Enjoy your little slice of indulgence!
Related update: Kahlua Tiramisu
Related update: Gingerbread
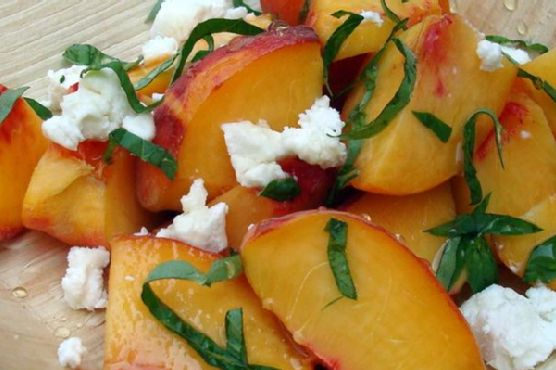
It was one of those sticky summer afternoons, the kind where even the shade feels warm and inviting. I had a couple of peaches lounging on the counter, looking like they might start a protest if not eaten soon. That’s when inspiration struck! I wanted something refreshing but also satisfying, and that’s how this Fresh Peach With Goat Cheese Side Salad came to life. It’s such a delightful surprise: juicy peaches balanced by creamy goat cheese, accented with fragrant basil and a hint of honey sweetness. Plus, it only takes a few minutes to whip up, making it perfect for a spontaneous lunch or a quick dinner side.
Jump to Recipe
What You’ll Need
I bet you have most of these hanging around your kitchen. Here’s what you need for this bite of sunshine:
- 4 ripe peaches – the juicier, the better
- 1 tablespoon of honey – for that sweet, sticky goodness
- Pinch of salt – to make all the flavors sing
- 1/2 cup of crumbled goat cheese – creamy and tangy
- A handful of fresh basil leaves – torn for maximum aroma
How to Make Fresh Peach With Goat Cheese Side Salad
- Halve and pit the peaches, then slice them into wedges. Place these sun-drenched beauties into a large mixing bowl.
- Drizzle the honey over the peach slices. Use your hands to gently toss them until they’re evenly coated. Feel free to sneak a taste here; it’s irresistible!
- Sprinkle a pinch of salt over the honeyed peaches. This simple move really brightens up the flavors, trust me.
- Now for the aromatic part: gently fold in the torn basil leaves. The smell is going to be like a mini vacation.
- Finally, crumble the goat cheese over the top and give it one last gentle toss. The cheese should cling lovingly to the peaches.
Cook’s Notes
Here’s a little secret: no need to be too precise with this salad. It’s all about the balance of sweet and tangy meeting fresh and creamy. If you don’t have ripe peaches, you might need a bit more honey to bring out their sweetness. This salad doesn’t keep well, so aim to enjoy it right away. But if you have leftovers, they’ll still be tasty for a day if stored in the fridge — just expect the basil to do a little wilting dance.
Make It Your Own
Looking to customize this salad? Here are some fun tweaks:
- Swap the peaches for nectarines or even grilled apricots for a smoky twist.
- Try using a soft blue cheese instead of goat cheese if you’re feeling adventurous.
- For a nutty crunch, add a handful of toasted pistachios or sliced almonds.
- If basil isn’t your thing, mint leaves could bring a refreshing coolness instead.
If you try this, I’d love to hear how it turns out — drop a comment or tag me! I hope this salad brings a burst of sunshine to your table as it did mine. Enjoy every juicy, creamy bite!
Related update: Fresh Peach With Goat Cheese Side Salad
Related update: Roasted Brussels Sprouts With Red Onions and Pancetta

Picture this: It’s a Wednesday evening, you’re staring blankly into your fridge, mentally calculating the time it takes to defrost a chicken breast versus the desire to just order takeout. Sound familiar? That’s when I stumbled upon the beauty of Swiss Chard Wraps. The first time I made these, I had a surplus of swiss chard and exactly zero motivation to cook anything I couldn’t make in less than 30 minutes. These wraps are fresh, flavorful, and unexpectedly satisfying, and they completely saved dinner that night. They’re packed with vibrant veggies and a spicy kick, and the best part is — they’re ridiculously easy to put together. Plus, they feel like a little bit of a kitchen adventure. Curious yet?
Jump to Recipe
What You’ll Need
Okay, here’s the best part. You likely have most of these ingredients on hand, and if not, they’re easy to grab. Plus, they’re all about that fresh, vibrant taste!
- Dried swiss chard leaves
- Orange cauliflower
- Olive oil
- Garlic
- Salt
- Fresh basil
- Zucchini
- Red bell pepper
- Avocado
- Trader Joe’s spicy peanut vinaigrette
How to Make Swiss Chard Wraps
- Chop off the stems of the swiss chard right where they meet the leaf. I like to leave a little bit of the stem attached to give the wraps some backbone, but you do you.
- Take that orange cauliflower, chop it into small pieces, and pulse in a food processor until it resembles rice. Florets and stalks are both fair game.
- Heat some olive oil in a sauté pan over medium-high heat. Once it’s shimmering, toss in the garlic and let it sizzle for a minute or two until you smell that glorious aroma and see it start to brown.
- Add your cauliflower rice to the pan and cook for about 2-3 minutes. You’ll know it’s done when it turns a vibrant yellow-orange. Sprinkle in a pinch of salt and some chopped basil, then give it a good stir.
- If you have a spiralizer, use Blade B to create zucchini noodles. No spiralizer? No problem. Just use a vegetable peeler to make ribbons.
- To assemble the wraps, lay a large swiss chard leaf flat. Add some sautéed cauliflower, zucchini noodles, red bell pepper slices, and avocado down the center along the stalk.
- Drizzle everything with a bit of spicy peanut vinaigrette and wrap it up tightly. Take a moment to admire your handiwork before diving in.
- These wraps are fantastic as a side dish to your favorite protein or even as a light main course. Enjoy them right away for the best experience!
Cook’s Notes
These wraps are freshest when made and eaten right away, but if you’re looking to prep ahead, you can make the cauliflower rice and chop the veggies in advance. Store them separately and assemble the wraps when you’re ready to eat. Leftovers? Pop them in an airtight container and refrigerate. They’ll keep for a day, but trust me, they’ll be long gone before you know it. If you’re watching the salt, taste as you go, especially if your vinaigrette is already salty.
Make It Your Own
Get creative with these wraps! Here are a few ways to mix things up:
- Swap the avocado for hummus for a creamy, Mediterranean twist.
- Use crispy tofu instead of the spicy peanut vinaigrette for a protein-packed version.
- Throw in some shredded carrots for an extra crunch.
- Experiment with different herbs — mint or cilantro can add new dimensions of flavor.
If you try this, I’d love to hear how it turns out — drop a comment or tag me! These wraps are a staple in my kitchen now, and I hope they become one in yours, too. Happy wrapping!
Related update: Swiss Chard Wraps
Related update: Fresh Peach With Goat Cheese Side Salad
Related update: Escarole & Beans

The other day, I found myself standing in my kitchen at 10 PM, staring longingly at the empty ice cream tub in my freezer. It was one of those evenings where you just need a little something sweet and comforting to wind down. I glanced over at my coffee maker, and a light bulb went off in my head. Why not combine my love of coffee with my undeniable ice cream addiction? And so, my homemade coffee ice cream was born. This recipe is worth the extra few steps because it’s creamy, full of java flavor, and doesn’t require anything fancy. Just a bit of time and patience, and you’ll be savoring the smoothest, most delightful treat you can imagine.
Jump to Recipe
What You’ll Need
This isn’t one of those ingredient lists that sends you on a wild goose chase. Chances are, you already have most of these goodies hanging out in your kitchen:
- 2 cups of cream
- 3/4 cup of sugar
- 1 tablespoon of coffee granules
- 1 cup of milk
- 4 large egg yolks
- 1 teaspoon of vanilla extract
How to Make Home made coffee ice cream
- In a medium, heavy saucepan, combine the cream, milk, sugar, and coffee granules. Bring the mixture to a gentle boil over medium heat, watching for those tiny bubbles at the edges and a heavenly coffee aroma, then remove from the heat and set aside.
- In a medium bowl, beat the egg yolks until they’re smooth and slightly frothy. Slowly whisk 1 cup of the hot cream mixture into the yolks, then stir in the vanilla extract.
- Pour the egg mixture back into the saucepan with the remaining hot cream mixture. Over low heat, cook the custard, stirring constantly with a wooden spoon or spatula until it thickens enough to coat the back of the spoon, about 4-5 minutes.
- Remove the custard from the heat and strain it through a fine mesh strainer into a clean bowl or container, catching any sneaky little bits of cooked egg. Press plastic wrap directly onto the surface to prevent a skin from forming.
- Chill the custard in the refrigerator for at least 2 hours to make it nice and cold. The anticipation will be worth it, trust me!
- Once chilled, pour the custard into your ice cream machine and churn according to the manufacturer’s instructions. The mixture will transform into a creamy, dreamy delight.
- Transfer the churned ice cream to a plastic container and pop it in the freezer for a few hours to firm up. When you’re ready to serve, let it sit out for 5-10 minutes to get to that perfect scoopable stage.
Cook’s Notes
There’s something magical about homemade ice cream, but it can be a bit tricky if you’re not careful. Always keep stirring the custard to prevent it from curdling. If you don’t have an ice cream maker, a bit of patience and elbow grease will do the trick—just freeze the mixture and stir it every 30 minutes until it’s frozen. Store the ice cream in an airtight container, and it should keep well for up to two weeks. That is, if you can resist finishing it off sooner!
Make It Your Own
Want to jazz things up a bit? Here are some simple swaps and additions:
- For a mocha twist, melt 1/2 cup of chocolate chips into the cream mixture before boiling.
- Add a teaspoon of cinnamon to the egg yolks for a spicy kick that pairs perfectly with the coffee.
- Mix in crushed biscotti or chocolate-covered espresso beans during the last few minutes of churning for a crunchy surprise.
- Swap the milk with almond milk for a nutty note that sings with the coffee flavor.
If you try this, I’d love to hear how it turns out—drop a comment or tag me! Enjoy every heavenly bite.
Related update: Home made coffee ice cream
Related update: Kahlua Tiramisu

It was a Wednesday, smack in the middle of a busy week, when I found myself staring at a fridge full of mismatched leftovers and a craving for something hearty. A glimpse of sweet potatoes and a package of lamb sparked an idea — Lamb & Sweet Potato Pot Pie. It’s one of those meals that’s worth every step, filling the kitchen with cozy aromas and rewarding you with a golden, flaky crust. Plus, it’s a great way to transform humble ingredients into something that feels like a hug wrapped in pastry. If you’re in the mood for a little kitchen adventure with a comforting payoff, this recipe is just the ticket.
Jump to Recipe
What You’ll Need
Chances are you already have most of these ingredients in your pantry or fridge. Here’s what makes this pot pie special:
- Lamb
- Sweet potatoes
- Bay leaf
- Black pepper
- Butter
- Caraway seeds
- Celery stalks
- Cornstarch
- Demi glace
- Flour (used twice)
- Fresh rosemary
- Fresh thyme
- Garlic
- Ice water
- Kosher salt
- Lemon zest
- Milk
- Olive oil
- Orange zest
- Frozen peas
- Crust
- Red onion
- Red wine
- Shortening
- Sugar
- Water
How to Make Lamb & Sweet Potato Pot Pie
- Start with the crust. Combine the flour, sugar, fresh rosemary, fresh thyme, and salt in a large bowl. Add chilled butter and use a pastry blender to mix until it resembles coarse cornmeal.
- Integrate the shortening into your flour-butter mix until just combined. Gradually add ice water, mixing well after each tablespoon, until the dough begins to stick together.
- Divide the dough into two even balls, dust lightly with flour, and wrap in plastic. Let them chill in the fridge for at least an hour.
- For the lamb, toss it with salt, pepper, caraway seeds, garlic, and flour, and set aside for a bit.
- Swirl some olive oil in a deep, wide pan on medium heat. Add the lamb and cook it until just browned, then transfer to a plate.
- In the same pan, add a touch more oil if needed, and scrape up those flavorful drippings. Add the red onion and celery, cooking until they soften and turn translucent.
- Pour in the red wine and demi-glace, stirring well, then add the lamb back with the peas and bay leaf. Cover the pan, reduce to a simmer, and cook for about 15 minutes.
- Stir together water and cornstarch, pour into the lamb mixture, and mix well. Add in the sweet potatoes, cooking for another 5-7 minutes. Remove from heat and let cool completely. Remember to fish out that bay leaf!
- Roll the chilled dough on a floured surface for the bottom crust, place it in a 9-inch pie dish, and trim edges. Put it in the fridge to stay cool while you roll the top crust.
- Pour the cooled filling into the bottom crust. Top with the rolled-out dough for the top crust and trim the edges if necessary.
- Crimp the edges to seal, and chill the whole pie in the fridge. A quick chill in the freezer for about 2-4 minutes if the dough feels soft will also work wonders.
- Brush the top crust with milk just before baking. Bake in a preheated oven at 375 degrees for 45-50 minutes, until the crust is golden brown and fragrant.
Cook’s Notes
Always ensure your dough is well chilled to ensure a flaky crust. If it’s warm, it can become a soggy mess, so over-chilling is better than under-chilling. You can let the filling cool completely in the fridge before assembling to keep it manageable. This pot pie is a great candidate for make-ahead meals; assemble it in advance and bake it right before dinnertime. Leftovers stay tasty for up to 3 days when refrigerated.
Make It Your Own
- Swap the lamb for chicken thighs for a lighter but equally delicious version.
- Replace sweet potatoes with regular potatoes if that’s more your style.
- Use vegetable broth instead of demi-glace for a different depth of flavor.
- Add mushrooms to the filling for an earthier taste profile.
If you try this, I’d love to hear how it turns out — drop a comment or tag me on social media! It’s always a joy to see your spins on these recipes. Enjoy every flaky, savory bite!
Related update: Lamb & Sweet Potato Pot Pie
Related update: Swiss Chard Wraps

Picture this: it’s a bustling Tuesday evening and I’m standing in my kitchen, rifling through the pantry for dinner inspiration when I stumble upon a bunch of cute, little eggplants. A light bulb moment hits—Hyderabadi baghara Baingan! This dish is like a warm hug, perfect for when you’re craving something rich and tangy yet surprisingly easy to whip up. The eggplants soak up the spiced, nutty goodness, leaving you with a delicious meal that feels like it took hours, but really didn’t. Trust me, even on the busiest days, this is a dish that delivers on flavor with every bite.
Jump to Recipe
What You’ll Need
This isn’t one of those crazy ingredient lists that sends you to five different stores. Chances are you already have most of these at home.
- 10-12 baby eggplants
- 3-4 red Kashmiri chilies
- Coconut
- Coriander seeds
- Cumin seeds
- 8-10 curry leaves
- Garlic
- 1 piece of ginger
- Tamarind, about a lime-sized ball
- Oil
- Onion
- Salt
- Nigella seeds
- Sesame seeds
- Turmeric
- Jaggery
- Peanuts
- Cashews
How to Make Hyderabadi baghara Baingan
- First things first—wash those baby eggplants and pat them dry. You’re going to slit them lengthwise into fours, but keep the stems intact. This way, they hold together nicely in the dish.
- In a separate pan, heat a teaspoon of oil. Toss in the cumin seeds, peanuts, and cashews and fry them for a few seconds until fragrant.
- Add in the ginger, garlic, and chopped onion. Cook this down for about a minute until everything turns soft and golden.
- Sprinkle in the turmeric, coriander seeds, coconut, and Kashmiri red chilies. Keep frying till the mixture turns a lovely brown. Let this cool completely and then blend it into a fine paste with a little water.
- Now, in a thick-bottomed pan, heat some oil and fry the eggplants until they’re brown and tender. This is where they get all soft and lovely. Remove them and set aside.
- In the same oil, add the nigella seeds and let them crackle before stirring in those aromatic curry leaves. Fry for a few seconds to release their flavors.
- Add the ground paste you prepared, along with the tamarind pulp, salt, and jaggery. Mix it all up until it becomes a fragrant, bubbling sauce.
- Gently add the sautéed eggplants and about half a cup of water. Cover the pan and let everything simmer over low heat until the eggplants are cooked through and super soft.
- Serve this hot with rice or rotis, and savor each mouthful of that rich, tangy curry.
Cook’s Notes
Cooking Hyderabadi baghara Baingan is a breeze if you keep a few things in mind. First, ensure the eggplants are fresh and firm for the best taste. If you don’t have Kashmiri red chilies, substitute with any mild red chili for that vibrant color, but be mindful of the spice level. This dish is great the next day too as the flavors deepen overnight, so don’t hesitate to make it ahead of time. Store leftovers in an airtight container in the fridge for up to 3 days. Reheat gently, adding a splash of water if needed to loosen the sauce.
Make It Your Own
Looking to shake things up a bit? Here are a few ways to switch up this recipe:
- Swap the eggplants for zucchini or baby bell peppers for a different twist.
- For a nut-free version, omit the peanuts and cashews and add a tablespoon of almond butter to the paste for richness.
- Dial up the heat by adding a green chili or two to the paste if you’re in the mood for something spicier.
- For a heartier meal, toss in some boiled potatoes along with the eggplants.
If you try this, I’d love to hear how it turns out—drop a comment or tag me! Your feedback makes my day and helps fellow food lovers. Enjoy the cooking adventure!
Related update: Hyderabadi baghara Baingan
Related update: Lamb & Sweet Potato Pot Pie

Ever have one of those days where you open the fridge, and it feels like a barren wasteland of half-used vegetables and random leftovers? Last Tuesday was precisely that for me. I had a craving for something comforting yet quick, and the idea of ordering takeout for the third time that week wasn’t sitting well with my wallet—or my waistline. That’s when I remembered my go-to Easy Vegetable Fried Rice. It’s one of those recipes that feels like a kitchen miracle, turning odds and ends into something spectacularly satisfying. Plus, it’s quicker than waiting for delivery and way more rewarding.
Jump to Recipe
What You’ll Need
This recipe’s magic lies in its versatility and simplicity. Chances are you already have most of these ingredients lurking in your kitchen:
- Broccoli – The more the merrier!
- Butter – Because everything’s better with it.
- Carrots – Sweet and crunchy.
- Cooked rice – Preferably a day old, but fresh works too.
- Egg – For that authentic fried rice finish.
- Garlic – Minced, for a punch of flavor.
- Ginger – Freshly grated, if possible.
- Green beans – Snappy and fresh.
- Peas – Sweet, lovely little peas.
- Soy sauce – This is your salt and savory magic.
- Sesame oil – For that nutty, toasted aroma.
- Sugar – Just a touch for balance.
How to Make Easy Vegetable Fried Rice
- Start by bringing a pot of water to a boil. Toss in the green beans and broccoli. Let them blanch for about two minutes, then drain them immediately to keep that vibrant color. If you’re using frozen veggies, ease off the package instructions by three minutes—no one likes mushy veggies.
- In a large pan or wok, heat your sesame oil over medium heat. Toss in the garlic and ginger. Stir them around for about a minute until your kitchen smells irresistibly fragrant.
- Add the carrots and give them a quick stir for one to two minutes—just enough to soften them a bit but still keep that crunch.
- Now, add the rice. The key here is using rice that’s a day old, but if you’re in a pinch, fresh rice works too. Pour in your soy sauce; adjust based on how salty you like it.
- While the rice warms up, beat the egg in a small bowl. Push the rice to the sides of the pan, creating a little space in the middle. Pour in the egg and scramble it right there, blending it in with the rice once it’s almost cooked.
- Throw in the blanched broccoli, peas, and any other veggies you fancy. Sprinkle in the sugar and stir everything together for a couple of minutes.
- Add the butter and let it melt through the rice mixture. This is where the magic happens—let the rice sit and sizzle just a bit to get those delightful crispy bits.
- Give it one last toss before serving. Dive in and enjoy your homemade fried rice!
Cook’s Notes
Fried rice is forgiving, but a few things can elevate your dish from good to great. First, cold, day-old rice is ideal since it’s less sticky and more likely to fry up nicely. If using fresh rice, spread it out on a baking sheet to cool and dry a bit. Feel free to adjust the soy sauce to your taste—every brand varies in saltiness. If you’re making this ahead of time, store it in an airtight container in the fridge for a couple of days. Reheat in a pan for the best texture, adding a splash of water if it seems dry.
Make It Your Own
- For protein, swap the egg for crispy tofu cubes. Just pan-fry them before adding the garlic and ginger.
- Add a kick by tossing in a teaspoon of chili paste or Sriracha along with the soy sauce.
- Switch out the green beans for snap peas for an even sweeter crunch.
- For a nutty twist, sprinkle toasted sesame seeds over the top before serving.
If you try this, I’d love to hear how it turns out—drop a comment or tag me on your social media adventures! Enjoy every spoonful of your kitchen creativity.
Related update: Easy Vegetable Fried Rice
Related update: Hyderabadi baghara Baingan

It was one of those weeks where everything felt just a bit off. You know the kind — when you drop your phone in the sink, forget your keys, and somehow leave a trail of bread crumbs throughout the entire house. I needed some comfort food, but not the kind that takes hours to prepare. Enter: Crawfish Cake Sliders. These little gems are a weeknight savior — quick to whip up, yet bold and satisfying. Perfect for when you need a little culinary escape without the fuss. Plus, they pack that southern charm that makes you feel like you’re right at home, sitting by a bayou.
Jump to Recipe
What You’ll Need
Here’s the best part: you likely have most of these ingredients hanging out in your pantry. Just a few fresh items and you’re golden.
- 1 teaspoon oil (plus more for frying)
- 1 pound crawfish tails, chopped
- 1 small red onion, finely chopped
- 1 clove garlic, minced
- 1 teaspoon Creole spice (or more to taste)
- 1 large egg
- 1/2 cup bread crumbs
- 8 slider buns
- Tartar sauce for serving
How to Make Crawfish Cake Sliders
- In a sauté pan, heat 1 teaspoon of oil over medium heat. Add the chopped red onion and cook until tender, about 2-3 minutes. The kitchen will start to smell amazing, like the beginning of a great meal.
- Once the onion is tender, remove the pan from the heat and add the minced garlic, chopped crawfish tails, and 1 teaspoon of Creole spice. Give it a quick toss to awaken those flavors.
- Transfer the mixture to a mixing bowl and let it cool for a bit. This is the perfect time to take a breather and maybe sip some iced tea.
- Once cooled, mix in the egg and just enough bread crumbs to bind everything together. You want the mixture to hold its shape, so feel free to adjust with more crumbs if needed. Season with salt, pepper, and more Creole spice if you’re feeling bold.
- Form the mixture into 8 equal patties and flatten them to about 3/4-inch thick. They should feel firm but not too dense.
- Heat more oil in the sauté pan over medium heat. Fry the patties on each side until they’re brown and crispy — about 3-4 minutes per side. You’ll know they’re ready when they smell irresistible.
- Serve these beauties on slider buns with a generous dollop of tartar sauce, and watch them disappear as quickly as you made them.
Cook’s Notes
A few things to keep in mind:
- If your mixture feels too wet, sprinkle in more bread crumbs until it binds correctly.
- Worried about the patties falling apart? Let them chill in the fridge for 15 minutes before frying. It makes them easier to handle.
- These sliders can be made ahead of time. Just prepare the patties and store them in the fridge. Cook them when you’re ready to serve.
- Leftovers can be stored in an airtight container in the fridge for up to two days. Reheat them in a skillet to bring back that lovely crispiness.
Make It Your Own
Want to put your spin on these sliders? Here are a few ideas:
- Add some heat: Chop up a jalapeño and add it to the mix for a spicy kick.
- Go green: Mix in some chopped fresh parsley or cilantro for a burst of freshness.
- Cheesy delight: Add a slice of your favorite cheese on top of each patty just before they’re done frying.
- Gluten-free option: Swap the bread crumbs for gluten-free crumbs and use gluten-free buns.
If you try this, I’d love to hear how it turns out — drop a comment or tag me in your delicious creations! Let’s make sure those off weeks are few and far between, my fellow food adventurers. Happy cooking!
Related update: Crawfish Cake Sliders
Related update: Easy Vegetable Fried Rice
Related update: Homemade Apple Almond Granola Bars

Picture this: It’s a chilly Wednesday evening, and I’ve got exactly 15 minutes before my friends show up for our weekly Wine & Whine night. The fridge is looking a bit sparse, but I spot some leftover brie from last weekend and a carton of raspberries that are starting to look a tad too ripe. As I rummage through my pantry, I stumble upon a forgotten stash of phyllo shells. A lightbulb moment strikes—why not whip up some White Chocolate Raspberry Brie Cups? They’re quick, ooze class with minimal effort, and the combination of creamy, tangy, and sweet is an absolute game-changer. Trust me, these little bites are what every Wednesday evening dreams of becoming.
Jump to Recipe
What You’ll Need
You might already have most of these on hand, which means fewer trips to the store—score!
- Brie – The creamy heart of our cups.
- Athens phyllo shells – Crunchy, flaky, ready-to-go lifesavers.
- Raspberries – Fresh and slightly tart.
- Raspberry preserves – For that extra berry punch.
- White chocolate – The sweet base to balance it all out.
How to Make White Chocolate Raspberry Brie Cups
- Preheat your oven to 350 degrees. This gives us just enough time to assemble everything.
- Line a baking sheet with parchment paper. This helps prevent any sticky messes and makes cleanup a breeze.
- Place 1 teaspoon of white chocolate in the bottom of each phyllo shell. The chocolate will melt into a sweet, gooey foundation.
- Top with chunks of brie. Go generous here—the brie should be the star of the show.
- Add about 1/2 teaspoon of raspberry preserves on top of the cheese. This layer should start to glisten.
- Bake for 8 minutes, or until the corners of the phyllo shells turn golden and the cheese is bubbling away.
- Carefully remove from the oven and top with a small dollop of extra raspberry jam. Trust me, it’s worth it.
- Place back in the oven for just 1 more minute to let the jam settle.
- Finally, crown each cup with a fresh raspberry. Serve them hot—the contrast of temperatures is divine.
Cook’s Notes
Don’t overstuff the shells; they need some space to breathe and bake properly. If you’re prepping for a party, you can assemble these up to a day in advance. Just cover and refrigerate them, then bake right before serving. These cups are best enjoyed fresh, but if you have leftovers (unlikely!), store them in an airtight container in the fridge. Pop them back in a warm oven for a few minutes to re-crisp.
Make It Your Own
- Swap the brie for camembert if you’re feeling adventurous—another creamy delight.
- Try a darker chocolate for a less sweet, more sophisticated bite.
- Substitute the raspberry preserves with apricot jam for a surprise twist.
- Add a thin slice of prosciutto under the brie for a savory kick.
If you try this, I’d love to hear how it turns out—drop a comment or tag me! Wine & Whine nights are my favorite, and I hope these cups make yours special too.
Related update: White Chocolate Raspberry Brie Cups

It was one of those afternoons when the sun was too hot, and all I could think of was something cool and creamy to beat the heat. The store-bought ice cream in my freezer just didn’t seem to cut it. I craved something more indulgent—a little scoop of homemade bliss I could savor slowly. That’s when I remembered this magic trick of a recipe for homemade coffee ice cream. It’s the kind of treat that sneaks in the backdoor of your afternoon and turns an ordinary day into something special. All you need is a few pantry staples and a bit of patience. Trust me, this coffee ice cream will make your taste buds dance and your kitchen smell like a cozy coffee shop. It’s the ultimate indulgence, perfect for a quick escape from the everyday grind or for impressing your dinner guests without breaking a sweat.
Jump to Recipe
What You’ll Need
The beauty of this recipe is its simplicity. Chances are, your kitchen already holds most of the magic beans for this spell. Here’s what you’ll need to whip up this silky delight:
- 2 cups of cream
- 1 cup of milk
- 3/4 cup of sugar
- 1 tablespoon of coffee granules
- 5 egg yolks
- 1 teaspoon of vanilla extract
How to Make Homemade Coffee Ice Cream
- In a medium, heavy saucepan, combine the cream, milk, sugar, and coffee granules. Heat gently over medium until it just begins to boil, filling your kitchen with a fragrant aroma. Remove from heat and let it sit while you move on to the eggs.
- In a medium bowl, beat the egg yolks until they’re smooth like sunshine. Slowly whisk in a cup of your hot coffee cream, taking care not to scramble the eggs.
- Add a dash of vanilla extract to this warm blend, because why not add a hint of sweetness to this love affair?
- Returning to your saucepan, gradually introduce the egg mixture by pouring it in a steady stream, stirring constantly. Cook over low heat until the mixture coats the back of a spoon, about 4-5 minutes. You’ll know it’s ready when it’s luxuriously thickened.
- Remove from heat and pour through a fine mesh strainer into a clean container. This step ensures your ice cream is as smooth as a jazz singer’s voice.
- Cover with plastic wrap, pressing it directly onto the surface to prevent a skin from forming. Chill in the fridge for at least 2 hours—perfect time to catch up on your favorite show!
- Once chilled, pour the mixture into an ice cream machine and churn according to the manufacturer’s instructions until it reaches a soft serve consistency.
- Transfer to a plastic container and freeze for a few hours to firm up. Before serving, let it sit out for 5-10 minutes to soften to the perfect scooping texture.
Cook’s Notes
This recipe is forgiving and rewards patience. Make sure you keep the temperature low when cooking with the egg yolks to avoid unpleasant curdling. Straining the mixture is not optional—it’s essential for that ultra-smooth texture. If you’re making this ahead of time, the mixture can be left to chill overnight in the fridge. Store your ready ice cream in an airtight container to keep it fresh; it should last about a week, but I doubt it will stick around that long!
Make It Your Own
- Want a more robust coffee flavor? Swap out regular coffee granules for an espresso version.
- For a luscious mocha twist, add a tablespoon of cocoa powder when combining the cream, milk, sugar, and coffee.
- Looking to impress with a boozy treat? Fold in a shot of coffee liqueur right before churning.
- Try using coconut milk instead of cow’s milk for a tropical vibe—it adds an unexpected twist and creaminess.
If you try this, I’d love to hear how it turns out—drop a comment or tag me! Whether you’re savoring this on a quiet afternoon or sharing it with friends, I hope it brings a little extra joy to your day.
Related update: Home made coffee ice cream
Related update: Home made coffee ice cream

Picture this: It’s a chilly autumn evening, and I’m staring at a bag of cranberries sitting on the counter, just begging to be transformed into something fabulous. The leaves are turning that gorgeous burnt orange, and I’ve got this urge to whip up something that screams cozy. Enter, my Cheesecake with Cranberries. It’s not just any cheesecake; it’s that magical blend of tart cranberries meeting creamy, dreamy cheesecake all bundled up in a hug of buttery, crumbly crust. If you’re in the mood for something that feels like a warm sweater for your taste buds but seems way more impressive than the effort it takes, this is your go-to. And the best part? You might already have most of these ingredients skulking in your pantry. So let’s dive right in.
Jump to Recipe
What You’ll Need
You know those recipes that call for exotic spices and ingredients that you’ll probably only use once? Yeah, this isn’t one of them. Chances are, your cupboards are already harboring most of these goodies.
- Cranberries – fresh is best, trust me on this one!
- Water – the unsung hero
- Allspice – gives it that warm, cozy vibe
- Cloves – just a pinch for depth
- Orange extract – for that zingy, citrusy kick
- Sugar – duh! Sweetness is key
- McVitie’s wholewheat digestive cookies – the foundation of our crumbly crust
- Butter – because buttery crust is life
- Cream cheese – the heart of the cheesecake
- Sour cream – adds a tangy creaminess
- Cornstarch – to hold it all together
- Eggs – the glue that binds
How to Make Cheesecake with Cranberries
- First things first, take those cranberries and toss them into a medium saucepan with some water. Bring it to a boil until the skins burst open. It’s like nature’s way of telling you they’re ready—about 5 minutes should do it.
- Take the pan off the heat and stir in allspice, cloves, orange extract, and sugar. Mix it all up until it’s just right, then pop it into the fridge to cool. Patience, my friend.
- Now, for the crust. Crush those digestive cookies into fine crumbs, mix them with sugar and melted butter, and press the lot into the bottom of a greased 9-inch springform pan. There, the base of our cheesecake empire!
- In a mixing bowl, beat the cream cheese and sugar together until they’re smooth like a jazz sax solo. Add the sour cream and cornstarch, beating until well combined.
- Gently add the eggs, beating on low speed. This is crucial—overbeating could deflate your cake, and nobody wants that.
- Drain the cranberry sauce and reserve those plump cranberry bits. Fold a cup of that sauce into the cheesecake mixture, pour it over your crust, and drizzle with the remaining sauce.
- Bake at 160°C for about 30-35 minutes, just until the center is almost set. A little jiggle is fine—it’ll firm up as it cools.
- Cool it on a wire rack for about 10 minutes. Run a knife around the edge to loosen it, then let it cool for another hour. Then, into the fridge it goes overnight. Yes, waiting is the hardest part.
- When you’re ready to serve, top with those reserved cranberries if you want to get fancy.
Cook’s Notes
Here’s the deal: Cheesecake is one of those things that just gets better with a little time chillin’ in the fridge. If you can, make it the day before. It gives the flavors more time to get together and party. Store leftovers in the fridge, tightly covered, for up to 4 days—if it lasts that long! When making the cranberry sauce, make sure it’s cool before folding it in. Warm sauce can curdle the cream cheese mixture, and we don’t want that drama.
Make It Your Own
Want to put your own spin on this cheesecake wonder? Here are some ideas:
- Swap the cranberries for raspberries if you’re feeling a different kind of tart.
- Try ginger snaps instead of digestive cookies for a spicier kick.
- Feeling nutty? Add a handful of chopped walnuts to the crust mixture for some crunch.
- For a citrus twist, add a tablespoon of lemon zest to the cream cheese mixture.
If you try this, I’d love to hear how it turns out—drop a comment or tag me in your delicious creations! Your kitchen adventures are what make this all worthwhile. 🍰
Related update: Cheesecake with cranberries
Related update: Home made coffee ice cream

Okay, so picture this: It’s a chilly Tuesday morning, and I had exactly five minutes before my first Zoom call of the day. My stomach was growling louder than my cat, and I needed a breakfast solution that was quick, comforting, and wouldn’t leave me feeling like I scarfed down a bowl of sugar cubes. Enter Peaches And Cream Oatmeal! It’s that perfect hug-in-a-bowl for mornings when time seems to slip through your fingers like sand. Honestly, it’s like eating dessert for breakfast, but without the guilt trip. And the best part? In just a few minutes, with ingredients you likely have on hand, you can whip up something that tastes like you’ve been slaving over the stove. Spoiler: You haven’t.
Jump to Recipe
What You’ll Need
This is one of those recipes where you’ll likely find most of the ingredients already hanging out in your kitchen. It’s delightfully simple, and trust me, you’re gonna love what these basics can turn into.
- Frozen peaches
- Cooking oats
- Non-fat milk
- Low fat cream cheese
- Agave
- Cinnamon
How to Make Peaches And Cream Oatmeal
- Start by microwaving the frozen peaches for about 30 seconds. You want them to be just soft enough to break apart easily with a spoon but still holding their shape.
- Add in the cooking oats, non-fat milk, a dollop of low fat cream cheese, a drizzle of agave, and a sprinkle of cinnamon. The combination of creamy and sweet with a hint of spice will make your kitchen smell divine.
- Pop it all in the microwave for about a minute. Keep an eye out as the edges will start to bubble, and the cream cheese will melt into a luscious swirl.
- Once done, give it a good stir. You want everything to meld together into a creamy, peachy paradise. Enjoy it while it’s warm and watch your morning instantly get better.
Cook’s Notes
Here’s the deal: This oatmeal is extremely forgiving, so don’t stress if you don’t measure everything exactly. I find it’s best eaten right away while it’s warm, but if you do have leftovers, they can be stored in an airtight container in the fridge for a day or two. Just add a splash of milk before reheating to bring it back to its creamy self.
If you don’t have agave, honey or maple syrup work just as well. And if you prefer your oatmeal a bit thicker, you can reduce the milk slightly or add more oats. The cream cheese gives it that dreamy, creamy texture, so feel free to adjust according to your taste buds’ desire.
Make It Your Own
- Berry Delight: Swap the peaches for a mix of berries. Frozen blueberries or raspberries can add a nice tart kick.
- Nutty Crunch: Toss in some chopped almonds or walnuts for a bit of texture and extra protein.
- Vegan Vibes: Use almond or oat milk and vegan cream cheese to keep it plant-based.
- Spice It Up: Add a pinch of nutmeg or ginger along with the cinnamon for a warm, spiced flavor.
If you try this, I’d love to hear how it turns out — drop a comment or tag me! Your mornings deserve a little bit of peachy comfort, and I can’t wait for you to try it. Enjoy! 🍑❤️
Related update: Peaches And Cream Oatmeal
Related update: Crawfish Cake Sliders
Related update: Blueberry, Chocolate & Cocao Superfood Pancakes - Gluten-Free/Paleo/Vegan

Last Tuesday, I found myself staring into the fridge, a little lost and a lot hungry, after a long day of work and an unexpected detour when my grocery bag tore open on the way home. There it was, my knight in shining armor: a half-eaten broccoflower and some leftover bacon from the weekend breakfast. Inspiration struck, and here we are with this Broccoli and Cheese Phyllo Pie. It’s surprisingly easy, deliciously comforting, and had the added bonus of making me feel like a culinary genius without breaking much of a sweat. Plus, who doesn’t love a dish wrapped in layers of flaky, buttery phyllo? Trust me, this is the kind of recipe that saves your night while winning you major points with anyone lucky enough to share it with you. Jump to Recipe
What You’ll Need
This pie is all about using what you likely already have mingling in your pantry and fridge. It’s unpretentious with a twist of sophistication, thanks to that golden, flaky phyllo.
- 1 broccoflower
- 5 large eggs
- 4 slices of cooked bacon, chopped
- 1 teaspoon salt
- 2 tablespoons all-purpose flour
- 1 cup milk
- 1/2 cup mayonnaise
- 3 green onions, chopped
- 1/4 teaspoon cayenne pepper
- 1/4 teaspoon black pepper
- 2 cups shredded smoked cheddar cheese
- 1 package of phyllo dough sheets (about 20 sheets)
- Butter, melted (for brushing)
How to Make Broccoli and Cheese Phyllo Pie
- Begin by preheating your oven to 350°F (175°C). This ensures it’s ready to go once your pie is assembled.
- Place your broccoflower in a pot, cover with water, and let it cook for about 5 minutes. Drain it well and set it aside to cool.
- In a large bowl, combine your chopped bacon, green onions, and shredded cheese. Give it a good mix so the flavors can start mingling.
- In a separate medium bowl, whisk together the eggs, salt, cayenne, black pepper, flour, mayonnaise, and milk. An immersion blender will help achieve a silky smooth texture, especially since mayo can seize up in cold mixtures.
- Unroll your phyllo dough and keep it covered with a damp paper towel to prevent it from drying out while you work.
- Prep an 8-inch springform pan by greasing it with cooking spray or melted butter, ensuring nothing sticks.
- Working quickly, lay two sheets of phyllo in the pan and gently brush with butter. Repeat this process, rotating the pan with each addition, until about 3/4 of your roll is used, creating a thick, pastry ‘nest.’
- Now that your broccoflower is cool, roughly chop it and fold it into your bacon mixture. Pour this mixture into your phyllo nest and pat it down gently.
- Give your egg mixture a quick remix before pouring it over the broccoli mix. You’ll want to ensure it’s evenly distributed.
- Layer the remaining phyllo sheets on top, two at a time, buttering in between. Roll any overhanging edges to create a neat crust. Brush the top with butter for that golden finish.
- Bake in the preheated oven for about 1 hour and 15 minutes. Keep an eye on it and cover with foil after an hour if the phyllo browns too quickly.
- Once baked, allow the pie to rest for 15 minutes before slicing. This prevents a lava flow of filling escaping. Use a serrated knife to cut through the delicate layers.
Cook’s Notes
Phyllo can be a bit of a diva, so keep it under a damp towel to avoid dryness. The immersion blender trick keeps your mixture velvety and avoids those pesky mayo clumps. If you’re making this ahead of time, the assembled pie can sit in the fridge for a few hours before baking. Leftovers? Store them in the fridge and reheat in the oven to bring back that crispiness.
Make It Your Own
- Vegetarian Delight: Swap the bacon for sautéed mushrooms or sun-dried tomatoes for a meatless version that’s still packed with umami.
- Cheese Swaps: If you’re out of smoked cheddar, try using a sharp cheddar or Gruyère for a different but equally mouthwatering experience.
- Spice It Up: Add a teaspoon of smoked paprika or a pinch of red pepper flakes for a pie with a little extra kick.
- Mix Up the Greens: No broccoflower? Broccoli, cauliflower, or even a mix of both work just as well, each bringing a unique flavor to the pie.
If you try this, I’d love to hear how it turns out — drop a comment or tag me! Your kitchen victories brighten my day more than you know.
Related update: Broccoli and Cheese Phyllo Pie

It was one of those days when the weather couldn’t make up its mind – gloomy clouds threatening rain one moment, only to break into streams of sunlight the next. I found myself aimlessly wandering the aisles of my favorite local grocer, craving something rich and warming. Lamb in Red Mole Sauce – that’s the dish that came to mind. It’s the kind of meal that feels like a cozy blanket after a long day but also carries a bit of flair, like you’ve spent hours crafting something special just for you (even if, honestly, the oven does most of the work). When you take that first bite and the tender lamb mingles with the smoky, spicy mole, it’s pure magic. Trust me, you’ll want to give this recipe a go, especially when you need a little pick-me-up that feels just a tad indulgent.
Jump to Recipe
What You’ll Need
This ingredient list is a little trip to flavor town with a Mexican twist. The beauty? You might already have most of these in your pantry, and the rest are definitely worth the hunt.
- Dried chipotle peppers
- Pasilla peppers
- Plum tomatoes
- Garlic
- Oregano
- Cinnamon
- Sesame seeds
- Pepper
- Canola oil
- Mexican chocolate
- Salt
- Tomato sauce
- Lamb shoulder
- Salt and pepper for seasoning
How to Make Lamb In Red Mole Sauce
- Begin by soaking the dried chipotle peppers in hot water until they soften up. Once soft, remove the seeds and stem. This is where the magic begins.
- In a blender, puree the softened chipotles, roasted pasilla peppers, plum tomatoes, and garlic until smooth. Set this flavor bomb aside for later.
- Grab a small skillet and toast the oregano, cinnamon, sesame seeds, and pepper until your kitchen smells like a spice market in Mexico – fragrant and irresistible.
- In a saucepan, heat some canola oil. Add the pureed vegetable mix, the freshly toasted spices, chocolate, salt, and tomato sauce. Stir everything together and let it simmer gently until the chocolate melts and the sauce is well blended. If it looks like it’s getting too thick, a splash of water will do the trick.
- Meanwhile, in a large skillet, heat more oil. Season the lamb shoulder liberally with salt and pepper. Sear it on all sides until a glorious brown crust forms. This step is where flavor meets texture.
- Place the browned lamb on a piece of heavy-duty aluminum foil. Pour the mole sauce over the top, making sure it’s nicely coated. Seal the foil tightly – doubling up is a smart move to keep all those juices in.
- Bake in the oven at 325°F for 3-4 hours. When you open that foil, the lamb should be so tender it practically falls off the bone. Succulent perfection.
Cook’s Notes
Cooking this dish is like an art, where patience is rewarded with flavors that are deep and layered. The sauce should be thick but pourable; add water if it gets too sturdy. If you’re making this ahead, you can prepare the mole sauce a day in advance and just warm it up when needed. As for leftovers, they keep well in the fridge for up to three days and taste even better the next day as the flavors meld. Just ensure you reheat gently to prevent the lamb from drying out.
Make It Your Own
While I adore the traditional flavors in this dish, there’s always room for a little personalization:
- Swap the lamb for pork shoulder if that’s more your style, but keep the cooking time the same to ensure tenderness.
- For a vegetarian twist, use large portobello mushrooms in place of lamb, adjusting the cooking time to just an hour.
- If spicy isn’t your thing, sub the chipotle peppers with guajillo peppers for a milder kick.
- Want to add a bit more crunch? Garnish with toasted pumpkin seeds and fresh cilantro before serving.
If you try this, I’d love to hear how it turns out—drop a comment or tag me! Whether you’re savoring it solo or sharing with friends, I hope this dish brings you as much joy as it’s brought me. Happy cooking!
Related update: Lamb In Red Mole Sauce
Related update: Broccoli and Cheese Phyllo Pie
Related update: Chimichurri

It was one of those gloomy Tuesday evenings when the thought of another sad salad was just too much to bear. I glanced at the dozen eggs I had forgotten in my fridge and thought, “We can do better than this, guys!” Thus, the Hard-Boiled Egg Gratin In A Béchamel Sauce was born. This dish is the perfect marriage of creamy comfort and accessible elegance. It’s like giving your humble eggs a posh makeover, and believe me, it’s way easier than you’d think. Plus, it’s the kind of dish that makes you feel like you can handle anything the week throws at you.
Jump to Recipe
What You’ll Need
You might already have most of this in your kitchen, just waiting to become something delightfully decadent. Here’s what you’ll gather:
- 6 large eggs
- 4 tablespoons butter, divided
- 1 small onion, finely chopped
- 3 tablespoons flour
- 2 cups milk
- Nutmeg, a pinch
- Salt and white pepper to taste
- 1 cup grated gruyère cheese
How to Make Hard-Boiled Egg Gratin In A Béchamel Sauce
- Start with hard-boiling your eggs. Bring a saucepan of salted water to a boil, add the eggs gently, then reduce the heat and let them simmer for 10 minutes. Once done, transfer the eggs to a bowl of cold water to cool slightly, then peel them. Trust me, rolling them gently with your palm on a hard surface makes peeling a breeze.
- In a small frying pan, melt 2 tablespoons of the butter over low heat and add the chopped onion. Cook, stirring frequently, until the onion is tender but not colored — you want that sweet onion aroma wafting through your kitchen.
- Now for the béchamel sauce: In a medium saucepan, melt the remaining 2 tablespoons of butter over low heat. Add the flour and whisk it for about 2 minutes. Keep an eye on it; you want a smooth blend without any color change.
- Slowly whisk in the milk and bring the mixture to a boil. Keep whisking to avoid lumps. Season the sauce with nutmeg, salt, and white pepper to your liking. Lower the heat and let it simmer for 10 minutes, continuing to whisk and scrape the sides for a silky finish.
- Stir in the cooked onions and let it all meld together for another 5 minutes, stirring occasionally.
- Preheat your grill. While it heats, slice the eggs about 1 cm thick. Spread a thin layer of béchamel sauce on the bottom of a gratin dish, then layer in the sliced eggs. Coat the slices generously with the remaining sauce.
- Top it all off with a generous sprinkle of grated gruyère cheese. Pop it under the grill and watch closely — turn the dish if needed to ensure an even, golden-brown crust. Serve immediately and bask in the glory of your culinary creation.
Cook’s Notes
A few things to keep in mind: The béchamel can be made ahead and stored in the fridge for up to two days. Just reheat gently before assembling the gratin. If you find your sauce is too thick after reheating, add a splash of milk to loosen it up. Leftovers (if you have any!) can be kept in the fridge and reheated in the oven at a low temperature. Just be mindful that the eggs can toughen slightly as they are reheated.
Make It Your Own
The joy of this dish is in its flexibility. Here are some fun variations:
- For a smoky twist, swap the gruyère for smoked gouda.
- If you’re feeling fancy, add a layer of sautéed mushrooms between the eggs and the sauce.
- For a fresh hit, sprinkle chopped chives or parsley over the top before serving.
- Try adding a thin layer of spinach under the eggs for a pop of color and nutrition.
If you try this, I’d love to hear how it turns out — drop a comment or tag me! Whip it up, make it your own, and most importantly, enjoy every creamy forkful. Happy cooking, friends!
Related update: Hard-Boiled Egg Gratin In A Bechamel Sauce

I once found myself in the middle of a weeknight conundrum—my sweet tooth was hollering louder than a toddler missing nap time, and my pantry was looking a little sparse. Cue the genius idea: Bacon Brownie Cupcakes. This is the kind of recipe that was born out of necessity, a craving, and a little slice of bacon heaven left over from breakfast. What’s better than combining the gooey richness of brownies with the savory crunch of bacon? This dish dances the line between dessert and daring, and let me tell you, it’s worth every single bite. Plus, it’s all done using familiar pantry staples, so you’ll feel like a kitchen wizard in no time.
Jump to Recipe
What You’ll Need
When I say this ingredient list will make you feel like you’ve hit the jackpot, I mean it. With just a few special touches, you’ll be whipping up a treat that feels both classic and adventurous.
- Unsweetened chocolate
- Sweetened chocolate
- Butter
- Sugar
- Salt
- Eggs
- All-purpose flour
- Cocoa powder
- Bacon
How to Make Bacon Brownie Cupcakes
- Preheat your oven to 350°F, and let’s get that muffin pan greased well. Trust me, you want these to come out looking fab, not stuck like a toddler’s fist in a cookie jar.
- Fry up your bacon until it’s crispy perfection, but avoid any charred bits. You want that savory crunch without the burnt taste. Pat it dry and crumble it up, discarding any overly fatty pieces.
- In a double boiler, melt the unsweetened chocolate and butter together. Stir occasionally until smooth, then let it cool slightly. This mixture will become the soul of your brownie cupcakes.
- Whisk in the sugar and salt into the melted chocolate. Add the eggs one at a time, making sure each is fully incorporated before adding the next. This gives them that fudgy texture we adore.
- Sift the flour and cocoa powder together, then gently fold it into the chocolate mixture. This is where the magic happens—don’t rush this step!
- Stir in the bacon pieces and sweetened chocolate bits. Pour the batter into your prepared muffin pan, filling each cup about ¾ full.
- Bake for around 30 minutes. You’ll know they’re ready when a toothpick inserted in the center comes out with a few moist crumbs. Let them cool before attempting to remove them from the pan.
Cook’s Notes
These little beauties can be stored in an airtight container for up to four days, but let’s be real—they’ll probably vanish much sooner. If you’re making them ahead for a party or just because, you can prepare the batter and refrigerate it for up to 24 hours before baking. Just bring it to room temperature before popping it in the oven. Sometimes the bacon can be a bit tricky; ensure it’s well-drained so you don’t end up with greasy cupcakes. And whatever you do, resist the urge to gobble them up straight from the oven—you’ll want them to firm up a bit first.
Make It Your Own
- Feeling nutty? Swap out half the bacon for toasted walnuts for a crunchy twist.
- Prefer a spicy kick? Add a pinch of cayenne pepper to the batter for a surprising heat that pairs beautifully with the chocolate.
- Not a fan of bacon (gasp!)? Substitute with crispy tofu bits seasoned with smoked paprika for a vegetarian-friendly version.
- Craving a bit of extra sweetness? Sprinkle some sea salt caramel bits on top before baking for a salty-sweet sensation.
If you try this, I’d love to hear how it turns out—drop a comment or tag me! Whether you stick to the script or put your own twist on it, these Bacon Brownie Cupcakes are bound to be a story in the making. Happy baking!
Related update: Bacon Brownie Cupcakes
Related update: Hard-Boiled Egg Gratin In A Bechamel Sauce
Related update: Cheesecake with cranberries
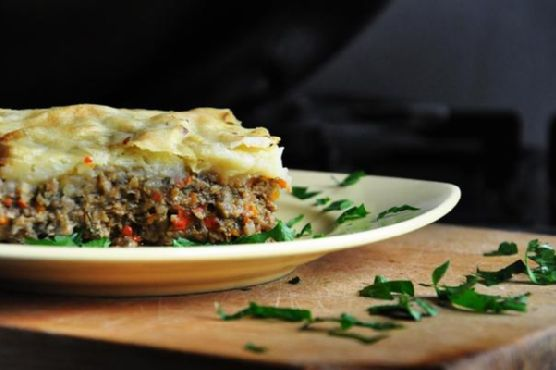
It was one of those crisp autumn evenings when the wind manages to sneak its way through every little crack in the window, and the leaves rustle just a bit too loudly. I was in my kitchen, fervently searching for something comforting yet uncomplicated enough to soothe the chill that had settled in my bones. And there it was—my answer in the form of a hearty, soul-warming Vegetarian Mushroom Shepherd’s Pie. It’s the kind of dish that’s a hug on a plate, warmly satisfying yet light enough that you won’t be falling asleep on the couch afterward. Trust me, this is a dish you’ll want to keep in your back pocket for those moments when you’re craving something cozy without all the fuss.
Jump to Recipe
What You’ll Need
It’s likely that you’ve got most of these ingredients chilling in your pantry or fridge right now. It’s a simple list, but when combined, the flavors really come alive.
- Red skin potatoes
- Soy granules
- Mushrooms
- Carrot
- Red bell pepper
- Diced onions
- Dill
- Parsley
- Dry eggs (or your favorite egg substitute)
- Sea salt
- Ground pepper
- Sweet paprika
- Dry thyme
- Unrefined sunflower oil
How to Make Vegetarian Mushroom Shepherd’s Pie
- Peel the red skin potatoes and place them into a large pot filled with water. Bring to a boil and let them bubble away until they’re tender and ready to be mashed.
- Once the potatoes are perfectly soft, drain and mash them. Let the mash cool while you get everything else ready—it should be smooth and slightly fluffy.
- Chop the mushrooms, carrot, and red bell pepper into manageable pieces, then add them into your food processor. Pulse until everything’s finely chopped and well mixed, creating a delightful, aromatic medley.
- In a large skillet, heat a splash of sunflower oil over medium heat until shimmering. Add the vegetable mixture, along with diced onions, chopped dill, parsley, soy granules, dry eggs, sea salt, ground pepper, sweet paprika, and dry thyme. Sauté for about 10 minutes until the mixture is fragrant, and the kitchen smells like comfort personified.
- Prepare a casserole dish by lining it with parchment paper. Divide the mashed potatoes into two portions, spreading the first half evenly as a base layer in the dish.
- Spoon the savory mushroom filling over the potato layer, ensuring it’s even and packed full of flavor.
- Spread the remaining mashed potatoes over the top of the filling, smoothing it out with a spatula like you’re icing a cake.
- Preheat your oven to 390°F (200°C). Slide your casserole into the oven and let it bake for 40 minutes until the top is golden and slightly crisp.
- Resist the urge to dive in immediately! Let it cool for at least half an hour to allow the flavors to settle and intensify.
Cook’s Notes
While this dish is pretty forgiving, a few tips can make it even better. If you’re tight on time, peel and chop the potatoes the night before and store them in water in the fridge. This way, they’ll be ready to go when you are. When mashing the potatoes, aim for smoothness, but a few lumps add a lovely rustic touch. Also, this pie is at its best when cooled slightly, so patience is key. Leftovers can be stored in an airtight container in the fridge for up to three days, and they reheat beautifully—just pop them back in the oven until they’re warmed through.
Make It Your Own
Feel free to tweak this recipe according to what’s in your fridge or what you’re craving:
- Swap the soy granules with cooked lentils for a different texture and earthy flavor.
- Use sweet potatoes instead of red skin potatoes for a sweeter topping that pairs beautifully with the savory filling.
- Add a sprinkle of cheese on top for a golden, melty finish—vegan cheese works just as well!
- Incorporate some corn or peas into the filling for an extra pop of color and sweetness.
If you try this, I’d love to hear how it turns out—drop a comment or tag me on social! I’m always excited to see your unique spins on this cozy classic.
Related update: Vegetarian Mushroom Shepherd’s Pie
Related update: Lamb In Red Mole Sauce
Related update: White Chocolate Raspberry Brie Cups

So there I was, staring at a pantry full of canned goods and feeling absolutely uninspired. You know those moments, right? When dinner needs to magically appear, but the motivation to whip up something grand is nowhere to be found? That’s when my trusty crockpot became my salvation, and this Crockpot “Refried” Beans recipe was born. Packed with hearty pinto beans and a kiss of cumin, it’s the kind of dish that mellows me out on a hectic Tuesday evening. Not to mention, it’s an absolute breeze to prepare. Whether you’re looking for a simple side or a filling for your tacos, this dish has you covered.
Jump to Recipe
What You’ll Need
Picture this: a short list of ingredients, most of which are probably lurking in your pantry right now. We’re talking about pantry staples here, folks, nothing too fancy.
- Pinto beans – the star of our show, dried and ready for action
- Water – simple enough
- Canned garlic – because chopping fresh is overrated (or maybe just too much effort today)
- Onion – for that subtle depth of flavor
- Cumin – gives that warm, earthy vibe to our beans
- Black pepper – just enough to make things interesting
- Salt – essential seasoning, obviously
How to Make Crockpot “Refried” Beans
- Rinse those pinto beans in a colander. Seriously, give them a good rinse until the water runs clear, and make sure to pick out any bad beans that are looking questionable.
- Combine all of the ingredients into your trusty crockpot. Toss the rinsed beans in, add the water, canned garlic, onion, cumin, black pepper, and salt. Give it a little stir to distribute the flavors.
- Notice any beans floating to the top? Go ahead and remove those. Floating beans often mean they’re not quite right, and we’re all about quality here.
- Cover the crockpot, set it on HIGH, and let it work its magic for 4 hours. The kitchen will start to smell warm and inviting — almost like a hug.
- After the 4 hours are up, switch the setting to LOW and let it continue to cook for another 2 hours. Patience, my friend, is key.
- Once cooked, uncover the crockpot and assess the liquid situation. Remove any excess liquid, but leave enough to reach your desired consistency when mashed. Remember, we’re aiming for somewhere between very liquidy, restaurant-style beans and the thicker, canned kind.
- Mash the beans using a potato masher. Go as smooth or chunky as you like — it’s your masterpiece.
- Serve them warm, and soak in the satisfaction of a meal well-crafted with minimal effort.
Cook’s Notes
So, a few things to keep in mind: using dried beans means you get to control the texture and sodium levels, which is a total win-win. As for storage, pop any leftovers into air-tight containers and they’ll chill in the fridge for up to 2 weeks. If you’re more of a plan-ahead person, freeze the beans in ziplock bags to enjoy at a later date. Just remember to thaw them in the fridge overnight before reheating.
Make It Your Own
Experimenting is half the fun, right? Here are a few ways to switch things up:
- Swap the pinto beans for black beans for a subtly different flavor profile.
- Feeling adventurous? Add a diced jalapeño to the crockpot for a spicy kick.
- Toss in a handful of chopped cilantro after mashing for a fresh, herbaceous finish.
- For a smoky twist, stir in a teaspoon of smoked paprika with the other spices.
If you try this recipe, I’d love to hear how it turned out! Drop a comment or tag me in your kitchen adventures. Happy cooking!
Related update: Crockpot "Refried" Beans

It was one of those evenings when I craved something that felt indulgent but didn’t require hours of kitchen labor. You know the days—when the sun sets a bit too early, and your energy to cook dwindles with it. That’s when my Baked Eggs and Bacon Cream In Spinach Fettuccine Nests came to the rescue. With its luscious bacon cream sauce, the comfort of pasta, and the elegance of a baked egg, this dish feels like a warm hug in a bowl. Plus, it’s surprisingly quick to whip up, leaving you time to savor a glass of wine (or two) while it bakes. Jump to Recipe
What You’ll Need
This recipe is perfect for when your pantry is doing most of the work. Chances are you already have most of these staples on hand.
- Bacon – the smoky heart of the dish
- Butter – for richness
- Parmigiano-Reggiano – freshly shredded, please
- Heavy cream – because we’re not skimping on comfort
- Fresh eggs – the crowning glory
- Nests of spinach fettuccine – adds a pop of color and nutrition
- Salt and pepper – the classic duo
- Scallions – for that fresh finish
How to Make Baked Eggs and Bacon Cream In Spinach Fettuccine Nests
- Start by slicing your bacon into small pieces. Cook them in a skillet over medium heat until they’re crispy and golden. The smell will be irresistible!
- Meanwhile, bring a pot of salted water to a boil. Drop in your spinach fettuccine nests and cook until just shy of al dente, about 10 minutes.
- In a separate large pan, melt the butter over high heat. Once melted, pour in the heavy cream and whisk to combine. Let it simmer gently.
- Add three-quarters of your shredded Parmigiano-Reggiano to the cream, stirring until it melts into a smooth, fragrant sauce. Throw in most of the crispy bacon, stirring to integrate all those flavors.
- Drain the pasta, reserving a bit of the cooking water. Toss the pasta into the cream sauce, adding a splash of the pasta water to keep things silky. Mix until well coated.
- Butter two medium ramekins and twirl half of the pasta mixture into each, leaving a small well in the center. Sprinkle with the remaining bacon pieces.
- Crack an egg into the center of each pasta nest. Be gentle, aiming to keep the yolk whole for that perfect Instagram moment.
- Bake in a preheated 350°F oven for about 15 minutes, or until the egg whites are set but the yolks remain tantalizingly runny.
Cook’s Notes
This dish is best enjoyed fresh out of the oven when the eggs are still runny and the pasta is perfectly creamy. If you need to prepare parts in advance, you can make the bacon and sauce ahead of time and store them separately in the fridge. Just reheat gently before proceeding with the recipe.
- Storage Tips: Leftovers can be stored in an airtight container for up to two days. Reheat in the oven to preserve the texture of the egg.
- Common Pitfall: Don’t overcook the pasta initially, as it will continue to cook while baking.
- Make-Ahead Tip: Prepare the pasta nests and bacon cream sauce the night before, then assemble and bake when ready to serve.
Make It Your Own
- Vegetarian Twist: Swap crispy tofu for bacon, seasoning it with smoked paprika to mimic that smoky flavor.
- Cheese Swap: Try Pecorino Romano instead of Parmigiano-Reggiano for a sharper bite.
- Herbal Boost: Add fresh thyme or basil to the sauce for an added layer of aroma.
- Spicy Kick: Toss in a pinch of red pepper flakes or drizzle some hot sauce over the top before serving.
If you try this recipe, I’d love to hear how it turns out! Drop a comment below or tag me when you share your delicious results. Happy cooking, my friends! 🍳🥓
Related update: Baked Eggs and Bacon Cream In Spinach Fettuccine Nests
Related update: Vegetarian Mushroom Shepherd's Pie