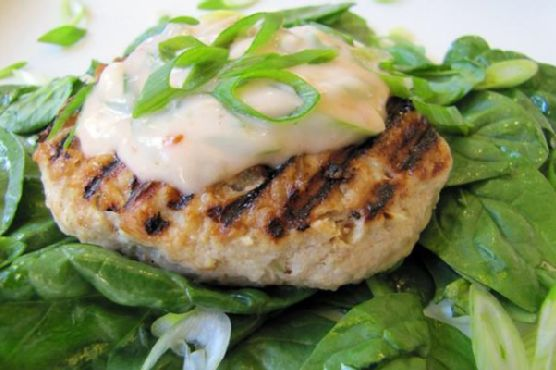
Thai Street Vendor Salmon Skewers | Made by Meaghan Moineau

Thai Street Vendor Salmon Skewers

Intro

One of my fondest memories from a trip to Thailand was wandering through the vibrant night markets. The air was thick with the aroma of sizzling spices, and I was instantly drawn to a small cart where a street vendor was expertly grilling skewers of salmon. The delicate fish, perfectly charred, was complemented by a delightful mix of sweet, tangy, and spicy flavors. Inspired by that unforgettable experience, I have recreated a recipe that brings the essence of Thai street food to your home kitchen. These Thai Street Vendor Salmon Skewers are a delicious tribute to those bustling markets and the culinary adventures that await in every corner of Thailand.

Why You’ll Love It

This recipe is a surefire hit for several reasons. First, it captures the authentic flavors of Thai cuisine with a simple yet effective marinade that enhances the natural taste of salmon. The dish is quick to prepare, making it perfect for both weeknight dinners and entertaining guests. Plus, the skewers are not only flavorful but also fun to eat, reminiscent of an exotic street food experience. Lastly, the dish is healthy, offering omega-3-rich salmon paired with fresh yu choy, ensuring a nutritious meal.

Ingredients

  • 1 bunch yu choy, chilled
  • 2 tablespoons brown sugar
  • 1 tablespoon chili sauce
  • 2 tablespoons fish sauce
  • 1 tablespoon fresh ginger, minced
  • 1 teaspoon dried ground turmeric
  • 1 lime, juiced and zested
  • 1 large salmon fillet, skin removed

Instructions

  1. Remove skin from the salmon fillet and trim away any brown fatty areas.
  2. Place 8 bamboo skewers into the fillet running from the thick side to the thin side, about 1.5 inches apart.
  3. Slice the fillet so that you have individual pieces of salmon on the skewers.
  4. In a bowl, combine brown sugar, chili sauce, fish sauce, minced ginger (using a garlic press), dried ground turmeric, lime juice, and zest to make the marinade.
  5. Adjust the mix of ingredients to match your personal tastes.
  6. Place the salmon skewers in a deep bowl or a Ziploc bag and marinate with about half of the sauce. Reserve the rest for serving.
  7. Refrigerate for 30 minutes to an hour. Avoid marinating for longer as the lime juice can start to “cook” the fish.
  8. Grill the skewers on high heat until the salmon is cooked through and slightly charred.
  9. Serve with chilled raw yu choy, wrapping bits of the fish, and drizzle with the remaining sauce.

Tips

For the best results, use fresh salmon and ensure it is thoroughly cleaned and deboned. Soak the bamboo skewers in water for at least 30 minutes before threading the salmon to prevent them from burning on the grill. Keep a close eye on the grilling process, as the salmon cooks quickly and can easily overcook. If you’re using a charcoal grill, allow the coals to turn white before placing the skewers on the grill for more even cooking.

Variations & Substitutions

Feel free to experiment with this recipe by substituting the salmon with other types of fish such as trout or cod. For a vegetarian version, you can use firm tofu instead of fish, adjusting the grilling time as necessary. If yu choy is not available, baby bok choy or even lettuce leaves make good alternatives for wrapping the fish. To add a bit more heat, you can include finely chopped fresh chili peppers in the marinade.

Storage

Leftovers can be stored in an airtight container in the refrigerator for up to two days. When ready to eat, reheat the skewers in a preheated oven at 350°F (175°C) until warmed through. Keep in mind that the texture of the salmon may change slightly after refrigeration and reheating. The reserved sauce can be stored separately and used as a dipping sauce or salad dressing.

FAQ

Can I prepare the marinade in advance?

Yes, you can prepare the marinade a day in advance and store it in the refrigerator. Just make sure to marinate the salmon for no more than an hour to prevent it from getting too “cooked” by the lime juice.

What can I serve with Thai Street Vendor Salmon Skewers?

These skewers pair wonderfully with steamed jasmine rice or a simple cucumber salad. You can also serve them alongside a spicy Thai green papaya salad for a complete meal full of refreshing flavors.

Nutrition

This dish is rich in omega-3 fatty acids, thanks to the salmon, which supports heart health. Yu choy adds a dose of fiber, vitamins, and minerals, including vitamin C and calcium. The marinade ingredients like lime and ginger offer additional health benefits, such as improved digestion and anti-inflammatory properties.

Conclusion

These Thai Street Vendor Salmon Skewers are more than just a meal; they’re an invitation to explore the rich tapestry of Thai street food culture right from your own kitchen. With simple, fresh ingredients and a burst of flavors, this dish is sure to become a favorite in your home. Whether you’re reminiscing about past travels or dreaming of future adventures, these skewers offer a delightful taste of Thailand that you can enjoy any time. Happy cooking!

Related update: Thai Street Vendor Salmon Skewers

Related update: Drunken Turkey Chili

Glazed pork chops | Made by Meaghan Moineau

Glazed Pork Chops

Intro

There’s something inherently comforting about a well-cooked pork chop. It takes me back to my childhood, where weekends meant family gatherings and the aroma of sizzling pork filling the air. My grandmother had a way with pork chops that was legendary in our family. Her secret? A perfectly balanced glaze that complemented the savory richness of the meat. Today, I’m excited to share a recipe inspired by those cherished memories, with a modern twist that brings out the best in each ingredient. These glazed pork chops are sure to become a favorite in your household, just as they were in mine.

Why You’ll Love It

This recipe for glazed pork chops is a delightful combination of sweet and savory flavors that will leave your taste buds singing. The succulent pork, paired with a rich glaze of honey, soy sauce, and balsamic vinegar, creates a dish that’s both satisfying and elegant. It’s a perfect choice for a weeknight dinner yet impressive enough to serve to guests. The simplicity of the preparation ensures that you can enjoy all the deliciousness without spending hours in the kitchen. Plus, the combination of tender meat and a luscious glaze is simply irresistible.

Ingredients

  • Balsamic vinegar
  • Black pepper
  • Butter
  • Cornstarch
  • Garlic cloves
  • Fresh green onions
  • Honey
  • Lean boneless pork chops
  • Soy sauce

Instructions

  1. Press one side of each chop into the black pepper.
  2. Heat a nonstick grill skillet until hot. Add pork chops, pepper side down, and cook about 4 minutes or until browned.
  3. Reduce heat to medium, turn pork chops, and cook for 6-8 minutes longer.
  4. When done, take the skillet from the heat, cover the pork chops, and set aside.
  5. Meanwhile, mix honey, soy sauce, balsamic vinegar, and cornstarch until smooth. Add the cracked pepper and stir.
  6. Melt the butter in a small pan, add garlic, and cook for 30 seconds, stirring constantly.
  7. Stir the honey mixture into the pan, let it boil, and cook for 1 minute, stirring.
  8. Spoon the sauce over the pork chops, sprinkle with fresh chives or green onions, and serve with polenta and a green salad.

Tips

For the best results, make sure your pork chops are of even thickness. This ensures they cook evenly and stay juicy. If you have thicker chops, you may need to adjust the cooking time slightly. Also, when making the glaze, keep stirring to prevent the cornstarch from clumping. Fresh garlic will provide the best flavor, so try to avoid using pre-minced varieties.

Variations & Substitutions

If you’re looking to switch up the flavors, consider using maple syrup in place of honey for a deeper, more caramel-like flavor profile. For those who prefer a bit of heat, a pinch of red pepper flakes in the glaze can add a delightful kick. Soy sauce can be substituted with tamari for a gluten-free option, and if you’re out of balsamic vinegar, apple cider vinegar makes a tangy alternative.

Storage

Leftover glazed pork chops can be stored in an airtight container in the refrigerator for up to three days. To reheat, place them in a skillet over medium-low heat until warmed through. You can also freeze the cooked chops for up to three months; just be sure to thaw them in the refrigerator overnight before reheating.

FAQ

Can I use bone-in pork chops for this recipe?

Yes, you can certainly use bone-in pork chops. Keep in mind that they may require a bit more cooking time to ensure they are cooked through. The bone can also add extra flavor to the meat.

What side dishes go well with glazed pork chops?

These glazed pork chops pair beautifully with polenta and a fresh green salad, as mentioned in the recipe. Other excellent side options include roasted vegetables, mashed potatoes, or a simple rice pilaf to soak up the delicious glaze.

Nutrition

This recipe is not only delicious but can be part of a balanced meal. Pork is a great source of lean protein, and the glaze, while indulgent, uses natural sweeteners like honey. Just be mindful of portion sizes, especially if you’re watching your sugar intake.

Conclusion

These glazed pork chops are a delightful homage to a classic comfort food, with a modern twist that elevates them to something truly special. Whether you’re cooking for family, friends, or just treating yourself to a night in, this recipe is sure to deliver on flavor and satisfaction. I hope these pork chops bring warmth and joy to your table, just as they have to mine. Enjoy!

Related update: Glazed pork chops

Related update: Thai Street Vendor Salmon Skewers

Pasta With Salmon Cream Sauce | Made by Meaghan Moineau

Pasta With Salmon Cream Sauce

Intro

There’s something truly comforting about a warm, creamy pasta dish, especially when it brings back fond memories of family gatherings. I remember my grandmother preparing her famous Pasta with Salmon Cream Sauce every Sunday. The aroma would fill her cozy kitchen, and we would eagerly wait at the dining table, ready to dive into a meal that felt like a warm hug on a plate. This dish combines the rich flavors of salmon with a velvety cream sauce, creating a meal that’s both satisfying and elegant. Whether you’re cooking for a family dinner or a romantic evening, this recipe is sure to impress.

Why You’ll Love It

This Pasta with Salmon Cream Sauce is a delightful blend of creamy, savory, and fresh flavors. Here’s why you’ll love making and eating it:

  • Quick and Easy: This recipe is perfect for busy nights, taking under 30 minutes from start to finish.
  • Rich and Flavorful: The creamy sauce is perfectly balanced with the saltiness of the salmon and the freshness of the herbs.
  • Family-Friendly: It’s a hit with both kids and adults, making it a great choice for family meals.
  • Customizable: You can easily tweak the ingredients to suit your dietary preferences or what you have on hand.

Ingredients

  • 2 tablespoons butter
  • 2 tablespoons flour
  • 2 cups milk
  • 1 onion, finely chopped
  • 1/2 cup grated parmesan cheese
  • 2 tablespoons chopped fresh parsley
  • 1 cup peas
  • 12 ounces penne pasta
  • 1/4 teaspoon pepper
  • 1 can (about 7.5 ounces) red salmon, drained and broken into chunks

Instructions

  1. In a large pot of boiling water, cook the penne pasta until al dente, about 10-12 minutes. Drain and return to the pot.
  2. In a saucepan, melt butter over medium heat. Add the chopped onion and cook until tender.
  3. Stir in the flour and cook for a few seconds to form a roux.
  4. Gradually whisk in the milk and bring to a simmer, stirring constantly until the sauce thickens.
  5. Add the peas, broken salmon chunks with juices, parsley, parmesan cheese, and pepper. Stir to combine.
  6. Pour the salmon cream sauce over the cooked pasta and stir gently until well mixed.
  7. Serve immediately and enjoy!

Tips

  • Don’t Overcook the Pasta: Make sure to cook the pasta just until al dente. It will continue to cook slightly when mixed with the sauce.
  • Use Fresh Ingredients: Fresh parsley and good-quality parmesan cheese make a big difference in flavor.
  • Adjust Consistency: If the sauce is too thick, add a splash of milk to reach your desired consistency.

Variations & Substitutions

  • Vegetarian Option: Substitute the salmon with sautéed mushrooms for a vegetarian twist.
  • Gluten-Free: Use gluten-free pasta and flour to make this dish suitable for a gluten-free diet.
  • Add More Veggies: Feel free to add spinach or broccoli for extra nutrients and color.

Storage

If you have leftovers, store them in an airtight container in the refrigerator for up to 3 days. Reheat gently on the stove or in the microwave, adding a little milk to loosen the sauce if necessary.

FAQ

Can I use fresh salmon instead of canned?

Absolutely! Fresh salmon will add a luxurious touch to this dish. Simply cook the salmon separately, flake it, and add it to the sauce in place of the canned salmon.

Can I make the sauce ahead of time?

Yes, you can prepare the sauce in advance and store it in the refrigerator for up to 2 days. Reheat it gently on the stove, stirring constantly, before mixing with the pasta.

Nutrition

This dish is approximately 300 calories per serving, making it a satisfying meal that won’t weigh you down. Pair it with a side salad for a balanced dinner.

Conclusion

Pasta with Salmon Cream Sauce is more than just a meal; it’s a culinary experience that brings warmth and joy to the table. Whether you’re recreating treasured family memories or creating new ones, this recipe is sure to become a favorite in your home. Enjoy the creamy textures, the vibrant flavors, and the satisfaction of a dish made with love. Happy cooking!

Related update: Pasta With Salmon Cream Sauce

Related update: Glazed pork chops

Sardine Croquettes (Croquetas De Sardinas) | Made by Meaghan Moineau

Sardine Croquettes (Croquetas De Sardinas)

Intro

There’s something truly magical about recipes that transport us back to cherished moments from our past. For me, sardine croquettes are a delightful reminder of family gatherings in my grandmother’s cozy kitchen. I remember sitting on a stool, watching her expertly shape the croquettes, her hands moving with a rhythm that was both practiced and loving. The aroma of frying croquettes filled the air, mingling with laughter and stories shared among family members. In this blog post, I am excited to share with you this beloved recipe for Sardine Croquettes, or as we say in Spanish, Croquetas de Sardinas. It’s a dish that brings warmth and connection, perfect for sharing with loved ones.

Why You’ll Love It

These Sardine Croquettes are a fantastic way to enjoy the rich flavors of sardines in a crispy, golden-brown package. Here’s why you’ll love them:

  • Quick and Easy: Using canned sardines and frozen cassava saves time without compromising on taste.
  • Flavorful: The combination of sardines, parmesan cheese, and fresh cilantro creates a savory and delightful bite.
  • Versatile: Perfect as an appetizer, snack, or main dish; they pair wonderfully with a simple salad or a tangy dip.
  • Nostalgic: A recipe that brings a taste of traditional Spanish cuisine to your table.

Ingredients

  • 1 can of sardines
  • 500g frozen cassava (yuca)
  • 1/2 cup grated parmesan cheese
  • 2 egg yolks
  • 2 egg whites
  • 1 teaspoon baking powder
  • 1 cup plain bread crumbs
  • 2 tablespoons chopped cilantro
  • Oil for frying
  • Salt & pepper to taste

Instructions

  1. Start by cooking the frozen cassava. In a pot with salted water, cook the cassava until fork tender, which usually takes about 20-25 minutes.
  2. Once the cassava is cooked thoroughly, drain the water and mash it until smooth.
  3. Add the canned sardines (drained), parmesan cheese, egg yolks, baking powder, salt, pepper, and chopped cilantro to the mashed cassava. Mix well until all ingredients are combined.
  4. Preheat oil in a frying pan over medium heat.
  5. With wet hands, form the sardine mixture into small balls.
  6. Dip each ball into the egg whites, then roll it in the bread crumbs to coat evenly.
  7. Fry the croquettes in the preheated oil until they are golden brown on all sides, about 3-4 minutes per side.
  8. Once cooked, let them rest on a double-lined paper towel to remove excess oil.
  9. Serve warm, accompanied by ketchup or your favorite dipping sauce.

Tips

  • Keep your hands wet when forming the croquettes to prevent the mixture from sticking.
  • For an extra crispy texture, you can double-dip the croquettes in the egg whites and bread crumbs.
  • Ensure the oil is hot enough before frying; otherwise, the croquettes may absorb too much oil.

Variations & Substitutions

  • Cheese: Swap parmesan with pecorino or even mozzarella for a different flavor profile.
  • Herbs: Substitute cilantro with parsley or dill for a different herbal touch.
  • Gluten-Free: Use gluten-free bread crumbs to make this recipe suitable for those with gluten sensitivities.

Storage

Store any leftover croquettes in an airtight container in the refrigerator for up to three days. To reheat, place them in a preheated oven at 350°F (175°C) for about 10 minutes to regain their crispiness.

FAQ

Can I use fresh cassava instead of frozen?

Absolutely! If you prefer using fresh cassava, peel and cut it into chunks before boiling. It might take a bit longer to cook, but the result will be just as delicious.

What can I serve with sardine croquettes?

Sardine croquettes pair well with a fresh green salad, roasted vegetables, or even a simple tomato and onion relish. They are also delicious on their own with a side of dipping sauce.

Nutrition

While the exact nutritional content may vary, these sardine croquettes are a good source of protein and healthy fats from the sardines. Cassava provides a carbohydrate base, making this dish a satisfying and balanced option.

Conclusion

Sardine Croquettes are a wonderful way to bring the heart and soul of Spanish cuisine into your home. They are easy to make, bursting with flavor, and perfect for sharing with friends and family. Whether you’re reminiscing about fond memories or creating new ones, I hope this recipe brings a bit of joy and deliciousness to your table. Enjoy!

Related update: Sardine Croquettes (Croquetas De Sardinas)

Related update: Steamed Artichokes With Roasted Red Pepper Aioli

Related update: Japanese Gyoza Pot Stickers

Ham and Red Bean Soup | Made by Meaghan Moineau

Hearty Ham and Red Bean Soup

Intro

There’s something deeply comforting about a pot of soup simmering on the stove, the aroma wafting through the house, promising warmth and nourishment. This Ham and Red Bean Soup is a recipe passed down through my family, a staple during cool autumn evenings. I remember my grandmother making it on Sundays, her kitchen filled with laughter and warmth. We’d gather around the table, bowls in hand, steaming with this savory delight. This soup is more than just a meal; it’s a memory, a legacy of love and togetherness.

Why You’ll Love It

This Ham and Red Bean Soup is a classic comfort dish that’s both hearty and flavorful. Here’s why you’ll fall in love with it:

  • Rich Flavor: The combination of smoked ham, aromatic spices, and tender beans creates a symphony of flavors that’s both warming and satisfying.
  • Nutritious: Packed with protein and fiber, this soup is not only delicious but also nutritious.
  • Easy to Make: With a bit of chopping and stirring, you can have this delightful soup simmering on your stove with minimal effort.
  • Perfect for Leftovers: This soup tastes even better the next day, making it a great make-ahead meal.

Ingredients

  • Green leeks, tops reserved
  • Thyme sprigs
  • 1 Bay leaf
  • 1 teaspoon Coriander seeds
  • 1 teaspoon Black peppercorns
  • 1 teaspoon Cumin seeds
  • 2 tablespoons Olive oil
  • 2 Diced carrots
  • 2 Diced celery stalks
  • 4 cloves Garlic, minced
  • 2 tablespoons Tomato paste
  • 2 cups Red beans, soaked overnight
  • 1 Cooked diced smoked ham bone
  • 3 cups Cooked diced ham
  • 1 teaspoon Ground chipotle chile powder
  • Salt and pepper to taste
  • Water, enough to cover

Instructions

  1. Take the thyme sprigs and bay leaf, and wrap the reserved green leek top around them. Tie with butchers twine to secure.
  2. Place the coriander seeds, peppercorns, and cumin seeds in the middle of a coffee filter or small piece of cheesecloth, and tie into a bundle using butchers twine. Set aside.
  3. Heat the olive oil in a large stockpot over medium heat. Add leeks, carrots, and celery. Saute for 5 minutes or until softened.
  4. Add garlic and saute for another minute.
  5. Add tomato paste and saute for another minute.
  6. Add the beans, ham bone, the herb bundle and the spice bundle, and enough water to cover. Bring to a boil and reduce to a simmer, partially covering. Allow to simmer for 1 hour.
  7. Add the diced ham and chipotle chile powder and stir in. Allow to simmer until beans are soft and are just beginning to break open, another 1 1/2 to 2 hours.
  8. Adjust seasoning to taste. Remove ham bone and pull any remaining ham from the bone and return to pot. Remove herb bundle and spice bundle, and serve.

Tips

  • Soak the Beans: Make sure to soak the red beans overnight. This helps to speed up the cooking process and ensures they become tender.
  • Spice it Up: If you like your soup with a bit more kick, feel free to add more chipotle chile powder.
  • Use Fresh Ingredients: Fresh spices and herbs make a big difference in flavor. Try to use fresh thyme, leeks, and garlic for the best results.

Variations & Substitutions

  • Vegetarian Option: Omit the ham and use vegetable broth instead of water for a delicious vegetarian bean soup.
  • Alternate Beans: If you don’t have red beans, you can substitute with kidney beans or pinto beans.
  • Spice Blend: Experiment with different spice blends or add a bit of smoked paprika for a different depth of flavor.

Storage

Store any leftover soup in an airtight container in the refrigerator for up to 4 days. This soup also freezes well; just allow it to cool completely before transferring to freezer-safe containers. It can be frozen for up to 3 months.

FAQ

Can I use canned beans instead of dried beans?

Yes, you can use canned beans. If you do, skip the soaking step and reduce the simmering time, as canned beans are already cooked.

What if I don’t have a ham bone?

No worries! You can still make the soup without a ham bone. The smoked diced ham will provide plenty of flavor on its own.

How can I make the soup thicker?

If you prefer a thicker consistency, you can blend a portion of the soup and return it to the pot, or you can let it simmer uncovered for a while longer to reduce the liquid.

Nutrition

This soup is a wholesome meal, rich in protein from the ham and beans, and full of fiber. It’s a perfect choice for a filling lunch or dinner that doesn’t compromise on flavor or nutrition.

Conclusion

This Ham and Red Bean Soup is more than a simple dish; it’s a comforting, hearty meal that brings family and friends together. Whether you’re enjoying it as a cozy dinner or sharing it with loved ones, this soup is sure to warm both the body and the soul. I hope you find as much joy in making and sharing this soup as I have over the years. Enjoy!

Related update: Ham and Red Bean Soup

Related update: Pasta With Salmon Cream Sauce

Related update: Sweet Potato and Celery Soup

Acorn Squash Biscuits with Sage & Gruyere | Made by Meaghan Moineau

Acorn Squash Biscuits with Sage & Gruyere

Intro

As the crisp air of autumn settles in, my heart often wanders back to the cozy kitchen of my grandmother’s house. The warmth from her oven, the laughter echoing through the room, and the delightful aroma of her baking have left an indelible mark on my soul. One of my most cherished memories is of her acorn squash biscuits, a recipe she lovingly crafted to celebrate the bounties of fall. These Acorn Squash Biscuits with Sage & Gruyere are a tribute to those fond memories, blending the comforting flavors of roasted squash with the savory notes of Gruyere and sage.

Why You’ll Love It

These biscuits are more than just a side dish; they are a celebration of autumnal flavors and textures. The acorn squash adds a subtle sweetness and moisture, creating a tender crumb that is perfectly complemented by the nutty richness of Gruyere cheese. Fresh sage brings an earthy aroma that elevates the biscuits to gourmet status. Whether you’re serving them at a holiday gathering or enjoying them with a simple bowl of soup, these biscuits are sure to become a seasonal favorite.

Ingredients

  • 2 cups all-purpose flour
  • 2 tablespoons cornstarch
  • 2 tablespoons light brown sugar
  • 1 tablespoon baking powder
  • 1/2 teaspoon baking soda
  • 1 teaspoon salt
  • 6 tablespoons unsalted butter, chilled and cut into pieces
  • 2 tablespoons vegetable shortening, chilled
  • 1 cup mashed roasted acorn squash
  • 1 tablespoon apple cider vinegar
  • 1 cup shredded Gruyere cheese
  • 2 tablespoons chopped fresh sage
  • Optional: whole sage leaves for garnish

Instructions

  1. Preheat your oven to 425°F (220°C) and adjust the oven rack to the middle position. Line a large baking sheet with parchment paper.
  2. In the work bowl of a food processor, combine the flour, cornstarch, brown sugar, baking powder, baking soda, and salt. Pulse a couple of times to combine.
  3. Scatter the chilled butter and shortening over the top of the flour mixture. Pulse a few times until the mixture resembles coarse meal.
  4. In a large bowl, mix the mashed acorn squash with the apple cider vinegar. Stir in the Gruyere cheese and chopped sage.
  5. Add the flour and butter mixture to the squash mixture, stirring until just combined.
  6. Turn the dough out onto a lightly floured surface and knead a few times to bring the dough together. Pat the dough into a round about 1-inch thick.
  7. Using a 2 1/4-inch biscuit cutter, cut out the biscuits, dipping the cutter in flour to prevent sticking. Gather the scraps and continue cutting until all dough is used.
  8. Place the biscuits evenly spaced on the prepared baking sheet. If garnishing with sage leaves, dip your finger in beaten egg and dot a small amount on the center of each biscuit. Place a sage leaf on top, pressing lightly to affix.
  9. Brush the biscuits with melted butter and bake until golden brown, about 18-22 minutes.
  10. Let the biscuits cool for 15 minutes before serving. Enjoy warm or at room temperature.

Tips

For the best results, ensure your butter and shortening are well-chilled before you begin. This helps create a flaky texture. If you don’t have a food processor, you can use a pastry cutter or your fingers to break down the butter into the flour mixture. Be careful not to overwork the dough to keep your biscuits tender.

Variations & Substitutions

If you can’t find Gruyere, feel free to substitute with sharp cheddar or another melting cheese of your choice. For a twist on flavor, try adding a pinch of nutmeg or cinnamon to the dry ingredients. If acorn squash is unavailable, butternut squash or pumpkin puree can work as a substitute.

Storage

Store any leftover biscuits in an airtight container at room temperature for up to 2 days. For longer storage, freeze them in a single layer on a baking sheet, then transfer to a freezer-safe bag or container. Reheat in a 350°F (175°C) oven until warmed through.

FAQ

Can I make the dough ahead of time?

Yes, you can prepare the dough a day in advance. Wrap it tightly in plastic wrap and store it in the refrigerator. When ready to bake, let the dough sit at room temperature for a few minutes before cutting and baking.

Can I use dried sage instead of fresh?

While fresh sage provides the best flavor, you can use dried sage in a pinch. Use about 1 tablespoon of dried sage in place of the fresh sage leaves.

What can I serve with these biscuits?

These biscuits are a versatile side that pairs well with soups, stews, or roasted meats. They also make a delightful addition to a brunch spread or holiday meal.

Nutrition

This recipe yields approximately 12 biscuits. Each biscuit contains an estimated 180 calories, 9g of fat, 20g of carbohydrates, 5g of protein, and 1g of fiber. It’s a delicious indulgence that fits well into a balanced diet when enjoyed in moderation.

Conclusion

These Acorn Squash Biscuits with Sage & Gruyere not only fill your kitchen with the comforting aroma of fall but also offer a nostalgic nod to the warm memories of family gatherings. Whether you’re a seasoned baker or a novice in the kitchen, this recipe is simple yet rewarding, making it a perfect addition to your autumnal culinary repertoire. So gather your ingredients, roll up your sleeves, and bake a batch of these delightful biscuits to share with loved ones, creating new memories that will be cherished for years to come.

Related update: Acorn Squash Biscuits with Sage & Gruyere

Related update: Sardine Croquettes (Croquetas De Sardinas)

Related update: Strawberry Basil Italian Ice

Pulled Pork Sandwich with Mango BBQ sauce | Made by Meaghan Moineau

Pulled Pork Sandwich with Mango BBQ Sauce

Intro

There’s something truly magical about the aroma of pulled pork simmering away, filling the house with its enticing smell. It takes me back to lazy Sunday afternoons spent at my grandmother’s house, where she would often prepare a hearty meal for the whole family. Her pulled pork sandwiches were legendary, not just for the tender meat but for the unique tangy and sweet sauce that accompanied them. It was her secret recipe, one that I have tweaked over the years to include the tropical sweetness of mango. This Pulled Pork Sandwich with Mango BBQ Sauce is my tribute to those cherished family gatherings, and I hope it becomes a staple in your home as well.

Why You’ll Love It

This Pulled Pork Sandwich with Mango BBQ Sauce is a delightful fusion of savory and sweet, guaranteed to become a new favorite in your recipe collection. The slow-cooked pork shoulder becomes melt-in-your-mouth tender, absorbing the rich and fruity flavors of the mango BBQ sauce. The hint of spice from the serrano pepper perfectly balances the sweetness of the mango, creating a complex and satisfying taste experience. Served atop a soft brioche roll with the optional addition of pickles, this sandwich offers a delicious medley of textures and flavors. Whether you’re hosting a summer barbecue or just craving comfort food, this recipe is sure to impress.

Ingredients

  • Apple cider vinegar
  • Lean boneless pork shoulder
  • Split brioche rolls
  • Cumin seeds
  • Dark brown sugar
  • Fennel seeds
  • Ginger
  • Kosher salt
  • Fresh lime juice
  • Mango puree
  • Molasses
  • Onion
  • Paprika
  • Serrano pepper
  • Vegetable oil
  • Worcestershire sauce

Instructions

  1. Combine the rub ingredients in a small bowl and massage it into the pork shoulder until well coated. Set aside while you make the BBQ sauce. You could do this a day ahead and keep refrigerated until ready to use.
  2. BBQ Sauce: In a large saucepan, warm the oil over low heat until hot and shimmering. Add the cumin and fennel seeds; they should splutter upon contact – be careful!
  3. Once the spluttering subsides, add the onions, ginger, serrano pepper, and a little salt, to taste. Sauté until they soften, but don’t let them get any color.
  4. Add the rest of the sauce ingredients. Simmer for about 5 minutes. Taste and season as needed.
  5. Add the pork shoulder to the saucepan, coating it with the sauce. Cover, and gently simmer until the pork falls apart easily, stirring and turning often, about 3 hours.
  6. Remove the pork from the saucepan and shred it using two forks. Return it to the sauce and stir to coat with the sauce.
  7. Put a generous spoonful of the pork inside a brioche bun, top with a few slices of pickle, and serve. Enjoy!

Tips

For the best results, allow the pork to marinate in the rub overnight. This will enhance the flavors and make the meat even more tender. When cooking the sauce, keep the heat low and be patient; the slow simmering process is crucial for developing the sauce’s depth of flavor. Additionally, using a high-quality brioche roll will provide the perfect balance of softness and sturdiness to hold the juicy pork without getting soggy.

Variations & Substitutions

If mango isn’t your favorite, try substituting with pineapple puree for a different tropical twist. For a spicier kick, increase the amount of serrano pepper or add a dash of cayenne pepper. If you prefer a different cut of meat, beef brisket also works wonderfully with this recipe. For a lighter option, consider using chicken thighs instead of pork shoulder.

Storage

Store any leftover pulled pork in an airtight container in the refrigerator for up to 3 days. To reheat, gently warm it on the stovetop over low heat, adding a splash of water or broth if necessary to keep it moist. You can also freeze the pulled pork for up to 3 months; just ensure it’s fully cooled before placing it in a freezer-safe bag or container.

FAQ

Can I make this recipe in a slow cooker?

Yes, you can easily adapt this recipe for a slow cooker. After preparing the rub and sauce, transfer everything to a slow cooker and cook on low for 6-8 hours or until the pork is tender and easily shredded.

What side dishes go well with pulled pork sandwiches?

Pulled pork sandwiches pair wonderfully with classic barbecue sides like coleslaw, potato salad, or baked beans. For something different, try serving them with a fresh corn salad or grilled vegetables.

Nutrition

This recipe is rich in protein, and the mango adds a dose of vitamin C. However, it’s also important to note that it contains sugars from the brown sugar and mango puree, so enjoy it as part of a balanced diet.

Conclusion

Whether you’re evoking memories of family gatherings or creating new traditions, this Pulled Pork Sandwich with Mango BBQ Sauce is sure to delight. Its harmonious blend of flavors and tender, juicy pork make it a standout dish that’s perfect for any occasion. I hope this recipe brings as much joy to your table as it has to mine. Happy cooking!

Related update: Pulled Pork Sandwich with Mango BBQ sauce

Gluten Free Dairy Free Sugar Free Chinese Chicken Salad | Made by Meaghan Moineau

Gluten Free Dairy Free Sugar Free Chinese Chicken Salad

Intro

Growing up, family gatherings were always incomplete without a large, colorful bowl of Chinese Chicken Salad gracing the table. It was my grandmother’s specialty, a dish she crafted with love, and one that brought everyone together. As dietary needs evolved within our family, I took it upon myself to recreate this beloved dish to suit our new preferences. This Gluten Free Dairy Free Sugar Free Chinese Chicken Salad maintains the vibrant flavors and textures of the original while meeting modern dietary requirements. With every bite, it brings back memories of those joyful family gatherings, and now, I hope it brings joy to your table as well.

Why You’ll Love It

This salad is a harmonious blend of fresh, crisp vegetables and juicy chicken, dressed in a tangy, sesame-infused vinaigrette. It’s not only gluten-free and dairy-free but also sugar-free, making it perfect for those with dietary restrictions. The combination of textures from the crunchy cabbage and carrots, alongside the tender chicken and juicy mandarins, creates a satisfying meal that is both nourishing and delicious. Plus, it’s easy to prepare and perfect for meal prep!

Ingredients

  • 1/2 cup apple cider vinegar
  • 1 teaspoon black pepper
  • 1 tablespoon black sesame seeds
  • 2 large carrots, peeled and grated
  • 1/3 cup extra virgin olive oil
  • 1/2 head green cabbage, finely sliced
  • 1 teaspoon kosher salt
  • 2 fresh satsuma mandarins, peeled and pith removed
  • 1/2 head red cabbage, finely sliced
  • 2 bone-in chicken breasts, roasted and shredded
  • 3 romaine lettuce hearts, ends removed and finely sliced
  • 4 scallions, ends trimmed and finely sliced
  • 2 tablespoons sesame oil
  • Juice of 1 mandarin (cut crosswise and squeeze into a jar over a strainer)
  • 1 tablespoon white sesame seeds
  • 1/4 cup xylitol

Instructions

  1. Prepare the vegetables: Finely slice the red and green cabbage. Remove ends and finely slice the romaine lettuce. Trim ends of scallions and finely slice both the white and green parts. Peel and grate the carrots or use a mini food processor to finely chop them.
  2. Peel the satsuma mandarins and remove the pith from the slices for a cleaner taste.
  3. In a large bowl, combine the sliced cabbages, romaine lettuce, scallions, and carrots. Add the shredded chicken to the bowl.
  4. In a separate small jar, combine the apple cider vinegar, extra virgin olive oil, sesame oil, mandarin juice, kosher salt, black pepper, and xylitol. Shake well until the dressing is emulsified.
  5. Pour the dressing over the salad ingredients and toss to combine thoroughly, ensuring the dressing is evenly distributed.
  6. Garnish the salad with black and white sesame seeds as well as the peeled mandarin slices.
  7. Serve immediately or refrigerate for up to 2 hours before serving to allow the flavors to meld together.

Tips

For the best results, use fresh, organic vegetables to ensure maximum flavor and nutrition. If you prefer your chicken warm, add it to the salad just before serving. This salad can be made ahead of time; simply store the dressing separately and combine just before serving to keep the vegetables crisp.

Variations & Substitutions

Feel free to customize this salad to suit your tastes. You can substitute the bone-in chicken breasts with boneless skinless chicken thighs for a richer flavor. If you don’t have xylitol, stevia or monk fruit sweetener can be used as alternatives. For a nutty twist, add a handful of toasted almonds or cashews.

Storage

Store the salad and dressing separately in the refrigerator. The salad can be kept for up to 2 days, while the dressing can last up to a week. Combine them just before serving for optimal freshness and texture.

FAQ

Can I make this salad vegetarian?

Yes, you can make this salad vegetarian by omitting the chicken and adding more vegetables or plant-based protein like tofu or chickpeas.

Is it necessary to use both black and white sesame seeds?

Using both black and white sesame seeds adds visual appeal and a slight difference in flavor, but you can use just one type if that’s what you have on hand.

What can I use instead of mandarin juice?

If mandarins are not available, you can substitute with orange juice or even lemon juice for a different citrus flavor.

Nutrition

This salad is packed with nutrients, including vitamins C and K from the cabbages and mandarins, healthy fats from the olive oil and sesame oil, and protein from the chicken. It’s a balanced meal that’s low in calories, making it ideal for a light lunch or dinner.

Conclusion

Our Gluten Free Dairy Free Sugar Free Chinese Chicken Salad is the perfect dish for those looking to enjoy a nutritious, satisfying meal without compromising on flavor. Whether you’re catering to dietary restrictions or simply seeking a healthier option, this salad will not disappoint. Try it for your next gathering or as a delicious meal prep option, and enjoy a taste of nostalgia with every bite.

Related update: Gluten Free Dairy Free Sugar Free Chinese Chicken Salad

Related update: Pulled Pork Sandwich with Mango BBQ sauce

Related update: Acorn Squash Biscuits with Sage & Gruyere

Bacalhau Macau | Made by Meaghan Moineau

Bacalhau Macau: A Taste of Tradition and Comfort

Intro

There’s something magical about recipes that have stood the test of time, passed down through generations, and cherished by families. Bacalhau Macau is one such dish that brings back fond memories of my grandmother’s kitchen, where the air was always filled with the rich aroma of spices and the comforting warmth of family gatherings. I remember sitting at the wooden table, eagerly waiting for the first bite of those golden, crispy fish cakes that she lovingly prepared. This recipe is a tribute to those cherished moments, a blend of tradition and flavor that I am delighted to share with you.

Why You’ll Love It

Bacalhau Macau is not just a dish; it’s an experience. You’ll love it for its delightful combination of textures and flavors. The crispy outer layer contrasts beautifully with the creamy, savory filling. The fusion of salt cod with aromatic herbs and spices creates a burst of flavor in every bite. Whether you’re serving it as an appetizer or a main course, Bacalhau Macau is sure to impress your family and friends.

Ingredients

  • 1 cup Japanese breadcrumbs
  • 2 tablespoons butter
  • 2 tablespoons chopped cilantro
  • 1 large egg
  • 1 egg white
  • 2 cloves garlic, minced
  • 1 tablespoon minced ginger
  • 2 green onions, sliced
  • 2 russet (Idaho) potatoes, peeled and diced
  • 1/4 cup oil-cured olives, chopped
  • 1/2 teaspoon salt
  • 1 pound salt cod fillets, soaked and shredded
  • 1 tablespoon sesame oil
  • 1/2 cup whipping cream
  • 1/4 teaspoon white pepper
  • Vegetable oil for frying

Instructions

  1. Place cod in a bowl and cover with cold water. Soak for 6 to 8 hours, changing the water once or twice. Drain, rinse very well and pat dry. Shred fish with your fingers.
  2. Pour 3 inches of water into a medium saucepan and bring to a boil. Add the diced potatoes, and cook until tender, 10 to 12 minutes. Drain the potatoes, return them to the pan briefly. Mash the potatoes until smooth, then whisk in the butter.
  3. Stir the cod into the mashed potatoes. Stir in the green onion, cilantro, olives, egg white, sesame oil, salt, garlic, ginger, and pepper.
  4. In a chilled bowl, whip the cream until it holds soft peaks. Gently fold the whipped cream into the cod mixture with a rubber spatula.
  5. Using two large soupspoons, form about 3 tablespoons of the cod-potato mixture into an oval fish cake. Set the cod cake on a baking sheet and repeat with the remaining potato mixture.
  6. Spread the breadcrumbs on a plate. Beat the egg in a wide, shallow bowl. Dip each cod cake into the egg, turning it gently to coat all sides. Allow any excess egg to drip back into the bowl, then roll the cake in breadcrumbs to coat all sides. Set the coated fish cakes on a baking sheet.
  7. Place a large skillet over medium heat and pour in 1/4 inch of vegetable oil. When the oil is hot – a corner of a cod cake will give off a lively sizzle when dipped in the oil – add as many of the fish cakes to the skillet as will fit without touching each other. Cook, turning once, until golden brown, about 5 to 7 minutes.
  8. Remove the fish cakes with a slotted spoon and drain them on paper towels. If necessary, repeat with the remaining cod cakes. Serve warm.

Tips

For the best results, make sure the whipping cream is well chilled before whipping to achieve the perfect soft peaks. Additionally, ensure that the oil is hot enough before frying the fish cakes; otherwise, they may absorb too much oil and become greasy. If you find salt cod difficult to find, many specialty stores or online retailers carry it year-round.

Variations & Substitutions

Feel free to experiment with this recipe by adding your favorite herbs or spices. A dash of smoked paprika or a pinch of chili flakes can add an exciting twist. If you’re seeking a gluten-free option, substitute the Japanese breadcrumbs with gluten-free breadcrumbs available at most grocery stores.

Storage

Any leftover fish cakes can be stored in an airtight container in the refrigerator for up to three days. To reheat, place them in a preheated oven at 350°F (175°C) for about 10 minutes or until warmed through. Avoid microwaving, as it can make the fish cakes soggy and less appetizing.

FAQ

Can I use fresh cod instead of salt cod?

While fresh cod can be used, it won’t provide the same depth of flavor as salt cod. However, if you choose to use fresh cod, make sure to adjust the seasoning as needed since the salt content will differ.

Is it necessary to soak the salt cod for so long?

Yes, soaking the salt cod is crucial to remove excess salt and rehydrate the fish. If not soaked properly, the dish may end up too salty. Make sure to change the water at least once during the soaking process.

Nutrition

This recipe yields 4 servings. Each serving contains approximately 400 calories, 20g of protein, 35g of carbohydrates, and 20g of fat. It’s a deliciously balanced meal that’s rich in flavor and nutrients.

Conclusion

Bacalhau Macau is more than just a recipe; it’s a celebration of rich culinary heritage and the joy of sharing meals with loved ones. Whether you’re recreating family memories or trying it for the first time, this dish promises to bring warmth and comfort to your table. I hope you enjoy making and savoring these delightful fish cakes as much as my family and I do. Bon appétit!

Related update: Bacalhau Macau

Ancient Grains Bread | Made by Meaghan Moineau

Ancient Grains Bread: A Nourishing Journey Back in Time

Intro

There’s something incredibly comforting about the aroma of freshly baked bread wafting through the house. It transports me back to my grandmother’s kitchen, where the clatter of vintage pots and the warmth of her old oven created a sanctuary of love and nourishment. Her bread, always an eclectic mixture of grains, was not just food, but a testament to resilience and tradition. Today, I want to share with you a recipe that echoes those cherished memories: Ancient Grains Bread. This hearty loaf combines the wholesome goodness of grains rooted in history, offering a taste that’s both rustic and refined.

Why You’ll Love It

This Ancient Grains Bread isn’t just any bread; it’s a journey through time. Each bite is packed with nutrients and flavors that tell a story of ancient civilizations and traditional baking methods. You’ll love it for its rich, earthy taste and delightful texture that pairs beautifully with both sweet and savory toppings. Plus, it’s a versatile addition to any meal, whether you’re toasting it for breakfast or serving it alongside a comforting soup for dinner.

Ingredients

  • 2 teaspoons yeast
  • 2 1/2 cups flour
  • 1 cup whole wheat flour
  • 1/2 cup rye flakes
  • 1/4 cup ground flaxseed
  • 1/4 cup amaranth grain
  • 1/4 cup quinoa
  • 1/4 cup soy flour
  • 2 tablespoons vital wheat gluten
  • 2 tablespoons skim milk powder
  • 1 1/2 teaspoons salt
  • 1 1/2 cups warm water
  • 2 tablespoons honey

Instructions

  1. In a large bowl or stand mixer, whisk together the yeast, flours, rye flakes, flaxseed, amaranth, quinoa, soy flour, wheat gluten, skim milk powder, and salt.
  2. Stir in the warm water and honey, mixing thoroughly to form a cohesive, fairly firm (but workable) dough.
  3. Turn out onto a floured board or knead with the dough hook for 12 minutes, until very elastic and smooth.
  4. Place into a bowl, cover and allow to rest for 30 minutes.
  5. Roll rested dough into a log shape and tuck it into a greased loaf pan.
  6. Cover with a clean towel and allow to rise for 50-60 minutes.
  7. Preheat the oven to 350°F (175°C).
  8. Slash the top of the loaf 2-3 times with a sharp knife or lame.
  9. Bake for 40 minutes.
  10. Turn out of the pan immediately and cool on a rack before slicing.

Tips

For the best results, make sure your yeast is fresh and active. If you’re unsure, proof it by dissolving it in a small amount of warm water with a pinch of sugar. It should become foamy within a few minutes. Additionally, be patient with the kneading process; it’s essential to develop the gluten network that gives this bread its wonderful texture.

Variations & Substitutions

Feel free to get creative with the grains and flours in this recipe. You can substitute spelt flour for the whole wheat flour or add a handful of sunflower seeds for extra crunch. If you prefer a gluten-free version, experiment with gluten-free flour blends and adjust the liquid as needed to achieve the right dough consistency.

Storage

Store your Ancient Grains Bread in a bread box or wrapped in a clean kitchen towel at room temperature for up to 3 days. For longer storage, slice the bread and freeze it in an airtight container or bag. Simply toast the slices straight from the freezer when you’re ready to enjoy them.

FAQ

Can I make this bread without a stand mixer?

Absolutely! While a stand mixer simplifies the process, you can knead the dough by hand. It might take a bit longer, but the therapeutic rhythm of kneading can be quite rewarding. Aim for a smooth and elastic dough, which should take about 12-15 minutes of hand kneading.

What can I use instead of honey?

If you prefer not to use honey, maple syrup or agave nectar are excellent substitutes that will provide similar sweetness and moisture to the dough.

Is it necessary to slash the top of the loaf?

Slashing the top of the loaf is not strictly necessary, but it allows the bread to expand evenly during baking and gives it a rustic look. If you skip this step, the loaf may crack unpredictably.

Nutrition

Each slice of this Ancient Grains Bread is a powerhouse of nutrition. Packed with fiber, protein, and essential vitamins and minerals, it’s a fantastic way to support a balanced diet. The incorporation of whole grains and seeds provides sustained energy and aids digestion.

Conclusion

Baking Ancient Grains Bread is more than crafting a loaf; it’s about connecting with the past and savoring the simple pleasures of homemade goodness. Whether you’re a seasoned baker or a curious beginner, this recipe invites you to explore the rich textures and flavors of ancient grains. So, tie on your apron, dust your counter with flour, and embark on this delightful baking journey. Your kitchen will soon be filled with the heartwarming aroma of tradition and love.

Related update: Ancient Grains Bread

Related update: Ancient Grains Bread

5 Minute Xocai Chocolate Mug Cake | Made by Meaghan Moineau

5 Minute Xocai Chocolate Mug Cake

Intro

There’s something undeniably comforting about chocolate cake. As a child, I remember the warm aroma of chocolate wafting through the house, signaling that a delightful treat was soon to be served. My grandmother would bake the most delicious chocolate cakes, and every bite was a taste of pure love. Fast forward to today, and while life has gotten busier, my love for chocolate cake remains. That’s why I’m thrilled to share this quick and easy recipe for a Xocai Chocolate Mug Cake. In just 5 minutes, you can enjoy a decadent dessert that will transport you back to those cozy, carefree days.

Why You’ll Love It

This Xocai Chocolate Mug Cake is perfect for those moments when you’re craving something delicious but short on time. Here are a few reasons why you’ll fall in love with this recipe:

  • Quick and Easy: Ready in just five minutes, this mug cake is the ultimate quick fix for your chocolate cravings.
  • Rich and Decadent: Made with high-quality dark chocolate, this cake offers a rich and indulgent flavor.
  • Single-Serving Bliss: Perfect for when you want a treat without the temptation of a whole cake.
  • Minimal Cleanup: Mixed and cooked in the same mug, it keeps the washing up to a minimum.

Ingredients

  • 2 tablespoons dark chocolate (chopped)
  • 1 large egg
  • 3 tablespoons all-purpose flour
  • 1 tablespoon honey
  • 3 tablespoons milk
  • 1/4 teaspoon vanilla extract

Instructions

  1. In a coffee mug, combine the egg, milk, honey, and vanilla extract. Mix together with a fork until well combined.
  2. Add the flour and chopped dark chocolate to the mug. Mix again until the batter is smooth and the chocolate is evenly distributed.
  3. Place the mug in the microwave and cook on high power for 3 minutes. The cake will rise slightly over the top of the mug as it cooks.
  4. Once cooked, allow the mug cake to cool for a minute or two. You can enjoy it straight from the mug or tip it out onto a plate if desired.
  5. Serve while warm, and enjoy your quick and delicious chocolate indulgence!

Tips

  • Watch the Cooking Time: Microwave power can vary, so keep an eye on your mug cake as it cooks to prevent overcooking.
  • Mix Thoroughly: Ensure all ingredients are well combined to avoid any pockets of dry flour.
  • Choose Quality Chocolate: The better the chocolate, the richer the flavor. Opt for a high-quality dark chocolate for the best results.

Variations & Substitutions

This versatile recipe can be tweaked to suit your preferences:

  • Chocolate Chips: Add a tablespoon of chocolate chips for extra gooeyness.
  • Nut Butter Swirl: Swirl in a teaspoon of peanut butter or almond butter for a nutty twist.
  • Gluten-Free: Substitute the all-purpose flour with almond or coconut flour for a gluten-free version.
  • Sugar Substitute: Replace honey with a sugar-free alternative like stevia or monk fruit sweetener.

Storage

This mug cake is best enjoyed fresh and warm. However, if you have leftovers, you can store them in an airtight container in the fridge for up to two days. When ready to enjoy, reheat gently in the microwave for 20-30 seconds.

FAQ

Can I use a different type of chocolate?

Absolutely! While dark chocolate adds a rich flavor, you can use milk chocolate or even white chocolate for a different taste. Just keep in mind that the sweetness level will vary accordingly.

What if I don’t have honey?

No worries! You can substitute honey with maple syrup, agave nectar, or even regular sugar. Adjust the quantity to taste, as these substitutes may vary in sweetness.

Can I make this mug cake vegan?

Yes, you can make a vegan version by using plant-based milk (such as almond or soy), a flax egg (1 tablespoon ground flaxseed mixed with 2.5 tablespoons water), and a vegan chocolate substitute.

Nutrition

While I don’t have exact nutritional information, this mug cake is a sweet treat that should be enjoyed in moderation. If you’re mindful of your sugar or calorie intake, consider some of the substitutions mentioned above.

Conclusion

There you have it — a quick, easy, and absolutely delicious 5 Minute Xocai Chocolate Mug Cake. Perfect for a spontaneous treat or a cozy night in, this mug cake will satisfy your chocolate cravings in no time. So go ahead, indulge in a little sweet nostalgia, and enjoy every bite!

Related update: 5 Minute Xocai Chocolate Mug Cake

Fresh Tomato Mozzarella Side Salad | Made by Meaghan Moineau

Fresh Tomato Mozzarella Side Salad

Intro

There’s something incredibly nostalgic about the combination of fresh tomatoes, creamy mozzarella, and fragrant basil. Every summer, as a child, I would watch my grandmother create this simple yet elegant salad with tomatoes freshly plucked from her garden. The vibrant reds, the pure whites, and the deep greens would come together on a plate, creating a symphony of colors and flavors. This Fresh Tomato Mozzarella Side Salad is a tribute to those cherished summer days, a recipe that brings warmth and simplicity to your table.

Why You’ll Love It

This salad is the epitome of freshness and simplicity. The juicy roma tomatoes paired with creamy mozzarella and aromatic basil create a delightful flavor profile that is hard to resist. Whether you’re looking for a quick side dish for a family dinner or a sophisticated starter for a dinner party, this salad is versatile enough to fit any occasion. It’s a celebration of fresh ingredients, easy to prepare, and full of healthy, wholesome goodness.

Ingredients

  • Balsamic vinegar
  • Shredded fresh basil leaves
  • Extra virgin olive oil
  • Kosher salt
  • Fresh Bel Gioioso mozzarella
  • 6 roma tomatoes

Instructions

  1. Slice the mozzarella into 1/2 inch slices.
  2. Slice the tomatoes into similar-sized slices.
  3. Arrange the slices by alternating the mozzarella and tomatoes in a neat row on a serving platter.
  4. Drizzle the arranged slices with extra virgin olive oil followed by balsamic vinegar.
  5. Sprinkle a pinch of Kosher salt over the salad for enhanced flavor.
  6. Stack about 4 basil leaves together and roll them up tightly like a log.
  7. Using a sharp knife, make diagonal slices along the rolled basil leaves to create thin strips.
  8. Loosen the strips and sprinkle them over the mozzarella and tomato slices.
  9. Chill the salad for at least 15 minutes before serving to allow the flavors to meld.

Tips

For the best flavor, choose ripe, firm tomatoes and high-quality mozzarella. If possible, use freshly picked basil from a garden or local market to maximize the aroma and taste. Drizzling the salad just before serving ensures that the tomatoes stay fresh and avoid becoming soggy.

Variations & Substitutions

If you want to switch things up, try using heirloom tomatoes for a burst of color and different textures. For a twist on the classic, you can substitute the mozzarella with burrata cheese for an extra creamy experience. If you prefer a touch of sweetness, consider adding a few slices of ripe peaches or nectarines to the salad. For a more robust flavor, a splash of lemon juice can be added to the olive oil before drizzling.

Storage

This salad is best enjoyed fresh but can be stored in an airtight container in the refrigerator for up to 2 days. If you plan to store it, avoid adding the balsamic vinegar until just before serving to prevent the tomatoes from becoming soggy.

FAQ

Can I make this salad ahead of time?

Yes, you can prepare the ingredients ahead and store them separately. Slice the mozzarella, tomatoes, and basil, but only assemble and dress the salad just before serving to maintain its freshness and texture.

What can I serve with this salad?

This salad pairs beautifully with grilled meats, such as chicken or steak, and goes well with crusty bread. It can also be served as a light appetizer before a heavier meal.

Nutrition

This Fresh Tomato Mozzarella Side Salad is not only delightful but also nutritious. Rich in vitamins A and C from the tomatoes, calcium from the mozzarella, and healthy fats from the olive oil, it’s a healthy choice that doesn’t compromise on flavor. It’s a perfect choice for those who are health-conscious but still want to enjoy delicious food.

Conclusion

The Fresh Tomato Mozzarella Side Salad is a testament to the beauty of simple, fresh ingredients coming together to create something truly special. Whether you’re looking to reminisce about summer days gone by or wanting to bring a bit of freshness to your current meal, this salad is sure to please. Enjoy it with loved ones, and let it become a staple in your culinary repertoire, just as it has in ours.

Related update: Fresh Tomato Mozzarella Side Salad

Related update: Bacalhau Macau

Related update: Gluten Free Dairy Free Sugar Free Chinese Chicken Salad

Easy Chicken Cordon Bleu | Made by Meaghan Moineau

Easy Chicken Cordon Bleu

Intro

Chicken Cordon Bleu is a classic dish that never fails to impress, and it holds a special place in my heart. I vividly remember the first time I tasted this delightful creation. It was during a family gathering at my grandmother’s house, where the air was filled with warmth, laughter, and the irresistible aroma of delicious food. My grandmother, with her gentle hands and loving smile, served us her special version of Chicken Cordon Bleu, and I was instantly captivated by its rich flavors and tender texture. Today, I’m excited to share with you a simple and easy-to-follow recipe that brings back those cherished memories, and I hope it becomes a favorite in your home too.

Why You’ll Love It

This Easy Chicken Cordon Bleu is perfect for both novice cooks and seasoned chefs. It’s a dish that combines the savory flavors of ham and cheese with tender, juicy chicken, all wrapped up in a crispy breadcrumb coating. Here are a few reasons why you’ll love this recipe:

  • Simple Ingredients: You probably already have most of the ingredients at home.
  • Quick Preparation: With just a few straightforward steps, you’ll have a gourmet meal ready in no time.
  • Kid-Friendly: The cheesy, crispy goodness is sure to be a hit with both kids and adults alike.
  • Customizable: Easily adapt the recipe to suit your taste preferences or dietary needs.

Ingredients

  • 4 skinless boneless chicken breasts
  • 4 slices of ham
  • 8 sticks of cheddar cheese (or more if you love cheese!)
  • Salt
  • Ground peppercorn
  • Bread crumbs
  • Flour
  • 1 egg, beaten
  • Butter (for layering)

Instructions

  1. Preheat your oven to 180°C (356°F).
  2. Gently pound the chicken breasts to about 1/4-inch thickness using a meat mallet.
  3. Season both sides of the chicken with salt and ground pepper.
  4. Place one slice of ham and two sticks of cheddar cheese on top of each chicken breast. Feel free to add more cheese if you love it as much as I do!
  5. Roll up each breast and secure with a toothpick to hold its shape.
  6. Dredge each roll in flour, ensuring an even coat.
  7. Brush each roll with the beaten egg.
  8. Roll the chicken in the bread crumbs mixture until fully coated.
  9. Brush a baking pan with olive oil, then place the chicken rolls on it.
  10. Bake in the preheated oven for about 20 minutes.
  11. Layer each roll with butter cubes. Allow the butter to melt on top, enhancing the aroma and flavor.
  12. Bake for another 15 minutes until golden and fully cooked.
  13. Serve hot, optionally with your favorite sauce.

Tips

  • For an extra crispy coating, use panko breadcrumbs instead of regular bread crumbs.
  • Ensure the chicken is pounded evenly to cook uniformly.
  • Let the chicken rest for a few minutes before slicing to lock in the juices.

Variations & Substitutions

This recipe is wonderfully adaptable. Here are some ideas to make it your own:

  • Cheese: Swap cheddar cheese for Swiss or Gruyère for a more traditional flavor.
  • Ham: Use turkey or prosciutto for a different taste profile.
  • Gluten-Free: Substitute regular flour and breadcrumbs with gluten-free versions.
  • Herbs: Add fresh herbs like thyme or parsley to the breadcrumb mixture for added flavor.

Storage

Leftover Chicken Cordon Bleu can be stored in an airtight container in the refrigerator for up to 3 days. To reheat, place the rolls in a preheated oven at 180°C (356°F) for about 10 minutes or until warmed through. Avoid using the microwave, as it can make the chicken rubbery.

FAQ

Can I prepare Chicken Cordon Bleu in advance?

Yes, you can prepare the chicken rolls up to the point of baking, then cover and refrigerate them for up to 24 hours. When you’re ready to serve, simply bake them as directed, adding a few extra minutes to the cooking time if needed.

What sauce goes well with Chicken Cordon Bleu?

There are several sauces that pair beautifully with Chicken Cordon Bleu. A classic choice is a creamy Dijon mustard sauce. Alternatively, you could try a mushroom or white wine sauce for a gourmet twist.

Nutrition

While nutritional content can vary based on ingredient brands and portion sizes, each roll of Chicken Cordon Bleu generally contains approximately:

  • Calories: 400
  • Protein: 35g
  • Fat: 20g
  • Carbohydrates: 15g
  • Fiber: 1g
  • Sugar: 1g

Conclusion

This Easy Chicken Cordon Bleu is a delightful dish that combines simplicity with elegance, making it perfect for any occasion. Whether you’re hosting a dinner party or simply enjoying a cozy meal with family, this recipe is sure to become a treasured favorite. I hope you find as much joy in making and sharing it as I do. Enjoy!

Related update: Easy Chicken Cordon Bleu

Shortbread Lemon Bars | Made by Meaghan Moineau

Shortbread Lemon Bars

Intro

There’s something incredibly nostalgic about baking, especially when it involves the zesty burst of fresh lemons and the buttery, crumbly texture of shortbread. Growing up, my grandmother would always have a tray of her famous lemon bars waiting on the kitchen counter when we visited her during the summer. The sweet, tangy aroma would greet us at the door, promising a delightful treat after a day of playing outside. These Shortbread Lemon Bars are a tribute to her recipe, with a few little tweaks of my own. They capture the essence of those cherished childhood afternoons in the kitchen, filled with laughter, love, and the simple joy of homemade dessert.

Why You’ll Love It

This recipe for Shortbread Lemon Bars is perfect for so many reasons:

  • Easy to Make: With simple ingredients and straightforward steps, these bars are perfect for both novice and experienced bakers.
  • Bright and Tangy Flavor: Fresh lemon juice and zest provide a vibrant citrus flavor that pairs beautifully with the buttery shortbread crust.
  • Perfect for Any Occasion: Whether it’s a family gathering, a potluck, or just a sweet treat for yourself, these lemon bars are always a hit.
  • Make-Ahead Friendly: These bars can easily be made ahead of time and stored, making them convenient for busy schedules.

Ingredients

  • 1 cup all-purpose flour
  • 1/2 cup powdered sugar
  • 1/4 teaspoon salt
  • 1/2 cup unsalted butter, softened
  • 3/4 cup granulated sugar
  • 2 tablespoons all-purpose flour
  • 2 large eggs
  • 1/3 cup fresh lemon juice
  • 2 tablespoons fat milk
  • 1 tablespoon lemon zest
  • Powdered sugar for dusting

Instructions

  1. Preheat your oven to 350°F (175°C).
  2. Coat an 8-inch square baking pan with non-stick cooking spray or line it with foil for easy removal.
  3. In a large mixing bowl, combine 1 cup of flour, 1/2 cup of powdered sugar, and 1/4 teaspoon of salt.
  4. Add 1/2 cup of softened unsalted butter to the flour mixture.
  5. Using a fork or your fingers, crumble the butter into the flour mixture until it resembles coarse meal.
  6. Press this mixture evenly over the bottom of the prepared pan to form the crust.
  7. Refrigerate the crust for 15 minutes to set.
  8. Bake the crust for about 20 minutes, or until it is golden brown.
  9. While the crust bakes, prepare the filling. In a medium mixing bowl, combine 3/4 cup of granulated sugar and 2 tablespoons of flour.
  10. Whisk in the 2 large eggs until well combined.
  11. Add 1/3 cup of fresh lemon juice, 2 tablespoons of fat milk, and a pinch of salt to the egg mixture; stir to combine.
  12. Pour the lemon filling over the baked crust.
  13. Sprinkle 1 tablespoon of lemon zest evenly over the filling.
  14. Return the pan to the oven and bake for an additional 20 minutes, or until the filling is firmly set.
  15. Allow the bars to cool on a rack.
  16. Once cool, remove the bars from the pan and cut them into 9 squares.
  17. Dust with powdered sugar before serving for an extra touch of sweetness.

Tips

  • For the best flavor, use freshly squeezed lemon juice and freshly grated lemon zest.
  • To ensure even baking, make sure the crust is uniformly pressed into the bottom of the pan.
  • If you prefer a less sweet dessert, reduce the amount of powdered sugar in the crust slightly.

Variations & Substitutions

Feel free to experiment with this recipe by adding your own twist:

  • Gluten-Free Option: Substitute the all-purpose flour with a gluten-free flour blend.
  • Vegan Version: Use a plant-based butter and substitute the eggs with a flaxseed egg alternative (1 tablespoon ground flaxseed mixed with 3 tablespoons water per egg).
  • Flavor Variations: Add a touch of vanilla extract to the filling for a different flavor profile, or try using lime juice and zest for a lime twist.

Storage

Store these Shortbread Lemon Bars in an airtight container in the refrigerator for up to a week. You can also freeze them for up to three months. To freeze, wrap each bar individually in plastic wrap and place them in a freezer-safe bag. Thaw in the refrigerator before serving.

FAQ

Can I use bottled lemon juice instead of fresh?

While bottled lemon juice can be used in a pinch, I highly recommend using fresh lemons for the best flavor and aroma. Fresh juice has a brightness that bottled simply can’t match.

How do I know when the lemon bars are done baking?

The filling should be set and not jiggle in the center when the bars are done. You can also test by inserting a toothpick into the center; it should come out mostly clean with a few moist crumbs.

Can I make these bars in advance?

Absolutely! These bars are perfect for making ahead of time. Simply bake them and allow them to cool completely before storing. They taste even better the next day as the flavors have more time to meld together.

Nutrition

Each serving of Shortbread Lemon Bars (1 bar) contains approximately 220 calories, 11g of fat, 29g of carbohydrates, 2g of protein, and 15g of sugar. Please note that these values are estimates and can vary based on the specific ingredients used.

Conclusion

These Shortbread Lemon Bars are a delightful blend of tart and sweet, making them a perfect dessert for any occasion. Their buttery crust and zesty lemon filling are sure to impress anyone who tries them. Whether you’re baking them for a special gathering or simply to enjoy with a cup of tea, these bars promise a taste of sunshine in every bite. I hope this recipe brings as much joy to your home as it has to mine. Happy baking!

Related update: Shortbread Lemon Bars

Related update: 5 Minute Xocai Chocolate Mug Cake

Chili-Garlic Stir Fry | Made by Meaghan Moineau

Chili-Garlic Stir Fry

Intro

There’s something magical about the sizzling sound of a stir fry in the making. It takes me back to my childhood kitchen, where my grandmother would prepare her famous stir fries with a touch of chili and a hint of garlic. The aroma would fill the air, drawing us in with its enticing scent. This Chili-Garlic Stir Fry recipe is a homage to those cherished memories, blending the comfort of home-cooked meals with the vibrant flavors of Asian cuisine. It’s quick, full of color, and perfect for a busy weeknight dinner or a leisurely weekend meal.

Why You’ll Love It

This Chili-Garlic Stir Fry is not only delicious but also incredibly versatile and easy to make. Here are a few reasons why you’ll fall in love with it:

  • Quick and Easy: With just a few simple steps, you can have a flavorful meal ready in under 30 minutes.
  • Healthy and Nutritious: Packed with lean protein and fresh vegetables, this stir fry is a nutritious choice for any meal.
  • Customizable: You can easily switch up the ingredients based on what’s in your fridge or your personal preferences.
  • Deliciously Spicy: The hint of chili adds just the right amount of heat to keep things exciting.

Ingredients

  • 3 teaspoons sesame oil, divided
  • 1 pound skinless boneless chicken breast, sliced thin
  • 1 bunch bok choy, stalks separated from leaves
  • 1 cup snow peas
  • 1 cup carrots, sliced
  • 1 yellow bell pepper, sliced
  • 1 orange pepper, sliced
  • 3 green onions, chopped
  • 1 cup low sodium chicken broth
  • 2 tablespoons cooking sherry
  • 1 tablespoon cornstarch
  • 1 tablespoon sriracha, or to taste
  • 2 cloves garlic, minced

Instructions

  1. In a wok or large skillet, heat 1 teaspoon sesame oil over medium-high heat. Add chicken and sauté until cooked through, about 5-7 minutes. Remove from pan, set aside, and cover to keep warm.
  2. In the same pan, heat another teaspoon of sesame oil over medium-high heat. Add bok choy stalks, carrots, and snow peas. Sauté until just tender, about 3-5 minutes. Remove from pan, set aside, and cover.
  3. In a medium bowl, whisk together chicken broth, cooking sherry, cornstarch, and sriracha. Set aside.
  4. Heat the remaining teaspoon of sesame oil in the pan over medium-high heat. Add minced garlic and sauté until fragrant, about 30 seconds to 1 minute.
  5. Add the prepared sauce to the pan and bring to a boil. Stir continuously until the sauce thickens, about 1-2 minutes.
  6. Return the chicken and vegetables to the pan. Add the bok choy leaves and green onions. Stir until everything is well coated with the sauce and heated through, about 2-3 minutes.
  7. Serve hot, garnished with additional green onions if desired.

Tips

  • For best results, make sure to slice the chicken thinly for quick and even cooking.
  • Prep all your ingredients before starting to cook as the stir fry process moves quickly.
  • Adjust the sriracha to suit your spice preference. If you prefer less heat, start with half the amount and add more to taste.

Variations & Substitutions

This stir fry is incredibly versatile, and you can easily make substitutions based on your dietary needs or what you have on hand:

  • Protein: Swap the chicken for shrimp, tofu, or beef for a different flavor profile.
  • Vegetables: Feel free to add or substitute other vegetables like broccoli, bell peppers, or snap peas.
  • Sauce: You can replace the sriracha with another hot sauce or omit it altogether if you prefer a milder dish.

Storage

Store any leftovers in an airtight container in the refrigerator for up to 3 days. Reheat gently on the stovetop or in the microwave, adding a splash of water or chicken broth to loosen the sauce if needed.

FAQ

Can I make this stir fry ahead of time?

Yes, you can prepare the vegetables and sauce ahead of time. Store them separately in the refrigerator for up to two days. Cook the chicken and vegetables just before serving for the freshest taste.

What can I serve with this stir fry?

This stir fry pairs perfectly with steamed rice, quinoa, or noodles. You can also serve it with a simple side salad for a complete meal.

Nutrition

This stir fry is a healthy option, packed with protein, fiber, and vitamins. It’s low in calories and can be adjusted to fit low-carb or gluten-free diets by substituting ingredients as needed.

Conclusion

This Chili-Garlic Stir Fry is a delightful dish that brings together the warmth of nostalgic flavors with the freshness of vibrant vegetables. It’s a dish that celebrates simplicity and versatility, making it a staple in any kitchen. Whether you’re cooking for yourself, your family, or friends, this recipe is sure to impress with its bold flavors and beautiful presentation. I hope you enjoy making and sharing this dish as much as I do!

Related update: Easy Chicken Cordon Bleu

Brown sugar & Spice Sugar cookie frogs | Made by Meaghan Moineau

Brown Sugar & Spice Sugar Cookie Frogs

Intro

There is something magical about the aroma of freshly baked cookies wafting through the house. It reminds me of my childhood, when my grandmother would let me sneak a taste of cookie dough while she carefully rolled and cut the cookies, her hands perfectly steady despite her age. Over the years, I have carried forward her tradition of baking for every special occasion, but with my own twist. These Brown Sugar & Spice Sugar Cookie Frogs are a tribute to those cherished memories. The warm spices combined with the sweetness of brown sugar create a delightful cookie that both kids and adults will love.

Why You’ll Love It

These cookies are not only cute and whimsical, but they’re also packed with flavor. The combination of cinnamon, ginger, nutmeg, and allspice gives them a warm, cozy spice, perfect for any season. The brown sugar adds a depth of sweetness that pairs beautifully with the buttery richness of the cookie. Plus, they’re incredibly fun to make, especially with little helpers who will enjoy cutting out the frog shapes. Whether you’re baking for a family gathering, a holiday, or just because, these cookies are sure to bring smiles to everyone who tries them.

Ingredients

  • 2 1/2 cups unbleached all-purpose flour
  • 1 teaspoon baking powder
  • 1 teaspoon ground cinnamon
  • 1/2 teaspoon ground ginger
  • 1/4 teaspoon ground nutmeg
  • 1/4 teaspoon ground allspice
  • 3/4 cup granulated sugar
  • 3/4 cup light brown sugar, packed
  • 1 cup unsalted butter, softened
  • 1 large egg
  • 1 teaspoon vanilla extract

Instructions

  1. Whisk the flour, baking powder, cinnamon, ginger, nutmeg, and allspice together in a medium bowl. Set aside.
  2. In a large bowl, cream the granulated sugar, brown sugar, and butter together until light and fluffy.
  3. Add the egg and vanilla extract to the butter mixture and mix until well-blended.
  4. Gradually add the flour mixture to the wet ingredients, beating just until combined. Be sure to scrape down the sides and bottom of the bowl to incorporate all ingredients. If necessary, knead in any stray bits of flour by hand.
  5. Roll the dough out on a floured surface to about 1/4 inch thickness. Cut into frog shapes using a cookie cutter.
  6. Place the cookies on parchment-lined baking sheets, leaving a bit of space between them.
  7. Bake in a preheated oven at 350°F (175°C) for 9-12 minutes, depending on the size of your cutters, until the edges are lightly golden.
  8. Let the cookies sit on the baking sheet for a few minutes before transferring them to a cooling rack to cool completely.

Tips

For the best results, make sure your butter is softened to room temperature before you start. This will help it cream more easily with the sugars, creating a smooth and fluffy texture. If the dough feels too sticky when rolling, lightly flour your rolling pin and work surface. Lastly, be sure to chill the dough for about 30 minutes if it’s too soft to handle; this will make cutting the shapes much easier.

Variations & Substitutions

If you want to switch things up, try adding some finely chopped nuts for a bit of crunch, or substitute part of the flour with whole wheat flour for a nuttier flavor. You can also experiment with different shapes if frogs aren’t your style—stars and hearts are always popular choices. For a holiday twist, add a pinch of cloves to the spice mix, or glaze the cookies with a simple icing made from powdered sugar and milk after they’ve cooled.

Storage

Store these cookies in an airtight container at room temperature for up to a week. If you want to keep them longer, you can freeze the baked cookies in a freezer-safe container for up to three months. Just make sure to separate layers with parchment paper to prevent sticking. To enjoy, simply thaw at room temperature.

FAQ

Can I make the dough ahead of time?

Yes, you can prepare the dough in advance. Wrap it tightly in plastic wrap and store it in the refrigerator for up to two days. When you’re ready to bake, let it sit at room temperature for a few minutes to make it easier to roll out.

What can I use if I don’t have a frog-shaped cookie cutter?

No worries! You can use any cookie cutter shape you like, or even cut the dough into squares or circles using a knife or a glass. The taste will be just as delightful, no matter the shape.

Can I use dark brown sugar instead of light brown sugar?

Yes, you can use dark brown sugar if that’s what you have on hand. It will give the cookies a slightly deeper molasses flavor, which can be a lovely variation.

Nutrition

These cookies contain approximately 150 calories per serving (2 cookies), with 8g of fat, 20g of carbohydrates, and 2g of protein. They are a delightful treat best enjoyed in moderation.

Conclusion

These Brown Sugar & Spice Sugar Cookie Frogs not only bring a touch of whimsy to your table but also fill your home with the comforting aroma of spices and sweetness. They’re easy to make, delightfully customizable, and perfect for sharing with loved ones. I hope this recipe becomes a cherished part of your baking traditions, just as it has in mine. Happy baking!

Related update: Brown sugar & Spice Sugar cookie frogs

Related update: Shortbread Lemon Bars

Thai Shrimp | Made by Meaghan Moineau

Thai Shrimp: A Flavorful Journey to the Heart of Thailand

Intro

There’s something truly magical about the aroma of Thai cuisine wafting through your kitchen. It reminds me of the first time I visited Thailand. I was wandering through the bustling streets of Bangkok when I stumbled upon a tiny street food stall. The vendor, with a warm smile, served me a dish that would forever change my culinary journey: Thai Shrimp. The combination of fresh basil, spicy chilies, and succulent shrimp immediately captivated my senses. This dish not only brings back fond memories but also allows me to share a piece of Thailand with my loved ones every time I make it. Join me as we recreate this vibrant and flavorful dish in the comfort of your own kitchen.

Why You’ll Love It

This Thai Shrimp recipe is a delightful symphony of flavors and textures. The fragrant basil leaves and spicy chilies create a perfect balance with the savory notes of soy sauce and fish sauce. The shrimp are cooked to perfection, tender yet firm, absorbing the rich broth that envelops them. What makes this dish stand out is its simplicity and quick preparation, making it a perfect choice for a weekday dinner or a special weekend treat.

Ingredients

  • Basil leaves
  • Chicken stock
  • Cooked rice
  • Fish sauce
  • Green onions
  • Peanut oil
  • Red green chilies
  • Cooked shrimp
  • Soy sauce
  • Sugar

Instructions

  1. Peel and devein the shrimp, ensuring they’re clean and ready for cooking.
  2. Wash and dry the basil leaves, then steam them until they are wilted and fragrant.
  3. Mince the garlic cloves and thinly slice the red green chilies, ensuring they are seeded for a milder heat.
  4. Mince the white part of the green onions and cut the green part into 1-inch pieces.
  5. Heat a wok over high heat until it’s hot, then swirl in the peanut oil, heating it almost to smoking point.
  6. Add the minced garlic, sliced chilies, and the white part of the onions to the wok, cooking for 10-15 seconds until aromatic.
  7. Add the shrimp to the wok and stir-fry for about 20 seconds or until they start to change color.
  8. Pour in the fish sauce, soy sauce, sugar, and chicken stock, bringing the mixture to a boil.
  9. Stir in the green parts of the onions and the basil leaves, cooking for another 20 seconds until the basil wilts and the shrimp are firm and pink.
  10. Serve the dish over hot cooked rice, ensuring some of the delicious soup is poured over the rice.

Tips

To ensure the best flavor, use fresh basil leaves and high-quality shrimp. Be cautious with the chilies if you prefer a milder dish, and consider wearing gloves when handling them to avoid skin irritation. If you’re short on time, prep the ingredients ahead of time and store them in the refrigerator until you’re ready to cook.

Variations & Substitutions

If you want to switch things up, consider these variations:

  • Swap the shrimp for chicken or tofu for a different protein source.
  • Use coconut milk instead of chicken stock for a creamier, richer sauce.
  • Add vegetables like bell peppers or snap peas for extra crunch and nutrition.
  • Substitute soy sauce with tamari for a gluten-free option.

Storage

Leftover Thai Shrimp can be stored in an airtight container in the refrigerator for up to 3 days. To reheat, gently warm it in a saucepan over medium heat, adding a splash of chicken stock or water if needed to maintain the soupy consistency. Avoid microwaving to prevent the shrimp from becoming rubbery.

FAQ

Can I make this dish ahead of time?

Yes, you can prepare the ingredients ahead of time and store them in the fridge. However, it’s best to cook the shrimp just before serving to maintain their texture and flavor.

How can I adjust the spiciness of the dish?

To adjust the spiciness, simply reduce the number of chilies or remove the seeds for a milder flavor. You can also add more chilies if you prefer a spicier kick.

What can I use if I don’t have a wok?

If you don’t have a wok, a large skillet or frying pan will work just fine. Ensure it’s hot enough to quickly stir-fry the ingredients, mimicking the wok’s high-heat cooking.

Nutrition

This dish is not only delicious but also nutritious. Shrimp is a great source of protein and low in calories, while basil and chilies provide vitamins and antioxidants. Served with rice, it offers a balanced meal with carbohydrates and essential nutrients.

Conclusion

Cooking Thai Shrimp at home is a wonderful way to bring the exotic flavors of Thailand into your kitchen. It’s a dish that resonates with nostalgia for me, and I hope it becomes a favorite in your household as well. Whether you’re a seasoned cook or a beginner, this recipe is approachable and rewarding. Enjoy the vibrant flavors and the joy of sharing a meal that’s as heartwarming as it is delicious.

Related update: Thai Shrimp

Butternut Squash Frittata | Made by Meaghan Moineau

Butternut Squash Frittata: A Comforting and Nutritious Delight

Intro

As the leaves turn golden and a crisp chill fills the air, my kitchen transforms into a cozy haven of warmth and tantalizing aromas. It reminds me of my childhood, when my grandmother would bring us together with her hearty meals, each one a tapestry of flavors and memories. Among her favorites was a delightful butternut squash frittata, a dish that combines the comfort of home-cooked meals with the vibrant colors of fall. Today, I’m thrilled to share this cherished recipe with you, hoping it brings the same joy and warmth to your table.

Why You’ll Love It

This Butternut Squash Frittata is a perfect balance of simplicity and sophistication, making it a versatile dish for any occasion. Whether you’re hosting a brunch or looking for a quick and healthy dinner option, this frittata is sure to impress. You’ll love how the creamy goat cheese complements the sweet butternut squash, while the liquid egg substitute and non-fat milk keep it light yet satisfying. This dish is not only delicious but also packed with nutrients, making it a guilt-free pleasure.

Ingredients

  • 1 cup chopped butternut squash
  • 1/4 cup crumbled goat cheese
  • 1 cup liquid egg substitute
  • 1/4 cup non-fat milk
  • 1/2 cup chopped bell pepper

Instructions

  1. Preheat your oven to 350°F (175°C).
  2. Spray a 10 oz oven-safe dish with cooking spray.
  3. Add the chopped butternut squash evenly into the dish.
  4. In a measuring cup, combine the liquid egg substitute and non-fat milk. Mix until well combined.
  5. Pour the egg mixture over the butternut squash.
  6. Sprinkle the chopped bell pepper over the top, then add the crumbled goat cheese.
  7. Bake in the preheated oven for 30-35 minutes, or until the middle is slightly firm and set.
  8. Remove from the oven and let it cool for a few minutes before serving.

Tips

To ensure the best results, make sure to cut your butternut squash into even pieces so they cook uniformly. If you’re using fresh squash, consider roasting it lightly beforehand to enhance its natural sweetness. Additionally, if your oven runs hot, keep an eye on the frittata to prevent overcooking.

Variations & Substitutions

Feel free to get creative with this frittata! Swap the goat cheese for feta or cheddar if you prefer a different flavor profile. For a heartier version, add cooked bacon or sausage. Vegetarians can boost the veggie content by adding spinach or mushrooms. If you’re out of liquid egg substitute, whole eggs can be used as an alternative—just whisk them thoroughly with milk before pouring over the squash.

Storage

This frittata stores beautifully, making it an excellent meal prep option. Simply cover and refrigerate any leftovers for up to three days. To reheat, place a slice in the microwave for about a minute or until warmed through. For a crispier texture, you can also reheat it in the oven at 350°F (175°C) for about 10 minutes.

FAQ

Can I make this frittata ahead of time?

Absolutely! You can prepare the frittata up to a day in advance. After baking, allow it to cool completely, then cover and refrigerate. Reheat it in the oven before serving for the freshest taste.

Can I freeze the butternut squash frittata?

Yes, this frittata freezes well. Once it’s completely cooled, wrap individual slices in plastic wrap and then in aluminum foil. Store them in the freezer for up to three months. To reheat, thaw overnight in the refrigerator and warm in the oven.

Nutrition

This frittata is not only delicious but also a nutritious choice. Each serving is rich in vitamins A and C from the butternut squash and bell peppers. Using a liquid egg substitute and non-fat milk reduces the calorie content while maintaining protein levels. Goat cheese adds a dose of healthy fats, making this a balanced, wholesome meal.

Conclusion

There’s something magical about gathering around the table to share a meal that warms both body and soul. This Butternut Squash Frittata is more than just a dish; it’s a celebration of flavors, colors, and the simple joys of life. Perfect for any occasion, it brings a touch of nostalgia and comfort to your dining experience. I hope this recipe becomes a beloved staple in your home, just as it has in mine. Bon appétit!

Related update: Butternut Squash Frittata

Related update: Thai Shrimp

Cheesy Cowboy Quesadillas | Made by Meaghan Moineau

Cheesy Cowboy Quesadillas

Intro

There’s something magical about blending flavors from different cuisines to create a dish that feels both familiar and new. Cheesy Cowboy Quesadillas are one such delightful fusion, combining the heartiness of American cowboy cuisine with the classic Mexican quesadilla. I remember first encountering this dish during a summer road trip with my family through the American Southwest. We stopped at a quaint little diner in Texas, where the warm, cheesy quesadillas filled us with comfort after a long day of travel. It quickly became a family favorite, reminding us of sunsets over endless plains and the joy of discovering new flavors together.

Why You’ll Love It

This dish is a perfect blend of creamy, cheesy goodness with the earthy flavors of beans and corn. It’s a quick and satisfying meal that can be enjoyed any time of day. Whether you’re looking for a hearty breakfast, a filling lunch, or a comforting dinner, these quesadillas fit the bill. The ingredients are simple, yet they come together in a way that’s anything but ordinary. Plus, it’s a great way to use up leftover chicken and turn it into something spectacular.

Ingredients

  • 2 tablespoons of butter
  • 1 cup diced onions
  • 2 cloves garlic, minced
  • 2 cups shredded chicken
  • 1 can (15 oz) black beans, drained and rinsed
  • 1 cup corn kernels (fresh, frozen, or canned)
  • 1 diced bell pepper
  • 1 teaspoon salt
  • 1 teaspoon cumin
  • 1 teaspoon chili powder
  • 4 oz cream cheese, cut into small pieces
  • 1 cup shredded cheese (cheddar or Mexican blend)
  • 8 white tortillas

Instructions

  1. In a large skillet, melt the butter over medium heat. Add the diced onions and minced garlic, sautéing for about 2 minutes until they become fragrant and translucent.
  2. Add the shredded chicken, black beans, corn, diced bell pepper, salt, cumin, and chili powder to the skillet. Stir well, allowing the mixture to heat through, about 5 minutes.
  3. Reduce the heat to low and add the cream cheese in spoonfuls, stirring until it melts and combines with the other ingredients.
  4. Mix in 1 cup of shredded cheese, stirring until the filling becomes creamy and cheesy.
  5. Place about ¼ cup of the filling onto one half of a tortilla. If you like it extra cheesy, sprinkle a little more cheese over the filling.
  6. Fold the tortilla in half, pressing gently to close.
  7. Heat a clean, dry skillet over medium heat. Place the filled tortilla in the skillet and fry for 2-3 minutes on each side, until the tortilla is golden and crispy.
  8. Repeat with the remaining tortillas and filling. Serve warm and enjoy!

Tips

For the best results, use fresh, high-quality ingredients. You can prepare the filling ahead of time and store it in the fridge for up to two days, making it easy to whip up quesadillas in a flash. If you’re looking for an even crispier tortilla, brush a little melted butter on the outside before frying.

Variations & Substitutions

Feel free to customize your Cheesy Cowboy Quesadillas to suit your taste. Swap out the chicken for beef or omit the meat altogether for a vegetarian version. You can also add other vegetables like chopped spinach or zucchini. If you prefer a spicier kick, toss in some diced jalapeños or a dash of hot sauce. For a gluten-free option, use corn tortillas instead of white tortillas.

Storage

If you have leftovers, allow the quesadillas to cool completely before storing them in an airtight container in the refrigerator. They will keep for up to three days. To reheat, simply place them in a skillet over medium heat until warmed through and crispy again. Avoid microwaving, as it can make the tortillas soggy.

FAQ

Can I freeze Cheesy Cowboy Quesadillas?

Yes, you can freeze them! Assemble the quesadillas but don’t cook them. Place them on a baking sheet and freeze until solid. Transfer to a freezer bag and store for up to three months. To reheat, cook from frozen in a skillet over low heat, allowing extra time for the filling to heat through.

What type of cheese is best for quesadillas?

A blend of cheddar and Monterey Jack is ideal for quesadillas, offering both flavor and meltability. However, feel free to experiment with your favorite cheeses, such as mozzarella or pepper jack, to create your perfect cheesy bite.

How do I prevent the filling from spilling out?

To keep the filling inside the quesadilla, don’t overfill the tortillas. Press the top firmly after adding the filling, and use a spatula to gently press down while cooking. This will help seal the edges and keep everything in place.

Nutrition

While we haven’t conducted a full nutritional analysis, these quesadillas are packed with protein from the chicken and beans, as well as essential vitamins from the vegetables. For a lighter version, you can use reduced-fat cheese and cream cheese.

Conclusion

Cheesy Cowboy Quesadillas are more than just a meal; they’re a culinary experience that brings a taste of the Southwest into your home. Whether you’re enjoying them alone or sharing them with loved ones, they offer a comforting blend of flavors that are sure to become a staple in your household. Try them out and let the delightful combination of creamy cheese, hearty beans, and savory chicken transport you to a place of warmth and satisfaction. Happy cooking!

Related update: Cheesy Cowboy Quesadillas

Banana Pudding Cake | Made by Meaghan Moineau

Banana Pudding Cake

Intro

Banana pudding cake holds a special place in my heart, as it was the dessert my grandma would lovingly prepare every Sunday afternoon. Her kitchen would fill with the sweet aroma of ripe bananas and vanilla, instantly making everyone feel at home. This cake is a delightful blend of soft cake layers, creamy custard, and the nostalgic taste of banana pudding, topped with a cloud of whipped cream. Now, I’m excited to share this cherished family recipe with you, hoping it becomes a favorite in your home too.

Why You’ll Love It

This banana pudding cake is the perfect blend of moist cake, rich custard, and fresh bananas, making it a crowd-pleaser at any gathering. It’s a showstopper dessert that looks intricate but is surprisingly easy to make. Whether you’re hosting a dinner party or just treating yourself, this cake is the perfect choice for a comforting dessert that doesn’t compromise on flavor. Plus, it’s a great way to use ripe bananas, ensuring nothing goes to waste.

Ingredients

  • Baking powder
  • Bananas
  • Cocoa powder
  • Egg yolks
  • Eggs
  • Flour
  • Heavy whipping cream
  • Milk
  • Powdered sugar
  • Salt
  • Pudding
  • Sugar
  • Vanilla
  • Vanilla extract
  • Vanilla wafers
  • Whipped cream

Instructions

  1. In a large bowl, beat egg yolks with sugar and set aside.
  2. In the bowl of an electric mixer, whip egg whites until stiff.
  3. Add baking powder, processed wafers, and cocoa to the egg yolk mixture.
  4. Drop about 1/4 of the egg whites into the larger bowl and fold lightly.
  5. Fold in remaining whites carefully.
  6. Line a jellyroll sheet pan with parchment paper covering all sides and spray paper with non-stick floured baking spray.
  7. Spread cake batter onto paper, so it covers the entire pan.
  8. Bake in a preheated oven at 350 degrees for 15-20 minutes.
  9. Let cake cool completely on the sheet (at least 30 minutes to an hour).
  10. As cake cools, mix sugar, flour, and salt in the top of a double boiler (or a makeshift double boiler).
  11. Blend in egg yolks and milk. Cook, uncovered, over boiling water, stirring constantly for 10 to 12 minutes or until thickened.
  12. Remove from heat and stir in vanilla.
  13. When the cake is cooled, carefully lift the parchment paper, remove it from the pan, and place it on a flat surface.
  14. Starting from the short end, cut into three even pieces.
  15. Place the first layer of cake on a serving platter. Spread half of the custard over the top of the cake, then cover with one-third of the banana slices.
  16. Take about one-third of the crumbled wafers and sprinkle them over the custard-banana layer.
  17. Top with the next piece of cake and repeat, being sure to reserve a few bananas and crumbled cookies.
  18. Spread the final amount of custard onto the top layer of cake and refrigerate the whole cake for at least 2 hours or until ready to serve.
  19. Just before serving, make the whipped cream topping. Combine all ingredients together in a large mixing bowl until the cream thickens and becomes stiff.
  20. Spread whipped cream on the cake and top with remaining banana and wafers.

Tips

To prevent the bananas from browning, sprinkle them with a bit of lemon juice before placing them on the cake. This will keep them looking fresh and vibrant. When folding the egg whites into the batter, be gentle to maintain the airiness that will give your cake a light texture. Lastly, allow the cake to cool completely before assembling; this will make handling easier and prevent the custard from melting.

Variations & Substitutions

If you’re feeling adventurous, consider adding a layer of chocolate ganache for a richer taste. You can also substitute the vanilla wafers with graham crackers for a different texture. For a nutty twist, sprinkle some chopped pecans or walnuts between the layers. If you prefer a lighter version, use light whipping cream and reduce the sugar in the custard slightly.

Storage

Store any leftover banana pudding cake in an airtight container in the refrigerator for up to 3 days. The flavors meld beautifully over time, making it taste even better the next day. Avoid leaving the cake out at room temperature for extended periods, as the custard can spoil. If you need to store it longer, consider freezing individual slices wrapped in plastic wrap and placed in a freezer-safe container.

FAQ

Can I make this cake a day ahead?

Absolutely! In fact, making it a day ahead allows the flavors to develop further. Just be sure to add the whipped cream topping and fresh bananas right before serving to keep them fresh and appealing.

What if I don’t have a jellyroll pan?

No worries! You can use a standard baking sheet or even a cake pan. Just remember to adjust the baking time slightly and check for doneness by inserting a toothpick in the center.

Can I use instant pudding mix?

Yes, you can use instant pudding mix if you’re short on time. Simply prepare it according to the package instructions and use it in place of the homemade custard. However, making your own custard adds a lovely homemade touch to the cake.

Nutrition

The nutritional information will vary based on portion size and ingredients used. On average, a slice of banana pudding cake contains approximately 350 calories, 18g of fat, 45g of carbohydrates, and 5g of protein. Keep in mind these are estimates and can vary.

Conclusion

Banana pudding cake is more than just a dessert; it’s a slice of nostalgia and comfort on a plate. Whether you’re a seasoned baker or just beginning your culinary journey, this cake is sure to impress with its delightful flavors and stunning presentation. I hope it brings as much joy and warmth to your home as it has to mine. Happy baking!

Related update: Banana Pudding Cake

Related update: Pumpkin Pecan Streusel Cake - gluten free, soy free, vegan