
Last Tuesday, I found myself staring into the fridge, contemplating my dinner choices. It was one of those days when the work seemed endless, and my energy level was as flat as a pancake. You know what I mean, right? When the day is long, but your patience is short? In times like these, I crave something that’s both comforting and ridiculously easy to make. Enter: Easy Baked Parmesan Chicken. The result? A dish that’s cozy enough for a solo dinner yet impressive enough for unexpected guests. Plus, the oven does most of the heavy lifting while you unwind with a glass of wine. Let’s dive in!
Jump to Recipe
What You’ll Need
This recipe is all about simplicity, and chances are you already have most of the ingredients chillin’ in your pantry or fridge.
- 4 skinless, boneless chicken breast halves
- 1 egg
- 1 cup Italian bread crumbs
- 2 cups pasta sauce (your favorite brand or homemade!)
- 1 cup shredded mozzarella cheese
- 1/2 cup grated parmesan cheese
How to Make Easy Baked Parmesan Chicken
- Preheat your oven to 400°F (200°C). The warm-up is key for that golden finish.
- Crack the egg into a shallow bowl and whisk it up like you’re making a mini omelet.
- Coat each chicken breast in the egg, letting the excess drip off, then roll it in breadcrumbs until it’s snugly coated.
- In a 13×9-inch baking dish, arrange the chicken breasts in a single layer. Make sure they’re not too cozy — social distancing for the chicken is important for even cooking!
- Bake the chicken uncovered for 20 minutes. The edges will start to brown and the kitchen will smell divine.
- Pour the pasta sauce over the chicken, covering each piece generously. Think of it as giving the chicken a warm tomato blanket.
- Sprinkle the mozzarella and parmesan cheese over the top. This is where the magic happens — golden, bubbly goodness incoming.
- Return the dish to the oven and bake for an additional 10 minutes. The cheese should be melted, bubbly, and just beginning to brown. Check that the chicken reaches 170°F and is no longer pink inside.
- Serve immediately, either on its own or over your favorite pasta. Enjoy the cheesy, saucy goodness!
Cook’s Notes
If you’re planning ahead or happen to have leftovers (lucky you!), this dish stores well in an airtight container in the fridge for up to three days. For reheating, skip the microwave unless you like rubbery chicken — instead, pop it back in the oven until warmed through.
A common pitfall is not letting the excess egg drip off the chicken before coating with breadcrumbs. Trust me, a thin coat is all you need for that perfect crisp. Another tip? Let the chicken rest a minute before serving — just enough time to pour yourself another glass of wine.
Make It Your Own
- Swap the chicken for crispy tofu slices if you’re feeling a vegetarian vibe. Just press the tofu well to get rid of excess moisture.
- Use panko breadcrumbs instead of Italian for an extra crunch factor.
- Going gluten-free? Opt for gluten-free breadcrumbs and gluten-free pasta sauce.
- Add sliced fresh basil or a sprinkle of red pepper flakes just before serving for an aromatic kick.
If you try this, I’d love to hear how it turns out — drop a comment or tag me! Let’s keep the deliciousness going. 🍽️
Related update: Easy Baked Parmesan Chicken
Related update: Alouette Chicken Paprika

So, there I was on a lazy Sunday morning, craving something indulgent yet homey, and oh-so-satisfying. The kind of comfort food that just wraps you up in a warm hug — you know what I mean? That’s when I decided to whip up one of my go-to favorites: Breakfast Biscuits and Gravy. I mean, who can resist flaky biscuits smothered in rich, savory sausage gravy? Not me! They’re perfect for those mornings when you want to treat yourself without spending hours in the kitchen. Jump to Recipe
What You’ll Need
If you’ve got a well-stocked pantry, you’re already halfway there. This recipe relies on some everyday staples, along with a few flavor-boosting stars:
- Flour — unbleached for the best texture
- Baking powder
- Salt — regular and a pinch of black salt for depth
- Unsalted butter — because you can never have too much
- Plain yogurt
- Whole milk
- Fresh sage leaves
- Paprika
- Ground allspice
- Pork sausage
- Black pepper
How to Make Breakfast Biscuits and Gravy
- Preheat your oven to 425°F. Trust me, getting that oven nice and hot is crucial for achieving biscuit perfection.
- Line a baking sheet with parchment paper — no one likes a sticky mess.
- In a large bowl, sift together the flour, baking powder, and salt. This is where the magic starts.
- Grab your pastry blender or two knives and cut in the butter. You’re aiming for a texture ranging from cornmeal to pea-sized bits. A quick blitz in the food processor works if you’re feeling fancy.
- Using a fork, mix in the yogurt followed by the milk. The dough should be soft and slightly sticky, so don’t sweat it if it feels a bit wet.
- Turn the dough onto a lightly floured surface and knead briefly — just enough to hold everything together. Roll it out about 1 1/4 inches thick and cut into rounds.
- While your biscuits are getting golden in the oven, let’s tackle the sausage. Combine all the sausage ingredients in a large bowl, mixing them up with your hands. Don’t be shy!
- Form small patties and cook them in a skillet over medium-high heat until crisp and browned on the outside, cooked through inside. About 8 minutes per side should do it.
- As the sausage sizzles, inhale that aromatic blend of sage and spices. It’s a thing of beauty!
Cook’s Notes
Here’s the deal: biscuits are one of those things that get better with practice, so don’t stress if your first batch isn’t perfect. Keep the butter cold for the flakiest layers, and don’t overwork the dough. You can make the sausage mixture ahead of time and keep it in the fridge for up to a day — just form and fry when ready. Leftover biscuits? Pop them in an airtight container, and they’ll last a couple of days; they’re great reheated in the oven.
Make It Your Own
Switch things up and put your own spin on this classic dish with these ideas:
- Swap the pork sausage for turkey sausage if you’re leaning towards a lighter option.
- Add a pinch of red pepper flakes if you crave a bit of heat in your morning.
- For a vegetarian twist, use crispy tofu instead of sausage.
- Throw in some cheddar cheese into the biscuit dough for an extra layer of flavor.
If you try this, I’d love to hear how it turns out — drop a comment or tag me! Cooking is all about sharing the love, and I can’t wait to see your versions and hear your stories. Enjoy every bite! 🍽️
Related update: Breakfast Biscuits and Gravy
Related update: Easy Baked Parmesan Chicken
Related update: Loaded Veggie Omelet

A few weekends ago, I had one of those mornings where you wake up craving something fresh and sunny to get your day going. It was gray and drizzly outside, and I wanted to bring a bit of brightness into the day. As I scanned my pantry, I spotted a forgotten lime yogurt, an orange rolling around with a couple of lemons in the fruit drawer, and a plan began to form. This Triple Citrus Cake is the kind of bake that feels like an instant mood-lifter. It’s got that perfect balance of tangy and sweet, and it’s way simpler than it sounds. Plus, it’s the kind of cake where you might already have most of the ingredients just hanging around. Every bite is like a little burst of sunshine, which sometimes is just what you need.
Jump to Recipe
What You’ll Need
Let me tell you, the best part about this ingredient list is that it’s the kind of thing you probably already have on hand. Here’s what you’ll need to create your own slice of citrusy heaven:
- 1 1/2 cups flour
- 2 teaspoons baking powder
- 1/2 teaspoon salt
- 3/4 cup lime yogurt
- 1 cup sugar
- 3 whole eggs
- 1 teaspoon vanilla extract
- 1/2 cup grapeseed oil
- Zest of 1 lemon
- 1/4 cup orange juice
- 1 cup powdered sugar
How to Make Triple Citrus Cake
- Preheat your oven to 350 degrees. You want it nice and warm, ready to give your cake a cozy bake.
- In a medium bowl, whisk together the flour, baking powder, and salt. This is your dry team; they’ll hang out together until called.
- Grab your electric mixer and in a larger bowl, beat together the lime yogurt, eggs, sugar, vanilla, oil, and lemon zest. It’ll look silky smooth and smell divine.
- Gently fold the dry ingredients into the wet mixture using a spatula. You’re aiming for a batter that’s just combined; over-mixing is a no-go here.
- Coat a 9 x 5 loaf pan with floured baking spray or line with parchment paper and spray. Pour the batter in, smoothing the top so it’s even.
- Bake for 40-50 minutes, or until a cake tester comes out clean. The top will be golden brown and your kitchen will smell like citrus heaven.
- Let the cake cool in the pan for at least an hour. Patience, my friend. The wait is worth it.
- Once cool, transfer to a serving plate. Mix the powdered sugar with orange juice until you have a smooth glaze, then drizzle it over the cake. Watch as it glistens invitingly.
Cook’s Notes
When it comes to baking, patience is key, especially in letting the cake cool before you apply the glaze. Trust me, you don’t want to rush it or you’ll end up with a soggy mess. The cake keeps well for 3-4 days if covered tightly and stored at room temperature, though I doubt it’ll last that long! If you’re planning to make it ahead, bake the cake and store the glaze separately. Glaze just before serving for the best texture.
Make It Your Own
Looking to switch things up? Here are a few ideas:
- Swap the lime yogurt for Greek yogurt and add a bit more lemon zest for an extra lemony punch.
- Replace grapeseed oil with melted coconut oil for a subtle coconut twist.
- Add a handful of poppy seeds to the batter for a delightful texture and a bit of visual flair.
- Use a mix of blood orange juice for the glaze if you want a richer color and slightly different taste.
If you try this, I’d love to hear how it turns out — drop a comment or tag me in your cake pics! It always makes my day to see your creations. Happy baking! 🍋🍊🍋
Related update: Triple Citrus Cake
Related update: Roasted Strawberry Coconut Milk Ice Cream

The other day, I found myself in one of those classic kitchen dilemmas. It was a chilly autumn afternoon, I was craving something warm and spicy, and I swear, every recipe I came across called for ingredients I didn’t have on hand. Determined not to let my sweet tooth win, I started rummaging through my pantry, and that’s when it hit me: fat-free gingerbread cookies! Yes, you read that right. These cookies are just what you need when you crave that cozy, ginger-spiced goodness but want to keep things light. Trust me, these cookies are packed with bold flavors, and you might already have most of these ingredients at home. Plus, they’re soft, chewy, and perfect for an afternoon treat or a holiday gathering.
Jump to Recipe
What You’ll Need
Okay, so these cookies are awesome because aside from being fat-free, they use simple ingredients that pack a punch. Here’s what you’ll need:
- All-purpose flour
- Whole wheat flour
- Baking soda
- Salt
- Ground ginger
- Cinnamon
- Ground cloves
- Black pepper
- Fresh ground nutmeg
- Ground allspice
- Dark brown sugar
- Blackstrap molasses
- Apple sauce
- Vanilla extract
- Maple extract
- Chai concentrate
- Egg whites
- Candied ginger
- Granulated sugar
- Cinnamon (for rolling)
How to Make Fat Free Gingerbread Cookies
- Start by sifting together the all-purpose flour, whole wheat flour, baking soda, salt, and all your spices. You’ll know it’s ready when the spices smell like a warm hug.
- In a large mixing bowl, combine the dark brown sugar, blackstrap molasses, apple sauce, vanilla extract, maple extract, and chai concentrate. Use an electric mixer and beat it for about four minutes until everything’s smooth and luscious.
- Add the egg whites into your molasses mixture. Beat for another minute until the whites are completely mixed in.
- Slowly incorporate your sifted dry ingredients into the wet mixture. Beat until everything is fully combined, creating a rich, aromatic dough. Stir in the candied ginger bits for that extra zing.
- Cover the dough and let it chill in the fridge for at least an hour. I personally prefer letting it chill overnight for a deeper flavor.
- When you’re ready to bake, preheat your oven to 350°F (175°C). Line a baking sheet with parchment paper or lightly grease it.
- Mix the granulated sugar with a dash of cinnamon in a shallow bowl. Scoop a tablespoon of dough, coat it in the cinnamon sugar, and shape it into a ball.
- Place each dough ball on the prepared baking sheet, leaving about three inches of space between them. They will spread out as they bake.
- Bake the cookies for 10-12 minutes until they’re beautifully puffed and you start to smell that delightful gingerbread aroma.
- Once out of the oven, transfer the cookies to a wire rack to cool. Trust me, waiting for them to cool is the hardest part!
Cook’s Notes
Baking these cookies is pretty straightforward, but here are a few tips to ensure they turn out perfect every time. First, don’t skip the chilling step. It helps the flavors meld together and keeps the dough from spreading too much. If you’re planning ahead, you can make the dough and keep it in the fridge for up to two days. Just remember to let it sit at room temperature for a few minutes if it’s too hard to scoop. For leftovers, these cookies stay fresh for about a week if kept in an airtight container. You can also freeze them for longer storage—just thaw before serving.
Make It Your Own
These cookies are versatile, so feel free to experiment with these ideas:
- Swap the candied ginger for chocolate chips if you’re feeling a chocolate craving coming on.
- Use pumpkin pie spice instead of the individual spices for a quicker spice mix.
- Replace the chai concentrate with a strong brewed tea of your choice for a subtle flavor twist.
- If you want a little crunch, add some finely chopped nuts like pecans or walnuts.
If you try this, I’d love to hear how it turns out—drop a comment or tag me! Baking is all about experimenting and having fun, so don’t be afraid to make these cookies your own. Enjoy every spicy, soft bite!
Related update: Fat Free Gingerbread Cookies
Related update: Triple Citrus Cake

Last Tuesday morning was one of those days where I just needed a little something extra to kickstart the day. You know the ones — when your brain is stuck somewhere between sleep and waking, your mug of coffee is feeling more like a warm hug than a caffeine fix, and breakfast needs to be something special but not overly demanding. That’s when these Blueberry, Chocolate & Cacao Superfood Pancakes came to the rescue. They’re those perfect pancakes that feel like you’re treating yourself to something really indulgent, yet they’re totally guilt-free. Plus, they’re gluten-free, paleo, and vegan! It’s like a breakfast trifecta. Ready to dive in? Trust me, these are worth the short time it takes to whip them up.
Jump to Recipe
What You’ll Need
Here’s the best part: chances are you already have most of these goodies hanging out in your pantry. No need for a special trip to the store when the craving hits!
- Almond flour
- Coconut flour
- Tapioca or arrowroot flour
- Nut, hemp, or coconut milk
- Baking powder
- Vanilla bean paste or extract
- Himalayan sea salt
- Frozen blueberries
- Cacao nibs
- Dark chocolate
How to Make Blueberry, Chocolate & Cocao Superfood Pancakes – Gluten-Free/Paleo/Vegan
- Grab a mixing bowl and combine the almond flour, coconut flour, and tapioca or arrowroot flour with the baking powder and a pinch of Himalayan sea salt. Give it a good mix until everything is nicely blended.
- Pour in the nut, hemp, or coconut milk along with the vanilla bean paste or extract, and whisk it all together until you have a smooth, dreamy batter. Let this beauty sit for 10-15 minutes. It’s like letting the batter take a mini-vacation to thicken up.
- Heat a smidge of coconut oil in your favorite skillet over medium heat. Once it’s warm and cozy, pour just enough batter into the center to form a pancake.
- Cook until the edges start to brown and you see bubbles gracing the surface. This is your cue to sprinkle a few blueberries on the pancake.
- Flip the pancake with confidence, cook for another minute or two, then immediately sprinkle cacao nibs and dark chocolate on the top. Let them melt and meld into pure bliss.
- Remove the pancake once fully cooked and repeat with the rest of the batter. Stack them up, drizzle with a little agave if you’re feeling it, and savor the moment!
Cook’s Notes
These pancakes are wonderfully adaptable, so don’t stress if you’re missing an ingredient. You can even mix the dry ingredients the night before to save a few precious minutes in the morning rush. Storing leftovers? Just pop them in an airtight container in the fridge, and they’re good for a couple of days. Reheat in a skillet over low heat or simply enjoy them cold. Making a larger batch and freezing them is also an option; just layer parchment paper between each pancake to keep them from sticking together.
Make It Your Own
- Swap out the frozen blueberries for fresh raspberries or chopped strawberries for a berry twist.
- Substitute the cacao nibs with crushed pecans or walnuts for a nutty crunch.
- If you’re not strictly vegan, a spoonful of Greek yogurt with honey makes an unbeatable topping.
- For a tropical flair, toss in a handful of shredded coconut before flipping.
If you try this, I’d love to hear how it turns out — drop a comment or tag me! Enjoy every delicious bite of these pancakes, knowing you’re starting the day in the best way possible. 😊
Related update: Blueberry, Chocolate & Cocao Superfood Pancakes – Gluten-Free/Paleo/Vegan
Related update: Breakfast Biscuits and Gravy

Imagine this: it’s midweek, and your brain is fried from a day full of emails and Zoom calls. You open the fridge, and there it is, an avocado teetering on the edge of overripeness and a couple of oranges sitting pretty but untouched. Suddenly, inspiration strikes—why not combine these beauties into a refreshing salad that screams “spring” without actually requiring a season change? This Avocado and Orange Salad, dressed with a zingy Orange-Ginger Dressing, is like a mini-vacation for your taste buds. It’s quick, colorful, and destined to make you fall in love with simple ingredients all over again. Jump to Recipe
What You’ll Need
The beauty of this ingredient list is how effortlessly it combines pantry staples with fresh produce to create something magical.
- Avocados – Perfectly ripe.
- Oranges – Sweet and juicy.
- Green onions – For a hint of sharpness.
- Orange juice – Freshly squeezed, for that extra punch.
- Lemon (juice) – To add a bit of zing.
- Fresh ginger paste – Trust me, it’s worth it.
- Agave syrup – For a touch of sweetness.
- Olive oil – Smooth and lush.
- Salt and pepper – To taste.
How to Make Avocado and Orange Salad With Orange-Ginger Dressing
- Begin by slicing your avocados and oranges. Let them overlap on a platter as if they’re chatting at a party.
- Don’t waste that orange carcass! Squeeze its juice over your arranged slices, letting it mingle and soften the edges of the avocado.
- Sprinkle green onions artfully over the top, like confetti, and add a pinch of salt to awaken those flavors.
- Cover the platter with cling film, tucking it into the fridge, so the salad chills out while you prepare the dressing.
- In a blender, combine orange juice, lemon juice, fresh ginger paste, agave syrup, and olive oil. Blend until the mixture is smooth and the ginger’s aroma wafts up deliciously.
- Season the dressing with salt and pepper, tasting it to find your perfect balance of sweet, spicy, and tangy.
- Just before serving, unveil your masterpiece from the fridge and drizzle the dressing generously over the salad.
Cook’s Notes
Here’s the lowdown on making this salad work like a charm:
- Make sure your avocados are ripe but firm enough to hold their shape when sliced.
- If you’re making this ahead, keep the dressing separate until just before serving to prevent the avocados from getting too mushy.
- Leftovers? Unlikely. But if you do have some, store them in an airtight container and consume within a day for best results.
- Be cautious with the salt. Remember, you can always add more, but you can’t take it out!
Make It Your Own
This salad is versatile enough to play with, so go ahead and shake things up:
- Swap the oranges for grapefruit slices if you’re after a slightly more tart flavor.
- Add some toasted almonds or walnuts for a crunchy contrast.
- For a spicy kick, sprinkle in some red pepper flakes to the dressing.
- Try a honey drizzle in place of agave if that’s more your style.
If you try this, I’d love to hear how it turns out—drop a comment or tag me! There’s nothing better than seeing your creations light up someone else’s table. Happy cooking!
Related update: Gluten Free Dairy Free Sugar Free Chinese Chicken Salad

It was one of those nights where dinner plans were nonexistent and I was staring at the contents of my fridge, hoping for inspiration to strike. You know the kind of night where the thought of cooking something complicated is just… ugh. Enter the hero of this tale: Curried Chicken Roll-Ups. They’re quick, they’re easy, and they have just the right amount of zing to make you feel like you’ve put in way more effort than you actually have. These roll-ups are like a little flavor vacation on a weeknight—tangy, crunchy, and creamy all in one bite. Plus, they’re perfect for using up random bits of veggies you’ve got lounging about.
Jump to Recipe
What You’ll Need
Surprisingly, you probably have most of these ingredients chilling in your fridge or pantry right now, just waiting to be turned into something fabulous.
- 1 can of chicken breast
- 1/2 cup diced cucumber
- 1/2 cup diced red bell pepper
- 1/2 cup diced celery stalk
- 2 tablespoons chopped green onion
- 1/4 cup light mayonnaise
- 1 tablespoon lime juice
- 1 tablespoon red curry paste
- 1/2 teaspoon garlic powder
- 1/4 teaspoon paprika
- 1/4 teaspoon chili powder
- Salt and pepper to taste
- 4 whole grain tortillas
- 1 cup shredded lettuce
How to Make Curried Chicken Roll-Ups
- In a large bowl, place all the ingredients except for the tortillas and lettuce. Stir everything until it’s nicely mixed, and any large pieces of chicken have broken down into shreds.
- Heat a skillet over medium and lightly toast or warm your tortillas. You’re looking for them to be pliable and just a tad crispy, which makes rolling them up so much easier.
- Scoop out a quarter of your chicken salad mixture and spread it evenly over the top of one tortilla. It should cover the tortilla pretty much edge to edge.
- Sprinkle a quarter of your lettuce on top of the chicken salad. It’ll add that fresh crunch we’re all about.
- Gently, and I mean gently, roll up your tortilla as tightly as you can without tearing it. Think burrito, but more delicate.
- Take a serrated knife and carefully slice the roll into 4 or 6 pieces, depending on your desired serving size. Serve immediately or stash them in the fridge for later munching.
Cook’s Notes
These roll-ups are great for a make-ahead lunch because they hold up well without getting soggy. Just keep them wrapped in plastic wrap or a sealed container in the fridge, and they’ll be good for up to 3 days. If you’re a prep-ahead wizard, you can mix the chicken salad the night before, and it’ll be even tastier as the flavors meld overnight. One thing to watch out for: Make sure your tortillas are fresh and not too dry, or they’ll crack when you roll them. If you’re feeling fancy, you can even warm them with a dab of butter!
Make It Your Own
- Swap the chicken for crispy tofu for a vegetarian twist. Just give it a quick sauté to ensure it’s nice and golden before adding it to your mix.
- Add sliced avocado right on top of the lettuce for extra creaminess and a touch of luxury.
- Use a spicy mayo instead of plain light mayo if you’re into a bit more heat and tang.
- Try spinach leaves instead of lettuce for a bit more nutritional punch without sacrificing crunch.
If you try this, I’d love to hear how it turns out—drop a comment or tag me in your roll-up adventures! Happy rolling, friends!
Related update: Curried Chicken Roll-Ups
Related update: Fresh and Simple Swai Ceviche

It was one of those fall evenings when the air felt crisp enough to warrant something warm and homely. I was rummaging through my pantry, looking for inspiration, when I spotted a basket of apples I’d forgotten about. That’s when it hit me: roast chicken with apples and rosemary. It’s a dish that sounds grand but is deceptively simple. Perfect for those days when you want the aroma of something wonderful wafting through your home, without spending hours in the kitchen. Trust me, the combination of sweet apples, aromatic rosemary, and the tangy kick from lemon balsamic vinegar makes this a dish you’ll want to repeat. It’s like autumn on a plate.
Jump to Recipe
What You’ll Need
I adore this recipe because you likely have most of these ingredients lounging in your kitchen already. Here’s what you’ll need to gather:
- Fresh apples
- Onions
- Garlic
- Fresh rosemary
- Lemons
- Raimondo Sicilian lemon balsamic vinegar
- Seasoning for a rub (salt, pepper, maybe your secret mix?)
- Roasting chickens
- Canned stock
How to Make Roast Chicken with Apples and Rosemary
- Preheat your oven to 400°F. Set a rack in the lower third of the oven to allow for even heat distribution.
- Rinse the chicken under cold water, then pat it completely dry with paper towels. This step is crucial for crispy skin.
- In a shallow roasting pan, arrange the apples, rosemary, three lemons (halved), onions, and garlic in a single layer. Season generously with salt and pepper. Toss everything together, then drizzle with the lemon balsamic vinegar.
- Rub the chicken with your seasoning mix until well coated. Place it breast-side-up on top of the apple and rosemary mixture. For added flavor, stuff some of the apple and onion mix inside the chicken cavity.
- Roast the chicken for about 30 minutes until the breast feels firm and starts to brown slightly. The aroma will start making its way into every nook of your home.
- Using tongs, flip the chicken over, breast-side-down, and let it roast for another 20 minutes. This helps the chicken cook evenly and the skin to attain a beautiful golden color.
- The chicken is done when a thermometer inserted into the thickest part reads 175°F. Tilt the chicken to let the cavity juices drain into the pan, then transfer it to a cutting board to rest.
- Spoon off any fat from the roasting pan, then place it over high heat. Add the canned stock, scraping up all those tasty browned bits. Squeeze in the juice of the last lemon to brighten up the sauce.
- Carve the chicken and serve it with the apples and onions, passing the chunky jus at the table. Enjoy the applause from your dinner guests!
Cook’s Notes
Let’s chat about making this dish your best friend in the kitchen. First off, drying the chicken well is key; moisture on the skin is the enemy of crispiness. When flipping the chicken, be gentle to keep the skin intact. If you’re in a hurry, you can prepare the apple and rosemary mix ahead of time and store it in the fridge until you’re ready to roast. Leftovers make fantastic sandwiches or can be tossed with some greens for a vibrant salad. Store any extras in an airtight container in the fridge for up to three days. Reheat gently to avoid drying out the meat.
Make It Your Own
Here are a few ideas to tweak this dish to your liking:
- Swap in pears instead of apples for a slightly different fruity twist.
- Use thyme or sage in place of rosemary if that’s what you’ve got on hand.
- Try a white wine vinegar instead of lemon balsamic for a milder acidity.
- For a vegetarian version, use crispy tofu in place of chicken and adjust cooking time accordingly.
If you give this roast chicken a whirl, I’d love to see your masterpiece! Drop a comment below or tag me on social media. Cooking is always more fun when shared, don’t you think? Happy roasting!
Related update: Roast Chicken with Apples and Rosemary
Related update: Curried Chicken Roll-Ups

It was one of those chilly October afternoons where the air feels crisp and the leaves are doing that magical thing they do—turning into a vibrant sea of reds, oranges, and yellows. I was craving something cozy but with a twist, something that fit the season without being a pumpkin-flavored cliché. That’s when the idea for Cranberry-Orange Pistachio Chip Cookies came to me. These cookies are the perfect blend of tart cranberries and zesty orange, with the unexpected crunch of pistachios and creamy white chocolate morsels. They’re a little bit fancy, but still easy enough to whip up on a whim. I promise, once you try them, you’ll want to make them part of your regular cookie rotation.
Jump to Recipe
What You’ll Need
I bet you already have most of these ingredients lounging in your pantry, just waiting to be transformed into something wonderful.
- 2 1/4 cups all-purpose flour
- 1 teaspoon baking soda
- 1/2 teaspoon salt
- 1 cup (2 sticks) butter, softened
- 3/4 cup granulated sugar
- 3/4 cup packed brown sugar
- 1 teaspoon vanilla extract
- 2 large eggs
- 2 cups white nestlé® toll house® premier morsels
- 1 cup chopped pistachios
- 1 cup dried craisins
- 1/2 cup chopped candied orange peel
How to Make Cranberry-Orange Pistachio Chip Cookies
- Preheat your oven to 375°F (190°C). The anticipation starts now as the kitchen warms up and gets ready for some cookie magic.
- In a small bowl, whisk together the flour, baking soda, and salt. This is your dry mix—it’s the base that holds all the other goodies together.
- In a large bowl, beat the butter, granulated sugar, brown sugar, and vanilla extract until creamy. You want it smooth and luscious, like frosting but thicker.
- Add the eggs one at a time, beating well after each addition. The batter will start to look pale and fluffy.
- Gradually beat in the flour mixture. Go slow here; you don’t want a flour storm in your kitchen.
- Fold in those beautiful white morsels, pistachios, dried cranberries, and orange peel. This is where the magic happens—the cookies are getting their personality.
- Drop rounded tablespoonfuls of dough onto parchment-lined baking sheets. Space them out, they need room to spread their deliciousness.
- Bake for 9 to 11 minutes or until golden brown. You’ll know they’re ready by the dreamy aroma and the slight browning at the edges.
- Cool on the baking sheets for a couple of minutes before moving to wire racks. This is the hardest part—waiting for them to cool completely.
Cook’s Notes
These cookies are a bit of a showstopper, but they’re really straightforward. A few tips:
- Use the freshest pistachios you can find; their flavor really shines here.
- If you don’t have candied orange peel, you can make your own or use fresh zest in a pinch—just a little extra sugar will balance the tartness.
- These cookies are perfect for making ahead. You can freeze the dough balls, then bake as needed for a fresh cookie fix.
- Leftovers will stay delicious in an airtight container for about a week, but honestly, they’ll probably disappear way before then.
Make It Your Own
Want to tweak these cookies to better suit your taste buds or pantry stash? Here are some ideas:
- Swap the pistachios for almonds or walnuts if you prefer a different nutty note.
- Try semi-sweet chocolate chips instead of white morsels for a deeper chocolate experience.
- If dried craisins aren’t your thing, swap them out for dried cherries or even chopped dried apricots.
- Add a hit of spice with a teaspoon of ground cinnamon or cardamom for a warm, cozy vibe.
If you try this, I’d love to hear how it turns out—drop a comment or tag me! Happy baking, and may your kitchen be filled with the sweet scent of these glorious cookies.
Related update: Cranberry-Orange Pistachio Chip Cookies
Related update: Fat Free Gingerbread Cookies
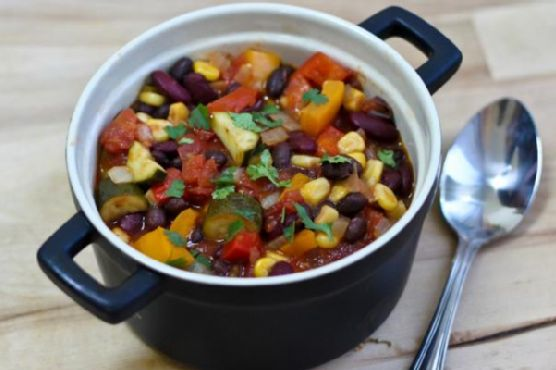
Last Tuesday, I found myself staring into the abyss that is my refrigerator, wondering what on earth I could whip up for dinner. You know those nights when you just can’t muster the energy to make anything extravagant but still crave something warm and satisfying? That’s when Smokey Rainbow Chili came to the rescue. Packed with colorful veggies and a kick of spice, this dish not only brightens up your plate but also your soul. Perfect for a chilly evening or when you need a bit of comfort without the fuss. It’s like a cozy blanket in a bowl, making it totally worth the little effort it takes to make.
Jump to Recipe
What You’ll Need
I bet you already have most of these tucked away in your pantry, just waiting to be transformed into something magical. Here’s what you’ll need:
- 2 tablespoons of olive oil
- 1 medium zucchini, diced
- 1 large red bell pepper, diced
- 1 large orange bell pepper, diced
- 1 diced fresh jalapeno pepper
- 4 cloves of garlic, minced
- 1 large onion, chopped
- 1 can (14.5 ounces) of stewed tomatoes with liquid
- 1 can (6 ounces) of tomato paste
- 1 can (15 ounces) of black beans, drained and rinsed
- 1 can (15 ounces) of whole kernel corn, drained
- 1 can (15 ounces) of red kidney beans, drained and rinsed
- 1 tablespoon of smoked paprika
- 2 tablespoons of chili powder
- 1 teaspoon of dried oregano
- 1/2 teaspoon of black ground pepper
- 1/4 teaspoon of cayenne pepper (or more if you’re feeling brave!)
How to Make Smokey Rainbow Chili
- In a large pot, heat the olive oil over medium-high heat. You want it shimmering, not smoking.
- Add the zucchini, red bell pepper, orange bell pepper, jalapeno, garlic, and onion. Cook them for about 5 minutes or until they’re just tender and the kitchen smells like heaven.
- Pour in the stewed tomatoes with their liquid and stir in the tomato paste until it dissolves evenly, giving you a beautiful, rich base.
- Add the black beans, corn, and kidney beans, mixing them well into the tomatoey goodness.
- Sprinkle in the smoked paprika, chili powder, oregano, black pepper, and cayenne. Each stir should reveal a little rainbow of color and promise of flavor.
- Bring the pot to a boil. Keep an eye out for those bubbling edges that signal it’s time to turn the heat down.
- Reduce the heat to low and let it simmer for about an hour, stirring occasionally. If your veggie chunks are on the larger side, you might want to let it simmer a bit longer until they’re perfectly tender.
Cook’s Notes
Here’s the deal: the longer you let this chili simmer, the deeper the flavors get, so if you’ve got the time, let it do its thing. But if you’re in a rush, 30 minutes of simmering can still do wonders. Just taste as you go and adjust the seasoning to your liking. If you like your chili super thick, reduce the simmering time or add a bit less liquid from the tomatoes.
Got leftovers? This chili tastes even better the next day. Just pop it in the fridge for up to 3 days, or freeze it for a rainy day. When reheating, you might need to add a splash of water or broth to get it back to the perfect consistency.
Make It Your Own
- Want some meat in there? Brown a pound of ground beef or turkey, and add it in after sauteing the veggies.
- For a vegan protein boost, throw in some crispy tofu cubes once the chili is done simmering.
- Craving more heat? Add an extra jalapeno or a splash of hot sauce to dial up the fire.
- If you’re a fan of smoky flavors, double up on the smoked paprika or add a drop of liquid smoke.
If you try this, I’d love to hear how it turns out — drop a comment or tag me! My DMs are open for all your kitchen triumphs and tribulations. Happy cooking, friends!
Related update: Roast Chicken with Apples and Rosemary
Related update: Vietnamese Beef-Noodle Soup With Asian Greens, Okay Vietnamese/japanese
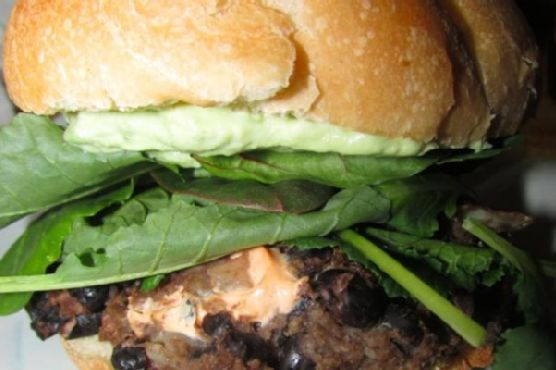
Last Tuesday was one of those days where time slipped through my fingers like sand, and suddenly it was dinnertime, and I had no plan. I stared into the fridge, hoping for inspiration to magically appear, and then my eyes landed on a can of black beans. Instantly, I knew it was time to whip up one of my lifesavers: Chipotle Cheese Stuffed Black Bean Burgers with Avocado Creme. These beauties are my go-to when I need something quick but still wanna impress myself (and anyone else lucky enough to be around). They're packed with flavor, and honestly, who can resist anything stuffed with cheese? Plus, they're vegetarian-friendly and can be made with stuff you're likely to have on hand. They're savory, slightly spicy, and the creamy avocado topping just brings it all home.
Jump to Recipe
What You'll Need
Chances are you already have most of this list tucked away in your pantry or fridge. Here's what you'll need to get these burgers sizzling:
- Canned black beans
- Yellow diced onion
- Diced mushrooms
- Egg
- Panko bread crumbs
- Cumin
- Chipotle chili powder
- Salt and pepper
- Wild olive oil
- Approx cream cheese spread
- Hamburger buns
- Cheese
- Spinach and tomato (optional)
- Avocado
- Sour cream
- Lime juice
- Sea salt
How to Make Chipotle Cheese Stuffed Black Bean Burgers with Avocado Creme
- Start by swirling a bit of olive oil in a skillet over medium heat. Toss in the diced mushrooms and onions. Sauté until they're softened and the aroma fills your kitchen, seasoning with a pinch of salt and pepper as you go.
- Drain the black beans and pour them into a medium bowl. Use a fork to mash them up; aim for a texture that's mostly smooth with some chunks left for interest.
- Mix in those sautéed mushrooms and onions, followed by the egg and bread crumbs. This is where it all starts coming together.
- Spice things up by adding cumin and a generous pinch of chipotle chili powder. Stir until everything is well combined, and take a moment to admire your handiwork.
- Now for the fun part: roll the mixture into burger patties. Whether you go for sliders or full-size is up to you. Create a little indent in the center of each and spoon in some cream cheese spread. Carefully mold the burger around the cheese, sealing it inside like a treasure.
- Heat a second swirl of olive oil in your skillet over medium heat. Cook the burgers two at a time, searing each side to a delicious golden brown, about 4 minutes on each side. If you're feeling cheesy, add sliced cheese on top now and cover the skillet to let it melt perfectly.
- While the burgers are sizzling, make your avocado creme. In a food processor or blender, combine avocado, sour cream, lime juice, and sea salt. Blend until smooth, tasting along the way to adjust the lime or sour cream to your liking.
- To serve, place each hot, cooked burger on an open toasted bun, top with optional spinach and tomato, and finish with a generous scoop of avocado creme before sandwiching it all with the top bun. Dig in while it's warm!
Cook's Notes
One of the best things about these burgers is how flexible they are. You can make the patties ahead of time and store them in the fridge for a day or two, or freeze them for up to a month. Just be sure to thaw completely before cooking. If you find your patties are falling apart, try adding a bit more bread crumbs to bind them better.
Leftovers, if you have any, are great for lunch the next day. Simply reheat in a skillet or microwave and enjoy them as they are, or get creative and crumble them into a salad or wrap.
Make It Your Own
- Swap the cream cheese for goat cheese for a tangier filling.
- For a vegan version, replace the egg with a flaxseed egg and use vegan cream cheese and cheese.
- If you’re not a fan of mushrooms, substitute them with finely chopped bell peppers.
- Add some chopped jalapeños to the mix for an extra spicy kick.
If you try this, I'd love to hear how it turns out — drop a comment or tag me! I always enjoy seeing the twists and tweaks you come up with. Happy cooking!

It was one of those dreary, chilly afternoons when all I wanted was to bury myself under a blanket with something sweet and comforting. My pantry was a hodgepodge of half-empty flours, a lonely can of pumpkin puree, and the remnants of a bag of chocolate chips. But somehow, out of that chaos, a masterpiece was born: the Pumpkin Pecan Streusel Cake. It’s like fall in every bite and the best part? You won’t find any gluten, soy, or animal products here. This cake is not only ridiculously delicious but also caters to almost every dietary restriction. And let’s be honest, anything with a streusel that’s crunchy with pecans and a drizzle of chocolate glaze is bound to be a crowd-pleaser.
Jump to Recipe
What You’ll Need
You probably have most of these ingredients lurking around your kitchen already. It’s a collection of pantry staples and a few key items, so grab your measuring spoons and let’s dive in.
- **Red brown rice flour**
- **Gluten free oat flour**
- White rice flour
- Sorghum flour
- Tapioca flour
- Light firmly brown sugar
- **Roasted pumpkin puree**
- Coconut yogurt
- Bananas
- Earth Balance soy-free spread
- **Pecans**
- Enjoy Life brand chocolate chips
- **Ground ginger**
- **Ground nutmeg**
- **Aluminum-free baking soda**
- **Aluminum-free baking powder**
- Kosher salt
- Apple cider vinegar
How to Make Pumpkin Pecan Streusel Cake – gluten free, soy free, vegan
- First things first, preheat your oven to 350°F (175°C). Let’s get this cake going!
- Mix the flours, brown sugar, cinnamon, and kosher salt in a small bowl. Add the Earth Balance spread and get your hands in there until the mix looks like coarse crumbs. Toss in the pecans and mix. Set aside this delightful streusel topping.
- Next up, measure your coconut milk and add the apple cider vinegar. Let it sit and work its magic till it looks all sour-creamy.
- In a medium bowl, whisk together the remaining flours, baking powder, baking soda, ground ginger, ground nutmeg, and kosher salt.
- In your mixer bowl, beat the Earth Balance and brown sugar together until they’re best friends, fluffy and well-mixed. Add the mashed banana, scraping down the sides of the bowl as needed. Follow with the pumpkin puree and your sour cream-esque coconut milk mixture. Mix on low speed till smooth.
- Throw in your flour mixture and stir until combined. The batter’s going to be thick, but that’s what we’re aiming for here.
- Spread half of this gloriously thick batter into a prepared cake pan. Sprinkle with half of that irresistible streusel. Layer on the remaining batter and spread it out evenly before topping with the rest of the streusel.
- Bake for 55-60 minutes. You’re looking for a clean toothpick when inserted into the center. Cool in the pan on a stovetop for 40 minutes. Patience, my friend.
- Once cooled, gently loosen the sides of the cake with a non-scratch knife, lift it out, and let it chill in the fridge for an hour.
- Meanwhile, melt the chocolate chips with Earth Balance over simmering water for a glossy glaze. Let it cool for a bit before drizzling over the cake.
- Remove the protective parchment paper and voila! You’ve got yourself a cake that’s ready to be devoured. Serve chilled or at room temp — your call!
Cook’s Notes
Now here’s the scoop: this cake loves a good chill in the fridge. It helps the flavors meld and makes slicing a breeze. Got leftovers? Keep them wrapped up in the fridge and they’ll stay fabulous for up to five days. If you prefer to prepare in parts, make the streusel in advance and keep it in the fridge for up to two days. Just don’t try to rush the cooling process. Trust me, it’s worth the wait for that perfect slice.
Make It Your Own
These swaps will keep things interesting, so don’t be shy about experimenting:
- Swap out the pecans for walnuts if you’re feeling nutty in a different way.
- Use mashed sweet potatoes instead of pumpkin for a twist on flavor.
- Try adding a teaspoon of espresso powder to the glaze for a mocha flair.
- If chocolate chips aren’t your thing, drizzle with a simple sugar glaze instead.
If you try this, I’d love to hear how it turns out — drop a comment or tag me! This cake has become a personal favorite, and I hope it brings as much joy to your table as it does to mine. Happy baking!
Related update: Pumpkin Pecan Streusel Cake – gluten free, soy free, vegan
Related update: Cranberry-Orange Pistachio Chip Cookies

The other day, I found myself staring aimlessly into my pantry, contemplating the eternal question: "What's for dinner?" It was one of those never-ending Tuesdays, and I needed a dinner that was like a warm hug — something quick, cozy, and just a bit zesty to shake off the day's blues. That's when Azteca Soup became my savior. With a refrigerator already stocked with fresh vegetables and a trusty can of tomatoes, it felt like the universe was nudging me toward this comforting bowl of delight. This soup is like a fiesta in a bowl; it’s rich, tangy, and just spicy enough to dance on your taste buds without setting off fire alarms. It’s easy enough to whip up on a weeknight, but impressive enough to make you feel like a kitchen goddess (or god, no discrimination here).
Jump to Recipe
What You'll Need
You might be surprised at how many of these ingredients are already in your kitchen. This list is all about bold flavors and easy pantry staples.
- Olive oil – for that luscious sauté start.
- 2 cloves garlic, minced
- 1 onion, chopped
- 1 jalapeno pepper, seeded and diced
- 2 celery stalks, chopped
- 1 can tomatoes, with juice reserved
- 1 teaspoon chili powder
- 1 teaspoon cumin
- 1 cup fresh corn kernels
- 2 tablespoons basil in ribbons
- 3 cups vegetable stock
- 2 tablespoons lime juice
- 1 avocado, diced
- Nacho chips
- Sour cream, for serving
- Basil shreds, for garnish
How to Make Azteca Soup
- In a medium saucepan, heat a splash of olive oil over medium heat. Toss in the garlic, onions, jalapeno pepper, and celery. Sauté until everything softens and becomes fragrant, about 5 minutes.
- Add the canned tomatoes, including the reserved juice, along with the chili powder and cumin. Cook this mixture down for about 10 minutes, stirring often. You'll know it's right when the tomatoes start breaking down, and the kitchen smells irresistible.
- Stir in the fresh corn and basil ribbons, followed by the vegetable stock. Bring it all to a gentle boil, then reduce the heat to a simmer. Let it bubble away for 15 minutes, letting all those flavors meld.
- Once done, remove the soup from heat. Stir in the fresh lime juice and diced avocado. The lime adds a bright kick, while the avocado brings a creamy contrast.
- Break a handful of nacho chips into each serving bowl. Ladle the hot soup on top, then add a generous dollop of sour cream. Scatter a few basil shreds and perch a nacho chip on top for good measure.
- Serve immediately to enjoy the full spectrum of flavors and textures. This makes enough for six people, whether it’s for a full lunch or a hearty starter.
Cook's Notes
Let's talk about a couple of things to keep in mind. First, sautéing your veggies just right is key — don't rush this step; it builds the flavor base. If you're making this ahead, the soup itself stores well in the fridge for a couple of days; just hold off on adding the avocado and chips until you're ready to serve. The avocado tends to go brown, and nobody wants soggy chips. Reheat gently, and add the fresh ingredients and garnishes once it's hot and ready to serve.
Make It Your Own
Here are some fun ways to tweak this soup to match your mood or pantry:
- Swap the chicken for crispy tofu: If you're in the mood for some protein, toss in some tofu cubes, pan-fried to crisp perfection.
- Heat lovers' edition: Throw in an extra jalapeno or a dash of hot sauce for an extra spicy kick.
- Cheese, please: Mix in a handful of shredded cheddar or jack cheese right before serving for a gooey, melty twist.
- Herbal touch: Substitute the basil with cilantro for a different but equally vibrant herbal note.
If you try this, I'd love to hear how it turns out — drop a comment or tag me! Sharing your kitchen adventures makes my day. I hope this Azteca Soup brings as much joy to your table as it does to mine. Happy cooking!

It was one of those early spring afternoons when the sun was just starting to peek through the clouds, promising warmer days ahead. I was rifling through my pantry, craving something sweet but not overly indulgent. You know, a little treat to go with my afternoon tea. That’s when I remembered this Easter Nest Sweet Cake recipe. It’s a delightful blend of flavors and textures — a soft cake topped with a tangy sour cream-royal icing and the crunch of pistachios. Perfect for those days when you want something that feels special but comes together without too much fuss. Plus, it makes for a show-stopping centerpiece at any Easter gathering or spring brunch.
Jump to Recipe
What You’ll Need
You might find that most of these ingredients are already in your kitchen, just waiting to be transformed into something magical. Here’s what you’ll want to gather:
- Unsalted butter – because decadent is the way to go.
- Brown sugar – for that rich, caramel-like sweetness.
- Eggs
- Flour
- Baking powder
- Sour cream – adds a moist and tangy kick to the cake.
- Icing sugar
- Lemon juice – brings brightness to the icing.
- Egg white
- Pistachios, unshelled – for a nutty crunch.
- Green food coloring – optional, but it gives the icing a festive touch.
How to Make Easter Nest Sweet Cake With Sour Cream-Royal Icing and Pistachios
- Preheat your oven to 190°C/375°F. Lightly grease a ring cake pan and set it aside. The anticipation starts here.
- In a medium bowl, use an electric mixer to beat the brown sugar, eggs, and unsalted butter until creamy — think smooth and dreamy. The sugar granules should almost disappear.
- Add the sour cream and flour to the mixture. Beat for a couple of minutes until everything is well combined. The batter should be thick and luscious.
- Pour the batter into your prepared cake pan, smoothing the top with a spatula. Bake for about 20 minutes. The cake should be golden brown and a skewer inserted in the center should come out clean.
- Let the cake cool in the pan for a few minutes, then transfer to a wire rack. The aroma is irresistible, but patience will pay off.
- For the icing, beat the egg white using a standard mixer until soft peaks form. Add lemon juice, icing sugar, and a drop of green food coloring if you’re feeling festive. Beat for a few more seconds until everything is just combined.
- Once the cake is cool, pour the royal icing generously over the top, letting it cascade down the sides. There’s something so satisfying about this step.
- Sprinkle with chopped pistachios, and get creative with your decorations. The crunch and subtle saltiness of the pistachios are a game-changer.
Cook’s Notes
Here’s the thing about this cake — it’s quite forgiving. If you find yourself without a ring pan, a regular cake pan or even a loaf pan will do in a pinch. Just keep an eye on the baking time. Store leftovers (if there are any!) in an airtight container at room temperature for up to three days. The icing may lose a little of its shine, but the flavor remains on point. If you’re planning ahead, bake the cake a day before and ice it on the day of serving for maximum freshness.
Make It Your Own
With a few tweaks, you can tailor this cake to suit different tastes or occasions:
- Swap the pistachios for toasted almonds for a different nutty flavor.
- If you’re not a fan of sour cream, try using Greek yogurt for a similar tanginess.
- Feeling adventurous? Add a tablespoon of shredded coconut to the batter for extra texture.
- For a citrus twist, incorporate the zest of one lemon into the cake batter.
If you try this, I’d love to hear how it turns out — drop a comment or tag me! And if you have any creative twists on this recipe, don’t keep it to yourself; I’m always on the lookout for new ideas. Happy baking!
Related update: Pumpkin Pecan Streusel Cake - gluten free, soy free, vegan
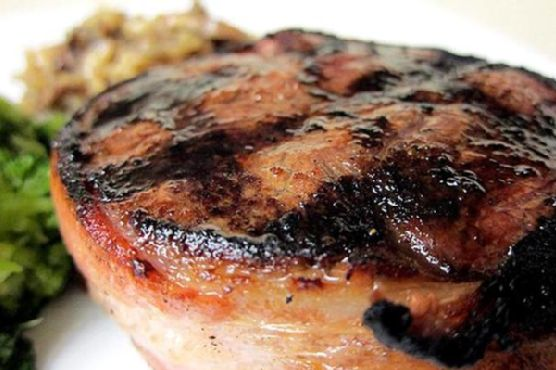
Last Tuesday, I found myself staring blankly into the fridge, desperately seeking inspiration for dinner after a long day of wrangling emails and chasing after my two-border collie pups, who were determined to shred every toy they own. Suddenly, a craving for something luxurious yet simple struck me—Bacon Wrapped Filet Mignon. It’s one of those dishes that sounds super fancy but is surprisingly easy to pull off. The genius pairing of tender beef with smoky bacon just hits all the right notes for a cozy, indulgent meal that feels like a mini celebration. And let’s be honest, we all need more of those! Plus, you can grill these beauties in under 30 minutes—perfect for when you’re short on time but still want to impress.
Jump to Recipe
What You’ll Need
I bet you have most of these already lurking in your pantry, just waiting to transform into something spectacular. No need for a lengthy grocery list here!
- 2 beef tenderloin steaks
- 2 slices of smoked bacon (room temperature)
- 4 cloves of garlic
- Salt & pepper to taste
How to Make Bacon Wrapped Filet Mignon
- First things first, get those tenderloins out and place them on a large dish. Now, take a deep breath and wrap a slice of room-temperature bacon around each filet. Gently stretch the bacon if needed, and secure its ends with a toothpick. It’s like giving your steak a delicious porky hug.
- Next, grab the garlic cloves. Cut them in half and rub both sides of each filet with the cut ends of the garlic. Trust me, this step infuses the steaks with a subtle, aromatic punch that’s absolutely divine.
- Season generously with salt and pepper on both sides—don’t be shy here, this is where the flavor magic starts to happen.
- Pre-heat your grill to very hot. You want it sizzling like a summer sidewalk.
- Using tongs, place each steak on the grill. For that perfect medium-rare, cook them for 3-4 minutes, rotating the steaks halfway through 90 degrees to achieve those Instagram-worthy grill marks.
- Flip the steaks over and grill the other side for another 3-4 minutes. The anticipation is killing me at this point.
- Remove the steaks from the grill and let them rest, loosely covered, for about 5 minutes. This step is crucial for locking in those juicy flavors before you remove the toothpicks and dive in.
Cook’s Notes
Let’s talk steak secrets! Always let your steaks rest at room temperature for about 20 minutes before you start wrapping them in bacon. This helps them cook more evenly. If you like your steak a bit more well-done, simply add a minute or two to each side. Got leftovers? Wrap them up and store them in the fridge—they make a killer steak salad the next day. And remember, sharp toothpicks are your friend for bacon security!
Make It Your Own
Why stop at classic when you can have fun experimenting? Here are a few ideas to jazz up your mignon:
- Swap the garlic rub for a herb butter spread before grilling for a luscious, buttery finish.
- Try using prosciutto instead of bacon for a slightly sweeter, more delicate wrap.
- Add a sprinkle of blue cheese crumbles on top right after grilling for a tangy twist.
- Serve alongside a creamy peppercorn sauce for an extra layer of flavor.
If you try this, I’d love to hear how it turns out—drop a comment or tag me on social media! Your gourmet adventure awaits, and I can’t wait to see where it takes you! 🍽️
Related update: Bacon Wrapped Filet Mignon

So there I was, staring into my fridge on a Wednesday night, contemplating the sad assortment of leftovers and a few random ingredients when inspiration struck. It was one of those evenings where cooking seemed more like a Herculean task than a simple pleasure, and I just needed something refreshing yet satisfying. Enter my Tuna and Tofu Cold Dish. This dish is like a cool breeze on a hot day—simple, refreshing, and oh-so-satisfying. It’s the perfect quick fix when you’re juggling work, life, and everything in between. Plus, it’s surprisingly elegant for how little effort it takes. Trust me, this one’s a keeper for those nights when you want to pretend you’re at a fancy restaurant without changing out of your pajamas.
Jump to Recipe
What You’ll Need
This is a no-fuss, ingredient-light dish. Chances are you already have most of this in your kitchen, just waiting to be transformed into something delicious.
- A block of silken tofu
- A can of tuna in water, drained
- White diced cherry tomatoes
- A dash of white pepper
- A pinch of salt
- A splash of extra virgin olive oil
- A few drops of vinegar
- Light Kikkoman soy sauce
- A clove of garlic, minced
- Freshly cracked black pepper
How to Make Tuna and Tofu Cold Dish
- Start by cutting your block of silken tofu into small, bite-sized blocks. Be gentle here—silken tofu is as fragile as my willpower at a dessert buffet!
- Open the can of tuna and drain it well. Once drained, place the tuna in a bowl and gently squash it with a fork. Mix in a dash of white pepper and a pinch of salt to bring out its flavor.
- Take your cherry tomatoes and slice them thinly. The goal is to get them to release their sweet and tangy juices.
- On a serving plate, carefully place the tofu blocks. Top them with your sliced cherry tomatoes and then the seasoned tuna.
- For the sauce, mix together a good splash of extra virgin olive oil, a few drops of vinegar, and a dash of light Kikkoman soy sauce. Add the minced garlic and freshly cracked black pepper.
- Drizzle this fragrant sauce over your tofu, tuna, and tomatoes.
- Finish by sprinkling with toasted sesame seeds and diced spring onion for that extra pop of flavor and crunch. Serve immediately and enjoy the calm in a chaotic weeknight!
Cook’s Notes
This dish is a lifesaver on busy nights. It’s all about the balance of textures and flavors—the creamy tofu, the robust tuna, and the crunchy veggies. Once assembled, it’s best eaten right away to enjoy the freshness of the ingredients. If you want to prep ahead, mix the sauce earlier in the day and keep it in the fridge. Just wait to dress the dish until you’re ready to serve, or the tofu might get over-marinated and lose its delicate texture.
Make It Your Own
- Swap the tuna for crispy tofu if you’re going plant-based. Just pan-fry tofu cubes until golden for a delightful contrast.
- Try adding sliced avocado for a creamy twist. It pairs beautifully with the tofu and tuna.
- For a spicy kick, mix a bit of Sriracha into the sauce. It’ll add warmth and complexity without overpowering the dish.
- Switch up the herbs by adding fresh cilantro or basil instead of spring onion for a different flavor profile.
If you try this, I’d love to hear how it turns out—drop a comment or tag me! Your feedback makes this kitchen adventure all the more fun. Bon appétit, my fellow food explorers!
Related update: Tuna and Tofu Cold Dish

Thanksgiving at my place is never complete without a little bit of chaos and a lot of laughter. One year, I thought I’d try my hand at a new dessert after we had a bit of a mishap with the pumpkin pie (don’t ask!). In the spirit of whimsy and fun, I concocted these adorable little OREO Turkeys that not only saved the day but also became a family favorite. These treats are deceptively simple to make and a delightful project to get kids involved in. Plus, who can resist the combination of OREO cookies and chocolate? Trust me, once you try them, they’ll be a staple at every Thanksgiving feast. Jump to Recipe
What You’ll Need
This ingredient list is a breeze, and chances are you’re already stocked up on most of it, especially if you’ve got a sweet tooth like me!
- OREO cookies (3 cups, crushed)
- Cream cheese (softened)
- Sweet semi baking chocolate (melted)
- Candy corn
- Candy eyes
- Icing (as glue)
How to Make OREO Turkeys for Thanksgiving
- First up, grab a package of OREO cookies and crush them up finely. We’re talking almost powdery, so they mix well.
- Mix the crushed OREO cookies with softened cream cheese until you have a smooth, pliable dough. It should feel like a rich, chocolatey clay.
- Roll this mixture into one-inch balls. They should be small enough to handle easily but big enough to hold their own as a turkey body.
- Pop those balls into the freezer for a quick chill — about 10 minutes should do the trick. This helps them firm up for the chocolate dip.
- Dip each ball into the melted chocolate, making sure it’s completely coated, and place them on a cookie sheet lined with wax paper. The chocolate should be smooth and glossy.
- Refrigerate the chocolate-coated balls for 15 minutes to an hour. This gives them a nice, firm shell.
- Now the fun part: decorating! Stick 5 candy corn pieces into the back of each ball to create colorful tail feathers.
- Use icing as glue to attach candy eyes towards the front top of the ball. We want those eyes peering out cutely!
- For the finishing touch, take a candy corn and cut it into pieces. Use the white tip for a nose and stick it under the eyes, then use the orange pieces as feet. Your turkey should look absolutely adorable!
Cook’s Notes
If your cookie balls are too sticky to roll, try chilling the mixture for a bit longer. It should be firm yet pliable. Don’t worry if your OREO Turkeys aren’t perfect; their charm is in their handmade look! You can make these a day ahead and store them in the refrigerator to keep the chocolate nice and solid. Leftovers (if there are any) can be kept in an airtight container for up to a week.
Make It Your Own
- Swap the candy eyes with mini chocolate chips. They’re just as cute and give a different texture.
- Use white chocolate instead of semi-sweet for a sweeter, more vibrant look.
- Try using different flavored OREOs, like mint or peanut butter, for a twist on the classic flavor.
- Add a dash of cinnamon to the cream cheese mixture for a subtle, warm hint of spice.
If you try this recipe, I’d love to hear how it turns out — drop a comment or tag me on social media! Your feedback and creativity always make my day. Happy Thanksgiving, and may your kitchen be filled with delightful chaos!
Related update: How to Make OREO Turkeys for Thanksgiving

Picture this: it’s a Tuesday evening, and the only thing standing between me and a total kitchen meltdown is the comforting prospect of pulling together Grandma Inez’s Pineapple Pie. I was staring down a pantry that looked more like a post-tornado disaster zone than the well-stocked haven I imagined. But there it was, hidden among the cans of neglected beans and a jar of something unrecognizable — a lone can of pineapple. That’s when I remembered this pie, a dessert that feels like a tropical vacation and a cozy hug all rolled into one. It’s quick, it’s a little quirky, and it’s a whole lot of delicious. A pie so luscious and breezy, it practically makes the kitchen clean itself. Well, almost.
Jump to Recipe
What You’ll Need
If you’ve got a stocked baking cupboard, you’re probably halfway there. The beauty of this pie is that it doesn’t ask for much — just a bit of finesse and a lot of love.
- 1 pre-baked pie crust
- 1 can crushed pineapple (keep the juice!)
- 1 cup sugar (divided)
- 1/4 cup butter
- 3 tablespoons cornstarch
- 1 teaspoon vanilla
- 3 egg yolks
- 3 egg whites
- 1/4 teaspoon cream of tartar
- 1/4 teaspoon salt
- 1/2 cup water
How to Make Grandma Inez’s Pineapple Pie
- Start by creaming 3/4 cup of the sugar, butter, and egg yolks in a medium saucepan. Use a hand-held mixer to make it fluffy — a workout for your good arm, just until it’s pale and dreamy.
- Blend in the cornstarch and vanilla until smooth. It should look like a creamy potion, sweet and inviting.
- Add the water and that whole can of crushed pineapple, juice and all. Mix again, until everything feels like it’s come to a tropical accord.
- Transfer your saucepan to the stove and set it over medium heat. Stir constantly — think of it as a zen exercise — until the mix thickens. You’ll know it’s ready when it can coat the back of a spoon.
- Pour this luscious filling into your pre-baked pie crust, spreading it out like you’re tucking it into bed.
- Now, whip the egg whites until they’re foamy, like the top of a cappuccino. Gradually add the remaining 1/4 cup sugar, cream of tartar, and salt. Keep whipping until soft peaks form and the mixture is glossy like a magazine finish.
- Spread the meringue over the cooled pie. Use the back of a spoon to create little peaks, like waves on an ocean.
- Bake in a preheated 400°F oven for just a few minutes. Stay close! You want the meringue to be golden, not torched.
- Let it cool completely before slicing — if you can wait that long. Store in the fridge and sneak slices whenever you need a pick-me-up.
Cook’s Notes
A few tips to keep this pie from veering off course:
– Make sure your pie crust is completely cool before adding the filling — we want a crispy base, not a soggy one.
– Meringue can be a bit temperamental. Avoid making it on a humid day, or it might weep. No one likes a sad pie.
– The pie is best eaten within a day or two, but trust me, it rarely makes it that long. If you’ve got leftovers, keep them covered in the fridge. The meringue might lose its crispness, but it’ll still taste divine.
Make It Your Own
Here’s where you get to flex your creative muscles:
- Swap the pineapple for mango or passion fruit for a different tropical twist.
- Add a hint of ginger or nutmeg to the filling for a warm-spiced version.
- Use almond extract instead of vanilla for a nutty, nuanced flavor.
- Try topping with coconut flakes post-bake for an extra layer of texture and flavor.
If you try this, I’d love to hear how it turns out — drop a comment or tag me! Your kitchen is about to smell amazing, and I can’t wait for you to taste this slice of sunshine. Enjoy every bite!
Related update: Grandma Inez’s Pineapple Pie
Related update: How to Make OREO Turkeys for Thanksgiving

Last winter, I found myself staring down a half-eaten box of candy canes—a festive gift from my overly enthusiastic neighbor. I adore peppermint, but there’s only so much peppermint tea one can drink! Desperate to create something my friends and family would devour, it hit me: those candy canes needed a sweet partner. Enter my Candy Cane Chocolate Marshmallows. Perfect for a cozy evening in your favorite fuzzy socks, these treats are surprisingly easy to make and look infinitely more impressive than the effort they require. They’re the kind of thing you whip up to wow guests during holiday gatherings or to simply satisfy that post-dinner sweet tooth while binge-watching your favorite show. Trust me, they’re a hit! Jump to Recipe
What You’ll Need
This recipe is like a scavenger hunt in your pantry; chances are you already have most of the goodies tucked away. Here’s what you’ll need:
- Candy canes – the stars of the show!
- Dark chocolate – for that rich, bittersweet contrast.
- Marshmallows – go for the big, fluffy kind.
- Milk chocolate – adds a creamy sweetness to balance the dark chocolate.
How to Make Candy Cane Chocolate Marshmallows
- First, let’s get those candy canes ready. Grab a few and crush them using the bottom of a sturdy glass or a mallet. You want pieces small enough to stick but not so tiny that they turn to dust. Set them aside.
- Set up a double boiler by placing a heat-safe bowl over a pot of simmering water. Make sure the bottom of the bowl doesn’t touch the water. Add the dark and milk chocolate to the bowl, stirring occasionally until the mixture is smooth and glossy.
- Now for the fun part—dip each marshmallow into the melted chocolate, ensuring it’s nicely coated but not drowning. Let the excess drip off back into the bowl.
- Immediately roll the chocolate-dipped marshmallow into the crushed candy canes. The pieces should stick to the chocolate, creating a delightful crunchy coating.
- Place each finished marshmallow on a sheet of wax paper. They’ll need to chill in the fridge for at least an hour, or until the chocolate has fully hardened.
Cook’s Notes
These little delights are pretty forgiving, so don’t stress if things get a bit messy. Here are a few pointers to keep you on track:
- If you don’t have a double boiler, don’t sweat it. Use a microwave in short bursts to melt the chocolate, stirring in between.
- Store your marshmallows in an airtight container in a cool, dry place. They should last up to a week, but honestly, they’ll probably disappear much sooner!
- To make ahead, prepare them up to two days in advance. They’re the perfect treat to have waiting for last-minute guests or unexpected sweet cravings.
Make It Your Own
- Try using white chocolate for a sweeter, milder twist. It pairs beautifully with peppermint!
- For a nutty crunch, roll the chocolate-coated marshmallows in finely chopped hazelnuts instead of candy canes.
- If you’re feeling adventurous, add a pinch of cayenne pepper to the melted chocolate for a spicy kick.
- Not a fan of peppermint? Substitute with crushed graham crackers and sprinkle with a touch of cinnamon for a s’mores vibe.
If you try this, I’d love to hear how it turns out—drop a comment or tag me in your marshmallow masterpiece! Happy indulging, and may your winter be as sweet as these treats!
Related update: Candy Cane Chocolate Marshmallows
Related update: Grandma Inez’s Pineapple Pie
Related update: Tuna and Tofu Cold Dish
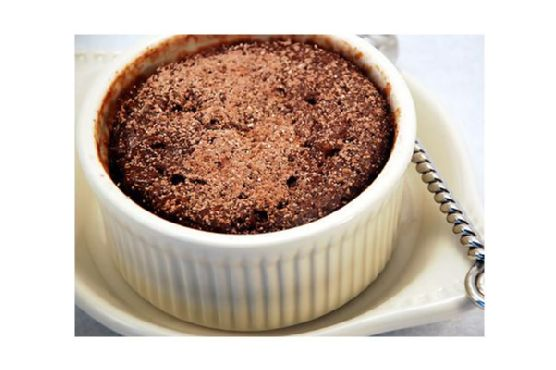
It was one of those evenings where you stare into your pantry hoping for a miracle, and it just magically happens! I had a sweet tooth that just wouldn’t quit, but the thought of baking a whole cake felt like running a marathon in heels. Ever been there? Enter: the 2 Minute Chocolate Yum. It’s that indulgent treat that saves you from dessert FOMO when you’re short on time and ingredients. Seriously, it’s like a chocolate hug in a mug. Imagine something that’s as easy as making a cup of coffee but infinitely more rewarding. Just a quick whip and zap, and you’ve got a dessert that feels like it took way more effort than it did. Also, if you’ve got a sudden guest or a cranky kid demanding sweets, this is your lifesaver.
Jump to Recipe
What You’ll Need
This recipe is a pantry hero; chances are, you’ve got most of these on hand. Here’s what you’ll need to whip up some chocolate magic:
- Cocoa powder
- Egg
- Flour
- Milk
- Oil
- Salt
- Sugar
- Vanilla
How to Make 2 Minute Chocolate Yum
- In a small mixing bowl, combine the cocoa powder, egg, flour, milk, oil, salt, sugar, and vanilla. Whip them together until the mixture is smooth and glossy, much like a velvety chocolate drizzle.
- Divide the batter evenly between two 6-8 oz. ramekins. Fill them a little over halfway full so they have room to puff up in the microwave.
- Microwave one ramekin at a time for about 2 minutes. You’ll know it’s done when the cake is puffed and looks like it’s ready to burst with chocolatey goodness.
- Serve immediately. Top with a scoop of ice cream, a dollop of whipped cream, or just a sprinkle of powdered sugar and cocoa for that minimalist vibe.
Cook’s Notes
Let’s keep it real: microwaves vary, so you might need to adjust the cooking time based on your machine’s mood swings. Start with 90 seconds if you’re unsure and then zap it in 10-second intervals until perfect. If you want to save some batter for later, it holds up well covered in the fridge for a day. Just give it a good stir before microwaving. Stuck with leftovers? Unlikely, but if that happens, you can refrigerate and reheat gently. The texture might change a bit, but it’ll still hit the spot.
Make It Your Own
- Black Forest Twist: Add a spoonful of cherry pie filling in the middle of the batter before cooking for a luscious surprise.
- Nutty Buddy: Stir in a tablespoon of peanut butter for a chocolate-peanut butter dream.
- Minty Fresh: A few drops of peppermint extract can turn this into a festive treat.
- Spice It Up: Add a pinch of cinnamon or chili powder for a surprising kick.
If you try this, I’d love to hear how it turns out! Drop a comment or tag me on social media with your chocolatey creations. Keep those sweet moments coming!
Related update: 2 Minute Chocolate Yum
Related update: Candy Cane Chocolate Marshmallows