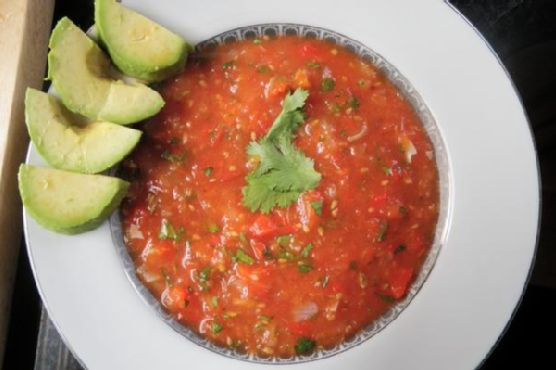
Shrimp and Asparagus Foil Packs with Garlic Lemon Butter Sauce | Made by Meaghan Moineau

Shrimp and Asparagus Foil Packs with Garlic Lemon Butter Sauce

Intro

There’s something magical about the aroma of garlic and lemon wafting through the air, especially when it brings back memories of summer barbecues with family. I remember the first time I made these shrimp and asparagus foil packs. It was a warm evening, and my parents had come over for dinner. As the foil packs sizzled on the grill, we sat in the backyard, reminiscing about our family vacations to the coast. These foil packets quickly became a family favorite, capturing those cherished moments in every bite.

Why You’ll Love It

If you’re looking for a quick, wholesome meal that doesn’t skimp on flavor, these shrimp and asparagus foil packs are perfect for you. Here’s why:

  • Easy to Prepare: Minimal prep work and cleanup make this an ideal dish for busy weeknights.
  • Packed with Flavor: The garlic lemon butter sauce infuses the shrimp and asparagus with a burst of freshness and richness.
  • Healthy and Nutritious: Loaded with protein and vitamins, this dish is both satisfying and guilt-free.
  • Customizable: You can easily adjust the ingredients to suit your personal taste or dietary needs.

Ingredients

  • Asparagus
  • Diced butter
  • Dry white wine
  • Fresh parsley
  • Garlic
  • Fresh lemon juice
  • Lemon zest
  • Black salt and pepper
  • Shrimp

Instructions

  1. Preheat a grill to medium-high heat (about 400 – 425 degrees).
  2. Cut 4 sheets of 14 by 12-inch heavy-duty aluminum foil and lay each piece separately on the countertop.
  3. Divide shrimp among packets near the center, then place asparagus to one side of the shrimp (going the long direction of the foil).
  4. Pour 1/2 Tbsp white wine over each packet.
  5. Sprinkle over garlic (1 tsp per packet) and lemon zest, then season with salt and pepper.
  6. Divide butter pieces evenly among packets, layering them over the shrimp and asparagus.
  7. Wrap packets and crimp edges together, then wrap ends up (don’t wrap too tight – keep a little extra space inside for heat to circulate).
  8. Grill, sealed side upward, until shrimp has cooked through, about 9 – 10 minutes.
  9. Carefully unwrap, then drizzle with lemon juice (or just serve with lemon wedges for spritzing) and sprinkle with parsley.

Tips

For the best results, here are a few tips to keep in mind:

  • Choose Fresh Ingredients: Fresh shrimp and asparagus will make a significant difference in flavor.
  • Don’t Overcook: Keep an eye on the grill to ensure the shrimp doesn’t overcook and become rubbery.
  • Use Heavy-Duty Foil: This will prevent tearing and help the packets hold their shape.

Variations & Substitutions

Feel free to make this recipe your own with some variations:

  • Protein Swap: Try using chicken or salmon if you prefer.
  • Vegetable Add-Ins: Add bell peppers or cherry tomatoes for more color and variety.
  • Herbal Twist: Substitute parsley with dill or basil for a different flavor profile.

Storage

If you have leftovers, store them in an airtight container in the refrigerator for up to 2 days. Reheat gently on the stovetop or in the microwave, adding a splash of water or broth to keep the shrimp moist.

FAQ

Can I prepare these foil packs in the oven?

Absolutely! If you don’t have a grill, you can bake the foil packs in the oven at 425 degrees for about 10-12 minutes until the shrimp is cooked through and the asparagus is tender.

What type of shrimp should I use?

Use large, peeled, and deveined shrimp for the best results. Fresh or frozen (thawed) shrimp both work well.

Is there a non-alcoholic substitute for the white wine?

Yes, you can use chicken broth or a mix of water and a splash of apple cider vinegar as a substitute for white wine.

Nutrition

This dish is not only delicious but also nutritious. It’s a great source of protein from the shrimp and vitamins from the asparagus. The lemon butter sauce adds healthy fats, making it a well-rounded meal. For those counting calories, you can adjust the amount of butter used to suit your dietary needs.

Conclusion

Shrimp and Asparagus Foil Packs with Garlic Lemon Butter Sauce is a recipe that combines simplicity with exceptional flavor. Whether you’re hosting a family barbecue or seeking a quick weeknight dinner, this dish delivers on all fronts. Try it out and create your own memories around the grill. Happy cooking!

Related update: Shrimp and Asparagus Foil Packs with Garlic Lemon Butter Sauce

Related update: My Drunken Fish Fillet

Kale and Chickpea Soup with Lemon | Made by Meaghan Moineau

Kale and Chickpea Soup with Lemon

There’s something magical about a pot of soup simmering on the stove, its aroma enveloping the kitchen like a warm hug. My love affair with soups began on a chilly autumn afternoon at my grandmother’s house. I remember her kitchen, a small, cozy space filled with love and laughter, where she would prepare the most comforting soups. Her kale and chickpea soup was a family favorite, and I’ve carried on the tradition, adding my own twist with fresh lemon juice to brighten the flavors. This recipe is my homage to her, combining the wholesome goodness of chickpeas and kale with the zesty freshness of lemon. It’s a simple pleasure, perfect for warming your soul on a cold day.

Why You’ll Love It

This Kale and Chickpea Soup with Lemon is a delightful blend of flavors and textures. It’s hearty and satisfying, yet light enough for a quick lunch or a cozy dinner. The combination of tender kale, protein-rich chickpeas, and fragrant rosemary, all enhanced by the tangy lemon juice, makes for a truly memorable dish. It’s not just nutritious; it’s a bowl of comfort and a celebration of wholesome ingredients. Plus, it’s easy to make, with simple steps and minimal prep work. Whether you’re a seasoned cook or a kitchen novice, you’ll find joy in creating and savoring this delicious soup.

Ingredients

  • 2 banana shallots, finely diced
  • 1 bay leaf
  • 1 can of chickpeas, drained and rinsed
  • 2 stalks of celery, diced
  • 1/2 teaspoon chili flakes
  • Crusty bread, for serving
  • 1 garlic clove, crushed
  • Juice of 1 lemon
  • 200g kale, chopped
  • 1 lemon, sliced for garnish
  • 2 tablespoons olive oil
  • Parmesan cheese, for serving
  • 1 teaspoon rosemary leaves, finely chopped
  • Salt, to taste
  • 1 liter of vegetable or chicken stock

Instructions

  1. Set a dutch oven or large saucepan over medium heat and pour in the olive oil.
  2. Finely dice the shallots and add to the pan, stirring to coat with the oil.
  3. Make 4 or 5 long horizontal slices in the celery stalk and dice. Add this to the pan and stir.
  4. Finely chop the rosemary leaves and stir into the pan together with the bay leaf and the chili flakes.
  5. Peel the garlic clove and, using the flat of your knife and the heel of your hand, crush so that it is still whole and add to the pan.
  6. Add the chickpeas and the kale, and stir.
  7. Pour in the hot stock, let it come to a boil, and then turn down the heat. Let it simmer for 20 minutes until the kale is tender.
  8. Squeeze in the juice of half a lemon. Check the seasoning and adjust to taste. You might want more lemon or salt depending on the stock used.
  9. Working in batches or in the pan itself if you have a stick blender, blitz until you have the texture you like. I prefer to set aside a couple of ladlefuls and use a stick blender to blitz the rest.
  10. Serve hot, floating a couple of slices of lemon on top of each serving. Pass around the parmesan cheese for everyone to help themselves. Serve with toasted crusty bread.

Tips

To enhance the flavor of the soup, consider using homemade stock if you have the time. It can make a significant difference. Also, taste as you go! The lemon juice and salt levels can vary depending on the stock you use. If you like a bit more heat, don’t hesitate to increase the chili flakes. Lastly, if you don’t have a stick blender, a regular blender will work just fine, but be cautious with the hot liquid.

Variations & Substitutions

This recipe is quite versatile. You can substitute the kale with spinach or Swiss chard if that’s what you have on hand. If you prefer a creamier soup, you can add a splash of coconut milk or cream after blending. For a protein boost, consider adding cooked chicken or turkey. Vegetarians can opt for vegetable stock, while carnivores might enjoy the depth that a good chicken stock brings.

Storage

This soup stores wonderfully and often tastes even better the next day as the flavors meld. Allow the soup to cool completely before transferring it to an airtight container. It will keep in the refrigerator for up to 4 days. For longer storage, you can freeze the soup for up to 3 months. Reheat gently on the stove, adding a bit of water or stock if the soup has thickened too much.

FAQ

Can I make this soup ahead of time?

Absolutely! This soup is perfect for making ahead. It keeps well in the fridge and the flavors develop even more after a day or two. Just reheat it gently before serving.

What can I use instead of chickpeas?

If you’re not a fan of chickpeas, you can substitute them with white beans or lentils. They will provide a similar texture and nutritional benefits.

Is this soup suitable for vegans?

Yes, this soup can easily be made vegan. Simply ensure that you use vegetable stock and omit the parmesan cheese, or replace it with a vegan alternative.

Nutrition

This soup is packed with nutrients. Kale is a superfood rich in vitamins A, C, and K, while chickpeas provide protein and fiber. The addition of lemon not only enhances the flavor but also adds vitamin C. It’s a wholesome dish that’s both nourishing and delicious, perfect for those looking to maintain a balanced diet.

Conclusion

Kale and Chickpea Soup with Lemon is more than just a meal; it’s a comforting embrace that brings people together. Whether enjoyed alone with a good book or shared with loved ones around the table, this soup is a testament to the power of simple, wholesome ingredients. I hope this recipe brings you as much joy and warmth as it does for my family. Happy cooking!

Related update: Kale and Chickpea Soup with Lemon

Related update: Shrimp and Asparagus Foil Packs with Garlic Lemon Butter Sauce

Related update: Ham and Red Bean Soup

Lebanese Tabouleh | Made by Meaghan Moineau

Lebanese Tabouleh: A Taste of Tradition

Intro

There’s something magical about a dish that transports you back to a cherished memory, and Lebanese Tabouleh does just that for me. I recall warm summer afternoons spent in my grandmother’s kitchen, the air filled with the aroma of fresh herbs and the sound of laughter. She would meticulously chop parsley and mint, telling stories of her childhood in Lebanon. This dish is more than a salad; it is a celebration of heritage, a blend of fresh ingredients that come together in harmony. Today, I’m excited to share this traditional recipe with you, hoping it brings as much joy to your kitchen as it has to mine.

Why You’ll Love It

Lebanese Tabouleh is not just a salad; it’s a symphony of flavors that sings of freshness and vitality. You’ll love its vibrant colors and the way the ingredients complement each other to create a refreshing and satisfying dish. Whether you’re looking for a healthy side or a light main course, this tabouleh is perfect for any occasion. It’s vegan, packed with nutrients, and incredibly easy to make. The combination of lemon juice and olive oil dressing ties everything together, making each bite a delightful experience.

Ingredients

  • 1 cup cooked bulgur wheat
  • 2 bunches flat leaf parsley
  • 1 bunch fresh mint
  • 4 green onions
  • Juice from 2 lemons
  • 1/4 cup olive oil
  • 4 roma tomatoes

Instructions

  1. Remove stems from parsley and mint.
  2. Rinse leaves in a colander and pat dry with a paper towel.
  3. In a food processor, pulse parsley and mint until finely chopped.
  4. Transfer the chopped herbs to a large mixing bowl.
  5. Add green onions, tomatoes, and bulgur wheat to the bowl; stir to combine.
  6. Toss the mixture with lemon juice and olive oil.
  7. Refrigerate for an hour before serving to let the flavors meld together.
  8. Serve on its own or with pita bread. Enjoy!

Tips

For the best flavor, use the freshest ingredients you can find. Make sure to dry the parsley and mint thoroughly after washing to prevent the salad from becoming watery. If you don’t have a food processor, you can finely chop the herbs by hand—just be patient and take your time!

Variations & Substitutions

While traditional tabouleh uses bulgur wheat, you can substitute with quinoa for a gluten-free option. Feel free to add cucumbers or bell peppers for extra crunch and color. If you prefer a milder onion flavor, substitute green onions with shallots.

Storage

Tabouleh can be stored in an airtight container in the refrigerator for up to three days. Keep in mind that the herbs will lose their vibrant color over time, so it’s best enjoyed fresh. If the salad becomes too dry, simply toss it with a little more olive oil and lemon juice before serving.

FAQ

Can I prepare tabouleh in advance?

Yes, you can prepare tabouleh a day in advance. In fact, allowing the salad to sit for a few hours or overnight in the refrigerator can enhance the flavors as they meld together. Just make sure to store it in an airtight container to keep it fresh.

What can I serve with tabouleh?

Tabouleh pairs wonderfully with a variety of dishes. Serve it alongside grilled meats, roasted vegetables, or as part of a mezze platter with hummus, baba ganoush, and warm pita bread. It’s also a great topping for falafel wraps or as a refreshing side for a summer barbecue.

Nutrition

This tabouleh is a nutritious powerhouse. Packed with fresh herbs, it’s rich in vitamins A, C, and K. The bulgur wheat provides a good source of fiber and protein, while the olive oil offers heart-healthy fats. Overall, it’s a delicious way to enjoy a variety of nutrients in one dish.

Conclusion

Lebanese Tabouleh is more than just a salad; it’s a beloved dish that brings people together. Whether you’re sharing it with family and friends or enjoying it on a quiet afternoon, it’s a recipe that promises freshness, flavor, and a touch of nostalgia. I hope it becomes a favorite in your home, just as it is in mine. Happy cooking!

Related update: Lebanese Tabouleh

Chicken Adobo & Coconut Ginger Rice | Made by Meaghan Moineau

Chicken Adobo & Coconut Ginger Rice

Intro

There’s something truly magical about the smell of chicken adobo simmering on a lazy Sunday afternoon. It’s a dish that’s been passed down through generations, each family adding their own unique twist. For me, the aroma of soy sauce mixed with the tang of vinegar and the warmth of garlic brings back fond memories of my grandmother’s kitchen. I remember sitting on a stool, eagerly watching her every move, as she expertly crafted this savory masterpiece. She’d always serve it with a side of coconut ginger rice, a fragrant companion that perfectly complemented the adobo. This recipe is a tribute to those cherished moments, and I hope it brings as much joy to your table as it has to mine.

Why You’ll Love It

This Chicken Adobo & Coconut Ginger Rice recipe is a delightful blend of savory, sweet, and tangy flavors that will make your taste buds dance. The tender chicken, infused with the rich marinade, paired with the creamy coconut and spicy ginger rice, makes for a comforting and satisfying meal. Whether you’re new to Filipino cuisine or a seasoned fan, this dish is easy to prepare and perfect for any occasion.

Ingredients

  • 1/2 cup low sodium soy sauce
  • 1/2 cup apple cider vinegar
  • 4 cloves garlic, smashed
  • 1 teaspoon whole peppercorns
  • 2 tablespoons brown sugar
  • 2 bay leaves
  • 2 pounds bone-in chicken thighs
  • 1 tablespoon grapeseed oil
  • 1 cup chicken broth
  • 1 tablespoon cornstarch
  • 1/4 cup water (for cornstarch mixture)
  • 3 cups water (for rice)
  • 1 1/2 cups rice (jasmine or long grain)
  • 1/2 cup sweetened shredded coconut
  • 1 tablespoon fresh ginger, grated
  • 2 scallions, thinly sliced
  • 2 tablespoons fresh parsley, chopped
  • 1 teaspoon kosher salt

Instructions

  1. In a large bowl or flat dish, combine the soy sauce, vinegar, garlic, peppercorns, brown sugar, and bay leaves. Add the chicken thighs, ensuring they are fully submerged in the marinade. Cover and marinate in the refrigerator for at least 1 hour, preferably overnight.
  2. When ready to cook, heat the grapeseed oil in a large pan over medium-high heat. Remove the chicken from the marinade, reserving the liquid, and brown the chicken thighs on both sides, about 2-3 minutes per side. Remove the chicken and set aside.
  3. Pour the reserved marinade and chicken broth into the pan. Bring to a boil over medium heat.
  4. Once boiling, return the chicken to the pan, cover, and reduce the heat to a simmer. Cook for about 10 minutes.
  5. In a small bowl, whisk together 1/4 cup water and the cornstarch until smooth. Add this slurry to the pan, stirring to combine. Turn the chicken pieces over, cover again, and cook until the chicken is cooked through and the sauce has thickened, about 6-9 minutes.
  6. Meanwhile, in a medium saucepan, bring 3 cups of water to a boil. Add a pinch of salt. Once boiling, add the rice and cook according to package instructions.
  7. When the rice is cooked, fluff with a fork and toss with the scallions, parsley, ginger, and shredded coconut.
  8. To serve, place a generous scoop of coconut ginger rice on a plate, top with chicken adobo, and drizzle with the sauce from the pan.

Tips

  • For deeper flavors, marinate the chicken overnight.
  • Use fresh ginger and garlic for the best taste.
  • Adjust the sweetness and tanginess by altering the amounts of brown sugar and vinegar to suit your palate.

Variations & Substitutions

If you’re looking to change things up, consider these variations:

  • Protein: Swap chicken thighs for chicken breasts or pork shoulder for a different texture.
  • Vinegar: Try using rice vinegar or white vinegar if apple cider vinegar is unavailable.
  • Rice: Brown rice or quinoa can be used as a healthier alternative to white rice.

Storage

Store any leftover Chicken Adobo & Coconut Ginger Rice in an airtight container in the refrigerator for up to 3 days. To reheat, simply microwave on medium heat until warmed through. The flavors meld beautifully over time, making for a delicious next-day meal.

FAQ

Can I freeze Chicken Adobo?

Yes, you can freeze Chicken Adobo. Allow it to cool completely, then store in an airtight container or freezer bag for up to 3 months. Thaw in the refrigerator overnight before reheating.

What can I serve with Chicken Adobo?

Chicken Adobo pairs wonderfully with steamed vegetables, a fresh green salad, or roasted potatoes. The coconut ginger rice is a traditional accompaniment, but feel free to explore other options.

Nutrition

This dish is a balanced meal with protein from the chicken, carbohydrates from the rice, and healthy fats from the coconut. It’s a great choice for a family meal, providing essential nutrients while being incredibly delicious.

Conclusion

Chicken Adobo & Coconut Ginger Rice is more than just a meal; it’s a culinary journey that brings comfort and nostalgia with each bite. Whether you’re sharing it with family or indulging in a quiet dinner for one, this dish promises satisfaction and smiles. So go ahead, gather your ingredients, and create your own memories with this timeless recipe. Enjoy!

Related update: Chicken Adobo & Coconut Ginger Rice

Havarti and Asparagus Quiche | Made by Meaghan Moineau

Havarti and Asparagus Quiche: A Delightful Spring Brunch

Intro

There’s something about the smell of a freshly baked quiche that takes me back to Sunday brunches at my grandmother’s house. The table was always set with the finest lace tablecloth, and the kitchen was filled with the comforting scent of buttery pastry and savory fillings. One of my all-time favorites was her Havarti and Asparagus Quiche, a dish that perfectly captured the essence of spring. Today, I’m thrilled to share this nostalgic recipe with you, bringing a touch of elegance and warmth to your own table.

Why You’ll Love It

This Havarti and Asparagus Quiche is a true celebration of flavors and textures. The creamy custard, combined with the subtle sharpness of Havarti cheese and the fresh, tender asparagus, creates a harmonious balance that is both satisfying and sophisticated. The homemade crust is perfectly flaky, providing a delightful contrast to the rich filling. Whether you’re serving it for a special occasion or simply enjoying a slice on a quiet morning, this quiche is sure to become a beloved favorite in your home.

Ingredients

  • 1 cup all-purpose flour
  • 1/4 teaspoon salt
  • 1/2 teaspoon sugar
  • 1/2 cup unsalted butter, chilled and diced
  • 5-6 tablespoons ice water
  • 1 bunch asparagus, trimmed
  • 2 cups Havarti cheese, shredded
  • 3 large eggs
  • 1 cup heavy cream
  • 1/2 cup milk

Instructions

  1. In the bowl of a food processor, combine flour, salt, and sugar. Add butter and pulse until the mixture resembles the size of small peas.
  2. Add the first 5 tablespoons of water, one at a time. Check consistency – if the mixture holds together when pinched, the crust is perfect. If it still crumbles, add the last tablespoon of water one teaspoon at a time, rechecking consistency.
  3. Turn the dough out onto a piece of plastic wrap. Form the dough into a disk, and refrigerate for 30 minutes.
  4. Meanwhile, boil a pot of water large enough to fit the stalks of asparagus. Blanch the asparagus for 2-3 minutes, then transfer to an ice bath. Set aside.
  5. Preheat the oven to 350°F (175°C). On a lightly floured surface, roll the dough into a circle a few inches larger than your quiche or pie pan. Transfer the dough to the pan, trimming the excess and crimping the edges.
  6. Poke a few fork holes in the crust and blind bake for 5 minutes. Remove from oven and sprinkle with Havarti cheese. Set aside.
  7. Increase oven temperature to 375°F (190°C). In a large bowl, combine eggs, heavy cream, and milk, whisking thoroughly. Pour over the cheese.
  8. Arrange the asparagus in a spoke pattern on top of the egg mixture. Bake for 40 minutes. Check the crust; if it’s getting too brown, cover with foil. Bake an additional 10-12 minutes.
  9. Test doneness with a butter knife. If it comes out clean, the quiche is ready. If not, bake for another 3-4 minutes with foil tented over the top.

Tips

  • Ensure all your ingredients, especially the butter, are cold when preparing the crust for the best flaky texture.
  • Use a rolling pin to gently lift and place the dough into the pan, preventing tears in the crust.
  • For an evenly baked quiche, rotate the pan halfway through the baking time.

Variations & Substitutions

If you want to experiment with this recipe, consider these variations:

  • Cheese: Swap Havarti with Gruyère or Swiss for a different flavor profile.
  • Vegetables: Add mushrooms or bell peppers for an extra layer of taste.
  • Herbs: Incorporate fresh dill or chives for an aromatic twist.

Storage

Once cooled, wrap your quiche tightly in plastic wrap or store in an airtight container. It can be refrigerated for up to 3 days. For longer storage, freeze individual slices and reheat in the oven before serving.

FAQ

Can I make the crust ahead of time?

Yes! You can prepare the crust a day in advance. Simply wrap it tightly in plastic wrap and store it in the refrigerator until you’re ready to roll it out.

Is it possible to use frozen asparagus?

While fresh asparagus provides the best flavor and texture, frozen asparagus can be used in a pinch. Make sure to thaw and pat it dry before using.

Can I make this quiche dairy-free?

Absolutely! Substitute the butter with a vegan butter alternative and use plant-based milk and cream. Opt for a dairy-free cheese to maintain the cheesy flavor.

Nutrition

This quiche is rich in protein from the eggs and cheese while providing a healthy dose of vitamins from the asparagus. Each slice offers a balanced combination of fats and carbohydrates, making it a satisfying meal.

Conclusion

Whether you’re reminiscing about cherished family gatherings or creating new memories, this Havarti and Asparagus Quiche is the perfect dish to grace your table. Its blend of flavors and textures is a testament to the beauty of simple, wholesome ingredients. We hope this recipe brings as much joy to your home as it has to ours. Enjoy!

Related update: Havarti and Asparagus Quiche

Related update: Chicken Adobo & Coconut Ginger Rice

Caribbean black bean and sweet potato soup | Made by Meaghan Moineau

Caribbean Black Bean and Sweet Potato Soup

Intro

There’s something magical about a bowl of soup that can transport you to another place. For me, this Caribbean Black Bean and Sweet Potato Soup does just that. I remember my first encounter with this delightful dish during a family trip to a little coastal village in Jamaica. The aroma of spices wafted through the air as we sat by the beach, the sun setting in the horizon, painting the sky with hues of orange and pink. The rich, comforting flavor of the soup was a perfect complement to the cool ocean breeze. Every time I prepare this soup, I’m reminded of that cherished memory, and I hope it brings a touch of the Caribbean warmth to your home as well.

Why You’ll Love It

This Caribbean Black Bean and Sweet Potato Soup is more than just a delightful culinary experience; it’s a bowl of comfort and warmth. Here are a few reasons why you’ll fall in love with it:

  • Rich in Flavor: The combination of spices like ginger and allspice gives this soup a unique and robust flavor profile that’s both comforting and exotic.
  • Nutritious: Packed with protein-rich black beans and nutrient-dense sweet potatoes, this soup is as healthy as it is delicious.
  • Versatile: It’s perfect for any occasion, whether you’re looking for a hearty lunch or a warming dinner.
  • Easy to Make: With simple steps and readily available ingredients, you can bring a taste of the Caribbean to your kitchen with ease.

Ingredients

  • 1 cup dry black turtle beans
  • 2 tablespoons coconut oil
  • 1 large yellow sweet onion, diced
  • 2 jalapenos, seeded and minced
  • 1 teaspoon ground ginger
  • 1 teaspoon ground allspice
  • 1 teaspoon dried thyme
  • 1 tablespoon coarse sea salt, plus more to taste
  • 6 cups vegetable broth
  • 2 large sweet potatoes, peeled and cubed
  • 1 tablespoon brown sugar
  • 1/4 cup chopped green onions
  • 1/4 cup fresh cilantro, chopped

Instructions

  1. Rinse the black beans thoroughly and place them in a large bowl. Cover the beans with about 4 inches of water and allow them to soak overnight or for at least 8 hours.
  2. Once soaked, strain and rinse the black beans again.
  3. In a large soup pot, heat the coconut oil over medium heat. Add the diced onion and minced jalapenos, sautéing for about 10 minutes until soft and fragrant.
  4. Add the soaked black beans and pour in the vegetable broth. Stir in ground ginger, allspice, thyme, and sea salt.
  5. Bring the mixture to a boil, then reduce the heat and let it simmer for approximately 1 hour and 30 minutes.
  6. Add the cubed sweet potatoes and brown sugar to the pot. Continue to simmer for an additional 30 minutes, or until the beans and sweet potatoes are tender.
  7. Remove 1 cup of the soup and puree it in a blender, then return it to the pot to add creaminess to the soup.
  8. Stir in the chopped cilantro and green onions, and season with additional salt and pepper to taste. Serve warm, and enjoy!

Tips

  • Bean Soaking: If you’re short on time, use the quick soak method by boiling the beans for 2 minutes, then letting them sit for 1 hour before proceeding with the recipe.
  • Spice Level: Adjust the number of jalapenos to your taste preference. For a milder soup, use only one jalapeno or remove the seeds.
  • Texture: For a thicker soup, puree more than a cup of the mixture, or use an immersion blender directly in the pot for desired consistency.

Variations & Substitutions

  • Protein Boost: Add cooked chicken or shrimp for an extra protein punch.
  • Vegan Option: Ensure that the vegetable broth is vegan-friendly and consider adding a squeeze of lime for zest.
  • Spice Swap: If you don’t have allspice, a blend of cinnamon, nutmeg, and cloves can be used as a substitute.

Storage

This soup keeps well, making it perfect for meal prep or enjoying throughout the week. Store any leftovers in an airtight container in the refrigerator for up to 5 days. The flavors will continue to meld and deepen, making it even more delicious the next day. For longer storage, freeze the soup in individual portions for up to 3 months. Thaw overnight in the refrigerator before reheating.

FAQ

Can I use canned black beans instead of dried?

Yes, you can use canned black beans as a convenient alternative. If you choose to use canned beans, drain and rinse them well. You can skip the soaking step and proceed directly to sautéing the onions and jalapenos. Since canned beans are already cooked, adjust the simmering time accordingly and add the beans during the last 30 minutes of cooking.

What can I serve with this soup?

This Caribbean Black Bean and Sweet Potato Soup is quite filling on its own, but it pairs wonderfully with a side of crusty bread or warm tortillas. A fresh green salad with citrus dressing can also complement the soup beautifully, adding a refreshing contrast to the rich flavors.

Is this soup suitable for freezing?

Absolutely! This soup freezes exceptionally well. Allow it to cool completely before transferring it to freezer-safe containers. It can be frozen for up to 3 months. To reheat, thaw overnight in the refrigerator and warm on the stove over medium heat. You may need to add a splash of broth or water to loosen the consistency as it heats.

Nutrition

This soup is not only delicious but also nutritious. Each serving is rich in fiber, vitamins, and minerals, making it a hearty and healthy choice. Black beans provide an excellent source of plant-based protein, while sweet potatoes are loaded with vitamin A and potassium. The use of coconut oil adds healthy fats, and the array of spices brings antioxidant properties to the table. Enjoy this wholesome meal knowing it’s both good for your taste buds and your body.

Conclusion

Incorporating the tropical flair of the Caribbean, this Black Bean and Sweet Potato Soup is a delightful and nourishing dish that can be enjoyed year-round. Whether you’re reminiscing about past travels or simply craving a comforting meal, this soup is sure to warm your heart and satisfy your palate. I hope you enjoy making this recipe as much as I do, and that it brings a little bit of the Caribbean sunshine into your home. Bon appétit!

Related update: Caribbean black bean and sweet potato soup

Related update: Lamb & Sweet Potato Pot Pie

Related update: Kale and Chickpea Soup with Lemon

Cinnamon & Sugar Roasted Chickpeas | Made by Meaghan Moineau

Cinnamon & Sugar Roasted Chickpeas

Intro

There’s something incredibly comforting about the aroma of cinnamon wafting through the air, evoking memories of cozy gatherings and delightful treats. I still remember the first time I tried roasted chickpeas at a family picnic. My grandmother, with her warmth and wisdom, had crafted a simple yet irresistible snack that captivated everyone. The subtle sweetness combined with a hint of spice was unlike anything I had tasted before. Today, I’m thrilled to share this cherished recipe with you: Cinnamon & Sugar Roasted Chickpeas. It’s a perfect blend of nostalgia and modern snacking.

Why You’ll Love It

This recipe combines the wholesome goodness of chickpeas with the delightful flavors of cinnamon and sugar. Whether you’re looking for a healthy snack to curb your cravings or a unique treat to impress your friends, these roasted chickpeas tick all the boxes. They’re crunchy, sweet, and just a bit spicy—everything you need in a satisfying snack.

Ingredients

  • Canned garbanzo beans
  • Olive oil
  • Maple syrup
  • Cinnamon
  • Cane sugar

Instructions

  1. Preheat oven to 425°F (220°C).
  2. Line a baking sheet with parchment paper or a silicone mat.
  3. Drain and rinse the chickpeas.
  4. Place the chickpeas between two sheets of paper towels and rub them gently to absorb the excess water. Pick out any loosened skin from the chickpeas. Don’t worry if you can’t get all of them out.
  5. Pour the dried chickpeas into a small bowl and mix in the olive oil, maple syrup, and cinnamon until well incorporated.
  6. Place the chickpeas on the baking sheet and bake for 15 minutes.
  7. After 15 minutes, give the chickpeas a quick stir.
  8. Continue baking the chickpeas at 3-4 minute increments. When they are browned and look quite dried, take them out of the oven. The longer you leave them in the oven, the crunchier they will be, but be careful not to burn the chickpeas!
  9. Let them cool for a few minutes and sprinkle the sugar on the roasted chickpeas. Enjoy!

Tips

For the best results, ensure the chickpeas are thoroughly dried before roasting. This helps them achieve that desirable crunch. If you have time, let the chickpeas air-dry for a bit longer after patting them with paper towels.

Variations & Substitutions

Feel free to get creative with this recipe! You can substitute the maple syrup with honey or agave syrup for a different sweetness profile. If you’re in the mood for a spicy kick, add a pinch of cayenne pepper to the mix. You can also experiment with different spices like nutmeg or cardamom to create your unique blend.

Storage

Store your roasted chickpeas in an airtight container at room temperature for up to a week. They make a great grab-and-go snack, perfect for lunchboxes or afternoon pick-me-ups.

FAQ

Can I use dried chickpeas instead of canned?

Yes, you can! However, you’ll need to cook the dried chickpeas first. Soak them overnight and boil them until tender before starting the roasting process. This adds an extra step, but it’s a great way to use up pantry staples.

Are roasted chickpeas healthy?

Absolutely! Chickpeas are a fantastic source of protein and fiber, making them a nutritious snack option. Plus, by controlling the ingredients in this homemade version, you can ensure they fit your dietary needs.

Nutrition

While exact nutritional values can vary depending on the specific brands you use, this snack is generally low in calories yet high in protein and fiber. It’s a guilt-free way to satisfy your sweet tooth!

Conclusion

Cinnamon & Sugar Roasted Chickpeas are more than just a snack; they’re a delightful fusion of flavors that brings warmth and joy to any occasion. Whether you’re savoring them on a quiet afternoon or sharing them with loved ones, these chickpeas are sure to become a beloved staple in your home. Enjoy the delicious crunch and the comforting scent of cinnamon with every bite!

Related update: Cinnamon & Sugar Roasted Chickpeas

Related update: Curious George's Gluten-Free Banana Nut Bread

Strawberry Basil Italian Ice | Made by Meaghan Moineau

Strawberry Basil Italian Ice

Intro

There’s something magical about the first taste of summer. For me, that taste has always been a mouthful of frosty, refreshing Italian ice. Growing up, my family would often visit a quaint little stand at the end of our street where the owner, an Italian immigrant named Giuseppe, crafted the most delightful ices in a rainbow of flavors. My favorite was always the strawberry basil—a combination so unexpected yet wonderfully refreshing. Today, I’m thrilled to share my own take on this classic summer treat, blending the sweetness of ripe strawberries with the aromatic hint of basil. It’s a nostalgic nod to those sun-drenched afternoons of my childhood.

Why You’ll Love It

This Strawberry Basil Italian Ice is not just a treat for your taste buds, but a delightful experience for all your senses. Here’s why you’ll fall in love with this recipe:

  • Refreshing and Light: Perfect for hot summer days when you crave something cool and invigorating.
  • Simple Ingredients: You’ll only need four basic ingredients, making it as easy as it is delicious.
  • Natural and Homemade: Free from artificial flavors and colors, this recipe is all about pure, fresh flavors.
  • Versatile: Can be served as a palate cleanser or a sweet treat at the end of a meal.

Ingredients

  • 1 cup fresh basil leaves
  • Juice of 1 lemon
  • 1 cup simple syrup (recipe below)
  • 2 cups fresh strawberries, hulled and halved

Instructions

  1. To make the simple syrup, combine one cup of water and one cup of sugar in a small saucepan or microwave-safe bowl. Heat until the sugar has completely dissolved. Allow it to cool slightly before using.
  2. Place the basil leaves, lemon juice, simple syrup, and strawberries in a blender.
  3. Puree the mixture until smooth and fully combined.
  4. Pour the mixture into 1 large container, or divide it evenly among 6 small dishes.
  5. Freeze for several hours or until fully set.
  6. When ready to serve, remove the container from the freezer and let it sit for about 10 minutes.
  7. Use a spoon to shave away the ice, creating a fluffy, snow-like texture. Enjoy!

Tips

  • For Best Flavor: Use ripe, in-season strawberries for the sweetest, most flavorful ice.
  • Blending: If your blender struggles with the mixture, add a splash of water to help it along.
  • Serving: Use chilled bowls or cups to keep your Italian ice frozen longer while serving.

Variations & Substitutions

Feel free to get creative with this recipe:

  • Different Herbs: Swap basil with mint for a more classic combination, or try adding a hint of rosemary for an earthy flavor.
  • Fruity Twists: Add a handful of raspberries or blueberries for an extra layer of flavor.
  • Sugar Alternatives: Use honey or agave syrup in place of the simple syrup for a different sweetness profile.

Storage

Store any leftover Italian ice in the freezer for up to one week. Be sure to cover it tightly with plastic wrap or a lid to prevent ice crystals from forming. When ready to enjoy again, let it thaw for a few minutes and then shave it with a spoon as before.

FAQ

Can I use frozen strawberries instead of fresh?

Yes, you can use frozen strawberries if fresh ones are not available. Just allow them to thaw slightly before blending to make it easier on your blender.

What if I don’t have a blender?

If you don’t have a blender, you can use a food processor instead. The key is to ensure the mixture is smooth and well blended to achieve the perfect texture.

Nutrition

Each serving of Strawberry Basil Italian Ice is approximately 100 calories, with most of the energy coming from the natural sugars in the strawberries and the simple syrup. It is a fat-free and gluten-free treat, perfect for those looking for a light and refreshing dessert.

Conclusion

This Strawberry Basil Italian Ice is a beautifully simple yet sophisticated treat that captures the essence of summer. Whether you’re reminiscing about childhood adventures or creating new memories, this recipe is sure to bring a smile to your face. Gather your ingredients, fire up that blender, and let this delightful dessert transport you to a sunlit afternoon, no matter where you are. Enjoy every refreshing spoonful!

Related update: Strawberry Basil Italian Ice

Dulce De Leche Cheesecake | Made by Meaghan Moineau

Dulce De Leche Cheesecake

Intro

There’s something magical about the rich, creamy texture of a well-made cheesecake. As a child, I remember watching my grandmother expertly whip together her signature desserts in our sunlit kitchen, the smell of caramel and vanilla swirling in the air. Her dulce de leche cheesecake was a family favorite, a decadent treat that brought us all together around the dining table. Inspired by those cherished memories, this Dulce De Leche Cheesecake recipe is a modern homage to her traditional creation, capturing the same warmth and sweetness that defined my childhood.

Why You’ll Love It

This Dulce De Leche Cheesecake is the perfect blend of creamy indulgence and subtle sweetness. You’ll appreciate the harmonious balance of flavors, from the smooth creaminess of the Philadelphia Balance cream cheese to the luscious caramel notes of the dulce de leche. The almond cookie crust adds a delightful crunch, contrasting beautifully with the velvety filling. Whether you’re a cheesecake connoisseur or a dessert novice, this recipe is sure to impress with its simple preparation and stunning results.

Ingredients

  • 200g almond cookies, crushed
  • 2 tbsp cornstarch
  • 500g Philadelphia Balance cream cheese, softened
  • 1 cup dulce de leche
  • 3 large eggs
  • 2 tbsp lemon juice
  • 1/2 tsp salt
  • 1 cup sugar
  • 100g unsalted butter, melted
  • 1/2 cup plain yogurt

Instructions

  1. In a mixing bowl, toss the almond cookie crumbs with the melted butter until well combined. Reserve 1 tablespoon of the mixture for the topping.
  2. Press the remaining mixture onto the bottom and up 3cm high of a greased 24cm springform pan. Chill until ready for use.
  3. Using an electric mixer, beat the Philadelphia Balance cream cheese and sugar in a large mixing bowl until smooth.
  4. Add yogurt and eggs, beating until just blended.
  5. Stir in cornstarch, dulce de leche, lemon juice, and zest until blended.
  6. Pour the mixture into the prepared crust and sprinkle the top with the reserved cookie crumbs.
  7. Steam bake the cheesecake at 165°C/330°F for 65 minutes until almost set.
  8. Turn the oven off and leave the cake inside with the oven door ajar for 1 hour.
  9. Cool the cheesecake completely and chill for at least 4 hours or overnight until firm.

Tips

Ensure all your ingredients are at room temperature before you begin mixing to achieve a smoother batter. For an even bake, use a water bath to prevent the cheesecake from cracking. Simply place the springform pan into a larger pan and fill the outer pan with hot water until it reaches halfway up the sides of the springform pan.

Variations & Substitutions

This recipe is highly adaptable to suit your taste preferences. Substitute almond cookies with graham crackers or digestive biscuits for a different flavor profile. If you prefer a more intense dulce de leche flavor, swirl additional dulce de leche into the top of the cheesecake batter before baking. For a zesty twist, incorporate orange zest instead of lemon.

Storage

Store the cheesecake in the refrigerator, covered, for up to 5 days. For longer storage, wrap it tightly in plastic wrap and aluminum foil, then freeze for up to 2 months. Thaw overnight in the refrigerator before serving.

FAQ

Can I make this cheesecake gluten-free?

Yes, you can make this cheesecake gluten-free by using gluten-free almond cookies or another gluten-free cookie alternative for the crust.

How do I know when the cheesecake is done baking?

The cheesecake is done when the edges are set and the center is slightly jiggly. It will continue to set as it cools in the oven with the door ajar.

What is a steam bake?

A steam bake involves placing the springform pan in a larger pan with water, creating a moist environment in the oven. This technique helps prevent cracks and ensures an even bake.

Nutrition

While exact nutrition can vary based on specific ingredients and portion sizes, a typical slice of this cheesecake provides a rich source of calcium and protein from the cream cheese and yogurt. However, it’s also high in sugar and fats, so it’s best enjoyed in moderation as part of a balanced diet.

Conclusion

Whether you’re baking for a special occasion or simply to satisfy a sweet craving, this Dulce De Leche Cheesecake is sure to become a new favorite. Its creamy texture, delightful flavor, and beautiful presentation make it a show-stopping dessert that’s surprisingly easy to prepare. Gather your ingredients, follow these simple steps, and soon you’ll be enjoying a slice of pure indulgence. Remember, the best recipes are those shared with loved ones, creating new memories that are as sweet as the dessert itself.

Related update: Dulce De Leche Cheesecake

Related update: Strawberry Basil Italian Ice

Corned Beef Cakes | Made by Meaghan Moineau

Corned Beef Cakes: A Savory Delight

Intro

Welcome to a recipe that brings back delightful memories of my grandmother’s kitchen. Every Sunday, the aroma of corned beef cakes would waft through the house, drawing everyone to the dining table. These cakes, crispy on the outside and tender on the inside, were a staple at our family gatherings. They carry a sense of nostalgia and warmth, reminding me of laughter-filled afternoons and the comforting embrace of home-cooked meals. Today, I’m excited to share this cherished recipe with you, hoping it brings the same joy to your table as it has to mine.

Why You’ll Love It

Corned beef cakes are a fusion of rich flavors and textures. They’re the perfect marriage of savory corned beef, creamy potatoes, and aromatic herbs. Whether you’re looking for a hearty snack, a delicious appetizer, or a side dish that stands out, these cakes will not disappoint. They’re easy to prepare, making them ideal for both casual and special occasions. Plus, the recipe is versatile, allowing you to tweak it to suit your family’s preferences.

Ingredients

  • 1 cup breadcrumbs
  • 2 chicken seasoning cubes
  • 1 can of corned beef
  • 2 eggs
  • 1/4 cup milk
  • Oil for frying
  • 1 bulb of onion, chopped
  • 2 tablespoons chopped parsley
  • 3 medium Irish potatoes
  • 1 scotch bonnet pepper, chopped

Instructions

  1. Wash, peel, and boil your potatoes with a pinch of chicken seasoning until tender.
  2. Mash the potatoes and set aside.
  3. Mash the canned corned beef and combine with the mashed potatoes.
  4. Add the chopped onions, parsley, chopped scotch bonnet pepper, and the remaining chicken seasoning cubes. Mix well and set aside.
  5. In a separate bowl, whisk the eggs with the milk.
  6. Pour approximately 3 tablespoons of the egg mixture into the corned beef and potato mix, stirring until fully integrated.
  7. Scoop a small portion of your mix and mold it into cakes.
  8. Dip each cake in the remaining egg mixture, then roll in the breadcrumbs, ensuring an even coating. Set aside.
  9. In a pan, heat the oil over medium-high heat for deep frying.
  10. Gently place the corned beef cakes into the hot oil and fry until golden brown, turning as needed.
  11. Carefully remove the cakes from the oil and drain on a paper towel-lined plate. Serve warm.

Tips

To ensure the perfect texture, make sure your potatoes are well-mashed and free of lumps. If you prefer a spicier kick, add more scotch bonnet pepper to taste. Be gentle when handling the cakes, as they can be soft and may crumble if not handled carefully. Consider using a slotted spoon for frying to help maintain the shape of the cakes.

Variations & Substitutions

If you’re looking to switch things up, try using sweet potatoes instead of Irish potatoes for a slightly sweeter flavor profile. For a cheesy twist, add some grated cheddar to the mix before molding the cakes. Vegetarians can substitute the corned beef with mashed chickpeas or lentils for a delicious alternative. Feel free to experiment with different herbs like cilantro or dill to add your personal touch.

Storage

Leftover corned beef cakes can be stored in an airtight container in the refrigerator for up to three days. To reheat, place them in a preheated oven at 350°F (175°C) for about 10 minutes or until heated through. Freezing is also an option; simply place the cakes on a baking sheet to freeze individually before transferring them to a freezer-safe bag. They can be stored in the freezer for up to two months. Thaw in the refrigerator overnight before reheating.

FAQ

Can I bake these instead of frying?

Yes, you can bake them! Preheat your oven to 400°F (200°C) and place the cakes on a baking sheet lined with parchment paper. Spray or brush them lightly with oil and bake for 20-25 minutes, flipping halfway through, until they’re golden and crisp.

What can I serve with corned beef cakes?

Corned beef cakes pair well with a simple green salad or roasted vegetables. For a more indulgent option, you can serve them with a side of garlic aioli or a dollop of sour cream. They also make a great addition to a brunch spread alongside scrambled eggs and toast.

Nutrition

While specific nutritional values can vary based on portion sizes and ingredient brands, a typical serving of corned beef cakes provides a good balance of protein and carbohydrates, making them a satisfying and energizing option. For those monitoring calorie intake, baking instead of frying can reduce the overall fat content.

Conclusion

Corned beef cakes are a delightful dish that combines comfort and flavor in every bite. Whether you’re recreating cherished family memories or introducing a new favorite to your culinary repertoire, these cakes are sure to impress. Easy to make and adaptable to various tastes, they’re a versatile addition to any meal. I hope you enjoy making and sharing them as much as I have. Happy cooking!

Related update: Corned Beef Cakes

Related update: Spanakopita Cups

Guacamole | Made by Meaghan Moineau

The Perfect Guacamole Recipe

Intro

There’s something incredibly comforting about making guacamole. It takes me back to my childhood, where Sunday afternoons meant family gatherings at my grandparents’ house. My grandmother’s guacamole was always the star of the meal, a creamy, flavorful delight that perfectly complemented the lively conversations and laughter that filled the room. Today, I’m excited to share a recipe that captures that same warmth and flavor. Whether you’re preparing it for a party or just a night in, this guacamole is sure to become a favorite in your household too.

Why You’ll Love It

This guacamole recipe is more than just an appetizer; it’s a celebration of fresh, vibrant flavors. You’ll love how the creamy avocados blend beautifully with the sharpness of onions, the heat of jalapenos, and the aromatic hints of cilantro, basil, and oregano. The addition of fresh lime juice not only enhances the taste but also keeps the guacamole looking green and fresh. It’s easy to make and can be customized to suit your taste preferences, making it a versatile choice for any occasion.

Ingredients

  • 3 ripe Haas avocados
  • 1 small onion, finely chopped
  • 1 jalapeno pepper, seeded and minced
  • 2 tablespoons fresh cilantro, chopped
  • 1 teaspoon salt
  • 1/2 teaspoon black pepper
  • 2 tablespoons fresh lime juice
  • 1 tablespoon fresh basil, chopped
  • 1 tablespoon fresh oregano, chopped

Instructions

  1. Cut the avocados in half lengthwise.
  2. Carefully drive a chef’s knife into the large pit and twist to remove it.
  3. Scoop the avocado out from the skin using a spoon and place it into a mixing bowl.
  4. Mash the avocado with a fork to your desired consistency.
  5. Add in the chopped onion, cilantro, oregano, and basil.
  6. Mix the ingredients to incorporate fully.
  7. Season the guacamole to taste with salt, pepper, and lime juice.
  8. Serve immediately or chill in the refrigerator.
  9. If not eating immediately, store in the refrigerator with plastic film wrap pressed directly onto the guacamole to prevent browning.

Tips

For the best guacamole, choose avocados that are ripe but not overripe. They should yield slightly when gently squeezed but not feel mushy. To keep your guacamole fresh, make sure to press the plastic wrap directly onto the surface to minimize exposure to air. This helps prevent browning. Finally, don’t skip the lime juice; it adds essential tartness and acts as a natural preservative.

Variations & Substitutions

If you’d like to change things up, try adding diced tomatoes or roasted corn for extra texture and sweetness. For those who prefer less heat, reduce or omit the jalapeno. You can also experiment with adding garlic or a dash of cumin for a different flavor profile. If you’re out of fresh herbs, dried ones can be used in smaller amounts, though fresh is always preferable for the best flavor.

Storage

Guacamole is best enjoyed fresh, but if you need to store it, keep it in an airtight container with a piece of plastic wrap pressed directly on the surface. This helps minimize browning. Stored this way, it should last about two days in the refrigerator. Remember to give it a good stir before serving again to refresh its appearance and flavor.

FAQ

Can I make guacamole in advance?

Yes, you can make guacamole a few hours in advance. Just be sure to store it properly with plastic wrap pressed directly onto the surface to minimize browning. Adding extra lime juice can also help preserve its color and flavor.

Is guacamole healthy?

Guacamole is a healthy addition to any diet, as it is rich in heart-healthy fats, vitamins, and minerals. Avocados are high in monounsaturated fats, which are good for cardiovascular health, and they also provide fiber, potassium, and vitamins C, E, and K.

Nutrition

A serving of this guacamole provides approximately 150 calories, primarily from the healthy fats in avocados. It’s low in carbohydrates and contains fiber, making it a satisfying and nutritious option. Be mindful of portion size, especially when pairing it with chips, to keep your meal balanced.

Conclusion

Whether you’re reminiscing about family gatherings or creating new memories, this guacamole recipe is sure to bring joy to your table. Its simple preparation, fresh ingredients, and irresistible taste make it a staple that you’ll return to time and again. Enjoy it with friends, family, or even as a solo treat, and savor the vibrant flavors that make guacamole an all-time favorite.

Related update: Guacamole

Tempered Spicy Potatoes | Made by Meaghan Moineau

Tempered Spicy Potatoes

Intro

As a child, the aroma of tempered spices wafting through our home was a sure sign of a special meal in the making. My grandmother had a magical way of transforming simple ingredients into something extraordinary, and her Tempered Spicy Potatoes were no exception. This dish, with its crispy exterior and tender, spicy interior, was a family favorite that never failed to bring everyone to the table. Today, I’m excited to share this nostalgic recipe with you, hoping it brings warmth and flavor to your home just as it did mine.

Why You’ll Love It

This recipe is a delightful blend of flavors and textures that will tantalize your taste buds. Whether you’re looking to spice up your weeknight meals or impress guests with something unique, these Tempered Spicy Potatoes are a perfect choice. They’re easy to make, require minimal ingredients, and are incredibly versatile. Plus, they pair beautifully with rice, roti, or even a slice of crusty bread.

Ingredients

  • Cinnamon stick
  • Curry leaves
  • Mustard seeds
  • Oil
  • Onions
  • Cooked par potatoes
  • Red dried chilli flakes
  • Salt
  • Turmeric

Instructions

  1. Cut the par-boiled potatoes into wedges.
  2. Heat oil in a pan for deep frying and fry the potatoes until they are slightly golden brown. Keep the fried potatoes aside.
  3. Place a frying pan on medium heat and add 1 1/2 tbsp of oil. (I used a non-stick pan.)
  4. Add the mustard seeds, cinnamon stick, and curry leaves. Let the mustard seeds pop.
  5. Next, add the sliced onions and cook for 1 minute.
  6. Add the potatoes, turmeric, and salt. Stir fry the potatoes for 5 minutes on low heat until the onions are slightly golden brown.
  7. Lastly, add the red chilli flakes and cook for a minute.
  8. Serve warm with rice, roti, or bread.

Tips

For the best results, ensure the potatoes are thoroughly dried after par-boiling; this will help them achieve a crispier texture when fried. If you prefer a milder spice level, adjust the amount of red dried chili flakes to suit your taste. Remember to keep the heat low when adding the spices to prevent them from burning, which can result in a bitter taste.

Variations & Substitutions

If you’re looking to experiment, consider these variations:

  • Herbs: Add fresh cilantro or mint leaves for an added burst of flavor.
  • Vegetables: Throw in some bell peppers or peas for a more colorful dish.
  • Spices: Swap the mustard seeds for cumin seeds for a different flavor profile.
  • Oil: Use ghee instead of oil for a richer taste.

Storage

These spicy potatoes are best enjoyed fresh, but if you have leftovers, store them in an airtight container in the refrigerator for up to 3 days. To reheat, simply warm them in a pan over low heat until heated through. Avoid microwaving, as it can make the potatoes soggy.

FAQ

Can I make this recipe vegan?

Absolutely! This recipe is naturally vegan as it uses plant-based ingredients. Just ensure any bread or sides you serve with it are vegan as well.

How can I make this dish less spicy?

If you prefer a milder version, reduce the amount of red dried chili flakes or substitute them with paprika for a less intense heat.

Can I use sweet potatoes instead of regular potatoes?

Yes, sweet potatoes can be a delicious alternative. They will add a subtle sweetness to the dish that pairs beautifully with the spices.

Nutrition

This dish is a great source of carbohydrates and is rich in flavor without being overly heavy. The use of spices brings added health benefits, including anti-inflammatory properties. Keep in mind that the nutritional content may vary based on portion sizes and specific brands of ingredients used.

Conclusion

Tempered Spicy Potatoes are more than just a side dish; they’re a celebration of flavors and family traditions. I hope you enjoy making this recipe and that it becomes a cherished part of your culinary repertoire. Whether you’re sharing it with loved ones or enjoying it as a comforting solo meal, may it bring warmth and happiness to your table.

Related update: Tempered Spicy Potatoes

Chicken Enchilada Salad Wraps | Made by Meaghan Moineau

Chicken Enchilada Salad Wraps

Intro

There’s something magical about recipes that bring back fond memories of family gatherings and cozy evenings. One of my favorite memories is of family picnics at the park, where my mom would pack a basket full of delicious and easy-to-eat meals. Among the assortment of sandwiches and snacks, her Chicken Enchilada Salad Wraps were always a hit. These wraps are the perfect blend of flavor and convenience, making them ideal for any occasion, whether it’s a quick lunch or a delightful picnic treat. Today, I’m excited to share this beloved recipe so you can enjoy these wraps as much as my family has over the years.

Why You’ll Love It

Chicken Enchilada Salad Wraps are the ultimate combination of flavor, ease, and versatility. Here’s why you’ll fall in love with this recipe:

  • Quick and Easy: With just a few simple ingredients, you can whip up these wraps in no time.
  • Flavorful: The creamy, spicy filling is balanced with fresh ingredients, making each bite a burst of deliciousness.
  • Versatile: Perfect for a quick meal, packed lunch, or a picnic snack.
  • Healthy: Made with light cream cheese and sour cream, these wraps are a lighter option that doesn’t compromise on taste.

Ingredients

  • 4 oz light cream cheese, softened
  • 1/2 cup sour light cream
  • 1 tsp chili powder
  • 1/2 tsp cumin
  • 1 clove garlic, minced
  • 1 can (12.5 oz) Swanson Premium Chicken, drained
  • 1 cup shredded cheddar cheese
  • 1 can (10 oz) diced tomatoes with green chilies, drained
  • 1/4 cup diced green onions
  • 2 tbsp fresh cilantro, chopped
  • 2 cups lettuce, chopped
  • 6 burrito-sized tortillas

Instructions

  1. In a medium bowl, blend together the light cream cheese, sour cream, chili powder, cumin, and minced garlic until smooth and well combined.
  2. Fold in the shredded cheddar cheese, Swanson Premium Chicken, drained tomatoes with green chilies, diced green onions, and chopped cilantro into the cream cheese mixture.
  3. Lay out the burrito-sized tortillas and divide the chicken mixture evenly among them.
  4. Top each tortilla with a portion of the chopped lettuce.
  5. Roll up each tortilla burrito-style, tucking in the sides as you go.
  6. Serve immediately or wrap in foil for later. Enjoy!

Tips

For the best Chicken Enchilada Salad Wraps, consider these helpful tips:

  • Ensure the cream cheese is softened for easier mixing.
  • To make rolling easier, slightly warm the tortillas before filling.
  • Cut wraps in half diagonally for easy handling, especially for packed lunches or picnics.

Variations & Substitutions

The beauty of this recipe is its flexibility. Here are some variations and substitutions you might consider:

  • Spice Level: Adjust the chili powder for more or less heat, or add a dash of hot sauce for an extra kick.
  • Protein: Swap the canned chicken for grilled chicken breast or rotisserie chicken for a different texture.
  • Cheese: Try using Monterey Jack or pepper jack cheese for a different flavor profile.
  • Tortillas: Use whole wheat or spinach tortillas for added nutrition.

Storage

These wraps are best enjoyed fresh, but they can also be stored for later:

  • Refrigerate: Wrap each enchilada salad wrap tightly in plastic wrap or foil and store in the refrigerator for up to 2 days.
  • Freeze: Although not recommended due to the fresh ingredients, you can freeze wraps without the lettuce for up to 1 month. Thaw in the refrigerator before adding fresh lettuce and serving.

FAQ

Can I make these wraps ahead of time?

Yes, you can prepare the filling a day in advance and store it in an airtight container in the refrigerator. Assemble the wraps just before serving to ensure they remain fresh and crisp.

What can I serve with Chicken Enchilada Salad Wraps?

These wraps are a meal on their own, but you can serve them with a side of tortilla chips, salsa, or a fresh fruit salad for a complete meal experience.

Can I make this recipe vegetarian?

Absolutely! Replace the chicken with canned black beans or grilled vegetables for a delicious vegetarian version.

Nutrition

While exact nutritional values can vary based on specific brands and quantities used, here’s an approximate breakdown per serving (1 wrap):

  • Calories: 320
  • Protein: 20g
  • Carbohydrates: 28g
  • Fat: 14g
  • Fiber: 3g

Conclusion

Chicken Enchilada Salad Wraps are a delightful blend of convenience and flavor, making them a fantastic choice for any meal or occasion. Whether you’re packing a lunch for work, planning a picnic, or simply looking for a quick and satisfying meal at home, these wraps are sure to please. Give this recipe a try, and I hope it becomes a staple in your household, just as it has in mine. Enjoy every bite!

Related update: Chicken Enchilada Salad Wraps

Almond Butter Slices | Made by Meaghan Moineau

Almond Butter Slices: A Delightful Treat

Intro

There’s something magical about the aroma of freshly baked almond butter slices wafting through the house. It takes me back to my grandmother’s cozy kitchen, where I would spend countless afternoons watching her expertly mix ingredients. Her baking tin, slightly worn but full of stories, was always ready for another batch of these delightful slices. This recipe, a cherished family tradition, combines the comforting flavors of almonds and butter with a hint of nostalgia. Today, I’m thrilled to share this beloved recipe so you can create your own warm memories and enjoy these delicious treats with your loved ones.

Why You’ll Love It

These Almond Butter Slices are incredibly easy to make and perfect for any occasion. Whether you’re hosting a tea party or simply craving a sweet treat, this recipe is a crowd-pleaser. Here’s why you’ll fall in love with this dessert:

  • Quick and Easy: With simple ingredients and minimal prep time, you’ll have delicious slices ready in under an hour.
  • Delightfully Crunchy: The almond topping provides a satisfying crunch, perfectly complementing the buttery dough.
  • Versatile: This recipe allows for creative variations and substitutions to suit your taste preferences or dietary needs.
  • Nostalgic Flavor: The combination of almonds and butter creates a timeless taste reminiscent of traditional European bakeries.

Ingredients

  • 100g almond slices
  • 1 teaspoon saffron baking powder
  • 150g Kerrygold butter, softened
  • 300g German #405 flour
  • 200g German Quark
  • 2 tablespoons safflower oil
  • 1/4 teaspoon salt
  • 100g sugar
  • 1 packet vanilla sugar
  • 50ml whole milk

Instructions

  1. Preheat the oven to 180°C (350°F). Line a 30x40cm baking tray with baking paper.
  2. In a small bowl, combine the sugar, vanilla sugar, and almond slices for the topping. Set aside.
  3. Sift the flour and baking powder into a large mixing bowl.
  4. Add the Quark, milk, safflower oil, sugar, and salt to the flour mixture.
  5. Mix all the ingredients with a hand mixer fitted with dough hooks for 1 minute on high speed. Be careful not to over-mix, as this will make the dough sticky.
  6. Transfer the dough onto the prepared tray and roll it out evenly.
  7. Spread the softened Kerrygold butter all over the surface of the dough.
  8. Sprinkle the almond topping mixture evenly over the dough.
  9. Bake on the upper rack of the preheated oven for about 20 minutes, until the slices are golden and crispy.

Tips

Here are some tips to ensure your Almond Butter Slices turn out perfectly every time:

  • Softened Butter: Make sure the butter is softened to room temperature for easy spreading over the dough.
  • Even Rolling: Roll the dough evenly on the baking tray to ensure consistent baking and a uniform texture.
  • Don’t Overmix: Mix the dough just until combined to prevent it from becoming sticky and difficult to handle.

Variations & Substitutions

This recipe is quite versatile, allowing for numerous variations and substitutions:

  • Flour: Substitute German #405 flour with all-purpose flour if it’s not available.
  • Quark: Replace Quark with Greek yogurt or ricotta cheese for a slightly different texture.
  • Oil: Use sunflower oil or melted coconut oil instead of safflower oil for a different flavor profile.
  • Sugar Alternatives: Swap sugar with coconut sugar or other sweeteners for a healthier option.

Storage

Store any leftover Almond Butter Slices in an airtight container at room temperature for up to 3 days. For longer storage, keep them in the refrigerator for up to a week. If you wish to enjoy them warm, reheat the slices in a preheated oven at 150°C (300°F) for about 5 minutes.

FAQ

Can I make these slices gluten-free?

Yes, you can substitute the German #405 flour with a gluten-free all-purpose flour blend. Ensure that the blend includes a binding agent like xanthan gum for best results.

What can I use instead of Quark?

If you don’t have access to Quark, you can use Greek yogurt or ricotta cheese as a substitute. These will provide a similar texture and flavor to the dough.

How can I make this recipe vegan?

To make this recipe vegan, you can replace the Kerrygold butter with a plant-based butter and use a dairy-free yogurt as a substitute for Quark. Ensure that all other ingredients are also vegan-friendly.

Nutrition

The Almond Butter Slices are not only delicious but also provide some nutritional benefits. Each slice contains a good amount of protein and healthy fats from almonds, making them a satisfying treat. However, they do contain sugar and butter, so it’s best to enjoy them in moderation as part of a balanced diet.

Conclusion

Baking these Almond Butter Slices is a delightful experience, filling your kitchen with warmth and the inviting aroma of almonds and butter. Whether you’re a seasoned baker or just starting, this recipe is straightforward and rewarding. I hope these slices bring as much joy to your home as they have to mine. So, gather your ingredients, preheat your oven, and enjoy the process of creating a delicious treat that echoes the nostalgia of cherished family traditions.

Related update: Almond Butter Slices

Alouette® Stuffed Mushroom Caps | Made by Meaghan Moineau

Alouette® Stuffed Mushroom Caps

Intro

There’s something magical about the aroma of mushrooms baking in the oven, taking me back to Sunday afternoons in my grandmother’s cozy kitchen. The warmth of the oven and the savory scent of garlic and herbs enveloped the room, signaling that a delicious treat was on the way. One of my all-time favorite appetizers that she would make were stuffed mushroom caps, a simple yet elegant dish that never failed to impress. Today, I’m excited to share a modern twist on her classic recipe: Alouette® Stuffed Mushroom Caps, combining the earthy flavor of mushrooms with the rich, creamy goodness of Alouette Spinach & Artichoke Spread.

Why You’ll Love It

  • Quick and Easy: This recipe is perfect for both beginners and seasoned cooks looking for a fuss-free appetizer.
  • Flavorful: The combination of Alouette Spinach & Artichoke Spread with seasoned bread crumbs creates a burst of flavor in every bite.
  • Elegant Presentation: These stuffed mushroom caps look as good as they taste, making them ideal for dinner parties or family gatherings.
  • Vegetarian-Friendly: A great option for vegetarians, these mushroom caps are both satisfying and indulgent.

Ingredients

  • 1 cup seasoned bread crumbs
  • 12 large mushroom caps, cleaned and stems removed
  • 1 package (6 oz) Alouette Spinach & Artichoke Spread

Instructions

  1. Preheat your oven to 375°F (190°C).
  2. Place the cleaned mushroom caps hollow side up on a baking sheet.
  3. Fill each mushroom cap with about 1 teaspoon of Alouette Spinach & Artichoke Spread.
  4. Sprinkle the tops with seasoned bread crumbs.
  5. Bake in the preheated oven for 12-15 minutes, or until the mushrooms are tender and the tops are golden brown.
  6. Garnish with fresh herbs if desired and serve warm.

Tips

  • Cleaning Mushrooms: Use a damp paper towel to gently wipe the surface of the mushrooms instead of washing them under water to prevent them from becoming soggy.
  • Even Filling: Use a small spoon or a piping bag to fill the mushroom caps evenly with the Alouette spread.
  • Perfect Baking: Keep an eye on the mushrooms in the oven to ensure they don’t overcook and become too soft.

Variations & Substitutions

  • Different Cheese Spread: Try using Alouette Garlic & Herbs Spreadable Cheese for a different flavor profile.
  • Additions: Consider adding chopped spinach or sun-dried tomatoes to the cheese spread for extra flavor and texture.
  • Gluten-Free: Use gluten-free bread crumbs to make this recipe suitable for those with gluten sensitivities.

Storage

Store any leftover stuffed mushroom caps in an airtight container in the refrigerator for up to 3 days. To reheat, place them in a preheated oven at 350°F (175°C) for about 10 minutes or until warmed through. Avoid using the microwave as it may make the mushrooms soggy.

FAQ

Can I prepare these mushroom caps ahead of time?

Yes! You can prepare the mushroom caps and fill them with the cheese spread a day in advance. Store them in the refrigerator and sprinkle the bread crumbs just before baking to keep them crisp.

What other mushrooms can I use?

While large white button mushrooms are ideal for this recipe, you can also use cremini or portobello mushrooms for a deeper flavor. Just be sure to adjust the filling amount accordingly as these mushrooms may have larger cavities.

Can I freeze stuffed mushroom caps?

It is not recommended to freeze cooked mushroom caps as they can become watery upon reheating. However, you can freeze them before baking. Simply assemble the mushrooms, place them in a single layer on a baking sheet, and freeze until solid. Transfer to a freezer-safe container and store for up to one month. Bake directly from frozen, adding a few extra minutes to the baking time.

Nutrition

Each serving of Alouette® Stuffed Mushroom Caps (2 pieces) contains approximately:

  • Calories: 120
  • Protein: 4g
  • Fat: 8g
  • Carbohydrates: 10g
  • Fiber: 1g

Conclusion

Alouette® Stuffed Mushroom Caps are a delightful appetizer that brings together the classic taste of stuffed mushrooms with the rich, creamy flavor of Alouette Spinach & Artichoke Spread. Perfect for any occasion, these mushroom caps are easy to make, packed with flavor, and sure to impress your guests. Whether you’re hosting a party or simply want to enjoy a special treat, this recipe is a must-try. So gather your ingredients, preheat your oven, and get ready to create a dish that will leave everyone asking for more!

Related update: Alouette® Stuffed Mushroom Caps

Ginger Chicken Stir-Fry | Made by Meaghan Moineau

Ginger Chicken Stir-Fry

Intro

There’s something truly magical about the way certain dishes can transport us back to cherished moments in our past. For me, Ginger Chicken Stir-Fry is one of those dishes. I remember the first time I tasted this delightful meal at my grandmother’s house. It was a rainy Saturday afternoon, and the aroma of ginger and teriyaki wafting through her cozy kitchen was simply irresistible. We gathered around her small wooden table, savoring each bite as the rain pattered softly against the window. This stir-fry became a family favorite, a dish we requested time and again, connecting us through shared laughter and stories.

Why You’ll Love It

Ginger Chicken Stir-Fry is a perfect blend of savory and slightly sweet flavors, making it both comforting and exciting. It’s a quick, one-pan meal that’s simple enough for a weeknight dinner but impressive enough to serve to guests. The vibrant colors of the vegetables, combined with the tender chicken and aromatic ginger, make this dish as pleasing to the eyes as it is to the palate. Plus, it’s versatile—you can easily adapt it to include your favorite vegetables or adjust the spiciness to suit your taste.

Ingredients

  • 2 chicken breasts, cut into bite-sized pieces
  • 1/4 cup teriyaki sauce
  • 1/4 cup water
  • 2 tablespoons vegetable oil
  • 1 onion, sliced
  • 1 teaspoon ground ginger
  • 1 package (16 ounces) frozen broccoli/cauliflower/carrots
  • 1/4 cup chicken broth
  • 2 tablespoons cornstarch
  • 3 tablespoons water
  • 2 cups cooked brown rice

Instructions

  1. In a shallow baking dish, combine the teriyaki sauce and 1/4 cup water. Add the chicken pieces, ensuring they are well coated. Cover and refrigerate for two hours to marinate.
  2. Drain the marinade from the chicken pieces.
  3. In a large skillet or wok, heat the vegetable oil over medium-high heat. Add the chicken and onion, stir-frying until the chicken is slightly browned.
  4. Stir in the frozen vegetables, ground ginger, and chicken broth. Cover and simmer for 4 to 5 minutes, or until the vegetables are tender-crisp.
  5. In a small bowl, combine the cornstarch and 3 tablespoons of water until smooth. Gradually add this mixture to the skillet, stirring constantly, until the sauce is thickened.
  6. Serve the stir-fry over hot cooked brown rice.

Tips

For the best results, ensure the chicken is cut into uniform pieces to promote even cooking. If you prefer a stronger ginger flavor, consider adding fresh ginger slices along with the ground ginger. To save time, you can marinate the chicken the night before, allowing it to soak up even more flavors.

Variations & Substitutions

Feel free to switch up the vegetables based on what you have on hand or your personal preferences. Snow peas, bell peppers, or snap peas would make excellent additions. If you’re looking for a gluten-free option, be sure to use a gluten-free teriyaki sauce. For a vegetarian version, substitute the chicken with firm tofu or tempeh, and use vegetable broth instead of chicken broth.

Storage

Store any leftovers in an airtight container in the refrigerator for up to 3 days. To reheat, simply warm the stir-fry in a skillet over medium heat until heated through. You may need to add a splash of water or broth to loosen the sauce as it reheats.

FAQ

Can I use fresh vegetables instead of frozen?

Yes, fresh vegetables can be used. Simply cut them into bite-sized pieces and adjust the cooking time slightly, as fresh vegetables may cook faster than frozen ones.

How can I make this dish spicier?

To add some heat, consider incorporating a pinch of red pepper flakes or a splash of sriracha sauce to the marinade. You can also add fresh sliced chili peppers during the stir-frying process.

Nutrition

This Ginger Chicken Stir-Fry is not only delicious but also nutritious. It’s a great source of protein from the chicken and a variety of vitamins and minerals from the vegetables. The use of brown rice adds fiber, making it a well-rounded meal that will keep you satisfied.

Conclusion

Ginger Chicken Stir-Fry is more than just a meal; it’s a journey back to those warm family gatherings and cherished memories. It’s a dish that brings people together, with its vibrant flavors and comforting nature. Whether you’re making it for a family dinner or a special occasion, this recipe is sure to become a favorite in your household, just as it did in mine. Enjoy every bite, and may it bring as much joy to your table as it has to mine.

Related update: Ginger Chicken Stir-Fry

Related update: Chicken Enchilada Salad Wraps

Basil Lime White Bean Hummus | Made by Meaghan Moineau

Basil Lime White Bean Hummus

Intro

There’s something about the combination of fresh basil and lime that instantly transports me back to my childhood summers spent in my grandmother’s garden. She grew the most fragrant basil I’ve ever encountered, and we’d often pick a handful to mix into our meals. One of my favorite memories is sitting on her porch, a gentle breeze carrying the scent of fresh herbs as we dipped into a bowl of her homemade hummus. Inspired by those memories, I’ve created a recipe with a zesty twist: Basil Lime White Bean Hummus. It’s a delightful blend of creamy cannellini beans, aromatic basil, and a refreshing burst of lime that will bring a touch of sunshine to any snack or meal.

Why You’ll Love It

This Basil Lime White Bean Hummus is a refreshing take on the classic hummus, perfect for those who love a good twist on traditional flavors. Here are a few reasons why you’ll fall in love with it:

  • Quick and Easy: With just a few simple ingredients, you can whip up this hummus in no time.
  • Flavorful: The combination of basil and lime gives this hummus a unique and vibrant taste that stands out.
  • Healthy: Packed with protein and fiber from the beans, it’s a nutritious choice for any snack or meal.
  • Versatile: Perfect as a dip, spread, or even a salad dressing alternative.

Ingredients

  • 1 can of cannellini beans, drained and rinsed
  • 2 cloves of garlic
  • 1 cup of fresh basil leaves
  • Zest of 1 lime
  • Juice from 1 lime
  • 3 tablespoons of olive oil
  • 1/4 cup of water
  • Salt, to taste
  • Black pepper, to taste

Instructions

  1. In a food processor, combine the cannellini beans, garlic, basil leaves, lime zest, lime juice, and olive oil. Blend until the mixture is smooth.
  2. With the processor on, gradually add water to the mixture until you reach your desired consistency. You may need slightly more or less than 1/4 cup depending on your preference.
  3. Season with salt and black pepper to taste. Blend again to ensure everything is well mixed.
  4. Taste the hummus and adjust the seasoning if needed. If you prefer a more pronounced lime flavor, feel free to add a bit more lime juice.
  5. Transfer the hummus to a serving bowl and serve it with chips or fresh veggies. For the best flavor, allow it to chill before serving, but if you’re eager, enjoy it immediately!

Tips

To make the most of your Basil Lime White Bean Hummus, consider the following tips:

  • Use Fresh Ingredients: Fresh basil and freshly squeezed lime juice make a significant difference in flavor.
  • Adjust Consistency: If you prefer a thicker hummus, add less water. For a smoother, thinner consistency, add a bit more.
  • Garnish: Consider garnishing with a few whole basil leaves or a sprinkle of lime zest for an extra touch of flavor and presentation.

Variations & Substitutions

Feel free to customize the recipe to suit your taste preferences:

  • Herbs: Swap basil with cilantro for a different herbal note.
  • Beans: Substitute cannellini beans with chickpeas for a more traditional hummus base.
  • Spice: Add a pinch of red pepper flakes or a dash of hot sauce for a spicy kick.

Storage

Basil Lime White Bean Hummus can be stored in an airtight container in the refrigerator for up to 5 days. Before serving, you might want to stir it well, as some separation may occur. For longer storage, consider freezing it for up to 3 months. Thaw in the refrigerator and blend again before serving for the best texture.

FAQ

Can I use dried beans instead of canned?

Yes, you can use dried cannellini beans. Just make sure to soak them overnight and cook them thoroughly before using them in the recipe. You’ll need about 1.5 cups of cooked beans to replace a can.

What are the best dippers for this hummus?

This hummus pairs beautifully with a variety of dippers. Try it with fresh veggies like carrots, cucumbers, and bell peppers, or go for pita chips, whole-grain crackers, or even spread it on a sandwich or wrap.

Can I make it ahead of time?

Absolutely! In fact, the flavors tend to meld and improve after a few hours in the fridge. Just be sure to give it a good stir and check seasoning before serving.

Nutrition

This hummus is not only delicious but also nutritious. Each serving is packed with protein, healthy fats, and fiber. While nutritional values can vary based on the exact ingredients used, one serving of this hummus (about 1/4 cup) contains approximately:

  • Calories: 120
  • Protein: 4g
  • Fat: 8g
  • Carbohydrates: 10g
  • Fiber: 3g

Conclusion

Basil Lime White Bean Hummus is a delightful twist on a classic favorite, bringing a burst of fresh flavors that are perfect for any occasion. Whether you’re hosting a gathering, looking for a healthy snack, or simply craving something different, this hummus is sure to please. Easy to make, versatile, and packed with nutrition, it’s a recipe you’ll find yourself returning to time and again. So, gather your ingredients, fire up your food processor, and enjoy a taste of summer with every bite.

Related update: Basil Lime White Bean Hummus

Related update: Steak And Pepper Rounds With Rose Horseradish Garlic Creme Sauce

Green Tea Fruit Medley Smoothie | Made by Meaghan Moineau

Green Tea Fruit Medley Smoothie

Intro

Welcome to your new favorite morning ritual: the Green Tea Fruit Medley Smoothie. There’s something magical about the quiet moments of dawn, where the world is still waking up and a gentle sun peeks through the curtains. It’s in these moments that I find myself reminiscing about the summers spent at my grandmother’s house. She had an expansive garden filled with vibrant berries and a cozy nook where she would brew fresh teas. The sweet aroma of berries mingling with the earthy scent of tea still lingers in my memory, and it’s this memory that inspired today’s recipe. This smoothie encapsulates those cherished mornings, blending the vibrant flavors of fresh berries and soothing green tea into a refreshing, nutrient-packed delight.

Why You’ll Love It

There are countless reasons to fall head over heels for this Green Tea Fruit Medley Smoothie:

  • Refreshing and Energizing: Start your day or recharge in the afternoon with a burst of natural energy from green tea and fruits.
  • Nutrient-Rich: Packed with antioxidants, vitamins, and fiber, this smoothie is as nutritious as it is delicious.
  • Quick and Easy: With just a few simple ingredients and a blender, you can whip up this delightful treat in minutes.
  • Customizable: Easily tweak the recipe to suit your taste or dietary needs.

Ingredients

  • 1 cup water
  • 3 Bigelow Green tea bags
  • 1 cup fresh berries (such as strawberries, blueberries, or raspberries)
  • 1 cup pineapple juice
  • 1/2 cup vanilla yogurt
  • 1 cup ice cubes

Instructions

  1. Bring 1 cup of water to a boil and pour over 3 Bigelow Green tea bags. Let steep for 5 minutes.
  2. Gently squeeze out the tea bags to extract all the flavor, then discard the bags.
  3. In a blender, combine the brewed green tea, fresh berries, pineapple juice, vanilla yogurt, and ice cubes.
  4. Blend all the ingredients until the mixture is smooth and creamy.
  5. Pour into a glass, serve immediately, and enjoy the refreshing taste of summer.

Tips

  • Choose ripe berries: For the best flavor, use ripe and sweet berries. You can also freeze them beforehand for a thicker smoothie.
  • Adjust sweetness: If you prefer a sweeter smoothie, add a teaspoon of honey or agave syrup.
  • Chill the tea: Prepare the green tea ahead of time and chill it for a colder, more refreshing drink.

Variations & Substitutions

This smoothie is quite versatile, and you can easily modify it to suit your preferences:

  • Different fruits: Swap out the berries for mangoes, peaches, or bananas for a different flavor profile.
  • Dairy-free option: Substitute vanilla yogurt with coconut yogurt or almond milk yogurt for a vegan version.
  • Herbal twist: Add a handful of fresh mint or basil leaves for a unique and refreshing herbal twist.

Storage

While this smoothie is best enjoyed fresh, you can store any leftovers in an airtight container in the refrigerator for up to 24 hours. Give it a good shake or stir before drinking. For longer storage, consider freezing the smoothie in ice cube trays and blending the cubes when you’re ready for another serving.

FAQ

Can I use black tea instead of green tea?

Yes, you can use black tea if you prefer its stronger flavor. Keep in mind that black tea has a higher caffeine content and a more robust taste, which will alter the flavor profile of the smoothie.

Is this smoothie suitable for kids?

Absolutely! This smoothie is a great way to sneak in some extra fruit and antioxidants into your child’s diet. If you’re concerned about caffeine, you can opt for a decaffeinated green tea.

Can I make this smoothie ahead of time?

While fresh is best, you can prepare the smoothie up to a day in advance. Store it in the refrigerator and give it a good shake before serving. For optimal freshness, consider freezing it into smoothie pops for a delightful treat.

Nutrition

This smoothie is a powerhouse of nutrition. Each serving is approximately 150 calories, with a good balance of carbohydrates, protein, and a small amount of fat. It provides a healthy dose of vitamin C, antioxidants from the berries and green tea, and probiotics from the yogurt, making it a well-rounded choice for a nutritious snack or breakfast.

Conclusion

The Green Tea Fruit Medley Smoothie is not just a drink; it’s a celebration of flavors and memories, a bridge connecting the tranquil mornings of the past with the vibrant mornings of today. Whether you’re enjoying it as a quick breakfast, a post-workout refreshment, or an afternoon pick-me-up, this smoothie promises to delight your senses and nourish your body. So, why wait? Gather your ingredients, blend up a glass, and let the refreshing taste remind you of sunlit gardens and peaceful mornings. Cheers to a deliciously healthy journey!

Related update: Green Tea Fruit Medley Smoothie

Related update: Fresh Peach Margarita With Lime Sugar

Stir Fry Mushrooms In Butter, Garlic And White Wine | Made by Meaghan Moineau

Stir Fry Mushrooms In Butter, Garlic And White Wine

Intro

There are few things more comforting than the sizzle of mushrooms in a hot pan, enveloped in the aroma of garlic and butter. This recipe for Stir Fry Mushrooms in Butter, Garlic, and White Wine takes me back to my grandmother’s cozy kitchen. I can vividly remember the way she would expertly toss a medley of mushrooms in her well-worn skillet, filling the room with a fragrance that promised a delightful meal. Her secret? A splash of white wine that added a touch of elegance, transforming a simple dish into something truly special. Today, I’m excited to share this recipe with you, hoping it brings as much warmth and joy to your table as it has to mine.

Why You’ll Love It

This dish is a celebration of flavors and textures. The mushrooms are tender and juicy, absorbing the richness of butter and the aromatic punch of garlic. A hint of white wine adds a sophisticated depth, while the teriyaki sauce and balsamic vinegar bring a delightful balance between sweet and tangy. Finished with a touch of chili oil for heat and fresh herbs for brightness, this dish is as versatile as it is delicious. Whether you’re a seasoned home cook or a beginner, you’ll find this recipe simple yet impressive.

Ingredients

  • Fresh shiitake mushrooms
  • White mushrooms
  • Garlic
  • Butter
  • White wine
  • Teriyaki sauce
  • Balsamic vinegar
  • Black ground pepper
  • Salt
  • Chili oil
  • Parsley
  • Diced spring onions

Instructions

  1. Melt the butter in a frying pan over medium heat.
  2. Add the garlic and stir-fry until fragrant, about 1 minute.
  3. Add the mushrooms and stir-fry for 30 seconds, allowing them to absorb the garlic-infused butter.
  4. Pour in the white wine and let it evaporate, infusing the mushrooms with its delicate flavor.
  5. Continue to fry the mushrooms for another minute.
  6. Add salt, black pepper, balsamic vinegar, teriyaki sauce, and chili oil. Fry for an additional minute, ensuring everything is well combined.
  7. Turn the heat to low and add parsley and diced spring onions. Mix well to incorporate the herbs’ freshness.
  8. Transfer the mushrooms to a serving plate and enjoy!

Tips

For the best results, use a mix of fresh shiitake and white mushrooms. Make sure the mushrooms are dry before adding them to the pan to achieve a nice golden-brown sear. If you want a more intense garlic flavor, add an extra clove or two. Always let the white wine fully evaporate to prevent the dish from tasting too acidic. Finally, adjust the amount of chili oil to your heat preference.

Variations & Substitutions

If you’re looking to switch things up, try adding some sliced bell peppers or snap peas for extra color and crunch. For a vegetarian-friendly version, ensure your teriyaki sauce is free of animal products. If you prefer a non-alcoholic version, substitute the white wine with vegetable broth. You can also use olive oil instead of butter for a lighter dish.

Storage

Leftover stir fry mushrooms can be stored in an airtight container in the refrigerator for up to 3 days. To reheat, simply warm them in a skillet over medium heat, adding a splash of water if needed to prevent drying out.

FAQ

Can I use other types of mushrooms?

Absolutely! Feel free to use any mushrooms you have on hand. Cremini, portobello, or oyster mushrooms would all work beautifully in this recipe.

What can I serve with stir fry mushrooms?

These mushrooms are incredibly versatile and can be served as a side dish with grilled meats, tossed with pasta, or even as a topping for bruschetta. They also make a great filling for an omelet or a savory crepe.

Nutrition

This dish is rich in antioxidants and essential nutrients provided by the mushrooms. The garlic and parsley contribute additional health benefits, such as boosting the immune system and providing anti-inflammatory properties. While butter and wine add richness, the dish is relatively low in calories and can be adjusted for dietary preferences.

Conclusion

Stir Fry Mushrooms in Butter, Garlic, and White Wine is more than just a dish; it’s a comforting experience that brings warmth to any table. Its simple preparation and complex flavors make it a perfect recipe for both everyday meals and special occasions. Whether you’re enjoying it as a side dish or the star of your meal, this recipe is sure to become a favorite. I hope you find as much joy in making and sharing this dish as I have.

Related update: Stir Fry Mushrooms In Butter, Garlic And White Wine

Related update: Basil Lime White Bean Hummus

Blue Cheese and Mushroom Turkey Burger | Made by Meaghan Moineau

Blue Cheese and Mushroom Turkey Burger

Intro

There’s something magical about the sizzle of a burger on the grill, the aroma wafting through the air, and the anticipation of that first juicy bite. When I was growing up, summer evenings were often spent in the backyard, my dad at the grill perfecting his burger technique. Those days were filled with laughter, the smell of freshly cut grass, and the comforting sound of cicadas in the distance. Inspired by those cherished memories, I crafted this Blue Cheese and Mushroom Turkey Burger to combine nostalgia with a rich, gourmet twist. Let me walk you through why this burger is going to become your next favorite.

Why You’ll Love It

This Blue Cheese and Mushroom Turkey Burger is a delightful fusion of flavors that will tantalize your taste buds. The earthy mushrooms combined with the savory turkey provide a hearty base, while the blue cheese adds a creamy, tangy finish. Whether you’re a grilling novice or a seasoned pro, this recipe is straightforward and satisfying. Plus, it’s a healthier alternative to traditional beef burgers without sacrificing any of the flavors.

Ingredients

  • 2 garlic cloves, minced
  • 1 pound of ground turkey
  • 1 onion, finely chopped
  • 1 cup portabello mushrooms, diced
  • 1 pinch of sea salt
  • 1 tablespoon soy sauce
  • Blue cheese, crumbled, for topping

Instructions

  1. In a large mixing bowl, combine the minced garlic, ground turkey, chopped onion, diced portabello mushrooms, sea salt, and soy sauce. Mix thoroughly until all ingredients are well incorporated.
  2. Divide the mixture into equal portions and form them into patties, making sure they’re not too thick for even cooking.
  3. Preheat your grill or a large frying pan over medium-high heat. Place the patties on the grill or in the pan.
  4. Cook the burgers for about 5-6 minutes on each side, flipping once, until they are cooked through and reach an internal temperature of 165°F (74°C).
  5. Once the burgers are cooked, add a small amount of crumbled blue cheese on top of each patty.
  6. If you’re using a grill, close the grill top and allow the cheese to melt for 1-2 minutes. If pan-frying, cover the pan with a lid to melt the cheese.
  7. Remove the burgers from the heat and let them rest for a couple of minutes before serving.

Tips

For the best results, make sure your turkey is fresh and not frozen. Fresh herbs like thyme or rosemary can be added to the mixture for an extra burst of flavor. If you’re grilling, lightly oil the grates to prevent sticking. Letting the burgers rest ensures the juices redistribute, keeping them moist and delicious.

Variations & Substitutions

Feel free to experiment with the ingredients. If blue cheese isn’t your favorite, try using goat cheese or feta for a different yet equally delicious taste. For a spicier kick, add a pinch of cayenne pepper or some chopped jalapeños to the turkey mixture. If you’re avoiding soy, try using Worcestershire sauce as an alternative.

Storage

Store any leftover burgers in an airtight container in the refrigerator for up to 3 days. To reheat, place them in a preheated oven at 350°F (175°C) until warmed through, or use a microwave. If freezing, wrap each patty individually in plastic wrap and store in a freezer bag for up to 3 months. Thaw in the refrigerator before reheating.

FAQ

Can I use a different type of cheese?

Absolutely! While blue cheese adds a unique flavor, you can substitute it with any cheese you prefer, such as cheddar, Swiss, or mozzarella. Each will bring its own distinct taste to the burger.

How can I make this recipe gluten-free?

To make this recipe gluten-free, ensure that your soy sauce is labeled gluten-free, or substitute it with tamari, which is naturally gluten-free. Check all other ingredient labels to ensure they are gluten-free as well.

Nutrition

This turkey burger is a healthier alternative to traditional beef burgers. It’s lower in fat and calories, making it a suitable option for those looking to enjoy a delicious meal without the guilt. The addition of mushrooms not only enhances the flavor but also adds fiber and nutrients.

Conclusion

Whether you’re reminiscing about summer barbecues or simply looking for a new recipe to try, this Blue Cheese and Mushroom Turkey Burger is sure to impress. Its rich, savory flavors and creamy cheese topping create a delightful culinary experience that’s both comforting and sophisticated. So, fire up your grill or heat up your pan and indulge in this delightful twist on a classic favorite. Enjoy every bite, and don’t forget to share the love with family and friends!

Related update: Blue Cheese and Mushroom Turkey Burger

Related update: Boeuf Bourgignon