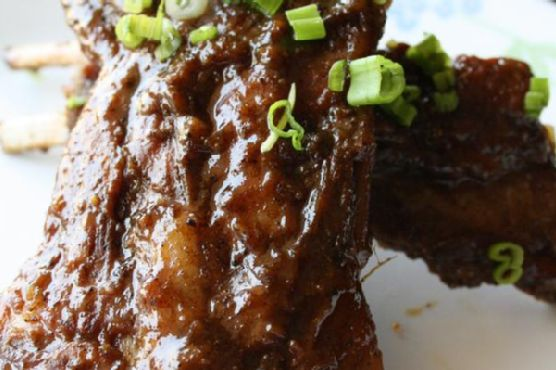
Loaded Baked Potato Soup with Crispy-Fried Potato Skins | Made by Meaghan Moineau

Loaded Baked Potato Soup with Crispy-Fried Potato Skins

Intro

There’s something undeniably comforting about a warm bowl of soup, especially when it combines the heartiness of a baked potato with the indulgent crispiness of fried skins. As the weather starts to cool, this Loaded Baked Potato Soup with Crispy-Fried Potato Skins becomes a staple in our household. I still remember the first time I made it for my family on a chilly autumn evening. The kids were playing in the living room, the leaves were rustling outside, and the savory aroma from the kitchen drew everyone around the table. From that day on, this soup has been a family favorite, bringing warmth and joy to our meals.

Why You’ll Love It

This soup is a delightful blend of creamy and crispy textures, offering the best of both worlds. It’s packed with flavors that remind you of a classic loaded baked potato, but it’s even more comforting and satisfying. The crispy-fried potato skins add a unique twist, providing a crunchy contrast to the rich, velvety soup. Whether you’re serving it as a hearty lunch or a cozy dinner, this soup is sure to please everyone at your table.

Ingredients

  • Bacon
  • Russet potatoes
  • Onion
  • Fresh thyme
  • Flour
  • Low sodium chicken broth
  • Half n half
  • Salt & pepper
  • Sharp cheddar cheese
  • Sour cream
  • Thinly sliced scallion

Instructions

  1. Using a vegetable peeler, remove wide, long strips of potato peel and set aside. Finish peeling the potatoes.
  2. Heat a large Dutch oven over medium heat. Add chopped bacon and cook until crisp, about 10 minutes. Remove bacon to a paper towel-lined plate.
  3. To the fat in the pan, add the potato skins and cook until crisp, about 10 minutes. If not crisp enough after 10 minutes, spread them on a cookie sheet and bake in a 400-degree oven for 5 minutes.
  4. Remove the crisped potato skins to the paper-lined plate with the bacon.
  5. Add the onion to the fat remaining in the pan, cook until tender and lightly browned, about 6 minutes.
  6. Add the thyme and flour, cook and stir for about a minute.
  7. Slowly whisk in the chicken broth and the half n half.
  8. Add the potatoes and bring to a boil over high heat.
  9. Reduce heat to medium-low, cover, and cook until the potatoes are very tender, about 10-15 minutes.
  10. Using a blender, puree all but about 3 cups of the soup in small batches.
  11. Lightly crush the potato chunks in the reserved portion of the soup using a potato masher or wooden spoon.
  12. Add the pureed soup back to the pot and return to a low burner to keep hot.
  13. Stir in 2 cups of cheese until melted, then add sour cream and mix well.
  14. Season to taste with salt & pepper. Optionally, add some of the crisped bacon into the soup mixture.
  15. To serve, top bowls of soup with crisped bacon and potato skins, additional cheddar, sour cream, and sliced scallion.

Tips

For the best results, make sure your potato skins are thoroughly crisped. If they’re not crispy enough in the pan, don’t hesitate to pop them into the oven for a few extra minutes. This step is crucial to prevent the skins from becoming soggy. Additionally, when pureeing the soup, work in small batches to avoid any hot splashes. Lastly, feel free to adjust the seasoning to your liking, and don’t forget to taste as you go!

Variations & Substitutions

This soup is incredibly versatile. You can easily swap the bacon for turkey bacon or omit it entirely for a vegetarian version. If you’re looking for a lighter option, use milk instead of half n half. For a different flavor profile, try adding roasted garlic or a pinch of smoked paprika to the soup. Feel free to experiment with different cheeses—Swiss or Gruyere can add a unique twist to this classic dish.

Storage

This soup stores beautifully in the refrigerator for up to three days. Simply place it in an airtight container and reheat it on the stove over low heat when you’re ready to enjoy it again. If you wish to freeze the soup, do so without the toppings. Thaw it in the refrigerator overnight before reheating.

FAQ

Can I make this soup ahead of time?

Absolutely! This soup can be made a day in advance. The flavors tend to deepen as it sits, making it even more delicious the next day. Just keep the toppings separate until you’re ready to serve.

What can I do if my soup is too thick?

If you find your soup is too thick, simply add a bit more chicken broth or milk until you reach the desired consistency. Reheat gently to ensure a smooth texture.

How can I make this soup vegetarian?

For a vegetarian version, use vegetable broth instead of chicken broth and omit the bacon. You can add a bit of smoked paprika to mimic the smoky flavor of bacon.

Nutrition

This hearty soup is rich and filling, with the perfect balance of carbohydrates, protein, and fat. While exact nutrition will depend on portion sizes and specific ingredient brands, each serving is roughly estimated to provide around 400 calories, 20 grams of fat, 15 grams of protein, and 40 grams of carbohydrates. It’s a comforting indulgence that satisfies hunger and warmth cravings alike.

Conclusion

Loaded Baked Potato Soup with Crispy-Fried Potato Skins is more than just a dish; it’s a comforting experience that brings family and friends together. Whether you’re enjoying it on a chilly evening or serving it as a centerpiece for a casual gathering, this soup is sure to become a beloved staple in your kitchen. Enjoy the creamy richness, the crunchy potato skins, and the nostalgia of cherished moments around the table. Bon appétit!

Related update: Loaded Baked Potato Soup with Crispy-Fried Potato Skins

Related update: Crock-Pot: Asian-Style Country Ribs with Black Bean Garlic Sauce

Related update: Homemade Broccoli Cheddar Soup

Cilantro Lime Halibut | Made by Meaghan Moineau

Cilantro Lime Halibut

Intro

There’s something magical about the aroma of lime and cilantro filling the kitchen. It takes me back to summer evenings spent by the sea with my family, sharing stories and laughter over a delicious meal. One of my fondest memories is a fishing trip with my grandfather where we caught fresh halibut, and he taught me how to cook it with his signature lime and cilantro twist. Today, I’m excited to share this Cilantro Lime Halibut recipe with you, a dish that combines fresh, zesty flavors with the rich taste of wild Pacific halibut. Whether you’re a seafood aficionado or just starting to explore fish dishes, this recipe is sure to become a favorite in your home.

Why You’ll Love It

This Cilantro Lime Halibut is not only delicious but also quick and easy to prepare, making it perfect for weeknight dinners or special occasions. The dish features a beautiful balance of flavors—a hint of citrus from the lime, aromatic freshness from the cilantro, and a subtle sweetness from the blood orange olive oil. Plus, it’s a healthy option packed with protein and essential nutrients. Whether you’re cooking for yourself or hosting a dinner party, this dish will impress with its simple yet sophisticated taste.

Ingredients

  • Chicken stock
  • Fresh cilantro
  • Green onions
  • Wild Pacific halibut filets
  • Lime (juice)
  • Another slug of blood orange olive oil
  • Mollie Stone’s blood orange olive oil
  • Dusting of garlic-pepper
  • Salt and pepper
  • White wine

Instructions

  1. Heat the oil in a large frying pan over medium heat.
  2. Coat the filets with garlic pepper on the flesh side.
  3. When the pan is heated, add the filet flesh side down to sear that side. Allow to cook for about 30 seconds.
  4. Flip the filets over with tongs.
  5. Add white wine to the pan and cover to steam. After about 2 minutes, much of the wine will have evaporated.
  6. Add the chicken stock gradually and allow the filets to steam for another couple of minutes.
  7. Add the lime juice. When bubbling and both filets are opaque all the way through, add the green onions to the pan and swirl in the sauce for a moment.
  8. Remove filets to beds of lettuce.
  9. Add a tsp of the Blood Orange Olive Oil, swirl the green onions in the sauce one more time, and then pour equal parts over the fish.
  10. Garnish with fresh cilantro and lime wedges. Sprinkle with salt and pepper to taste.
  11. Serve immediately.

Tips

For the best results, ensure your halibut filets are fresh. If possible, purchase them from a reputable fishmonger. When searing the fish, make sure the pan is hot enough before adding the filets, as this will give them a nice crust. If you don’t have blood orange olive oil, regular olive oil with a splash of orange juice can be a suitable substitute.

Variations & Substitutions

If you’re not a fan of halibut, this recipe works well with other white fish such as cod or haddock. You could also experiment with adding different herbs like parsley or dill for a different flavor profile. For a spicier kick, consider adding a pinch of red pepper flakes to the sauce.

Storage

Leftover Cilantro Lime Halibut can be stored in an airtight container in the refrigerator for up to two days. To reheat, place the fish in a pan over low heat until warmed through. Be careful not to overcook, as the fish can become dry.

FAQ

Can I use frozen halibut filets?

Yes, you can use frozen halibut filets. Just make sure to thaw them completely before cooking. Pat them dry with a paper towel to remove any excess moisture, which helps in achieving a good sear.

What can I serve with Cilantro Lime Halibut?

This dish pairs beautifully with a simple salad, steamed vegetables, or a light quinoa pilaf. The fresh flavors of the halibut complement a variety of sides, so feel free to get creative with your pairings.

Nutrition

Halibut is an excellent source of protein and is rich in omega-3 fatty acids, which are beneficial for heart health. This dish is also low in carbohydrates, making it suitable for those following a low-carb diet. The use of fresh lime and cilantro adds vitamins and antioxidants, contributing to a nutritious, balanced meal.

Conclusion

Our Cilantro Lime Halibut is a delightful dish that brings together the best of fresh seafood and vibrant flavors. It’s easy to prepare, healthy, and sure to please even the pickiest eaters. Whether you’re evoking seaside memories or creating new ones, this recipe is a wonderful way to bring a touch of elegance and flavor to your dining table. We hope you enjoy this recipe as much as we do and that it becomes a cherished part of your culinary repertoire.

Related update: Cilantro Lime Halibut

Classy Poached Pear In Spicy Mango Nectar With Mango Ice Cream | Made by Meaghan Moineau

Classy Poached Pear In Spicy Mango Nectar With Mango Ice Cream

Intro

There’s something undeniably enchanting about the delicate, aromatic flavors of poached pears. I remember the first time I tasted a poached pear at my grandmother’s Sunday lunch. It was a cold winter afternoon, and the warmth of the spices filled the room, creating a cozy haven from the chill outside. Each bite was a revelation, the soft fruit yielding to the rich syrup, and it was then that I knew this dessert would hold a special place in my heart.

Fast forward to today, I’ve added my own twist to this classic dessert by pairing it with a spicy mango nectar and a scoop of refreshing mango ice cream. This recipe is simple yet sophisticated, perfect for impressing your dinner guests or treating yourself to a luxurious dessert experience.

Why You’ll Love It

  • Elegantly Simple: Despite its sophisticated appearance, this recipe is straightforward and easy to follow.
  • Exotic Flavors: The combination of pear, mango, and spices creates a unique and tantalizing dessert.
  • Perfect for Any Occasion: Whether it’s a dinner party or a quiet evening at home, this dessert is sure to impress.

Ingredients

  • 4 ripe pears
  • 1/2 cup sugar
  • 1 cup water
  • 1 cup mango pulp
  • 1/2 cup fruit juice (orange or apple)
  • 1 teaspoon lemon juice
  • 1 tablespoon orange rind
  • 1/2 teaspoon ground cinnamon
  • A few strands of saffron
  • Fresh mint leaves for garnish
  • Mango ice cream, for serving

Instructions

  1. Peel the pears and slice a bit off the bottom of each pear to ensure they can stand upright. Keep the stem intact to insert a mint sprig later.
  2. Gently dab some lemon juice over the pears to prevent browning, and set them aside.
  3. In a medium pot, create a simple syrup by combining half a cup of sugar with one cup of water over medium heat. Stir until the sugar dissolves and the mixture thickens slightly.
  4. Add the mango pulp, fruit juice, orange rind, a dash of cinnamon, and saffron strands to the sugar syrup. Stir to combine.
  5. Submerge the peeled pears into the syrup, ensuring they’re completely covered. Allow them to cook on low heat for 15 to 20 minutes, or until the pears are tender and have absorbed the amber hue from the mango syrup.
  6. Once cooked, remove the pears from the syrup and set them on a plate to cool.
  7. Garnish each pear with a fresh mint leaf inserted into the stem and drizzle some of the remaining syrup over the top.
  8. Serve warm or chilled, accompanied by a scoop of mango ice cream.

Tips

  • Choose the Right Pears: Look for ripe but firm pears to ensure they hold their shape while poaching.
  • Monitor the Syrup: Keep an eye on the syrup as it simmers to prevent it from reducing too much or burning.
  • Chilling Option: For a refreshing summer treat, chill the pears before serving.

Variations & Substitutions

  • Spice It Up: Add a pinch of ground nutmeg or cloves for a more robust spice profile.
  • Fruit Juice Options: Experiment with different fruit juices like pineapple or pomegranate for a unique twist.
  • Dairy-Free: Substitute mango sorbet for the ice cream to make this dessert dairy-free.

Storage

Leftover poached pears can be stored in an airtight container in the refrigerator for up to three days. Keep the syrup separate and drizzle it over the pears just before serving to maintain their texture and flavor.

FAQ

Can I make this dessert ahead of time?

Absolutely! You can poach the pears a day in advance and store them in the refrigerator. Simply drizzle with syrup and garnish with mint just before serving.

What type of mango pulp should I use?

Both fresh and canned mango pulp work wonderfully in this recipe. If using canned, ensure it’s pure mango pulp without added sugars or preservatives.

Nutrition

This dessert is a luxurious treat, and while it is not low-calorie, it offers the natural sweetness of fruit with the richness of spices. Pairing it with mango ice cream adds a creamy contrast to the tender pears.

Conclusion

Incorporating the exotic flavors of mango and spices, this poached pear dessert is a testament to how simple ingredients can create a gourmet experience. Whether you’re channeling nostalgia like I do, or simply indulging your taste buds, this recipe is sure to delight. Serve it at your next gathering or enjoy it as a solo treat to make any day a little more special. Remember, cooking is all about sharing love through food, so don’t hesitate to put your own spin on this classic dish. Happy cooking!

Related update: Classy Poached Pear In Spicy Mango Nectar With Mango Ice Cream

Related update: Roasted Asparagus With Bacon and Feta Cheese

Related update: Ginger Molasses Rounds

Chapchae (Korean Stir-Fried Noodles) | Made by Meaghan Moineau

Chapchae (Korean Stir-Fried Noodles)

Intro

Chapchae, a delightful Korean stir-fried noodle dish, has a special place in my heart. I remember the first time I tasted it was during a family trip to Seoul. The vibrant colors of the vegetables, the glossy sheen of the noodles, and the intoxicating aroma of sesame oil filled the air as we sat down at a local eatery. Each bite was a harmony of flavors and textures, and it instantly became a favorite. Inspired by that trip, I’ve recreated this dish at home many times, each instance bringing back fond memories of that culinary adventure.

Why You’ll Love It

Chapchae is a versatile dish that’s not only delicious but also a feast for the eyes. It’s perfect for any season, offering a balance of savory, sweet, and umami flavors that appeal to various palates. This dish is naturally gluten-free when using sweet potato vermicelli, making it a fantastic option for those with dietary restrictions. Additionally, chapchae is packed with vegetables, making it a nutritious choice for a quick lunch or a vibrant side dish.

Ingredients

  • 8 oz sweet potato vermicelli noodles
  • 1 sweet onion, thinly sliced
  • 2 cloves garlic, minced
  • 2 cups baby spinach
  • 1 carrot, julienned
  • 3 scallions, sliced
  • 1 cup mushrooms, sliced
  • 1 zucchini, julienned
  • 2 Tbsp olive oil
  • 2 Tbsp sesame oil, divided
  • 3 Tbsp soy sauce
  • 1 Tbsp sugar
  • Salt to taste

Instructions

  1. Cook the sweet potato vermicelli noodles according to the package directions. Once cooked, drain and set aside.
  2. In a large pan or wok over medium heat, heat the olive oil and 1 tablespoon of the sesame oil.
  3. Add the onion slices and minced garlic, sautéing for about 1 minute until fragrant.
  4. Add the rest of the vegetables: baby spinach, carrots, scallions, mushrooms, and zucchini. Cook for 4-5 minutes until the vegetables are half-cooked and still a bit crispy.
  5. Turn the heat to low and add the cooked noodles to the pan.
  6. Pour in the soy sauce, sugar, and the remaining sesame oil. Mix everything to combine and cook for another 2 minutes.
  7. Taste and add salt or more soy sauce if needed. For a sweeter dish, add a touch more sugar.
  8. If using, sprinkle sesame seeds over the top just before serving for an added nutty flavor and crunch.

Tips

For the best results, ensure that your vegetables are cut uniformly for even cooking. Don’t overcook them; chapchae is best with vegetables that retain a slight crunch. Also, feel free to adjust the seasoning according to your taste preferences. A dash of chili flakes can also add a nice kick if you enjoy a bit of heat.

Variations & Substitutions

Chapchae is incredibly adaptable. You can substitute the vegetables with whatever you have on hand, such as bell peppers or broccoli. For a protein boost, add tofu, beef strips, or chicken. If you prefer a lower-sodium option, use low-sodium soy sauce. For a vegetarian version, ensure your soy sauce is vegetarian-friendly and skip any meat additions.

Storage

Chapchae can be stored in an airtight container in the refrigerator for up to three days. Reheat gently on the stovetop or in the microwave, adding a splash of water or soy sauce to revitalize the noodles. Note that the noodles may absorb more sauce over time, so adjust the seasoning as needed when reheating.

FAQ

Can I make chapchae ahead of time?

Yes, chapchae can be prepared in advance. It’s an excellent dish for meal prep as the flavors meld beautifully over time. Just be sure to store it properly and give it a good stir before serving.

Is chapchae gluten-free?

Chapchae is naturally gluten-free when made with sweet potato vermicelli noodles, which are a common ingredient in Korean cuisine. However, make sure to check the labels on your soy sauce to ensure it’s gluten-free, or opt for tamari as an alternative.

Nutrition

Chapchae is a nutrient-rich dish thanks to its variety of vegetables. It’s high in fiber, vitamins, and minerals, and the sweet potato noodles provide a source of complex carbohydrates. The sesame oil and soy sauce contribute healthy fats and protein, respectively, making chapchae a well-rounded meal.

Conclusion

Chapchae is more than just a dish; it’s a delightful journey through flavors and textures that can transport you to the vibrant streets of Korea. Whether you’re making it for the first time or it’s been a staple on your menu, this recipe is sure to bring joy to your table. So grab your wok, gather your ingredients, and savor a bowl of this Korean classic. Enjoy every bite and perhaps, like me, you’ll find it becomes a cherished part of your culinary repertoire.

Related update: Chapchae (Korean Stir-Fried Noodles)

Related update: Cilantro Lime Halibut

Savory Slow Roasted Tomatoes with Filet of Anchovy | Made by Meaghan Moineau

Savory Slow Roasted Tomatoes with Filet of Anchovy

Intro

There’s something incredibly comforting about a kitchen filled with the sweet aroma of slow-roasting tomatoes. It takes me back to lazy summer afternoons spent in my grandmother’s kitchen, where time seemed to slow down just enough to savor each moment. Her garden was always brimming with ripe, juicy tomatoes, and she would often let me help her prepare them for roasting. Those afternoons, with the sun filtering through the curtains and the smell of herbs dancing in the air, are memories I cherish deeply. Today, I want to share a recipe that captures that nostalgia — Savory Slow Roasted Tomatoes with Filet of Anchovy.

Why You’ll Love It

This dish is a delightful blend of rich, sweet, and savory flavors that come together beautifully. The slow-roasted tomatoes become wonderfully caramelized, their natural sugars intensified by the long cooking process. The subtle hint of herbs, combined with the salty punch of anchovy filets, creates a complex flavor profile that is simply irresistible. Whether served as an appetizer, a side dish, or even a topping for bruschetta, these tomatoes are sure to impress your guests and become a staple in your culinary repertoire.

Ingredients

  • Round tomatoes
  • Any fresh herbs you like
  • Salt & pepper
  • Extra virgin olive oil
  • Anchovy filets

Instructions

  1. Preheat your oven to 150°C (280°F).
  2. Cut the top third off the tomatoes and discard the tops.
  3. Place the tomatoes on a baking tray lined with parchment paper.
  4. Sprinkle generously with salt, pepper, and your choice of fresh herbs.
  5. Drizzle the tomatoes with a generous amount of olive oil.
  6. Place the tray in the oven and roast for 4-6 hours, depending on the size of your tomatoes.
  7. Occasionally, baste the tomatoes with the juices and olive oil from the pan.
  8. Once the tomatoes are shriveled and begin to resemble sun-dried tomatoes, they are ready. They should still hold their shape and not become mushy.
  9. Remove from the oven and top each tomato with a whole anchovy filet.
  10. Serve warm or at room temperature, drizzling olive oil from the baking pan over the top.

Tips

To enhance the flavor, consider using a variety of herbs such as thyme, rosemary, or basil. Each brings a unique taste that complements the tomatoes beautifully. Additionally, choose tomatoes that are firm and ripe for the best texture and sweetness.

Variations & Substitutions

If anchovies aren’t to your liking, you can substitute them with capers or olives for a different type of umami flavor. For a vegetarian option, consider topping the tomatoes with crumbled feta cheese or a sprinkle of nutritional yeast.

Storage

These slow-roasted tomatoes can be stored in an airtight container in the refrigerator for up to a week. They also freeze well, allowing you to enjoy a taste of summer long after tomato season has passed. Simply thaw in the refrigerator before serving.

FAQ

Can I use cherry tomatoes instead of round tomatoes?

Yes, cherry tomatoes can be used, though the roasting time will be shorter. Keep an eye on them to ensure they don’t overcook.

What type of olive oil should I use?

Extra virgin olive oil is recommended for its rich flavor and health benefits. However, feel free to use any good-quality olive oil you have on hand.

Nutrition

This dish is not only delicious but also nutritious. Tomatoes are packed with vitamins C and K, potassium, and folate, while anchovies provide a good source of omega-3 fatty acids, protein, and essential nutrients. A serving of this dish offers a healthy dose of antioxidants and healthy fats, making it a guilt-free indulgence.

Conclusion

Savory Slow Roasted Tomatoes with Filet of Anchovy is a dish that beautifully marries simplicity with sophistication. It’s a recipe that not only fills your home with an irresistible aroma but also promises a burst of flavor with every bite. Whether you’re reminiscing about sunlit afternoons in a nostalgic kitchen or looking to create new memories with loved ones, this dish is sure to be a hit. Enjoy the luxurious taste and embrace the joy of slow cooking with this delightful recipe.

Related update: Savory Slow Roasted Tomatoes with Filet of Anchovy

Grilled Guacamole with Pistachios | Made by Meaghan Moineau

Grilled Guacamole with Pistachios

Intro

Welcome to a culinary journey where tradition meets innovation with our Grilled Guacamole with Pistachios. This recipe brings a smoky twist to the classic guacamole, elevating it to a gourmet experience that is perfect for any occasion. I remember the first time I tried grilled guacamole at a summer barbecue hosted by an old friend. The subtle smokiness intertwined with creamy avocado and crunchy pistachios was a revelation. Ever since that day, this dish has become a staple in my summer gatherings. Let me share this delightful recipe with you, and perhaps it will become a cherished part of your culinary repertoire as well.

Why You’ll Love It

This grilled guacamole is not your ordinary dip. Here are a few reasons why you’ll fall head over heels for this recipe:

  • Smoky Flavor: Grilling the vegetables adds a depth of flavor that is both intriguing and satisfying.
  • Texture Heaven: The crunchy pistachios contrast beautifully with the creamy avocado, creating a delightful texture.
  • Fresh and Nutritious: Packed with fresh ingredients and healthy fats, this recipe is both delicious and nutritious.
  • Versatile: Perfect as a dip, a topping for burgers, or even as a side dish.

Ingredients

  • 2 avocados, split
  • 1 teaspoon cumin
  • 1 ear of corn, split
  • 1/4 cup fresh cilantro, chopped
  • 2 cloves garlic, minced
  • 1/4 teaspoon red ground pepper
  • 1/4 teaspoon black fresh ground pepper
  • 2 jalapeño peppers, split
  • 1 lime, juiced
  • Olive oil, for brushing vegetables
  • 1 small onion, split
  • 1/4 cup pistachios, chopped
  • Salt to taste
  • 1/2 cup diced tomatoes

Instructions

  1. Lightly brush the avocado flesh, corn, onion, and jalapeño peppers with olive oil.
  2. Place all vegetables except the avocado in a grill basket and on the grill over medium-high heat.
  3. Place the avocados cut side up directly on the grill and cook for 2 minutes, then flip and cook cut side down for another 2 minutes. Remove and set aside.
  4. Allow the other vegetables to cook, turning, until they are tender and lightly charred (10-12 minutes). The corn may take a few minutes longer.
  5. When the vegetables have cooled enough to touch, cut the corn off the cob and dice the other vegetables.
  6. In a large bowl, combine the tomatoes, corn, onion, peppers, garlic, and cilantro, and toss to mix.
  7. Add the avocado to the mixture, lightly tossing and mashing it.
  8. Add the lime juice, cumin, red and black pepper, and salt. Mix together and adjust seasoning as needed.
  9. Add the pistachios, toss the mixture again, and serve.

Tips

  • Ensure your grill is properly heated before placing the vegetables to get that perfect char.
  • Adjust the level of spiciness by varying the amount of jalapeño and red ground pepper according to your preference.
  • Use ripe avocados for the best texture and flavor.

Variations & Substitutions

There are numerous ways to adapt this recipe to your tastes:

  • Cheese: Add crumbled feta or cotija cheese for an extra burst of flavor.
  • Nuts: Swap pistachios with pecans or almonds for a different nutty twist.
  • Herbs: Replace cilantro with parsley or basil for a different herbal note.

Storage

Store any leftover guacamole in an airtight container in the refrigerator for up to two days. To prevent browning, place a layer of plastic wrap directly on the surface of the guacamole before sealing the container.

FAQ

Can I make this recipe without a grill?

Absolutely! You can achieve a similar effect by using a grill pan on your stovetop. If neither is available, roasting the vegetables in the oven will also work, though you’ll miss a bit of the smoky flavor.

What if I don’t like spicy foods?

No problem! You can reduce or omit the jalapeño and red ground pepper for a milder version. Consider adding bell peppers for a sweet alternative.

Can I prepare this dish in advance?

Yes, you can grill the vegetables ahead of time and store them in the refrigerator. Assemble the guacamole just before serving to ensure the freshest flavor and texture.

Nutrition

This recipe is rich in healthy fats, fiber, and antioxidants. Avocados provide heart-healthy monounsaturated fats while pistachios offer protein and additional healthy fats. The vegetables add vitamins and minerals, making this a nutrient-dense dish perfect for any diet.

Conclusion

Grilled Guacamole with Pistachios is a delightful twist on the classic guacamole that brings a smoky flavor and a satisfying crunch from the pistachios. This dish is perfect for summer barbecues, family gatherings, or as a unique addition to your weeknight meals. With its combination of fresh, nutritious ingredients and vibrant flavors, it’s sure to become a favorite. We hope you enjoy making and sharing this recipe as much as we do!

Related update: Grilled Guacamole with Pistachios

Related update: Savory Slow Roasted Tomatoes with Filet of Anchovy

Gooey Chocolate Buttermilk Sheet Cake | Made by Meaghan Moineau

Gooey Chocolate Buttermilk Sheet Cake

Intro

There’s something magical about a chocolate cake that instantly brings back a flood of childhood memories. I recall spending countless afternoons in my grandmother’s kitchen, eagerly awaiting the moment when I could lick the spoon clean of any remaining batter. The aroma of chocolate wafting through the house was a promise of the indulgent treat to come. This Gooey Chocolate Buttermilk Sheet Cake is a tribute to those cherished days, combining rich cocoa flavors with a tender crumb that only buttermilk can provide. Whether it’s for a birthday, a family gathering, or just a midweek pick-me-up, this cake promises to delight and satisfy.

Why You’ll Love It

This cake isn’t just about chocolate; it’s about creating moments. Its melt-in-your-mouth texture and rich, gooey frosting make it an instant hit at any gathering. You’ll love how easy it is to make, with simple ingredients that come together to create something extraordinary. The buttermilk adds a subtle tanginess that perfectly complements the sweetness of the chocolate, while the frosting is a luscious dream that you’ll want to eat straight from the pan.

Ingredients

  • 2 cups all-purpose flour
  • 2 cups sugar
  • 1 teaspoon baking soda
  • 1/2 teaspoon salt
  • 1 cup butter (or margarine)
  • 1/4 cup cocoa powder
  • 1 cup water
  • 1/2 cup vegetable oil
  • 1/2 cup buttermilk
  • 2 large eggs, beaten
  • 1 teaspoon vanilla extract
  • 1/2 cup milk
  • 4 cups icing sugar
  • Optional: chopped nuts for topping

Instructions

  1. Preheat your oven to 350°F (180°C).
  2. In a large saucepan, bring to a boil the water, cocoa powder, oil, and butter or margarine.
  3. In a separate large mixing bowl, combine the flour, sugar, salt, and baking soda.
  4. Whisk the hot cocoa mixture into the dry ingredients and mix well.
  5. Add the buttermilk, vanilla extract, and beaten eggs to the batter; continue mixing until smooth.
  6. Pour the batter into a greased and floured 9″x13″ oblong baking pan.
  7. Bake in the preheated oven for approximately 20 minutes, or until a toothpick comes out clean when inserted in the middle.
  8. Remove the cake from the oven and prepare the frosting while the cake is still warm.
  9. For the frosting, set a large pan over medium heat and melt the butter with the cocoa powder and milk.
  10. Stir in the icing sugar and vanilla extract; whisk until smooth.
  11. Add the chopped nuts if desired, then stir well and spread the frosting on the warm cake.
  12. Let the cake cool before serving.

Tips

To ensure your cake remains moist, avoid overbaking. Keep a close eye on it towards the end of the baking time. If you want a deeper chocolate flavor, consider using Dutch-processed cocoa powder. For a nut-free option, simply omit the nuts from the frosting.

Variations & Substitutions

If you’re out of buttermilk, you can make a quick substitute by adding a tablespoon of lemon juice or white vinegar to a cup of milk and letting it sit for 5 minutes. For a more decadent version, fold in chocolate chips or swirl in some peanut butter before baking. If you prefer a lighter frosting, you can reduce the icing sugar by a cup.

Storage

This cake can be stored at room temperature, covered, for up to 3 days. If you live in a particularly warm climate, consider refrigerating it to preserve the frosting. For longer storage, wrap individual slices in plastic wrap and freeze them for up to two months. Thaw at room temperature before enjoying.

FAQ

Can I make this cake ahead of time?

Absolutely! This cake can be made a day in advance. Just ensure it’s stored properly to maintain its moist texture. You can frost it on the day you plan to serve for optimal freshness.

Can I use margarine instead of butter?

Yes, margarine can be used in place of butter in both the cake and the frosting. However, butter will provide a richer flavor and texture.

Can I add coffee to enhance the chocolate flavor?

Definitely! Adding a tablespoon of instant coffee granules to the boiling cocoa mixture will deepen the chocolate flavor without making the cake taste like coffee.

Nutrition

This cake is a treat and should be enjoyed as such. Each serving contains approximately 350 calories, with 15g of fat, 50g of carbohydrates, and 4g of protein. Keep in mind that these values may vary based on portion size and specific ingredients used.

Conclusion

This Gooey Chocolate Buttermilk Sheet Cake is more than just a dessert; it’s a delightful experience that brings joy with every bite. Whether you’re rekindling fond memories or creating new ones, this cake is sure to become a beloved staple in your recipe collection. So preheat that oven, gather your ingredients, and enjoy the sweet satisfaction of homemade goodness.

Related update: Gooey Chocolate Buttermilk Sheet Cake

Related update: Classy Poached Pear In Spicy Mango Nectar With Mango Ice Cream

Caramelized Tofu & Gala Apple Salad | Made by Meaghan Moineau

Caramelized Tofu & Gala Apple Salad

Intro

There’s something magical about the combination of sweet and savory flavors, especially when they come together in a perfectly balanced dish. This Caramelized Tofu & Gala Apple Salad is a delightful example of that harmony. I remember the first time I experimented with this recipe; it was a chilly autumn afternoon, and I was inspired by the abundance of apples from a recent orchard visit with my family. The air was crisp and filled with laughter as we picked apples straight from the trees. This salad brings back those warm memories with every bite, combining the sweetness of Gala apples with the rich, savory notes of caramelized tofu.

Why You’ll Love It

This salad is not only delicious but also incredibly satisfying and nourishing. The caramelized tofu provides a hearty, protein-rich element, while the Gala apples add a fresh, crisp sweetness. The greens and pecans add texture and a nutty flavor that ties everything together. This dish is perfect for a light lunch, a side dish at dinner, or even as a part of a holiday feast.

Ingredients

  • 1/4 cup brown sugar
  • 2 tablespoons butter
  • 1 block extra-firm tofu
  • 1 diced Gala apple
  • 2 cloves garlic, minced
  • 4 cups green lettuce, washed and torn
  • 1/2 cup raw whole pecans
  • 1/4 cup water

Instructions

  1. First thing of action: bake your tofu. Preheat the oven to 350°F. Let the tofu sit on a kitchen towel for 15 minutes, turning once, to absorb moisture.
  2. Cut tofu into 1-inch cubes. Brush them lightly with vegetable oil. Place them on a baking sheet and bake for 35 minutes, turning once.
  3. In a small pan, heat butter and garlic on low until the butter has just almost melted.
  4. Add the apples, tofu, and salt. Bring heat up to medium, and cook for about 4 minutes.
  5. Add the water and stir every minute for the next 6-7 additional minutes, or until there is little moisture left in the pan.
  6. Turn off the heat, and add the brown sugar. Stir to incorporate all of the sugar.
  7. Place the caramelized mixture on top of the salad lettuce and garnish with pecans.

Tips

To get the best texture out of your tofu, make sure to press it adequately to remove excess moisture. This step is crucial for achieving that perfect golden-brown crust when baking. Additionally, using a high-quality non-stick pan will make caramelizing the tofu and apples a breeze.

Variations & Substitutions

Feel free to customize this salad to your liking. If you prefer a different type of apple, Honeycrisp or Fuji would be excellent choices too. For a spicy kick, consider adding a pinch of cayenne pepper to the caramelization process. If you’re aiming for a nut-free version, sunflower seeds offer a similar crunch without the allergens.

Storage

This salad is best enjoyed fresh, but if you have leftovers, store the caramelized tofu and apples separately from the lettuce to prevent wilting. Keep them in an airtight container in the refrigerator for up to three days. When ready to serve, gently reheat the tofu and apples in a pan and toss them with fresh lettuce.

FAQ

Can I make this salad vegan?

Absolutely! Simply substitute the butter with a plant-based alternative, such as margarine or olive oil. The salad will be just as delicious.

What can I use instead of brown sugar?

If you’re looking for a healthier alternative, try using maple syrup or coconut sugar. Both will provide a similar sweetness and caramelization effect.

How can I make the tofu extra crispy?

To achieve extra crispy tofu, ensure that it’s thoroughly pressed to remove moisture and bake it at a slightly higher temperature, around 375°F, for an additional 5-10 minutes.

Nutrition

This Caramelized Tofu & Gala Apple Salad is not only delicious but also packed with nutrients. Tofu is a fantastic source of plant-based protein and contains all nine essential amino acids. Gala apples provide dietary fiber and vitamin C, while pecans are rich in healthy fats and antioxidants. Together, these ingredients make for a balanced and nourishing meal.

Conclusion

With its delightful blend of flavors and textures, the Caramelized Tofu & Gala Apple Salad is sure to become a favorite in your recipe collection. It’s a dish that not only satisfies the palate but also brings back cherished memories of family and nature. I hope this salad brings as much joy to your table as it does to mine. Enjoy!

Related update: Caramelized Tofu & Gala Apple Salad

Related update: Chapchae (Korean Stir-Fried Noodles)

Related update: Zucchini Ribbon Caper Salad

Green Beans with Pearl Onions and Salmon | Made by Meaghan Moineau

Green Beans with Pearl Onions and Salmon

Intro

As the cool breeze of autumn sets in, I often find myself reminiscing about family dinners at my grandmother’s house. Her kitchen, always filled with the comforting aroma of delicious home-cooked meals, was a sanctuary of love and laughter. One dish that stood out was her Green Beans with Pearl Onions and Salmon—a delightful medley that brought together the freshness of vegetables and the rich flavor of perfectly cooked salmon. Today, I’m sharing this cherished recipe with you, hoping it brings the same warmth and joy to your table as it does to mine.

Why You’ll Love It

This dish is a perfect blend of simplicity and elegance, making it ideal for both weeknight dinners and special occasions. You’ll love the way the tender green beans and sweet pearl onions complement the flaky, savory salmon. The addition of brown sugar adds a subtle sweetness that balances the dish beautifully. Moreover, it’s a healthy, one-pan meal that’s quick to prepare, leaving you with more time to enjoy with your loved ones.

Ingredients

  • 1 lb frozen green beans
  • 1 cup frozen pearl onions
  • 2 tablespoons olive oil
  • 1 tablespoon unsalted butter, plus 1 teaspoon
  • 1/4 cup chicken stock
  • 1 tablespoon brown sugar
  • Salt and pepper, to taste
  • 2 skinless salmon steaks

Instructions

  1. In a large pot, add some water, the frozen green beans, and frozen pearl onions. Cover and cook over medium heat until they are tender. Drain and set aside.
  2. In a large skillet over medium-high heat, melt 1 tablespoon of butter and the olive oil. Add the green beans and pearl onions and sauté for 1 minute.
  3. Add the chicken stock and cook for another minute until the stock is evaporated.
  4. Add 1 tablespoon of butter and the brown sugar; lower the heat to low and mix gently until slightly caramelized. Remove from the heat and keep warm.
  5. Return the skillet back to medium-high heat and melt the remaining teaspoon of butter in the center. Add the salmon, season with salt and pepper generously. Cook for 3-5 minutes until a golden crust is formed.
  6. Turn the salmon and cook for another 3 minutes.
  7. Place the green beans with pearl onions on the plate and top with the salmon. Serve immediately.

Tips

  • For perfectly cooked salmon, ensure your skillet is hot before adding the fish. This helps achieve a nice, crispy crust.
  • Do not overcrowd the pan when cooking salmon to ensure even cooking.
  • Adjust the seasoning according to your taste. A touch of lemon juice can also brighten the flavors.

Variations & Substitutions

Variations:

  • Add some crushed garlic to the green beans and onions for an extra layer of flavor.
  • Include some chopped fresh herbs like dill or parsley as a garnish for a fresh touch.

Substitutions:

  • If you prefer a different protein, chicken breast or shrimp would work well with this dish.
  • Feel free to use fresh green beans and onions if available, adjusting the cooking time accordingly.

Storage

Store any leftovers in an airtight container in the refrigerator for up to 2 days. Reheat gently in a skillet over low heat until warmed through. Avoid using the microwave as it can make the salmon rubbery.

FAQ

Can I use fresh green beans and onions instead of frozen?

Absolutely! Fresh green beans and onions can be used in place of frozen ones. Just be sure to adjust the cooking time, as fresh vegetables may take a bit longer to tenderize.

What should I do if I don’t have chicken stock?

If chicken stock is not available, you can substitute it with vegetable stock or even a bit of water with added salt for flavor. The goal is to deglaze the pan and add moisture to the dish.

How can I tell when the salmon is done?

Salmon is done when it flakes easily with a fork and the flesh is opaque. Be careful not to overcook it, as this can lead to dry, tough fish. The internal temperature should reach 145°F (63°C).

Nutrition

This dish is not only delicious but also nutritious. Salmon is a great source of omega-3 fatty acids and high-quality protein. The green beans and pearl onions provide fiber and essential vitamins, making it a balanced meal.

Conclusion

Green Beans with Pearl Onions and Salmon is a dish that beautifully combines flavors and textures, making it a standout meal in any household. It’s a recipe that brings a touch of nostalgia and comfort, perfect for sharing with family and friends. I hope this recipe finds a special place in your kitchen, just as it has in mine. Enjoy the warmth and joy of a cozy meal, and don’t forget to share your experience in the comments below!

Related update: Green Beans with Pearl Onions and Salmon

Pulled Pork Sandwich with Mango BBQ sauce | Made by Meaghan Moineau

Pulled Pork Sandwich with Mango BBQ Sauce

Intro

Welcome to a culinary journey that blends the rich, smoky essence of pulled pork with the luscious sweetness of mango BBQ sauce. This dish is not just a meal; it’s an experience that evokes memories of backyard barbecues and sunlit afternoons. I remember the first time I tasted a pulled pork sandwich; it was at a family reunion where my uncle, the family grill master, introduced us to this delightful creation. The aroma filled the air, and I couldn’t resist sneaking a taste before dinner. That first bite left a lasting impression, and I knew I had to recreate it in my kitchen.

Why You’ll Love It

This pulled pork sandwich is a crowd-pleaser, perfect for gathering with friends and family. The combination of tender, slow-cooked pork and the unique twist of mango-infused BBQ sauce makes it unforgettable. The spices create a depth of flavor that balances the sweetness of the mango, while the brioche rolls add a buttery finish. Whether you’re hosting a party or looking for a comforting meal, this sandwich will leave everyone asking for seconds.

Ingredients

  • 1 tablespoon apple cider vinegar
  • 2 pounds lean boneless pork shoulder
  • 4 split brioche rolls
  • 1 teaspoon cumin seeds
  • 2 tablespoons dark brown sugar
  • 1 teaspoon fennel seeds
  • 1 tablespoon ginger, finely chopped
  • 1 teaspoon kosher salt
  • 2 tablespoons fresh lime juice
  • 1 cup mango puree
  • 2 tablespoons molasses
  • 1 small onion, finely chopped
  • 1 tablespoon paprika
  • 1 serrano pepper, minced
  • 2 tablespoons vegetable oil
  • 2 tablespoons Worcestershire sauce

Instructions

  1. Combine the rub ingredients, in a small bowl and massage it into the pork shoulder until well coated. Set aside while you make the BBQ sauce. You could do this a day ahead and keep refrigerated until ready to use.
  2. In a large saucepan, warm the oil over low heat until hot and shimmering. Add the cumin and fennel; they should splutter upon contact – be careful!
  3. Once the spluttering subsides, add the onions, ginger, serrano pepper, and a little salt, to taste. Sauté until they soften but don’t let them get any color.
  4. Add the rest of the sauce ingredients: apple cider vinegar, brown sugar, lime juice, mango puree, molasses, paprika, and Worcestershire sauce.
  5. Simmer for about 5 minutes. Taste and season as needed.
  6. Add the pork shoulder to the saucepan, coating it with the sauce. Cover, and gently simmer until the pork falls apart easily, stirring and turning often, about 3 hours.
  7. Remove the pork from the saucepan and shred it using 2 forks. Return it to the sauce and stir to coat with the sauce.
  8. Put a generous spoonful of the pork inside a brioche bun, top with a few slices of pickle, and serve.
  9. Enjoy the swoons from your loved ones!

Tips

For the best results, use a meat thermometer to ensure your pork is cooked to perfection. Letting the pork shoulder rest in the fridge with the rub overnight enhances the flavors. If you’re short on time, you can use a pressure cooker to speed up the cooking process without sacrificing tenderness.

Variations & Substitutions

If you’re looking to switch things up, try substituting the mango puree with pineapple for a tropical twist. For a spicier kick, add more serrano peppers or a dash of hot sauce. Vegetarian? Substitute the pork with jackfruit for a plant-based alternative that still satisfies.

Storage

Leftover pulled pork can be stored in an airtight container in the refrigerator for up to 3 days. To freeze, portion the pork into freezer-safe bags or containers, leaving some room for expansion, and store for up to 3 months. Reheat gently on the stovetop or in the microwave with a splash of water to keep it moist.

FAQ

Can I make this recipe in advance?

Absolutely! The flavors deepen when the pork is allowed to sit in the fridge overnight, making it a great make-ahead dish for parties or busy weeknights.

What can I serve with these sandwiches?

These sandwiches pair perfectly with classic coleslaw, sweet potato fries, or a simple green salad. The tangy coleslaw adds a refreshing crunch that complements the rich flavors of the pork.

Can I use a different type of bun?

Definitely! While brioche rolls add a buttery richness, you can use any type of bun you prefer, such as ciabatta or whole wheat, to suit your taste and dietary preferences.

Nutrition

Each serving of Pulled Pork Sandwich with Mango BBQ Sauce provides approximately:

  • Calories: 510
  • Protein: 32g
  • Carbohydrates: 56g
  • Fat: 18g
  • Sodium: 780mg
  • Fiber: 2g

Conclusion

Creating a Pulled Pork Sandwich with Mango BBQ Sauce is not just about cooking; it’s about crafting an experience that brings joy to those around you. With its perfect blend of sweet, spicy, and savory flavors, this dish is sure to become a favorite at your table. So go ahead, indulge in this delicious sandwich, and create memories that will last a lifetime. Happy cooking!

Related update: Pulled Pork Sandwich with Mango BBQ sauce

Related update: Green Beans with Pearl Onions and Salmon

Julia Child’s Vichyssoise | Made by Meaghan Moineau

Julia Child’s Vichyssoise: A Timeless Classic for Every Season

Intro

There’s something incredibly comforting about a bowl of soup, particularly one that carries the rich history and culinary expertise of a legend like Julia Child. When I was a child, my grandmother would often make vichyssoise on Sunday afternoons, filling the kitchen with its soothing aroma. Sitting at the kitchen table, I would eagerly watch her every move, fascinated by how a few simple ingredients transformed into a luxurious dish. This soup not only warms the belly but also the heart, evoking memories of family gatherings and laughter. Today, I share with you the recipe for Julia Child’s Vichyssoise, a chilled soup that’s perfect for any season and situation.

Why You’ll Love It

Julia Child’s Vichyssoise is more than just a soup; it’s a culinary experience. Here’s why you’ll love making and eating it:

  • Simple Ingredients: This recipe uses basic, easily accessible ingredients, making it convenient for any home cook.
  • Rich and Creamy: The combination of leeks and potatoes creates a perfectly smooth and creamy texture.
  • Versatile: Whether served hot or cold, this soup is delightful in any weather.
  • Elegant Presentation: With a simple garnish of chives or parsley, it’s an impressive dish for entertaining.
  • Nostalgic Comfort: Each spoonful is a trip down memory lane for those who grew up with classic French cuisine.

Ingredients

  • White leeks
  • Diced baking potatoes (recommended)
  • Water
  • Salt
  • Sour crème fraîche
  • Fresh chives

Instructions

  1. Bring the leeks, potatoes, and water to the boil in a saucepan.
  2. Salt lightly, cover partially, and simmer for 20-30 minutes, or until the vegetables are tender.
  3. Puree the soup if you wish for a smoother texture.
  4. Taste and correct the seasoning as needed.
  5. Chill the soup thoroughly.
  6. Once chilled, stir in a little more crème fraîche if desired.
  7. Taste carefully again and correct the seasoning.
  8. Top each serving with a sprinkle of chives or parsley and a drizzle or dollop of crème fraîche.

Tips

To ensure your Vichyssoise is perfect every time, keep these tips in mind:

  • Use Fresh Ingredients: The flavor of your soup depends heavily on the freshness of your leeks and potatoes.
  • Chill Thoroughly: For the best flavor, make sure the soup is well chilled before serving.
  • Adjust Consistency: If the soup is too thick, you can thin it out with a bit more water or broth.

Variations & Substitutions

While Julia Child’s original recipe is a classic, there are endless ways to make it your own:

  • Herbs: Add fresh herbs like thyme or basil for an additional layer of flavor.
  • Dairy-Free: Substitute the crème fraîche with a plant-based cream to make the soup vegan-friendly.
  • Broth: Swap water for chicken or vegetable broth for a richer taste.

Storage

This soup is perfect for make-ahead meals. Store it in an airtight container in the fridge for up to three days. If you want to enjoy it later, freeze it for up to two months. Just be sure to thaw it in the fridge overnight before reheating.

FAQ

Can I use other types of potatoes?

Yes, absolutely! While baking potatoes are recommended for their texture, you can use any type of potatoes you have on hand. Just be aware that the texture and flavor may vary slightly.

Is it necessary to puree the soup?

Pureeing the soup is optional but recommended for a smooth, creamy texture. If you prefer a chunkier soup, you can skip this step.

How can I make this recipe vegetarian or vegan?

This recipe is naturally vegetarian if you use vegetable broth in place of water. To make it vegan, replace the crème fraîche with a non-dairy alternative. The rest of the ingredients are already plant-based.

Nutrition

Vichyssoise is a nutritious option, thanks to its vegetable-rich base. While precise nutritional values depend on the specific quantities and brands used, a serving typically contains around 150-200 calories, with a healthy amount of vitamins and minerals derived from the leeks and potatoes. For a lighter version, reduce or omit the crème fraîche.

Conclusion

Julia Child’s Vichyssoise is a testament to the beauty of simplicity in cooking. It’s a dish that transcends time and trends, offering a luxurious yet comforting experience with every spoonful. Whether you’re revisiting childhood memories or creating new ones, this recipe is sure to become a beloved staple in your home. So, gather your ingredients, channel your inner Julia Child, and savor the delight of homemade vichyssoise.

Related update: Julia Child’s Vichyssoise

Related update: Pulled Pork Sandwich with Mango BBQ sauce

Related update: Grilled Guacamole with Pistachios

Related update: Loaded Baked Potato Soup with Crispy-Fried Potato Skins

Penne with Goat Cheese and Basil | Made by Meaghan Moineau

Penne with Goat Cheese and Basil

Intro

There’s something undeniably comforting about a bowl of perfectly cooked pasta, especially when it’s infused with the creamy tang of goat cheese and the aromatic freshness of basil. This Penne with Goat Cheese and Basil recipe is a delightful blend of rich flavors and simple ingredients, creating a dish that’s both elegant and easy to prepare. Every time I make this dish, I’m transported back to a sunlit kitchen in Tuscany, where I first learned the art of making pasta from scratch with my grandmother. The memory of her gentle hands guiding mine through the process is as vivid as the vibrant green basil leaves we picked fresh from her garden. This recipe is my homage to those cherished moments and a reminder of how food can connect us to our past.

Why You’ll Love It

This recipe is a true celebration of simplicity and flavor, perfect for both weeknight dinners and special occasions. Here’s why you’ll adore it:

  • Quick and Easy: It takes less than 30 minutes from start to finish.
  • Minimal Ingredients: You’ll only need five ingredients, all of which are pantry staples.
  • Rich and Creamy: The goat cheese melts beautifully, creating a luscious sauce that coats each piece of pasta.
  • Fresh and Aromatic: Fresh basil adds a burst of flavor and color.
  • Versatile: Perfect for a quiet dinner for two or a festive gathering with friends.

Ingredients

  • Penne pasta
  • Fresh basil leaves
  • Goat cheese
  • Olive oil
  • Salt and pepper

Instructions

  1. Cook the penne pasta according to the package directions until al dente. Drain and set aside.
  2. Arrange the basil leaves in a stack, roll them lengthwise like a cigar, and slice thinly crosswise to create a chiffonade. This technique enhances the basil’s flavor and presentation.
  3. In a large bowl, toss the hot pasta with olive oil and crumbled goat cheese. Stir gently until the cheese melts slightly, coating the pasta.
  4. Allow the pasta to cool for a few minutes. This step helps the flavors meld together.
  5. Add the basil chiffonade, and season with salt and pepper to taste. Toss everything together until well combined.
  6. Serve immediately, garnished with additional basil if desired.

Tips

Here are some handy tips to make your dish even more delightful:

  • Use High-Quality Ingredients: Since this recipe relies on a few key ingredients, using high-quality olive oil and fresh goat cheese will make a noticeable difference.
  • Don’t Overcook the Pasta: Be sure to cook the pasta al dente, as it will continue to soften when tossed with the warm ingredients.
  • Chiffonade Like a Pro: Rolling the basil before slicing helps prevent bruising and keeps your basil looking fresh.

Variations & Substitutions

This recipe is wonderfully adaptable. Here are some variations and substitutions you might consider:

  • Add Protein: Grilled chicken or shrimp would pair beautifully with the creamy goat cheese and fresh basil.
  • Try Different Cheeses: If goat cheese isn’t your preference, feta or ricotta can work as delicious alternatives.
  • Incorporate Vegetables: Cherry tomatoes, roasted red peppers, or spinach can add extra nutrition and flavor.
  • Use Whole Wheat Pasta: For a healthier twist, substitute the penne with whole wheat pasta.

Storage

This dish is best enjoyed fresh, but if you have leftovers, store them in an airtight container in the refrigerator for up to three days. To reheat, gently warm the pasta in a skillet over low heat with a splash of olive oil to help revive the creamy texture.

FAQ

Can I make this dish vegan?

Yes, you can easily make a vegan version by using vegan cheese alternatives available in most grocery stores. Nutritional yeast can also add a cheesy flavor without dairy.

Can I serve this dish cold?

Absolutely! This pasta is also delightful as a cold pasta salad. Simply allow the pasta to cool completely before adding the basil, and enjoy it straight from the fridge.

What type of goat cheese should I use?

A soft, creamy goat cheese works best for this recipe, as it melts well and evenly coats the pasta. You can also experiment with flavored varieties, like herbed or peppered goat cheese for an extra kick.

Nutrition

This dish is a wholesome meal, offering a balanced mix of carbohydrates, healthy fats from the olive oil, and protein from the goat cheese. While exact nutritional values will vary based on the specific brands and quantities used, each serving provides a good source of calcium and vitamins from the basil.

Conclusion

Penne with Goat Cheese and Basil is not just a meal; it’s a comforting reminder of the power of simple ingredients coming together to create something extraordinary. Whether you’re relishing it alone with a glass of wine or sharing it with loved ones around a bustling dinner table, this dish is sure to become a beloved staple in your culinary repertoire. As you savor each bite, may it bring you warmth, joy, and perhaps a touch of nostalgia for the cherished memories created in your own kitchen.

Related update: Penne with Goat Cheese and Basil

Ancient Grains Bread | Made by Meaghan Moineau

Ancient Grains Bread: A Taste of Tradition

Intro

There’s something incredibly comforting about the smell of freshly baked bread wafting through the house. It’s a scent that takes me back to my grandmother’s kitchen, where she would spend hours kneading dough by hand, humming softly to herself. Her bread was always a family favorite, packed with hearty grains and a touch of sweetness. Inspired by her timeless recipes, I’ve crafted this Ancient Grains Bread to bring a slice of that nostalgia to your own table. This bread, rich with history and flavor, combines the best of old-world grains with modern baking techniques for a loaf that is both wholesome and delicious.

Why You’ll Love It

This Ancient Grains Bread is not just a treat for the taste buds but also a wholesome addition to your diet. Packed with a variety of nutritious grains, this bread offers a delightful texture and a rich, earthy flavor. Each bite provides a satisfying chew, a hint of sweetness from the honey, and the comforting aroma of a well-baked loaf. Whether you’re making sandwiches, toast, or enjoying it plain with a pat of butter, this bread is versatile enough to complement any meal.

Ingredients

  • 2 teaspoons yeast
  • 2 cups all-purpose flour
  • 1 cup whole wheat flour
  • 1/4 cup rye flakes
  • 2 tablespoons ground flaxseed
  • 2 tablespoons amaranth grain
  • 2 tablespoons quinoa
  • 2 tablespoons soy flour
  • 1 tablespoon vital wheat gluten
  • 1/4 cup skim milk powder
  • 2 teaspoons salt
  • 1 1/2 cups warm water
  • 2 tablespoons honey

Instructions

  1. In a large bowl or stand mixer, whisk together the yeast, all-purpose flour, whole wheat flour, rye flakes, ground flaxseed, amaranth grain, quinoa, soy flour, vital wheat gluten, skim milk powder, and salt.
  2. Stir in the warm water and honey, mixing thoroughly to form a cohesive, fairly firm but workable dough.
  3. Turn the dough out onto a floured board or knead it with the dough hook for about 12 minutes until it becomes very elastic and smooth.
  4. Place the dough into a bowl, cover, and allow it to rest for 30 minutes.
  5. Roll the rested dough into a log shape and tuck it into a greased loaf pan.
  6. Cover the pan with a clean towel and allow the dough to rise for 50-60 minutes.
  7. Preheat your oven to 350°F (175°C).
  8. Slash the top of the loaf 2-3 times with a sharp knife or lame to allow the bread to expand properly in the oven.
  9. Bake the loaf for about 40 minutes until it is golden brown and sounds hollow when tapped on the bottom.
  10. Turn the bread out of the pan immediately and cool on a rack before slicing.

Tips

For the best results, make sure your water is warm, not hot, to activate the yeast without killing it. If you have time, let the dough rise in a warm, draft-free area. This will give the yeast the best environment to work its magic, resulting in a lighter loaf.

Variations & Substitutions

Feel free to experiment with this recipe by adding seeds like sunflower or pumpkin seeds for additional crunch and flavor. If you have dietary restrictions, you can substitute the honey with agave syrup or maple syrup. For a gluten-free version, replace the flours and vital wheat gluten with your favorite gluten-free blend, though be aware that the texture may vary.

Storage

Store your Ancient Grains Bread in an airtight container or wrapped in a clean kitchen towel at room temperature for up to 3 days. For longer storage, slice and freeze the bread, then toast slices directly from the freezer as needed.

FAQ

Can I make this recipe without a stand mixer?

Absolutely! While a stand mixer makes the process easier, you can knead the dough by hand. Just ensure you knead it long enough to achieve a smooth and elastic texture, which is key for a good rise.

What can I use if I don’t have rye flakes?

If you don’t have rye flakes on hand, you can substitute them with rolled oats or simply omit them from the recipe. The bread will still be delicious and hearty.

Nutrition

This bread is rich in fiber and protein thanks to the mix of ancient grains, making it a nutritious choice for your meals. Each slice provides a balance of carbohydrates, healthy fats, and plant-based proteins.

Conclusion

Baking this Ancient Grains Bread is like baking a piece of history. With each slice, you’ll enjoy a medley of flavors and textures that only ancient grains can offer. Whether you’re a seasoned baker or a newcomer to bread making, this recipe is straightforward and rewarding. Share it with loved ones and let it become a staple in your kitchen, just as it has in mine. Happy baking!

Related update: Ancient Grains Bread

Easy Pork Chops on Stuffing | Made by Meaghan Moineau

Easy Pork Chops on Stuffing

Intro

There’s something magical about the aroma of a home-cooked meal wafting through the house. This Easy Pork Chops on Stuffing recipe takes me back to my childhood, when Sundays were reserved for family dinners and the kitchen was the heart of our home. I remember my grandmother preparing this dish, the savory scent of pork mingling with the comforting aroma of stuffing filling every corner. It was more than just a meal; it was a tradition, a moment to gather and share stories. Now, I’m excited to share it with you, so you can create your own cherished memories around the dinner table.

Why You’ll Love It

This recipe is a perfect combination of simplicity and flavor. You’ll love how tender and juicy the pork chops turn out, and the stuffing is the perfect accompaniment to soak up all the delicious juices. It’s a dish that doesn’t require a lot of fancy ingredients or complicated techniques, making it ideal for both weeknight dinners and special occasions. Plus, the nostalgic flavors will transport you back to simpler times, making every bite a comforting experience.

Ingredients

  • Butter
  • Diced celery
  • Chicken broth
  • Fresh parsley
  • Diced onion
  • Bell pepper
  • Pork chops
  • Salt
  • White bread

Instructions

  1. Early in the day (or the night before), cut the bread into 1-inch cubes and leave them out to air dry. Place the cubes in a large mixing bowl.
  2. Heat 2 tablespoons of butter over medium heat in a sauté pan and sauté the celery until it’s almost tender.
  3. Add the onions and continue to cook over medium heat until they become translucent.
  4. Remove the mixture from the heat and add half of the chicken broth.
  5. Add the chopped parsley to the bread cubes and toss to distribute evenly.
  6. Pour the celery/onion mixture over the bread cubes and gently toss, adding additional broth as needed to moisten the bread. Be cautious not to break up the bread cubes. They should be moistened through but not soaking wet.
  7. Butter a shallow baking dish with half of the remaining butter and place the stuffing in the middle. Dot the top of the stuffing with any remaining butter.
  8. Cover the dish with aluminum foil and bake for 20 minutes in a preheated 350°F oven.
  9. Meanwhile, pat the pork chops dry with a paper towel and season both sides with salt and pepper. With a sharp knife, cut 2-3 slices through the fat edge on each chop to prevent them from curling while cooking.
  10. Preheat a non-stick sauté pan over medium-high heat and quickly sear the chops on each side until lightly browned. The chops will still be nearly raw in the center.
  11. Remove the foil from the precooked stuffing and place the chops in a single layer over the stuffing.
  12. Return the dish to the oven and roast for approximately 15-25 minutes, uncovered (depending on the thickness of your chops). The chops should be cooked until they are no longer dark pink inside, remaining moist and juicy, but not overcooked.
  13. Remove from the oven and serve immediately.

Tips

  • Ensure your bread is stale enough before using it for stuffing. If it’s too fresh, the stuffing might become mushy.
  • Use a meat thermometer to ensure your pork chops are perfectly cooked. They should reach an internal temperature of 145°F.
  • Searing the pork chops before baking ensures a flavorful crust that locks in moisture.

Variations & Substitutions

If you’re looking to add more flavor, consider mixing in some diced apples or cranberries into the stuffing for a sweet twist. You can also substitute chicken broth with vegetable broth if you prefer a vegetarian version of the stuffing. For an herbaceous kick, try adding some fresh thyme or rosemary to the stuffing mixture.

Storage

Leftovers can be stored in an airtight container in the refrigerator for up to three days. To reheat, place them in an oven-safe dish and warm them in a preheated oven at 350°F until heated through. Alternatively, you can reheat individual portions in the microwave.

FAQ

Can I use bone-in pork chops for this recipe?

Yes, you can use bone-in pork chops, but you may need to adjust the cooking time slightly to ensure they are cooked through.

What can I serve with this dish?

This dish pairs wonderfully with a side of green beans or a fresh garden salad. Mashed potatoes or roasted vegetables also complement the flavors nicely.

Nutrition

This dish is a hearty and satisfying meal, with each serving offering a good balance of protein and carbohydrates. While exact nutritional values will vary based on portion sizes and specific ingredients used, pork chops are a great source of lean protein, and the stuffing provides fiber and essential vitamins from the vegetables.

Conclusion

This Easy Pork Chops on Stuffing recipe is more than just a meal; it’s an experience that brings people together. With its rich flavors and comforting aromas, it’s a dish that warms both the heart and the soul. Whether you’re making it for a family dinner or a special occasion, it’s sure to become a beloved favorite in your home. Enjoy creating delicious memories with this timeless recipe!

Related update: Easy Pork Chops on Stuffing

Related update: Penne with Goat Cheese and Basil

HomeMade Hashbrowns with Spinach and Carrots | Made by Meaghan Moineau

Homemade Hashbrowns with Spinach and Carrots

Intro

There’s something incredibly comforting about a plate of crispy hashbrowns. They remind me of weekend breakfasts at my grandmother’s house, where the aroma of frying potatoes would gently wake us up. My grandmother had a knack for adding a little something extra to her hashbrowns, a touch of love that made them irresistible. Inspired by those mornings, I’ve crafted a recipe that not only hits the comfort spot but also packs a nutritious punch with the addition of fresh spinach and carrots. These Homemade Hashbrowns with Spinach and Carrots are a delightful twist on the classic, providing a burst of flavor and a boost of nutrients in every bite.

Why You’ll Love It

This recipe is perfect for those seeking a delicious, healthy meal that doesn’t compromise on taste. The combination of crispy potatoes with the fresh, earthy flavor of spinach and the subtle sweetness of carrots is truly magical. These hashbrowns are versatile and can be served as a hearty breakfast, a delicious side dish, or even a satisfying snack. They’re also vegetarian-friendly and can be easily adapted to suit a variety of dietary needs.

Ingredients

  • 2 large potatoes, grated
  • 1 cup fresh spinach leaves, finely chopped
  • 1 onion, finely chopped
  • 1 carrot, grated
  • 1/2 teaspoon red chili powder
  • 2 tablespoons cornflour
  • 1/2 teaspoon salt, plus more to taste
  • Oil for shallow frying

Instructions

  1. In a large bowl, combine grated potatoes, chopped spinach, chopped onion, and grated carrot.
  2. Add 1/2 teaspoon of salt to the mixture and mix well.
  3. Squeeze the vegetable mixture to remove all the excess moisture.
  4. Stir in the red chili powder and cornflour, mixing until well combined. Adjust salt by tasting the mixture.
  5. Form the mixture into small patties, ensuring they’re compact and hold together.
  6. Heat oil in a pan over medium-high heat for shallow frying.
  7. Gently place the patties in the hot pan, allowing them to brown on both sides for a few minutes.
  8. Lower the heat to medium and cook until the patties are cooked through and crispy.
  9. Remove from the pan and drain on paper towels before serving.

Tips

For the best results, make sure to thoroughly squeeze out any moisture from the vegetable mixture. This ensures your hashbrowns are crispy rather than soggy. Also, be patient while frying; allow each side to brown completely before flipping to achieve that perfect golden crust.

Variations & Substitutions

Feel free to experiment with other veggies such as zucchini or bell peppers for added flavor and nutrition. If you’re avoiding cornflour, you can substitute with all-purpose flour or rice flour. For a spicier kick, consider adding a pinch of cayenne pepper or some finely chopped jalapeños.

Storage

These hashbrowns can be stored in an airtight container in the refrigerator for up to 3 days. To reheat, simply place them in a hot oven or in a pan to restore their crispiness. They can also be frozen for up to a month; just make sure to thaw them thoroughly before reheating.

FAQ

Can I make these hashbrowns gluten-free?

Yes, you can easily make this recipe gluten-free by using a gluten-free flour alternative like rice flour or chickpea flour in place of cornflour.

How can I make these hashbrowns vegan?

This recipe is naturally vegan as it contains no animal products. Just be sure to use a vegetable-based oil for frying.

Can I bake these hashbrowns instead of frying?

Absolutely! To bake, preheat your oven to 400°F (200°C) and line a baking sheet with parchment paper. Arrange the patties on the sheet and bake for about 20-25 minutes, flipping halfway, until they are golden brown and crispy.

Nutrition

These hashbrowns are not only delicious but also nutritious, providing a healthy dose of vitamins and minerals from the spinach and carrots. They’re a great source of dietary fiber and contain a good balance of carbs and protein to fuel your day.

Conclusion

Homemade Hashbrowns with Spinach and Carrots are a versatile and delicious addition to any meal. Whether you serve them for breakfast, as a side dish, or a snack, they are sure to please. This recipe is a nod to the comforting meals of my childhood, with a modern twist that incorporates fresh, nutritious ingredients. I hope you enjoy making and sharing these hashbrowns as much as I do. Happy cooking!

Related update: HomeMade Hashbrowns with Spinach and Carrots

North Carolina-Style BBQ Pulled Pork | Made by Meaghan Moineau

North Carolina-Style BBQ Pulled Pork

Intro

Welcome to a delightful culinary journey to the heart of North Carolina with our authentic BBQ Pulled Pork recipe. I remember summer afternoons at my grandmother’s house, where the aroma of slow-cooked pork would waft through the air as we played outside. This dish was the centerpiece of our family gatherings, bringing everyone together with its rich flavors and tender texture. Now, I’m thrilled to share this cherished recipe with you, so you can create your own memories around the table.

Why You’ll Love It

This North Carolina-Style BBQ Pulled Pork is a true crowd-pleaser. It’s a perfect blend of tangy, savory, and sweet flavors, with a hint of smokiness that takes it over the top. Whether you’re hosting a backyard barbecue, a family dinner, or just craving something comforting, this dish is incredibly versatile and sure to satisfy. Plus, it’s easy to make, allowing you to enjoy the company of your loved ones while the oven does most of the work.

Ingredients

  • 8 cups apple cider vinegar
  • 1 boneless pork shoulder (about 5 pounds)
  • 1/4 cup dark firmly-packed brown sugar
  • 1/4 cup butter, melted
  • 1 tablespoon celery salt
  • 1 tablespoon dry mustard
  • 1 tablespoon garlic salt
  • 1 tablespoon black ground pepper
  • 1 cup ketchup
  • 1/4 cup light brown sugar
  • 2 tablespoons liquid hickory smoke
  • 1 tablespoon onion powder
  • 1 tablespoon crushed red pepper flakes
  • 2 tablespoons salt
  • 1 cup water

Instructions

  1. In a small bowl, mix together paprika, light brown sugar, celery salt, garlic salt, dry mustard, black pepper, onion powder, and salt.
  2. Season the entire pork roast with the spice mixture and cover it. Let it rest overnight in the refrigerator to absorb the flavors.
  3. Preheat your oven to 325°F (165°C).
  4. Place the seasoned pork roast in a large, disposable aluminum roasting pan.
  5. In a small bowl, combine the melted butter and liquid hickory smoke to create the basting marinade.
  6. Pour the basting marinade over the pork and cover the pan with aluminum foil.
  7. Cook the pork for approximately 4 1/2 hours or until the meat becomes tender enough to pull apart. Turn the pork every hour and baste it every 30 minutes. Alternatively, cook the pork over white hot coals, covered, for 3-3 1/2 hours, basting and turning frequently with the marinade.
  8. Transfer the pork roast to a cutting board and drain the excess juices from the pan.
  9. Slice the pork roast and pull apart the meat, trimming any fat. Place the shredded pork back into the roasting pan.
  10. Prepare the BBQ sauce by mixing together the cider vinegar, water, ketchup, dark brown sugar, salt, and red pepper flakes in a large bowl.
  11. Pour the BBQ sauce over the pulled pork, stirring to ensure all the meat is covered. Cover with aluminum foil.
  12. Place the pulled pork back into the oven (still at 325°F) or grill and cook for 1 1/2 hours, stirring the pork and sauce every 30 minutes.

Tips

For best results, make sure to let the pork marinate overnight. This allows the spices to penetrate deeply, enhancing the flavor of the meat. When pulling the pork, be patient and gentle to ensure it remains juicy and tender. If you’re cooking on a grill, maintain a consistent temperature to avoid overcooking.

Variations & Substitutions

Feel free to get creative with this recipe! You can substitute the pork shoulder with a pork butt if preferred. For a spicier kick, add more red pepper flakes or a dash of hot sauce to the BBQ sauce. If you don’t have apple cider vinegar on hand, white vinegar can be used as a substitute. For a smoky flavor without liquid smoke, try grilling the pork over wood chips.

Storage

Store any leftover pulled pork in an airtight container in the refrigerator for up to 4 days. It can also be frozen for up to 3 months. To reheat, gently warm it in the oven or on the stovetop, adding a splash of water or extra BBQ sauce to keep it moist.

FAQ

Can I make this recipe in a slow cooker?

Absolutely! To adapt this recipe for a slow cooker, follow the same steps for seasoning the pork and making the sauce. Place the seasoned pork in the slow cooker, pour the sauce over it, and cook on low for 8-10 hours or until the pork is tender and falls apart easily.

How do I know when the pork is fully cooked?

The pork is done when it reaches an internal temperature of 195°F to 205°F and easily pulls apart with a fork. If using a meat thermometer, insert it into the thickest part of the pork for an accurate reading.

What should I serve with BBQ pulled pork?

BBQ pulled pork pairs wonderfully with classic sides like coleslaw, cornbread, baked beans, or potato salad. For a lighter option, serve it with a fresh green salad or roasted vegetables.

Nutrition

This North Carolina-Style BBQ Pulled Pork is high in protein and provides a satisfying meal. Keep in mind that portion sizes and sides will affect the overall nutritional value. For specific dietary concerns, consider using leaner cuts of pork or modifying the sugar content in the sauce.

Conclusion

Our North Carolina-Style BBQ Pulled Pork is a must-try for anyone who loves a good barbecue. With its rich flavors and tender texture, it’s a dish that brings people together, creating lasting memories around the table. Whether you’re a seasoned cook or a beginner, this recipe is straightforward and rewarding. So gather your loved ones, fire up the oven or grill, and enjoy this delicious taste of North Carolina tradition.

Related update: North Carolina-Style BBQ Pulled Pork

Related update: Easy Pork Chops on Stuffing

Korean Sweet n Sour Chicken | Made by Meaghan Moineau

Korean Sweet n Sour Chicken

Intro

There’s something about the combination of sweet and sour flavors that transports me back to my childhood. I remember the first time I tasted this delightful Korean Sweet n Sour Chicken; it was during a family gathering. My grandmother, who was an exceptional cook, had prepared this dish with so much love. As the aroma filled the house, we all gathered around the table, our mouths watering in anticipation. That first bite was a revelation — the perfect balance of crispy chicken, tangy sauce, and fresh vegetables. Today, I am thrilled to share this cherished recipe with you, hoping it becomes a favorite in your home as well.

Why You’ll Love It

This Korean Sweet n Sour Chicken recipe is not only delicious but also easy to make. It’s a wonderful fusion of flavors that takes your taste buds on a delightful journey. The crispy chicken pairs perfectly with the sweet and tangy sauce, and the colorful vegetables add a burst of freshness and nutrition. Whether you’re cooking for your family or hosting a dinner party, this dish is sure to impress.

Ingredients

  • 2 boneless chicken breasts
  • 2 tablespoons soy sauce
  • 1 cup flour
  • 1/2 cup cornstarch
  • 1 egg, beaten
  • 1 cup water (divided)
  • Vegetable oil for frying
  • 1 onion
  • 1 cup carrot slices
  • 1 cup edamame
  • 1/2 cup cider vinegar
  • 1/2 cup pineapple juice
  • 3 tablespoons sugar
  • 1/4 cup mixed corn starch and water

Instructions

  1. Cut the chicken into thin strips, about 1 or 2-inch pieces. Add soy sauce to the chicken for a short marination; mix well and set aside.
  2. Cut the vegetables into large bite-sized pieces. Set aside until the sauce is ready and thickened.
  3. Make the batter by mixing the flour, cornstarch, water, and beaten egg. Add more flour until a thick consistency is reached.
  4. Dip the marinated chicken strips into the batter.
  5. Bring vegetable oil to medium-high heat. Deep fry each of the strips for about 3 to 4 minutes per batch or until browned and cooked through.
  6. When finished, place on a paper towel-lined dish to remove excess oil. For extra crispiness, optionally re-fry the chicken strips for a second time.
  7. To make the sauce, bring 1 cup of water, 3 tablespoons of vinegar, 3 tablespoons of sugar, and 2 tablespoons of soy sauce to a rapid boil in a saucepan.
  8. Add the mixture of cornstarch and water to the saucepan. Add desired vegetables and let simmer for about 5 minutes or until it thickens.
  9. On a large plate, add the fried chicken strips, then pour over the sauce/vegetable mixture and serve while warm.

Tips

  • For best results, ensure the oil is at the right temperature before frying. Too low, and the chicken will absorb too much oil; too high, and it will burn.
  • Feel free to adjust the sweetness or sourness of the sauce according to your taste preferences.
  • Use paper towels to drain excess oil from the fried chicken, ensuring it stays crispy.

Variations & Substitutions

If you’re looking to switch things up, here are some variations and substitutions you can try:

  • Protein Swap: Substitute chicken with tofu or shrimp for a different protein option.
  • Vegetable Variety: Add bell peppers, snow peas, or broccoli for additional flavor and nutrients.
  • Gluten-Free Option: Use a gluten-free flour blend instead of regular flour for a gluten-free version.

Storage

Store any leftovers in an airtight container in the refrigerator for up to 3 days. To reheat, place the chicken and sauce in a skillet and warm over low heat until heated through. Alternatively, use a microwave, but be mindful that the chicken may not remain as crispy.

FAQ

Can I prepare this dish in advance?

Yes, you can prepare the sauce and marinate the chicken in advance. Store them separately in the refrigerator for up to 24 hours. When you’re ready to serve, fry the chicken and heat the sauce with the vegetables.

Is there a way to make this dish healthier?

To make this dish healthier, consider air frying the chicken instead of deep frying to reduce oil content. You can also use brown rice flour for the batter and serve with a side of steamed brown rice for added fiber.

Nutrition

While specific nutritional values can vary, this dish provides a good source of protein from the chicken and edamame. The vegetables offer dietary fiber, and the sauce, when used in moderation, can fit into a balanced diet. If you have dietary concerns, consider adjusting the sugar and oil quantities.

Conclusion

There you have it, a delightful and nostalgic Korean Sweet n Sour Chicken recipe that is bound to become a staple in your kitchen. Whether you’re making it for a special family gathering or a casual weeknight dinner, this dish is sure to bring smiles and satisfy cravings. Enjoy the harmonious blend of flavors and the joy of sharing a meal with loved ones. Happy cooking!

Related update: Korean Sweet n Sour Chicken

Related update: North Carolina-Style BBQ Pulled Pork

Mashed Potatoes with Garlic, Sage & Goat Cheese | Made by Meaghan Moineau

Mashed Potatoes with Garlic, Sage & Goat Cheese

Intro

There’s a certain magic in the air when the aroma of garlic and sage wafts through the kitchen, bringing back fond memories of family gatherings and celebrations. I remember my grandmother’s cozy kitchen, where we would gather around the table, eagerly waiting for her famous mashed potatoes to be served. The rich, creamy texture and the subtle tang of goat cheese would melt in our mouths, creating a symphony of flavors that lingered long after the meal was over. Today, I’m excited to share with you a recipe that brings those cherished memories to life: Mashed Potatoes with Garlic, Sage & Goat Cheese. This dish is a perfect combination of comfort and elegance, making it a delightful addition to any meal.

Why You’ll Love It

This recipe for Mashed Potatoes with Garlic, Sage & Goat Cheese is a game-changer for several reasons:

  • Rich and Creamy: The addition of goat cheese provides a luxurious creaminess that elevates traditional mashed potatoes.
  • Flavorful: Garlic and sage add depth and complexity, transforming a simple side dish into a gourmet experience.
  • Easy to Make: With just a handful of ingredients and straightforward instructions, you’ll have this dish ready in no time.
  • Versatile: Perfect for holiday feasts, intimate dinners, or as a comforting treat on a chilly evening.

Ingredients

  • 4 large baking potatoes, peeled and cubed
  • 3 cloves of garlic, minced
  • 1 Chavrie goat cheese pyramid (5.3 oz)
  • 2 tablespoons olive oil
  • 1 tablespoon fresh sage, finely chopped
  • Salt and black pepper to taste

Instructions

  1. In a medium saucepan, cook the potatoes in salted water until tender, about 15 minutes.
  2. Drain the potatoes and return them to the saucepan.
  3. While still warm, add the olive oil, garlic, and Chavrie Goat Cheese.
  4. Whip the potatoes with hand-held mixers until the ingredients are blended and the desired consistency is obtained.
  5. Season with salt and black pepper to taste.
  6. Garnish with fresh sage before serving.

Tips

  • Use Starchy Potatoes: Russet or Yukon Gold potatoes work best for this recipe, providing a fluffy and creamy texture.
  • Don’t Overmix: To avoid gummy mashed potatoes, mix just until the ingredients are combined.
  • Infuse the Oil: For an extra flavor boost, gently heat the olive oil with the minced garlic before adding it to the potatoes.

Variations & Substitutions

  • Dairy-Free Option: Substitute the goat cheese with a dairy-free cheese alternative for a lactose-free version.
  • Herb Variations: Experiment with different herbs like rosemary or thyme for a unique twist.
  • Cheese Alternatives: Try using cream cheese or feta for a different flavor profile.

Storage

Store any leftover mashed potatoes in an airtight container in the refrigerator for up to 3 days. To reheat, gently warm them on the stove over low heat, adding a splash of milk or cream to restore their creamy consistency.

FAQ

Can I prepare the mashed potatoes ahead of time?

Yes, you can prepare the mashed potatoes a day in advance. Simply reheat them gently on the stove or in the microwave before serving, adding a little cream or milk to bring back their creamy texture.

What can I serve with these mashed potatoes?

These mashed potatoes are incredibly versatile and pair well with a variety of dishes, including roasted chicken, grilled steak, or even a hearty vegetable stew.

Can I freeze the mashed potatoes?

While it’s possible to freeze mashed potatoes, the texture may change upon thawing. If you choose to freeze them, store in an airtight container and reheat gently, adding cream or milk to improve texture.

Nutrition

Each serving of these mashed potatoes provides approximately:

  • Calories: 230
  • Protein: 5g
  • Carbohydrates: 25g
  • Fat: 12g
  • Fiber: 3g
  • Sugar: 2g

Conclusion

Mashed Potatoes with Garlic, Sage & Goat Cheese are more than just a side dish—they’re a celebration of flavors that bring warmth and joy to any table. Whether you’re hosting a holiday gathering or simply treating yourself to a cozy meal at home, this recipe is sure to impress. With its blend of rich, creamy textures and aromatic herbs, you’ll find yourself returning to this dish time and again. So gather your ingredients, embrace the nostalgia, and savor the comforting taste of these gourmet mashed potatoes. Happy cooking!

Related update: Mashed Potatoes with Garlic, Sage & Goat Cheese

Chinese Potstickers | Made by Meaghan Moineau

Delicious Chinese Potstickers: A Culinary Adventure

Intro

Growing up, Chinese potstickers were a staple in my household. I remember the comforting aroma wafting through the kitchen as my grandmother expertly folded each dumpling with swift, practiced motions. We would gather around the kitchen table, sharing stories and laughter as we eagerly awaited the moment we could dig into these delectable treats. There’s something about these crispy, juicy dumplings that instantly transports me back to those warm family gatherings. Today, I’m excited to share this cherished recipe with you so you can create your own memories around the table with these scrumptious Chinese potstickers.

Why You’ll Love It

This Chinese potsticker recipe is a delightful blend of flavors and textures that will satisfy your cravings for a savory, mouthwatering treat. They’re not only delicious but also fun to make, especially if you involve family or friends in the dumpling-folding process. The fragrant filling, coupled with the crispiness of the wrapper, makes them an irresistible dish that you’ll want to make again and again. Plus, they’re perfect for serving at parties, family dinners, or simply as a comforting snack.

Ingredients

  • 200g lean ground pork (or ground chicken)
  • 100g canned water chestnuts (or spinach/cabbage)
  • 1 teaspoon sea salt
  • 1 teaspoon fine sugar
  • 1/2 teaspoon ground black pepper
  • 2 teaspoons light soy sauce
  • 2 teaspoons sesame oil
  • 1 tablespoon Shaoxing Huatiao wine
  • 2 to 3 tablespoons finely chopped scallions or spring onions
  • Dumpling wrappers
  • Plain flour, for dusting
  • 2 to 3 tablespoons vegetable oil
  • 1/3 cup water

Instructions

  1. Place 200g of ground pork in a large mixing bowl. If preferred, pork may be substituted with ground chicken.
  2. Add 1 teaspoon of sea salt, 1 teaspoon of fine sugar, 1/2 teaspoon of ground black pepper, 2 teaspoons of light soy sauce, 2 teaspoons of sesame oil, and 1 tablespoon of Shaoxing Huatiao wine.
  3. Place 100g of canned water chestnuts in a chopper/blender and chop them into small pieces. Add the chopped water chestnuts to the pork mixture. If preferred, use spinach or cabbage in place of water chestnuts.
  4. Add 2 to 3 tablespoons of finely chopped scallions or spring onions to the pork mixture. Combine all the filling ingredients well.
  5. Thaw the dumpling wrappers if they are frozen and keep them well covered until ready to use. Dust a dish and the table generously with flour.
  6. Fill each dumpling wrapper with about 1.5 teaspoons of the prepared pork filling. Prepare a bowl of water for sealing the wrappers.
  7. Dip a finger into the water and lightly wet the rim of each dumpling wrapper. Bring the wrapper together till the opposite ends meet, then gently push the filling into the wrapper and pinch the top tip to seal it.
  8. From the center, fold a pleat on one side and bring it to the other side of the dumpling. Repeat to create two more pleats, ensuring each side has three pleats. Repeat on the other end of the dumpling.
  9. Place the prepared dumplings in a well-floured dish, ensuring they do not touch each other. Set aside or freeze until ready to cook.
  10. To cook, add 2 to 3 tablespoons of vegetable oil to a very hot frying pan. Cook potstickers in batches, ensuring the flat surfaces face down.
  11. Pan fry until the bottoms are golden brown, then add 1/3 cup of water to the pan. Cover immediately and steam for 4 to 5 minutes.
  12. Once the water evaporates, remove the cover and let the dumplings sit in the hot pan for another minute to crisp up the base.
  13. Gently transfer the potstickers to a plate and serve immediately with a vinegar dip made with balsamic or black Chinese vinegar and thinly sliced ginger. Soy sauce, chili oil, or sesame oil can also be added to the dipping sauce.

Tips

When making potstickers, it’s important to ensure all the edges are sealed tightly to prevent the filling from spilling out. If you’re new to pleating dumplings, practice makes perfect! Don’t worry if your first few attempts aren’t perfect—each potsticker will still taste delicious. Additionally, make sure to use a non-stick pan to ensure the dumplings don’t stick during cooking. And remember, patience is key when frying and steaming to achieve that perfect crispy bottom.

Variations & Substitutions

This potsticker recipe is highly versatile and can be adapted to suit your tastes. You can swap the pork for ground chicken, turkey, or even shrimp for a different protein profile. Vegetarians can enjoy these dumplings by substituting the meat with finely chopped mushrooms or tofu. Feel free to experiment with different vegetables like finely chopped carrots or bell peppers for added color and texture in the filling. Additionally, you can spice things up by adding a pinch of chili flakes or a few drops of chili oil to the filling for a hint of heat.

Storage

Uncooked potstickers can be stored in the freezer for future enjoyment. Simply place them on a baking sheet in a single layer, making sure they don’t touch each other, and freeze until solid. Once frozen, transfer them to a zip-top bag or airtight container for long-term storage. Cooked potstickers can be refrigerated in an airtight container for up to three days. To reheat, simply pan fry them again until heated through.

FAQ

Can I make potstickers in advance?

Yes! Potstickers can be made in advance and stored in the freezer. Just follow the instructions up to the cooking step, then freeze the uncooked dumplings. When you’re ready to enjoy them, simply cook them directly from frozen, adding a couple of extra minutes to the steaming time.

What dipping sauce pairs well with potstickers?

Potstickers are traditionally enjoyed with a simple vinegar dipping sauce made from balsamic or black Chinese vinegar and thinly sliced ginger. You can also add soy sauce, chili oil, or sesame oil for extra flavor. Feel free to experiment with different combinations to find your perfect dipping sauce!

Can I use homemade dumpling wrappers?

Absolutely! Homemade dumpling wrappers can add a personal touch to your potstickers. If you have the time and inclination, making your own wrappers can be a fun and rewarding experience. Just make sure to roll them out thinly and evenly for best results.

Nutrition

While nutritional content can vary, a typical serving of Chinese potstickers (3-4 dumplings) may contain around 200 calories, with a balance of protein, carbohydrates, and fats. They’re a great source of protein and can be part of a balanced diet when enjoyed in moderation.

Conclusion

Chinese potstickers are more than just a delightful treat; they’re a gateway to cherished memories and shared experiences around the table. Making these dumplings at home allows you to bring a taste of traditional Chinese cuisine into your own kitchen. Whether you’re a seasoned home cook or a beginner looking to try something new, this recipe offers a wonderful opportunity to explore your culinary skills. So gather your ingredients, call your loved ones, and embark on a delicious adventure with these homemade Chinese potstickers. Enjoy the flavors, the process, and most importantly, the company as you savor every bite!

Related update: Chinese Potstickers

Related update: Korean Sweet n Sour Chicken

Cheesy Spinach Stuffed Shells | Made by Meaghan Moineau

Cheesy Spinach Stuffed Shells

Intro

There’s something about the combination of cheese and pasta that feels like a warm hug on a cold day. I remember family gatherings where this dish was a staple on the dining table. My grandmother would lovingly prepare these Cheesy Spinach Stuffed Shells, and the aroma that filled the house was just as comforting as the dish itself. Those gatherings were filled with laughter, stories, and the savory delight of pasta shells stuffed to the brim with cheesy goodness. Today, I’m excited to share this recipe with you, hoping it brings warmth and joy to your own home.

Why You’ll Love It

This dish is a delightful blend of creamy, cheesy flavors with a hint of fresh greens from the spinach. It’s comforting, filling, and perfect for both family dinners and special occasions. The combination of alfredo and spaghetti sauce creates a rich, savory base that complements the cheesy filling magnificently. Plus, the addition of pecans adds a delightful crunch, making each bite an experience to savor.

Ingredients

  • Jumbo pasta shells
  • Cooked frozen spinach
  • Wheat germ
  • Shredded parmesan cheese
  • Pecans, chopped
  • Shredded Mexican cheese
  • Diced green onions
  • Salt
  • Dried basil
  • 2 eggs
  • Water
  • Alfredo sauce
  • Spaghetti sauce

Instructions

  1. Preheat your oven to 350°F (175°C).
  2. Start by boiling the jumbo shells in a large pot of salted water for about 9 minutes. They should be al dente as they’ll finish cooking in the oven later. Drain and place them face down on a paper towel to remove excess water.
  3. While the shells are cooking, prepare the filling. Microwave the frozen spinach until thawed, following the package instructions. Do not add extra water.
  4. In a mixing bowl, combine the cooked spinach with wheat germ, parmesan cheese, shredded Mexican cheese, chopped pecans, and diced green onions. Mix until well combined.
  5. Season the mixture with salt, pepper, and dried basil to taste. Optionally, add a pinch of nutmeg for extra flavor. Once seasoned, add in the eggs and water, mixing until fully incorporated.
  6. Stuff each shell with the spinach mixture. You should have enough filling for approximately 16-20 shells. Set these aside.
  7. Prepare an 8×8-inch baking pan (or a 9×13-inch pan) by greasing it with cooking spray. Spread a layer of alfredo sauce on the bottom, followed by a layer of spaghetti sauce, using about half a jar of each.
  8. Arrange the stuffed shells on top of the sauce in the pan. Cover the shells with the remaining sauce.
  9. Bake in the preheated oven, uncovered, for about 30-35 minutes or until the sauce is bubbly and the top is slightly golden.
  10. Serve hot and enjoy!

Tips

For best results, make sure to drain the shells thoroughly to prevent a watery dish. You can prepare the filling a day in advance to save time. Just keep it stored in the refrigerator until you’re ready to stuff the shells.

Variations & Substitutions

If you want a lighter version, consider using low-fat cheeses and a lighter alfredo sauce. You can also substitute the pecans with walnuts or omit them altogether if you prefer a nut-free version. For added protein, mix in some cooked chicken or turkey with the filling.

Storage

Leftover stuffed shells can be stored in an airtight container in the refrigerator for up to 3 days. To reheat, cover with foil and bake at 350°F (175°C) until warmed through. You can also freeze the shells for up to 2 months. Allow them to thaw overnight in the fridge before reheating.

FAQ

Can I use fresh spinach instead of frozen?

Yes, you can use fresh spinach. Simply sauté it until wilted, then chop it finely before adding it to the filling mixture.

What can I serve with these stuffed shells?

This dish pairs beautifully with a fresh garden salad and garlic bread. A glass of white wine or your favorite sparkling water would also complement the flavors nicely.

Can I make this dish ahead of time?

Absolutely! You can prepare the stuffed shells up to the baking step and refrigerate them for a day. When ready to serve, bake them as directed, adding a few extra minutes if they are cold from the fridge.

Nutrition

This dish is a hearty, protein-rich meal thanks to the cheese and eggs. The spinach adds a good dose of vitamins and minerals, while the pecans provide healthy fats. Keep in mind that using full-fat cheeses and sauces will increase the calorie content, so adjust according to your dietary needs.

Conclusion

Cheesy Spinach Stuffed Shells are a wonderful way to bring comfort and warmth to your dining table. Whether you’re making them for a special occasion or a cozy family dinner, this dish is sure to become a beloved favorite. Enjoy the cheesy, creamy goodness and the delightful crunch of pecans in every bite. Bon appétit!

Related update: Cheesy Spinach Stuffed Shells

Related update: Chinese Potstickers

Related update: Mashed Potatoes with Garlic, Sage & Goat Cheese