Jumbo Blueberry Muffins | Made by Meaghan Moineau

Picture this: it’s a lazy Sunday morning, and the sun’s just lazily peeking through your kitchen window. I was in my coziest pajamas, craving something warm and sweet that didn’t involve leaving the house. Enter these Jumbo Blueberry Muffins. They’re like a giant hug in muffin form—a bit of a show-off with their size, but oh so easy to whip up. With a crunchy lemon-sugar topping and bursting with blueberries, they’re the hero of any breakfast spread or spontaneous brunch. Plus, they’re quick enough to make on a weekday morning when you’re feeling a bit extra. Ready to bake? Let’s dive in.

Jump to Recipe

What You’ll Need

You probably have most of this stuff lounging in your pantry. Here’s what you’ll need:

  • 2 cups all-purpose flour
  • 2 teaspoons baking powder
  • 1/2 teaspoon salt
  • 1/3 cup granulated sugar + 1 cup separate
  • 2 large eggs
  • 1/4 cup unsalted butter, melted
  • 1/4 cup vegetable oil
  • 1 cup buttermilk
  • 1 teaspoon vanilla extract
  • Zest of one fresh lemon
  • 1 1/2 cups fresh blueberries

How to Make Jumbo Blueberry Muffins

  1. Preheat your oven to 425°F (220°C). Give a 6-cup large-sized muffin tin a light spritz of cooking spray, and set it aside.
  2. In a small bowl, combine the lemon zest and 1/3 cup of sugar. Use a fork to mix them thoroughly, creating a fragrant lemon-sugar mixture.
  3. Grab a large bowl and whisk together the flour, baking powder, and salt. Try to distribute everything evenly—it’ll make for a fluffier muffin.
  4. In another medium bowl, whisk the remaining 1 cup of sugar with the eggs. Go at it for about 45 seconds until the mixture is thick and homogeneous.
  5. Slowly pour in the melted butter and oil, then whisk in the buttermilk and vanilla extract. The mixture should be smooth and creamy.
  6. Add the liquid ingredients and the blueberries to the dry ingredients. Gently fold everything together until just combined. Resist the urge to over-mix!
  7. Fill the muffin tins with the batter, right up to the top. Sprinkle the tops generously with the lemon-sugar mixture for a crunchy finish.
  8. Bake the muffins at 425°F for 5 minutes. Then, lower the heat to 375°F and bake for another 25 minutes. Remember to rotate the pan halfway through to ensure even baking.
  9. The muffins are done when a toothpick inserted near the center comes out with just a few crumbs attached. Let them cool in the pan for about 5 minutes before transferring them to a wire rack to cool completely.

Cook’s Notes

Here’s the scoop: the key to these muffins is not over-mixing the batter. Too much mixing leads to tough muffins, and nobody wants that. These muffins are best enjoyed fresh, but if you’re making them ahead, they stay good in an airtight container at room temperature for up to three days. You can also freeze them! Just wrap them tightly in plastic wrap and pop them in a freezer bag. They’ll last for about three months, and all you have to do is let them thaw at room temp or give them a quick zap in the microwave.

Make It Your Own

Feel like experimenting? Here are a few variations:

  • Mixed Berry Muffins: Swap half of the blueberries with raspberries or chopped strawberries.
  • Nutty Twist: Add a handful of chopped walnuts or almonds to the batter for some crunch.
  • Citrus Punch: Substitute the lemon zest with orange zest for a different citrusy flavor.
  • Chocolate Indulgence: Replace some of the blueberries with chocolate chips for a sweet surprise.

So, are you ready to go jumbo? If you try this, I’d love to hear how it turns out—drop a comment or tag me! Let’s make your kitchen smell like a bakery, one muffin at a time. Happy baking! 💙

Related update: Jumbo Blueberry Muffins

Related update: Wild Blueberry Lemon Muffins

Related update: Home made organic maple granola with fresh fruit

Broccolini Quinoa Pilaf | Made by Meaghan Moineau

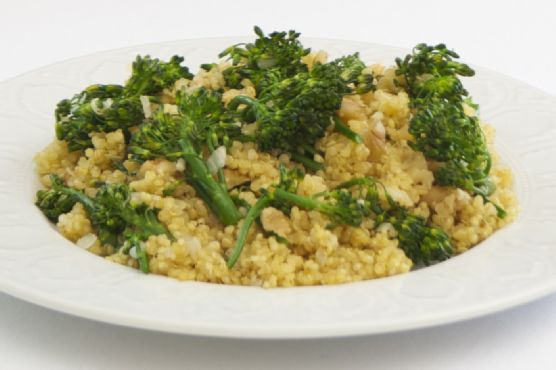
It was one of those evenings when the clouds rolled in, and the rain tapped softly against the windows, turning my kitchen into a cozy haven. I was craving something warm and hearty, something that didn’t require a grocery run in the drizzle. Enter Broccolini Quinoa Pilaf—a dish that’s both comforting and surprisingly simple. What I love about this dish is how effortlessly it balances health and flavor. The nutty quinoa paired with tender broccolini and crunchy walnuts is just the kind of meal that warms both your heart and your belly. Plus, it’s almost a one-pan wonder, which means fewer dishes—always a win in my book.

Jump to Recipe

What You’ll Need

This ingredient list is delightfully short, and chances are you already have most of this in your pantry.

  • Broccolini, trimmed
  • 1 garlic clove, minced
  • 2 tablespoons olive oil
  • 1 small onion, diced
  • 1 cup quinoa, rinsed
  • 2 cups vegetable broth
  • 1/4 cup walnuts, chopped
  • Salt and pepper to taste

How to Make Broccolini Quinoa Pilaf

  1. In a large pan with a lid, heat the olive oil over medium-high heat. Once shimmering, add the diced onions and cook for about a minute. You’ll notice the onions start to sizzle and soften.
  2. Add the minced garlic and continue to cook, stirring occasionally, until the onions become translucent and the garlic is wonderfully fragrant—this should take about 2-3 minutes.
  3. Pour in the quinoa and stir to coat it with the oil, garlic, and onion mixture. Let it toast for a minute to bring out its nutty flavor.
  4. Slowly add the vegetable broth, stirring as you pour. Increase the heat to bring it all to a boil.
  5. Once boiling, cover the pan and reduce the heat to low. Let the quinoa simmer for about 15 minutes.
  6. In the last 2-3 minutes of cooking, gently lay the broccolini on top of the quinoa. Don’t stir! Just cover it back up and let the steam work its magic.
  7. After 15 minutes, uncover the pan and toss the broccolini and quinoa together. The broccolini should be bright green and tender-crisp.
  8. Season with salt and pepper to your liking. Finish by sprinkling the chopped walnuts over the top for a delightful crunch.
  9. Serve hot and enjoy the medley of flavors and textures.

Cook’s Notes

A few tips to help you along: Make sure to rinse your quinoa under cold water before cooking to remove any bitterness. This dish is pretty forgiving, so feel free to let the onions cook a bit longer for a richer flavor. If you’re making this ahead, keep the broccolini separate until you’re about to serve, then warm everything up and integrate it at the end to keep the veggies vibrant. Leftovers? Store them in an airtight container in the fridge for up to 3 days, though I doubt they’ll last that long!

Make It Your Own

Here are some tweaks to keep things exciting:

  • Swap the broccolini for asparagus tips if you’re in a pinch. They cook similarly and add a nice touch.
  • For a protein boost, stir in some chickpeas when you add the vegetable broth. They’ll soak up the flavors beautifully.
  • If you’re a cheese lover, a sprinkle of feta or parmesan over the top before serving can add a deliciously creamy element.
  • For a nut-free version, use toasted pumpkin seeds for an equally satisfying crunch.

If you give this Broccolini Quinoa Pilaf a try, I’d love to hear how it turns out! Drop a comment below or tag me in your photos. Happy cooking, friends!

Related update: Broccolini Quinoa Pilaf

Strawberry-Mango Quinoa Salad | Made by Meaghan Moineau

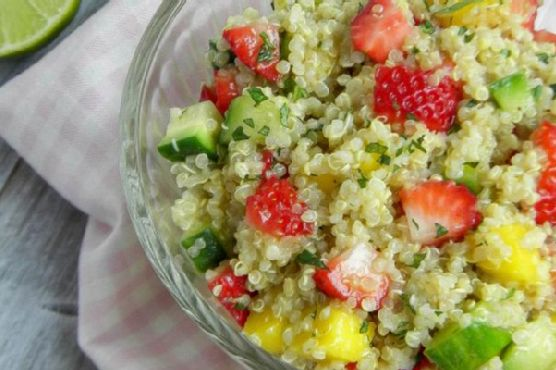
The first time I made this Strawberry-Mango Quinoa Salad, it was one of those chaotic weeknights where I just wanted something fresh and easy. You know the kind—work had run late, the fridge was a bit empty, and the idea of ordering takeout was so tempting. But then I remembered the sweet mangoes I had picked up on a whim, and the lonely strawberries sitting in the fridge. That’s when the idea hit me—what if I threw together a salad that was not only refreshing but also filled with vibrant, zesty flavors? This salad is the kind of dish that makes you feel like you’ve got it all together, even when life is a little messy. Plus, it’s super quick to whip up.

Jump to Recipe

What You’ll Need

This salad’s beauty lies in its simplicity and the burst of flavors from super fresh ingredients. Chances are you already have most of these in your kitchen:

  • Quinoa – Nutty and satisfying, the base of our salad.
  • Water
  • Salt
  • Fresh strawberries – Sweet, juicy, and perfect for adding a pop of color.
  • Ripe mango – For that tropical twist.
  • Cucumber – Crunchy and refreshing.
  • Fresh mint – Bright and aromatic.
  • Lime juice and zest – To give that zesty zing.
  • Honey – For a touch of sweetness.
  • Canned sour plain cream – Adds a creamy tang.
  • Olive oil – Smooth and rich, tying it all together.
  • Bell pepper – For some extra crunch and color.

How to Make Strawberry-Mango Quinoa Salad

  1. In a medium saucepan, combine the quinoa, water, and a pinch of salt. Bring it to a boil over medium-high heat. Once it starts bubbling, lower the heat and let it simmer. Cover the pan and let it cook for about 15 minutes, until the liquid is just absorbed. You’ll know it’s done when you see those little quinoa tails unfurling.
  2. Spread the cooked quinoa out on a baking sheet. Let it cool for about 20 minutes. It should be warm to the touch but not steaming hot—perfect for absorbing all the dressing goodness later.
  3. While the quinoa is cooling, grab a large bowl. Whisk together the lime juice, lime zest, honey, sour cream, and olive oil. The mixture should be smooth and slightly thick, with a lovely citrusy aroma.
  4. Add the cooled quinoa to the bowl. Then toss in the strawberries, mango, cucumber, and mint. Toss everything well to make sure each bite is balanced.
  5. Season with a pinch of salt and a grind of pepper to taste. Give it one last gentle toss, and you’re ready to serve immediately.

Cook’s Notes

This salad is as forgiving as they come. If your quinoa isn’t quite cool when you mix it with the dressing, don’t sweat it—just let it sit a little longer before adding the other ingredients. Also, always taste as you go; if your mangoes are particularly sweet, you might want to dial back a bit on the honey. Leftovers can be stored in an airtight container in the fridge for up to two days. But let’s be real, it rarely lasts that long!

Make It Your Own

Here’s where you can get playful with it:

  • Swap the mango for juicy pineapple if that’s what’s on hand or in season.
  • For a bit of nuttiness, toss in a handful of toasted almonds or cashews.
  • Add a spicy kick by mixing in some finely chopped jalapeños or a dash of chili flakes.
  • If you’re a cheese lover, crumble some feta or goat cheese on top before serving.

If you try this, I’d love to hear how it turns out—drop a comment or tag me! Whether you stick to the original or put your own twist on it, this salad is sure to bring a bit of sunshine to your table. Enjoy!

Related update: Strawberry-Mango Quinoa Salad

Related update: Carrot and Cabbage Salad With Coriander+cumin Dry Rub

RuneScape: Dragonwilds Heads to PS5 | Analysis by Brian Moineau

TL;DR

  • RuneScape: Dragonwilds is coming to PlayStation 5 in late 2026 as a day-one PlayStation Plus Extra/Premium catalog title, the RuneScape IP’s first proper console landing in 25 years. [1][2]
  • Jagex isn’t porting the click-heavy MMO; it’s leading with a survival-crafting spinoff that already cleared 1 million PC sales and holds a “Very Positive” Steam rating—both strong signals for controller-first play and PS Plus discovery. [1][3][5]
  • The upside is outsized: PlayStation Network counted 132 million monthly active users in 2024, and 38% of PS Plus members pay for Extra or Premium, so even modest catalog sampling could rival Dragonwilds’ 1 million–player PC start. [7][8][1]

What the source said

IGN reported that RuneScape: Dragonwilds will launch on PlayStation 5 “later in 2026” and join PlayStation Plus Extra and Premium on day one, marking the franchise’s first console appearance since RuneScape began on PC in 2001. The spinoff swaps MMO interfaces for 1–4 player survival crafting on Ashenfall, where parties build skills and hunt the Dragon Queen. IGN and the official site add that Dragonwilds has sold over 1 million copies on PC and holds a “Very Positive” Steam user rating. The main RuneScape and Old School RuneScape clients remain on PC and mobile with no console versions announced. [1][3][5]

Why it matters

Two stakeholder groups stand to gain—or stumble—here. For Jagex, this is a controlled expansion that avoids reworking a two-decade-old MMO UI for gamepads while extending 25 years of Gielinor lore into a controller-native loop. Survival crafting suits pick-up-and-play on PS5, pairs well with subscription sampling, and can onboard lapsed players into the wider RuneScape universe if events and progression land cleanly. [3][4]

For Sony, Dragonwilds is a 2026 proof point that third‑party day-one PS Plus Game Catalog drops can boost engagement. Tchia hit 1 million players in six weeks via PS Plus in 2023, and a co-op survival title with RuneScape’s brand gravity gives Extra/Premium a sticky fall window anchor on PlayStation 5. [2][9]

Original analysis

RuneScape: Dragonwilds on PS5 — why a survival-crafter is the beachhead

The consensus take is “RuneScape finally comes to console.” The contrarian read: Jagex is sidestepping a costly, risky MMO port by building a console-native pillar in the same universe. Survival crafting directly tackles the three console MMO blockers—fiddly UI, marathon sessions, and upfront price hesitance—by leaning into controller-friendly loops (gather, craft, base-build, boss runs) and launching straight into PS Plus Extra/Premium to kill purchase friction. [2][3]

Back-of-envelope reach math (scenario, not a forecast):

  • PC baseline: 1.0 million Early Access players on Steam and PC storefronts. [1][3]
  • PS Plus gating: 38% of PS Plus members are on Extra or Premium. Let N = total PS Plus subscribers; Extra+Premium members ≈ 0.38N. [8]
  • Solve for “match PC in month one”: 0.06 × 0.38N ≈ 1.0m → N ≈ 43.9m. So, if PS Plus sits near 44m subscribers at launch, a 6% try rate among Extra/Premium would yield ≈1.0m players (0.06 × 0.38 × 43.9m ≈ 1.0m). This is sensitivity analysis, not a prediction. [8][1]
    This mirrors prior day-one catalog outcomes: Tchia crossed 1 million players in six weeks, showing how visibility and low-friction access can bend the player curve for smaller teams. Dragonwilds adds co-op stickiness that single‑player catalog darlings often lack. [9][2]

Named-stakeholder breakdown:

  • Jagex: Gains a console beachhead without rewriting RuneScape’s legacy client and can test cross-progression, live events, and monetization on a cleaner surface. If Dragonwilds retention holds, Jagex proves the IP travels and can route players between PC and console ecosystems. [3][4]
  • Sony (SIE): Banks a late‑2026 co-op time sink that reinforces PS Plus Extra/Premium’s value without first‑party day-one spending, and can showcase third‑party partnerships in State of Play beats. [2]
  • Steam/PC survival incumbents (Valheim‑likes, Enshrouded, Palworld‑adjacent): Face a brand-backed entrant with 25 years of lore and a studio trained on live ops cadence, which could accelerate updates if console traction feeds PC content. [4][5]
  • RuneScape MMO loyalists: Don’t get a console client yet, but do get a lore-forward on‑ramp for friends and lapsed players, with potential cross-event hooks if RS25 beats sync across titles in 2026. [4]

A visible strategy shift shows up in 2025–2026 comms: Jagex’s RS25 program emphasizes “player‑first design” and integrity roadmaps, while Dragonwilds’ updates highlight dedicated servers and steady content drops. That rhythm matters on console, where shorter sessions and party churn punish slow weekly cadence. [4][3]

2×2: IP carryover vs. porting friction

  • High IP carryover / High friction: Port RuneScape MMO to console (heavy UI/UX/controls lift across 20+ years of content).
  • High IP carryover / Low friction: A guided console client with cross‑save and slimmed interfaces (rare without a multi‑year rebuild).
  • Medium IP carryover / Low friction: Dragonwilds spinoff—shared lore, controller‑first design, subscription distribution.
  • Low IP carryover / Low friction: New IP survival‑crafter—cleanest controls, zero heritage draw.

Dragonwilds sits in the third box. It captures brand equity while optimizing for console ergonomics and subscription incentives, and it can ladder into deeper crossovers—or even a modernized MMO console client—if retention and party formation metrics clear 2026 targets. [2][3]

What others are missing

The critical angle isn’t just “reach,” it’s the co-op slope: time from a PS5 dashboard ping to a four‑stack in Ashenfall, and back again the next night. That slope depends on frictionless parties, clear cross‑play/cross‑progression messaging on the PS Store page, and resilient servers at PS Plus scale; Jagex has name‑checked dedicated servers and regular updates, but console retention hinges on how base building, enemy AI, and late‑game bosses recycle the social loop week after week. If Dragonwilds maps RuneScape‑style skilling and boss rotations onto PS5 parties—and says so clearly in pre‑launch beats—it can avoid the one‑and‑done catalog trap. [3][5]

What to watch next

  1. By September 30, 2026, Jagex announces cross‑play and cross‑progression specifics between PS5 and PC for Dragonwilds—or explicitly confirms “not at launch”—which will materially cap or expand first‑month co-op growth. [3]

  2. By November 30, 2026, Dragonwilds surpasses 2.5 million cumulative players on PlayStation, verified via a Jagex blog, PS Wrap‑Up stats, or press statements; this requires a 10–15% try rate among active Extra/Premium members at launch. [2][3]

  3. By Q1 2027 earnings, Sony cites Dragonwilds (or “survival‑crafting titles”) as a top PS Plus engagement driver for fall 2026 in a blog or investor post, echoing how prior catalog performers were spotlighted. [2]

My take

Launching Dragonwilds into PS Plus Extra/Premium in late 2026 gives Jagex immediate reach on PlayStation 5 while avoiding a risky RuneScape MMO port, and it hands Sony a co-op tentpole when subscription momentum matters. The bet works if parties form fast, progression climbs weekly, and server reliability holds at PSN scale. If those basics click, Dragonwilds becomes the franchise’s second pillar in 2026–2027, not a side story. Jagex and Sony both get measurable wins without overextending on a two‑year port of a 2001‑era client. [2][3]

Sources

  1. RuneScape IP Makes the Jump to Console for the First Time in Its 25-Year History With RuneScape: Dragonwilds Later in 2026 — IGN (https://www.ign.com/articles/runescape-dragonwilds-launches-on-consoles-later-in-2026-sony-picks-up-spinoff-for-ps-plus) — Original report: PS5 timing, PS Plus day‑one, 1M PC copies, Steam sentiment.

  2. State of Play June 2026: all announcements, trailers — PlayStation Blog (https://blog.playstation.com/2026/06/02/state-of-play-june-2026-all-announcements-trailers/) — Official confirmation of Dragonwilds’ PS5 reveal and day‑one Game Catalog positioning.

  3. Dragonwilds comes to PlayStation 5! — Dragonwilds official site (https://dragonwilds.runescape.com/news/dragonwilds-ps5) — Jagex’s PS5 announcement: “later this year,” PS Plus Extra/Premium, update cadence mentions and Early Access milestone.

  4. Jagex Marks RuneScape’s 25th Year with RS25… — Jagex press release (https://www.jagex.com/news/jagex-marks-runescape%E2%80%99s-25th-year-with-rs25-delivering-record-investment-a-dedicated-game-integrity-roadmap-new-game-modes-player-first-design-and-franchise-expansion) — Confirms 2026 franchise roadmap, integrity focus, and franchise expansion framing.

  5. RuneScape: Dragonwilds — Steam store page (https://store.steampowered.com/app/1374490?l=english) — Live user review status: “Very Positive,” review count context, Early Access positioning.

  6. RuneScape: Dragonwilds is coming to PlayStation Plus on day one — VGC (https://www.videogameschronicle.com/news/runescape-dragonwilds-gitaroo-man-ps-plus/) — Independent recap of PS Plus day‑one and late‑2026 window.

  7. PlayStation Network sets a new monthly active users record — Shacknews (https://www.shacknews.com/article/147748/playstation-network-monthly-active-user-record?amphtml=1) — PSN at 132 million MAUs and context for platform‑level reach.

  8. 38% of PS Plus Members Are Paying More for Extra, Premium — Push Square (https://www.pushsquare.com/news/2025/06/38percent-of-ps-plus-members-are-paying-more-for-extra-premium) — Tier mix data (22% Premium, 16% Extra) informing sampling scenarios.

  9. Tchia tops one million players in six weeks — Gematsu (https://www.gematsu.com/2023/05/tchia-tops-one-million-players-in-six-weeks-physical-edition-launches-july-18) — Evidence that day‑one PS Plus catalog launches can rapidly amass players.


Related update: We recently published an article that expands on this topic: read the latest post.

One Soup, Two Ways: Chunky Vegetables and Cream Of Vegetables | Made by Meaghan Moineau

Picture this: it’s a chilly Wednesday evening, and I’m staring into the abyss of my refrigerator, silently hoping for a miracle. You know, one of those magical moments when dinner just materializes without much effort. Alas, the fridge reveals only lonely carrots, wilting celery, and a half-used onion. But hey, sometimes the best meals start with a scavenger hunt, right? That’s when I remembered this gem of a recipe: One Soup, Two Ways. It’s like having your cake and eating it too, but with soup! You get the hearty, rustic charm of chunky vegetables or the silky smoothness of cream of vegetables—all from the same pot. It’s quick, comforting, and perfect for those nights when you’re in dire need of warmth and coziness, without a lot of fuss.

Jump to Recipe

What You’ll Need

You’re in luck! This recipe mostly calls for pantry staples, so you might not even need to make a grocery run. Here’s what you’ll need:

  • Olive oil
  • Garlic, minced
  • Onion, chopped
  • Carrots, sliced
  • Celery, sliced
  • Salt
  • Canned tomato puree
  • Canned corn
  • Chicken broth
  • Canned beans
  • Dried herbs like thyme
  • Whole cooking cream (for the creamy version)
  • Turmeric

How to Make One Soup, Two Ways: Chunky Vegetables and Cream Of Vegetables

  1. Heat the olive oil over medium-low heat in a soup pot, big enough to hold all the goodness. The aroma of sizzling garlic and onions will greet you first—just the start of this flavorful journey.
  2. Add the garlic, onions, carrots, and celery. Give them a gentle stir, sprinkle the salt, and cover the pot. Let them sweat for about 10 minutes, until everything softens and the kitchen smells like a hug.
  3. Stir in the tomato puree and corn. Allow this medley to cook for a few minutes, until the puree deepens in color, promising robust flavor.
  4. Pour in the chicken broth, crank the heat to maximum, and bring it all to a boil. This is where the soup starts to take shape, bubbling with potential.
  5. Introduce the beans into the pot and season with your choice of dried herbs. Thyme is a personal favorite; it adds a gentle earthiness.
  6. For the chunky version, let this simmer for another 10-15 minutes until everything is heated through.
  7. If you’re feeling like a creamy delight, blend the soup in batches after the simmering. Stir in the whole cooking cream and a pinch of turmeric for a golden hue and a hint of warmth.

Cook’s Notes

I totally get it; sometimes soup can be a little intimidating, but don’t stress. The key here is to let those veggies sweat properly at the beginning—it builds the foundation of flavor. If you’re making the creamy version, remember not to fill your blender too full, or you might end up with a soup explosion (learned that the hard way). Store leftovers in an airtight container in the fridge for up to three days. Reheat gently on the stove, adding a splash of broth if it thickens too much.

Make It Your Own

Here are a few ideas to give this soup your own twist:

  • Swap the beans for chickpeas for a nuttier flavor and a bit more texture.
  • Use vegetable broth instead of chicken broth for a vegetarian-friendly version.
  • Add cooked shredded chicken for a protein boost and to make it extra hearty.
  • Try coconut milk instead of cream for a dairy-free, subtly tropical twist.

If you try this, I’d love to hear how it turns out—drop a comment or tag me! Soup’s on, friends. Enjoy every spoonful. 🍲

Related update: One Soup, Two Ways: Chunky Vegetables and Cream Of Vegetables

Related update: Curry and Sage Roast Chicken

Related update: Moosewood Lentil Soup

Pumpkin gnocchi with basil and Parmesan | Made by Meaghan Moineau

Picture this: It’s a chilly Tuesday evening, and I’m rummaging through my pantry, mentally mapping out a dinner plan that’s both comforting and a touch fancy. The pumpkins from last weekend’s farmers’ market trip are staring at me, practically begging to be transformed into something indulgent. That’s when it hits me—pumpkin gnocchi. It’s one of those dishes that sounds like it takes hours of meticulous preparation but is surprisingly straightforward. Plus, it’s the perfect blend of fall flavors with the savory twist of basil and Parmesan. This dish is a dinner table showstopper without the stress. Ready to dive in?

Jump to Recipe

What You’ll Need

I love when a recipe feels like solving a cozy puzzle with ingredients you already have hanging out in the kitchen. This one’s full of those pantry-staple vibes with a few key players.

  • Pumpkin – the star of the show!
  • Whole eggs
  • Sea salt
  • Pepper
  • Fresh basil leaves
  • Wheat flour
  • Corn flour
  • Olive oil
  • Grana Padano cheese

How to Make Pumpkin gnocchi with basil and Parmesan

  1. First, wrestle with that pumpkin like it’s a stubborn jar lid. Separate the flesh and chop it down into a fine puree. Feel free to get your hands a little messy here—it’s part of the fun!
  2. In a large bowl, combine the pumpkin puree with the eggs. Stir until the mixture looks like a velvety sunset.
  3. Season the mix with sea salt, a sprinkle of pepper, and a handful of finely chopped fresh basil. The aroma should already start to make you feel warm inside.
  4. Gradually add the wheat flour, kneading until you get a soft dough. If the dough feels more like sticky tape, throw in some more flour until it’s nice and pliable.
  5. Divide your dough into equal rolls—aim for about 3 cm thick and around 20 cm long. Then slice these rolls into 2 cm long pillows of joy.
  6. Bring a large pot of salted water to a rolling boil. Carefully drop the gnocchi in and watch them dance. They’re ready when they bob to the surface, usually within a few minutes.
  7. Using a slotted spoon, rescue the gnocchi from their hot bath and either drizzle hot olive oil over them or toss them in a skillet with olive oil until they’re lightly golden.
  8. Serve them up on a platter, showered with Grana Padano and garnished with fresh basil leaves. Stand back and admire your edible masterpiece before digging in.

Cook’s Notes

Making gnocchi can feel like a balancing act between dough that’s too sticky and too dry. Remember, the weather and your pumpkin’s moisture can change the game, so trust your instincts and adjust with flour as needed.

These delicate pillows are best served straight away, but if you must, you can refrigerate them for a day or two. Just reheat gently, perhaps with a little extra olive oil to revive their golden exterior.

Looking to prep in advance? You can shape the gnocchi and freeze them on a tray before transferring them to a bag for storage. Cook them right from frozen, just adding a minute or two to their swim time.

Make It Your Own

  • Swap out the pumpkin for butternut squash if you’re feeling adventurous or that’s what’s on hand.
  • For a nutty twist, sprinkle toasted pine nuts over the finished dish.
  • To add a bit of heat, toss in some red pepper flakes when frying the gnocchi in oil.
  • Try a different cheese like Pecorino for a sharper edge.

If you try this out, I’d love to hear how it turns out — drop a comment or tag me! And remember, the best recipes are the ones that come with a story, so let this one create a delicious memory for you. Happy cooking!

Related update: Pumpkin gnocchi with basil and Parmesan

Related update: Broccolini Quinoa Pilaf

Classic French Onion Soup | Made by Meaghan Moineau

Picture this: it’s a chilly weekday evening, the kind where the wind seems to seep through every layer of clothing, and all I can think about is wrapping my hands around a warm bowl of something comforting. That’s how I found myself in the kitchen, wrestling with the idea of making a classic French Onion Soup. You know, the kind with a deep, rich broth and a cheesy, bubbly top that smells like pure coziness. It’s the perfect dish for those nights when you want to impress yourself with something that feels a bit fancy yet totally do-able. Spoiler alert: this recipe is easier than it seems and totally worth every bit of effort. Oh, and if you’re in a hurry to dive in, I’ve got you covered.

Jump to Recipe

What You’ll Need

Guess what? You might already have most of these ingredients hanging out in your kitchen. This recipe leans on everyday staples with a few stars that bring the magic.

  • 2 tablespoons of salted butter
  • 4 large yellow onions, sliced thin
  • 2 tablespoons of flour
  • 1/2 cup of sherry
  • 8 cups of beef broth
  • 4 sprigs of fresh thyme
  • 3 sprigs of fresh parsley
  • 1 bay leaf
  • Salt and pepper to taste
  • 1 French crusty baguette
  • 2 cups of shredded gruyere cheese

How to Make Classic French Onion Soup

  1. Preheat your oven to 400°F (200°C). This is crucial for that cheesy top finish.
  2. In a large Dutch oven, melt the butter over medium heat. Let it sizzle and foam—it’s the signal that your onions are ready to join the party.
  3. Add the sliced onions to the pot and sprinkle them with flour. Stir occasionally, adjusting the heat between medium and low. You’ll want to do this for about 45 minutes until they turn a tender, golden brown. If they start to brown too quickly, don’t hesitate to lower the heat.
  4. It’s de-glazing time! Pour in the sherry and scrape up those flavorful bits stuck to the bottom of the pot—aroma heaven.
  5. Add the beef broth and bring everything to a rolling boil. The anticipation builds!
  6. Toss in the fresh thyme, parsley, bay leaf, and season with salt and pepper. Simmer gently for 15 minutes, letting the flavors mingle and deepen.
  7. Meanwhile, slice the baguette and butter each piece. Arrange them on a cookie sheet and bake for 5-10 minutes until they’re dry and ready to soak up all that brothy goodness. Set aside to cool just a bit.
  8. Remove the herb sprigs and bay leaf from the soup. Ladle the soup into four oven-safe ramekins. Now, the fun part: top each with a slice of crusty bread and a generous sprinkle of gruyere cheese.
  9. Place your ramekins on a cookie sheet (for easy handling) and bake uncovered at 400°F for another 5-10 minutes until the cheese is bubbling. For an extra golden top, switch to broil for one more minute.
  10. Finally, serve warm and watch the smiles unfold around the table.

Cook’s Notes

Okay, here are a few nuggets of wisdom to ensure your soup is spot-on. First, let’s talk onions. Low and slow is key for that melt-in-your-mouth caramelization, so patience is your best friend here. And always taste your broth before seasoning—sometimes beef broth can be saltier than expected.

If you’re making it ahead, the soup base can be stored in the fridge for up to 3 days. Just reheat gently and add the bread and cheese topping before serving. Leftovers? They reheat beautifully in the oven; just keep the bread and cheese separate until you’re ready to enjoy round two.

Make It Your Own

Want to put a personal spin on this classic? Here are some tasty variations:

  • For a vegetarian version, swap the beef broth with a robust veggie broth and add a splash of soy sauce for depth.
  • If sherry isn’t your thing, try a dry white wine or even a splash of brandy for a different kind of warmth.
  • Love a bit of heat? Add a pinch of red pepper flakes to the onion mix for a subtle kick.
  • Switch up the cheese! Try a combo of gruyere and sharp cheddar for a more pronounced flavor.

If you give this recipe a try, I’d love to hear how it turns out—drop a comment or tag me in your delicious creations. Happy cooking, and may your kitchen be filled with warmth and joy!

Related update: Classic French Onion Soup

Related update: One Soup, Two Ways: Chunky Vegetables and Cream Of Vegetables

Fixing Robotaxi Custody for Mass Markets | Analysis by Brian Moineau

TL;DR

  • Uber charges a $15 fee for lost‑item returns, and its 2024 Lost & Found Index still lists phones as the top lost item—facts that frame the real AV challenge: industrializing the last 30 seconds of a ride across doors, trunks, and handoffs. [1][5]
  • Waymo rides have been bookable inside the Uber app in Phoenix since 2023, which makes Uber a multi‑party broker where custody and claims policy matter as much as the driving stack. [3]
  • To become the biggest robotaxi broker by 2029, Uber must make custody bulletproof at high‑throughput venues like Phoenix Sky Harbor (PHX) and SFO, where airports publish strict curbside SOPs that won’t forgive sloppy handoffs. [7]

What the source said

Uber’s Lost & Found Index (2024) highlights the usual parade of oddities and confirms that phones remain the most commonly lost items across its network—a reminder that misplacement is a stable human behavior, not a novelty. The help center sets a $15 rider fee for item returns, a standardized touchpoint that now extends to autonomy pilots. [5][1]

On the AV front, Uber and Waymo announced in May 2023 that Waymo’s robotaxis would be available in the Uber app, starting in Phoenix and expanding from there; that integrated booking step turns Uber into a front‑door for AV rides it does not operate. [3]

Waymo’s consumer support flow directs riders to report lost items through the Waymo One app, after which support coordinates retrieval—typically via depot intake or a scheduled return, which differs operationally from a human driver turning around. [6]

Why it matters

Three named stakeholders carry exposure. Uber, the broker, owns first‑line support and refunds, and must normalize custody across partner fleets, depots, and curbs in cities like Phoenix and Los Angeles by year‑specific playbooks rather than ad hoc chats. If it fails, complaints pile up in the same channels that drive MAUs. [1][3]

Waymo, the operator, owns curbside “edge‑case hospitality”—trunk confirmations, door interlocks, and remote assistance—already staffed by Fleet Response Specialists noted in Waymo’s safety reports. A clean trunk‑close at PHX, Chase Field, or Footprint Center is table stakes for brand protection. [8][7]

Airport and city authorities, from PHX to the California Public Utilities Commission (CPUC), publish and enforce precise pickup/drop‑off SOPs and AV permit conditions; unresolved custody at curbs can rapidly become a regulatory finding rather than a customer‑support ticket. [7][10]

Original analysis

Robotaxi lost and found: the underrated economics

The consensus: Lost‑and‑found in AVs is a quirky culture story.
The contrarian read: It’s an exception‑handling P&L story where small, frequent failures create real broker costs and reputational drag.

  • Evidence 1: Uber’s flat $15 lost‑item fee is an intentional cost anchor; the moment AV returns trigger courier legs and depot touches, that anchor shapes routing logic and SLAs. [1]
  • Evidence 2: Waymo publicly documents remote assistance roles that resolve on‑scene anomalies; those humans will adjudicate handoffs and custody questions that a Level‑4 system can’t “sense,” especially amid crowds leaving Chase Field after a 2024 Diamondbacks home game. [8]
  • Evidence 3: Airports publish curb management rules that already bind human ride‑hail; AVs inherit those timing windows and signage constraints, which forces precise, telemetry‑driven custody steps rather than vague “we’ll call you” promises. [7]

Back‑of‑envelope: courier costs scale faster than you think

Knowns:

  • Uber reported roughly 9.4 billion trips in 2023. [2]
  • Lost‑item return fee = $15. [1]

Scenario math (assumptions stated):

  • If AV trips on Uber reach 0.5% of total by 2026 and 0.05% of those AV trips require a couriered return, then yearly pass‑through courier fees ≈ 9.4B × 0.5% × 0.05% × $15. [1][2]
  • Work: 9,400,000,000 × 0.005 × 0.0005 = 23,500 AV courier events; 23,500 × $15 = $352,500 in courier fees before support labor, depot handling, or refunds. [1][2]

Interpretation: Even with conservative penetration and exception rates, six‑figure courier pass‑through arrives quickly; that is incentive to add AV‑native interlocks (door‑hold and trunk‑confirm) that shave exception rates by basis points.

A simple 2×2 for custody maturity

  • X‑axis: Vehicle autonomy capability (supervised → driverless).
  • Y‑axis: Custody instrumentation (manual → telemetry‑confirmed).

Quadrants:

  • Supervised × Manual: Safety driver checks cabin; cheap but unscalable.
  • Supervised × Telemetry‑confirmed: Safety driver plus app prompts; training ground for SOPs.
  • Driverless × Manual: Support‑chat roulette; slow, inconsistent, brand‑risky.
  • Driverless × Telemetry‑confirmed: Door/trunk sensors, dwell‑time rules, positive rider confirmation, depot scan‑ins; the only quadrant that scales to airports and stadiums.

Historical analogue: UPS introduced the DIAD handheld in 1991 to scan parcels at every handoff, which crushed dispute rates by logging custody at each node; robotaxis need the DIAD equivalent for riders’ belongings. [9]

Named‑stakeholder breakdown

  • Uber: Ship in‑app interlocks such as “trunk confirm” and “door hold” tied to curb geofences at PHX and SFO; route unresolved cases to partner depots with clock‑started SLAs. Miss this, and refunds and airport fines eat margin; hit it, and custody becomes a defensible broker moat. [7]
  • Waymo: Tighten curbside SOPs where rides are bookable via Uber in Phoenix, and publish artifacted logs (door state, trunk actuation, dwell time) to shrink dispute windows to hours, not days; lean on Fleet Response Specialists to clear edge cases. [3][8]
  • Regulators and venues: CPUC and airport authorities will codify trunk/door dwell minimums and return windows once volume rises; early compliance wins lift‑and‑shift across markets in 2025–2027. [10][7]

This is why “weird stuff left in robotaxis” is not a sideshow; it is the probe we can use to measure whether AV networks deliver hospitality, not only autonomy.

What others are missing

The angle: chain‑of‑custody will harden into a platform standard with telemetry primitives—door‑open states, trunk release logs, rider proximity pings, depot intake scans, and venue geofences—rather than a soft help‑center script. Waymo already runs remote assistance roles, and Uber already standardizes return fees; wiring those facts into a cross‑partner custody API lets the broker mandate positive confirmation before any trunk closes at PHX or Chase Field, pushing exception rates down and making partner onboarding a policy load, not a bespoke ops sprint. [1][8][7]

What to watch next

  1. By December 31, 2026, Uber will publicly list at least one additional U.S. city beyond Phoenix where AV rides are bookable in‑app (via press release, newsroom post, or investor deck), and third‑party outlets will confirm it. [3]

  2. By June 30, 2026, Uber’s Help Center or Newsroom will publish an AV‑specific lost‑item workflow that differs from the human‑driver flow (mentioning depot intake or partner coordination), with a dated update page. [1]

  3. By March 31, 2027, at least one major U.S. airport (PHX, SFO, or LAS) will publish an AV curbside SOP that includes explicit rules on luggage handling or dwell times for driverless vehicles, available on the airport’s official site. [7]

My take

The denture jokes distract from the 1991‑style DIAD lesson: custody is a data problem that decides unit economics. Uber and Waymo already have the building blocks—flat fees, remote assistance, and instrumented vehicles—and the broker who turns those into a custody standard will set the industry spec by 2027. If they do, “largest robotaxi broker by 2029” reads less like swagger and more like a normal consequence of better exception math.

Sources

  1. Uber Help Center — Lost items and the $15 return fee — Establishes the standardized rider charge and baseline flow for lost‑item returns.

  2. Uber Investor Relations — Q4 2023 results (press release/letter) — Provides the ~9.4 billion 2023 trip count used in the back‑of‑envelope math.

  3. The Verge — Waymo and Uber partnership announcement (May 2023) — Confirms that Waymo rides are available inside the Uber app in Phoenix.

  4. TechCrunch — Waymo expansion to Austin (August 2023) — Documents planned AV service areas beyond Phoenix and the cadence of city additions.

  5. Uber Newsroom — 2024 Lost & Found Index — Confirms that phones are the top lost item and provides context on item types and seasonality.

  6. Waymo One Help Center — Lost and found process — Describes how riders report and retrieve items via support and depots rather than



Related update: We recently published an article that expands on this topic: read the latest post.

Loaded Veggie Omelet | Made by Meaghan Moineau

I was deep in the throes of a Tuesday night quandary—hungry but not wanting to commit to a full-on kitchen escapade. You know those nights, right? The ones where takeout seems like the easy choice, but your inner voice whispers (or maybe shouts), “Use the groceries you bought!” It was on one such evening that I whipped up this Loaded Veggie Omelet. It’s the kind of recipe that feels like a mini victory; quick to make yet hearty enough to satisfy. Perfect for when you want something impressive without the fuss. Plus, who wants a mountain of dishes? Not me.

Jump to Recipe

What You’ll Need

This isn’t one of those recipes where you’ll be chasing obscure ingredients. Chances are you already have most of this:

  • Shallot
  • Garlic
  • Mushrooms
  • Cherry tomatoes
  • Fresh basil
  • Fresh spinach
  • Eggs whisked
  • White cheese
  • Drizzle of olive oil

How to Make Loaded Veggie Omelet

  1. Start by preheating your oven to warm or 170 degrees. This will keep your first omelet cozy while you prepare the second one. Trust me, it’s worth it.
  2. Heat a small sauté pan over medium. Drizzle it with just enough olive oil to give your veggies a glistening hug.
  3. Add the shallot and garlic first. Sauté them until they’re golden and fragrant—your kitchen should smell amazing by now.
  4. Toss in the mushrooms and let them soften. They’ll release their juices, which is exactly what we want.
  5. Now, add the cherry tomatoes and fresh spinach. Give everything a good stir and then remove the pan from the heat. The spinach should just start to wilt.
  6. In a small omelet or sauté pan, pour in a layer of your whisked eggs. As the egg begins to set, gently run a spatula around the edges. This keeps it from sticking and makes folding easier.
  7. When the egg is almost fully cooked—think slightly runny on top—layer half of the basil, cheese, and your sautéed veggie mix onto one side of the egg.
  8. Gently fold the other side of the egg over the filling. Use your spatula to help if needed. Slide the omelet onto a small oven-safe plate and keep it warm in the oven.
  9. Repeat the process for the second omelet, then serve both while they’re still warm.

Cook’s Notes

Cooking omelets is more of an art than a science, and a few tips can make all the difference.

  • If you’re not a fan of runny eggs, let them cook a bit longer before adding the filling. The key is to keep it soft enough to fold.
  • Store leftovers in an airtight container in the fridge. They make a delightful breakfast next day, just reheat in a pan to revive some freshness.
  • Use a non-stick pan to make your life easier, especially if you’re new to making omelets. It’s all about the slide!
  • If you want to make these ahead, prepare the veggie mix and store it separately. When you’re ready to eat, whip up those eggs and you’re set.

Make It Your Own

Here’s where you get to play chef. These variations keep things exciting:

  • Swap the mushrooms for crispy tofu for an extra protein punch.
  • If you’re a cheese enthusiast, try using feta instead of white cheese for a tangy twist.
  • Give it a spicy kick by adding a dash of red pepper flakes or a few jalapeño slices.
  • Not a fan of spinach? Substitute with arugula for a peppery note.

I hope this Loaded Veggie Omelet becomes your go-to for those nights when you need a quick, satisfying meal. If you try this, I’d love to hear how it turns out — drop a comment or tag me! Here’s to cozy, tasty evenings in.

Related update: Loaded Veggie Omelet

Related update: Jumbo Blueberry Muffins

Greek Yogurt Chicken Salad | Made by Meaghan Moineau

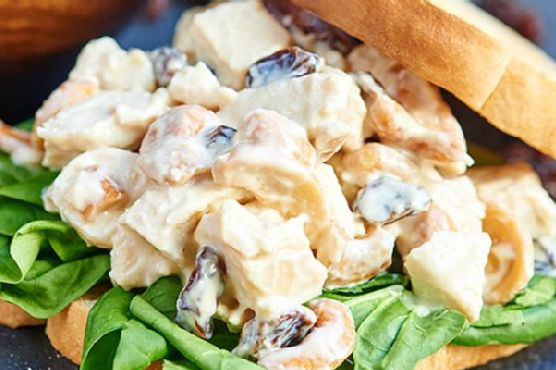
It was one of those whirlwind Wednesday evenings where everything seemed to be happening at once. My kitchen was a mess of grocery bags, half-empty coffee cups, and a laptop precariously perched on the edge of the counter streaming my latest binge-worthy show. Between juggling work calls and taming the chaos that had taken over my living space, I needed dinner to be quick, satisfying, and ideally nutritious enough to make me feel like I was winning at adulthood. Enter the Greek Yogurt Chicken Salad. It’s a reliable hero for those nights when you need something comforting yet refreshing, and it doesn’t hurt that the cleanup is a breeze! The creamy, tangy dressing paired with the tender chicken and the occasional sweet zing from the craisins is just what you need to hit reset.

Jump to Recipe

What You’ll Need

Just a heads up, this is the kind of recipe where you might already have most of the ingredients lounging around in your kitchen. It’s simple yet flavorful.

  • 2-3 whole chicken breasts
  • 4 cups chicken broth or water
  • 1 cup plain Greek yogurt
  • 1 tablespoon Dijon mustard
  • 1 teaspoon garlic powder
  • 1/2 cup craisins (or raisins)
  • 1/2 cup roasted cashews
  • Salt, to taste
  • Pepper, to taste

How to Make Greek Yogurt Chicken Salad

  1. Start by bringing your chicken broth or water to a boil in a medium pot. Once it’s bubbling, add in your whole chicken breasts. Let them cook until there’s no pink left in the middle; this usually takes about 15-20 minutes depending on their size.
  2. While your chicken is having its spa treatment, whisk together the Greek yogurt, Dijon mustard, and garlic powder in a bowl. You’re aiming for a smooth, well-mixed sauce here. Add a dash of salt and pepper, adjusting to your taste.
  3. Stir in the craisins and cashews. If you love a bit more crunch, hold off on the cashews until just before serving. This way, they maintain their delightful crunch!
  4. Once the chicken is done, let it rest for about 5 minutes. Trust me, this little pause keeps all those flavorful juices locked in.
  5. Dice the chicken into bite-sized chunks and toss it into your prepared sauce. Give everything a good mix so each piece of chicken is generously coated.
  6. Serve your chicken salad chilled or at room temperature. It’s perfect in a sandwich, on a bed of greens, or just straight from the bowl.

Cook’s Notes

– Boiling the chicken in broth instead of water really takes the flavor up a notch, but if you’re in a pinch, water works just fine.
– This chicken salad keeps well in the fridge for about 3 days, making it a great make-ahead lunch option. Just store it in an airtight container to keep it fresh.
– If you’re planning to eat it over a few days, consider adding the cashews just before serving each time to maintain that satisfying crunch.
– Be mindful not to overcook the chicken, as it can become a bit rubbery. You want it tender and juicy!

Make It Your Own

  • Swap the chicken for crispy tofu if you’re going for a vegetarian vibe. Just cube it and toss it in!
  • Love a bit of heat? Add a pinch of cayenne pepper or some chopped jalapeños to the sauce.
  • For an extra tangy twist, try tossing in some diced green apples. They add a delightful crunch and zing.
  • Switch the craisins for chopped dried apricots for a different kind of sweetness if you’re feeling adventurous.

If you give this Greek Yogurt Chicken Salad a whirl, I’d love to hear how it turns out for you! Drop a comment below or tag me in your kitchen creations. Let’s keep those weeknight dinners delicious and stress-free!

Related update: Greek Yogurt Chicken Salad

Related update: Strawberry-Mango Quinoa Salad

S’mores-n-berry Bars for National S’mores Day – August 10 | Made by Meaghan Moineau

Picture this: it’s a Wednesday evening, and I’m knee-deep in that midweek slump, feeling like a bit of a sweet escape. The kind where comfort meets simplicity. I glanced at the calendar and saw it was nearing August 10th—National S’mores Day. Immediately, a light bulb moment struck! Why not combine the nostalgia of campfire s’mores with a fruity twist to lift my spirits? Enter: S’mores-n-berry Bars. They’re as indulgent as they sound, with a crispy graham cracker base, rich brownie layer, and gooey marshmallow topping that’s lightly kissed by the oven’s broiler for that perfect toasted finish. It’s the kind of treat that’s easy to whip up, yet impressive enough to satisfy any sweet tooth. Jump to Recipe

What You’ll Need

You probably have most of these ingredients lounging in your pantry already. Here’s what you’ll need:

  • 1 box of cooked brownie mix
  • 1 egg
  • 1 cup graham cracker crumbs
  • 2 whole graham crackers
  • 1 cup mini marshmallows
  • 1/2 cup fresh dried raspberries
  • 1/4 cup sugar
  • 1/2 cup unsalted butter, melted
  • 1/4 cup vegetable oil
  • 1/4 cup water

How to Make S’mores-n-berry Bars for National S’mores Day – August 10

  1. Preheat your oven to 325°F. Line an 8-inch-square baking pan with foil, making sure the foil hangs over the edges for easy removal later. Give it a spritz of nonstick cooking spray to make doubly sure nothing sticks.
  2. In a medium-sized bowl, combine the melted butter, graham cracker crumbs, and sugar until it resembles wet sand. Press this mixture evenly into the bottom of your prepared pan. Bake for about 20 minutes, or until it looks golden and smells like heaven. Set aside.
  3. Crank up your oven to 350°F. Meanwhile, grab another bowl and mix together the brownie mix, vegetable oil, water, and egg until smooth. Gently fold in the fresh dried raspberries. Pour this luscious batter over the cooled graham cracker crust.
  4. Bake the brownie layer for about 25 minutes, or until a toothpick inserted into the center comes out clean. This is your cue to remove it from the oven.
  5. Break up the two graham crackers into small pieces and scatter them artfully atop the brownie layer.
  6. Scatter the mini marshmallows over the graham crackers. Return the pan to the oven, this time setting it to broil. Watch carefully, as the marshmallows can quickly go from toasty to burnt in a flash! Once they’re golden and bubbly, pull the pan out.
  7. Allow the bars to cool completely in the pan. Lift them out using the overhanging foil and cut into squares. Enjoy the ooey-gooey goodness!

Cook’s Notes

These bars are as versatile as they are delicious. The graham cracker crust adds an incredible texture contrast to the fudgy brownie and gooey marshmallow topping. Here are a few tips to ensure they turn out perfect:

  • If you prefer a denser brownie, add an extra egg to the brownie mixture.
  • Store any leftovers in an airtight container at room temperature for up to 3 days. They’ll stay delicious, though the marshmallows might lose a bit of their chew.
  • To make these ahead, you can prepare the graham cracker crust and brownie layer a day in advance. Add the graham crackers and marshmallows just before serving for the best texture.

Make It Your Own

  • Nutty Twist: Swap out the raspberries for chopped toasted almonds or pecans for a crunchy surprise.
  • Berry Medley: Use a mix of freeze-dried strawberries and blueberries instead of just raspberries for a more fruity experience.
  • Chocolate Lovers: Add chocolate chips to the brownie mix for extra gooeyness. You can never have too much chocolate, right?
  • Salted Caramel: Drizzle caramel sauce over the marshmallows before broiling. A sprinkle of sea salt can elevate these bars to gourmet status.

If you try this, I’d love to hear how it turns out — drop a comment or tag me! S’mores day or not, these bars are a crowd-pleaser every time.

Related update: S’mores-n-berry Bars for National S’mores Day – August 10

Related update: Cherry-Berry Pie With Agave Nectar All-Butter Crust

Cash Payers Subsidize Cardholder Perks | Analysis by Brian Moineau

TL;DR

  • High-end credit card perks don’t come free: U.S. merchants baked roughly $198.25 billion of 2025 card fees into prices, shifting costs onto cash and debit users while rewarding premium cardholders [3][4]. (merchantspaymentscoalition.com)
  • A Harvard Business School working paper estimates an implicit transfer of about $30 billion a year from cash/debit users—often lower-income households—to rewards card users [2].
  • The “easy fix” of cutting interchange looks oversold: after the 2011 Durbin cap on debit, about 77% of merchants did not lower prices, hinting new reforms could enrich large retailers while shrinking consumer rewards [7].

What the source said

NBC News profiled Tiger Fuel in Ruckersville, Virginia, and other small merchants who say rising swipe fees from Visa and Mastercard networks and issuing banks now rival or exceed rent and utilities [1]. Premium rewards cards often carry fees above 2%, and total U.S. merchant card fees hit about $198 billion in 2025, per the Nilson Report and industry tallies [3][4]. The National Retail Federation claims these fees add more than $1,200 a year to the average household’s costs [5]. Harvard researchers estimate roughly $30 billion flows annually from cash/debit users to rewards cardholders, while the Electronic Payments Coalition argues that cash handling also carries costs like theft risk and labor [2][13].

Why it matters

This isn’t “points people vs. Luddites.” It’s a regressive cross-subsidy embedded in 2025 retail pricing: cash and debit users—disproportionately households under $25,000 in income—fund airport lounges, 5x dining multipliers, and companion fares via higher shelf prices, while rewards users get some of it back as points [2][6]. Harvard’s $30 billion estimate and the Federal Reserve’s Diary of Consumer Payment Choice both show who pays and who benefits when merchants recoup acceptance costs through uniform pricing [2][6].

Merchants face a blunt P&L trade-off in 2026: accept card convenience and bigger baskets but pay rising tolls, or push cash/ACH and risk lost sales and chargebacks. Networks (Visa, Mastercard), big issuers (JPMorgan Chase, Capital One, Citi), and loyalty partners (United, Delta, American) live on interchange economics that fund rewards; banks alone collected about $66 billion of interchange revenue in 2025, according to the St. Louis Fed [10]. Policy tinkering can redirect billions across these pipes, but pass-through depends on local competition and merchant power, not promises in a press release.

Original analysis

High-end credit card perks and the cash shopper subsidy

  • Back-of-envelope math, shown:

    • Total U.S. merchant card fees in 2025: $198.25 billion (credit + debit) [3][4]. Total U.S. card purchase volume in 2025: $12.498 trillion [3]. Average all-in fee load ≈ 198.25 / 12,498 ≈ 1.59% on carded spend, before acquirer markups and MCC differences [3][4]. For low-margin formats like grocery, that burden explains why fuel stations and c-stores complained first.
    • What would a 10-basis-point (0.10%) cut do at the register? On a $100 basket, it saves $0.10; on $1,000,000 in monthly credit sales, it saves $1,000. The proposed Visa/Mastercard settlement’s five-year, 10 bps reduction would be meaningful for thin-margin operators, but small in a supermarket aisle price tag context [8].
  • A contrarian read:

    • Consensus: “Rewards are a regressive tax; cap interchange and prices will fall.”
    • Pushback: After the 2011 Durbin cap on debit, Richmond Fed surveys found about 77% of merchants did not cut prices; roughly 1–2% lowered them, and others raised them—weak pass-through from lower acceptance costs to shelf prices [7]. If credit caps replay this script, consumers could lose rewards value while prices mostly stay put.
  • A 2×2 to predict pass-through from fee cuts:

    • Low ticket, high competition (e.g., QSRs like McDonald’s; MCC 5814): Highest odds of pass-through via value menus and combo pricing to defend share.
    • Low ticket, low competition (e.g., captive venues at airports; limited-choice c-stores on highways): Low pass-through; fee relief pads margins or offsets rent.
    • High ticket, high competition (e.g., electronics retailers; Home Depot vs. Lowe’s): Moderate pass-through in promos, rebates, or free financing offers.
    • High ticket, low competition (e.g., airline direct sales; Delta/American/United): Minimal pass-through; savings more likely to fund loyalty tweaks or fees.
  • A named-stakeholder breakdown:

    • Visa and Mastercard: A time-limited 10 bps haircut is manageable; the bigger risk is the Credit Card Competition Act forcing routing choice that could erode network dominance [8][9].
    • Large issuers (JPMorgan Chase, Capital One, Citi): Expect incremental rewards repricing—fewer eye-popping multipliers, more annual-fee creep, and tighter lounge/partner access if interchange compresses.
    • Small merchants (gas, c-stores, restaurants): Savings from a 10 bps cut are real but thin; dual pricing, PINless debit routing, and steering will likely drive more net benefit in 2026–2027 than headline settlements [4].
    • Low-income cash users: The Harvard-estimated $30 billion transfer exists, but history suggests caps won’t automatically flow back as lower prices; cash-acceptance mandates and transparent dual pricing are more targeted [2][11].

What others are missing

The specific angle missing is the break-even basket size and fraud-loss variance by merchant category code: compare fully loaded cash costs (till labor, shrink, armored car, bank fees) against card acceptance (interchange, assessments, chargeback loss) for MCC 5411 (grocery), 5541 (service stations), and 5814 (fast-food/QSR). Industry groups highlight one side—NRF emphasizes card tolls; EPC stresses cash’s hidden costs—yet policymakers rarely see an apples-to-apples, third-party audit by basket size and format [5][13]. A 2026 benchmark that publishes per-transaction cost curves and pass-through elasticities by format would show whether “cash isn’t free” or “cards tax every item” dominates in real stores, not just in D.C. hearing rooms.

What to watch next

  1. By Q4 2026, Judge Margo Brodie either approves the revised Visa/Mastercard settlement or remands it; my call: not approved in 2026, given retailer opposition and limited structural change [12].
  2. By June 2027, at least three additional states follow New York’s March 2026 statute and enact cash-acceptance mandates for most brick-and-mortar retailers, citing equity for unbanked consumers [11].
  3. By 2027 year-end, at least one top-5 U.S. card issuer announces a meaningful rewards devaluation (earn rates or redemption), attributing it to program costs and regulatory pressure around routing and fees [9].

My take

Yes, premium credit card perks are hurting cash shoppers; the ~$30 billion annual transfer is real and persistent in 2024–2026 data [2]. But if Congress or the courts shave interchange without enforcing shelf-level transparency, consumers will likely lose rewards while prices stay sticky. The practical fix is local and testable in 2026: universal cash acceptance, visible dual pricing, and competitive routing that merchants can actually use [11]. If Washington wants broad relief, force price clarity and rivalry—not just a smaller toll collected in the dark [4].

Sources

  1. NBC News — How shoppers who pay in cash are subsidizing Americans’ credit card reward points (https://www.nbcnews.com/business/consumer/credit-card-perks-hurt-shoppers-pay-cash-debit-rcna346905) — Reported merchant pain points, cited network/issuer roles, and surfaced household impact claims.

  2. Harvard Business School — Interchange Fees and Cross-Subsidies in Consumer Payments (Working Paper 26-069) (https://www.hbs.edu/ris/Publication%20Files/26-069_6c4ebfc5-af17-4744-b8a5-3f2ca740aea7.pdf) — Estimated ~$30B annual transfers from cash/debit users to credit users, with incidence by income.

  3. The Nilson Report — Merchant Processing Fees in the United States — 2025 (https://nilsonreport.com/articles/merchant-processing-fees-in-the-united-states-2025/) — Provided 2025 U.S. purchase volume ($12.498T) and context for fee-load calculations.

  4. Merchants Payments Coalition — Credit and Debit Card ‘Swipe’ Fees Reach Record $198.25 Billion (https://merchantspaymentscoalition.com/credit-and-debit-card-swipe-fees-reach-record-19825-billion-president-and-congress-call-action) — Cited Nilson’s 2025 fee total and summarized merchant-side advocacy.

  5. National Retail Federation — Swipe Fees (https://nrf.com/advocacy/policy-issues/swipe-fees) — Claimed swipe fees are a top cost driver and add “more than $1,200 a year” to average household costs.

  6. Federal Reserve Financial Services — 2025 Findings from the Diary of Consumer Payment Choice (https://www.frbservices.org/binaries/content/assets/crsocms/news/research/2025-diary-of-consumer-payment-choice.pdf) — Documented higher cash use among low-income households and transaction-size patterns.

  7. Federal Reserve Bank of Richmond — Did the Durbin Amendment Reduce Merchant Costs? Evidence from Survey Results (https://www.richmondfed.org/publications/research/economic_brief/2015/eb_15-12) — Found limited post-cap price reductions, informing pass-through expectations.

  8. U.S. SEC — Mastercard filing summarizing proposed settlement terms (10 bps cut; caps) (https://www.sec.gov/Archives/edgar/data/0001141391/000114139125000197/exb991-11102025.htm) — Documented details of the November 2025 revised settlement structure.

  9. Congress.gov — Credit Card Competition Act bill page (https://www.congress.gov/bill/119th-congress/senate-bill/3623/all-actions) — Tracked routing-choice legislation that could change network economics.

  10. Federal Reserve Bank of St. Louis — Credit and Debit Card Fees Collected by U.S. Banks Rose in 2025 (https://www.stlouisfed.org/on-the-economy/2026/apr/banking-analytics-credit-debit-card-fees-collected-banks-rose-2025) — Estimated banks’ 2025 interchange revenue (~$66B).

  11. New York Attorney General — Statewide Cash Acceptance Law (Press Release, March 2026) (https://ag.ny.gov/press-release/2026/attorney-general-james-notifies-new-yorkers-about-new-state-law-requiring-stores) — Confirmed a cash-acceptance mandate trend shaping “cash equity” policy.

  12. American Bar Association — In re Payment Card Interchange Fee and Merchant Discount Antitrust Litigation (newsletter) (https://www.americanbar.org/groups/antitrust_law/resources/newsletters/in-re-payment-card-interchange-fee-merchant-discount-antitrust-litigation/) — Summarized settlement posture before Judge Margo Brodie.

  13. Electronic Payments Coalition — Cash Costs More Than Credit Cards for Small Businesses (https://electronicpaymentscoalition.org/resources/cash-costs-more-than-credit-cards-for-small-businesses/) — Presented the industry view on cash-handling costs versus card acceptance.


Related update: We recently published an article that expands on this topic: read the latest post.


Related update: We recently published an article that expands on this topic: read the latest post.

Tart Raspberry Sorbet with a Hint of Heat | Made by Meaghan Moineau

Picture this: it’s a sweltering summer afternoon, and you’re yearning for something refreshing yet a little out of the ordinary. You’ve already got one foot in the kitchen, rifling through the freezer, when you stumble upon a forgotten stash of frozen raspberries. Suddenly, inspiration hits you like a cool breeze. Why not whip up a sorbet that’s as tart as your mood and just a tad mischievous, with a spicy kick to keep things interesting? This Tart Raspberry Sorbet with a Hint of Heat is exactly what you need. It’s the kind of recipe that doesn’t just cool you down but also gives your taste buds a little wake-up call. Plus, it’s ridiculously easy to make—perfect for those moments when you want to impress but can’t be bothered with a culinary masterpiece.

Jump to Recipe

What You’ll Need

You might already have most of these tucked away in your pantry and freezer, which makes this sorbet a breeze to throw together on a whim.

  • Frozen raspberries – The star of the show, bringing their tart and vibrant flavor.
  • Raspberry jam – For an extra burst of raspberry goodness and a bit of sweetness.
  • White grape juice – To lend a subtle sweetness and some liquid gold.
  • Cardamom powder – Adds an exotic warmth that pairs beautifully with the raspberries.
  • Green chili – Just a little, for that unexpected kick.
  • Lime juice – To enhance the tartness and add a citrusy zing.

How to Make Tart Raspberry Sorbet with a Hint of Heat

  1. In your food processor, combine the frozen raspberries, raspberry jam, and white grape juice. Add a pinch of cardamom powder, a small piece of green chili, and a generous squeeze of lime juice.
  2. Process the mixture until it’s smooth and vibrant. Listen for the change in sound as the chunks of raspberry become a luscious puree.
  3. Push the mixture through a fine strainer to remove most of the seeds. This part might seem tedious, but trust me, your teeth will thank you later.
  4. Transfer the silky mixture to a container, cover, and pop it in the freezer. Every couple of hours, check on it and give it a good stir. This keeps the texture smooth and prevents large ice crystals from forming.
  5. As the sorbet nears the end of its freezing journey, consider shaping it into enticing balls using an ice cream scoop or a large spoon. It’s not just about looks—it helps the sorbet melt evenly when served.
  6. Once frozen, let your sorbet thaw for a few minutes before serving. This little pause is crucial, especially if your freezer tends to be overzealous.

Cook’s Notes

Let’s talk about some nuances that can take this sorbet from good to unforgettable. First off, if you’re worried about the heat, start by adding just a sliver of green chili. You can always add more, but you can’t take it out. As for storage, this sorbet keeps well in the freezer for up to two weeks, though it’s best enjoyed within the first few days when the flavors are at their peak.

If you’re planning ahead, make the sorbet the day before you want to serve it. This allows it to firm up perfectly. If you end up with leftovers (unlikely, but it happens), let them soften a bit before diving back in.

Make It Your Own

This sorbet is a canvas for your creativity. Here are a few ideas to make it uniquely yours:

  • Swap the raspberries for frozen strawberries for a sweeter, less tart version.
  • If you’re a mint fan, add a handful of fresh mint leaves to the food processor for a refreshing twist.
  • Looking for an adult-only version? Replace the white grape juice with a splash of Prosecco or a sweet white wine.
  • For a nutty contrast, sprinkle a handful of toasted pistachios over your sorbet before serving.

If you try this, I’d love to hear how it turns out—drop a comment or tag me! Your adventures in sorbet-land might just inspire someone else to give it a whirl. Enjoy your chill time!

Related update: Tart Raspberry Sorbet with a Hint of Heat

Related update: S’mores-n-berry Bars for National S’mores Day – August 10

Related update: Pumpkin gnocchi with basil and Parmesan

Rugelach | Made by Meaghan Moineau

Picture this: a cozy Sunday afternoon, the type where time seems to slow down and a light drizzle taps rhythmically against your kitchen window. It’s the perfect setting for a baking adventure, and today’s mission is rugelach. This delightful pastry is more than just a treat; it’s a buttery, flaky, nutty explosion of flavor that’s surprisingly easy to pull off. Even if you’re juggling kids, pets, or a mountain of laundry, this recipe fits snugly into your schedule and promises to fill your home with warmth and the irresistible scent of cinnamon. Let’s dive in, shall we?

Jump to Recipe

What You’ll Need

The beauty of this rugelach recipe lies in its simplicity. Chances are, you have most of these ingredients lounging in your pantry or fridge already. Here’s what you’ll need:

  • Salted butter – it gives the dough a rich flavor and perfect flakiness.
  • Cream cheese – make sure to use a block, not the spreadable kind.
  • Salt – just a pinch to balance the sweetness.
  • Plain flour – for that tender, delicate texture.
  • Egg yolks – they add richness and help bind the dough.
  • Vanilla extract – a splash for warmth.
  • Caster sugar – both in the dough and as a sweet coating at the end.
  • Fruit preserves – I love orange marmalade, but feel free to experiment.
  • Walnuts – adds crunch and a lovely nutty flavor.
  • Ground cinnamon – because cinnamon and sugar are best friends.

How to Make Rugelach

  1. Start by leaving your butter and cream cheese out for a couple of hours. They should be soft and spreadable, which is key to working them into a smooth dough.
  2. Preheat your oven to 180°C (that’s about 356°F for my stateside friends).
  3. In a large mixing bowl, beat the softened butter and cream cheese together on medium speed until they’re light and fluffy. This should take about 2-3 minutes.
  4. Add in the egg yolks, vanilla extract, caster sugar, and a pinch of salt. Gradually mix in the flour until everything comes together into a smooth dough.
  5. While that’s mixing, chop up your walnuts into fine pieces and set them aside. They’ll add the perfect crunch to your rugelach.
  6. Once your dough is ready, dust your work surface with flour and knead the dough gently into a large block. If your dough feels a bit sticky, sprinkle on some more flour.
  7. Divide the dough into four equal pieces, keeping the ones you’re not currently using under a damp cloth so they stay moist.
  8. Roll one piece into a ball, then use a floured rolling pin to flatten it into a circle about 2 to 3mm thick.
  9. Cut the rolled dough into eight triangles. Like mini pizza slices, but so much better!
  10. Time to get fruity! Place a teaspoon of your fruit preserves at the wide end of each triangle, spreading it lightly.
  11. Sprinkle some chopped walnuts over the preserves, then tuck in the sides of the triangle slightly to keep everything tucked in as you roll.
  12. Roll each piece towards the pointed end, making sure the filling stays inside. Repeat for the other dough pieces.
  13. Place your rugelach on a baking tray lined with parchment paper.
  14. Mix caster sugar and ground cinnamon in a small bowl. Melt your butter and brush it over each rugelach, finishing with a generous sprinkle—or a roll—in the cinnamon-sugar.
  15. Bake for about 35 minutes, or until the rugelach are a deep golden brown and your kitchen smells heavenly.
  16. Let them cool on a rack before savoring or storing them away (if they last that long!).

Cook’s Notes

Rugelach is all about that flaky, tender dough, so make sure your butter and cream cheese are properly softened. Cold ingredients can lead to a dense pastry instead of the melt-in-your-mouth texture we’re after. If the dough gets too sticky, don’t be shy about adding a little more flour as you roll it out. These pastries store well—just pop them in an airtight container, and they’ll keep for a few days at room temperature or freeze beautifully for up to a month. A quick reheat in the oven or toaster oven revives their just-baked allure.

Make It Your Own

  • Swap the orange marmalade for raspberry or apricot preserves for a different fruity twist.
  • If you’re not into walnuts, try pecans or almonds for a different nutty bite.
  • Add a sprinkle of chocolate chips to the filling for a decadent, chocolatey surprise.
  • Feeling spicy? A pinch of cardamom in the sugar-cinnamon mix adds an exotic flair.

If you try this, I’d love to hear how it turns out—drop a comment or tag me on your socials! Cheers to cozy baking sessions and delicious rugelach adventures!

Related update: Rugelach

Related update: Tart Raspberry Sorbet with a Hint of Heat

Eggplant Fries with Tzatziki Sauce | Made by Meaghan Moineau

Picture this: it’s a lazy Sunday afternoon, and I’m in my kitchen staring down a couple of eggplants that have been lounging in my crisper drawer for a bit too long. It’s one of those days where I desperately want something crispy and satisfying, but without the guilt that comes with a giant bowl of fries. Enter: Eggplant Fries with Tzatziki Sauce. These little guys are a revelation—they’re crunchy, flavorful, and come with a cool, tangy dipping sauce that just hits the spot. The best part? They’re baked, not fried, so you get all the crunch with none of the extra oil. They’re also perfect for when you’re hosting friends and need an appetizer that’s impressively delicious yet deceptively simple to make. Seriously, your friends will be raving about these.

Jump to Recipe

What You’ll Need

What’s great about this recipe is that it’s likely you already have most of these ingredients lounging in your pantry. The secret is in the mix of spices and the creamy yogurt that coats the eggplant before it bakes to crispy perfection. Here’s the crew you’ll need:

  • Eggplants – the star of the show!
  • Italian seasoning mix – for that herby kick.
  • Bread crumbs – to give our fries that crispy crunch.
  • Low fat plain yogurt – adds creaminess and tang.
  • Egg – helps bind everything together.

How to Make Eggplant Fries with Tzatziki Sauce

  1. Preheat your oven to 450°F. This is key for achieving that glorious crunchy exterior on the fries. Trust me, a hot oven is your best friend here.
  2. Mix together a pinch of salt, garlic powder, Italian seasonings, and a dash of paprika in a bowl. This mixture will become your flavor-packed coating.
  3. In another bowl, whisk together the yogurt and egg until you have a smooth mixture. This will act as the glue to hold those delicious breadcrumbs.
  4. Slice your eggplants into strips—think classic fry shape. Dunk each strip into the yogurt and egg mix, allowing any excess to drip off.
  5. Roll the coated eggplant strips in the breadcrumb mix, making sure each piece is covered well. This is what’s going to give you that irresistible crunch.
  6. Place the breaded eggplant strips onto a parchment-lined or greased baking pan, making sure they have some breathing room. You want them to bake, not steam.
  7. Pop them into the oven and bake for about 10-15 minutes, rotating once halfway through. They’re done when they’re slightly brown and smell absolutely divine.

Cook’s Notes

  • Don’t overcrowd your baking sheet. The eggplant needs space to crisp up, so if you’re making a big batch, use two sheets or bake in batches.
  • If you find your eggplant fries aren’t browning as much as you’d like, you can pop them under the broiler for a minute or two—just keep a close eye to prevent burning.
  • These fries are best enjoyed fresh out of the oven, but if you have leftovers, they can be stored in an airtight container in the fridge for up to two days. To reheat, just pop them back into the oven at 400°F for a few minutes.

Make It Your Own

  • Want to go gluten-free? Swap out the bread crumbs for a gluten-free variety, or try crushed cornflakes for an extra crunch.
  • For a spicy twist, add a teaspoon of cayenne pepper to the breadcrumb mix. It’ll give your fries a nice kick.
  • If you’re out of Italian seasoning, get creative with what you have on hand—oregano, thyme, or even a hint of rosemary can work wonders.
  • No yogurt? No problem. Buttermilk or a splash of milk with a squeeze of lemon can substitute in a pinch.

If you try this, I’d love to hear how it turns out—drop a comment or tag me! Your kitchen adventures always make my day. Happy cooking, friends!

Related update: Eggplant Fries with Tzatziki Sauce

Related update: Breaded Shrimp and Spicy Mayo Appetizer

Iraola Incoming: Liverpools Tactical | Analysis by Brian Moineau

TL;DR

  • Arne Slot’s Liverpool exit on May 30, 2026—after a 2024/25 title and a 2025/26 fifth-place slide—forces a tactical and payroll reset; the successor choice could swing eight-figure UEFA income and multiple careers. [2][3][4]
  • The consensus centers on Andoni Iraola, whose high-press, wide-lane system would immediately reshape roles for Florian Wirtz, Jeremie Frimpong, and Milos Kerkez at Anfield. [1][5][6]
  • The decisive edge won’t be “bounce” but system–squad fit: aligning Iraola’s vertical press with a roster assembled for Slot’s controlled build-up while protecting Champions League revenue margins. [1][3][4][5]

What the source said

Sports Illustrated casts Liverpool’s sacking of Arne Slot two years after his June 2024 start as a split dressing-room moment, naming Florian Wirtz, Curtis Jones, Milos Kerkez, and Jeremie Frimpong as “winners,” and Cody Gakpo and Ryan Gravenberch as “losers.” The piece cites 2025/26 outputs—Wirtz’s 15 goal involvements in 49 matches and Frimpong’s 3 in 35—as evidence that usage under Slot dulled certain profiles. It also places Andoni Iraola, coming off Bournemouth, as the near‑term favorite to take over at Liverpool in 2026. [1][8]

Why it matters

Fenway Sports Group’s football leadership—Michael Edwards (FSG CEO of Football) and Richard Hughes (sporting director)—must now hire a coach whose game model fits pieces acquired in 2024–26; after finishing fifth and 25 points behind Arsenal in 2025/26, Liverpool put Champions League qualification and its wage bill under immediate pressure. The wrong fit could suppress outputs for Wirtz and Frimpong and force discount exits in 2026/27. [3][9][2]

UEFA’s revamped distributions widen the financial cliff. The Champions League equal-share “starting fee” is about €18.62m per club, while the Europa League’s equal-share pot is €155m spread across 36 teams—around €4.31m per club—before performance, coefficient, and market/value pillars. That baseline delta is roughly €14.31m per season, excluding additional upside tied to results and historical ranking. [4][7]

Original analysis

Contrarian read

  • Consensus: Iraola is the antidote to Slot’s slower, inside-channel build-up and will “free” Liverpool’s wide threats.
  • Counter: the promise only materializes if Liverpool embrace his principles—press-first, wide-lane occupation, fast verticals, and full-backs as true overlap threats. Asking the current group to mimic Iraola-ball without retooling spacing and pressing triggers risks transition leaks more than chance creation. Iraola has publicly described the regain-to-nine immediacy and risk–reward of his model; it lives on field occupation and rest-defense starting positions. [5][6]

2×2: Fit vs. full-back role

  • Axes: Manager pressing intensity (High vs. Moderate) x Full-back usage (Wide/overlap vs. Inverted/inside).
    • Klopp 2018–22: High press + Wide/overlap; Trent Alexander-Arnold and Andy Robertson were primary chance creators from the sides.
    • Slot 2024–26: Moderate-to-high press + More inverted/controlled build-up with full-backs stepping inside.
    • Iraola 2023–26: High press + Wide/overlap with aggressive verticals and early diagonals. [2][5][6]
  • Implication: If Iraola arrives in 2026, Frimpong and Kerkez should live on the outside lane again; Wirtz must receive between lines with overlaps outside him. That geometry echoes Klopp-era spacing more than Slot’s inside-out patterns—and it dictates recruitment for touchline wingers and overlap-heavy full-backs. [1][5][6]

Back-of-envelope money math

  • UEFA Champions League equal-share: €18.62m per club. [4]
  • UEFA Europa League equal-share: €155m/36 ≈ €4.31m per club. [7]
  • Baseline delta: ≈ €14.31m per season, before performance, coefficient, and market/value pillars that add further millions. [4][7]
  • Point: tactical fit isn’t aesthetic; it’s financial risk management tied to 2026/27 European qualification.

Named-stakeholder breakdown

  • FSG (Michael Edwards/Richard Hughes): Their 2024 restructuring promised process discipline; a mis-hire now risks burning eight figures of UEFA distributions and devaluing key assets, while a good fit re-rates Wirtz/Frimpong/Kerkez on the balance sheet in 2026. [9][4][7]
  • Andoni Iraola: A high-press teacher with proof at Rayo Vallecano (La Liga, Madrid) and Bournemouth (Dorset) from 2020–2026; Anfield will demand alignment on wide profiles and pressing triggers rather than miracles. [5][6]
  • Florian Wirtz: He posted 11 goals and 11 assists for Bayer Leverkusen in 2023/24; he excels receiving between lines with overlaps outside. Park him wide and his per-90 output drops. [10]
  • Jeremie Frimpong: As an overlapping RB/wing-back, he logged double-digit G/A seasons and 1,000+ sprints in the 2023/24 Bundesliga; conservative RB usage blunts his value. [1][10]
  • Cody Gakpo: Slot gave him 52 appearances and 9 goals in 2025/26; with academy winger Rio Ngumoha emerging and a likely senior wide addition in 2026, his minutes compress unless he spikes early output. [1]

What others are missing

The non-negotiables of Iraola’s attack—not his name—drive outcomes in 2026/27: wide and high full-backs, relentless lane occupation, and immediate verticals into the No.9 within the first five seconds after regain. Those choices create central pockets for Wirtz and on-the-move receptions for Frimpong and Kerkez; Slot’s inside-channel, slower build-up produced different rest-defense and spacing trade-offs. If Edwards and Hughes back Iraola, they must restore touchline width from full-backs and accept a wider rest-defense shell to protect transitions. Skip that structural reset and Liverpool will strand two space-runners—Frimpong and Kerkez—who rarely receive in stride. [5][6][1]

What to watch next

  1. By June 15, 2026, Liverpool announce Andoni Iraola as head coach; if they do not, expect a tactical pivot away from high-press, wide-full-back principles. [3][8]
  2. By September 1, 2026, Liverpool either sell or loan Cody Gakpo, or start a newly signed senior winger in at least 3 of the first 5 Premier League matches of 2026/27—evidence of a reset in the wide rotation. [1]
  3. By December 31, 2026, Wirtz posts non-penalty goals+assists of ≥0.60 per 90 across ≥900 league minutes if used centrally with overlaps outside; failure to clear that mark signals continued misuse toward the ~0.30/90 tier cited under Slot. [1][10]

My take

I’d hire Iraola in 2026 only with a written mandate for his geometry: wide full-backs, fast vertical regains, and Wirtz as a between-lines hub with Frimpong/Kerkez attacking outside. That structure revives a Klopp-adjacent identity the Kop recognizes and protects a €14–25m annual European revenue swing tied to qualification and distributions. [4][7] Miss the structural piece and you get tired presses, stranded full-backs, and a multi‑million shortfall the accountants will notice in 2026/27. Fit beats slogans at Anfield.

Sources

  1. The Winners, Losers From Arne Slot’s Liverpool Departure — Sports Illustrated (https://www.si.com/soccer/winners-losers-arne-slot-liverpool-departure) — Names winners/losers, cites 2025/26 production (e.g., Wirtz 15 G/A in 49; Frimpong 3 in 35), and flags Iraola as likely successor.
  2. Liverpool closing in on new manager appointment after shock Arne Slot sack bombshell — FourFourTwo (https://www.fourfourtwo.com/person/coaches-managers/liverpool-closing-in-on-new-manager-appointment-after-shock-arne-slot-sack-bombshell) — Context on Slot’s dismissal plus first‑season title and 2025/26 slump.
  3. El Liverpool destituye a Arne Slot — El País (https://elpais.com/deportes/futbol/2026-05-30/el-liverpool-destituye-a-arne-slot.html) — Reports May 30, 2026 sacking, 25‑point gap to Arsenal, and UCL quarterfinals.
  4. Financial Report 2024/25 (UEFA) — UEFA.com (https://editorial.uefa.com/resources/02a1-1fcc539a26d9-78ac6793e755-1000/20260113_enclosure_04_financial_report_2024-25_en.pdf) — Sets 2024–27 distributions, including €18.62m UCL equal-share per club.
  5. Andoni Iraola explains the high-risk tactics behind his Bournemouth transformation — Sky Sports (https://www.skysports.com/football/news/11670/13235389/andoni-iraola-explains-the-high-risk-tactics-behind-his-bournemouth-transformation-before-arsenal-test) — Iraola’s own description of pressing and transition cues.
  6. Andoni Iraola tactics watch — The Coaches’ Voice (https://learning.coachesvoice.com/cv/andoni-iraola-tactics-bournemouth-vallecano/) — Independent breakdown of Iraola’s vertical press, rest-defense, and full-back roles.
  7. UEFA Circular No. 32/2025 and Europa League split — UEFA.com (https://editorial.uefa.com/resources/029a-1e0b5460b86d-31e6cad26358-1000/20250616_circular_2025_32_en.pdf) — Confirms UEL total (€565m) with 27.5% (€155m) as equal shares; ≈€4.31m per club across 36 teams.
  8. Arne Slot begins role as Liverpool FC head coach — Liverpool FC (https://www.liverpoolfc.com/news/arne-slot-begins-role-liverpool-fc-head-coach) — Official timing of Slot’s start in June 2024, anchoring the two‑season window.
  9. Richard Hughes appointed sporting director; Michael Edwards returns as FSG CEO of Football — ESPN (https://www.espn.com/soccer/story/_/id/39770016/liverpool-appoint-new-sporting-director-post-klopp-shake-up) — Confirms decision-makers shaping the 2026 hire and recruitment model.
  10. Bundesliga 2023/24 stats: Frimpong and Wirtz — Bundesliga.com (https://www.bundesliga.com/en/bundesliga/news/bayer-leverkusen-florian-wirtz-the-complete-midfielder-29628) — Documents Wirtz’s 11G+11A and Frimpong’s elite output in Leverkusen’s 2023/24 season.


Related update: We recently published an article that expands on this topic: read the latest post.


Related update: We recently published an article that expands on this topic: read the latest post.

Beans With Smoked Pork Hock | Made by Meaghan Moineau

Picture this: It’s a chilly Tuesday evening, and the last thing you want to do is spend hours in the kitchen after a long day. But you’re craving something warm and fulfilling, something that feels like a hug in a bowl. Enter my Beans With Smoked Pork Hock — a dish I stumbled upon during a desperate weeknight scramble when all I had were pantry basics and a lonely smoked pork hock languishing in the freezer. This recipe is the hero of cozy weeknight dinners, rich with smoky depth and packed full of comforting flavors. The beauty of it lies in its simplicity; it’s the kind of meal that lets you put in minimal effort yet rewards you with a nourishing, soul-warming bowl of happiness.

Jump to Recipe

What You’ll Need

It’s likely you’ve got most of these hanging around your kitchen already. This shopping list is delightfully short and sweet, focusing on a few key ingredients that pack a punch.

  • Smoked pork hock
  • 1 onion
  • 2 garlic cloves
  • 1 bay leaf
  • 2 cups dried beans, soaked overnight
  • 1 vegetable cube
  • 2 carrots
  • Celery root
  • Salt and pepper to taste
  • A nice loaf of black bread

How to Make Beans With Smoked Pork Hock

  1. Start by soaking your beans the night before. Trust me, you’ll thank yourself tomorrow when the beans are perfectly plump and ready to soak up all that deliciousness.
  2. Rinse the smoked pork hock under cold water and remove the skin. This is where the magic begins — the smokiness of the pork hock will infuse everything with flavor.
  3. In a large pan, combine the onion, pork hock, beans, bay leaf, and garlic. Your kitchen should start smelling like the warm-up to a grand meal.
  4. Pour enough water to cover the beans and meat, then crumble in the vegetable cube. Bring everything to a gentle simmer.
  5. Let it all cook for a good 60 minutes on low heat, with the lid on. This is when you can kick back and relax, maybe with a glass of wine in hand.
  6. Fifteen minutes before the end, chop the carrots and celery root in a blender or roughly by hand if you like it chunkier. Add them to the pot and give everything a good stir.
  7. Once the beans are tender and the flavors have melded, fish out the pork hock. Tear it into smaller, bite-sized pieces — perfect for mingling with the beans.
  8. Don’t forget to remove the bay leaf. This little soldier has done its job.
  9. Season with salt and pepper to your liking. Serve the beans with those deliciously shredded pieces of pork and a hearty slice of black bread.

Cook’s Notes

Let’s chat about some practical tips. First, if you forget to soak the beans overnight (we’ve all been there), a quick soak method works too: boil them for 1-2 minutes, then let them sit off the heat for an hour. For storage, leftovers can be kept in the fridge for up to three days and they freeze beautifully. Just be sure to store the beans and meat separately for best results. When reheating, add a splash of water to loosen things up.

Make It Your Own

Here’s where you can play around and make this recipe truly yours:

  • Swap the smoked pork hock for a smoked turkey leg if you’re feeling adventurous or simply want to switch up the protein.
  • Try using kidney or black beans instead of your regular go-to beans for a different texture and color.
  • Add a pinch of red pepper flakes for a bit of warmth and spice if you like a little kick.
  • If you’re feeling extra, throw in some diced potatoes along with the carrots and celery for added heartiness.

If you give this recipe a whirl, I’d love to hear how it turns out for you! Drop a comment below or tag me in your culinary creations. Happy cooking, friends!

Related update: Beans With Smoked Pork Hock

Linguine and Clams In Garlic White Wine Sauce | Made by Meaghan Moineau

It was one of those weeknights when I opened the fridge and stared blankly, hoping dinner would magically appear. With only a few clams left from last weekend and some trusty linguine, I decided it was time to whip up my favorite Linguine with Clams in Garlic White Wine Sauce. It’s one of those dishes that sounds fancy—and tastes even fancier—but it’s surprisingly forgiving and quick to prepare, perfect for a midweek pick-me-up. By the time the pasta was perfectly al dente, my kitchen smelled like a cozy little Italian trattoria. My secret weapon? Loads of garlic and a splash of wine that turns simple ingredients into something special.

Jump to Recipe

What You’ll Need

I bet you have most of these ingredients hanging around already, and if not, they’re worth stocking up on for moments like this.

  • 5 cloves of garlic
  • 3 1/2 dozen little neck clams
  • 1 cup dry white wine
  • Pinch of red pepper flakes
  • 1 pound linguine
  • 4 tablespoons unsalted butter
  • 1/4 cup fresh Italian parsley
  • 1/4 cup fresh oregano leaves
  • Parmigiano-Reggiano (optional)
  • Kosher salt

How to Make Linguine and Clams In Garlic White Wine Sauce

  1. Coat a large sauté pan with olive oil and toss in 5 garlic cloves with a pinch of red pepper flakes. Crank the heat to medium-high until the garlic is golden brown and fragrant; this is when your kitchen begins to smell divine. If you’re like me and adore garlic, flip the cloves for extra flavor. Once golden, remove and discard them.
  2. Add the clams to the pan, pour in the white wine, and cover. Allow it to come to a boil over medium heat. Let it simmer until the clams open up, around 10 minutes. Use a slotted spoon to fish out the clams, reserving the cooking liquid.
  3. Boil a large pot of water for your linguine. Normally, I’d salt the water generously, but this time I skipped it because the clam juice added enough salty goodness.
  4. Mince the remaining garlic cloves. In the same sauté pan, drizzle more olive oil, add the minced garlic and another pinch of red pepper flakes. Cook until the garlic is just releasing its aroma, careful not to brown it.
  5. Add the raw clams and reserved clam juice back to the pan, checking the liquid for any sand or grit. A paper towel-lined sieve could help here to avoid any unwanted crunchiness in your dish.
  6. Cover and let the clams cook while you drop your linguine into the boiling water, aiming for very al dente—about a minute less than the box suggests.
  7. Once the clams have opened, set aside those in their shells to keep warm. Add butter and the clams removed from their shells back to the pan. Bring the liquid to a boil, then toss in the cooked pasta and fresh herbs.
  8. Cook everything together until the sauce coats the linguine. Kill the heat, then stir in grated Parmigiano-Reggiano if you’re using. Serve up the pasta, topping each dish with the clams in their shells and a sprinkle of fresh herbs.

Cook’s Notes

A few pearls of wisdom from my kitchen to yours: make sure to buy shellfish sold in mesh bags to avoid dead shellfish—plastic suffocates them. If you’re planning in advance, all the components can be prepped a few hours ahead, but cook them right before serving for optimal freshness. Leftovers, if you have any, can be refrigerated for up to two days. Just know that reheating clams can make them chewy, so enjoy it fresh if possible.

Make It Your Own

Switch it up with a few fun variations:

  • Substitute the clams for crispy tofu for a plant-based twist.
  • Use whole wheat or gluten-free pasta to suit dietary needs.
  • Swap the white wine for vegetable broth if you’re steering clear of alcohol.
  • Add a handful of cherry tomatoes for a pop of color and sweetness.

If you try this, I’d love to hear how it turns out—drop a comment or tag me! Cooking is all about sharing, so let’s keep this delicious conversation going.

Related update: Beans With Smoked Pork Hock

Related update: Greek Yogurt Chicken Salad